-
Protip: Profile posts are public! Use Conversations to message other members privately. Everyone can see the content of a profile post.
You are using an out of date browser. It may not display this or other websites correctly.
You should upgrade or use an alternative browser.
You should upgrade or use an alternative browser.
1991 Black NSX Michigan ReSpray
- Thread starter shawn110975
- Start date
I know you've got your Seminoles in national championship game in a few days, but you've got work to do.  What's the latest on this re-spray??
shawn110975
Suspended
I have the 2001 I am finishing up and don't want them to mix up parts since both cars are berlina so this NSX should be off to paint sometime next week.
stay tuned guys been busy
stay tuned guys been busy
Good Stuff.
Congratulations on your Noles!
Congratulations on your Noles!
shawn110975
Suspended
Ok chassis is back from paint looks so pimp.
since this is a coupe I left the doors on and had them paint the enginebay surround ( top ) and trunk surround ( top ), the rear and doors.
this thread is gonna get alot of pics very soon cuz parts are going off to paint today. here are some pics for you veiwing pleasure
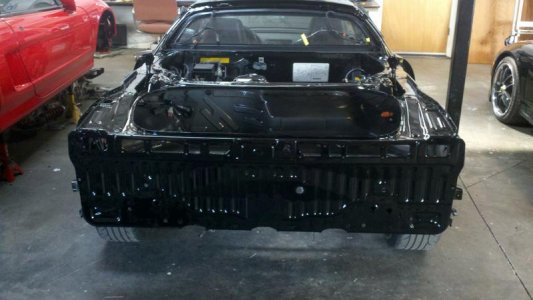
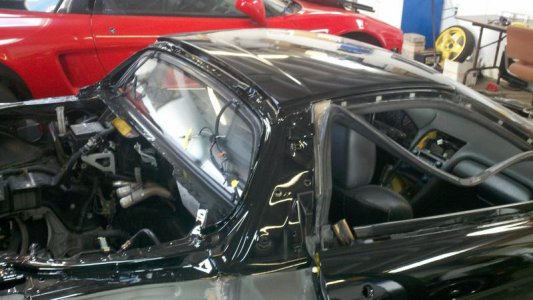
since this is a coupe I left the doors on and had them paint the enginebay surround ( top ) and trunk surround ( top ), the rear and doors.
this thread is gonna get alot of pics very soon cuz parts are going off to paint today. here are some pics for you veiwing pleasure


Coming on nicely Shawn :smile:
shawn110975
Suspended
thanks guys, taking the cluster apart to insert the SOS alum rings I will take lots of pics so you DIY'ers can have balls to take the task on yourself.
but if your on a budget then go get some Aluminum model ( testors ) paint like i did and hand paint them. turns out the exact same look but only cost you 1.68 for the paint LOL
all parts are laying in order on the floor to go to paint tomorrow.
stay tuned you NSX lovers and greese monkeys :biggrin:
but if your on a budget then go get some Aluminum model ( testors ) paint like i did and hand paint them. turns out the exact same look but only cost you 1.68 for the paint LOL
all parts are laying in order on the floor to go to paint tomorrow.
stay tuned you NSX lovers and greese monkeys :biggrin:
Looks good man.
Yep, that's the guy...........what, are you a cop or something?Hey Shawn. I think i know this car. Does it belong to steven working for AVL? This car looks clean as it is. Can't wait to see the end product.
;^D
Brian
Yep, that's the guy...........what, are you a cop or something?
;^D
Brian
:biggrin: Tai works for one of our customers on the West coast.
Looks great Shawn
shawn110975
Suspended
Ok guys did the cluster rings so here are some pics.
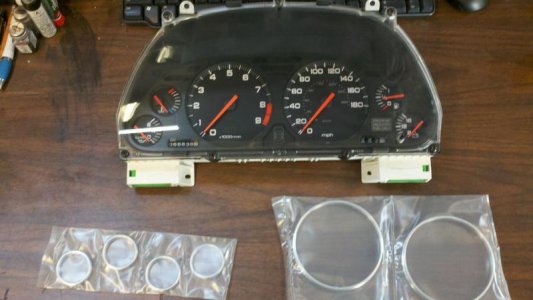
in this pic you need to remove the 7 screws that hold the clear lens in, remember never touch the inside of this glass as fingerprints inside the glass will drive you insane
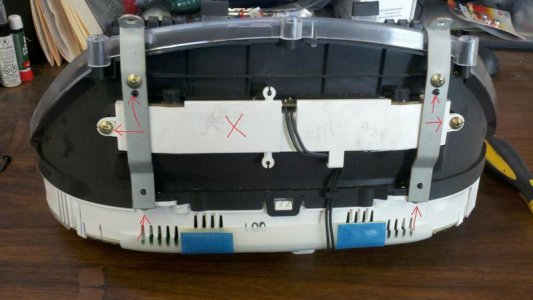
As you can see in this pic there are some screws you need to remove to get the middle out, remove them take the bracket off, now you dont need to remove the back light, I do to make things easier since you will not be fighting the wires still connected to the frame.
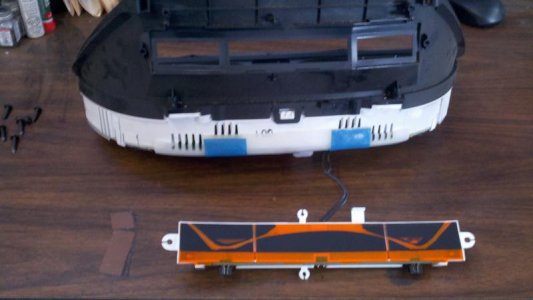
here is a pic of the light removed
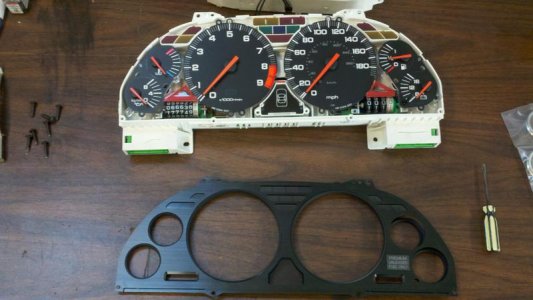
here is the faceplate removed also note there is a rubber cap on the trip button so remove that also so it doesnt fly off and you cant find it LOL
also try not to touch the faceplate as fingerprints will collect dust and will drive you insane.
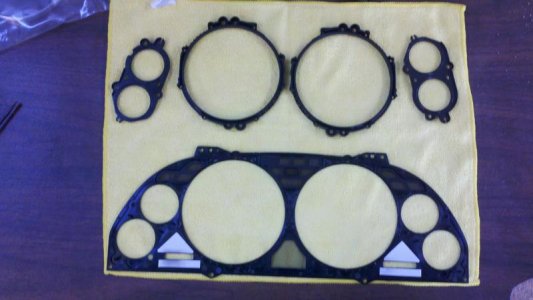
place the flaceplate face down on something that isnt going to leave dirt dust etc.
remove the OEM cluster rings at this point you can hand paint them with TESTORS ALUMINUM paint which is about 1.89 and it will do the same thing as the rings ( if your on a budget )
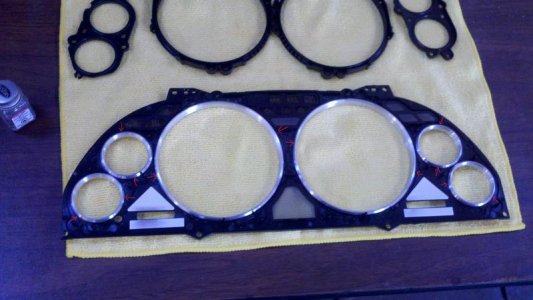
install the rings from the front of the faceplate and add some silicon glue to the points where I put red arrows it will help hold them inplace
so bumps in the road will not have them flop out. also while adding the glue make sure the tops of the rings dont have any glue on them.
if there is any glue on them when you put it back together this glue will touch the dials and possibly eat the paint off and then your in trouble LOL
- - - Updated - - -
cant post anymore cuz the glue needs to dry first LOL
after the glue has hardened a little put the faceplate back on and reverse order till your done. when it drys I will add the last photo
goodluck guys dont be scared to do this its easy as it looks.
- - - Updated - - -
also note where the screws go as some are shorter than others and a long screw in the wront hole will crack the plastic

in this pic you need to remove the 7 screws that hold the clear lens in, remember never touch the inside of this glass as fingerprints inside the glass will drive you insane

As you can see in this pic there are some screws you need to remove to get the middle out, remove them take the bracket off, now you dont need to remove the back light, I do to make things easier since you will not be fighting the wires still connected to the frame.

here is a pic of the light removed

here is the faceplate removed also note there is a rubber cap on the trip button so remove that also so it doesnt fly off and you cant find it LOL
also try not to touch the faceplate as fingerprints will collect dust and will drive you insane.

place the flaceplate face down on something that isnt going to leave dirt dust etc.
remove the OEM cluster rings at this point you can hand paint them with TESTORS ALUMINUM paint which is about 1.89 and it will do the same thing as the rings ( if your on a budget )

install the rings from the front of the faceplate and add some silicon glue to the points where I put red arrows it will help hold them inplace
so bumps in the road will not have them flop out. also while adding the glue make sure the tops of the rings dont have any glue on them.
if there is any glue on them when you put it back together this glue will touch the dials and possibly eat the paint off and then your in trouble LOL
- - - Updated - - -
cant post anymore cuz the glue needs to dry first LOL
after the glue has hardened a little put the faceplate back on and reverse order till your done. when it drys I will add the last photo
goodluck guys dont be scared to do this its easy as it looks.
- - - Updated - - -
also note where the screws go as some are shorter than others and a long screw in the wront hole will crack the plastic
Last edited:
Great write up Shawn, always loved this mod
shawn110975
Suspended
ok guys 90% of a parts are back from paint will be putting in the engine tonight I have a chest cold and it hurts to breath but I have NSX in my blood I can die later when Im done LOL
anyway I have since cleaned the engine and now I am cleaning the subframe and its a beast..... so any advise for getting years of built up grime and greese. I want the sub frame to sparkle with that new aluminum color ya know
I have tried Purple power, Laquer thinner, brake fluid, bleach, Joy soap, and aluminum shiner and pressure washer set on high. I have gotten the sub frame very very clean but I want more.
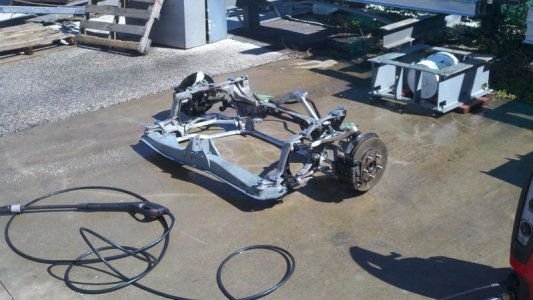

I would ask Mitch. I found a red scotchbrite and simple green HD works great on the aluminum. Lots of scrubbing though- my shoulders were on fire lol.
I used a Scotchbrite stuck to a drill-mounted sanding pad (and WD-40 or brake clean as the solvent) to restore the subframe.
It came out quite well.......but was still plenty of work.
Brian
It came out quite well.......but was still plenty of work.
Brian
shawn110975
Suspended
Ok guys pics are coming
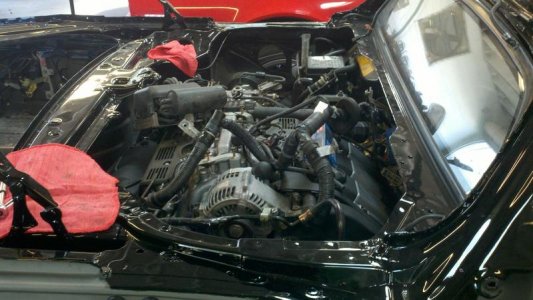
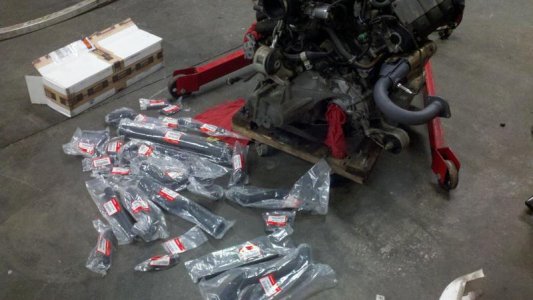
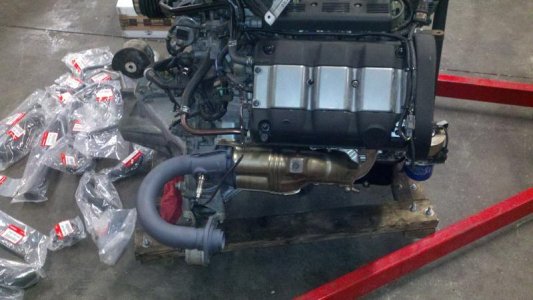
I ordered all the coolant hoses from SOS and was waiting on them to finish the engien off the absolute best time to do all the hoses is when the engine is out I mean it take almost no time. but with the engine in Oh my getting your hands in there to get them all off is a nightmare.
here is a pic of the OEM 97+ headers and adapters the owner had them powdercoated for heat they look great but hell you never see them when they are under the car. whats great about OEM headers is they have heatsheilds aftermarket pipes do not. this is the only way I would go if i got headers. I had a set but sold them and I hate myself for that LOL.
anyway getting near the end here.
- - - Updated - - -
- - - Updated - - -
Wow glad we did all the hoses most of the hoses were so brittle a little squeeze and they would crack, you could pull on them and they would just rip off LOL
the 3 under the car were the worst. pulled on the first one and it split right down the middle coolant all in my face and mouth ugghhh...........
coolant has a real sweet taste though. after you throw up LOL
I ordered all the coolant hoses from SOS and was waiting on them to finish the engien off the absolute best time to do all the hoses is when the engine is out I mean it take almost no time. but with the engine in Oh my getting your hands in there to get them all off is a nightmare.
here is a pic of the OEM 97+ headers and adapters the owner had them powdercoated for heat they look great but hell you never see them when they are under the car. whats great about OEM headers is they have heatsheilds aftermarket pipes do not. this is the only way I would go if i got headers. I had a set but sold them and I hate myself for that LOL.
anyway getting near the end here.

- - - Updated - - -

- - - Updated - - -
Wow glad we did all the hoses most of the hoses were so brittle a little squeeze and they would crack, you could pull on them and they would just rip off LOL
the 3 under the car were the worst. pulled on the first one and it split right down the middle coolant all in my face and mouth ugghhh...........
coolant has a real sweet taste though. after you throw up LOL
Last edited:
shawn110975
Suspended
Similar threads
- Replies
- 10
- Views
- 2K
- Replies
- 2
- Views
- 1K


