I think I can get a complete Stage 1 clutch from Andy's for just a little over $800.00. Going to keep the engine stock, so think I'm fine there. Curious who else has taken this on themselves? '96 NSX has 78,000 miles, but previous owner must have been a bit harder on clutch. Do most find they can still use their flywheel, and just have it resurfaced? Or do most find it needs to be replaced too? As I stated in other thread, the Acura dealer quoted $3,000 to have clutch installed, and another $2,600, both of which included the clutch. I have only did one other clutch many years ago, still have my shop and tools. Just wondering what caveats I need to be aware of before considering attempting this. Much rather somebody good shop do it, but not sure I can find somebody wanting to do the labor for $1,000 or less.
-
Protip: Profile posts are public! Use Conversations to message other members privately. Everyone can see the content of a profile post.
You are using an out of date browser. It may not display this or other websites correctly.
You should upgrade or use an alternative browser.
You should upgrade or use an alternative browser.
How difficult to change clutch?
- Thread starter Razncain
- Start date
Removal and installation of the gearbox is straightforward. The biggest issue is raising the car high enough to get the gearbox out, and the gearbox is fairly heavy. Other than that it was straightforward. I cannot speak for the clutch itself but other than initializing a dual disk setup, which I don't think applies, it should be standard work. 12-15 hours for all the work seems about the amount. At $125-150 / hour it adds up quick.

I did it some years ago on a tire car lift following this DIY. It was not easy but not very difficult. I replaced just the plates and the release bearing, not the flywheel.
Just high enough... Not a comfortable job. Luckily, I have a slightly higher lift in my new garage as I will do my synchros this winter.


I would like some tips on replacing the clutch as well. I have a Bend Pac lift as well as air tools. I have replaced transmissions and clutches in my early Corvettes. My 2000 has about 65K miles on its original clutch, so a replacement is in the future for me. Jerry
I followed this DIY : http://www.c-speedr.com/howto/nsx/clutch/nsx_clutch_install.php
Clutch
Thank you. Jerry
Thank you. Jerry
I replaced my cutch on jackstands in my garage over a winter (working on and off), so I can't accurately quote how many hours it took.
But I can agree with most/all of the above. It wasn't difficult from the point of view that I'm a relatively new DIYer, but it was no where as easy as changing your oil...
I replaced the flywheel, pressure plate, clutches, and release bearing. I went from a single disc SOS clutch to OEM twin disc (standard on my 91).
A 30,000 foot view of what has to be done in no particular order (just to give you an idea of what needs to be tackled):
Rear wheels off
Remove /disconnect ABS sensors/sway bar/E-brake
Pull driveshafts and intermediate shaft
Disconnect lower control arms and tie rods
Remove air intake/airbox and misc things in the way up top
Remove starter motor
Remove 2.5 transmission/engine mounts
Remove bolts into the block (many, and very tight!)
Remove Slave cylinder
Disconnect various parts of wiring harness and sensors from gearbox
Remove gearbox (very heavy, very awkward even with a transmission lift)
A twin disk clutch requires an alignment tool, and A LOT of patience lining up the gearbox.
I imagine a single disk is easier to install.
Extra-tall jackstands are needed, but a lift is really the tool to have.
It was a PITA, so if you're not curious I'd let a professional do the work. Preferably someone who has done it before (not all Acura dealers have NSX experienced staff on hand).
Let us know how it works out.
Lucas
Let's just say I've been retired for a while, not as "flexible" as I used to be, and yet I replaced my disks and release bearing in 2014 at 72,000 miles. The bearing grease had gotten stiff, creating a kind of screech at the engagement point as the clutch was released. The disks had over 50% life left, but Larry B. recommended replacing them due to the stress on them during the removal process.
How hard was it? I have a 4 poster lift, did most of the work up in the air, then lowered the lift to the point that the (low) transmission jack could support the transaxle. As others have noted, mostly it was grunt work, not technically hard if you've done something like the timing belt. I'm kind of fussy - clean everything, use anti-seize compound most everywhere, and torque every bolt to spec, plus I cleaned/re-greased/re-booted the half-shafts for my NSX's 18th birthday, so it took me about 3 days (24 hours).
Doing the clutch on my (previous) '64 & (present) '84 Corvettes was far simpler and took about 1/3 the time or less.
- Joined
- 15 May 2004
- Messages
- 6,898
What stress are you talking about? If the gearbox is been taken out straight there should be little to none stress on the discs. I'm going to change the clutch complete as it smells a little bit burnt after a few CTSC WOT pulls and guess that the pad materials got tired over the last 15 years....The disks had over 50% life left, but Larry B. recommended replacing them due to the stress on them during the removal process.
Considering how long the job takes, I think Larry was just being conservative. You note "If the gearbox is been taken out straight there should be little to none stress on the discs." True, but in that tight a space, a little wiggling is needed to separate the trans from the engine while rolling the trans back on the jack. The disc dampening springs looked fine, but the discs were only a moderate charge in the scheme of things. Besides, now I won't need to change the discs again until I'm about 95 years old. By then I won't remember where I parked it. :smile:
The plates & flywheel had no detectable warp - I couldn't fit my thinnest feeler gauge under a straightedge.
There was a very slight bit of bluing/"staining" on the plates; but just one light swipe across them with fine crocus cloth cleaned them up. So, those parts seem quite durable, but I don't have a CTSC to dish out that little extra punishment. Still, you might want to wait until you remove the clutch assembly to choose between just discs and the entire assembly.
Happy wrenching!
- Joined
- 15 May 2004
- Messages
- 6,898
Thanks for the hints. One error to not duplicate is NOT unbolting the left lower control arm. With it still installed you can't pull the gearbox straight away from the engine and won't be able to push it in straight again. In that case both clutch discs moved while pulling the trans. Needingless to say the one disc moved more than the other. They had some extra hours to correct it, esp. more than doing a proper Alignement (the thing they tried to avoid). ")
I'm starting in two months or so. My car gets a full kit. I expect the flywheel having burnt spots as the CTSC is too much for it now.
I'm starting in two months or so. My car gets a full kit. I expect the flywheel having burnt spots as the CTSC is too much for it now.
For the time it is pretty easy. I finished with the "top" part of the job. You just need wrench extensions of different lengths to reach the bolts.


It's out. It took me something like 6 hours. If you have a lot of different wrenches and extensions of lots of different sizes (1/4, 3/8, 1/2, ...) and length to catch the bolts, it is not that difficult. The right shaft is a bit tricky to pop out. It is usefull if someone turns the brake disc while you try to pull it out with two big screwdrivers. The bolts of the front motor mount are a bit tricky too, as you need a long 12 point 14 mm wrench. Otherwise I followed this DIY :
http://www.c-speedr.com/howto/nsx/clutch/nsx_clutch_install.php
There are some errors :
Next, disconnect the power and signal wire to the starter. Then remove the two 14mm bolts securing the starter to the gearbox. At this point, also remove the four upper 17mm gearbox bolts on the driver side.
There are only 17mm bolts (no 14mm bolts). There is one bolt securing the starter to the box, one long bolt securing the starter and the gearbox to the motor, 2 upper bolts and one down close to the front motor mount.
You can now remove the three bolts securing the front engine mount to the engine. A rachetting 14mm wrench comes in real handy here as the space is tight. You do not need to remove the mount from the cross member. Then remove the lower shift cable cover by removing the 10mm bolts.
You only need to remove the two 14mm bolts between the front motor mount and the gearbox. The third one is on the motor side. No need to touch it.
Last edited:
This lift is very usefull. And I have a lot of things to do this winter on it. But if you need help, I can come.
You do not need to remove the beam and the front motor mount, just the two bolt between the motor mount and the gearbox.
You do not need to remove the beam and the front motor mount, just the two bolt between the motor mount and the gearbox.
- Joined
- 15 May 2004
- Messages
- 6,898
One question to this: how do you tilt the engine down a little bit to the driver side if you leave the third screw on? Is tilting the engine necessary/recommendable or not?You can now remove the three bolts securing the front engine mount to the engine. A rachetting 14mm wrench comes in real handy here as the space is tight. You do not need to remove the mount from the cross member. Then remove the lower shift cable cover by removing the 10mm bolts.
You only need to remove the two 14mm bolts between the front motor mount and the gearbox. The third one is on the motor side. No need to touch it.
On your pics I don't see how you support the engine by the oil pan...
When you remove the rear mount and the upper left mount, the motor tilts down enough to get the gearbox out and you do not need to support it.
I just got my transmission and clutch out. Thanks for all the tips on this forum and personal consulting by Ben of Daisy Import Auto. I followed LarryB's advice and pulled the front beam off, which helped with clearance for a variety of things. The downside is requiring more support for the engine, which is left with just one mount. I used a jack and wood support under the oil pan, and a beam above with a ratchet strap around the area between the throttle body and CTSC snout (the beam sits on folded moving blankets).
For me the hardest part was getting the intermediate shaft out of the bracket supporting it (I removed the bracket from the engine block). I have a 2-post lift but used the Harbor Freight cheap transmission jack so did the final separation pretty low to the ground.
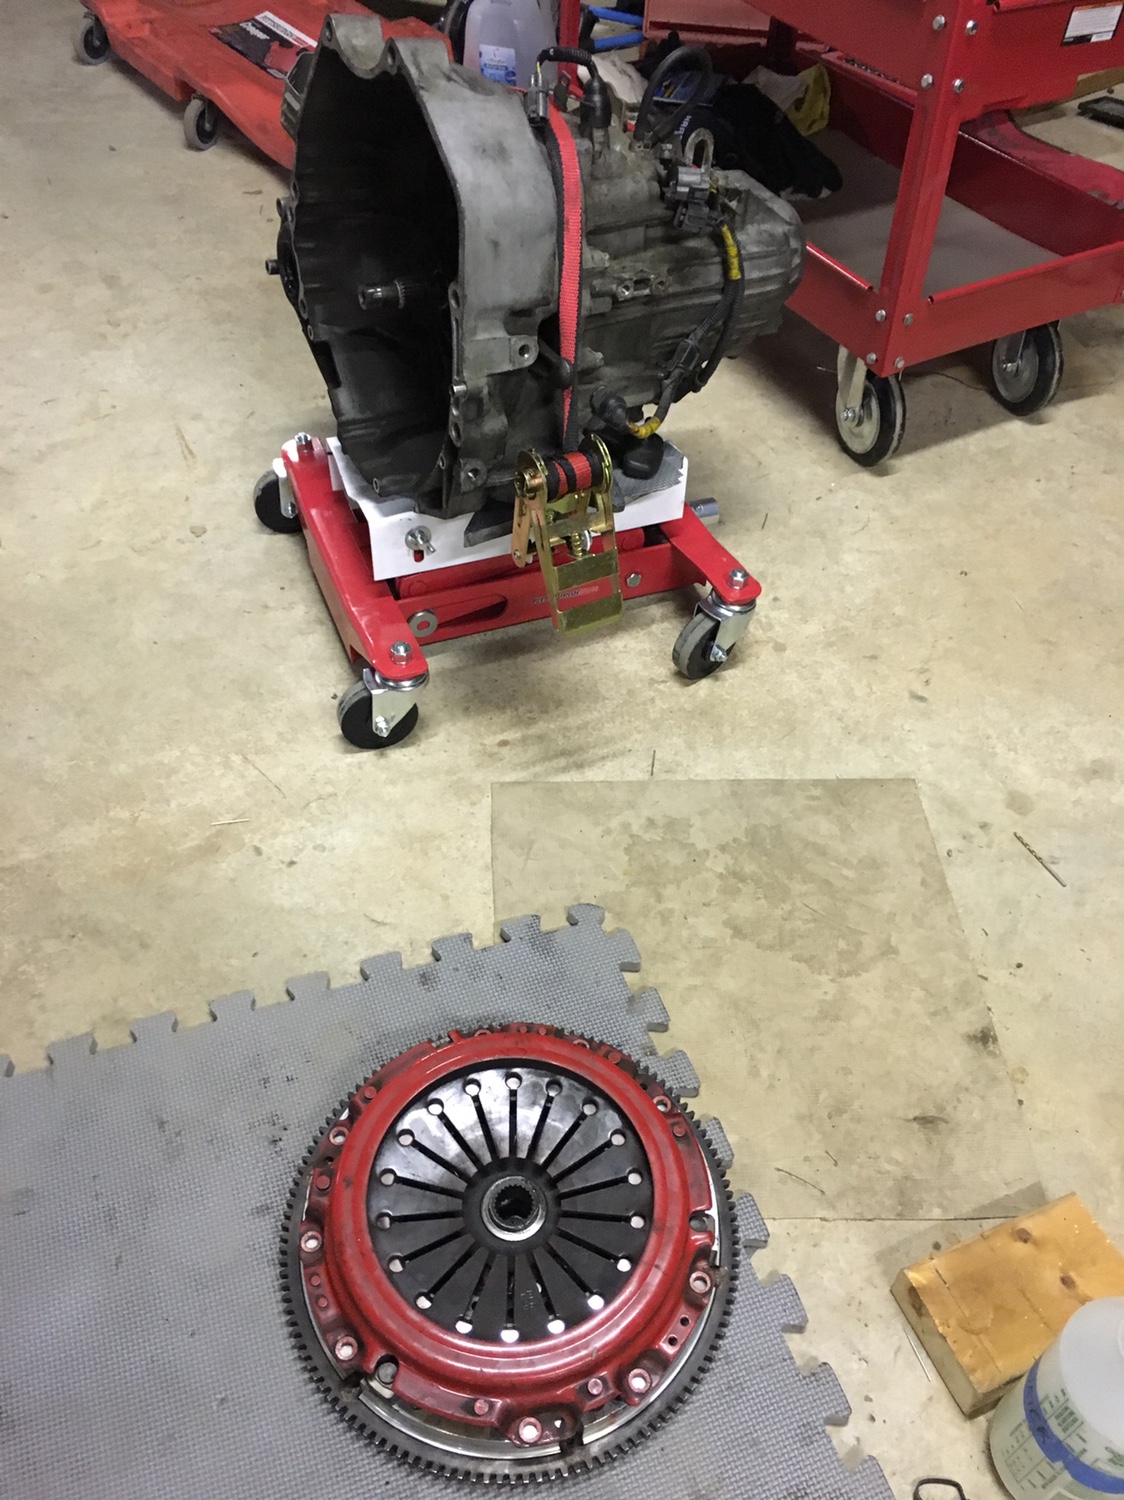
Now the plan is sending the clutch (SOS Sport 350) back to SOS for rebuilding.
For me the hardest part was getting the intermediate shaft out of the bracket supporting it (I removed the bracket from the engine block). I have a 2-post lift but used the Harbor Freight cheap transmission jack so did the final separation pretty low to the ground.
Now the plan is sending the clutch (SOS Sport 350) back to SOS for rebuilding.
Last edited:
- Joined
- 15 May 2004
- Messages
- 6,898
This has been heard from different people. A little bit of heat can help here and some antiseize for the next time. I never had big problems with it as far as you know how to take it apart.For me the hardest part was getting the intermediate shaft out of the bracket supporting it (I removed the bracket from the engine block).

A trick for getting the intermediate shaft out of the bracket is to spray some WD40 on the top, so it drips around the outer housing of the bearing/mount. After a few minutes, use a strong piece of wood and tap the assy out. Once it moves a 1/2" outboard, rotate counter-clockwise slightly and it will come out easily.
HTH,
LarryB
HTH,
LarryB
how did you like the 350? I'm thinking of going with it after the ct PGII is gone
Similar threads
- Replies
- 29
- Views
- 3K
- Replies
- 9
- Views
- 1K