-
Protip: Profile posts are public! Use Conversations to message other members privately. Everyone can see the content of a profile post.
You are using an out of date browser. It may not display this or other websites correctly.
You should upgrade or use an alternative browser.
You should upgrade or use an alternative browser.
MotorMouth93's 1994 Berlina Black NSX Thread
- Thread starter MotorMouth93
- Start date


awesome job wrapping so far! ive wrapped some car parts before and it's definitely a learned skill. you did awesome especially given that its your first shot at it!
Thanks, yeah I'm actually fairly happy with the first few pieces, but I think I'm going to end up redoing them. At the time I wasn't planning on doing any touch up on the road rash, but after reading more threads about and doing some research I decided to go with the Dr. Colorchip road rash kit after seeing a lot of good results from it, and to apply that I'll have to pull the film from the fender and lights. Even if the kit doesn't live up to my (admittedly rather low) expectations, it should fill in the larger chips enough to hide them a lot better once the film is applied.
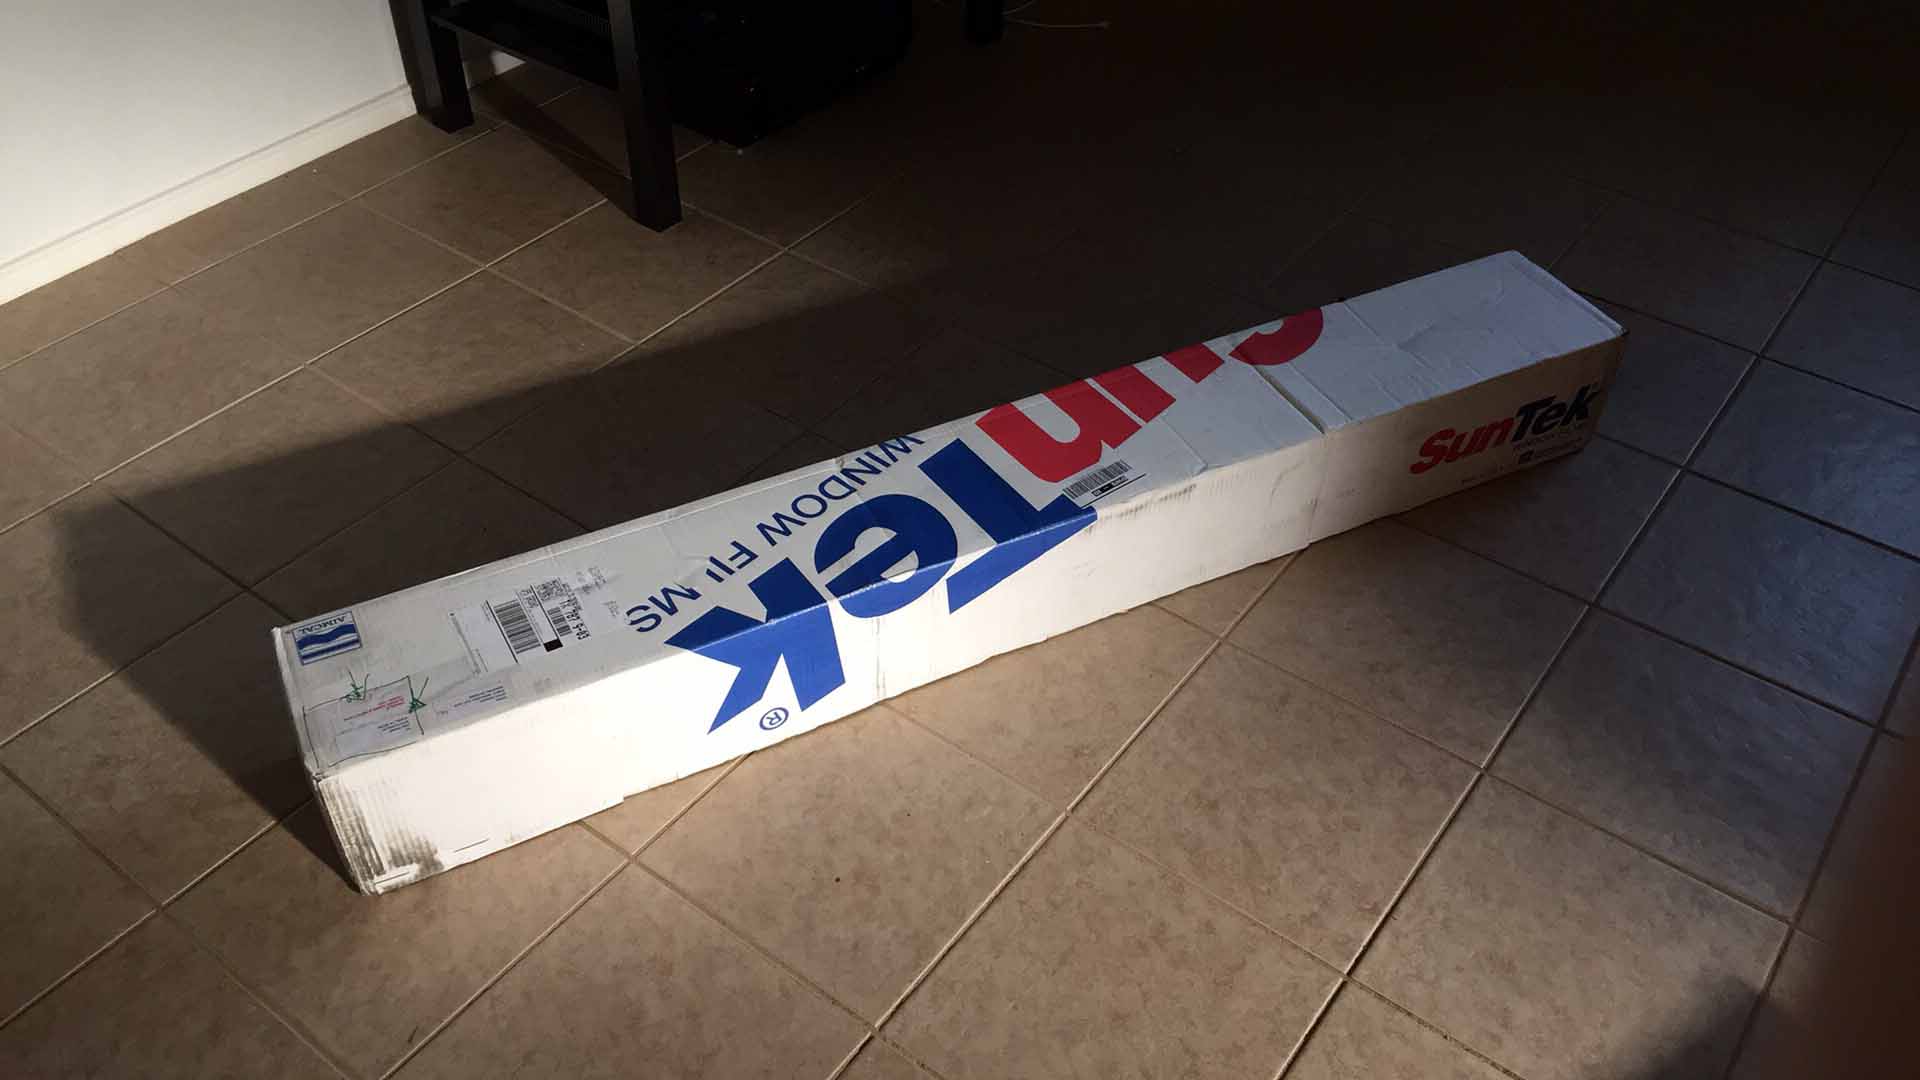
Also, Christmas came early, the UPS man dropped off a full 50'x60" roll of Suntek PPF today, should be roughly twice as much as I need so a friend and I are planning on doing both our cars and splitting the cost. I couldn't find a local shop to sell me any so I ended up buying it from some place in California called Myko Designs for $1250 shipped.
Last edited:
Film installation is going slowly but smoothly. So far the trunk, spoiler, passenger quarterpanel, roof, B-pillars, door handles, and passenger fender are done but I might decide to redo the roof since it was the first piece I installed and has some really jacked up edges. I've gotten the hang of the installation but I'm getting a few dust specs under the film and it's not enough to redo anything but enough to make me think about ways to avoid it.
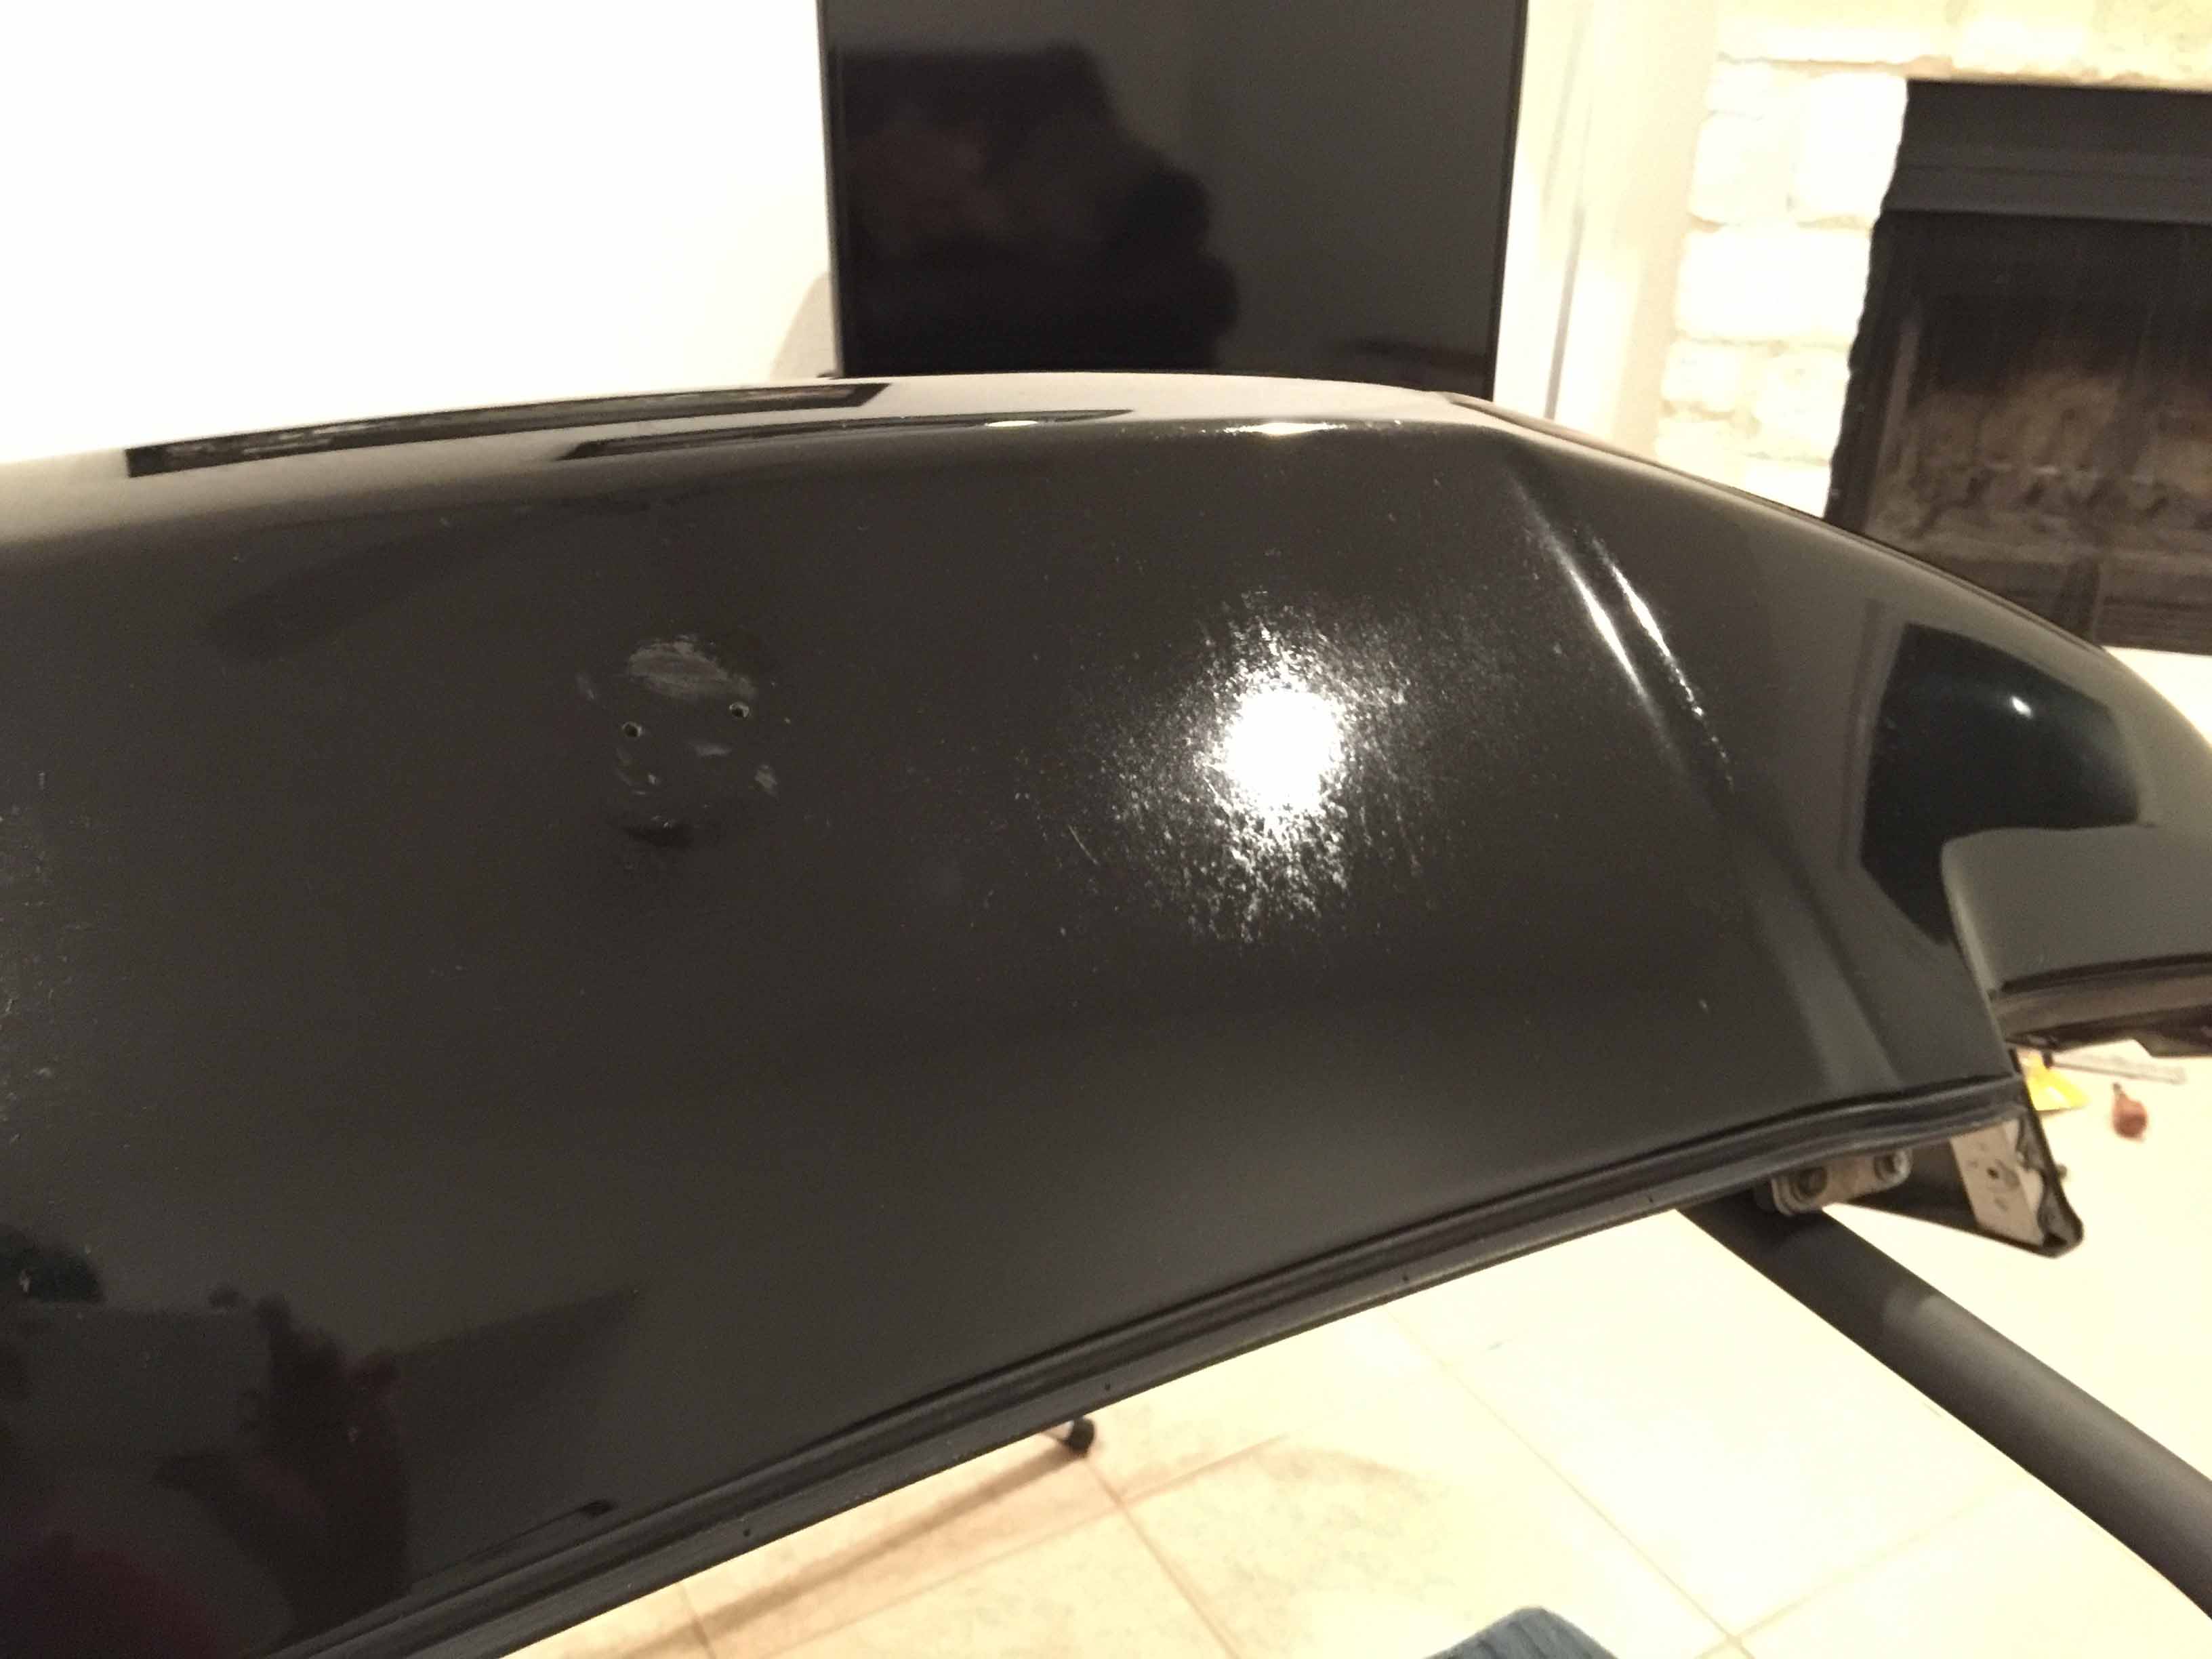
Also, horrible news. I was wetsanding some touch up and sanded through to the primer on the fender. I'm debating between moving to South America and starting a new life, paying a shop to respray the whole front end and driver side door to take care of the door dings and road rash, or suicide. Looking back I'm not even sure how I managed to screw up that badly, I normally use a tiny 1"x1" or pencil erase sized sanding block since I can make sure I don't really touch anything but the touch up spot, but at the time I was using a FULL SIZE SANDING BLOCK. For touch up. I know better. Paint chip touch up wetsanding is routine for me at this point, I've done it many times in the past with zero issues, I have no idea what the FUCK I was thinking. I couldn't bring myself to take pictures of it, I feel like I'm gonna puke every time I look at the car.
Before resigning myself to a front end respray though I decided to give myself one shot at a temporary repair myself so I can push that down the road a ways and not eat ramen 3 meals a day for the next 6 months, because if a respray is on the table there's really nothing I can do to make it worse at this point short of going at it with 80 grit sandpaper or paint stripper.
So, I went down to Hobby Lobby and bought their entry level airbrush intended for spraying model airplanes and such. I have some touch up paint from automotivetouchup.com so I marked off an area about 2"x4" around the primer spot with masking tape and lightly airbrushed the touch up paint on. In the retrospect, feathering the edges would result in a better final look but initially I wasn't planning on using a clear coat, and I'm not going to redo it because I promised myself I'm only attempting it once and redos on spot repairs generally result in an even bigger spot. Anyways, the touch up went on well and after the initial polishing I found that rubbing alcohol dissolves the touch up paint and it is entirely unsuitable for use without a clear coat except for in tiny paint chips.
So, after lightly sanding the touch up spot with 2000 grit again to remove the damage caused by the alcohol, I went out to the shed in my back yard where I still have 3/4 gallon of catalyzed automotive urethane clear coat leftover from when I resprayed the Integra and mixed up about an ounce of it to shoot over the touch up spot. (This is real clear coat, if anyone needs a tiny amount of it for whatever reason and you don't want to pay $80+ for a whole gallon, let me know and I'd be happy to help, mailing a little glass bottle of activator and clear shouldn't cost more than a few bucks.) I marked off a spot about 2" from the edge of the touch up spot for the clear coat and airbrushed on 3 wet coats with 15 minutes flash time between each. At this point I've smoothed the edges of the repair into the factory paint and have wetsanded up to 3000 grit, I'm holding off for a week or so on the final polishing stages to let the clear coat harden more.
Overall the repair looks good given I did it in my garage with a $25 airbrush and a bottle of touch up paint, but I still hate it because it's 100% my fault the repair was needed in the first place. It would, however, be a great way to repair bumper scrapes yourself if you want to hold off on a respray and are willing to put a few hours into it.
Last edited:
Suntek PPF has a 5 year warranty (when applied by a professional, so doesn't apply to me), so under fairly poor conditions it should last that long without deteriorating too much, if taken care of it should last quite a bit longer. I've never heard of any issues with paint damage after removal unless it was an extremely poor respray. Either way, if I still own the car when the film comes off, it's going straight into the shop for a respray. I'm doing the film so I can push that back as long as possible since spending $10k (if not more) on a factory quality wetsanded respray isn't something I want to do right now.
Photobucket has gotten substantially worse since I started using it and has now solidified its status as being one of the worst photo hosting sites ever by randomly deleting the album I used to store NSX pictures (at least the links still work) so from now on I will be uploading images directly to NSXPrime.
Anyways, I've gotten quite a bit done over the past few months. I pulled the vents off to wrap them and while removing the inserts, noticed that the studs with the push nuts is just about the perfect size to thread an M3 die onto, so I did. Nobody will ever see this again but it makes me happy.")

Vent insert reinstalled with two M3 locknuts and washers instead of the crappy push nuts that work themselves loose and rattle a bit.

You can see here that the weird oxidization or whatever it is on the front bumper came back despite being coated in synthetic wax and rarely exposed to the sun, so I wetsanded some more, polished, and wrapped it.
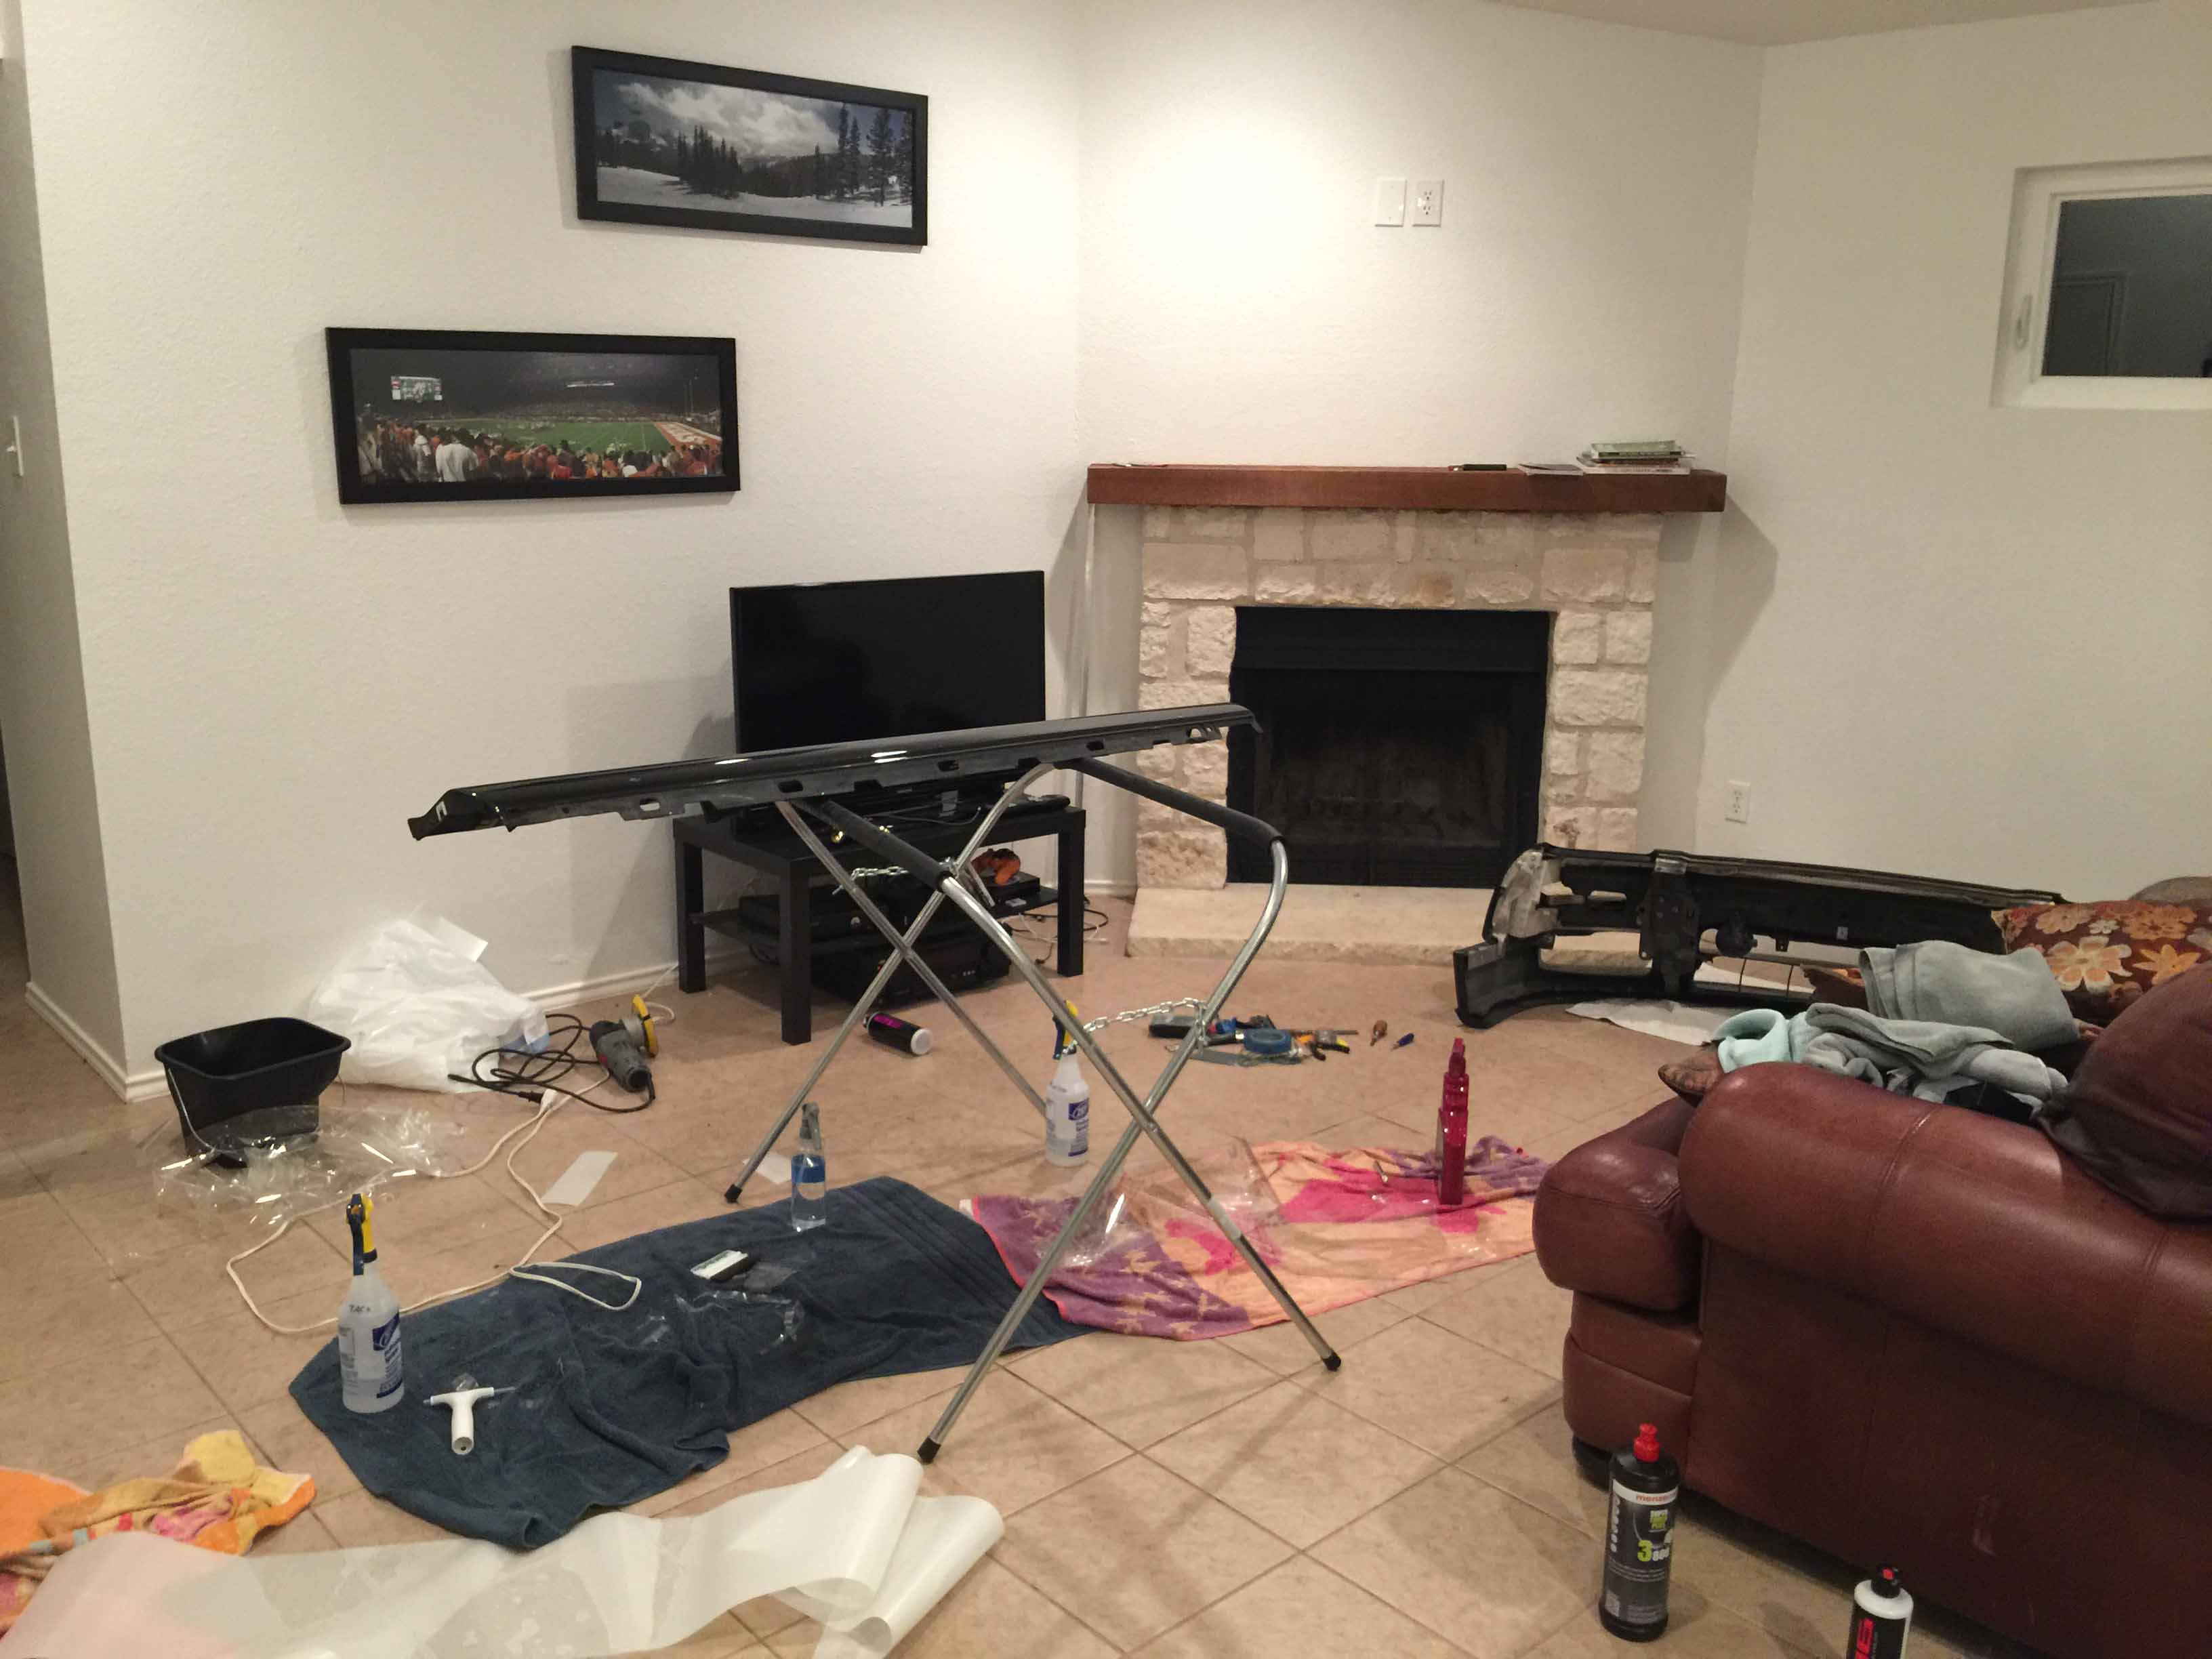
I cleared out my living room to use it as an extension of the garage, one of the perks/downsides of living alone. In the process of prepping the side skirts for wrapping here, speaking of which, does anyone have any suggestions for replacing the adhesive used to keep the side step panels on?
And with everything put back together. At this point I just have the doors and the hood left before the car is completely wrapped in PPF.
It's really nice to be able to drive it again, it's nice to have the option to not drive my 140hp FWD Integra, as much as I love it it's pretty depressing to drive compared to the NSX.
I also started looking into the front-end noise, I swapped the front wheels and the noise followed, so something is up with the wheel/tire. A tire shop pointed out that it was starting to feather so I need to figure out why that's happening, possibly something a bit off with the alignment.
Photobucket has gotten substantially worse since I started using it and has now solidified its status as being one of the worst photo hosting sites ever by randomly deleting the album I used to store NSX pictures (at least the links still work) so from now on I will be uploading images directly to NSXPrime.
Anyways, I've gotten quite a bit done over the past few months. I pulled the vents off to wrap them and while removing the inserts, noticed that the studs with the push nuts is just about the perfect size to thread an M3 die onto, so I did. Nobody will ever see this again but it makes me happy.
Vent insert reinstalled with two M3 locknuts and washers instead of the crappy push nuts that work themselves loose and rattle a bit.
You can see here that the weird oxidization or whatever it is on the front bumper came back despite being coated in synthetic wax and rarely exposed to the sun, so I wetsanded some more, polished, and wrapped it.
I cleared out my living room to use it as an extension of the garage, one of the perks/downsides of living alone. In the process of prepping the side skirts for wrapping here, speaking of which, does anyone have any suggestions for replacing the adhesive used to keep the side step panels on?
And with everything put back together. At this point I just have the doors and the hood left before the car is completely wrapped in PPF.
It's really nice to be able to drive it again, it's nice to have the option to not drive my 140hp FWD Integra, as much as I love it it's pretty depressing to drive compared to the NSX.
I also started looking into the front-end noise, I swapped the front wheels and the noise followed, so something is up with the wheel/tire. A tire shop pointed out that it was starting to feather so I need to figure out why that's happening, possibly something a bit off with the alignment.
Last edited:
Time for a long overdue update!
As most of you have probably noticed, Photobucket has cut off all 3rd party hosting after allowing it for 14 years and literally billions of images, unless you're willing to pay $400/year, which is absolutely insane. So, I bit the bullet and did something I've been meaning to do for a while now and bought my own personal domain along with 100GB of storage and unlimited bandwidth. In my industry (software) having it for git repositores, resumes, etc. is a good thing anyways so as long as I keep paying for my domain the images will stay up. I think it might be worthwhile to look into upgrading the image storage options of NSXPrime itself though, this is a fairly small community and the NSX is one of the only exotics that regular people can hope to own and maintain without constant trips to the dealer so losing out on 15 years worth of photos in writeups and build threads would be a damn shame. Storage is very cheap now and it wouldn't take many of us paying a marginal fee to allow everyone to upload as many images as they wanted, especially if images were resized to 1mb or so each. I'd be willing to pay $10-$20 a year or so for it, and I'd also be willing to write some scripts to automate the process of retrieving the images from other hosting sites, copying them to NSXPrime storage, and then modifying the links in threads.
Anyways, about the car. I can barely stay awake right now so if I ramble, I apologize in advance. This post is mostly tiny OCD fixes that most people wouldn't care about or notice, but it makes me happy.
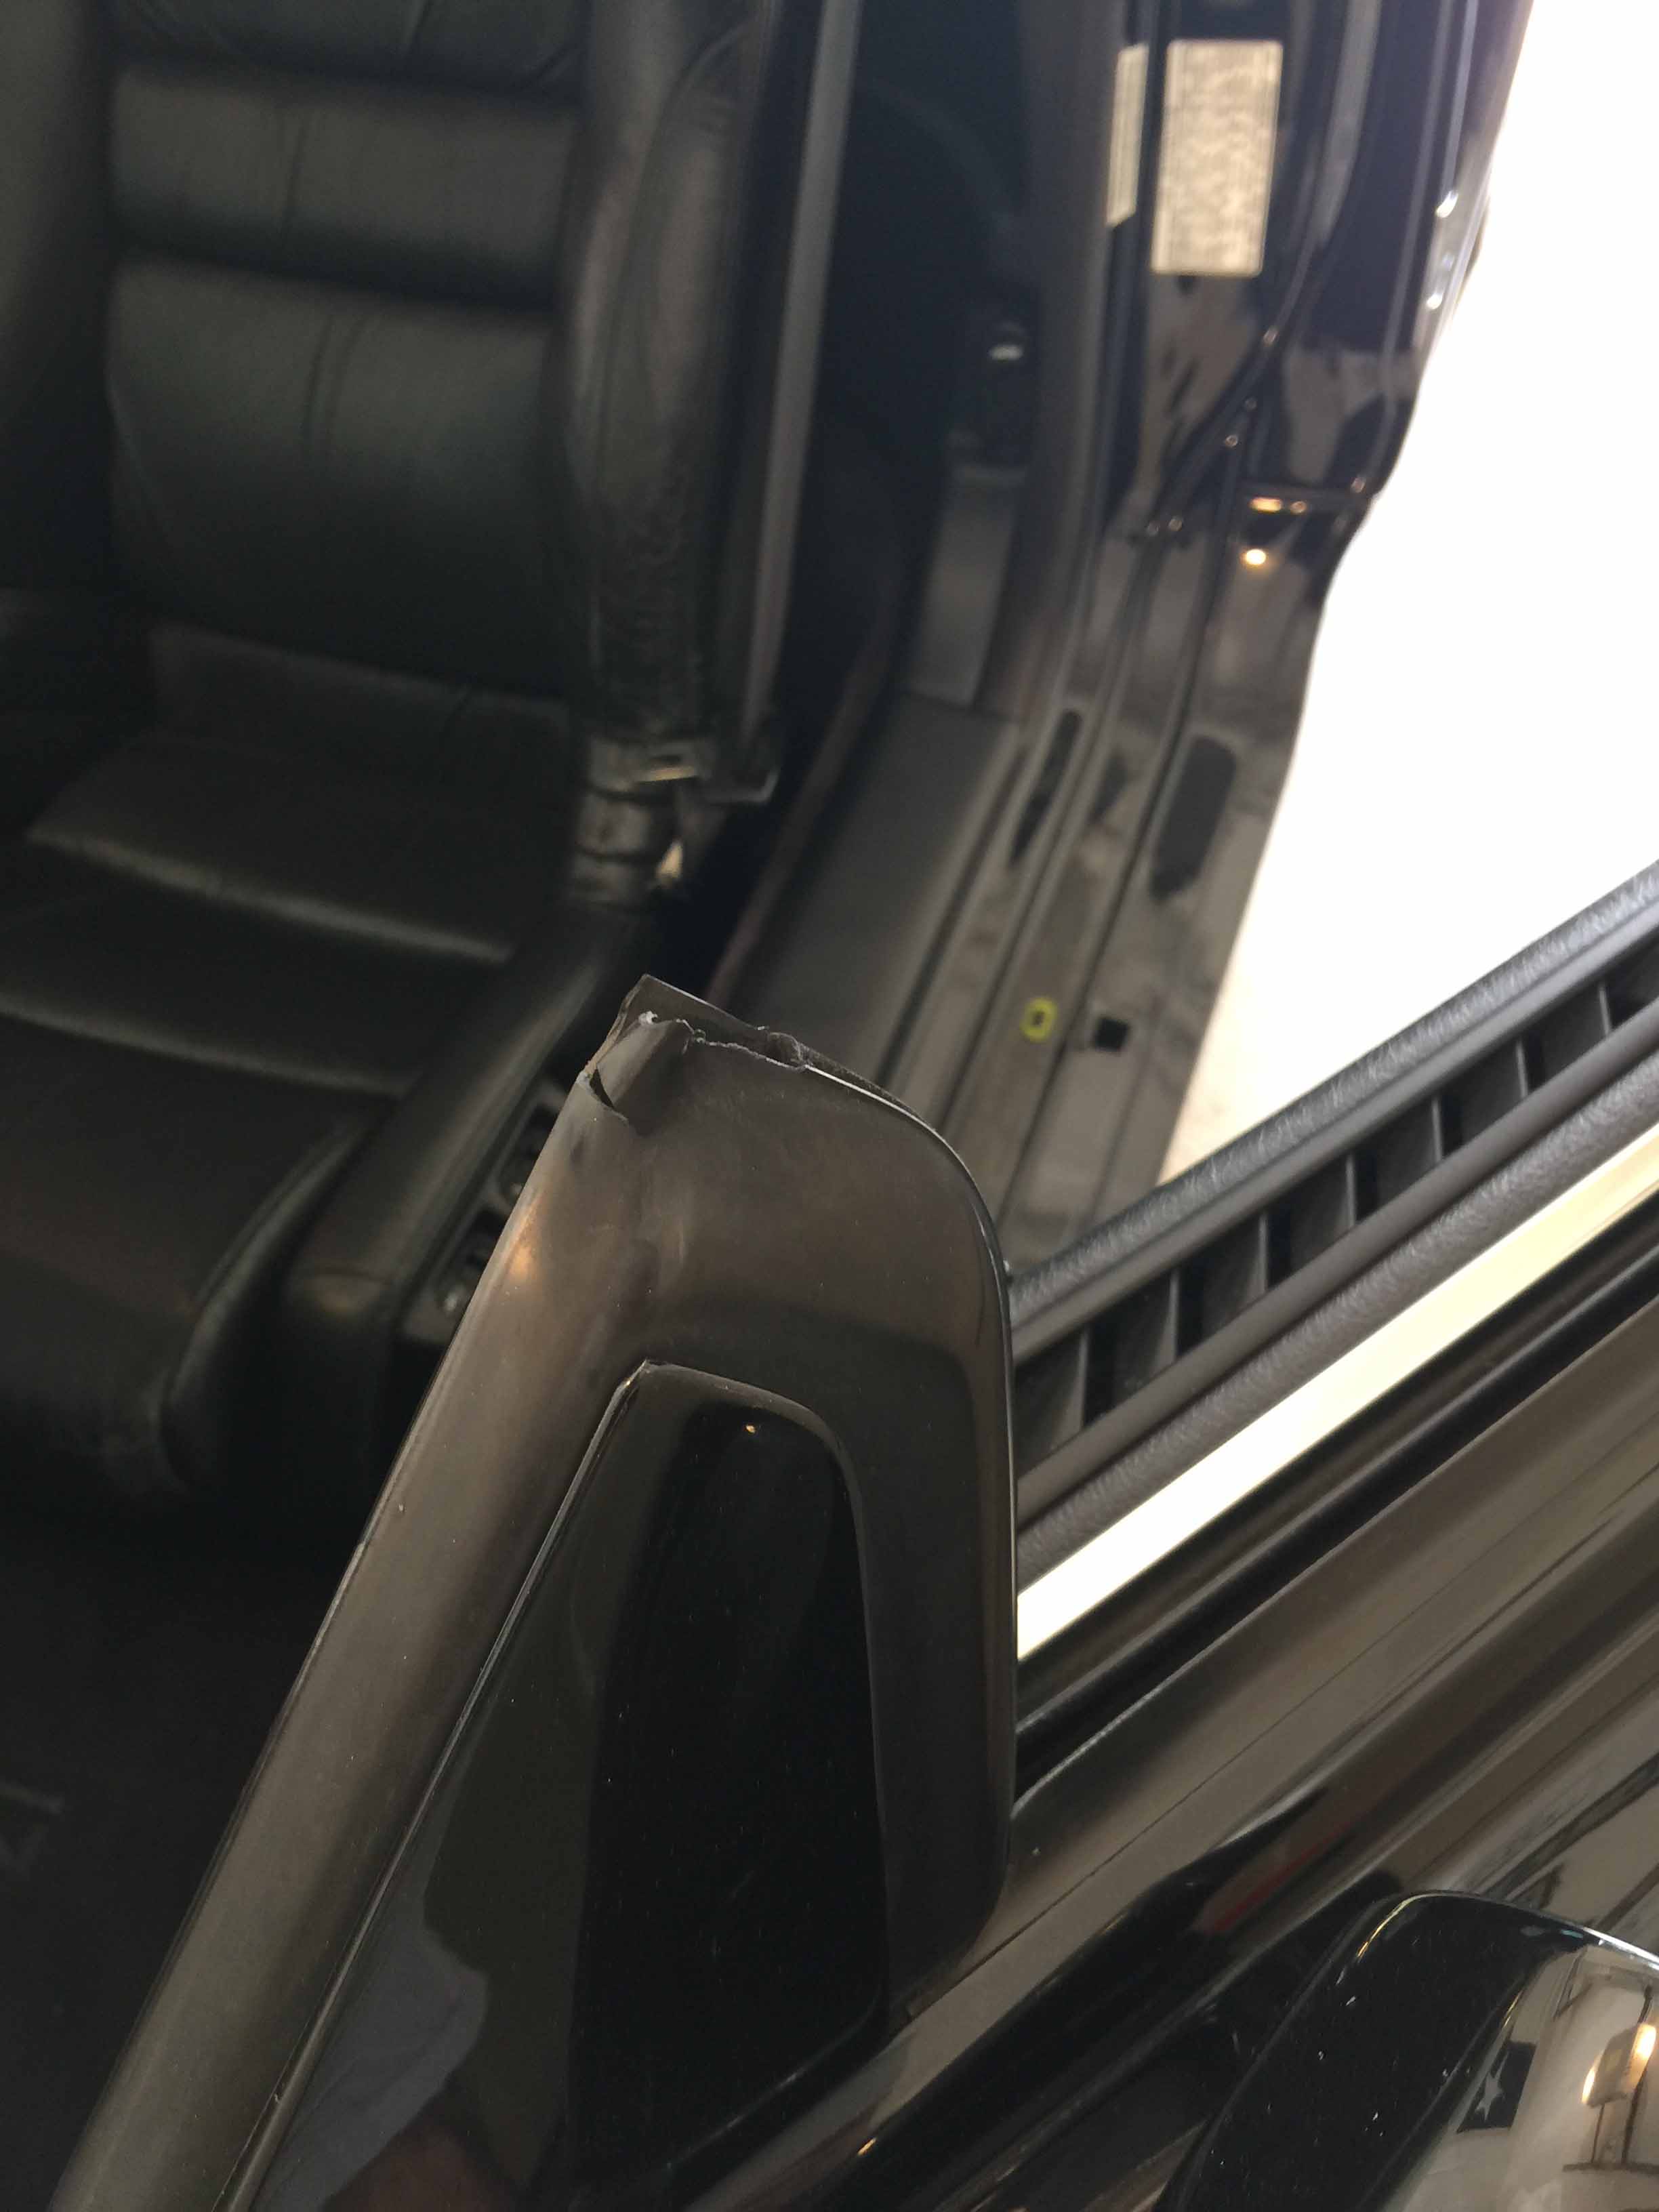
The edges of the rubber parts around the windows were tearing from old age, since I don't want to spend hundreds of dollars to replace them just yet (though I probably will eventually) I instead just cut the frayed parts off. The unintended and unforeseen result of this is a bit of wind noise though, so I'm not sure if it was worth it. What I should have done was just cut the minimum off to get rid of the tears rather than trying to make it look as clean as possible, but it looks better now and I drive with the windows down 90% of the time so I can deal with it for now.
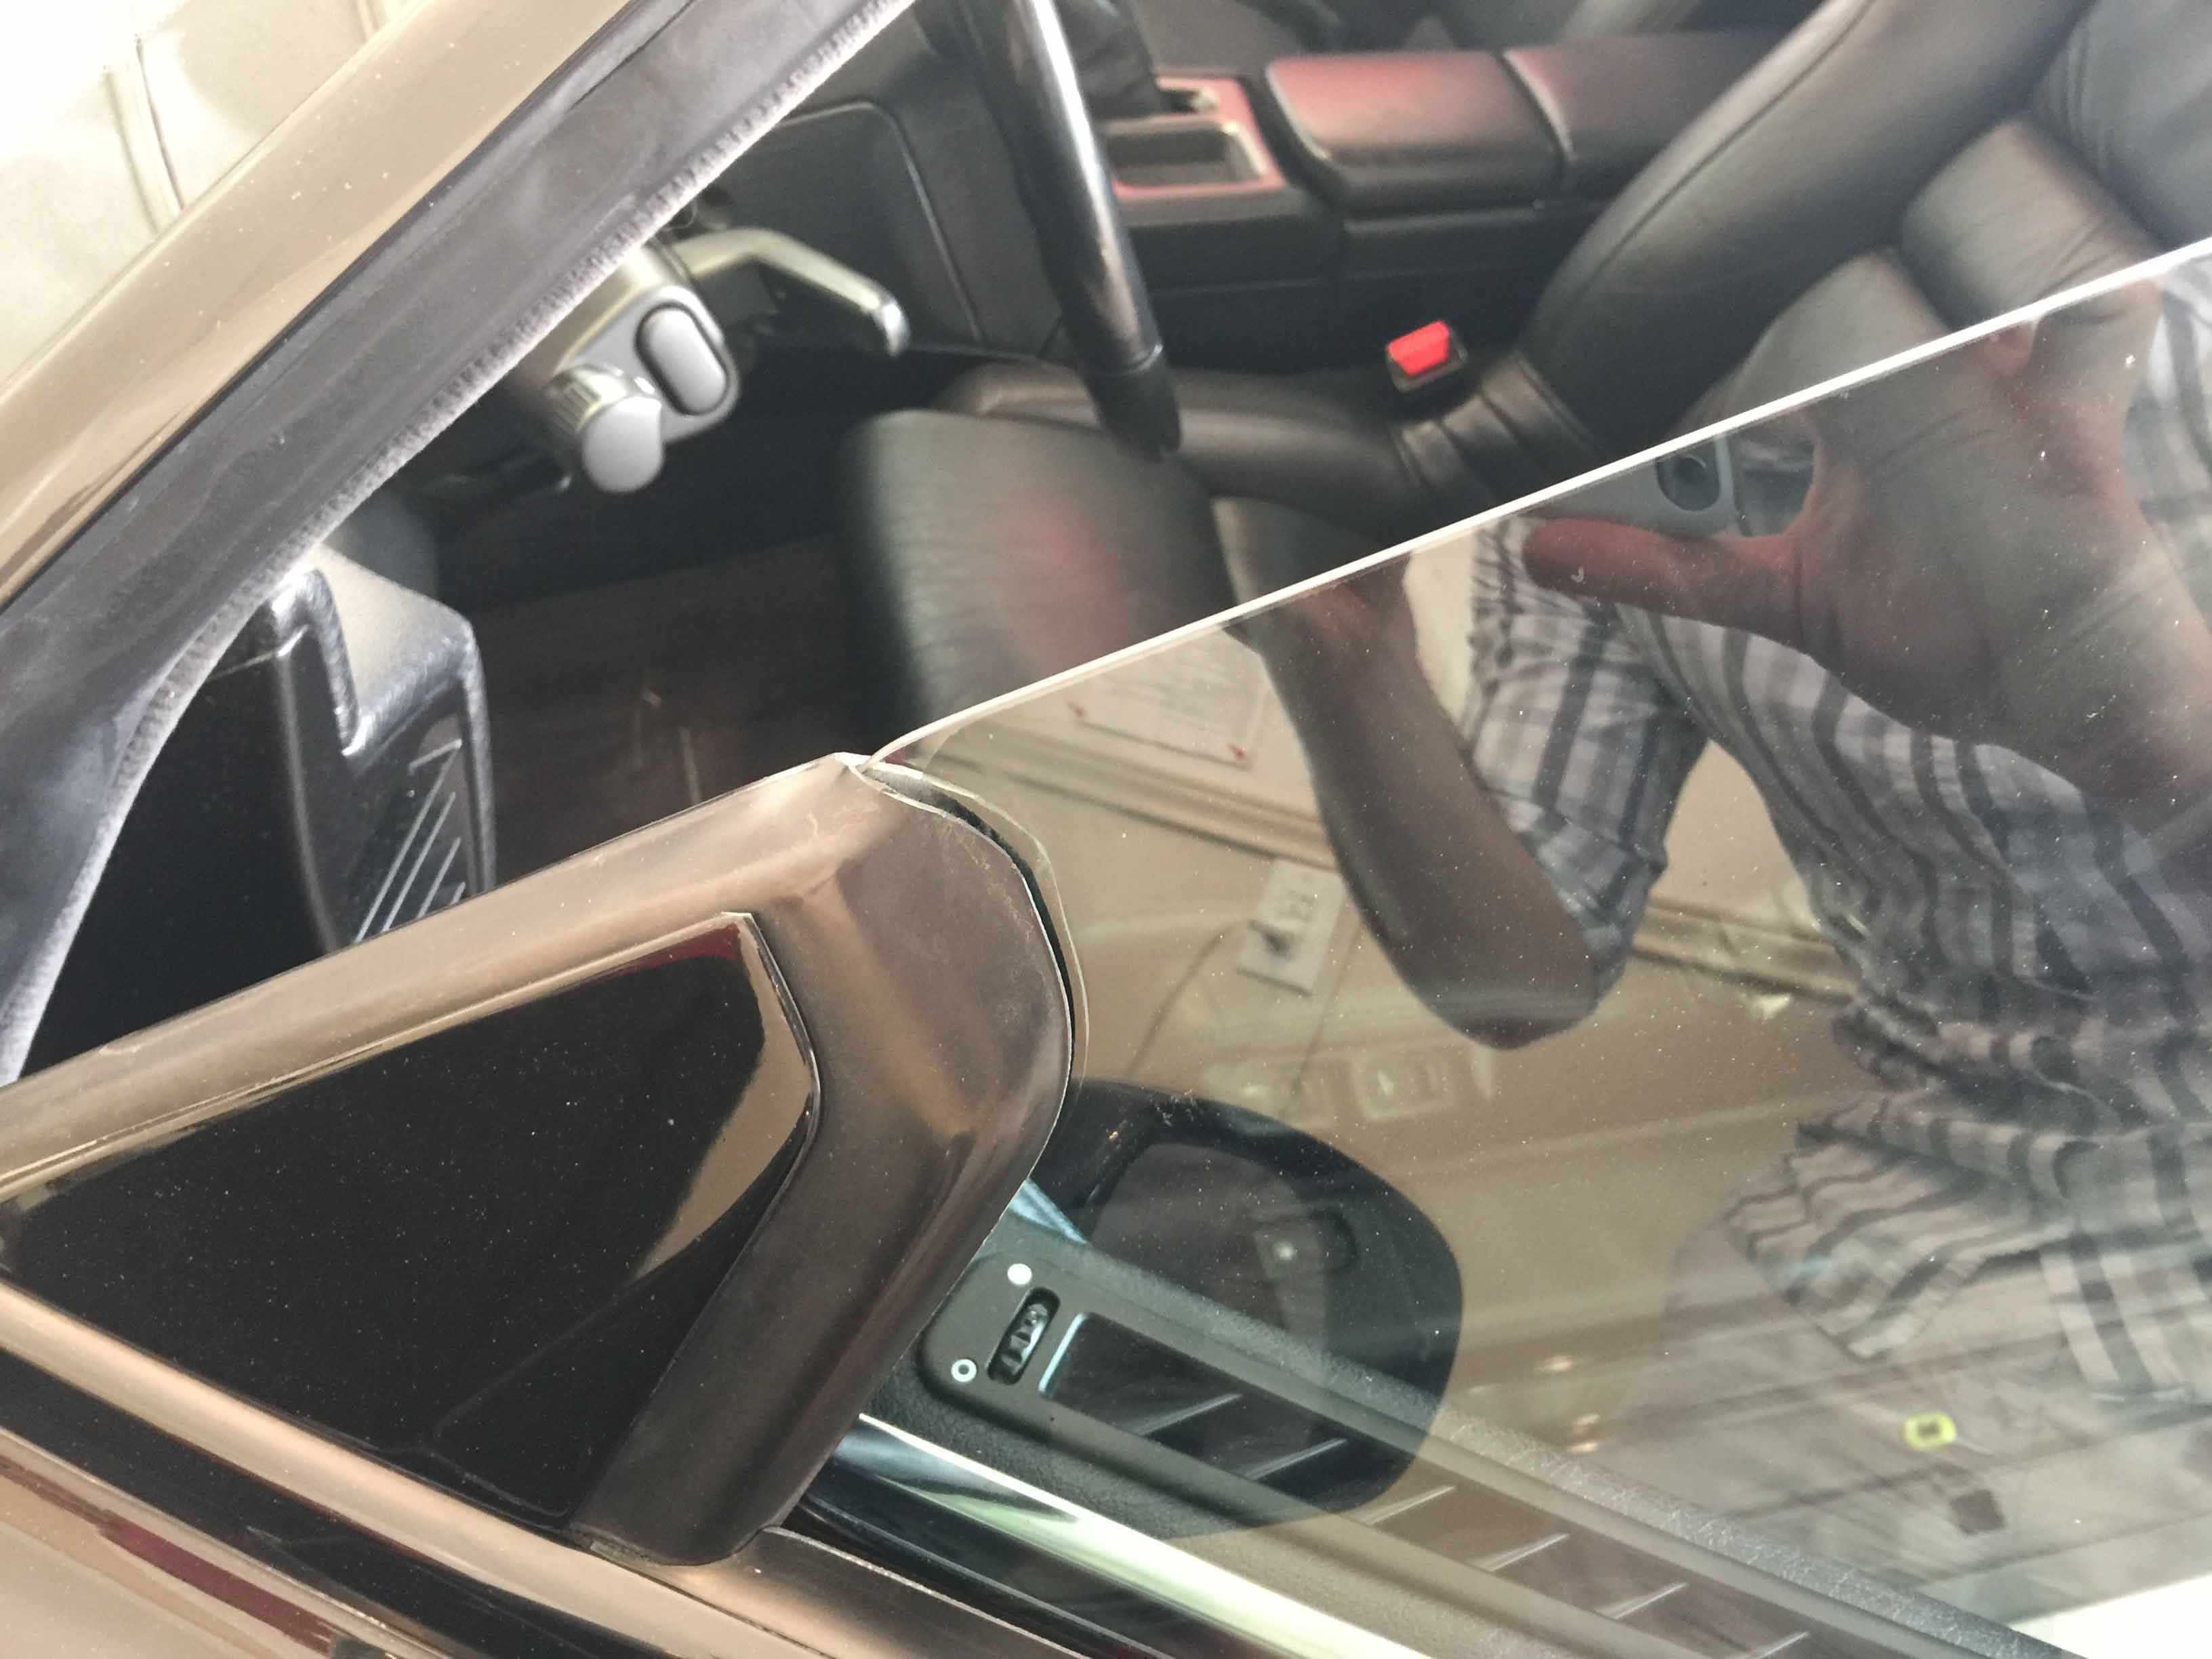
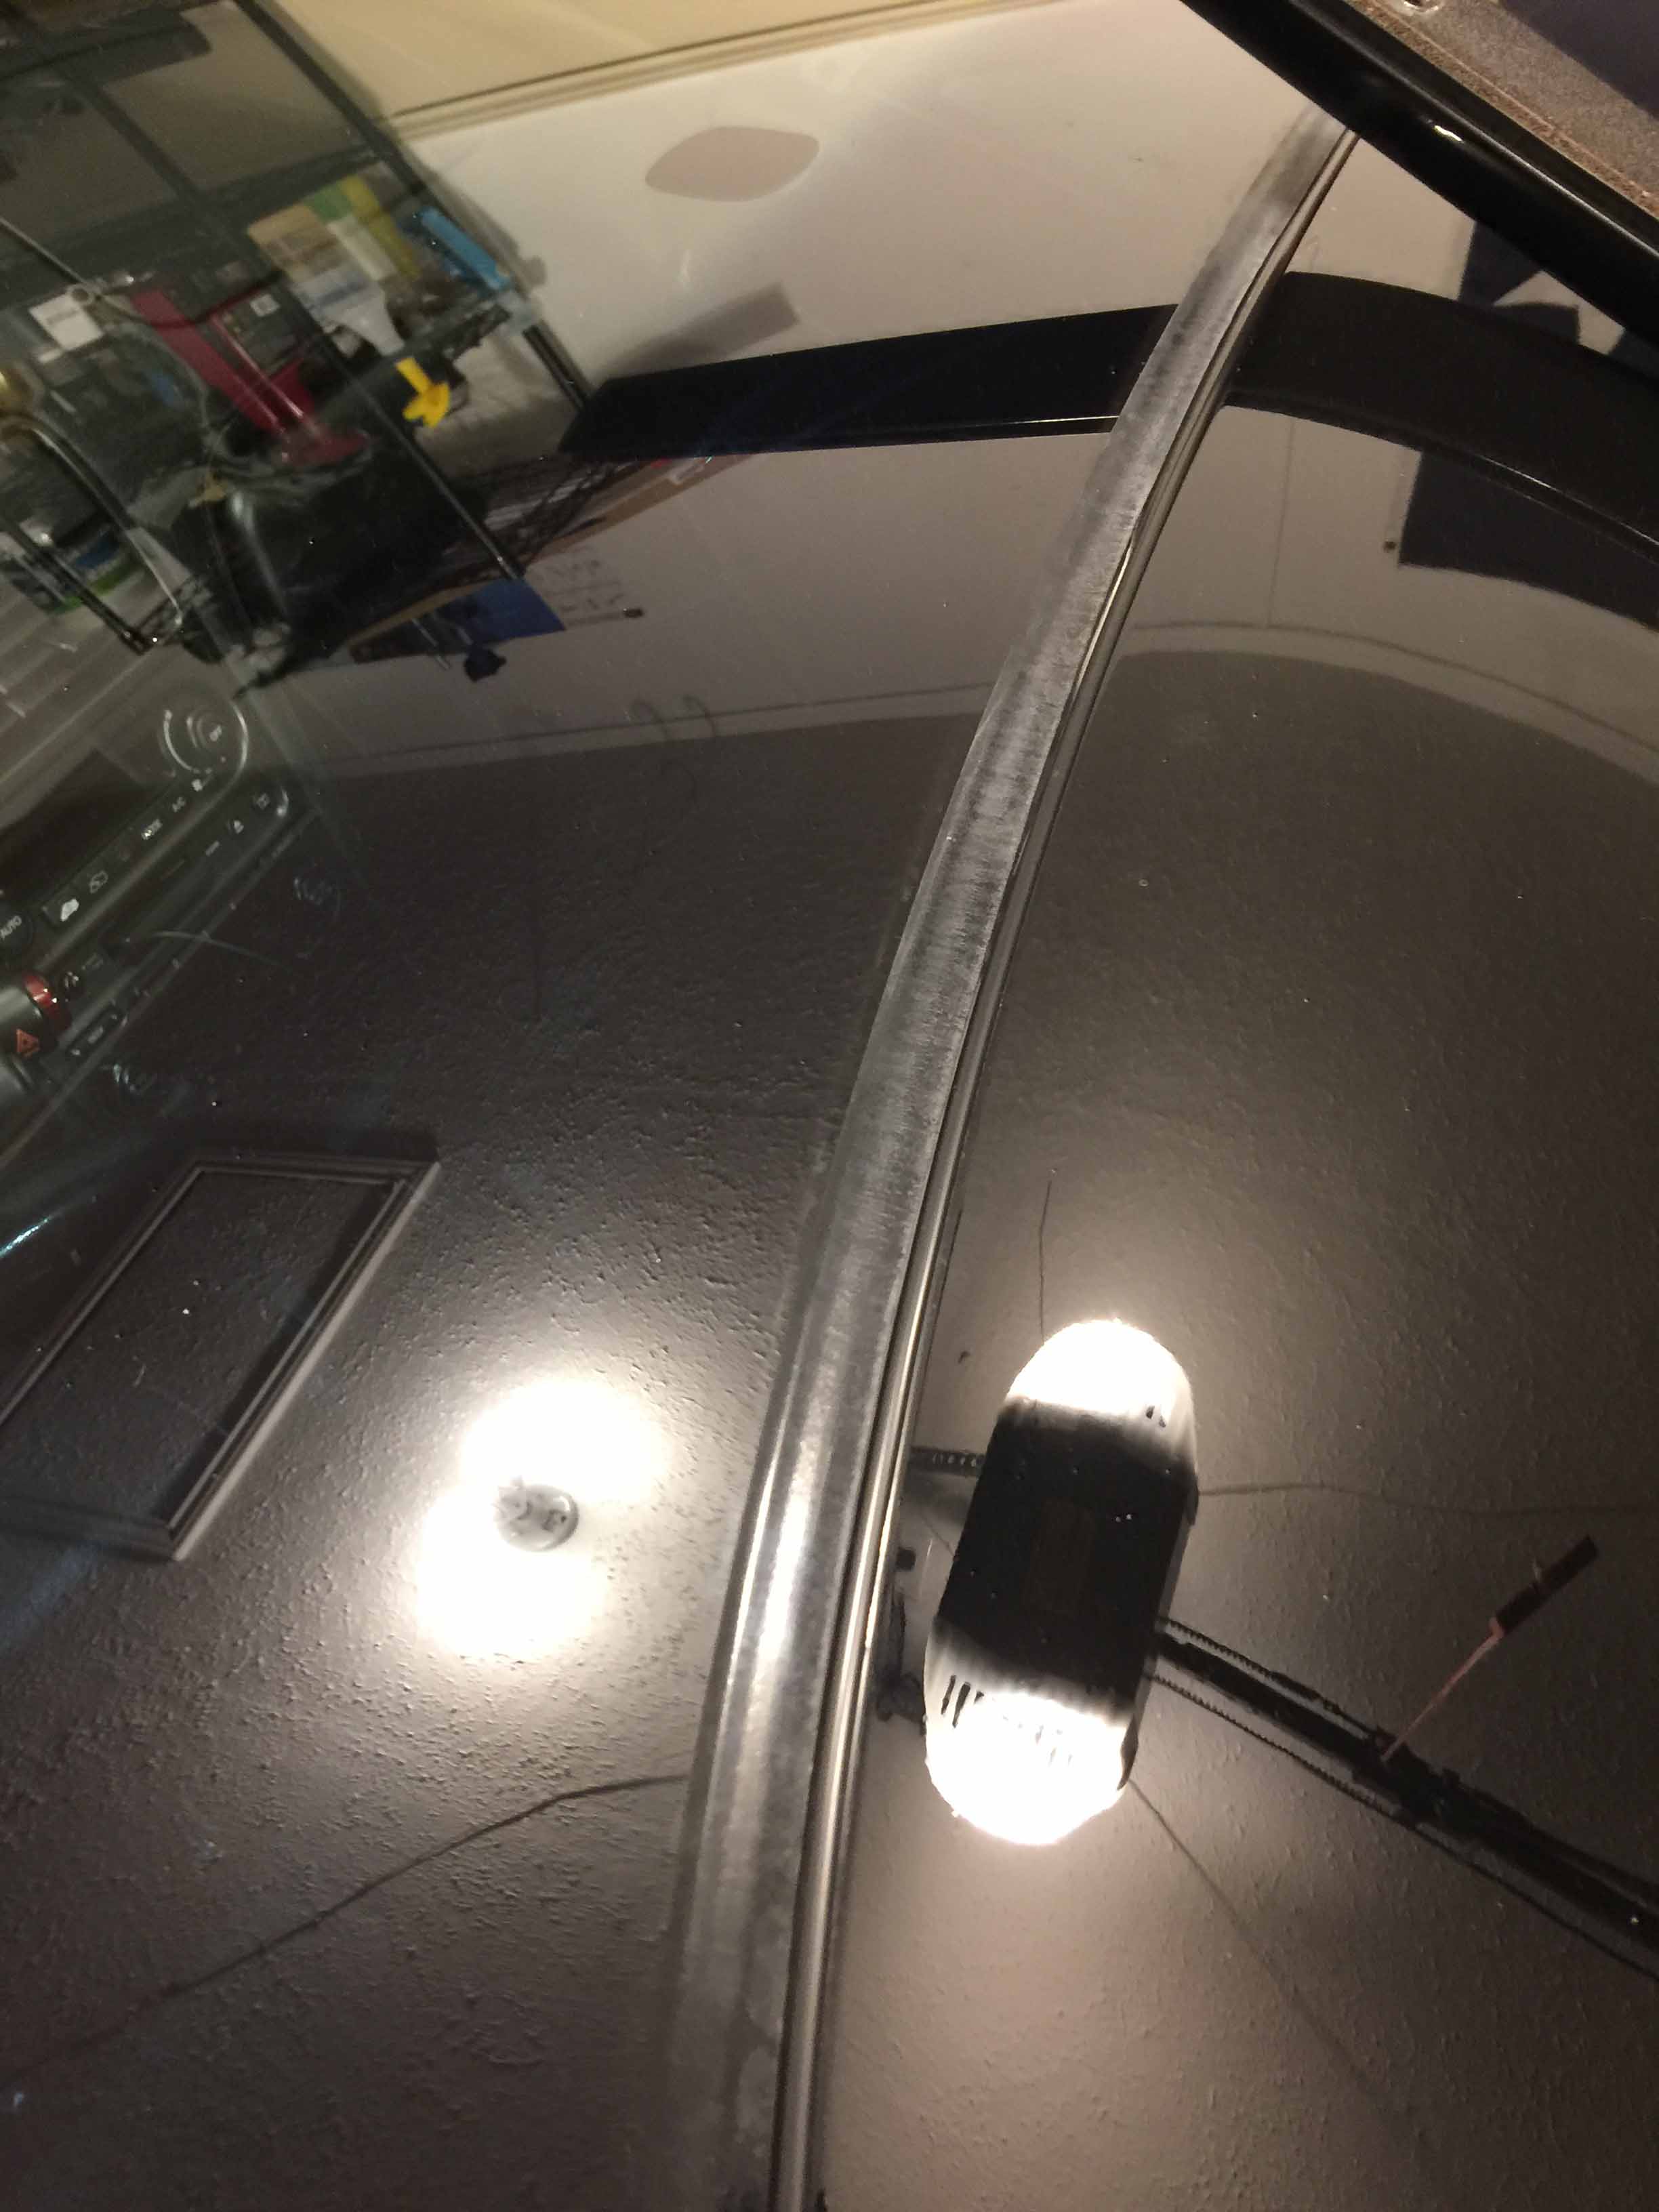
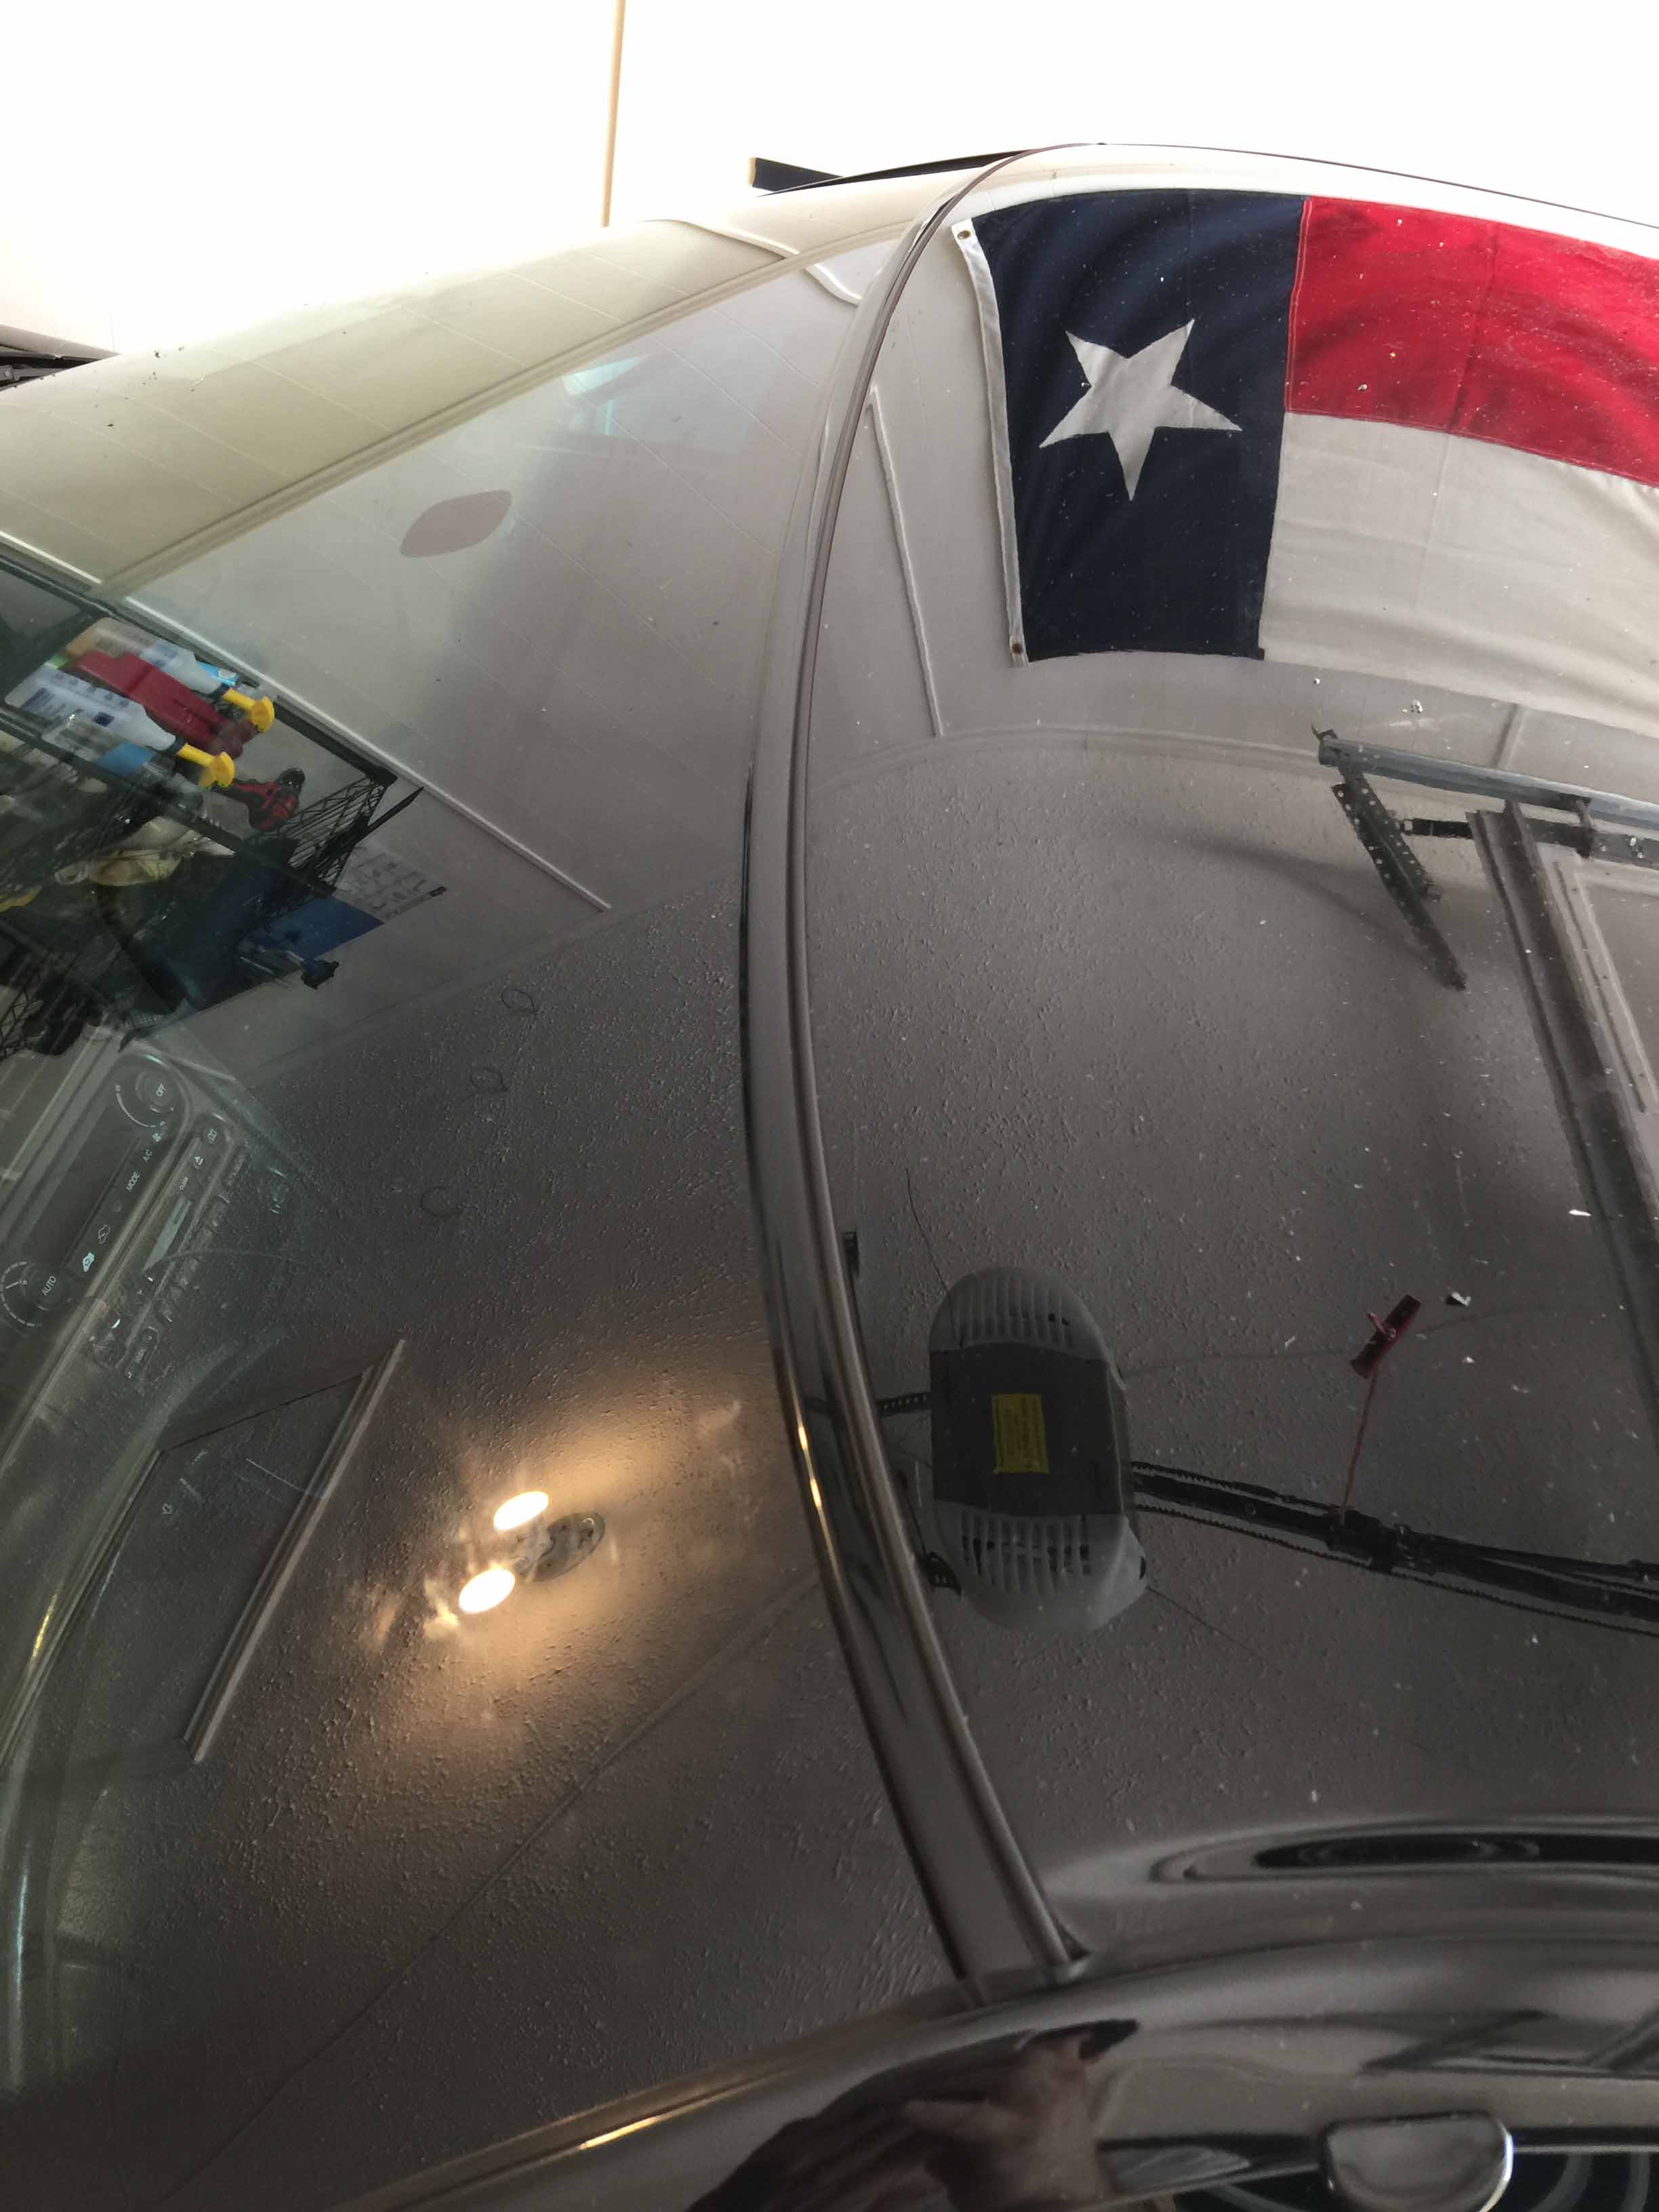
I also finally got around to replacing this trim piece on top of the windshield. Cleaning out the groove it sits in was a royal pain in the butt since they use that awful dark grey adhesive that just doesn't come off unless you use powerful solvents that ruin the paint. After scraping it all out and installing the new trim pieces it turned out pretty well though.
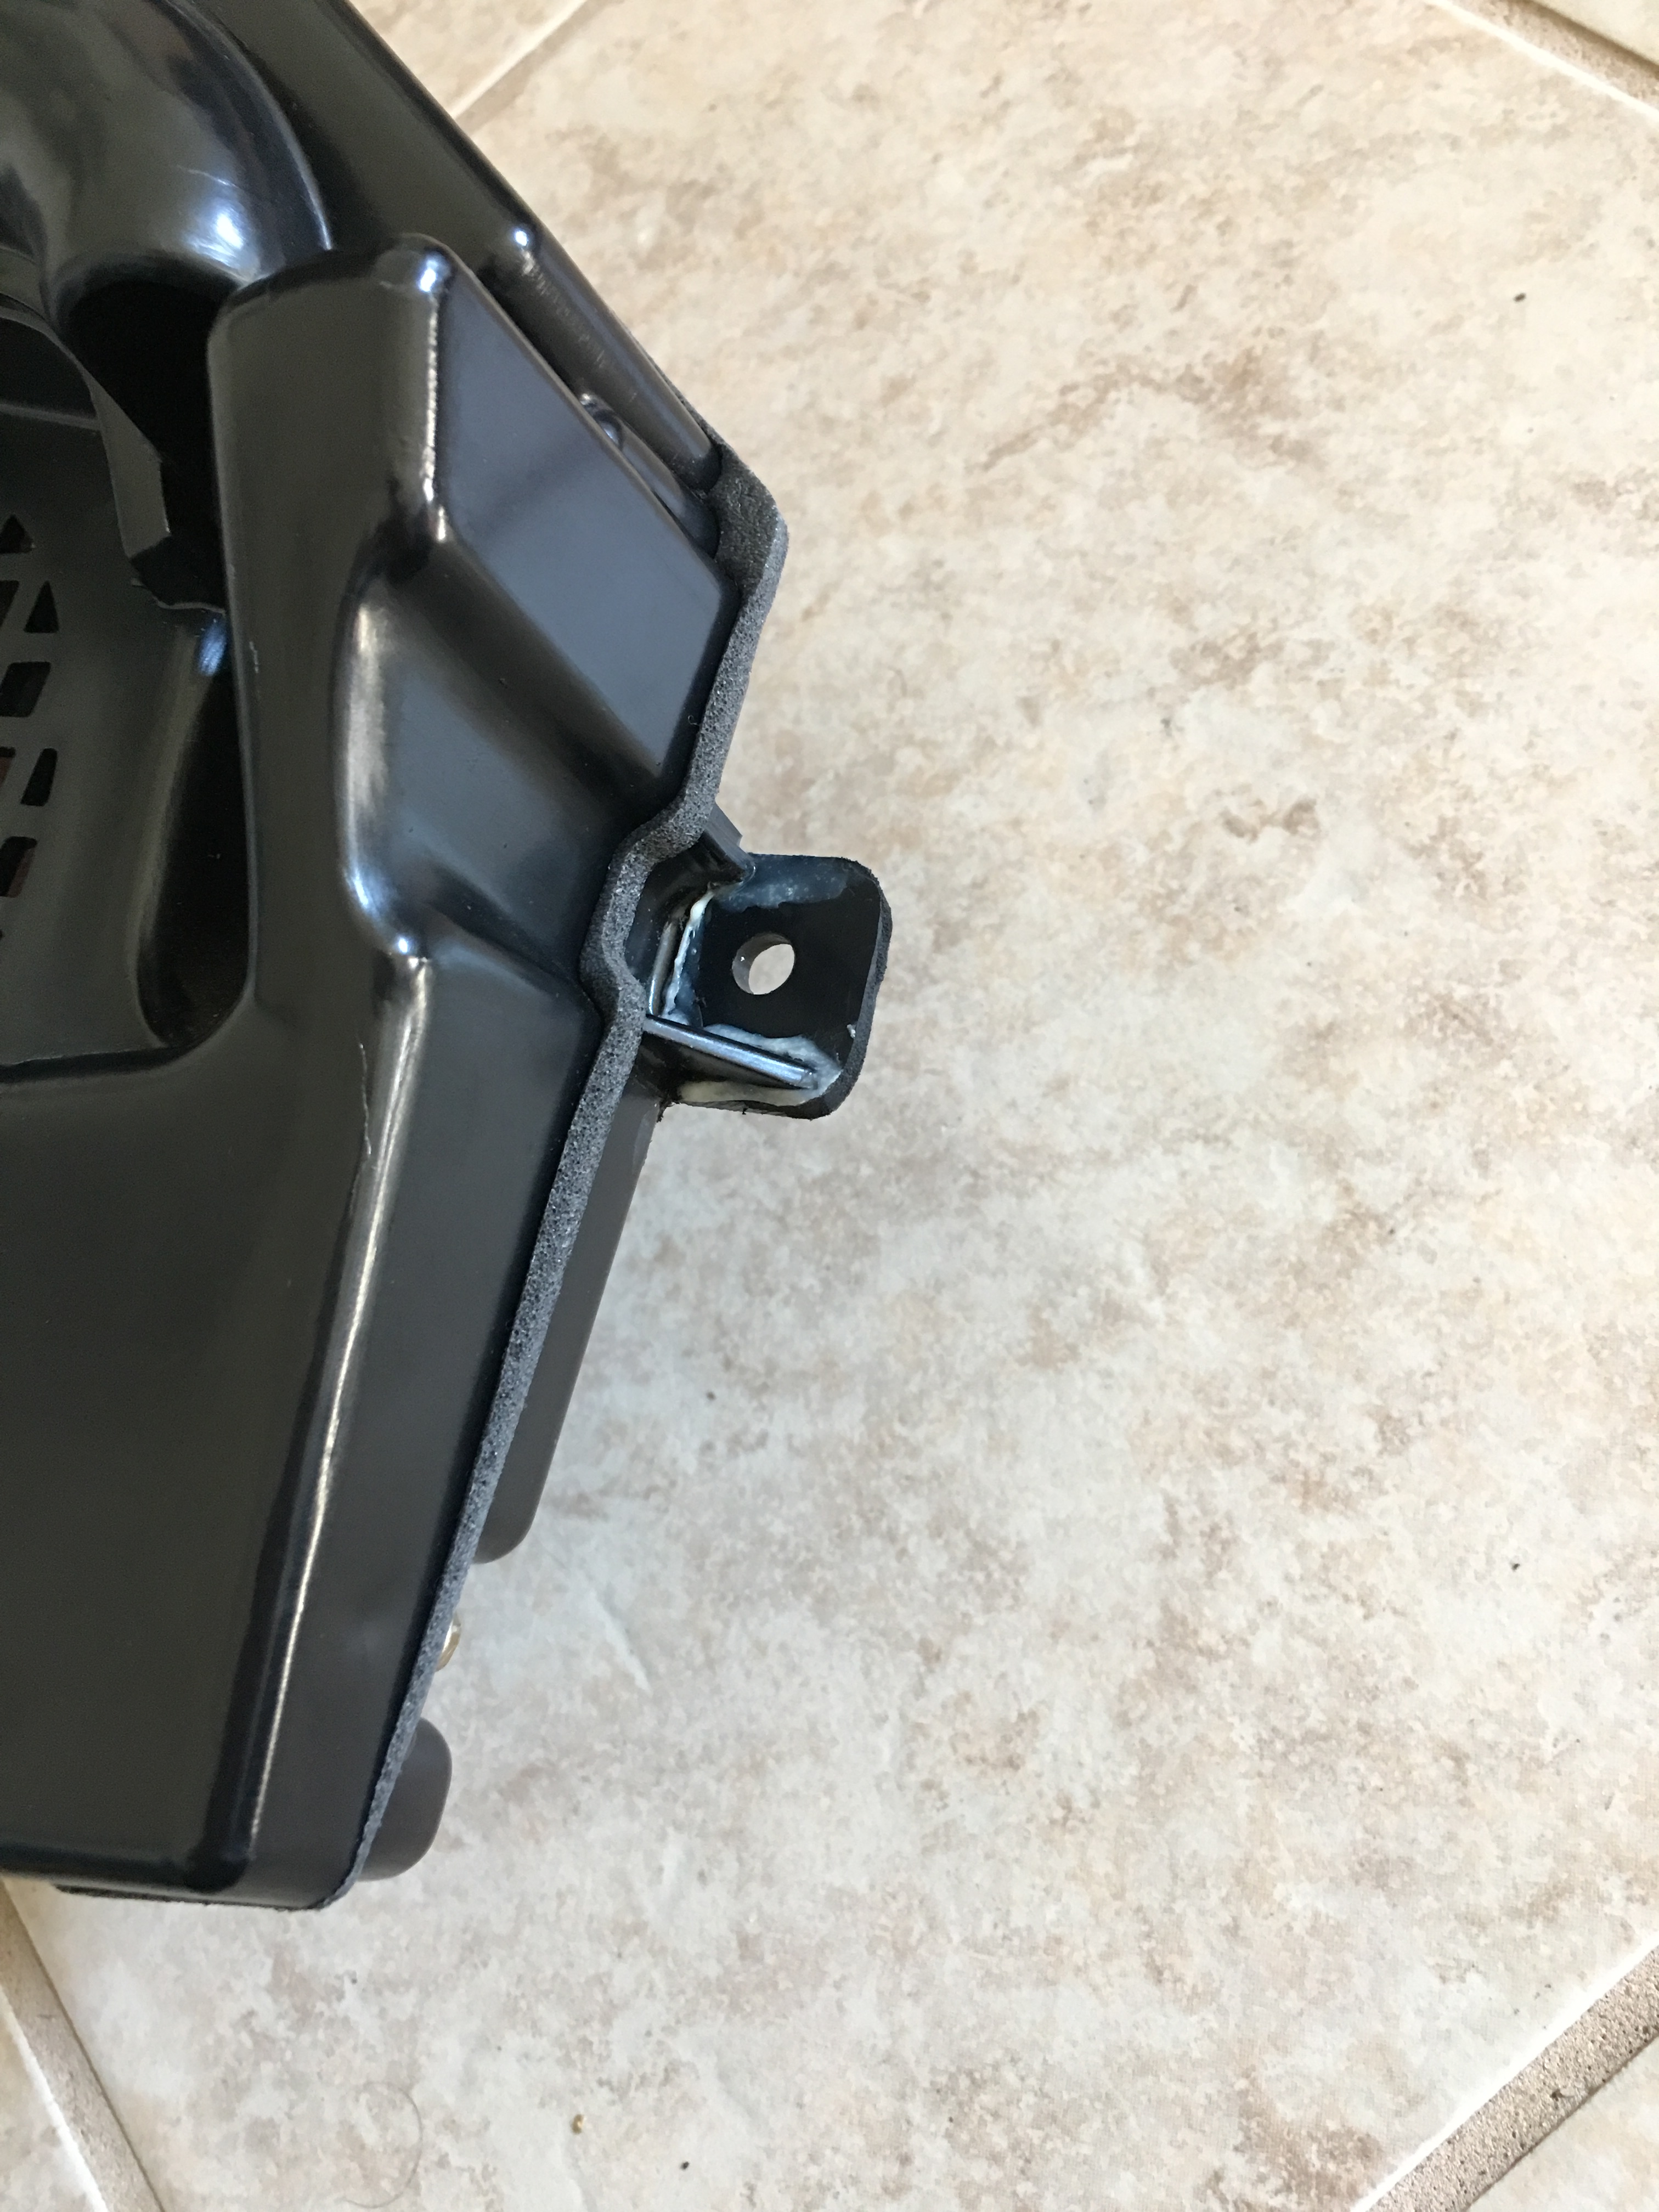
After doing some research on the fender liner clips I came across some threads talking about the Auveco parts that nearly perfectly match the OEM clips for a fraction of the price, and since most of my clips were falling apart from old age I bought two boxes of 25 (after ordering the wrong ones first...) and replaced all of them in one go.
The little triangle piece where the door handle meats the door panel was lifting up on both doors, so I put a tiny dab of superglue underneath it and stuck it back down, working perfectly so far. (excuse the extremely dirty car)
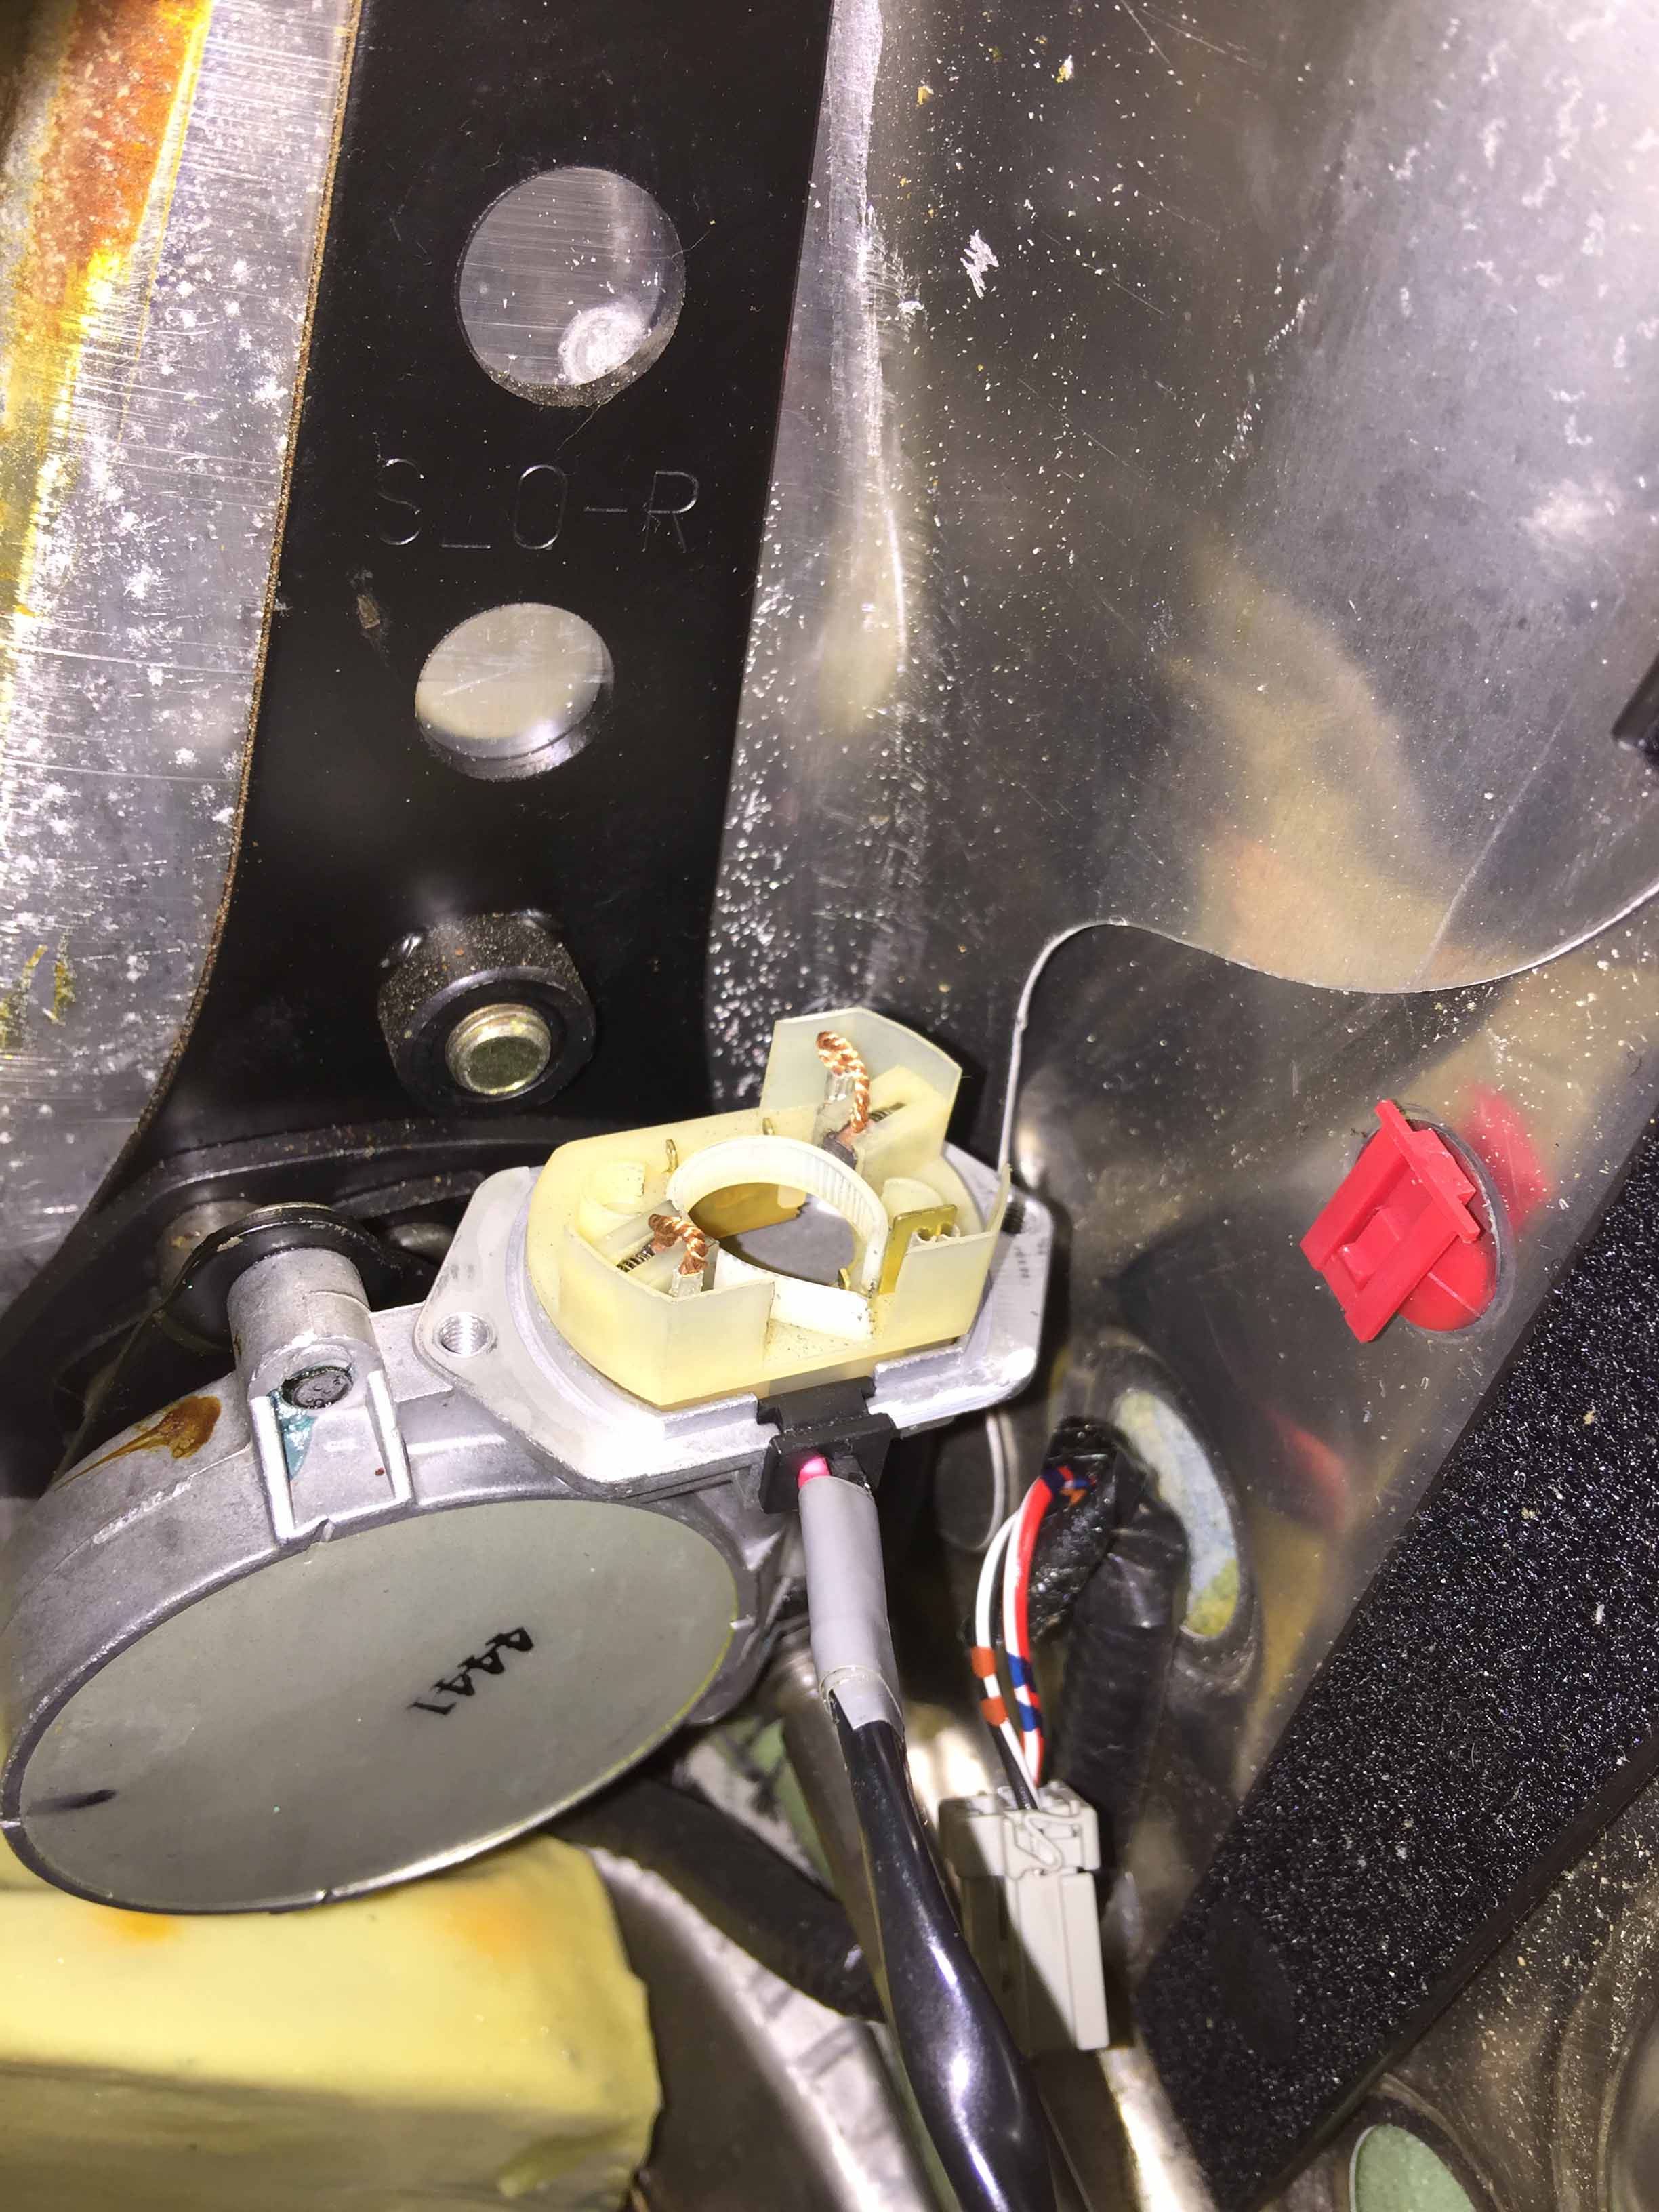
I went to lunch with a very tall coworker and he put the seat back all the way and kept the switch held down until the motor stopped working. :-( To troubleshoot it, I checked the fuse which was good, checked for power at the seat connector which was good, checked for power at the recline switch was good, checked the recline switch to make sure it still worked, so after all that it had to be either the wires running to the motor or the recline motor itself. This sucks because the recline motor is inside the bolster and you have to remove almost everything to get to it. All those hours spent in electonics lab in college debugging circuit boards are finally paying off I guess.
After testing the motor plug for power which was good, I removed the motor can and inspected the innards. Turns out that one of the brushes had gotten so hot that it stuck to the track it sits in, which caused it to lose contact with the commutator. Fortunately the plastic wasn't melted except for the tiny spot, so after tapping the brush free I greased the tracks with dielectric grease and reassembled the motor and all was good. I just have to make sure he doesn't sit in my car anymore.
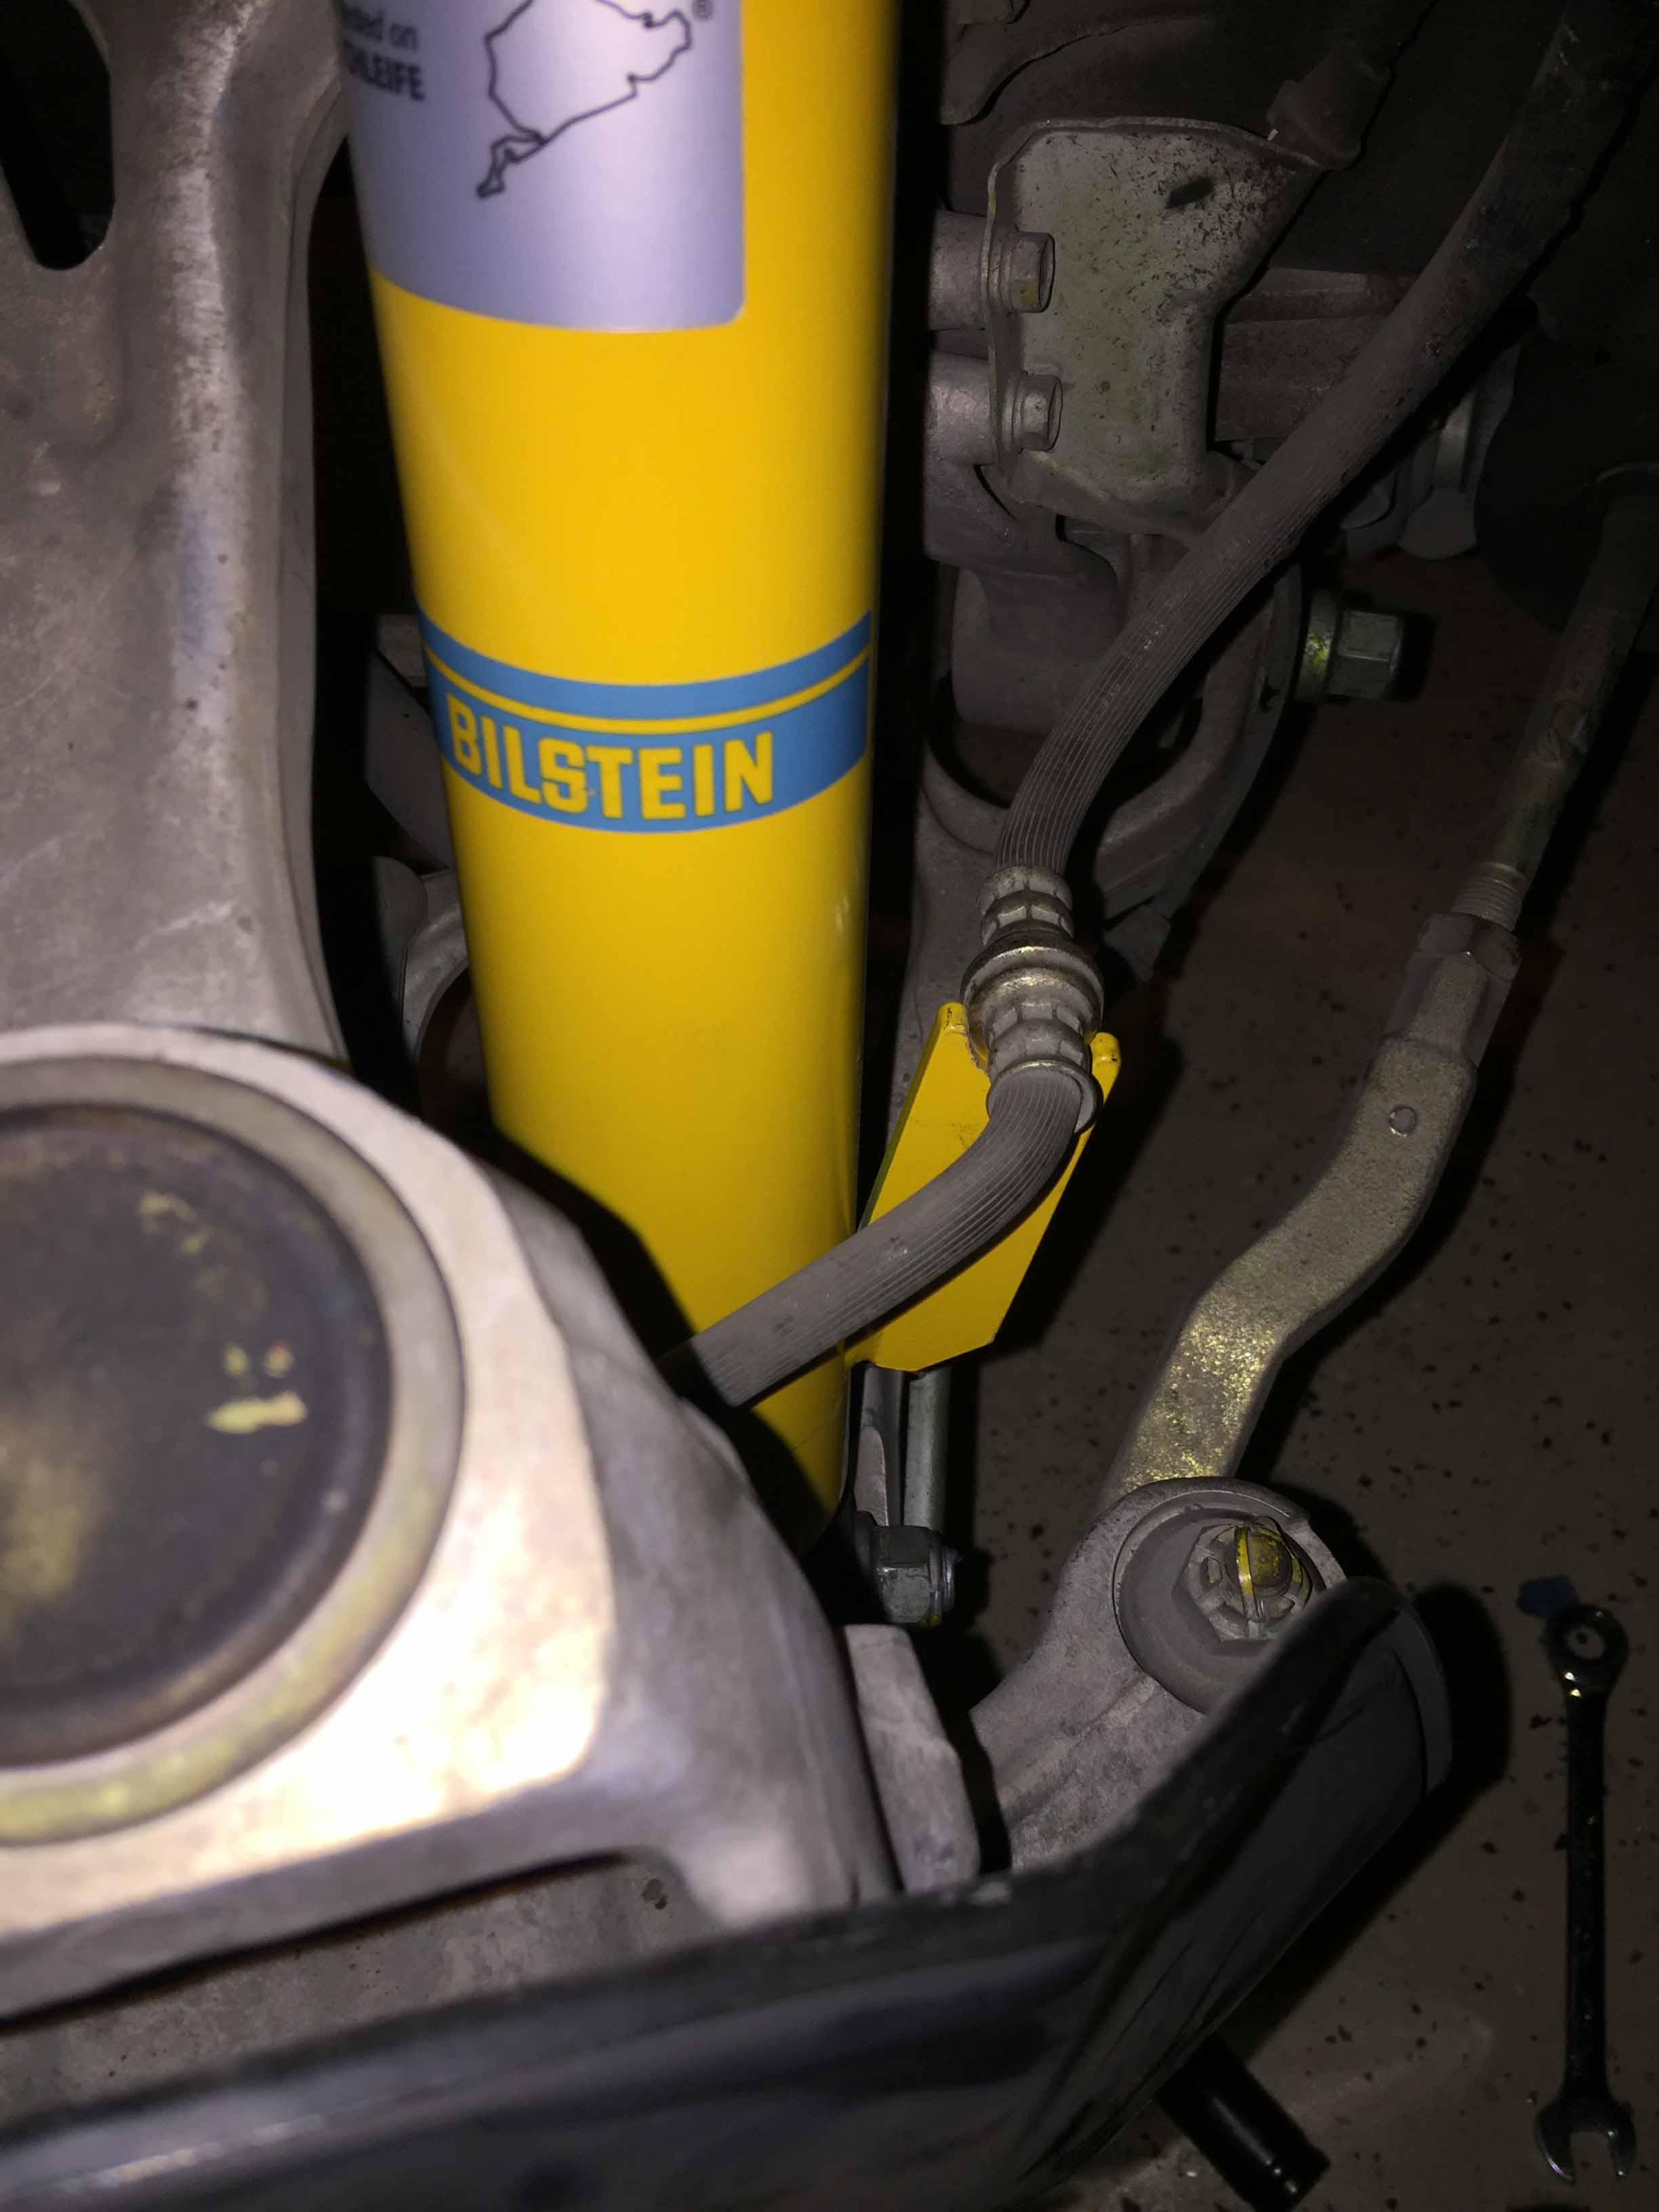
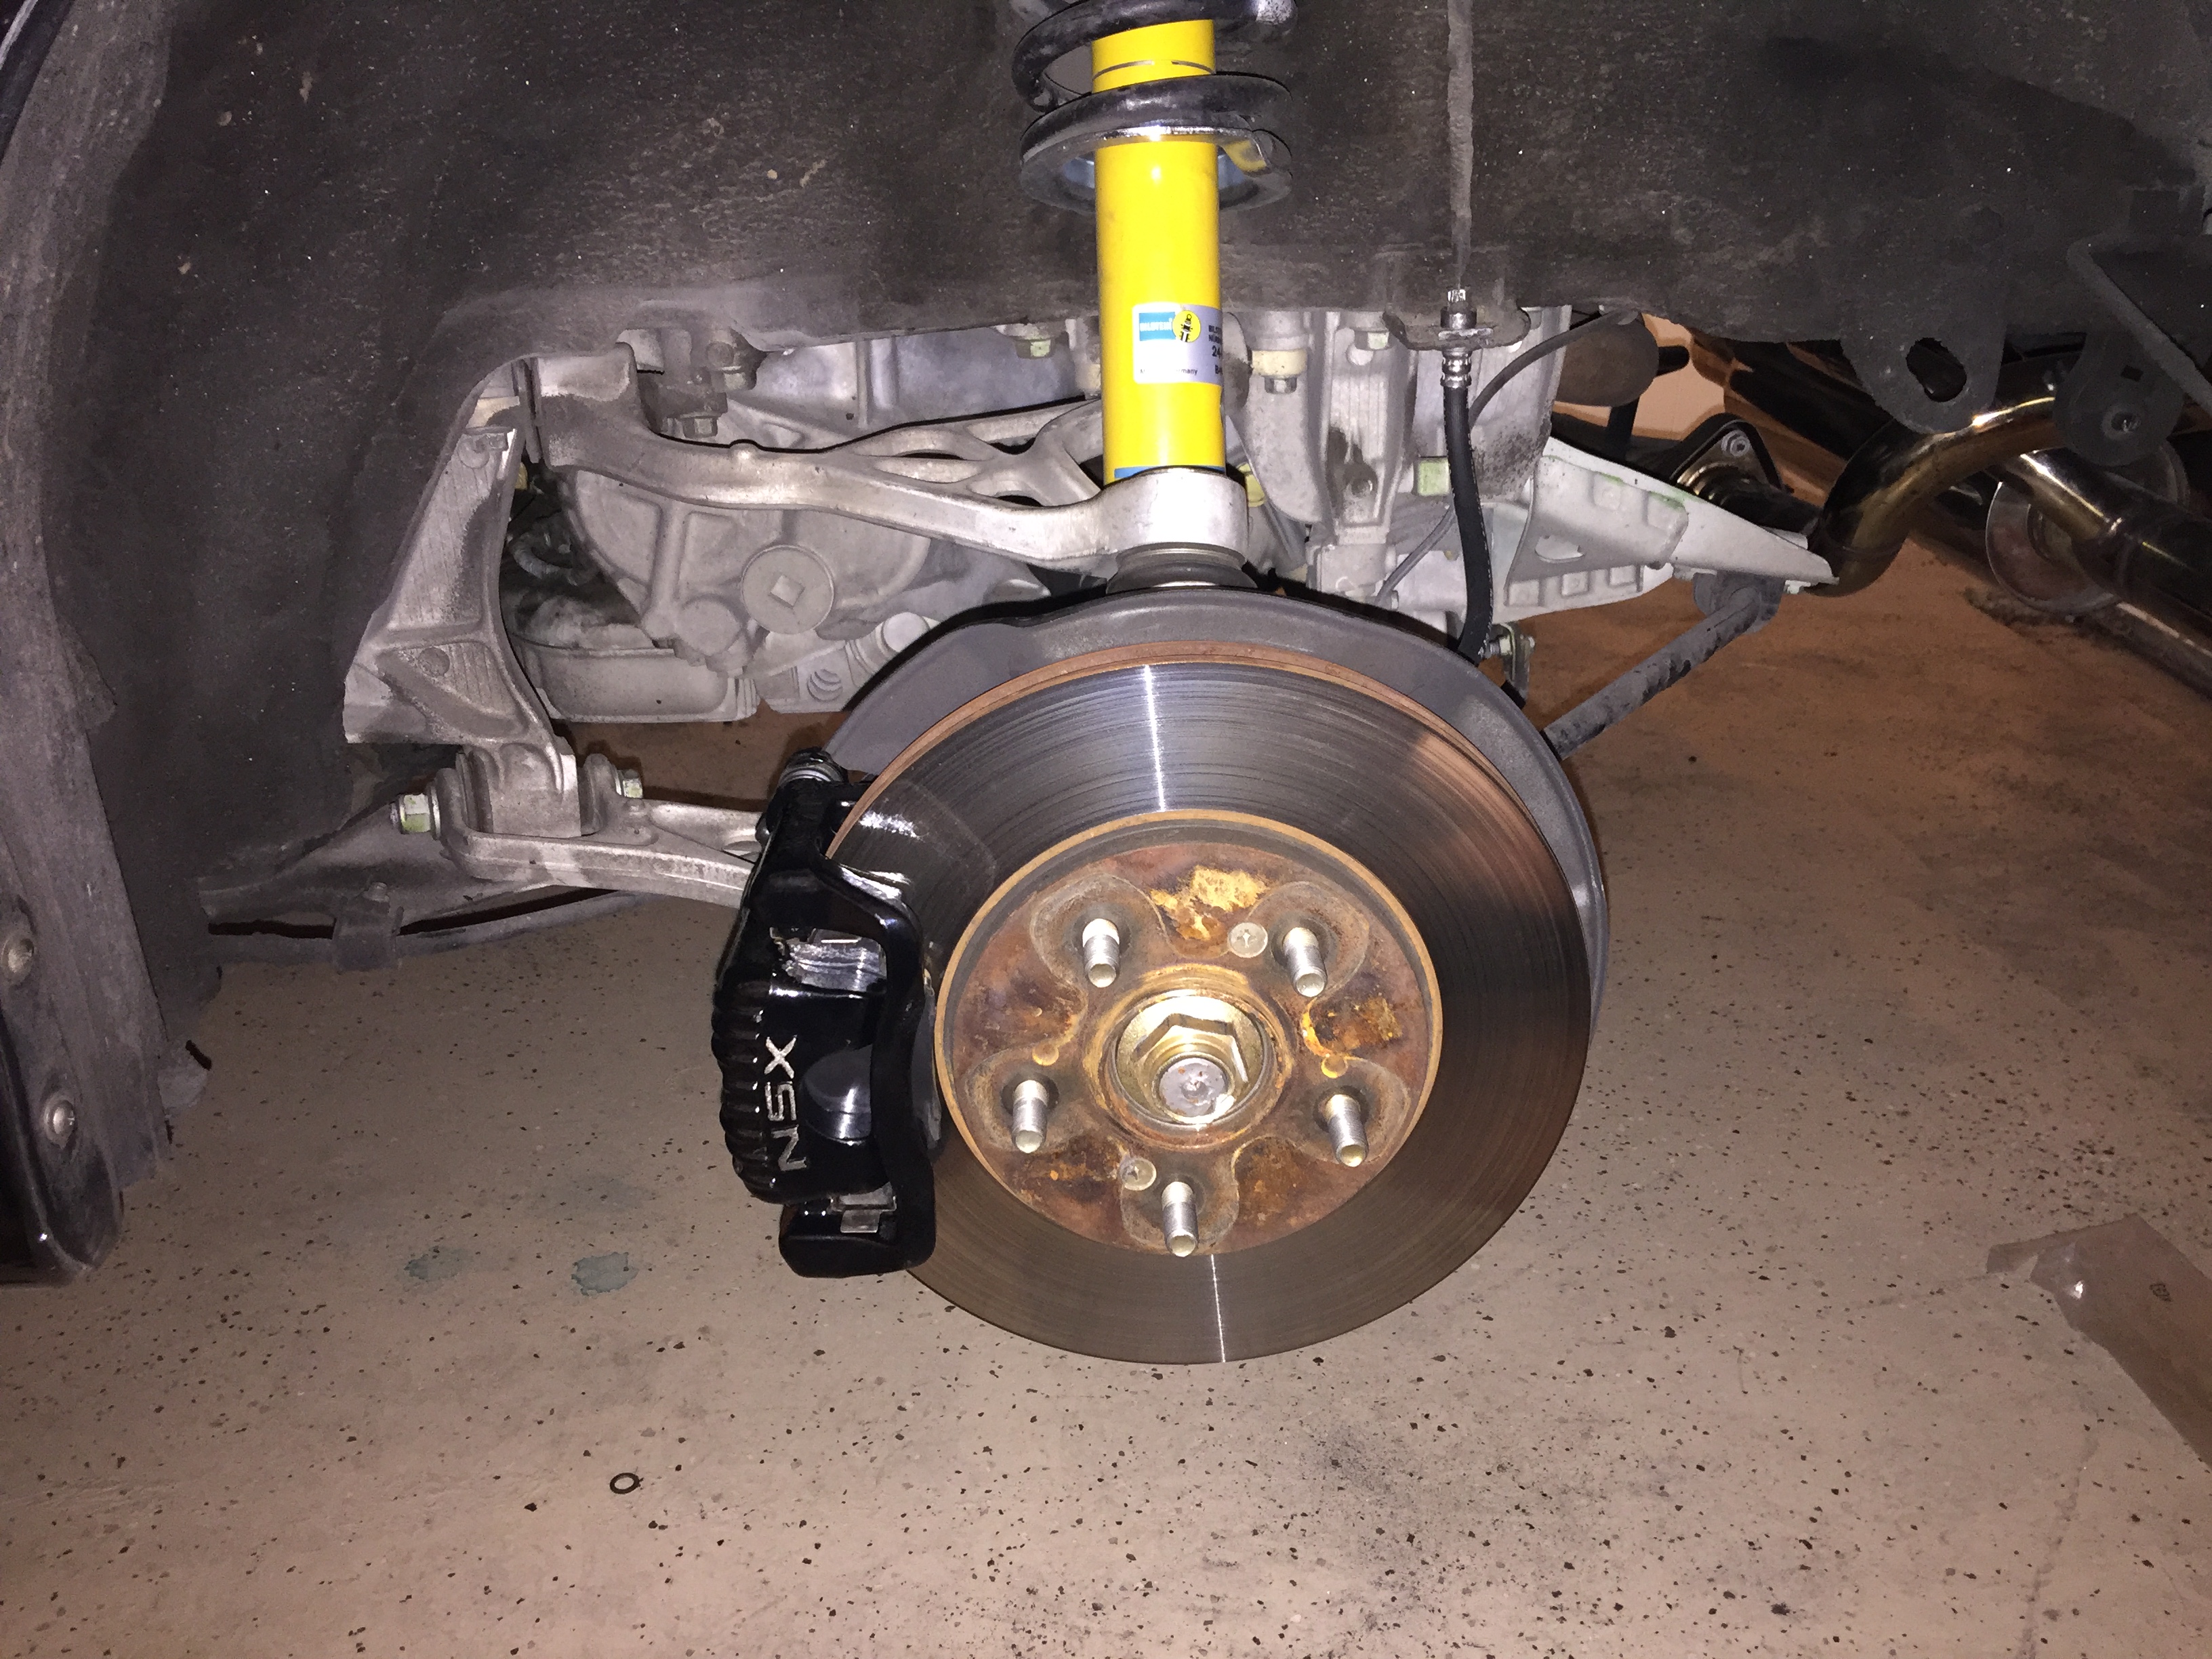
And finally, something interesting. After taking the car to a tire shop about the noisy front end, I was informed that the tires are cupping due to worn shocks. I didn't realize it until then because I hadn't spent enough time in other NSXs to know better, but after having it pointed out to me it made sense. The front end was a bit bouncy and would get squirrelly on uneven roads while cornering. So, I started looking into replacement shocks. I'm trying to keep the car mostly stock in terms of performance and feel so I started looking into stock and similar shocks, but I also wanted the car a bit lower since the wheel gap from the factory is ridiculous, and the Bilsteins offered both of those at a cheaper price point and with a better warranty than stock, so I ordered them up on TireRack.
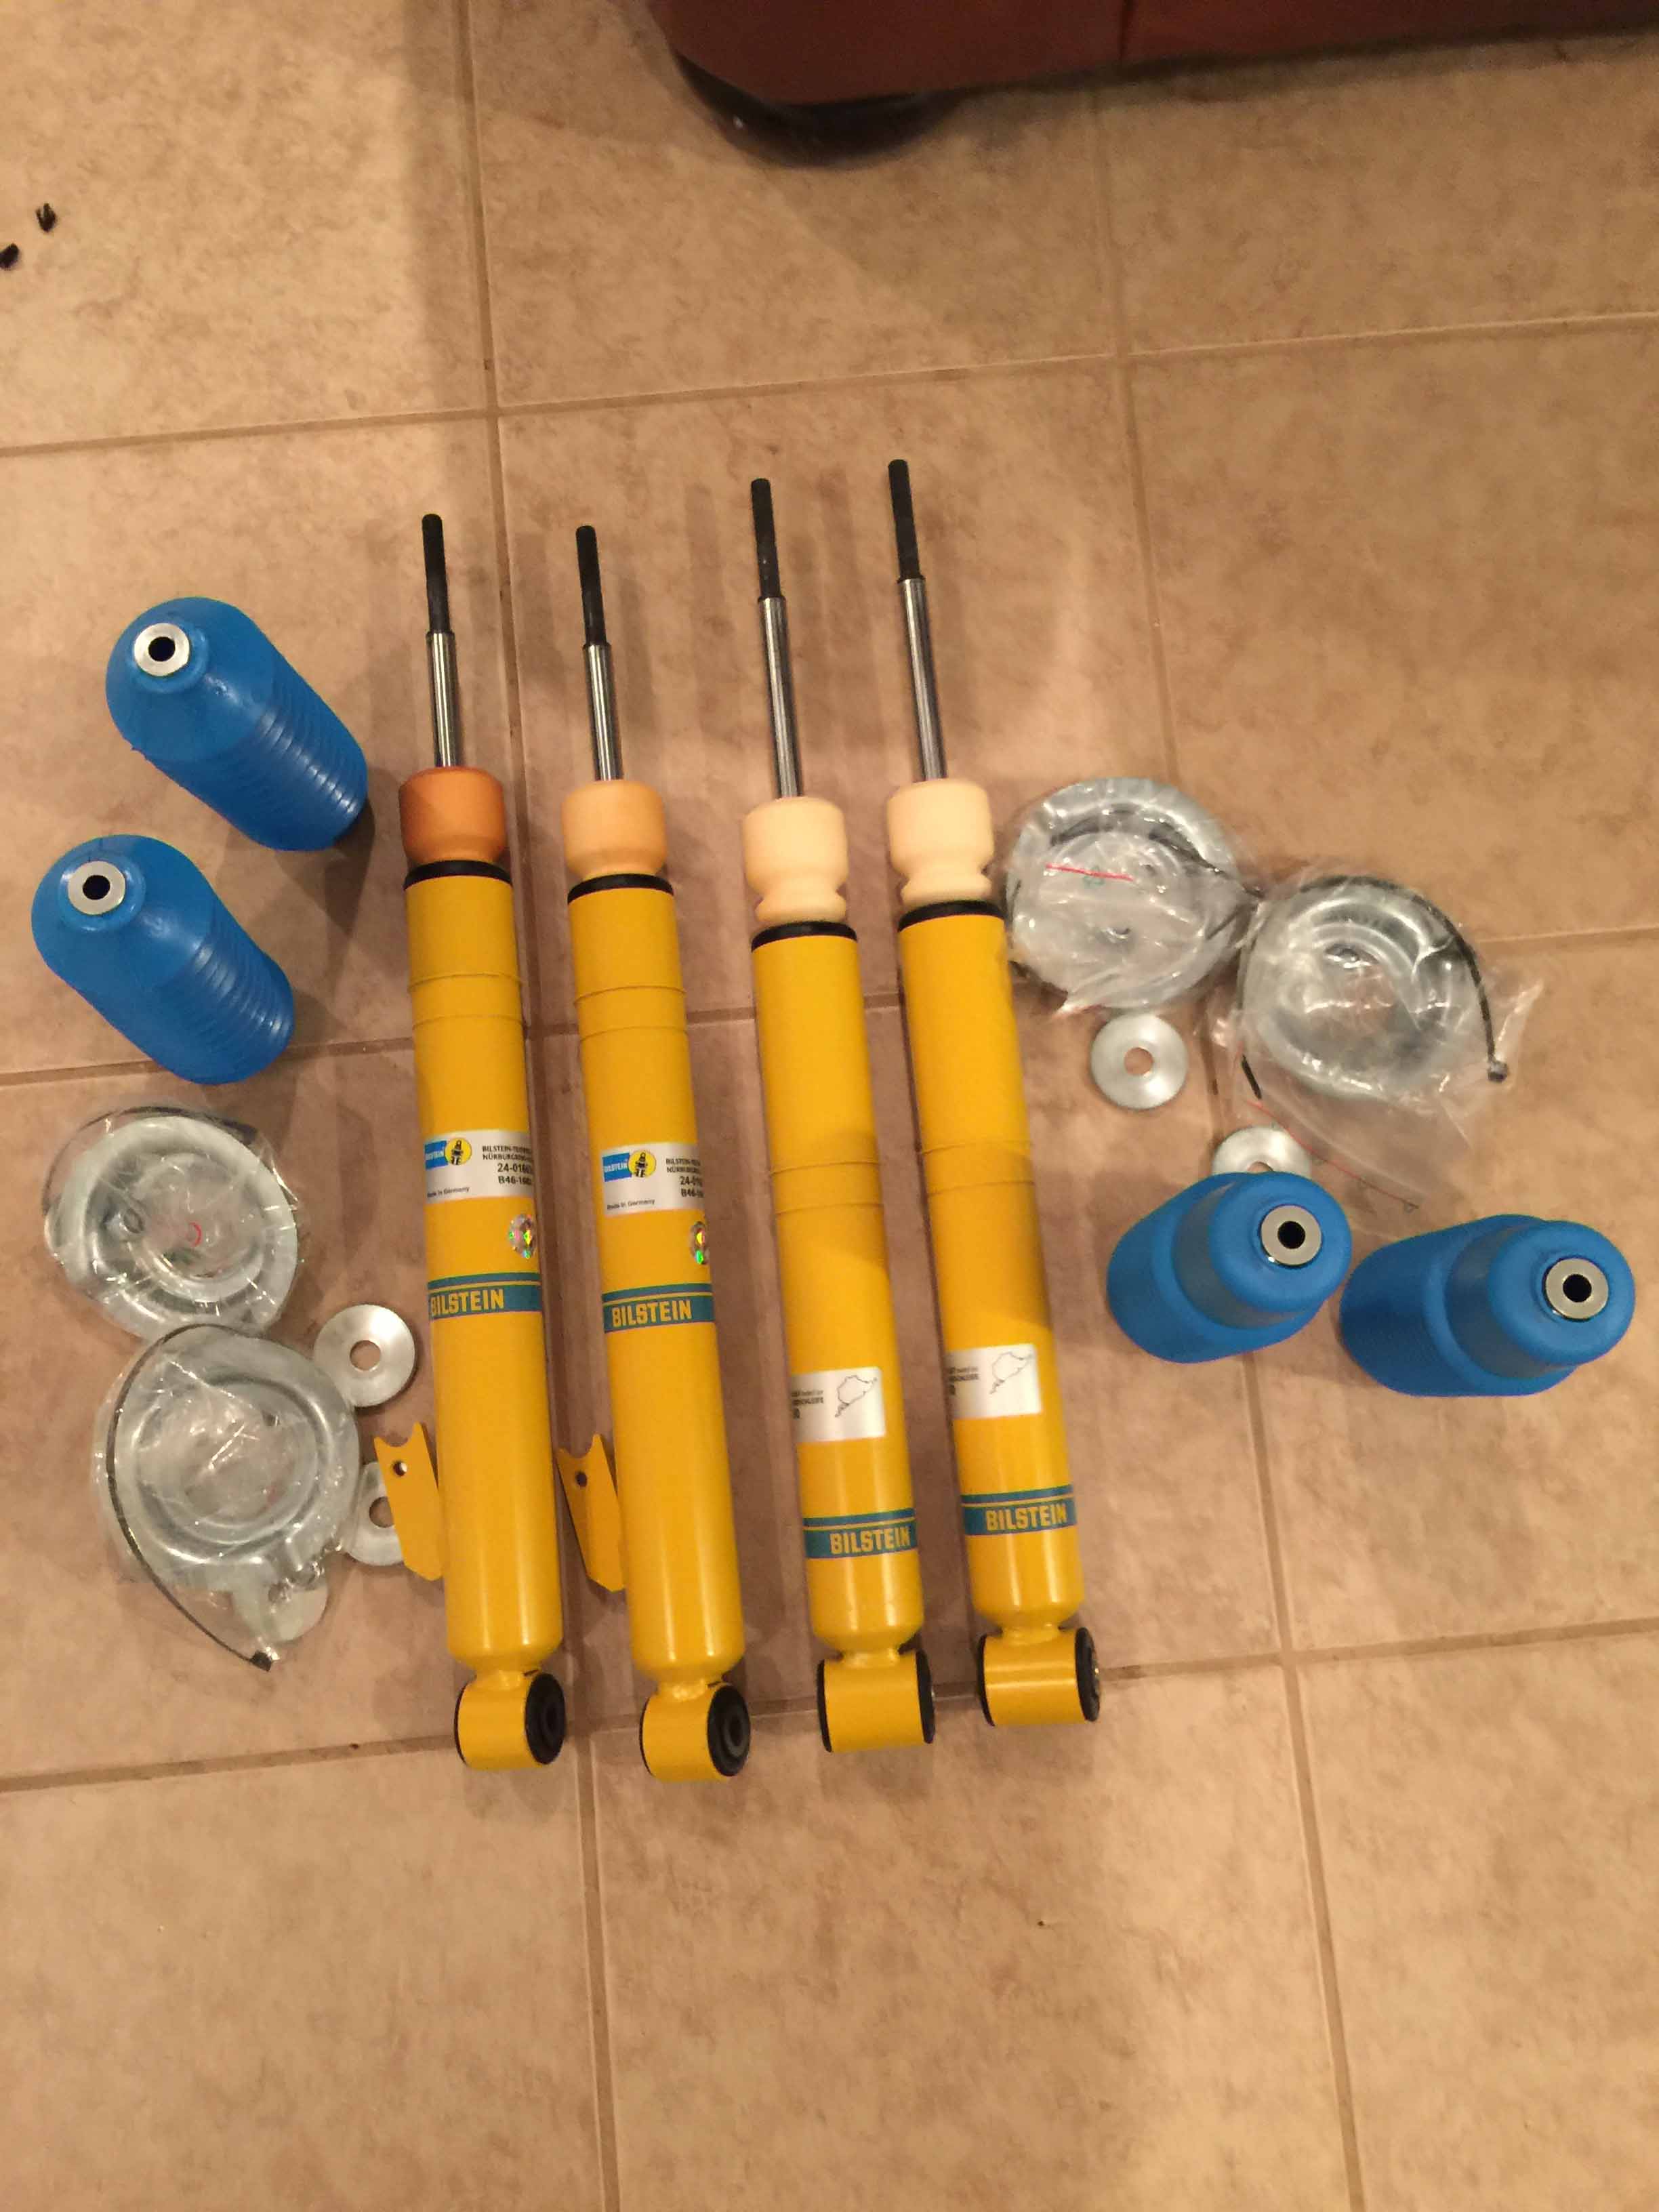
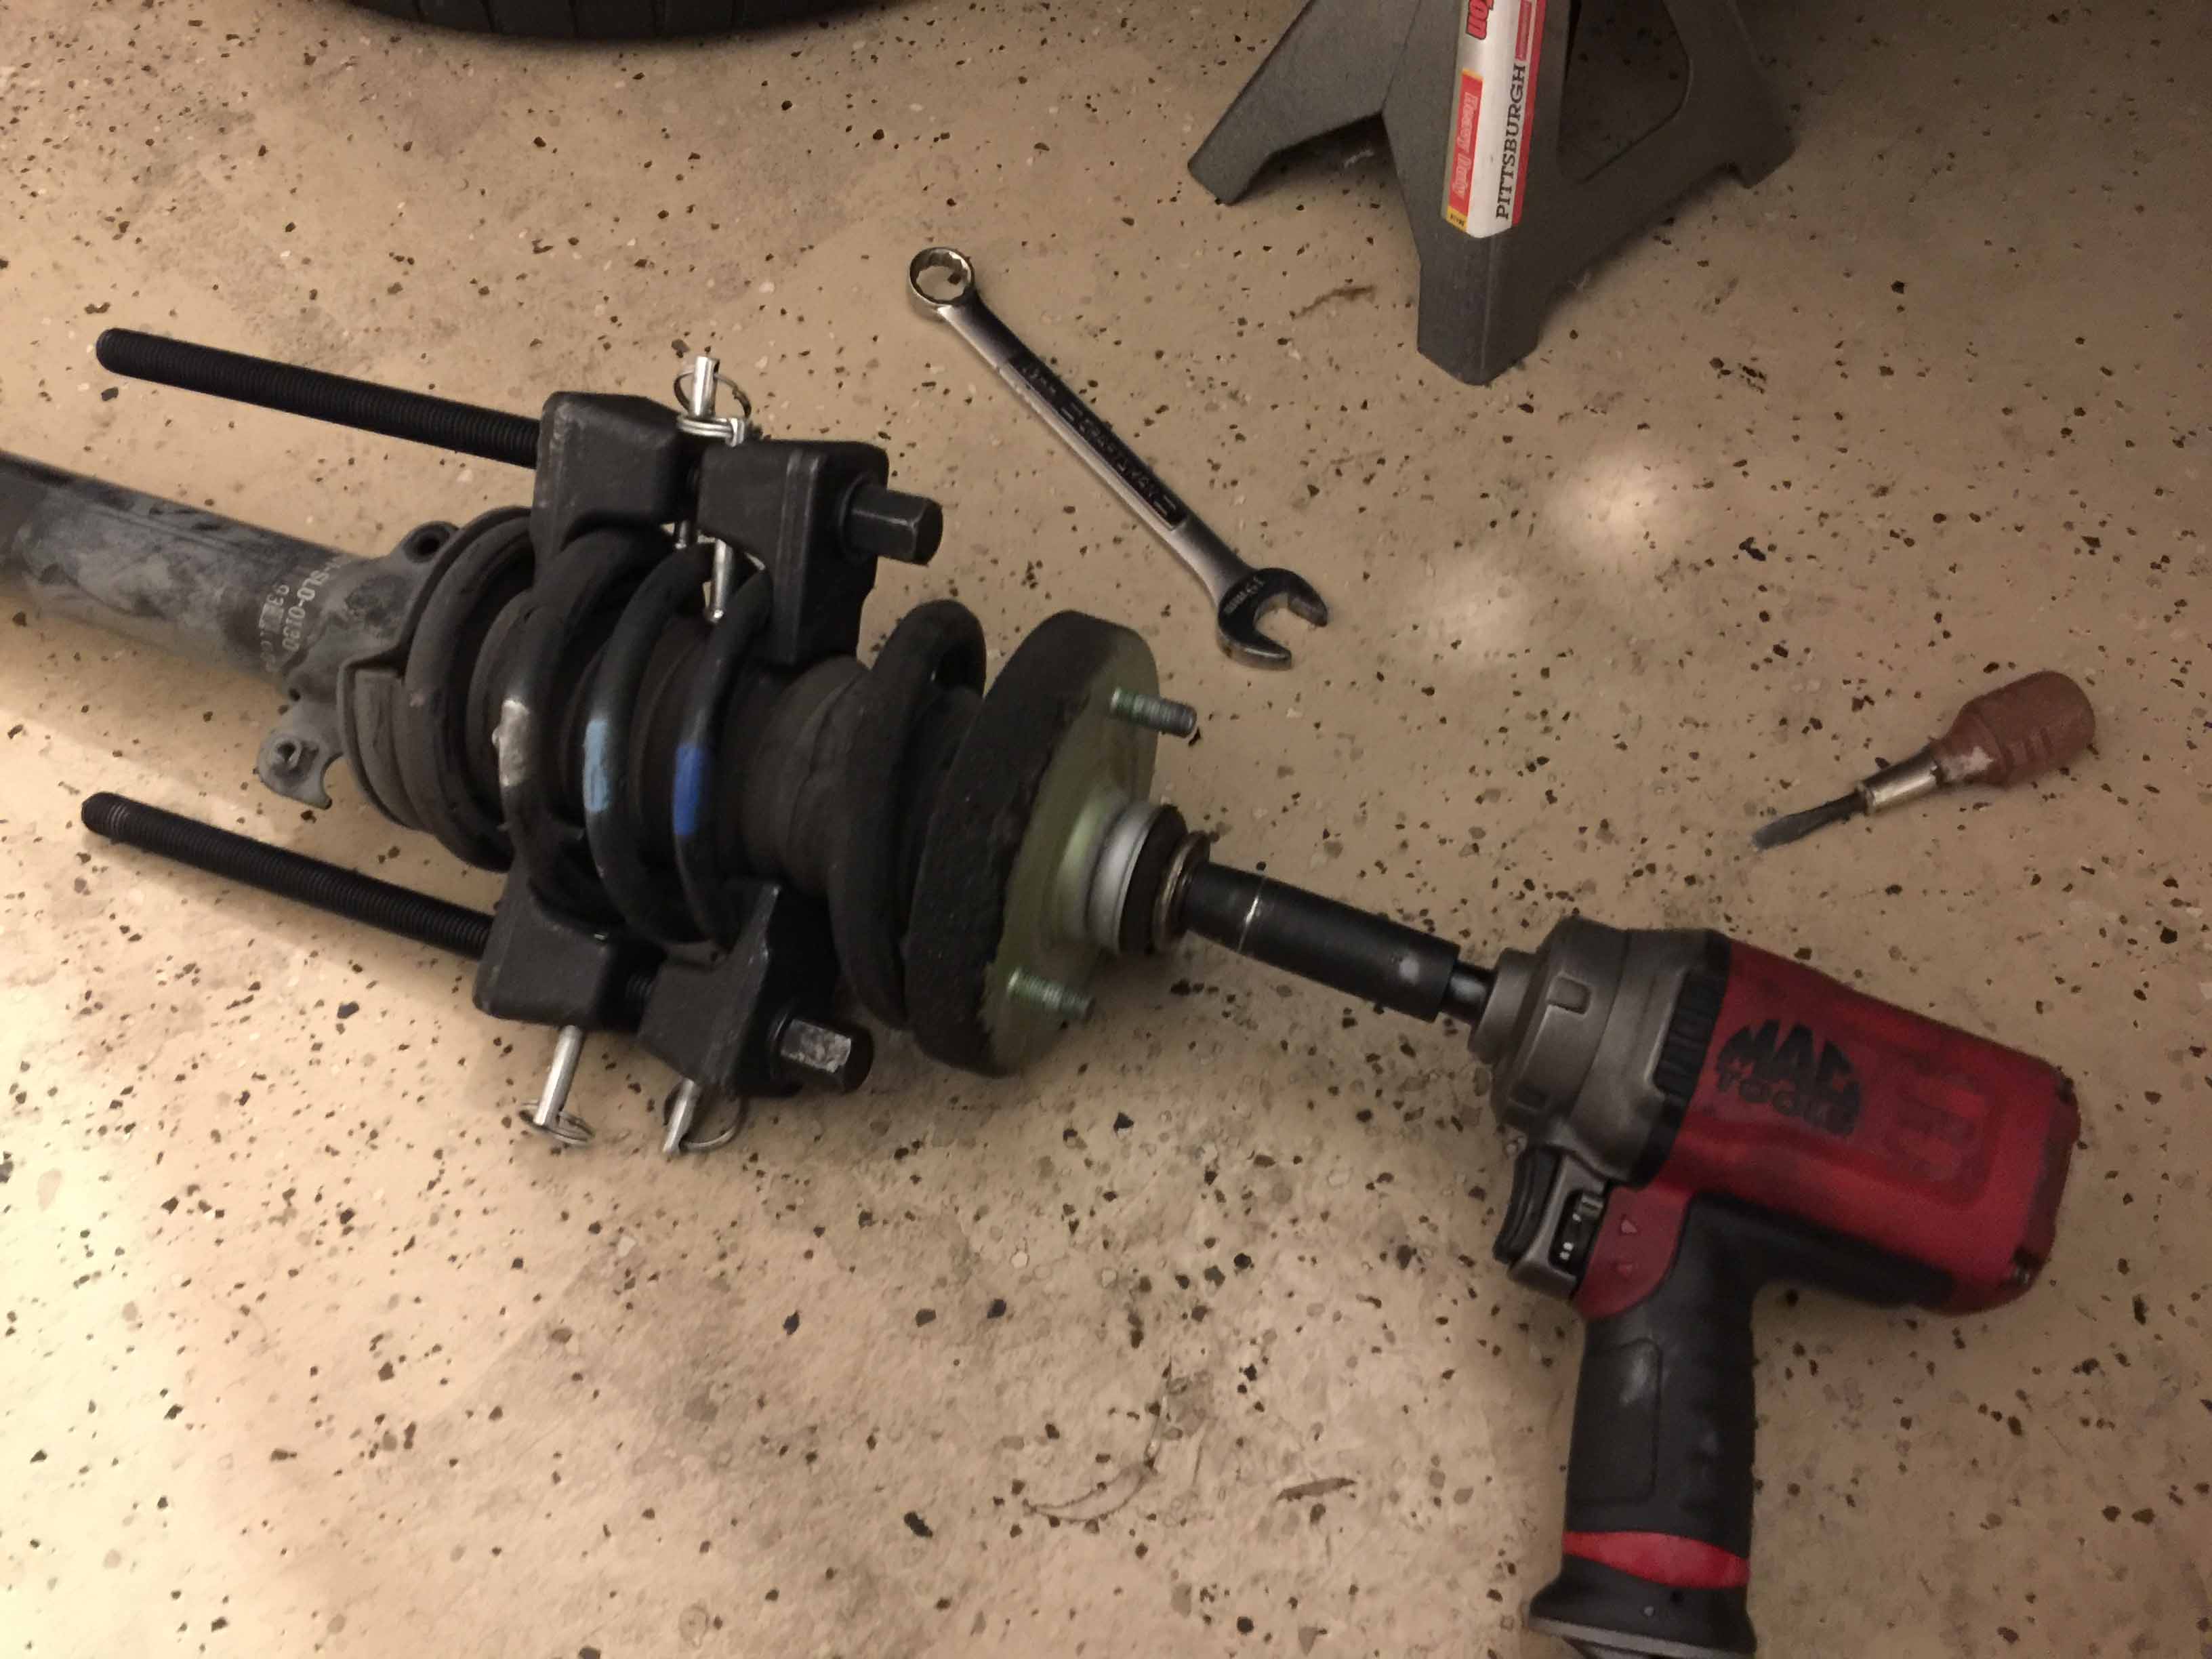
The only rust I've found anywhere on this car was at the very top of the shock absorber assembly where the lock nut holds the top hats on, the allen key stripped out within seconds of attempting to remove the bolt, so rather than try to cut it off I fired up the compressor and zipped it off with my impact gun. Worked extremely well, actually.
I also went ahead and replaced the clips holding the cowl cover on, remember the wrong clips I ordered? They happened to be exactly the right ones for this.
Anyways, some quick glamor shots of the new ride height.

One last thing, warning to anyone using Bilstein shocks, DO NOT USE THE BRAKE LINE MOUNT ON THE FRONT SHOCK TUBE. With the steering wheel locked to each side they put tension on the brake lines which is a huge risk, just zip tie it to the shock body. This photo is with the brake line on the inside of the shock but with it on the outside you still have the same problem. I ended up using zip ties.
As most of you have probably noticed, Photobucket has cut off all 3rd party hosting after allowing it for 14 years and literally billions of images, unless you're willing to pay $400/year, which is absolutely insane. So, I bit the bullet and did something I've been meaning to do for a while now and bought my own personal domain along with 100GB of storage and unlimited bandwidth. In my industry (software) having it for git repositores, resumes, etc. is a good thing anyways so as long as I keep paying for my domain the images will stay up. I think it might be worthwhile to look into upgrading the image storage options of NSXPrime itself though, this is a fairly small community and the NSX is one of the only exotics that regular people can hope to own and maintain without constant trips to the dealer so losing out on 15 years worth of photos in writeups and build threads would be a damn shame. Storage is very cheap now and it wouldn't take many of us paying a marginal fee to allow everyone to upload as many images as they wanted, especially if images were resized to 1mb or so each. I'd be willing to pay $10-$20 a year or so for it, and I'd also be willing to write some scripts to automate the process of retrieving the images from other hosting sites, copying them to NSXPrime storage, and then modifying the links in threads.
Anyways, about the car. I can barely stay awake right now so if I ramble, I apologize in advance. This post is mostly tiny OCD fixes that most people wouldn't care about or notice, but it makes me happy.
The edges of the rubber parts around the windows were tearing from old age, since I don't want to spend hundreds of dollars to replace them just yet (though I probably will eventually) I instead just cut the frayed parts off. The unintended and unforeseen result of this is a bit of wind noise though, so I'm not sure if it was worth it. What I should have done was just cut the minimum off to get rid of the tears rather than trying to make it look as clean as possible, but it looks better now and I drive with the windows down 90% of the time so I can deal with it for now.
I also finally got around to replacing this trim piece on top of the windshield. Cleaning out the groove it sits in was a royal pain in the butt since they use that awful dark grey adhesive that just doesn't come off unless you use powerful solvents that ruin the paint. After scraping it all out and installing the new trim pieces it turned out pretty well though.
After doing some research on the fender liner clips I came across some threads talking about the Auveco parts that nearly perfectly match the OEM clips for a fraction of the price, and since most of my clips were falling apart from old age I bought two boxes of 25 (after ordering the wrong ones first...) and replaced all of them in one go.
The little triangle piece where the door handle meats the door panel was lifting up on both doors, so I put a tiny dab of superglue underneath it and stuck it back down, working perfectly so far. (excuse the extremely dirty car)
I went to lunch with a very tall coworker and he put the seat back all the way and kept the switch held down until the motor stopped working. :-( To troubleshoot it, I checked the fuse which was good, checked for power at the seat connector which was good, checked for power at the recline switch was good, checked the recline switch to make sure it still worked, so after all that it had to be either the wires running to the motor or the recline motor itself. This sucks because the recline motor is inside the bolster and you have to remove almost everything to get to it. All those hours spent in electonics lab in college debugging circuit boards are finally paying off I guess.
After testing the motor plug for power which was good, I removed the motor can and inspected the innards. Turns out that one of the brushes had gotten so hot that it stuck to the track it sits in, which caused it to lose contact with the commutator. Fortunately the plastic wasn't melted except for the tiny spot, so after tapping the brush free I greased the tracks with dielectric grease and reassembled the motor and all was good. I just have to make sure he doesn't sit in my car anymore.
And finally, something interesting. After taking the car to a tire shop about the noisy front end, I was informed that the tires are cupping due to worn shocks. I didn't realize it until then because I hadn't spent enough time in other NSXs to know better, but after having it pointed out to me it made sense. The front end was a bit bouncy and would get squirrelly on uneven roads while cornering. So, I started looking into replacement shocks. I'm trying to keep the car mostly stock in terms of performance and feel so I started looking into stock and similar shocks, but I also wanted the car a bit lower since the wheel gap from the factory is ridiculous, and the Bilsteins offered both of those at a cheaper price point and with a better warranty than stock, so I ordered them up on TireRack.
The only rust I've found anywhere on this car was at the very top of the shock absorber assembly where the lock nut holds the top hats on, the allen key stripped out within seconds of attempting to remove the bolt, so rather than try to cut it off I fired up the compressor and zipped it off with my impact gun. Worked extremely well, actually.
I also went ahead and replaced the clips holding the cowl cover on, remember the wrong clips I ordered? They happened to be exactly the right ones for this.
Anyways, some quick glamor shots of the new ride height.
One last thing, warning to anyone using Bilstein shocks, DO NOT USE THE BRAKE LINE MOUNT ON THE FRONT SHOCK TUBE. With the steering wheel locked to each side they put tension on the brake lines which is a huge risk, just zip tie it to the shock body. This photo is with the brake line on the inside of the shock but with it on the outside you still have the same problem. I ended up using zip ties.
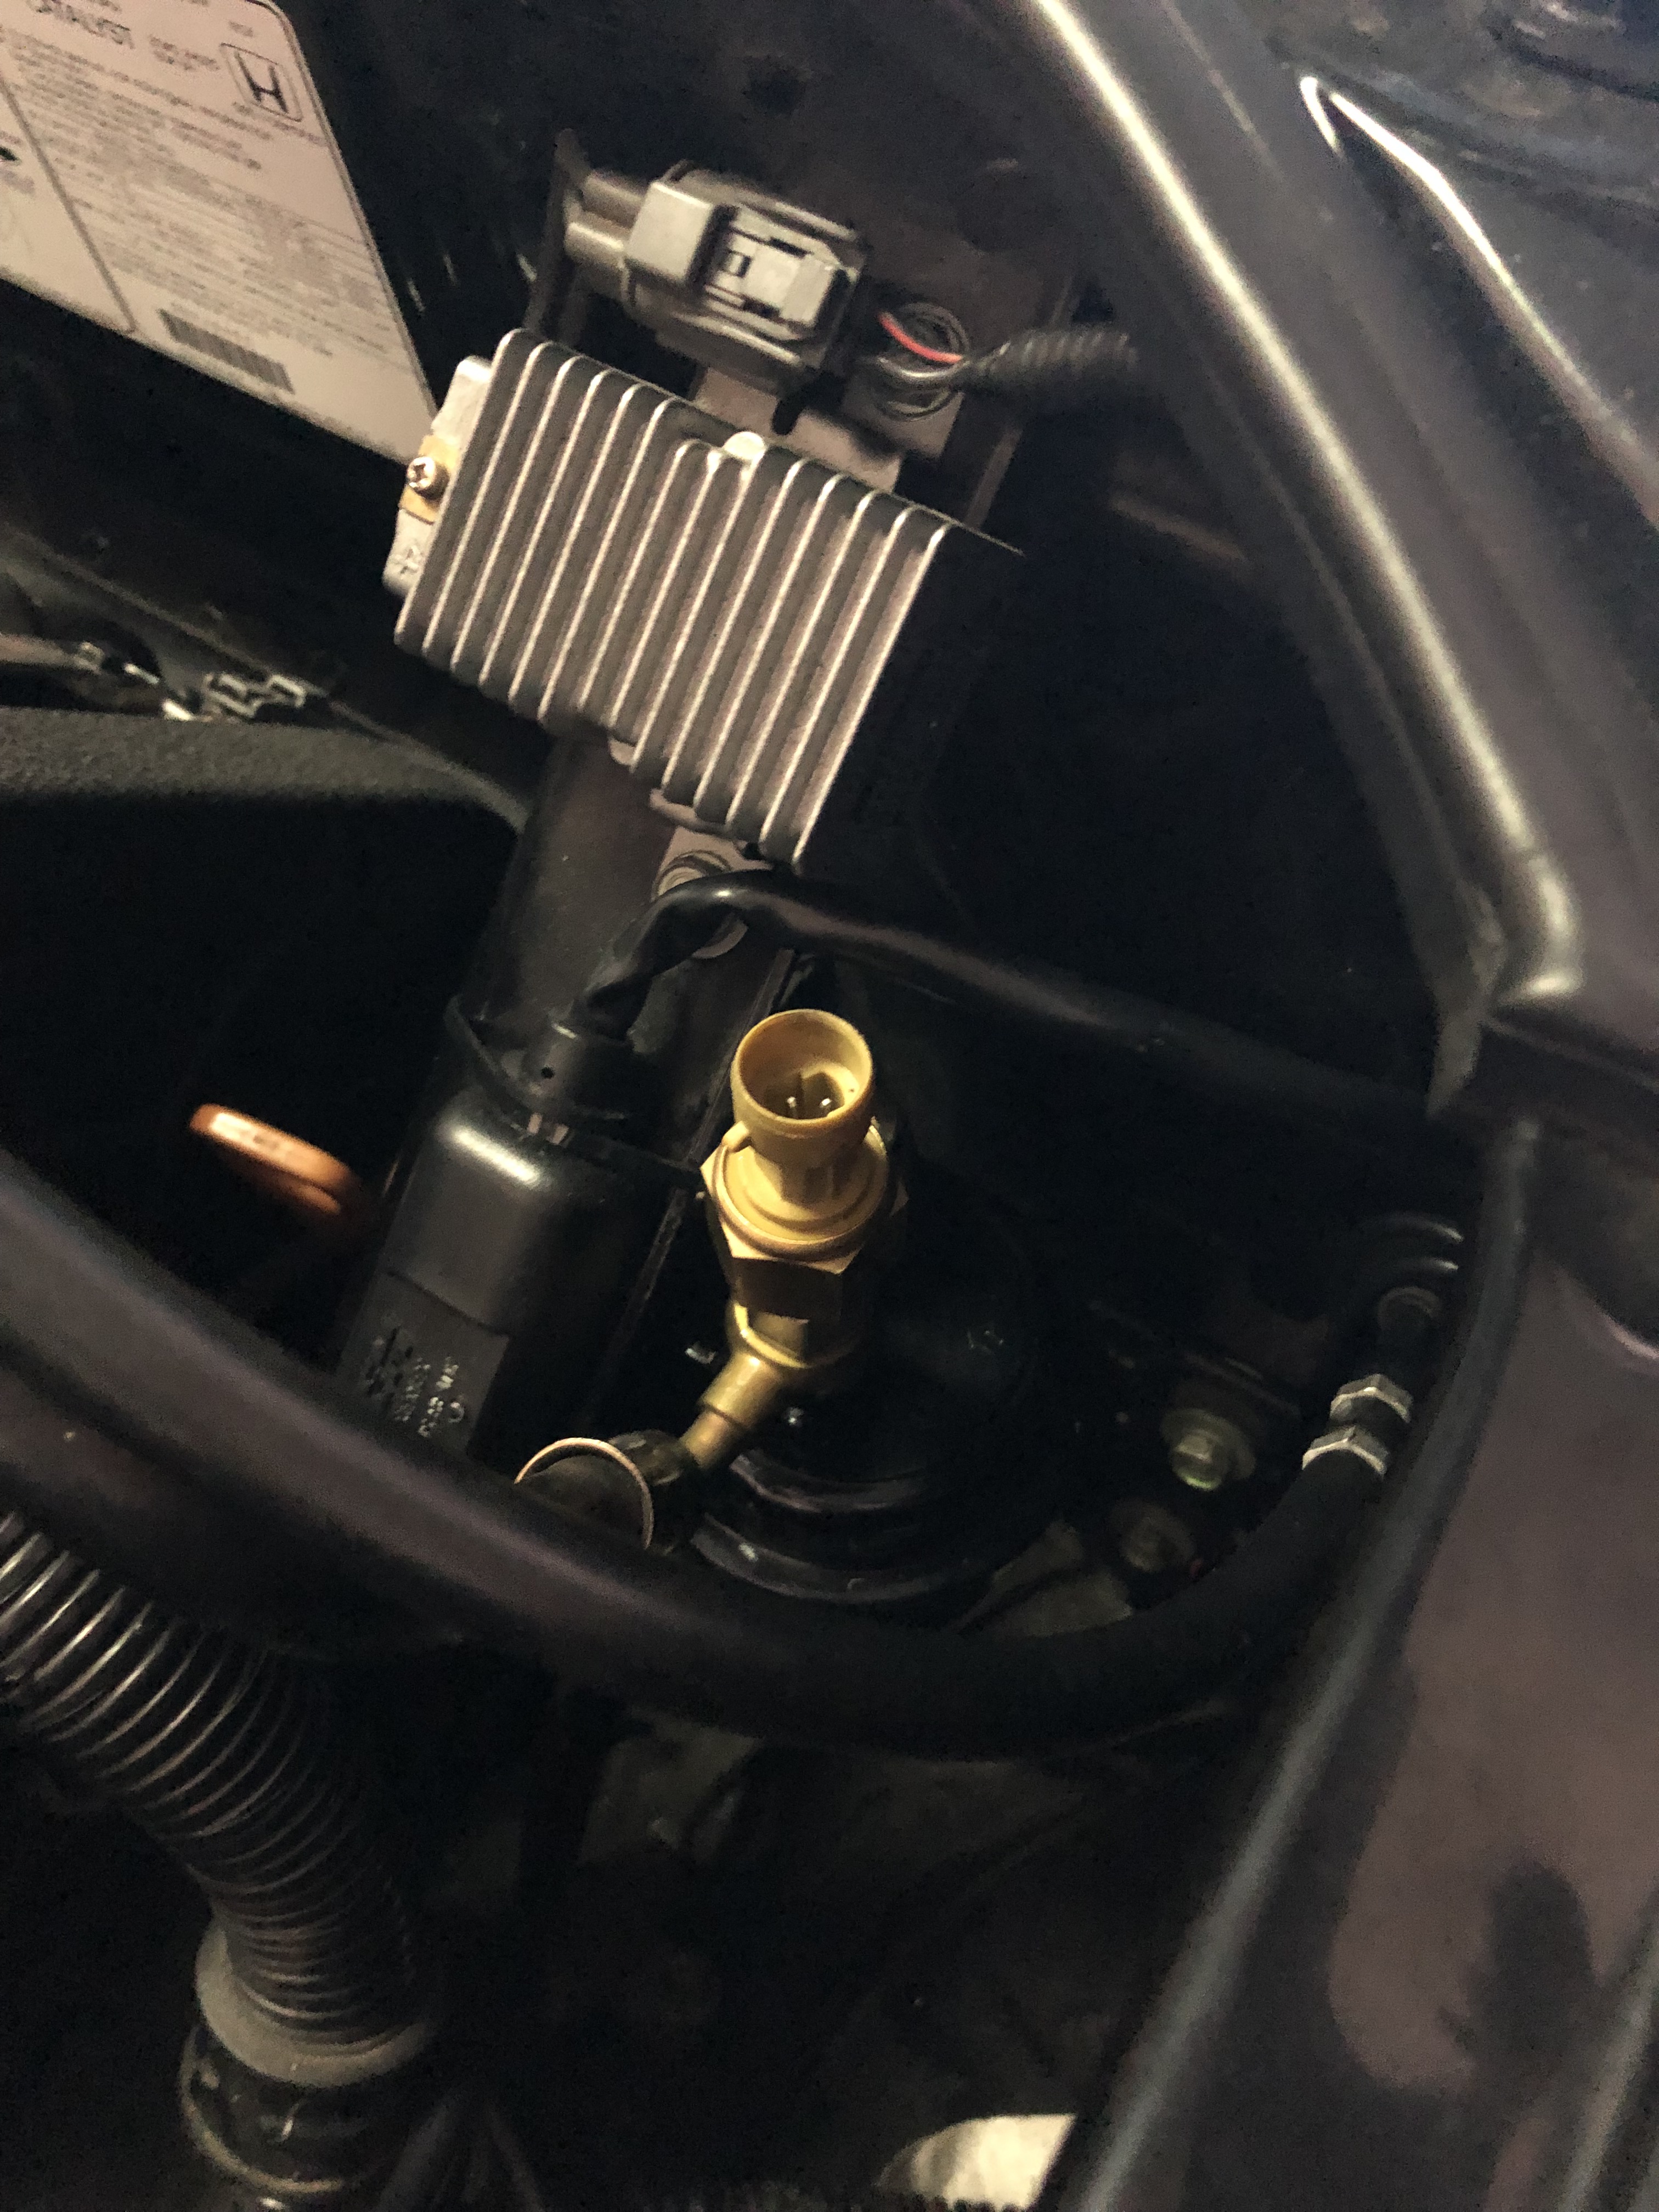
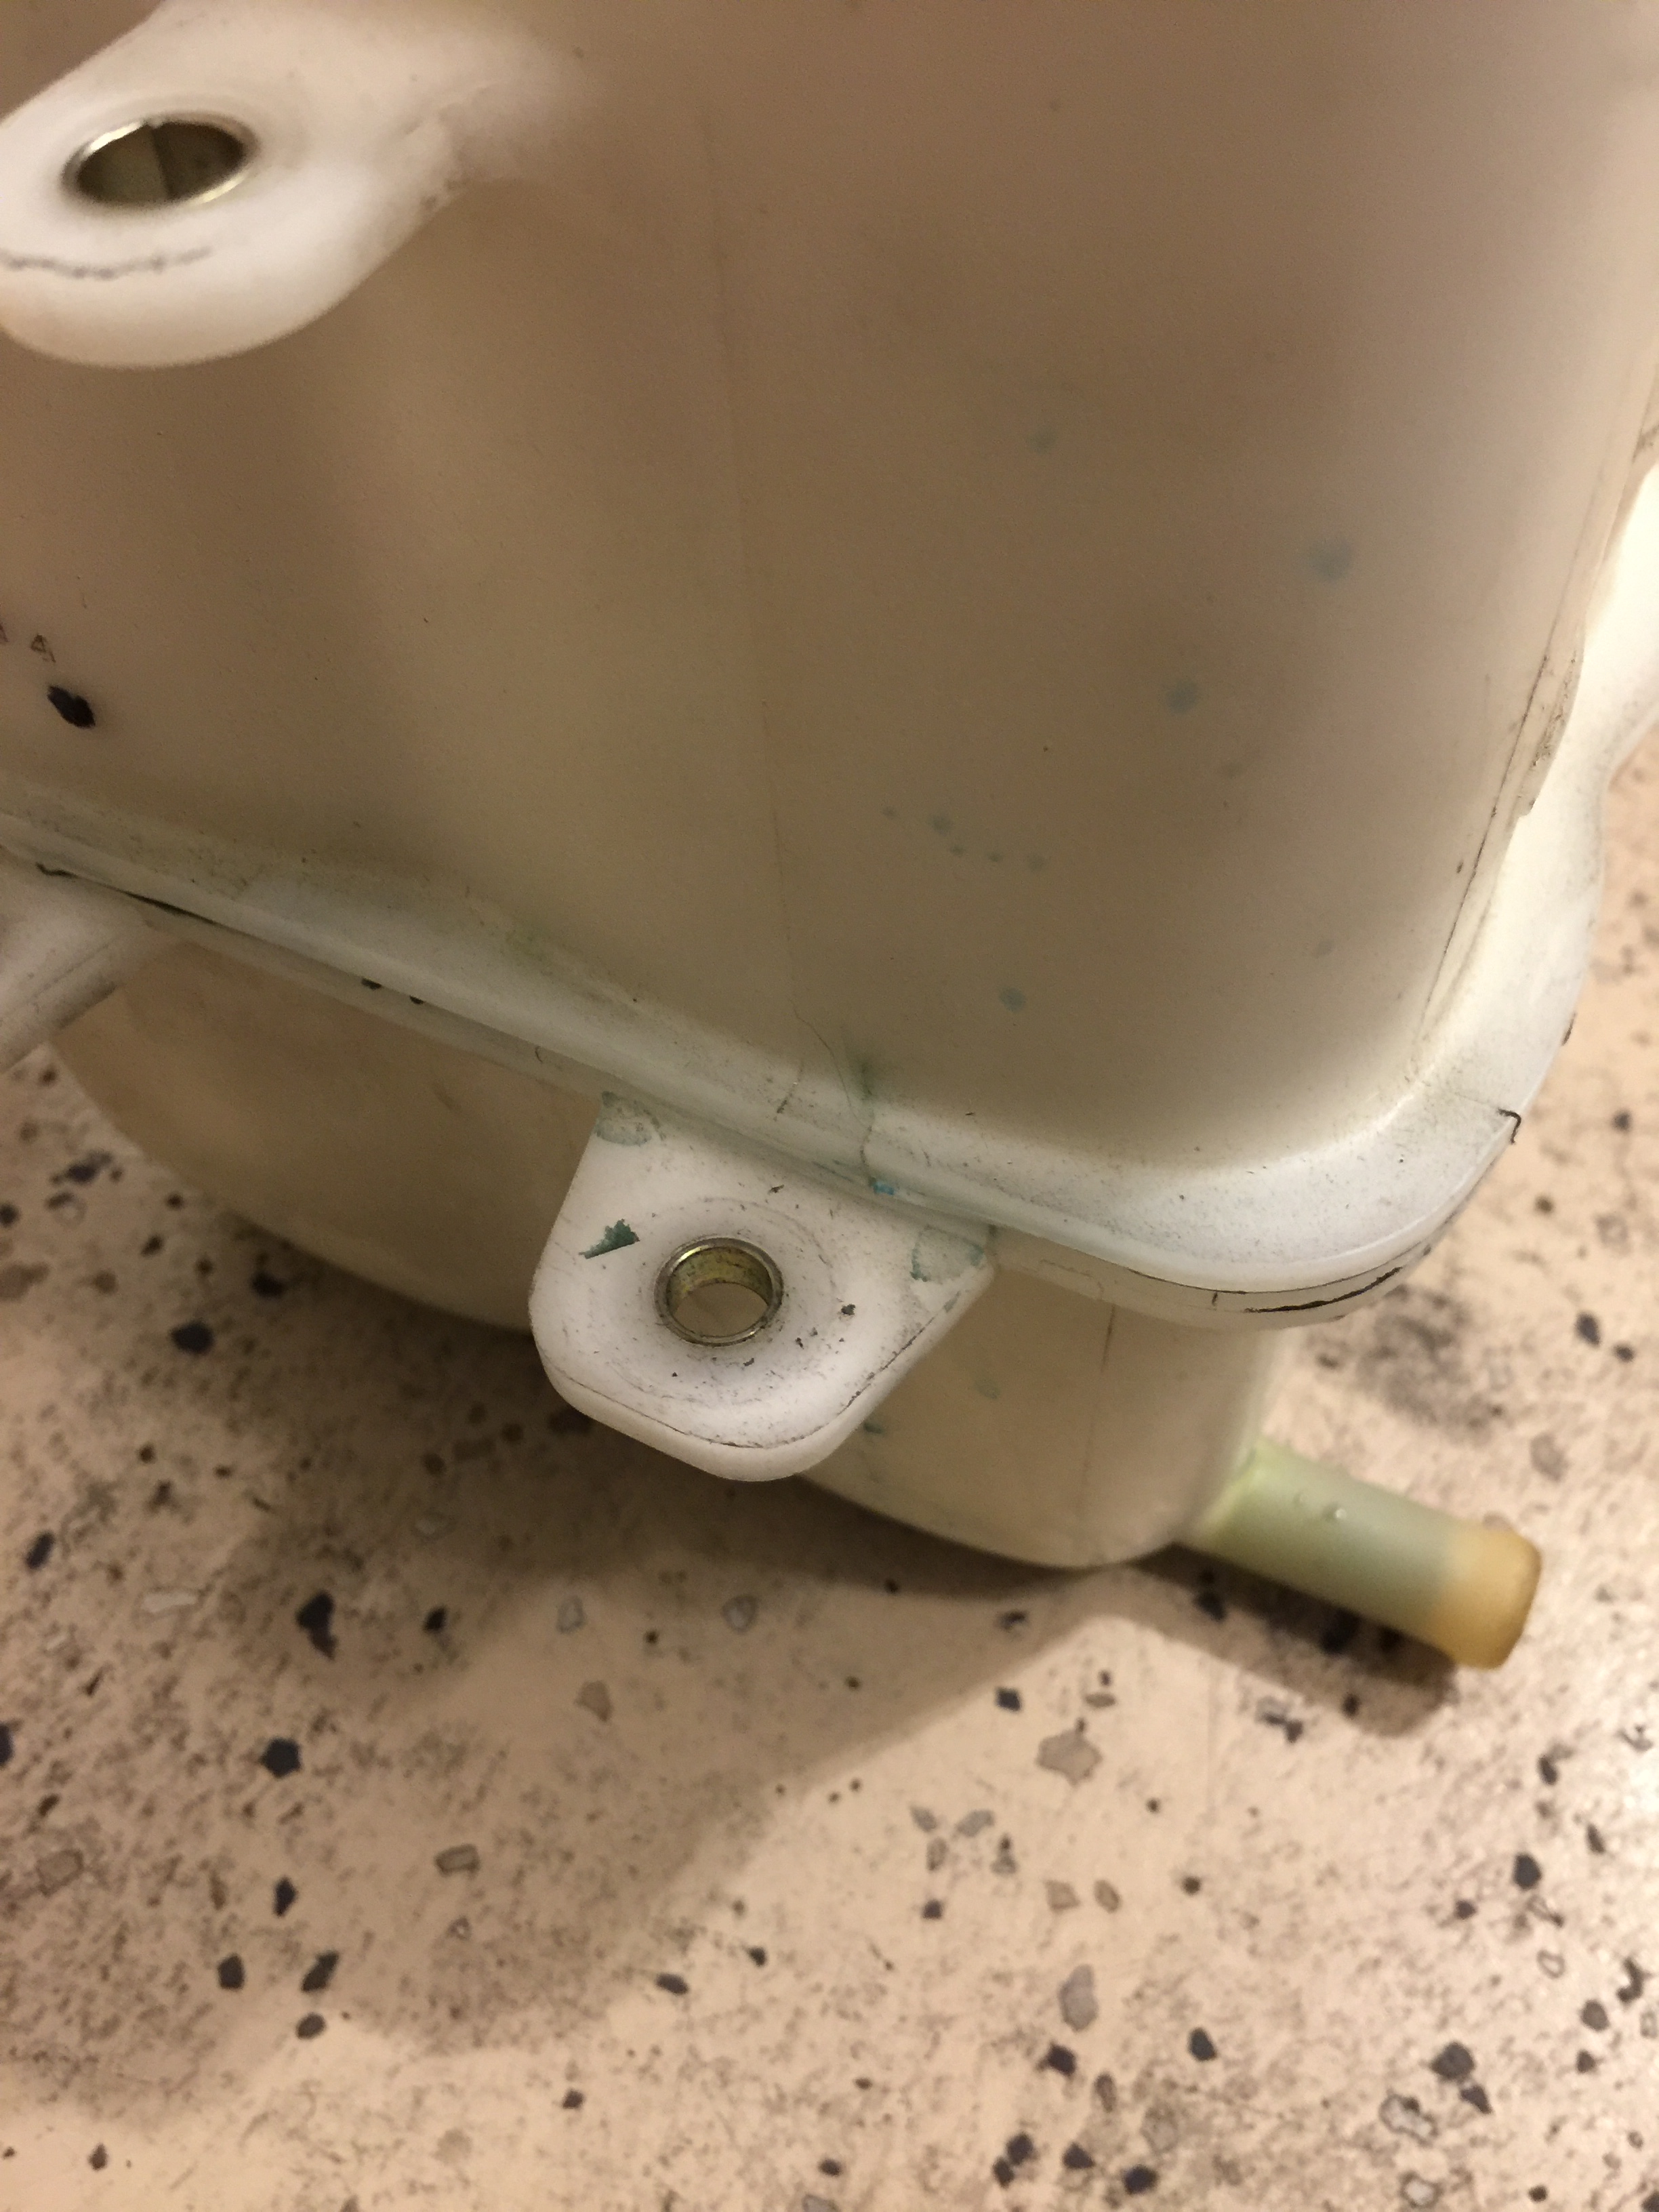
After pulling the car out of the garage today I had a scare when I saw blue coolant on the garage floor. After investigating a bit, I was relieved to find that my coolant expansion tank has cracked and that it wasn't something more serious, so I guess it's time to order a new one.

Also I spent 30 minutes or so going back through my old posts in this thread and updating the photo links, so everything is 100% working again.
Also I spent 30 minutes or so going back through my old posts in this thread and updating the photo links, so everything is 100% working again.
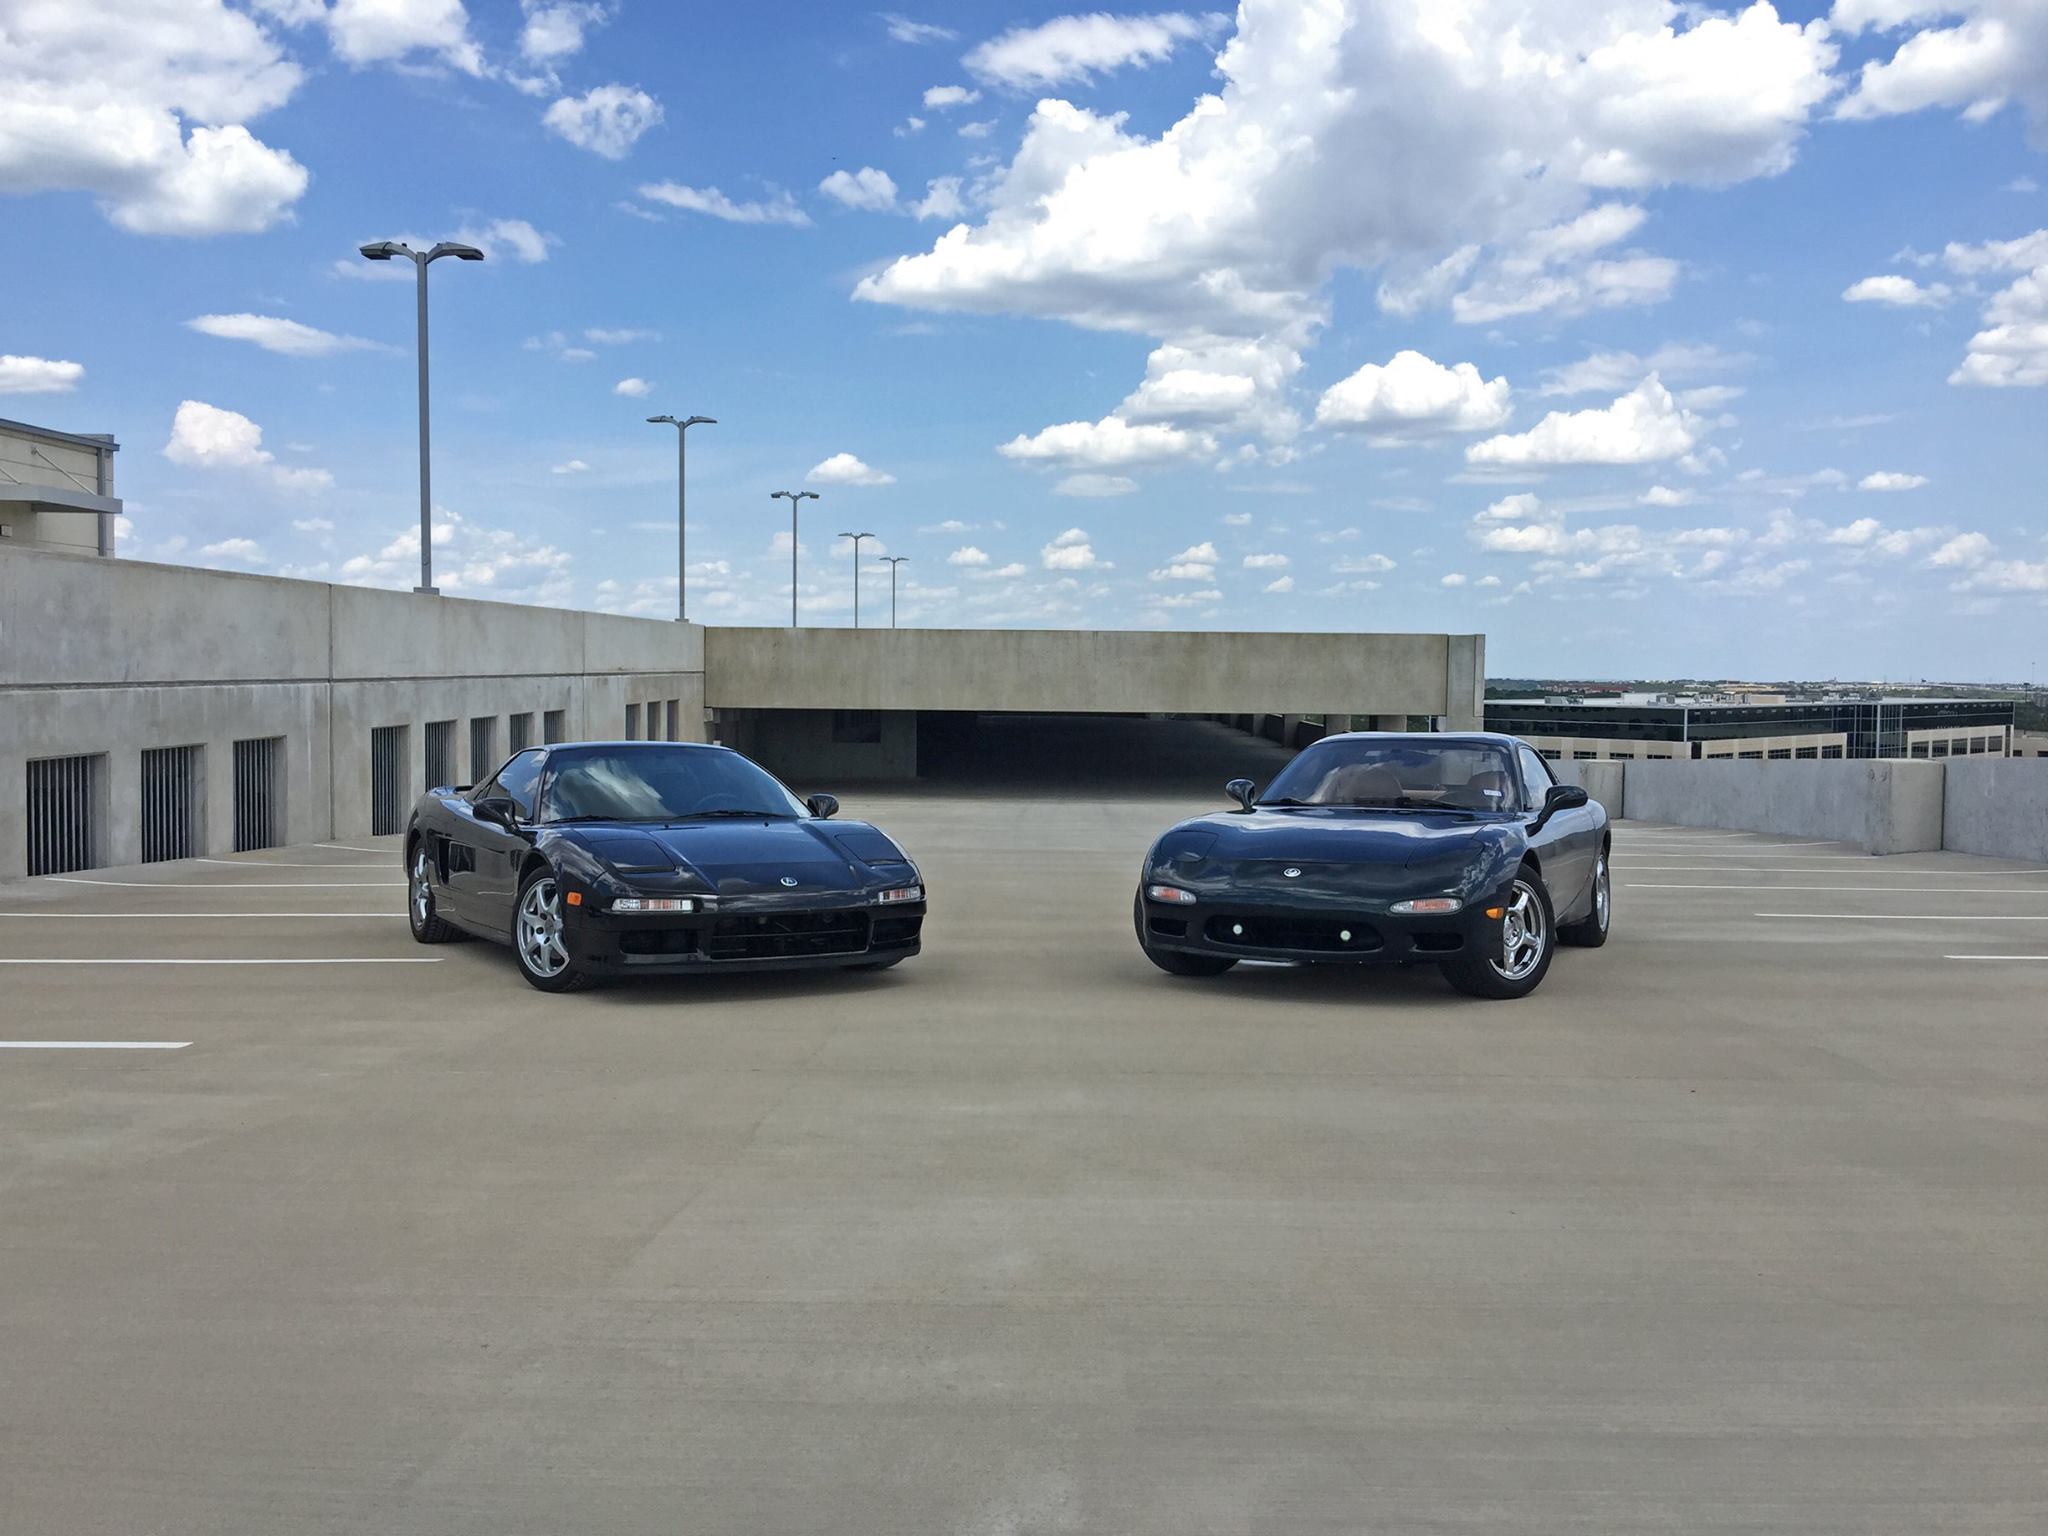
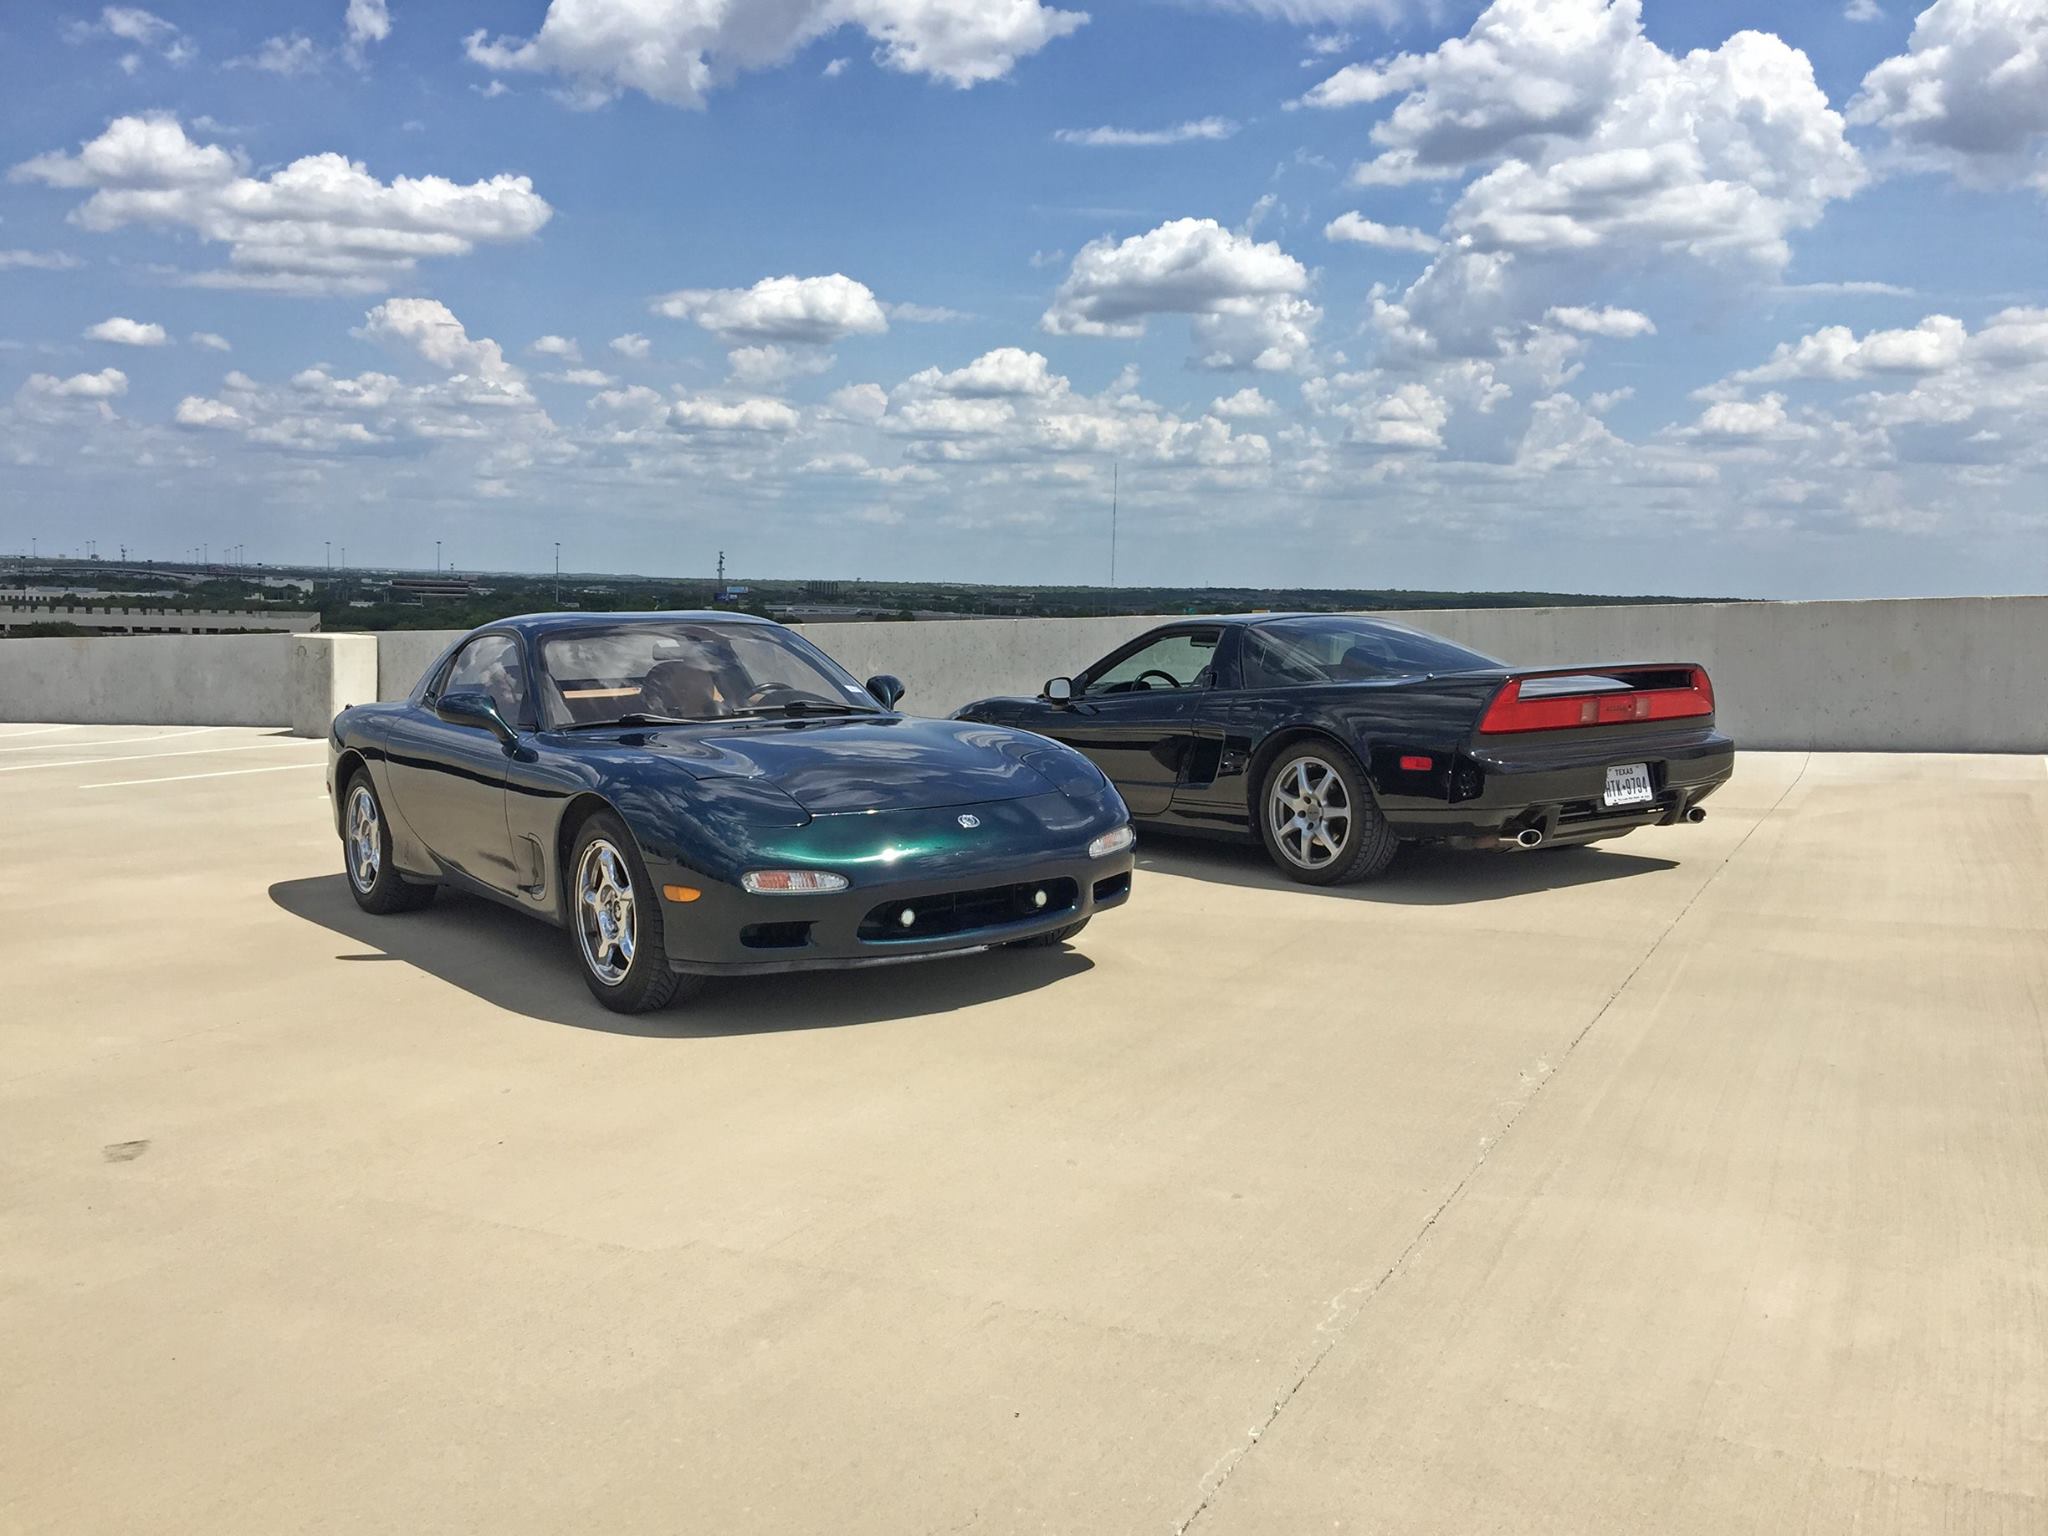
Had the chance to take some pictures with a friends 1993 RX7 last weekend, such a pretty car.
Also, I've recently noticed the brake pedal feeling pretty badly lately (when holding the brake pedal for long periods of time it will slowly go to the floor sometimes, otherwise it's plenty firm) and I think it might be due to the brake system not being flushed and bled properly at the dealership I bought the car from. It wouldn't surprise me, they haven't seemed very competent with anything else they did with this car. So, since the car is nearing 25, I decided to go ahead and refresh the whole brake system and replace the hoses with new OEM hoses, disassemble calipers and have them powder coated gloss black, and then rebuild them with new OEM seal kits. I had seen a few posts about having to buy the rear caliper seals separately since the kits are discontinued but I just ordered two rebuild kits on Amayama where they are still available. I'm planning on doing a full write up and/or video of the whole rebuild process if anyone is interested, there isn't really a single tutorial that has everything in good quality that I've found, and since these calipers are built almost identically to every other Honda caliper it should be helpful to everyone with a Civic or Integra too.
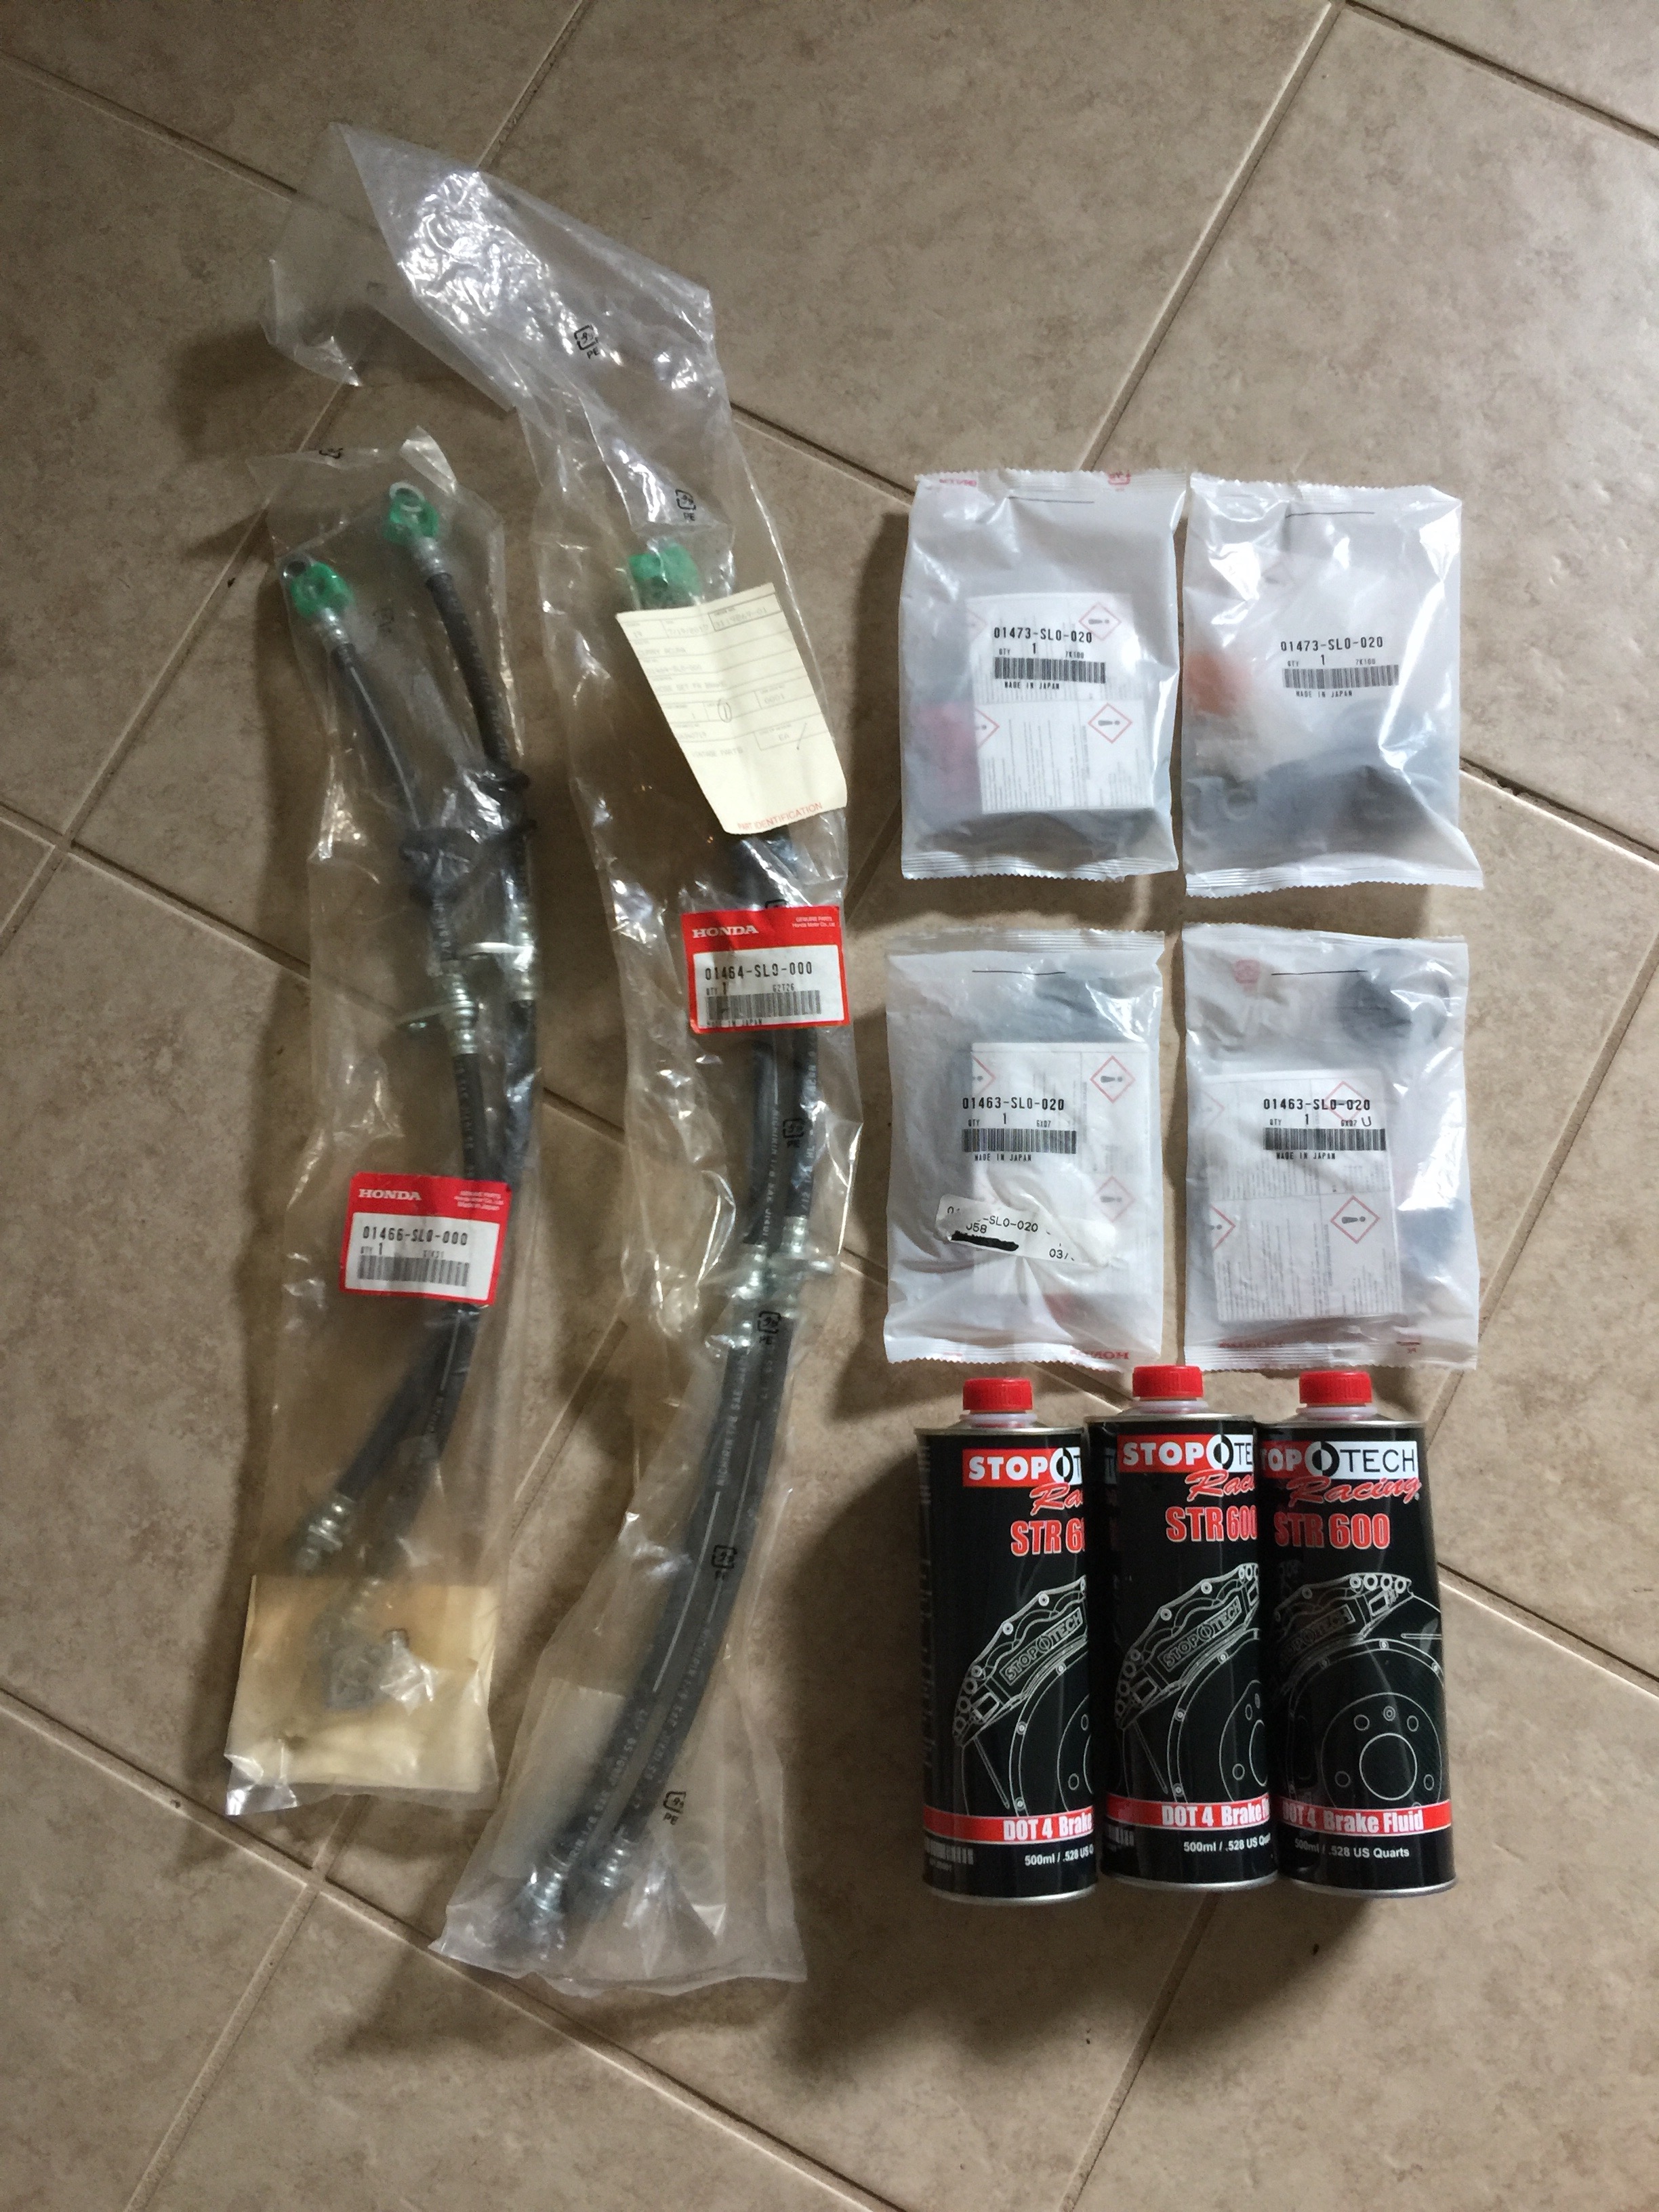
Also, I've recently noticed the brake pedal feeling pretty badly lately (when holding the brake pedal for long periods of time it will slowly go to the floor sometimes, otherwise it's plenty firm) and I think it might be due to the brake system not being flushed and bled properly at the dealership I bought the car from. It wouldn't surprise me, they haven't seemed very competent with anything else they did with this car. So, since the car is nearing 25, I decided to go ahead and refresh the whole brake system and replace the hoses with new OEM hoses, disassemble calipers and have them powder coated gloss black, and then rebuild them with new OEM seal kits. I had seen a few posts about having to buy the rear caliper seals separately since the kits are discontinued but I just ordered two rebuild kits on Amayama where they are still available. I'm planning on doing a full write up and/or video of the whole rebuild process if anyone is interested, there isn't really a single tutorial that has everything in good quality that I've found, and since these calipers are built almost identically to every other Honda caliper it should be helpful to everyone with a Civic or Integra too.
Due to a tip from a user on Honda-Tech, I checked out my brake master cylinder and determined that it was likely in the process of failing too, so I ordered a new factory MC and then found that it's out of stock in the entire US and I probably won't have it until the end of the month. So in the meantime, I get to sit and look at my new exhaust (which was delivered on Monday, thanks Viss!!!) since the car is undriveable without brakes.
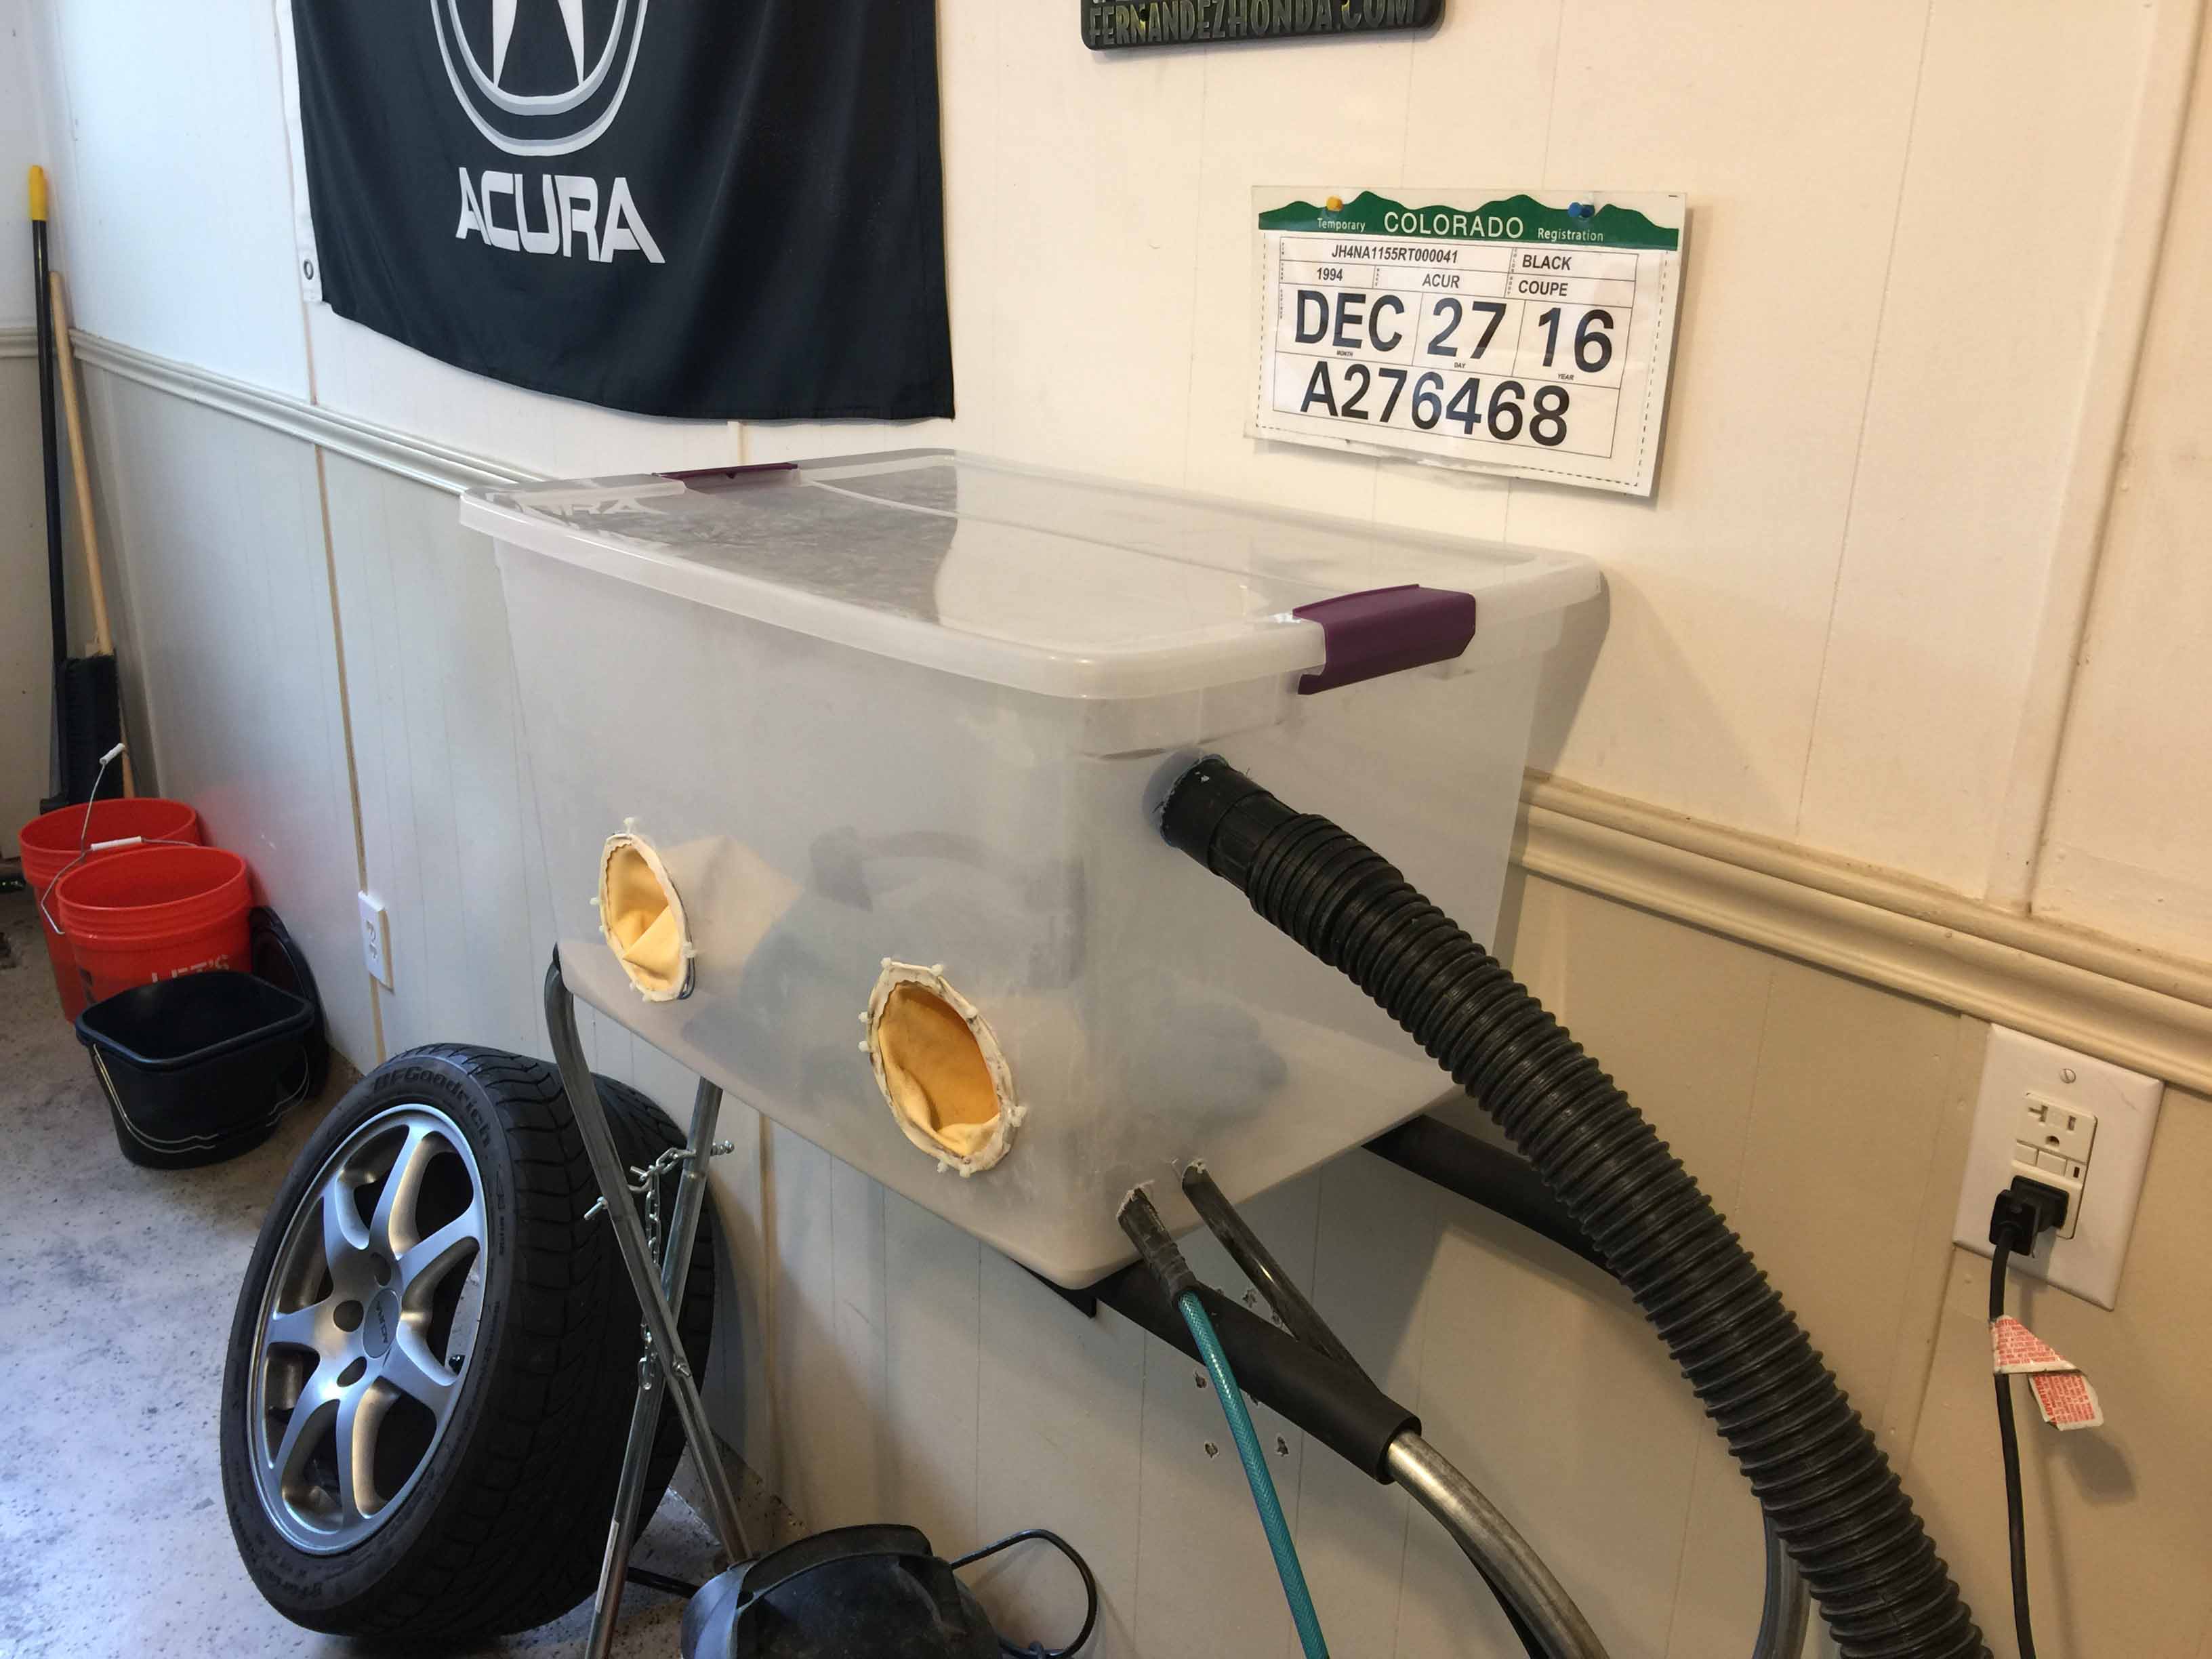
After getting quotes from powder coating shops of $300 - $400 to coat the calipers glossy black, I decided to do it myself. So I went on down to Harbor Freight and picked up a media blaster, 25lbs of glass beads, and a powder coating machine, then I ordered a pound of gloss black and a pound of clear powder, and finally I dropped by target and picked up some long cleaning gloves and a plastic storage box. Grand total of about $175.
After some trial and error (there's a hole covered in packing tape on the other side of the box where I messed up) I ended up with this ghetto media blasting rig, I put the OEM car cover over the car during this ordeal so no blasting media dust can get on it. It actually works pretty well aside from being cramped, most of the blasting media settles at the bottom of the box and can be poured out and reused, but the shop vac keeps the box negatively pressurized so dust doesn't go everywhere and also makes it so the gaps don't spew dust.
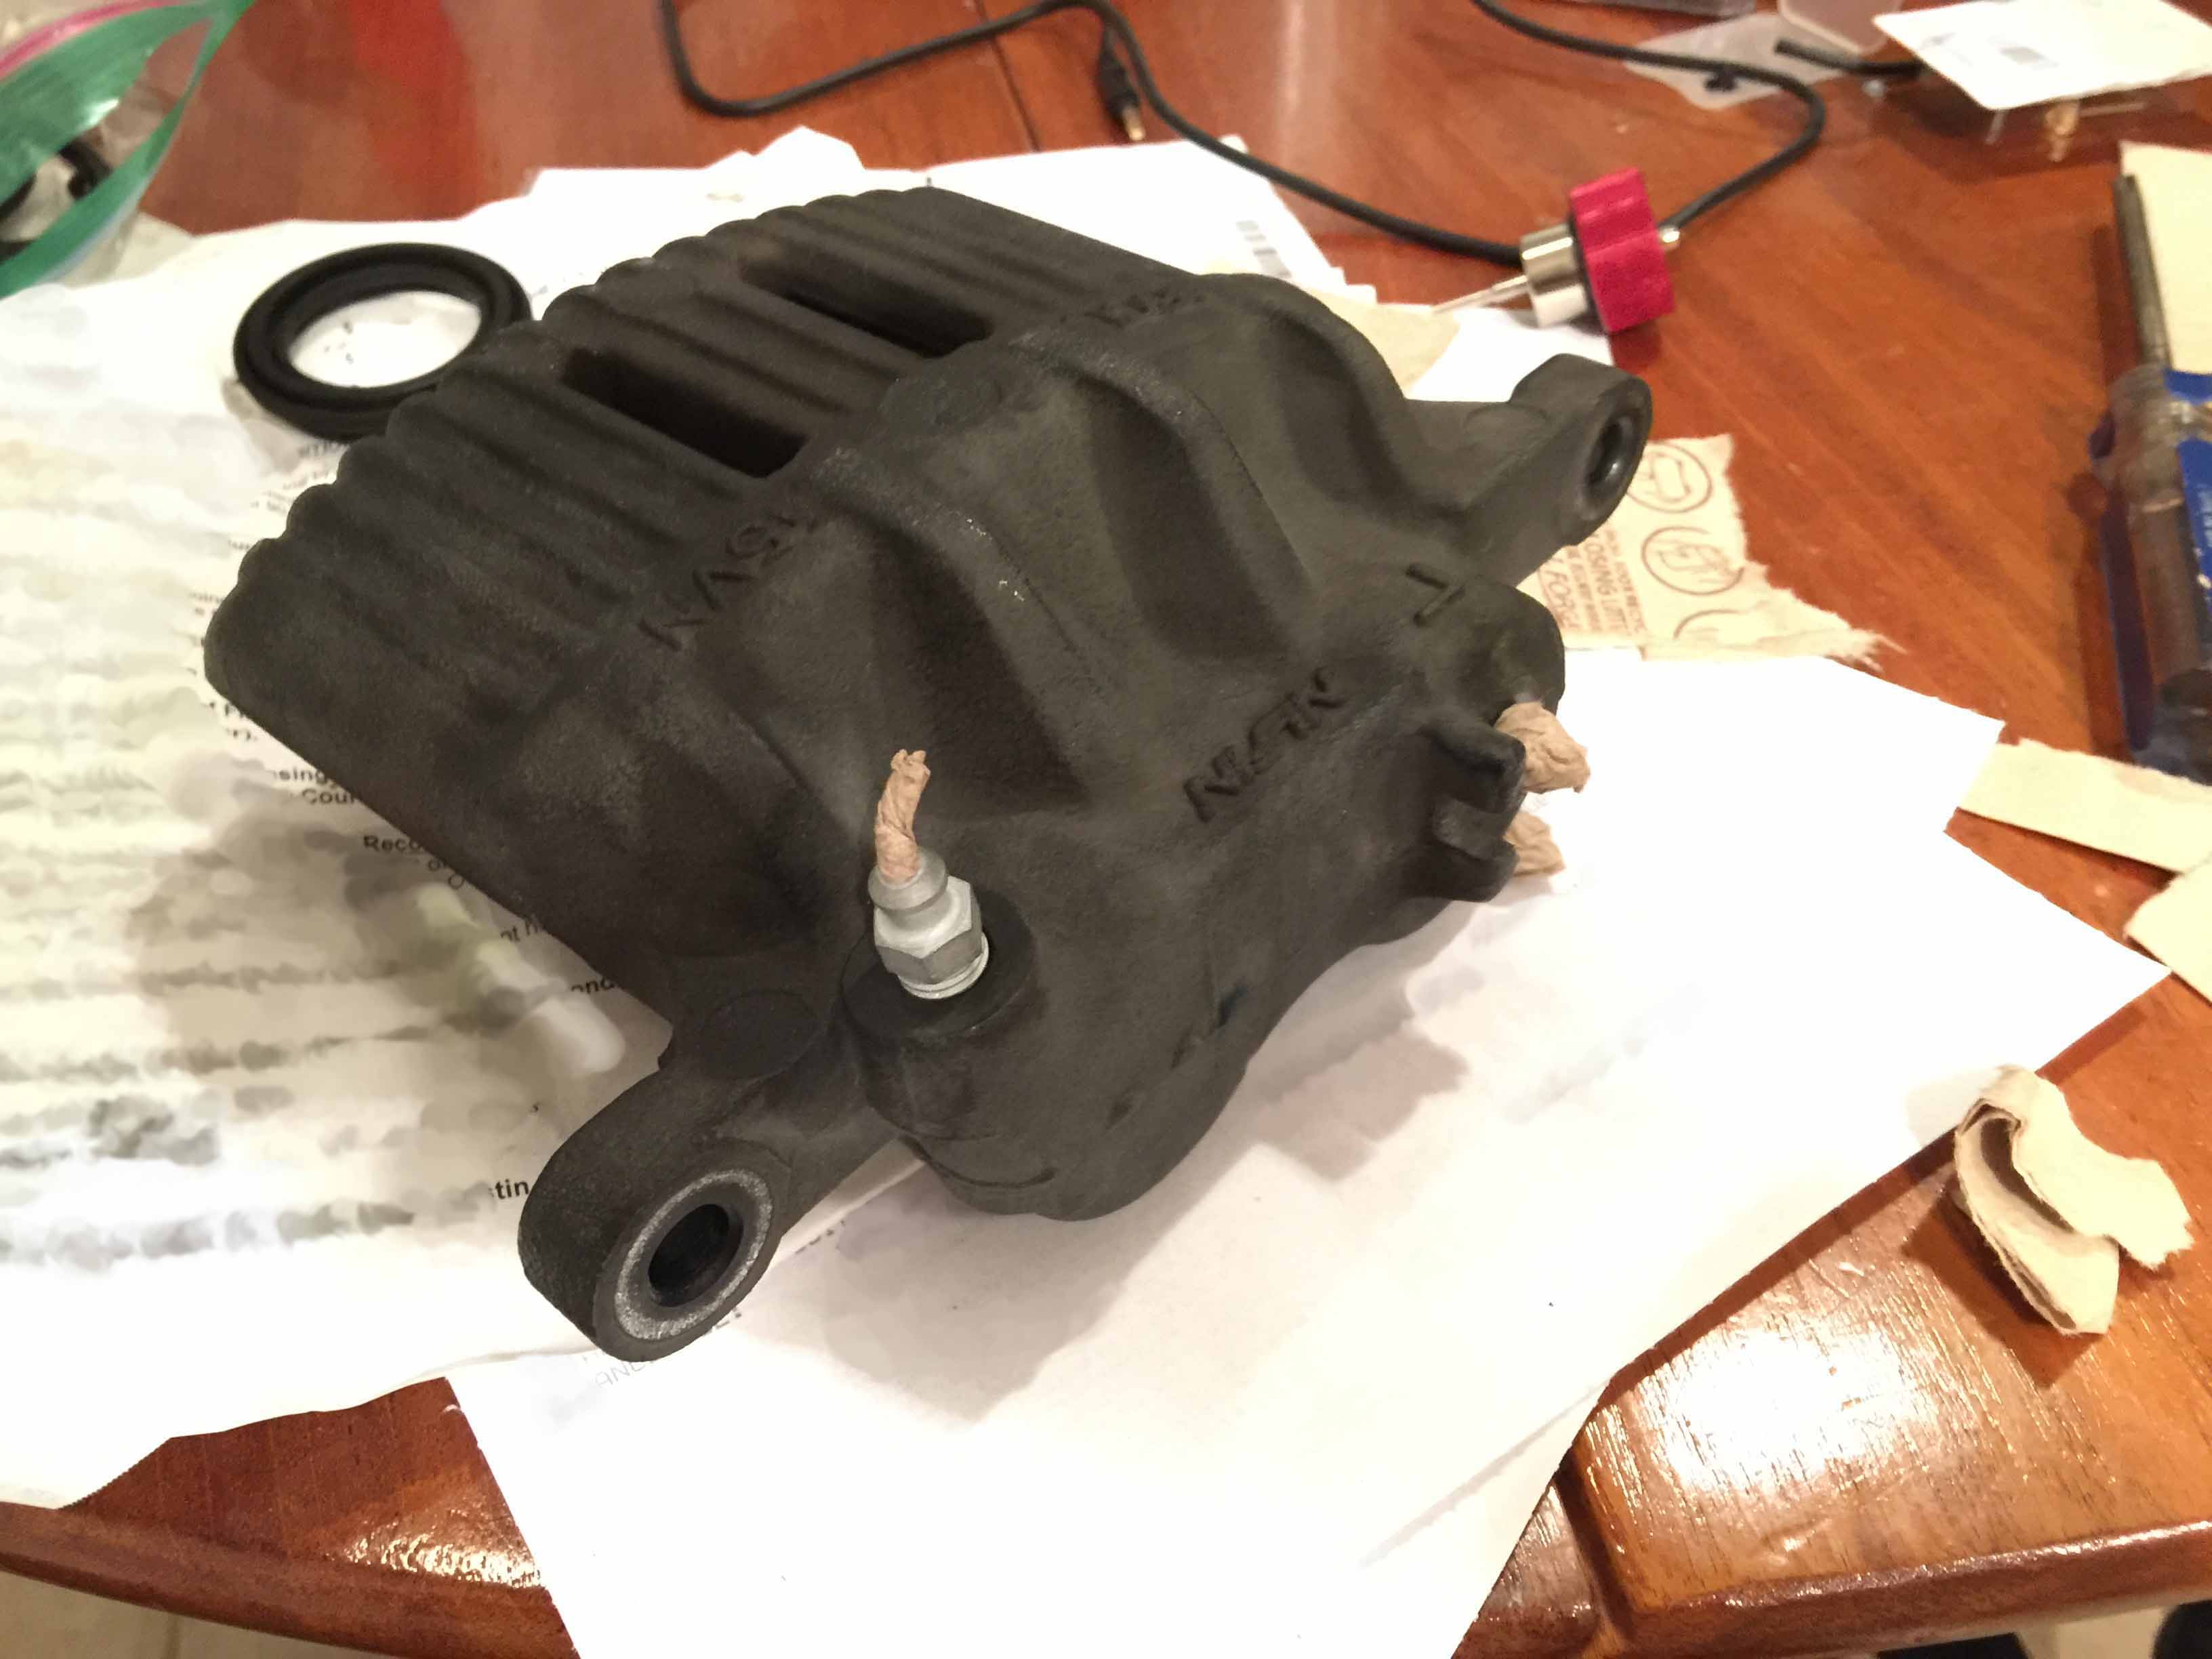
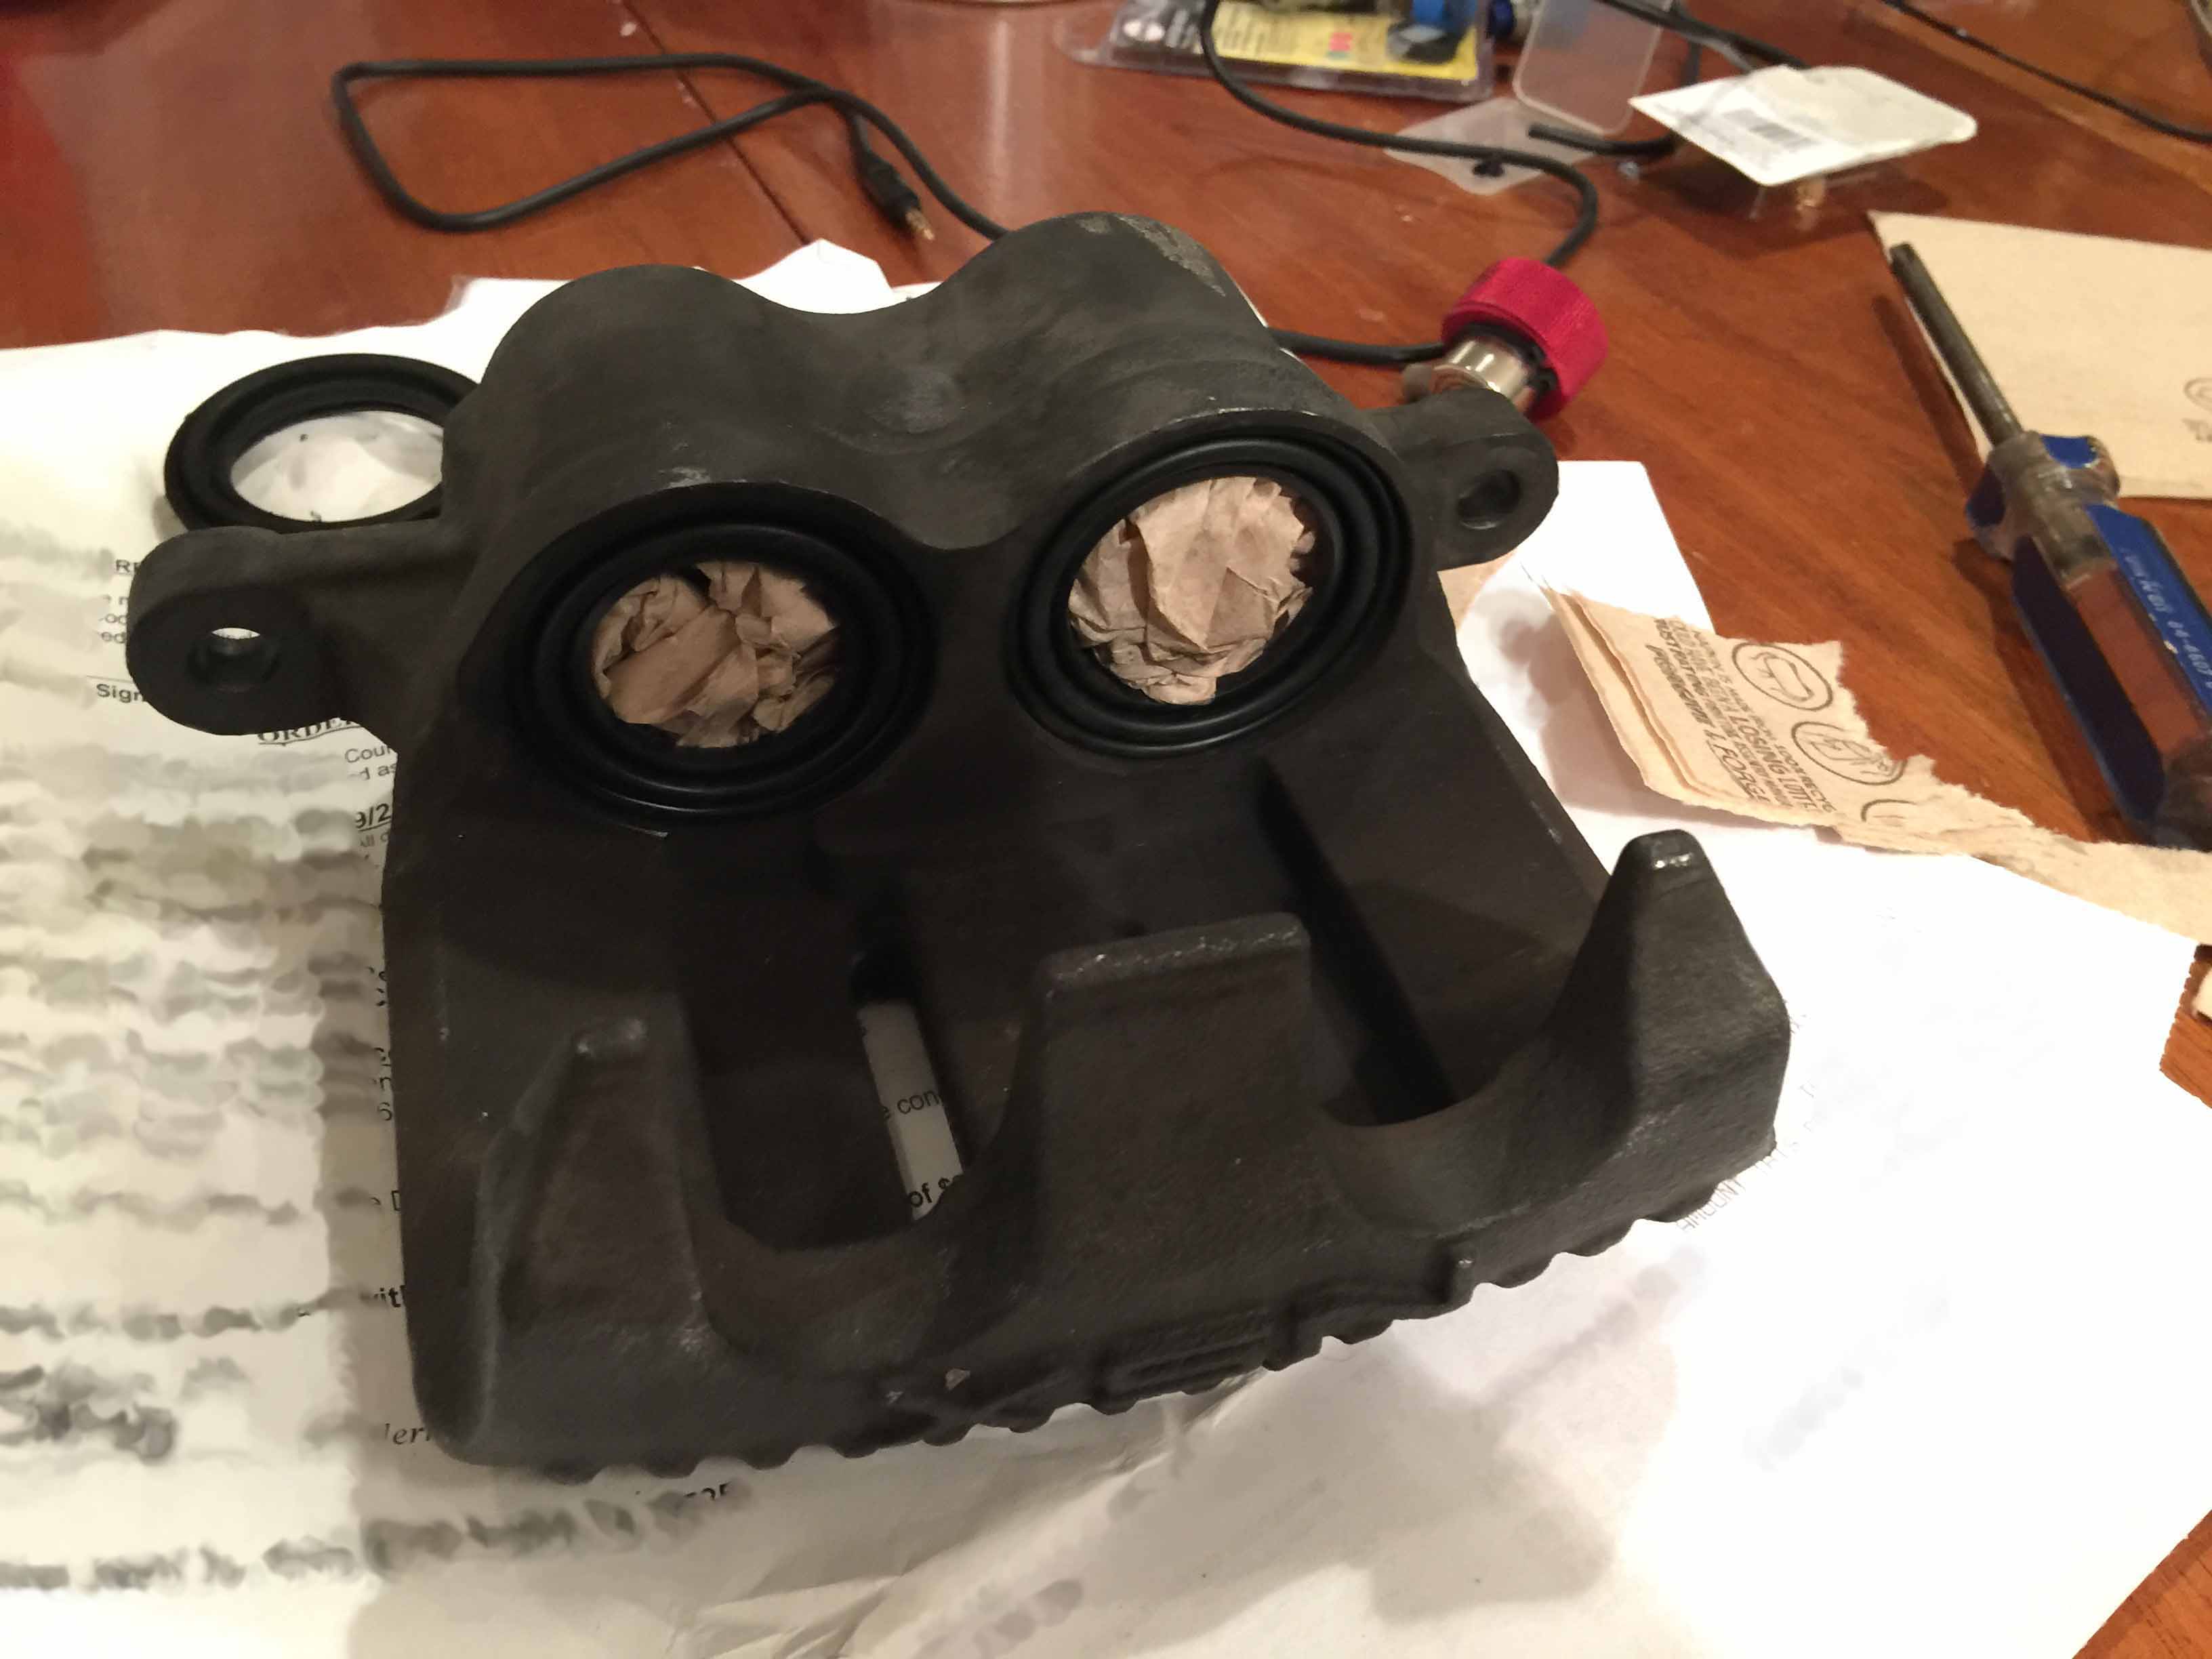
Prepping the caliper for blasting. I put the old seals back in so I can blast right up to them without worry, it doesn't matter if a bit of media gets in the calipers, I'll be cleaning them out before reassembly. I bought new bleeder valves so I don't have to worry about messing up the old ones.
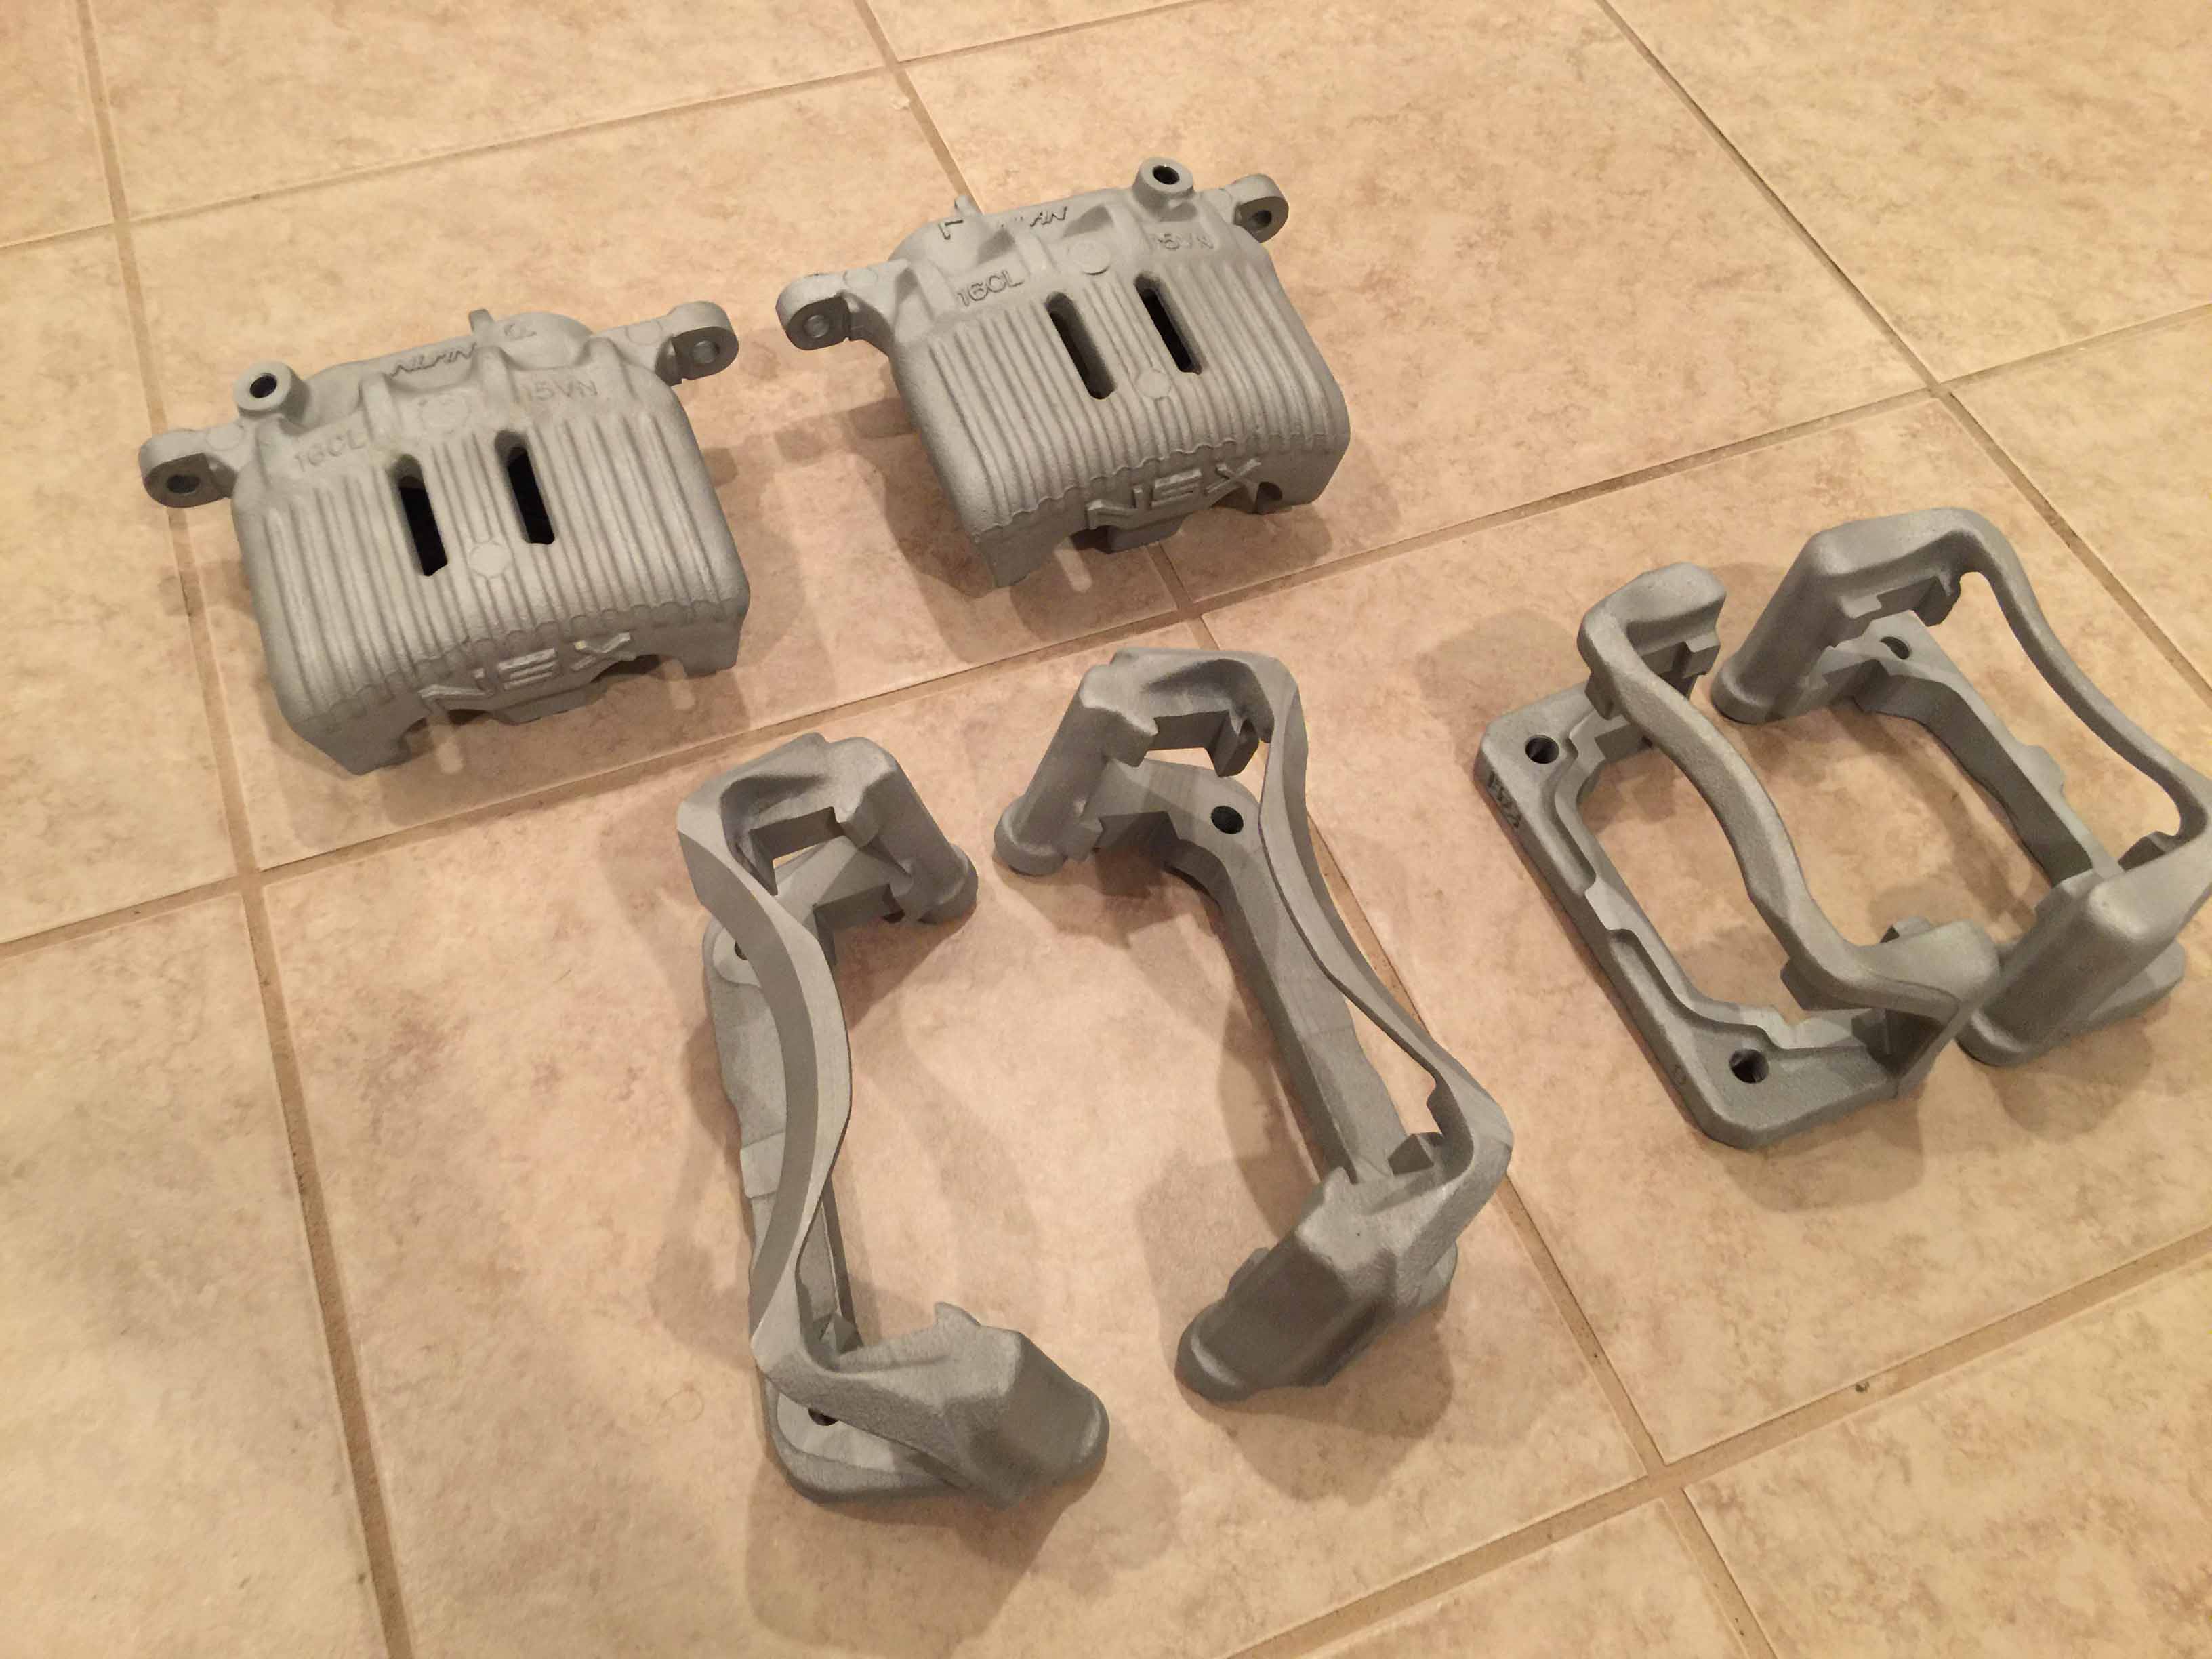
Front calipers and brackets blasted and ready for coating.
My powder hasn't been delivered yet, but when it does I'll post pictures of the final results. If it turns out well I might do a few sets for a fair price for other people to get my money back for the blasting and coating equipment.
After getting quotes from powder coating shops of $300 - $400 to coat the calipers glossy black, I decided to do it myself. So I went on down to Harbor Freight and picked up a media blaster, 25lbs of glass beads, and a powder coating machine, then I ordered a pound of gloss black and a pound of clear powder, and finally I dropped by target and picked up some long cleaning gloves and a plastic storage box. Grand total of about $175.
After some trial and error (there's a hole covered in packing tape on the other side of the box where I messed up) I ended up with this ghetto media blasting rig, I put the OEM car cover over the car during this ordeal so no blasting media dust can get on it. It actually works pretty well aside from being cramped, most of the blasting media settles at the bottom of the box and can be poured out and reused, but the shop vac keeps the box negatively pressurized so dust doesn't go everywhere and also makes it so the gaps don't spew dust.
Prepping the caliper for blasting. I put the old seals back in so I can blast right up to them without worry, it doesn't matter if a bit of media gets in the calipers, I'll be cleaning them out before reassembly. I bought new bleeder valves so I don't have to worry about messing up the old ones.
Front calipers and brackets blasted and ready for coating.
My powder hasn't been delivered yet, but when it does I'll post pictures of the final results. If it turns out well I might do a few sets for a fair price for other people to get my money back for the blasting and coating equipment.
Last edited:
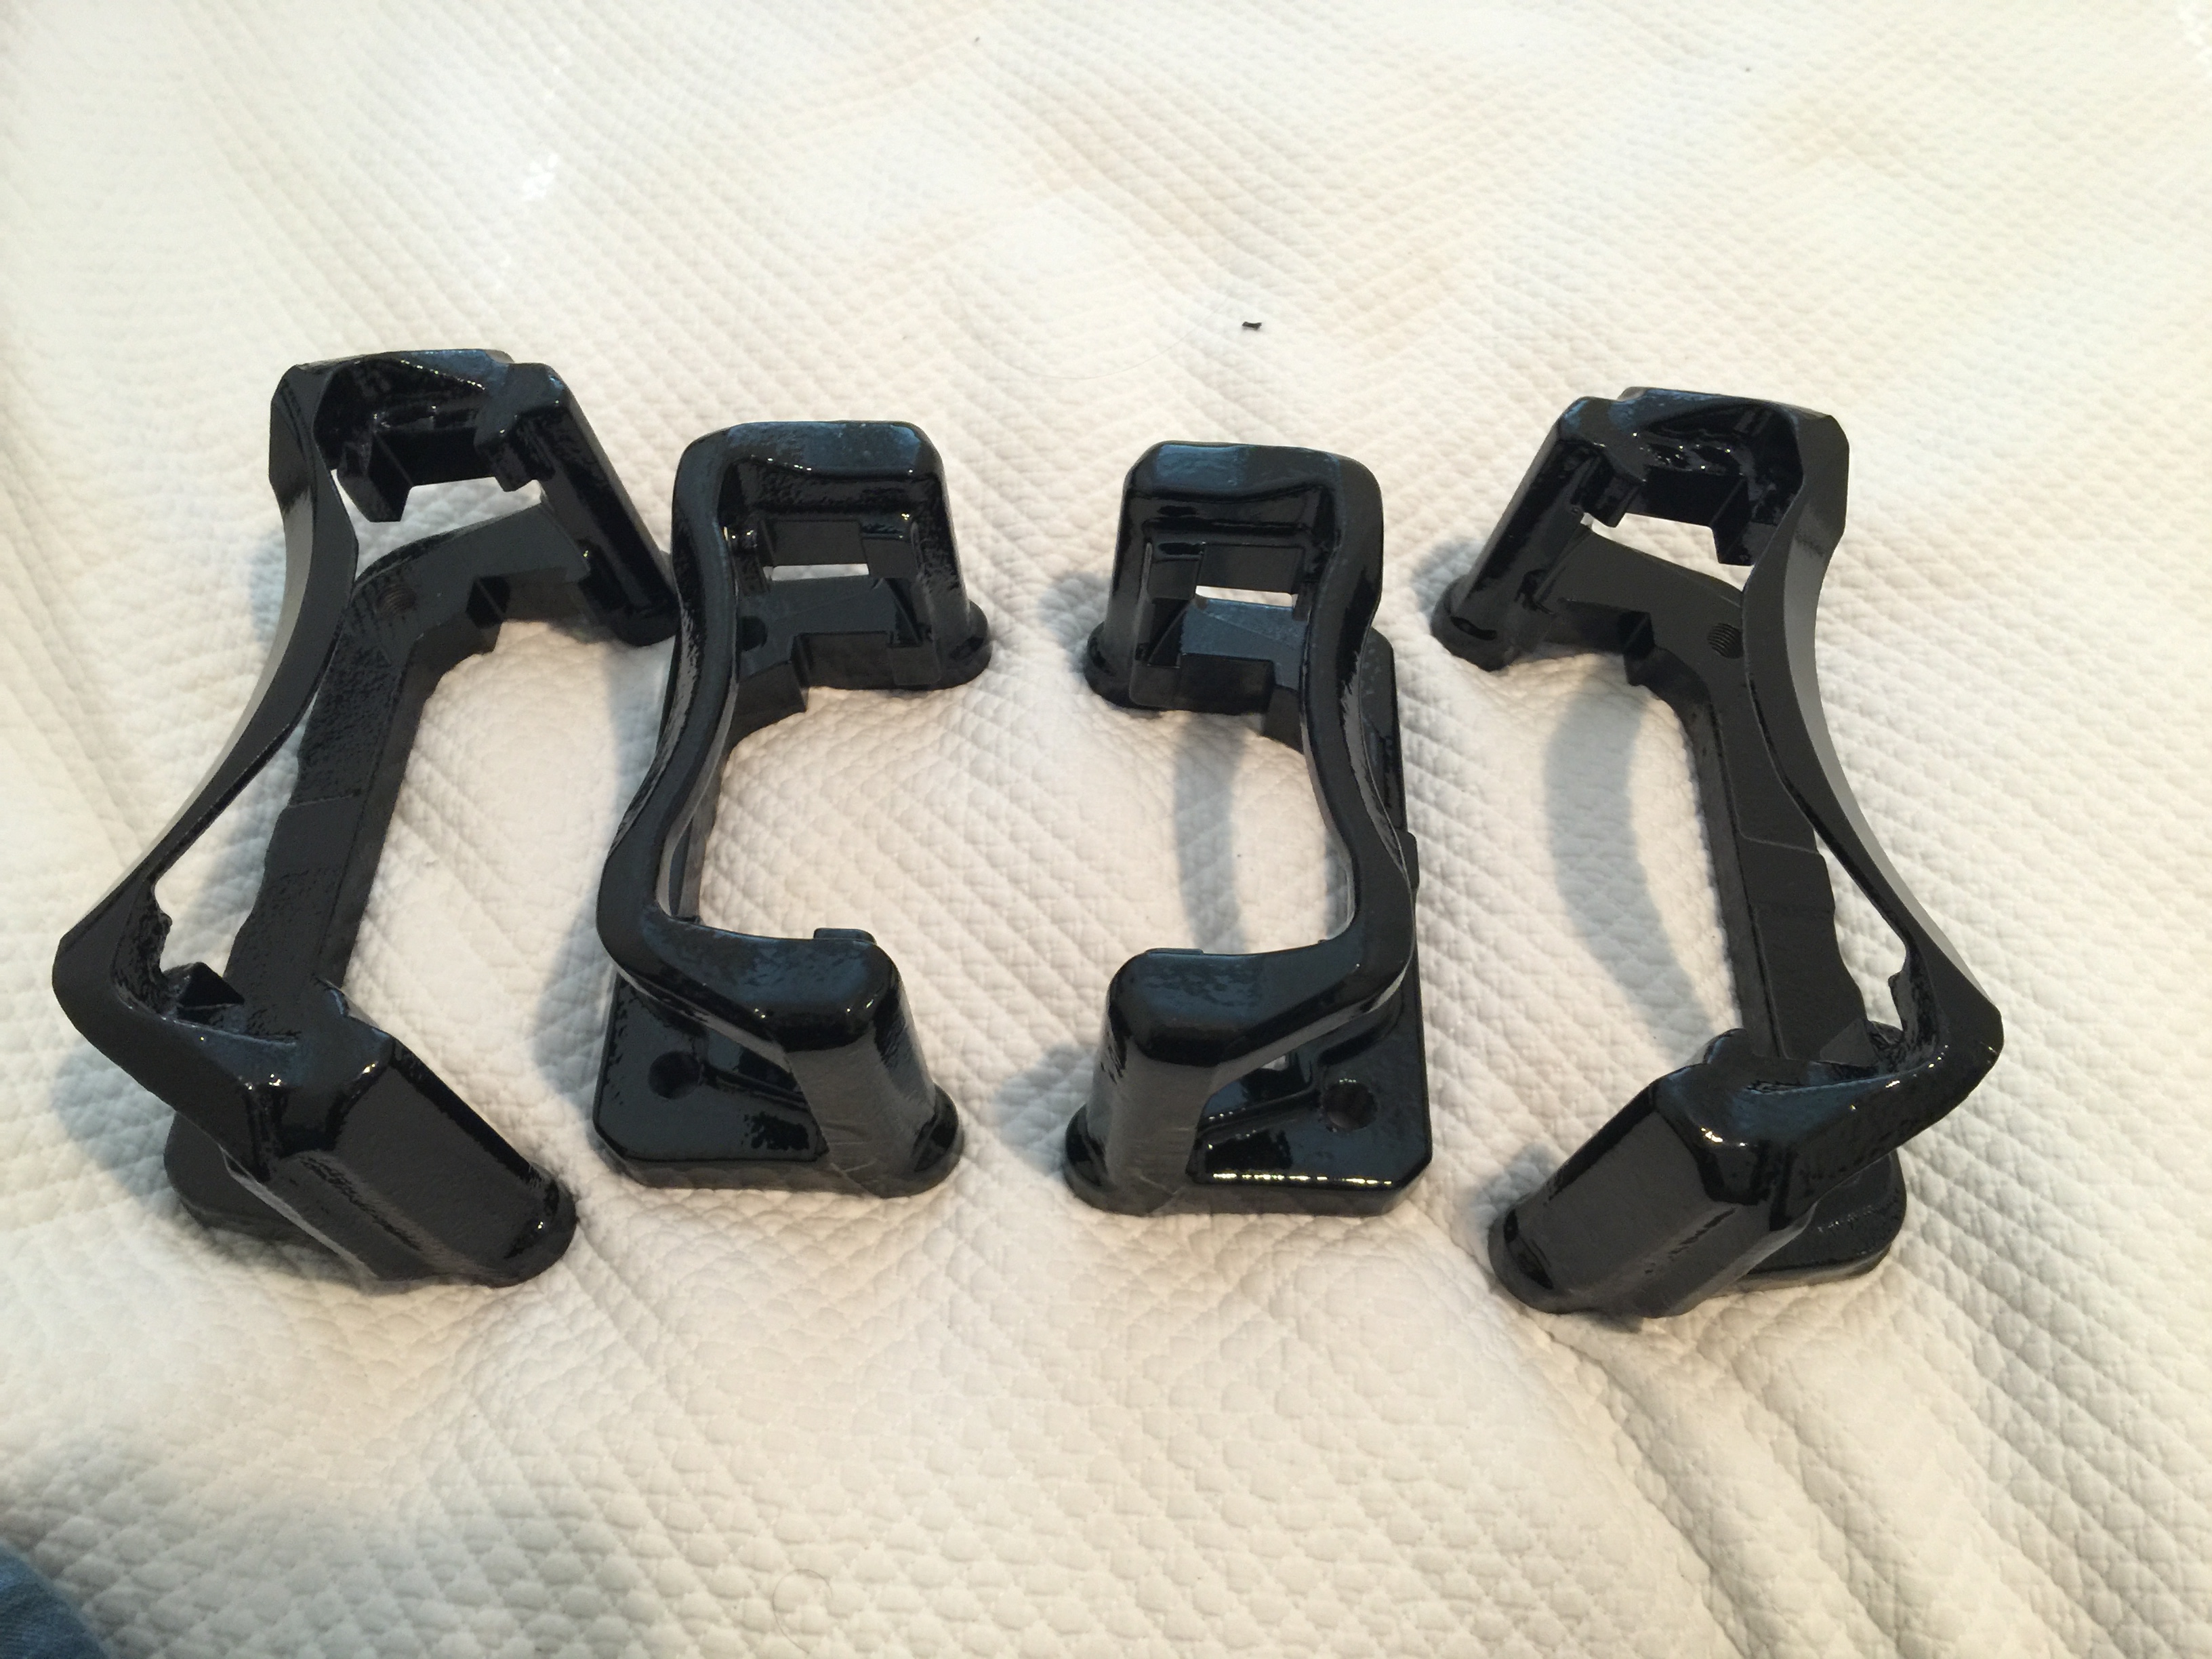
I didn't have much time this weekend since I was out of town for a track driving school event with the Integra, but I was able to finish up the powdercoating on the brackets and they turned out great! There are a few tiny imperfections if you look very closely but none are visible from the front, and overall the process was much easier than I had expected. Now to start on the calipers themselves, I need to reblast them because I put them in the oven to outgas which caused them to build up some surface rust. When I put them in the oven they were dry, and when I checked on them a few minutes later the surface had little droplets of liquid all over it, so I guess it came from the caliper?
The process used to apply the powder after blasting:
1) Heavy coat of black powder
2) Bake at 400f until it flows out properly but not for the full cure time
3) Another heavy coat of black since getting full coverage on a bumpy surface is difficult in one go
4) Bake at 400f until it flows out properly but not for the full cure time
5) Heavy coat of clear powder
6) Bake at 355f for the full 18 minute cure time
From what I've seen while scraping off powder from surfaces I accidentally coated, it's a nice hard coating and adhered very well, but only time will tell.
The rest of my brake parts are supposed to be here this week so hopefully the car will be back on the road sometime this weekend.
Last edited:
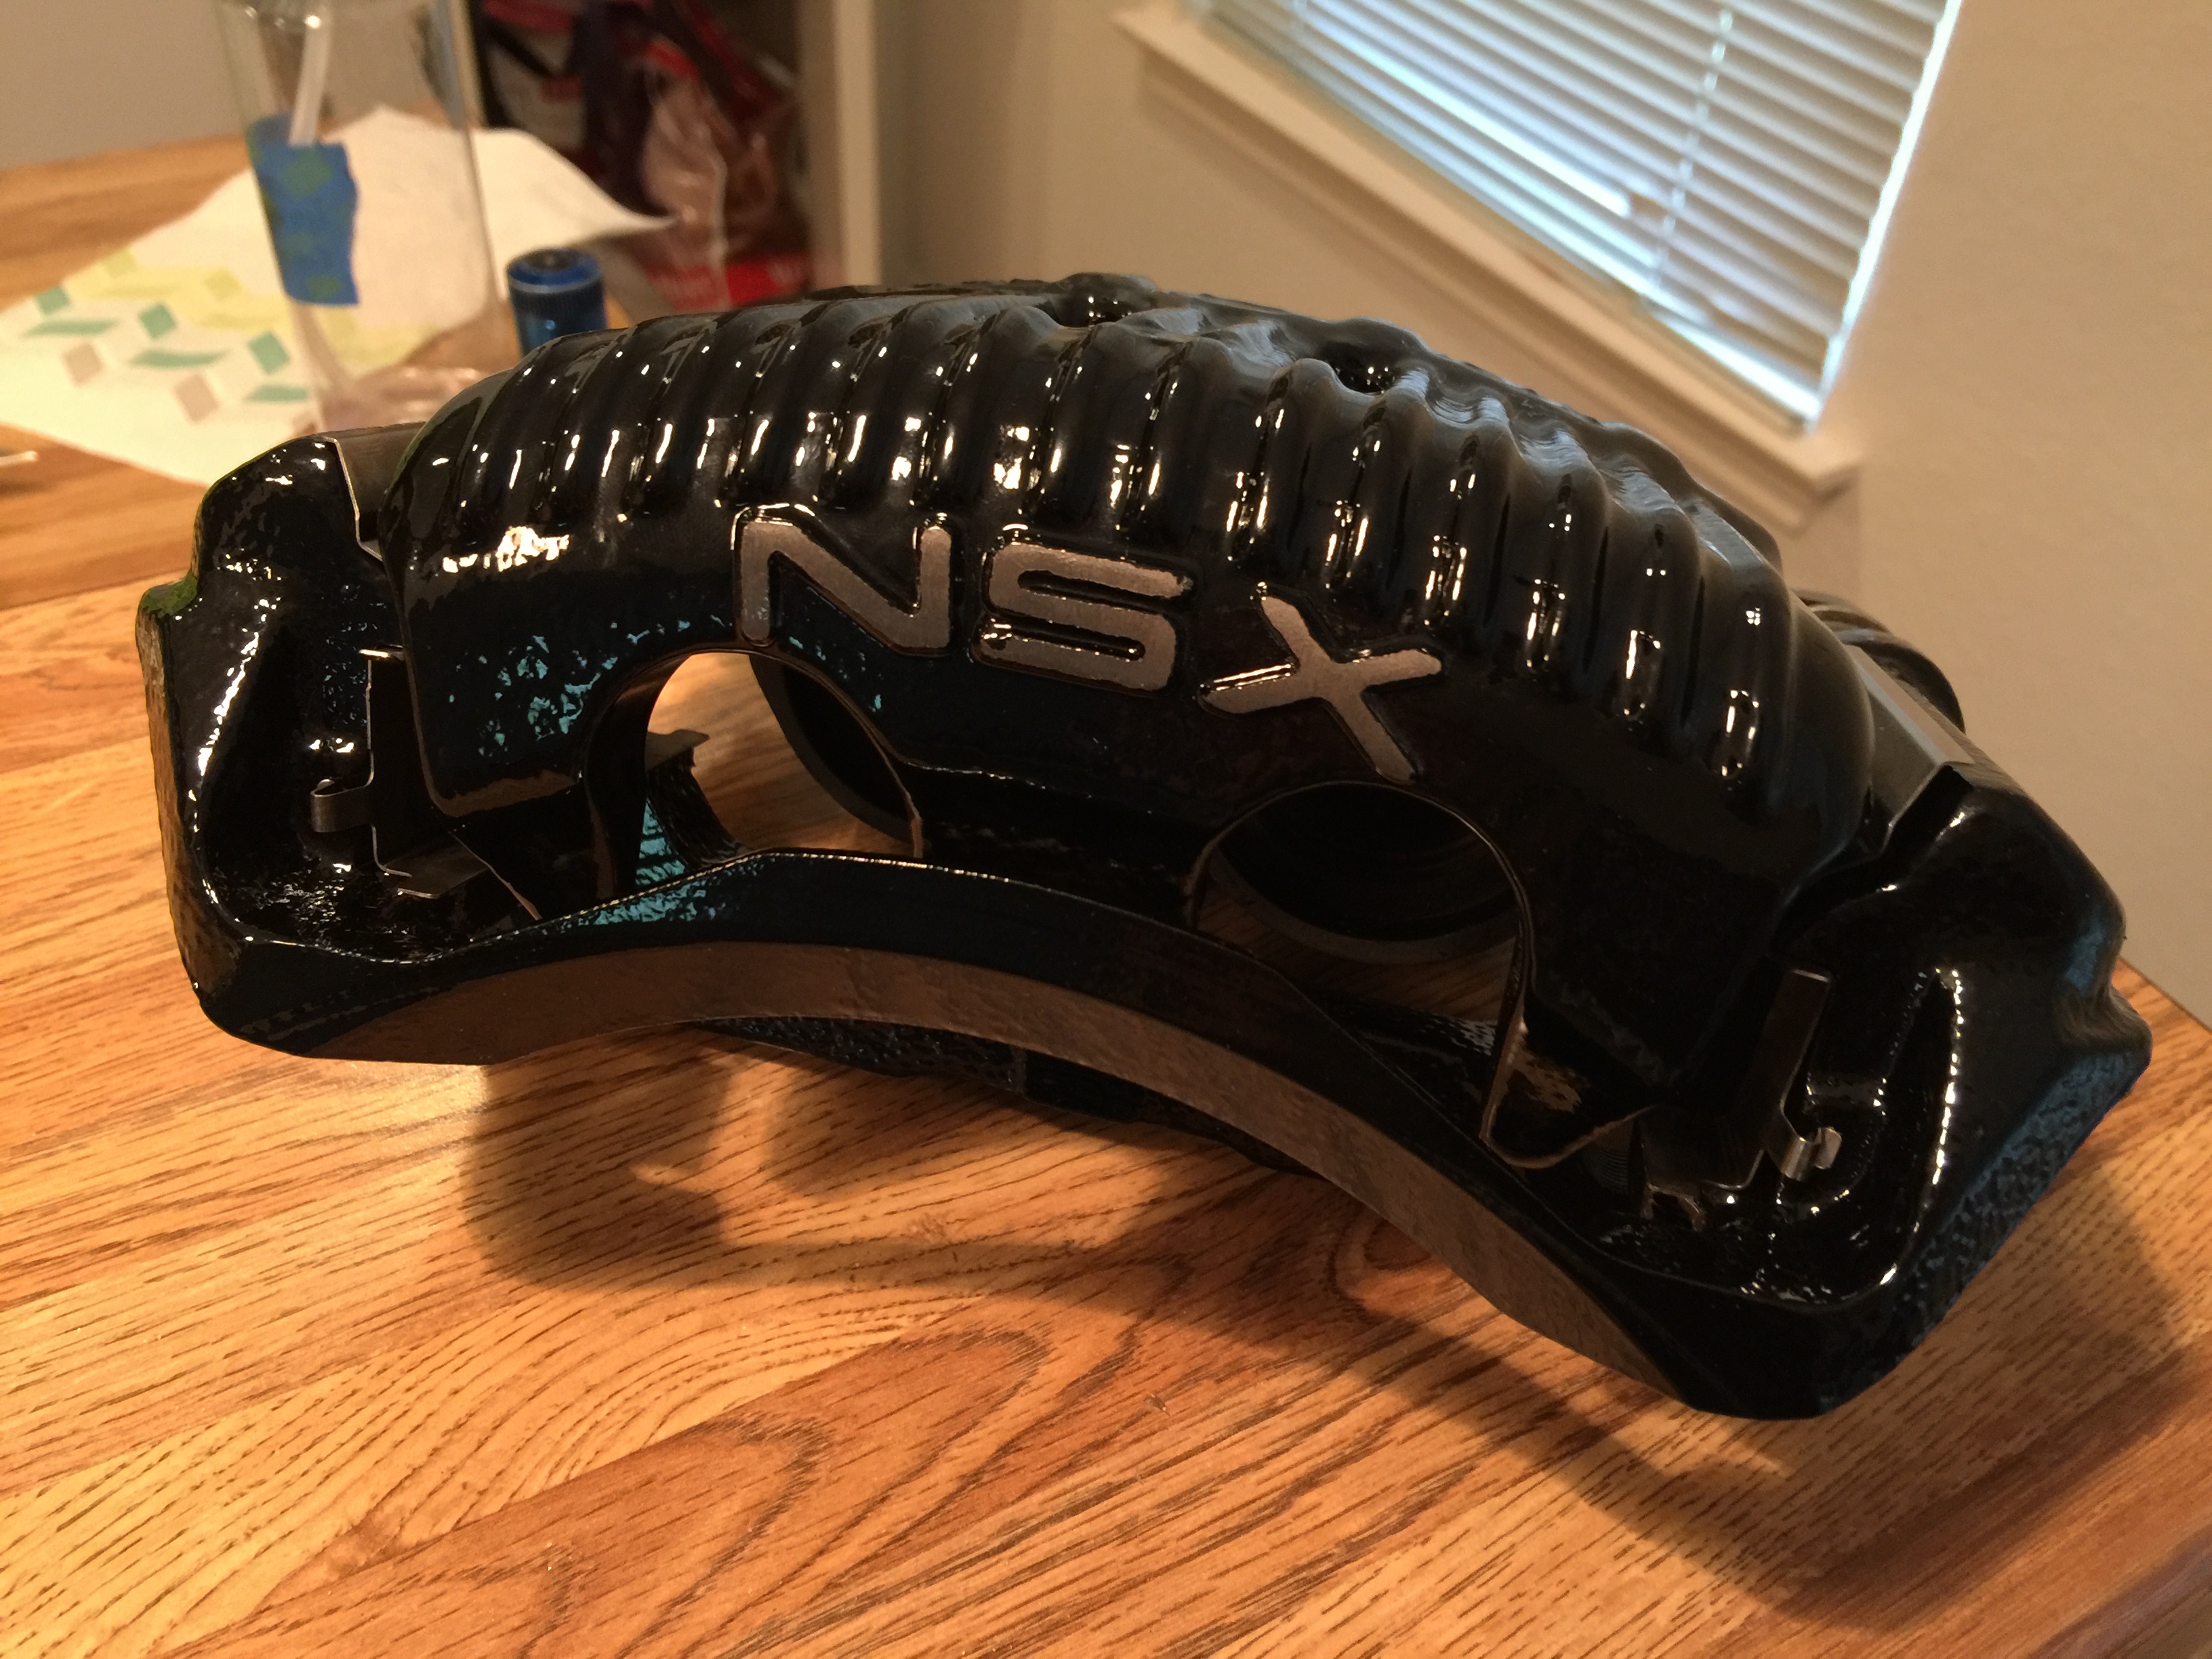
I'm pretty happy with the way the calipers came out, the 3 coat (2 black, 1 clear) process was a pain but worth it. The results look great and I've never seen them done this way on this car before.
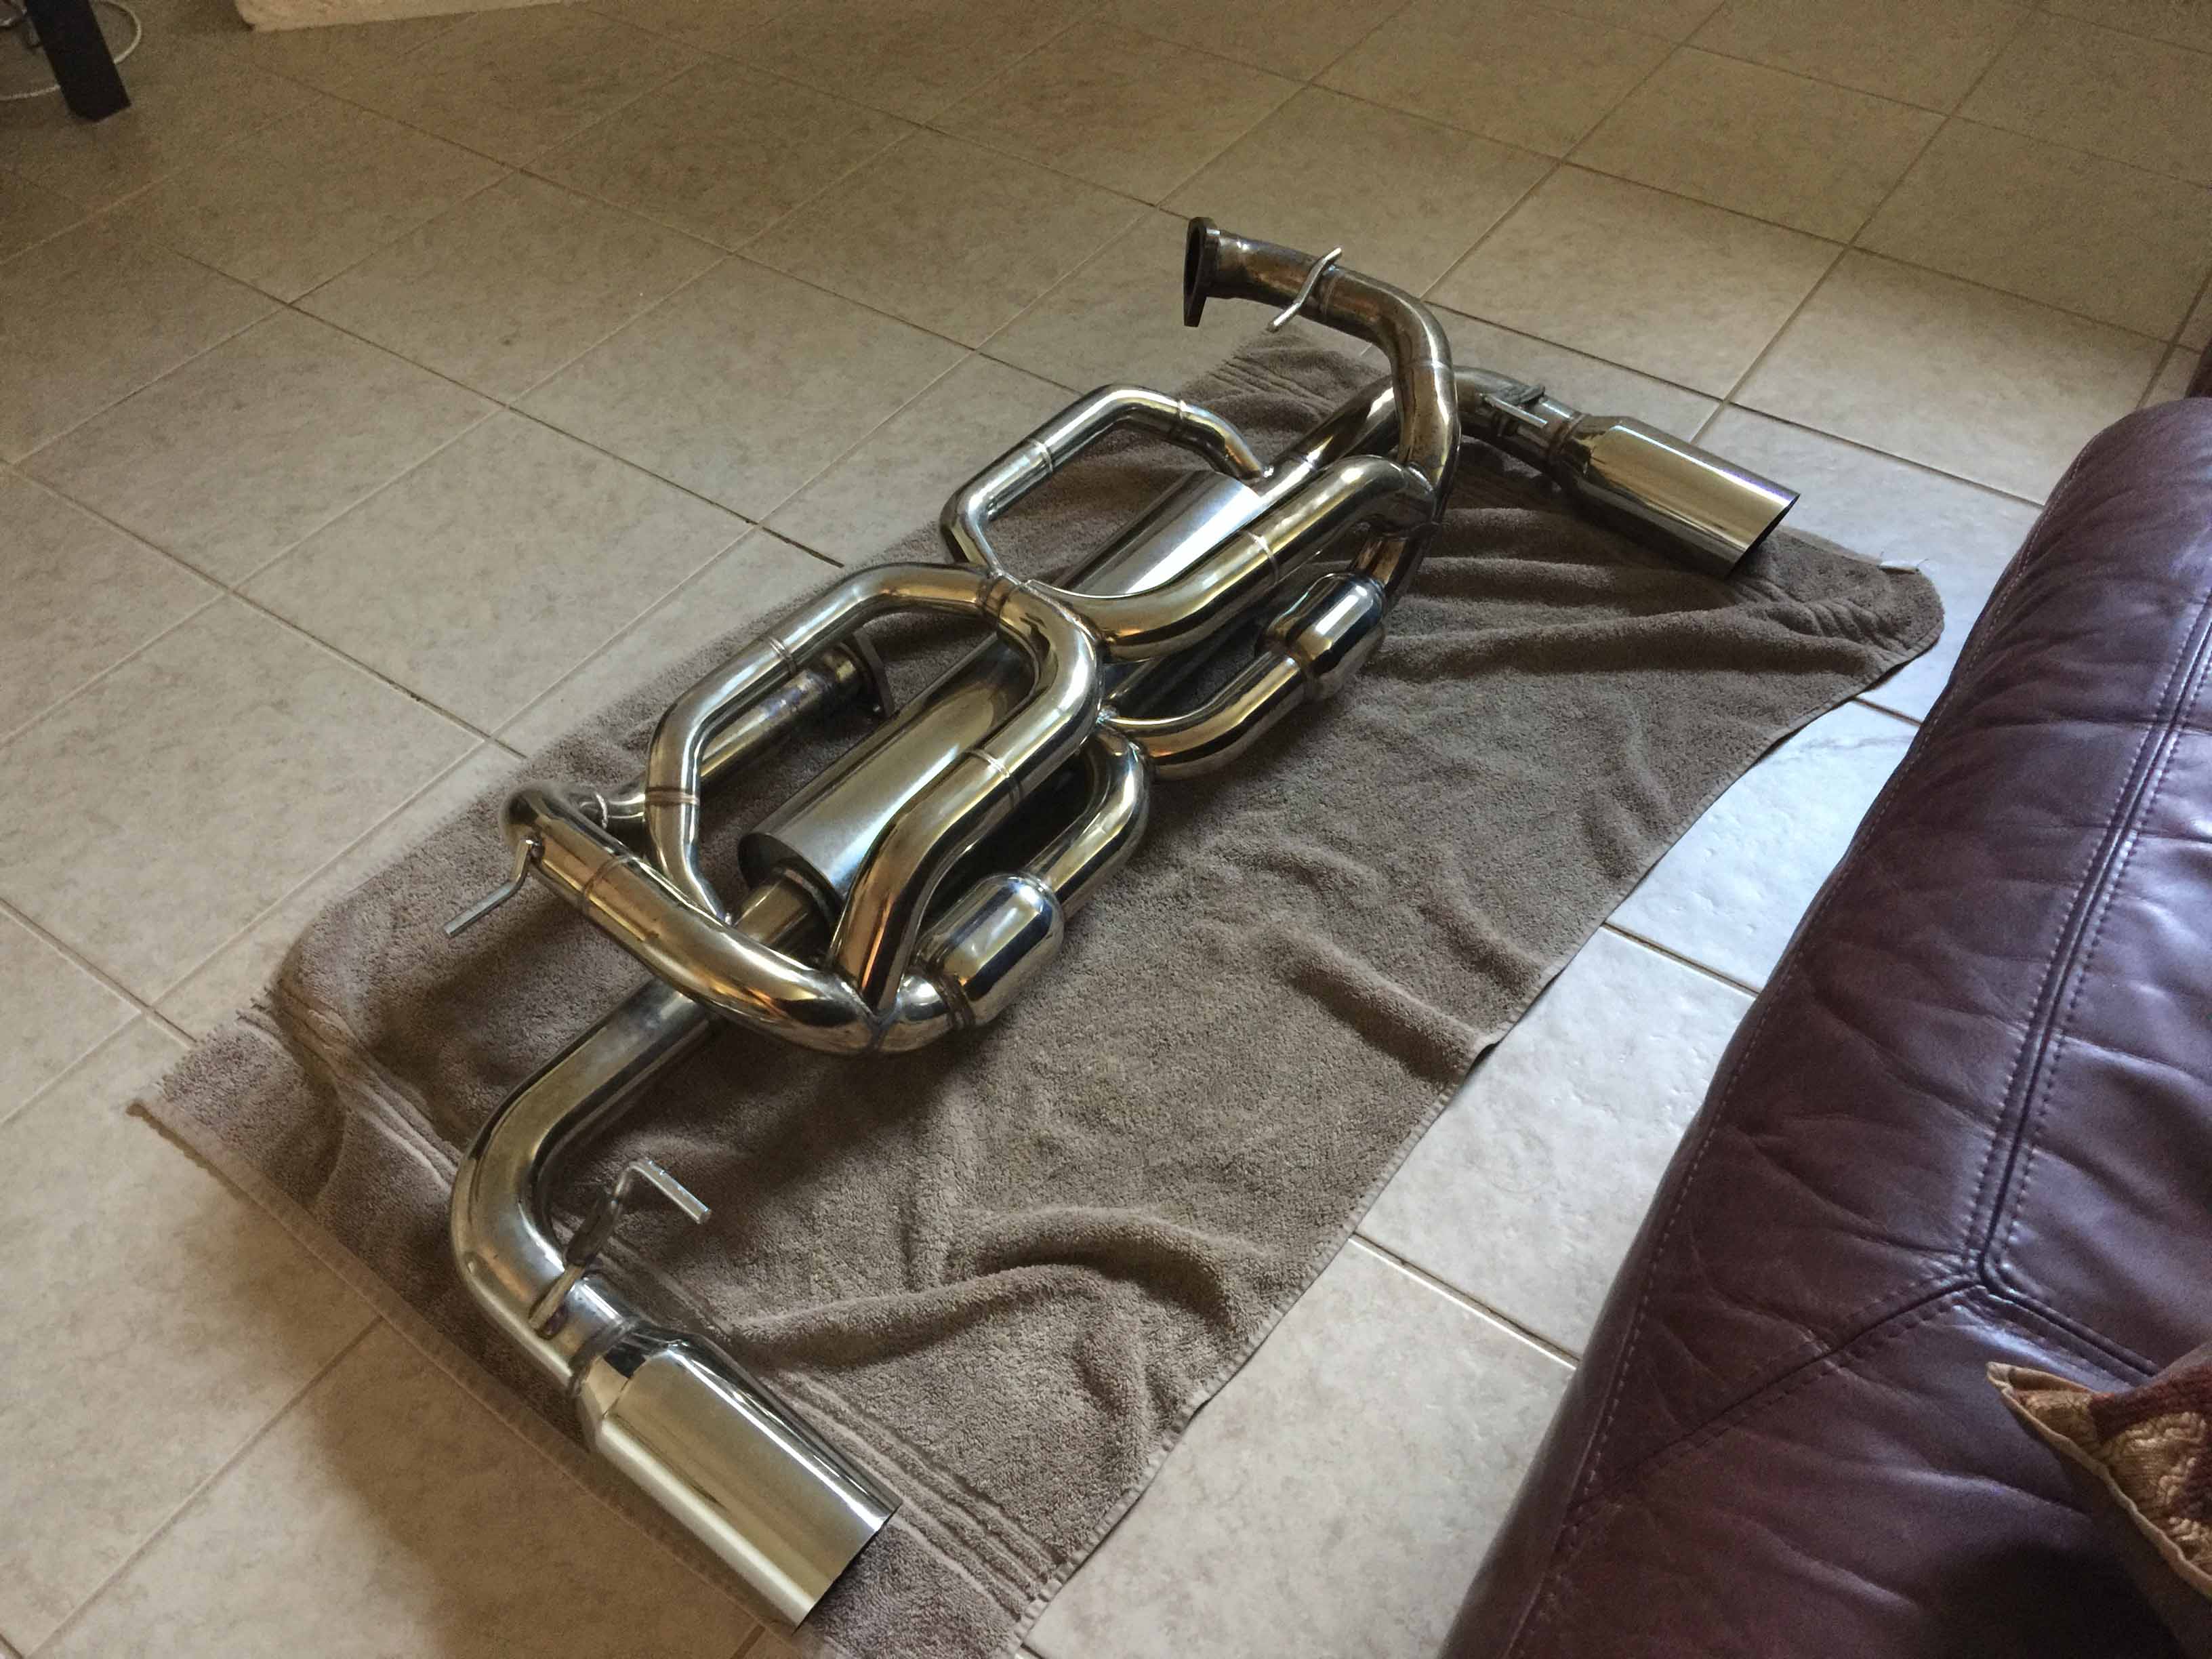
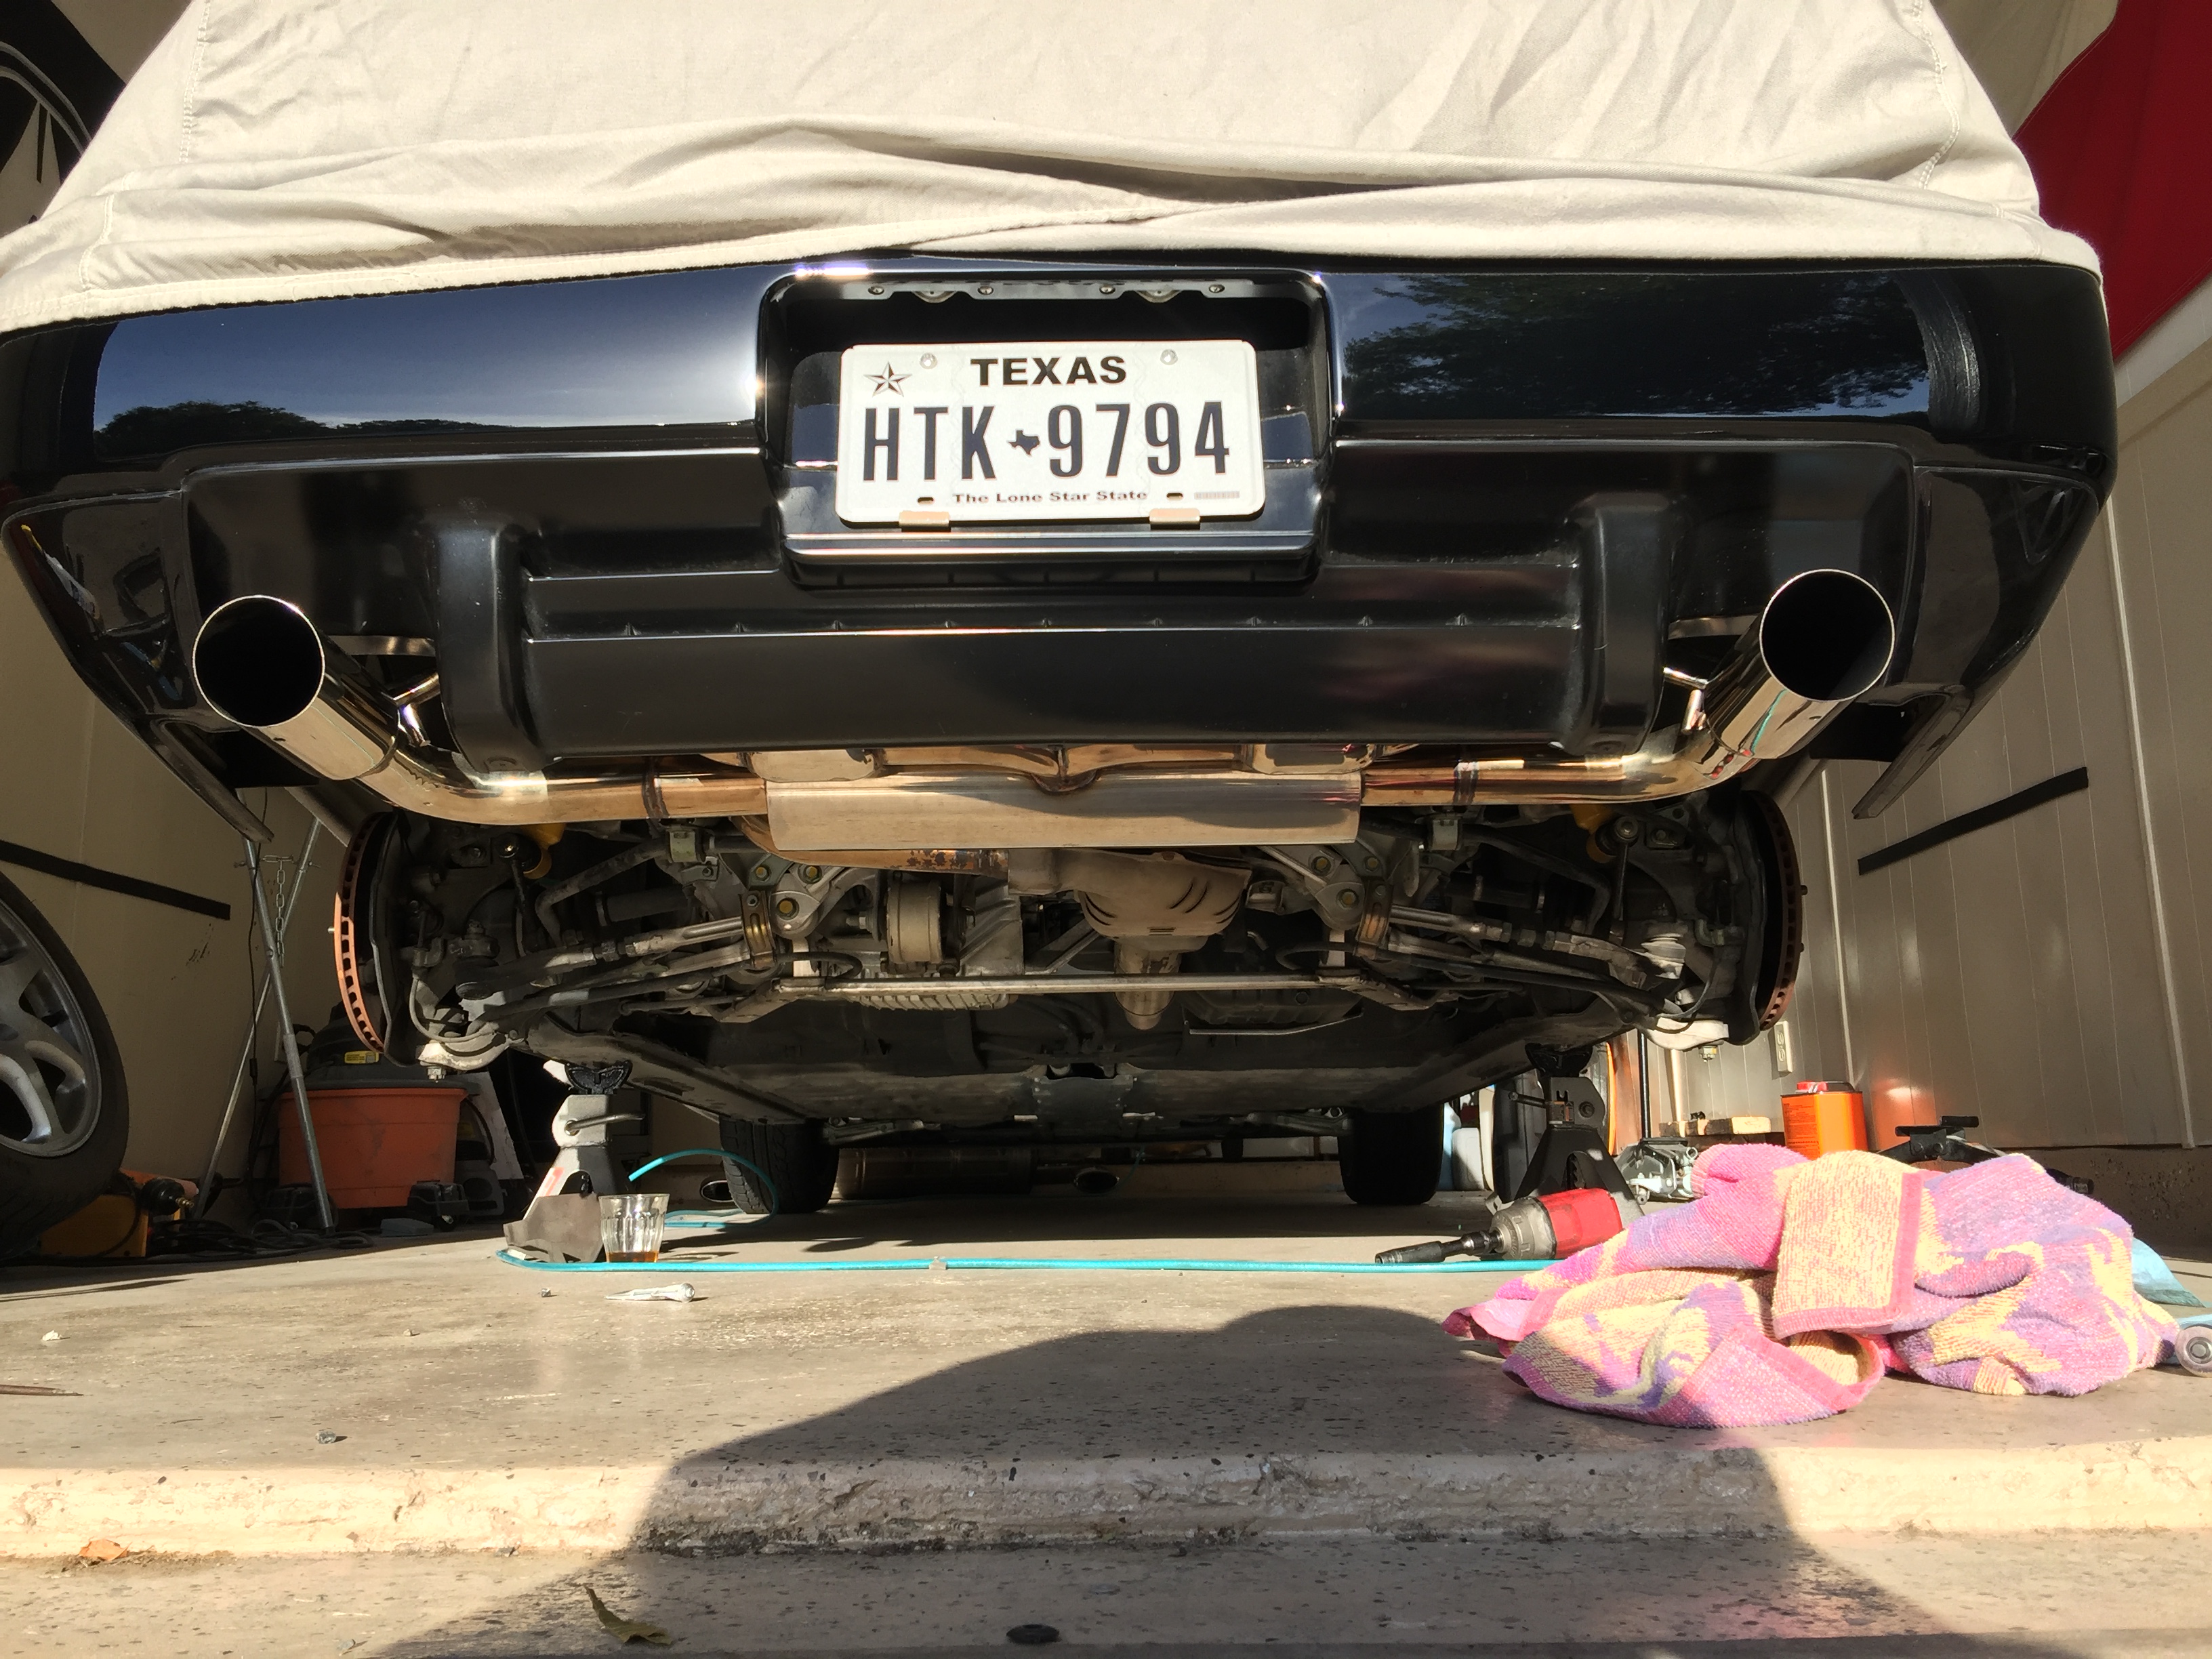
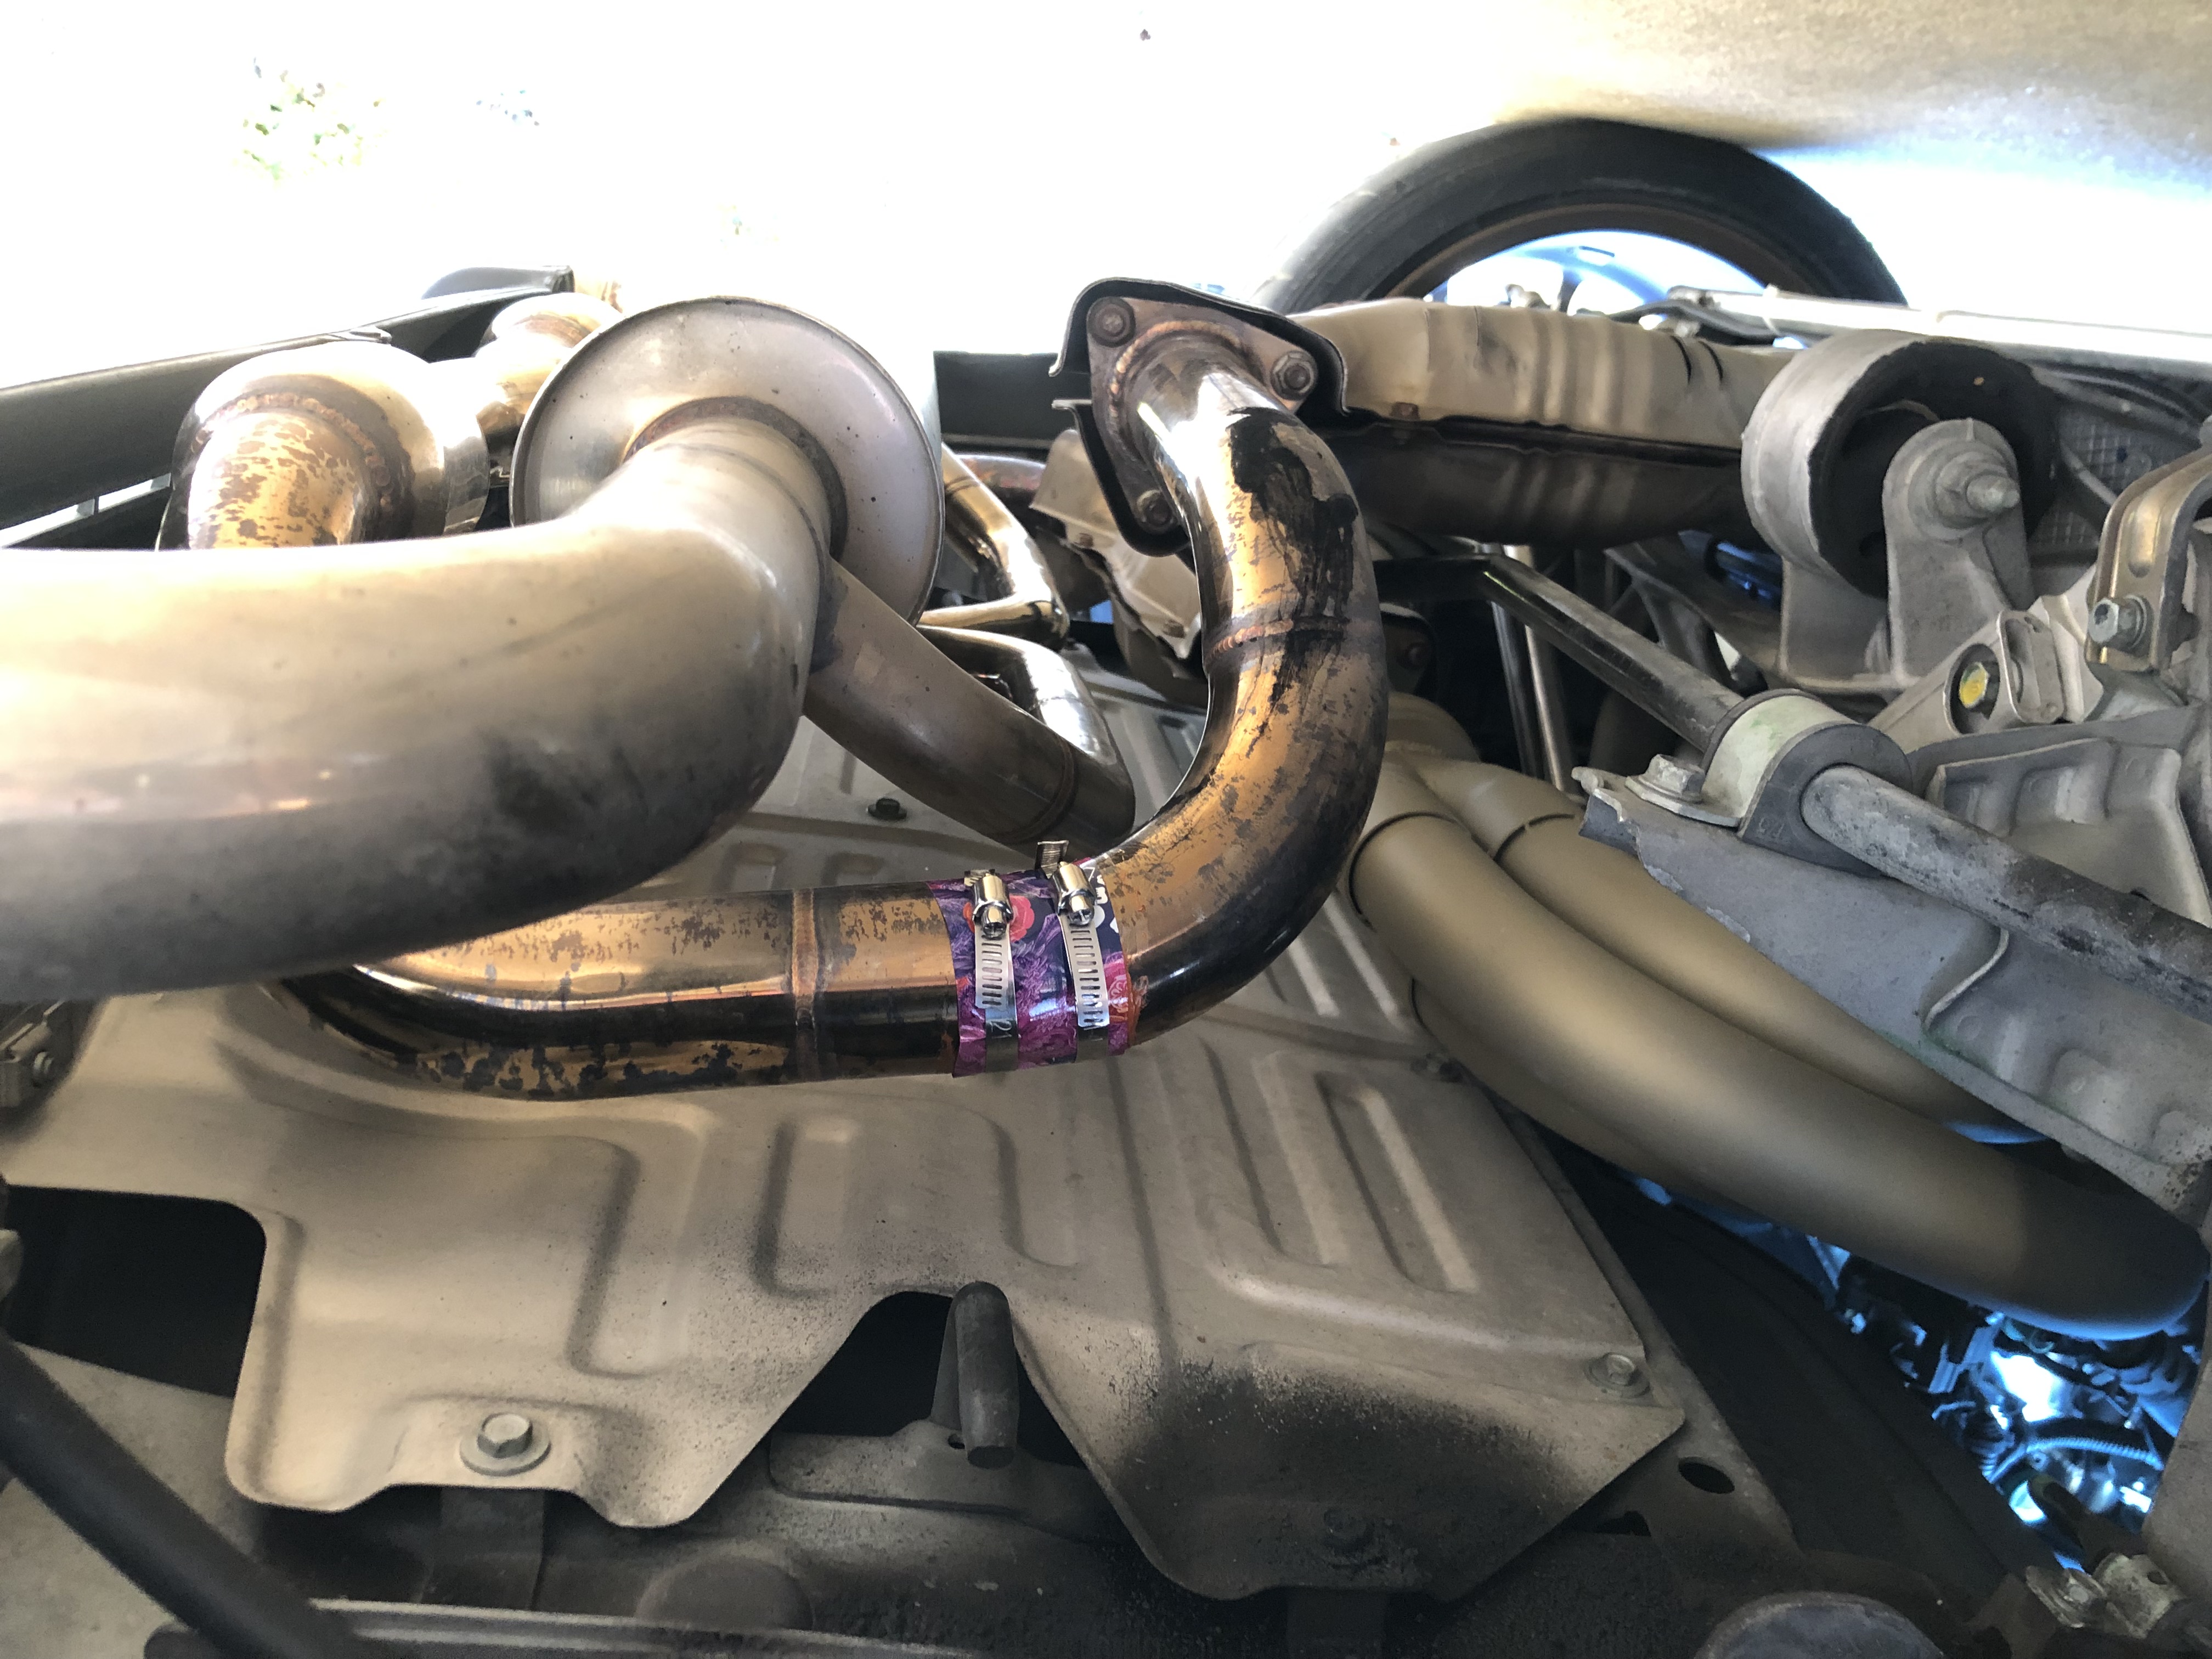
Also bolted up the exhaust, it's a bit uneven so I might end up getting the adjustable hangers at some point, but for the time being I'll just live with it.
I made the mistake of taking apart the rear caliper piston when I should have just blasted it out with brake cleaner. It has a snap ring holding in a stiff spring, so after thinking about it for a while I bought a sacrificial socket at AutoZone and hacked it up until I could use it to compress the spring while still having room to maneuver the snap ring into place. The calipers are the same on Integras, Civics, etc. so just leave the rear pistons alone, there aren't any seals to replace and you'll save yourselves a few hours of headache.

I was able to get them back together though, so here they are bolted up with the new hose.
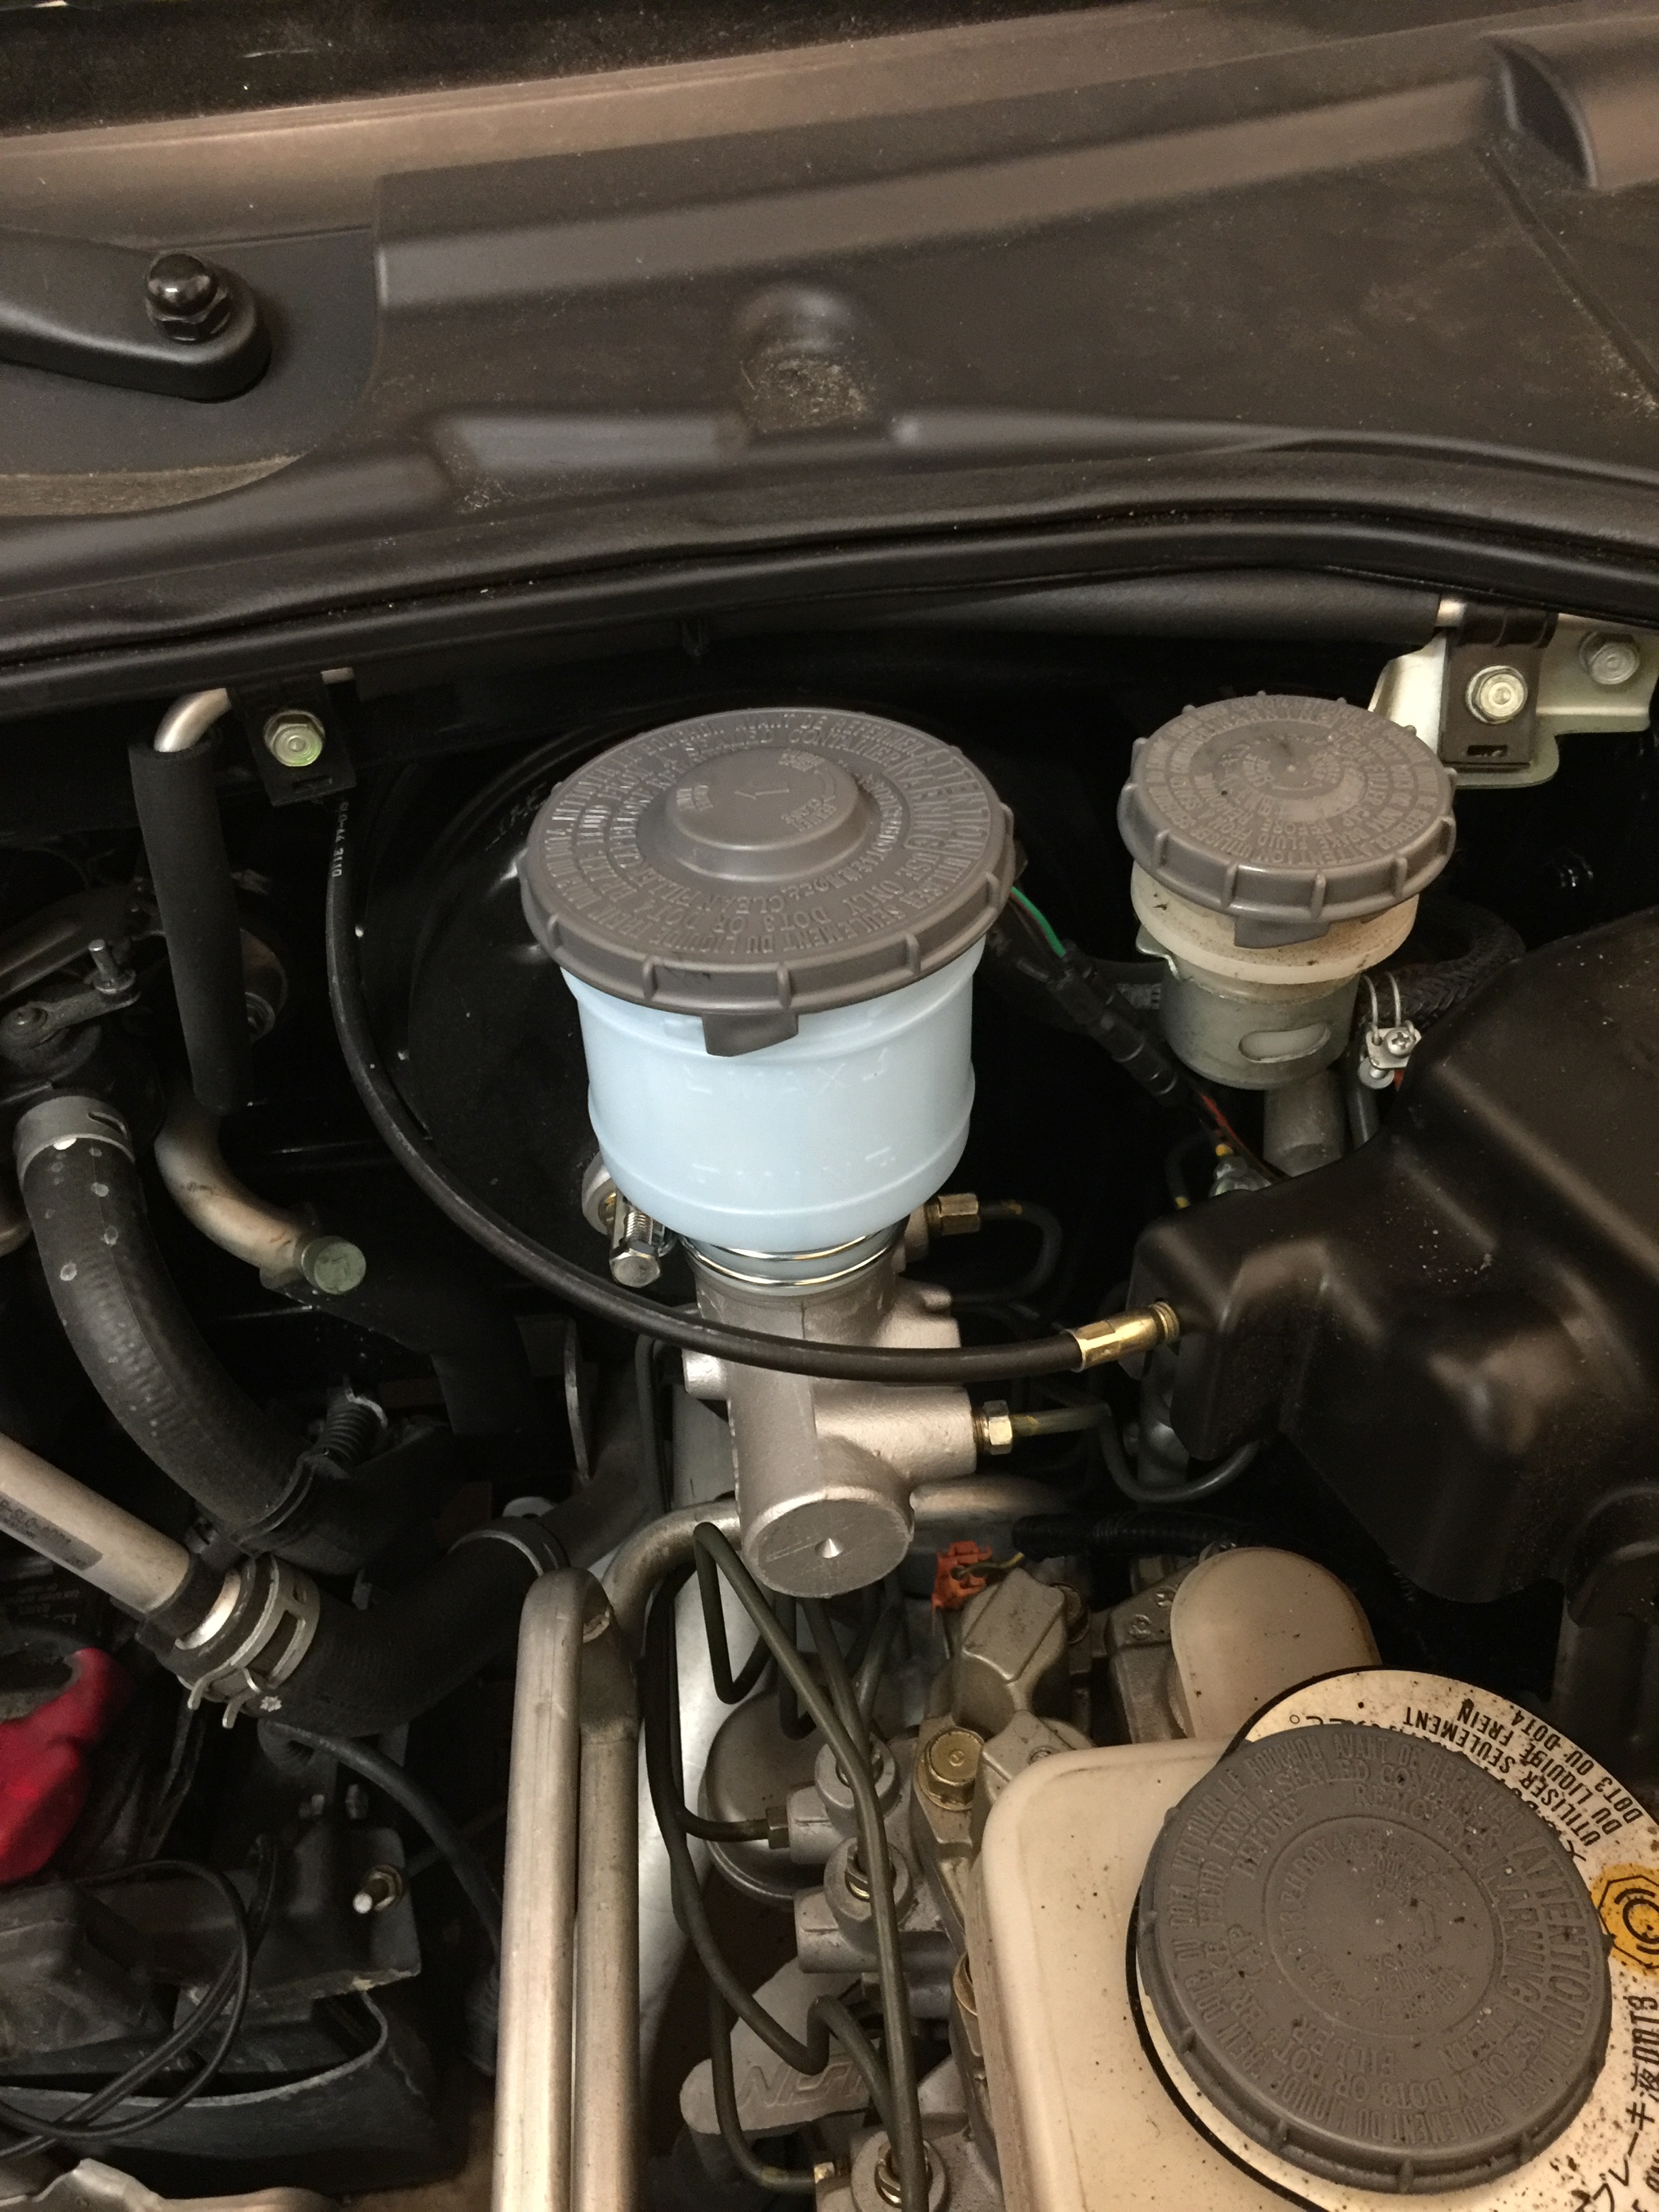
Master cylinder replaced, surprisingly easy, just undo the two flare nut fittings and remove the 2 bolts holding it to the firewall. I didn't bother to bench bleed it since I couldn't find a single actual reason to bench bleed other than people saying they had always done it like that. You're going to get air in the lines just from removing the fittings in the first place, skipping bench bleeding just adds a bit more air to bleed out and makes it MUCH easier to avoid getting brake fluid on stuff, and to me, protecting the paint is much more important than spending an extra 2 minutes bleeding the brakes.
Car reassembled, I really like the way they came out. Subtle but nice looking.
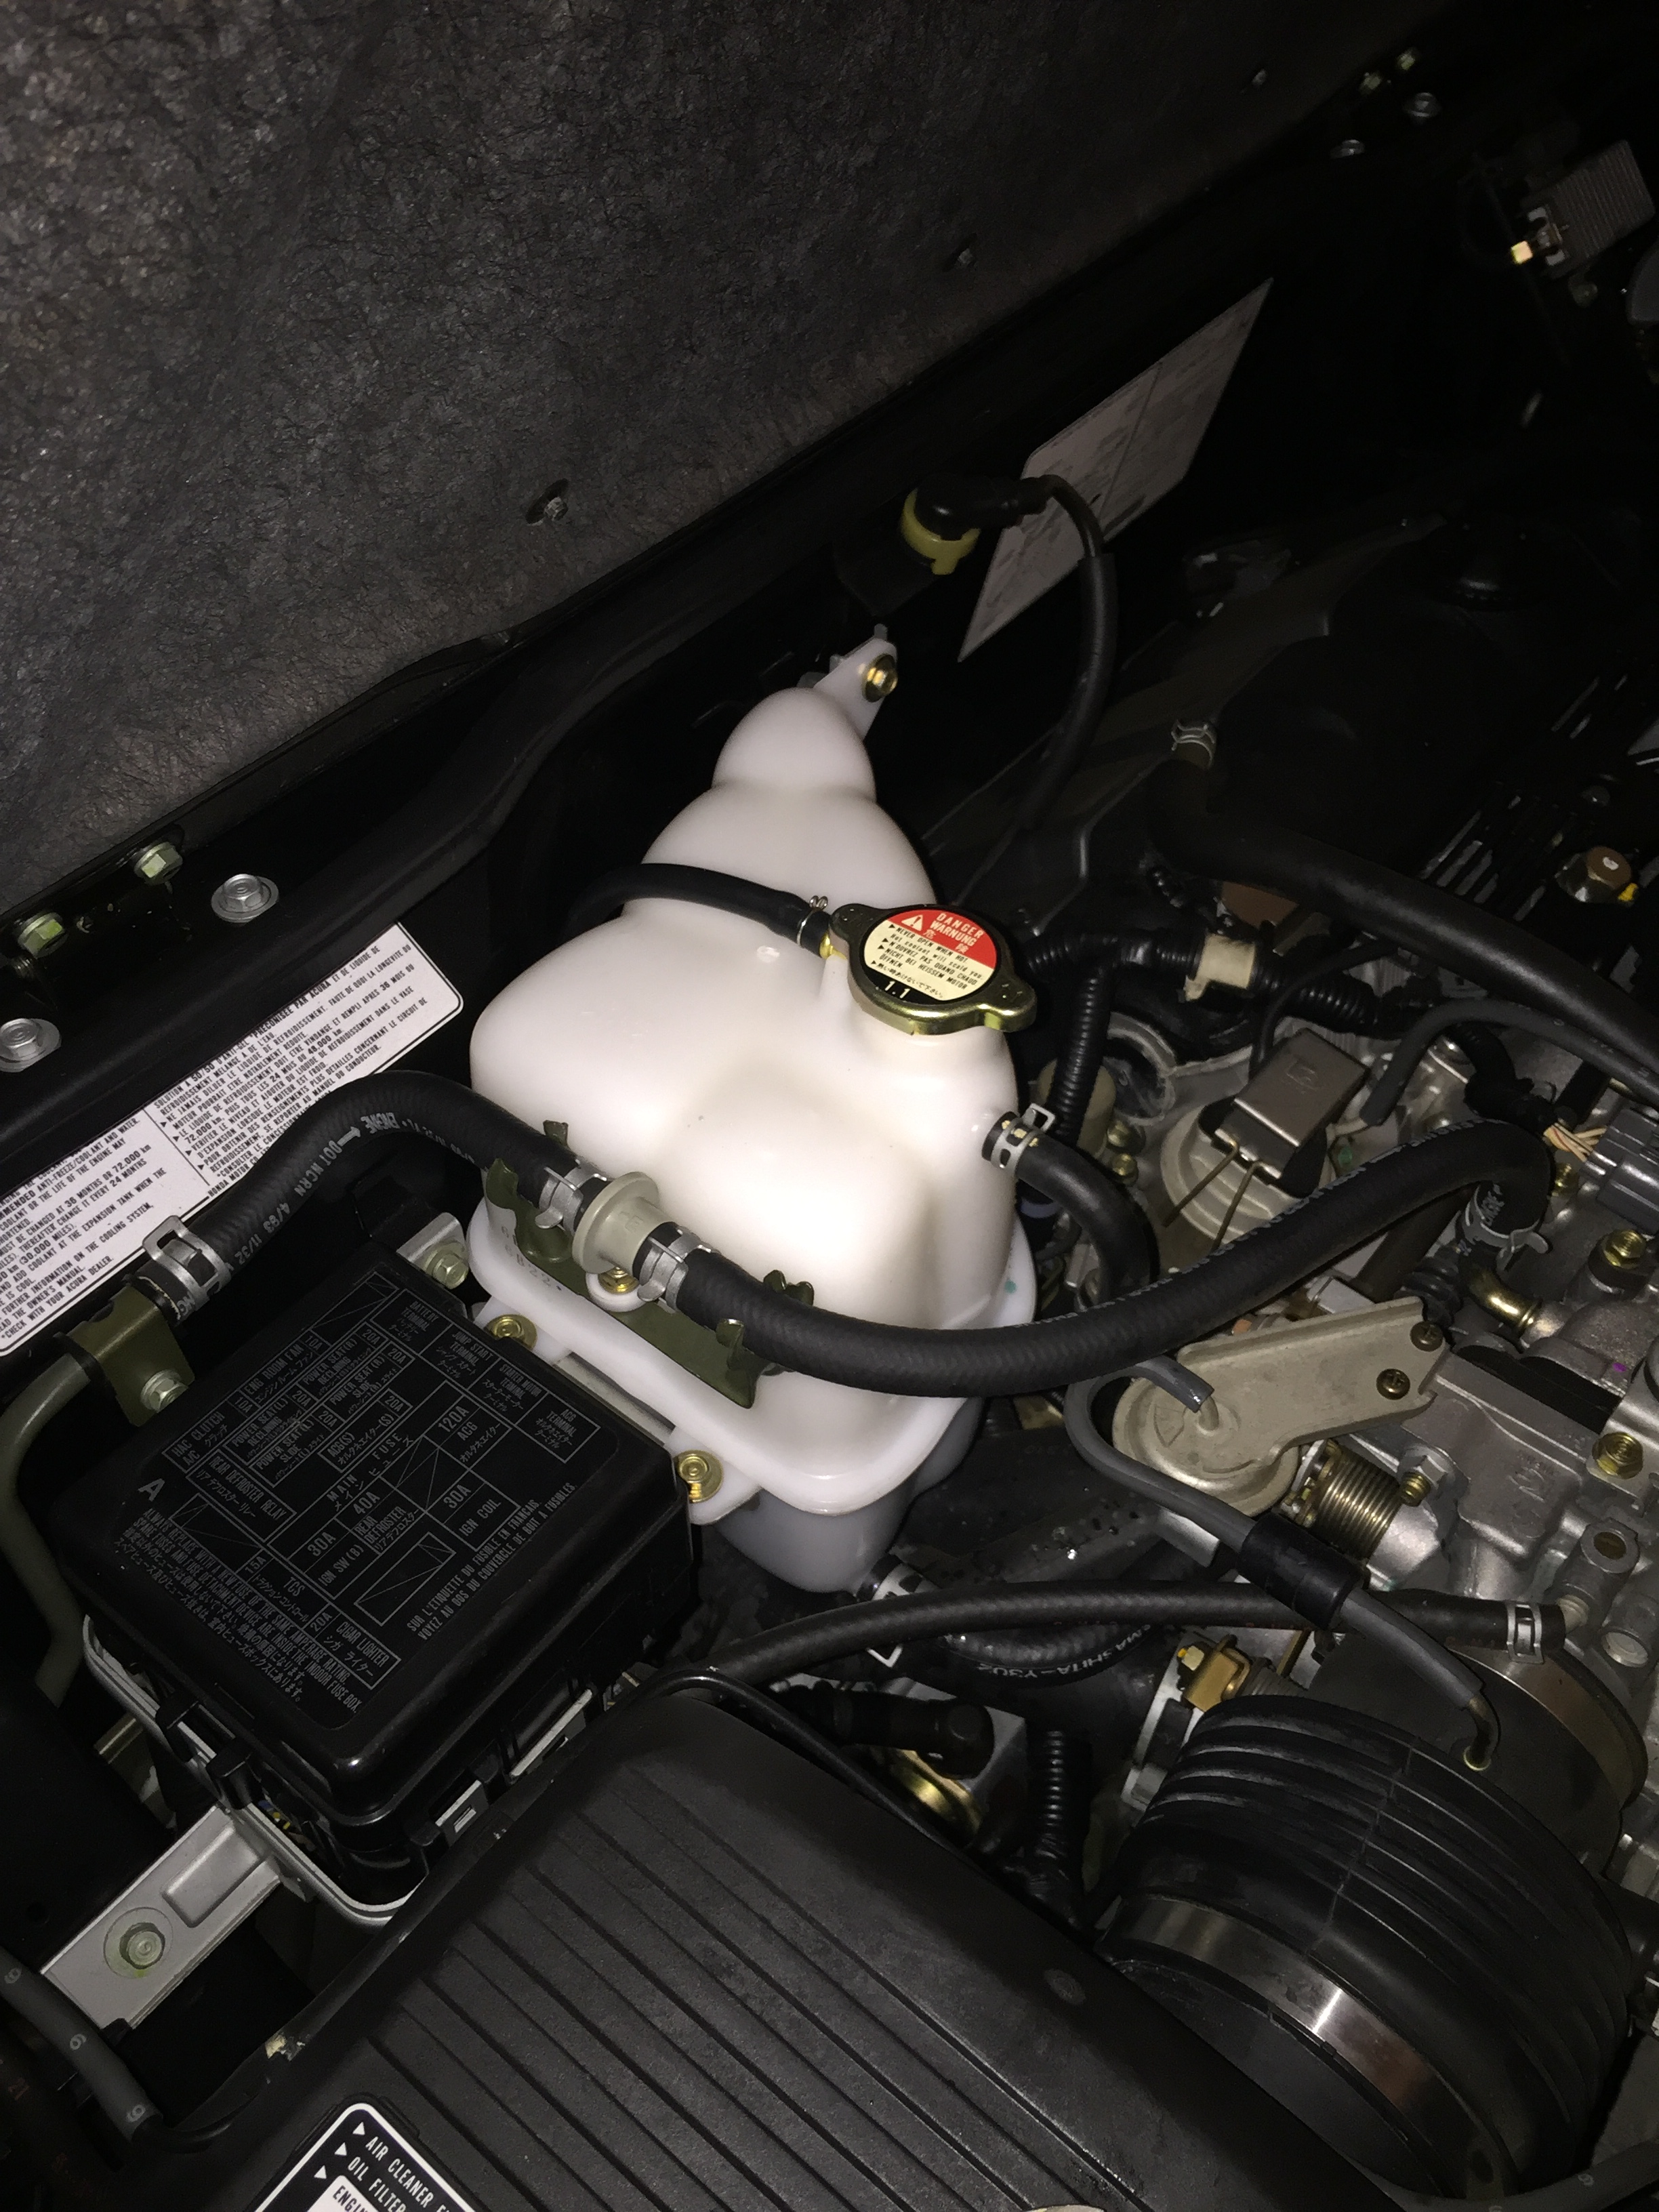
Also replaced the cracked overflow tank.
Here's a quick video of a 1-2 pull with the Pride V1 exhaust, it's a bit annoying just driving around town and downright obnoxious in parking garages but we all know that WOT at redline is all that really matters.
https://youtu.be/uABAQuBfO4g
Also bolted up the exhaust, it's a bit uneven so I might end up getting the adjustable hangers at some point, but for the time being I'll just live with it.
I made the mistake of taking apart the rear caliper piston when I should have just blasted it out with brake cleaner. It has a snap ring holding in a stiff spring, so after thinking about it for a while I bought a sacrificial socket at AutoZone and hacked it up until I could use it to compress the spring while still having room to maneuver the snap ring into place. The calipers are the same on Integras, Civics, etc. so just leave the rear pistons alone, there aren't any seals to replace and you'll save yourselves a few hours of headache.
I was able to get them back together though, so here they are bolted up with the new hose.
Master cylinder replaced, surprisingly easy, just undo the two flare nut fittings and remove the 2 bolts holding it to the firewall. I didn't bother to bench bleed it since I couldn't find a single actual reason to bench bleed other than people saying they had always done it like that. You're going to get air in the lines just from removing the fittings in the first place, skipping bench bleeding just adds a bit more air to bleed out and makes it MUCH easier to avoid getting brake fluid on stuff, and to me, protecting the paint is much more important than spending an extra 2 minutes bleeding the brakes.
Car reassembled, I really like the way they came out. Subtle but nice looking.
Also replaced the cracked overflow tank.
Here's a quick video of a 1-2 pull with the Pride V1 exhaust, it's a bit annoying just driving around town and downright obnoxious in parking garages but we all know that WOT at redline is all that really matters.
https://youtu.be/uABAQuBfO4g
Last edited:
keep up the great work!
Awesome thread... subbed.
Few questions: How did you fix the adhesive problem on the top windshield trim? Mine is coming out and I was wondering what kind of adhesive people apply to get it stuck in there.
The door trim will probably require 3m automotive tape. I have used adhesive velcro in the past which, unforunately doesn't last very long in the heat. I now live pretty religiously by 3m tape since it is easy to remove (with a rubber eraser wheel and plastic scrapers) even when cracked and old.
How's the suntek ppf doing? I was doing some research into clear solutions and it seems like XPel Ultimate was the best cost-effective clear protection solution. I know Suntek is new to the game and much more expensive so I haven't heard much in terms of reviews.
Few questions: How did you fix the adhesive problem on the top windshield trim? Mine is coming out and I was wondering what kind of adhesive people apply to get it stuck in there.
The top windshield trim is in 2 pieces and I replaced both, the lower piece has adhesive pre-applied to the back edge when you buy it and the upper piece snaps into the lower piece. If yours is still in good shape you might be able to get by with just scraping the old adhesive off and sticking it back down using 3M tape or something similar but that depends on being able to remove the trim piece without damaging it.
The door trim will probably require 3m automotive tape. I have used adhesive velcro in the past which, unforunately doesn't last very long in the heat. I now live pretty religiously by 3m tape since it is easy to remove (with a rubber eraser wheel and plastic scrapers) even when cracked and old.
Thanks, I'll give that a shot, at the moment my door trim pieces are just sitting on a shelf in the garage, I really need to reinstall them since it looks terrible without them.
How's the suntek ppf doing? I was doing some research into clear solutions and it seems like XPel Ultimate was the best cost-effective clear protection solution. I know Suntek is new to the game and much more expensive so I haven't heard much in terms of reviews.
So far so good, no one else has noticed that it's even there, but my car isn't exactly a torture test for it since I have a garage at home and at work so it really only sits in the sun during errands and such.
A few weeks ago I settled on the Blackvue DR470-2CH dash cam for this car, reasons being because it's capacitor based so works well in high heat like we have in Texas, fairly no frills and elegantly designed, and it has 2 separate cameras to record both in front of the car and behind the car. The downside to this is that an extra wire to connect to the rear camera has to be hidden, but since I was planning on removing the headliner to do the install I wasn't too worried.
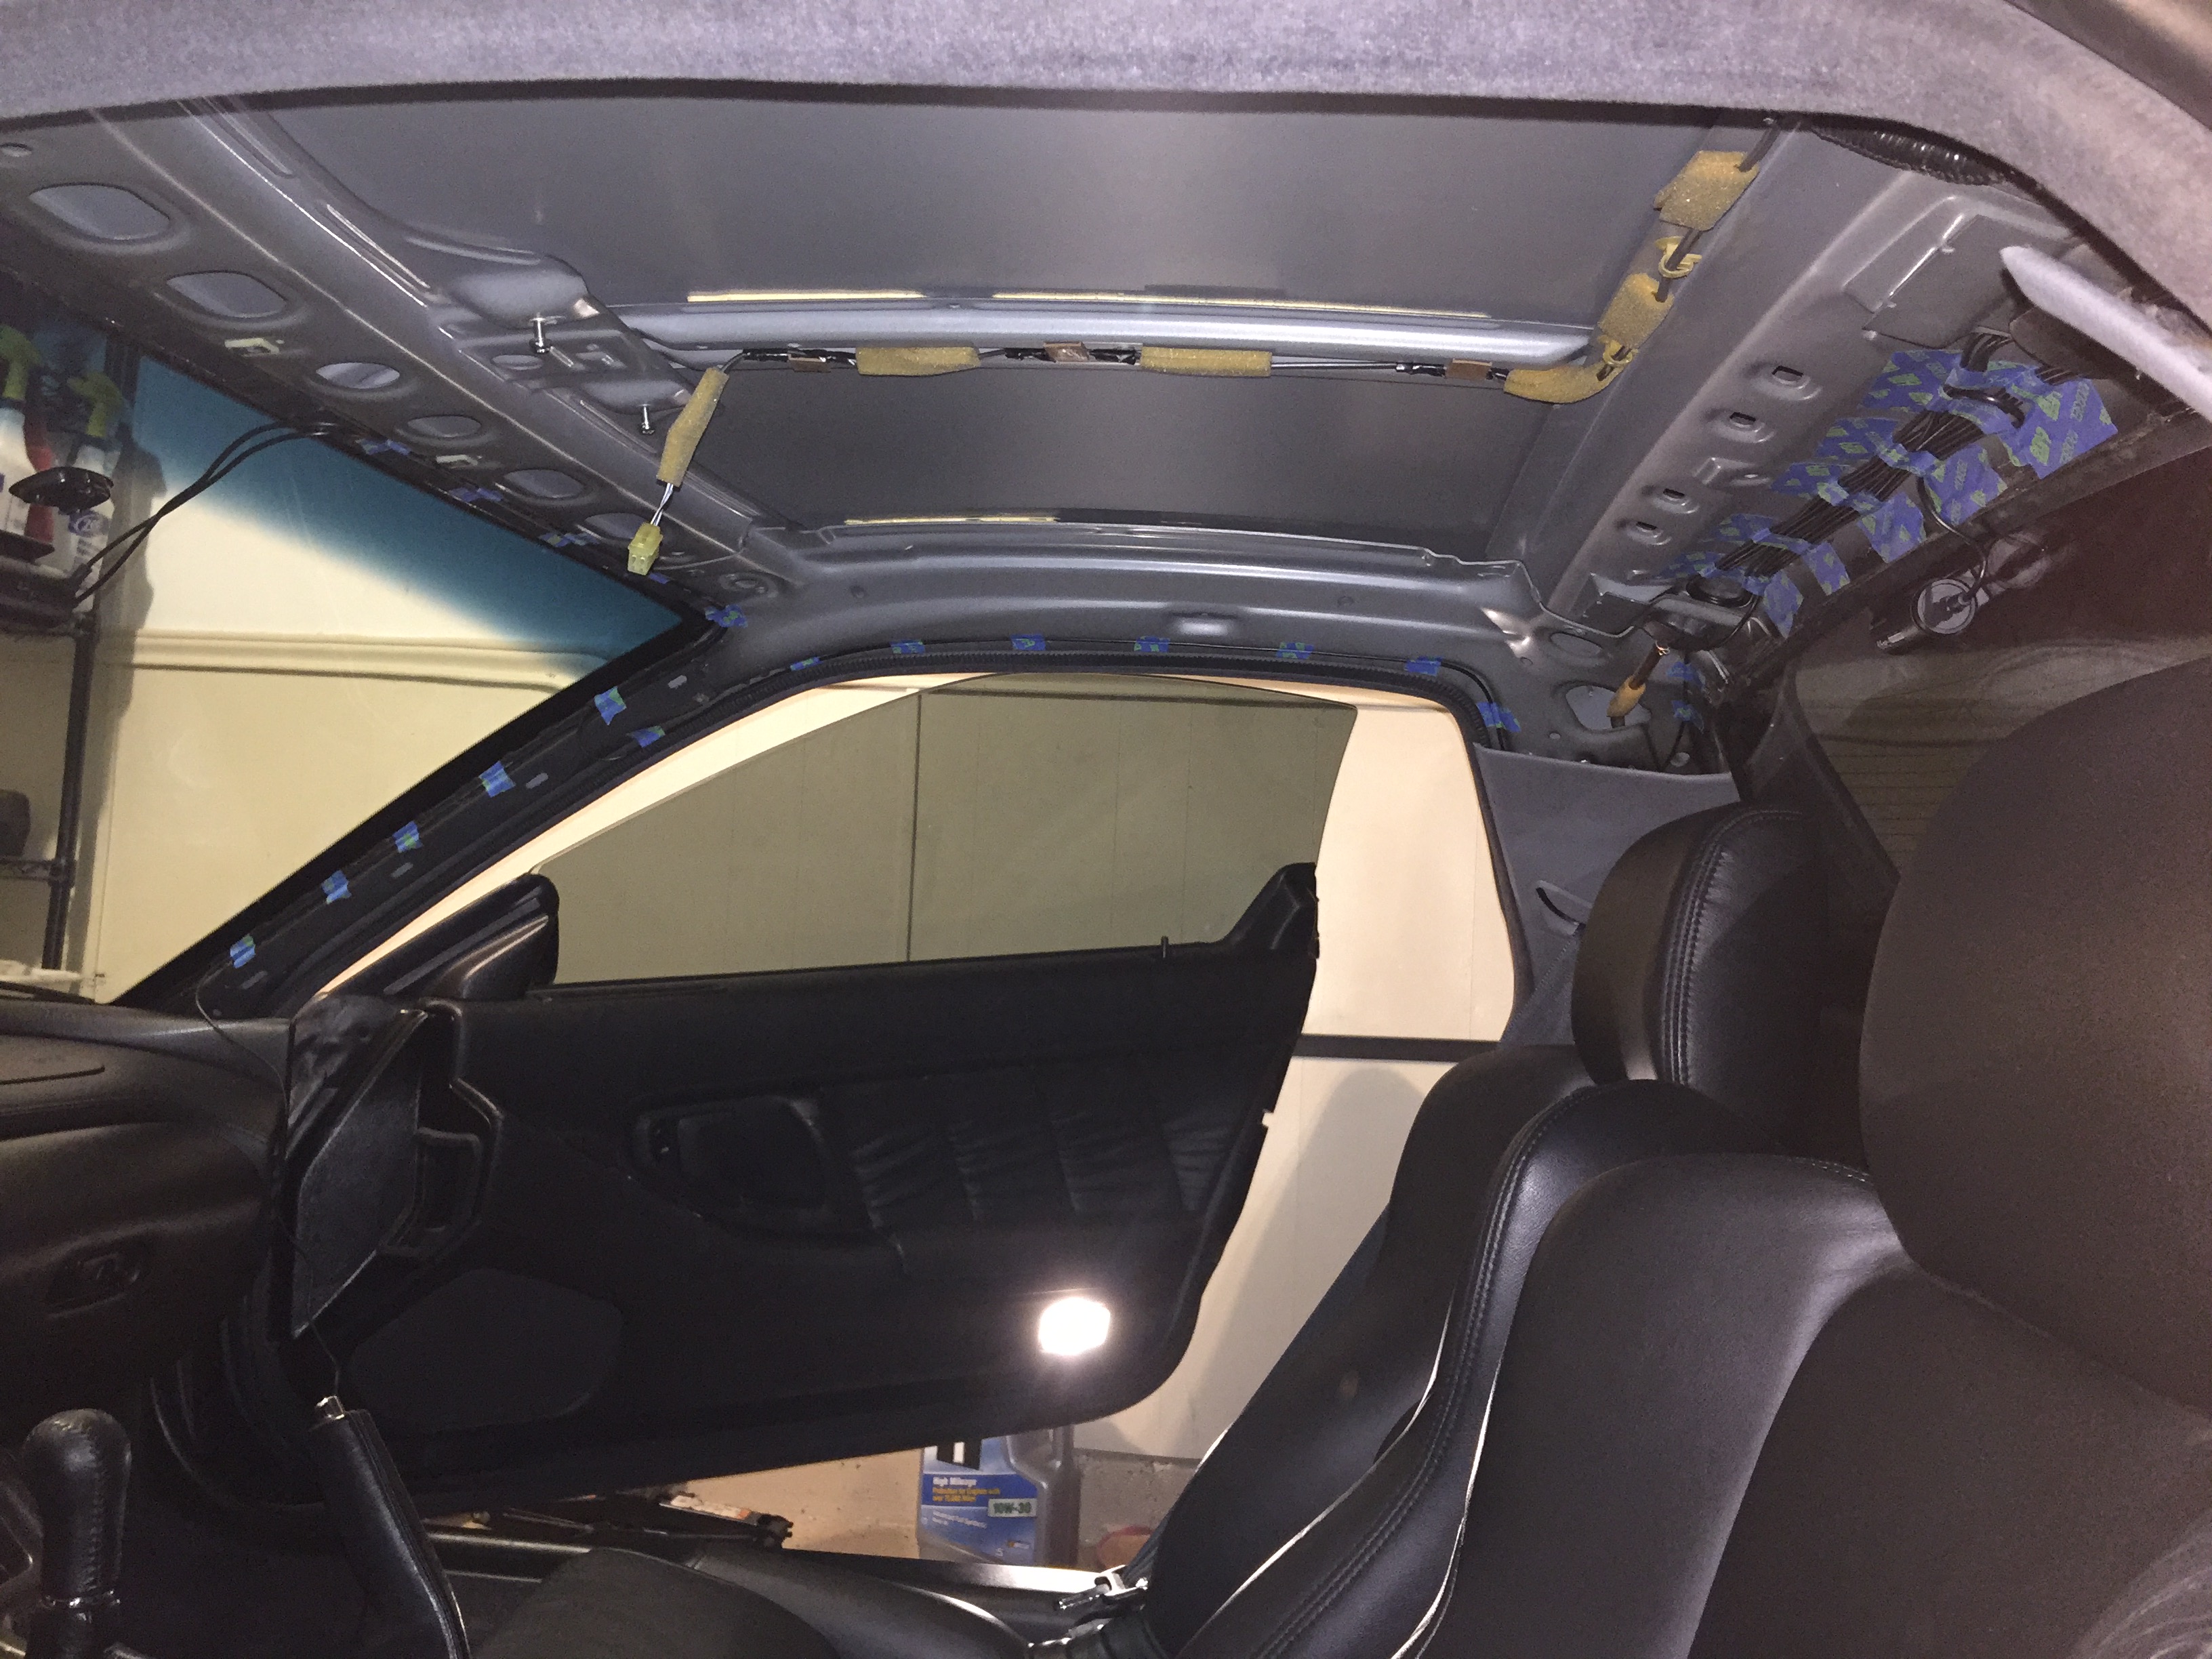
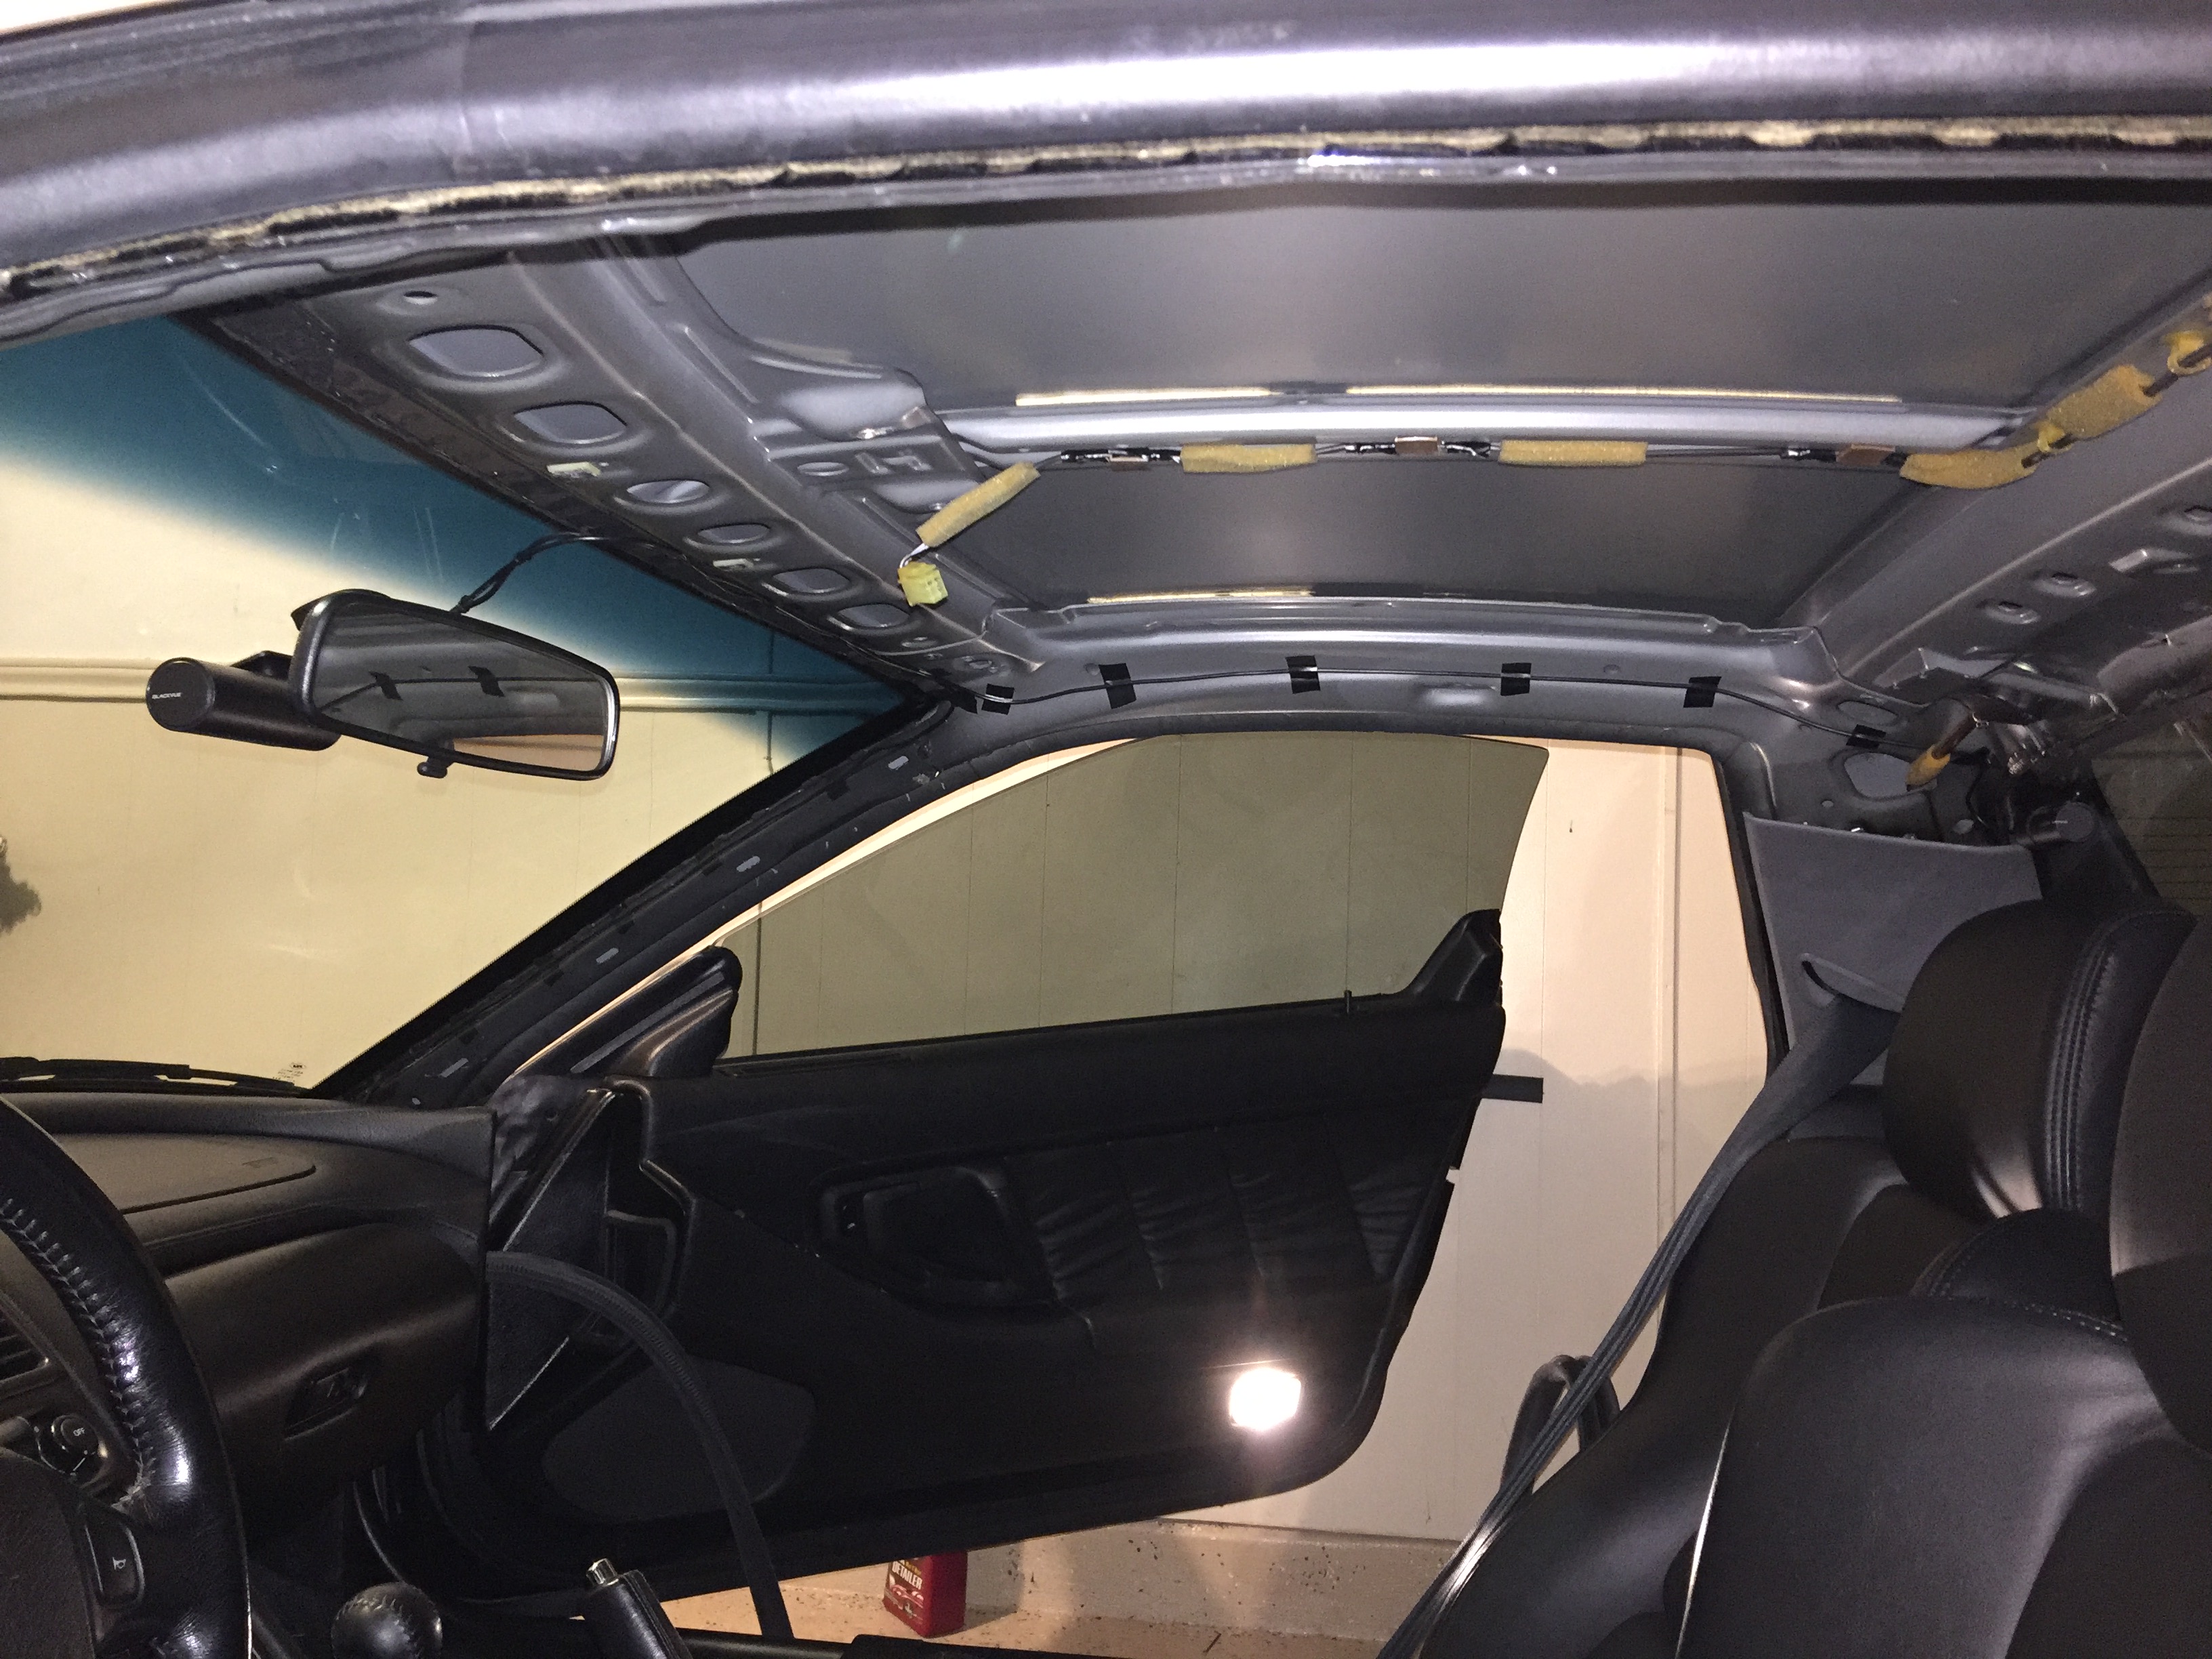
Taking the headliner out according to the manual is an insanely long and brutal process that requires removing the seats and most of the interior panels, however I was able to do it just by pulling back the weather stripping, removing the A pillar covers, and popping out the top clips of the B-pillar covers and bending them back enough to get the headliner out. Nothing broke and it ended up being a fairly quick and easy process.
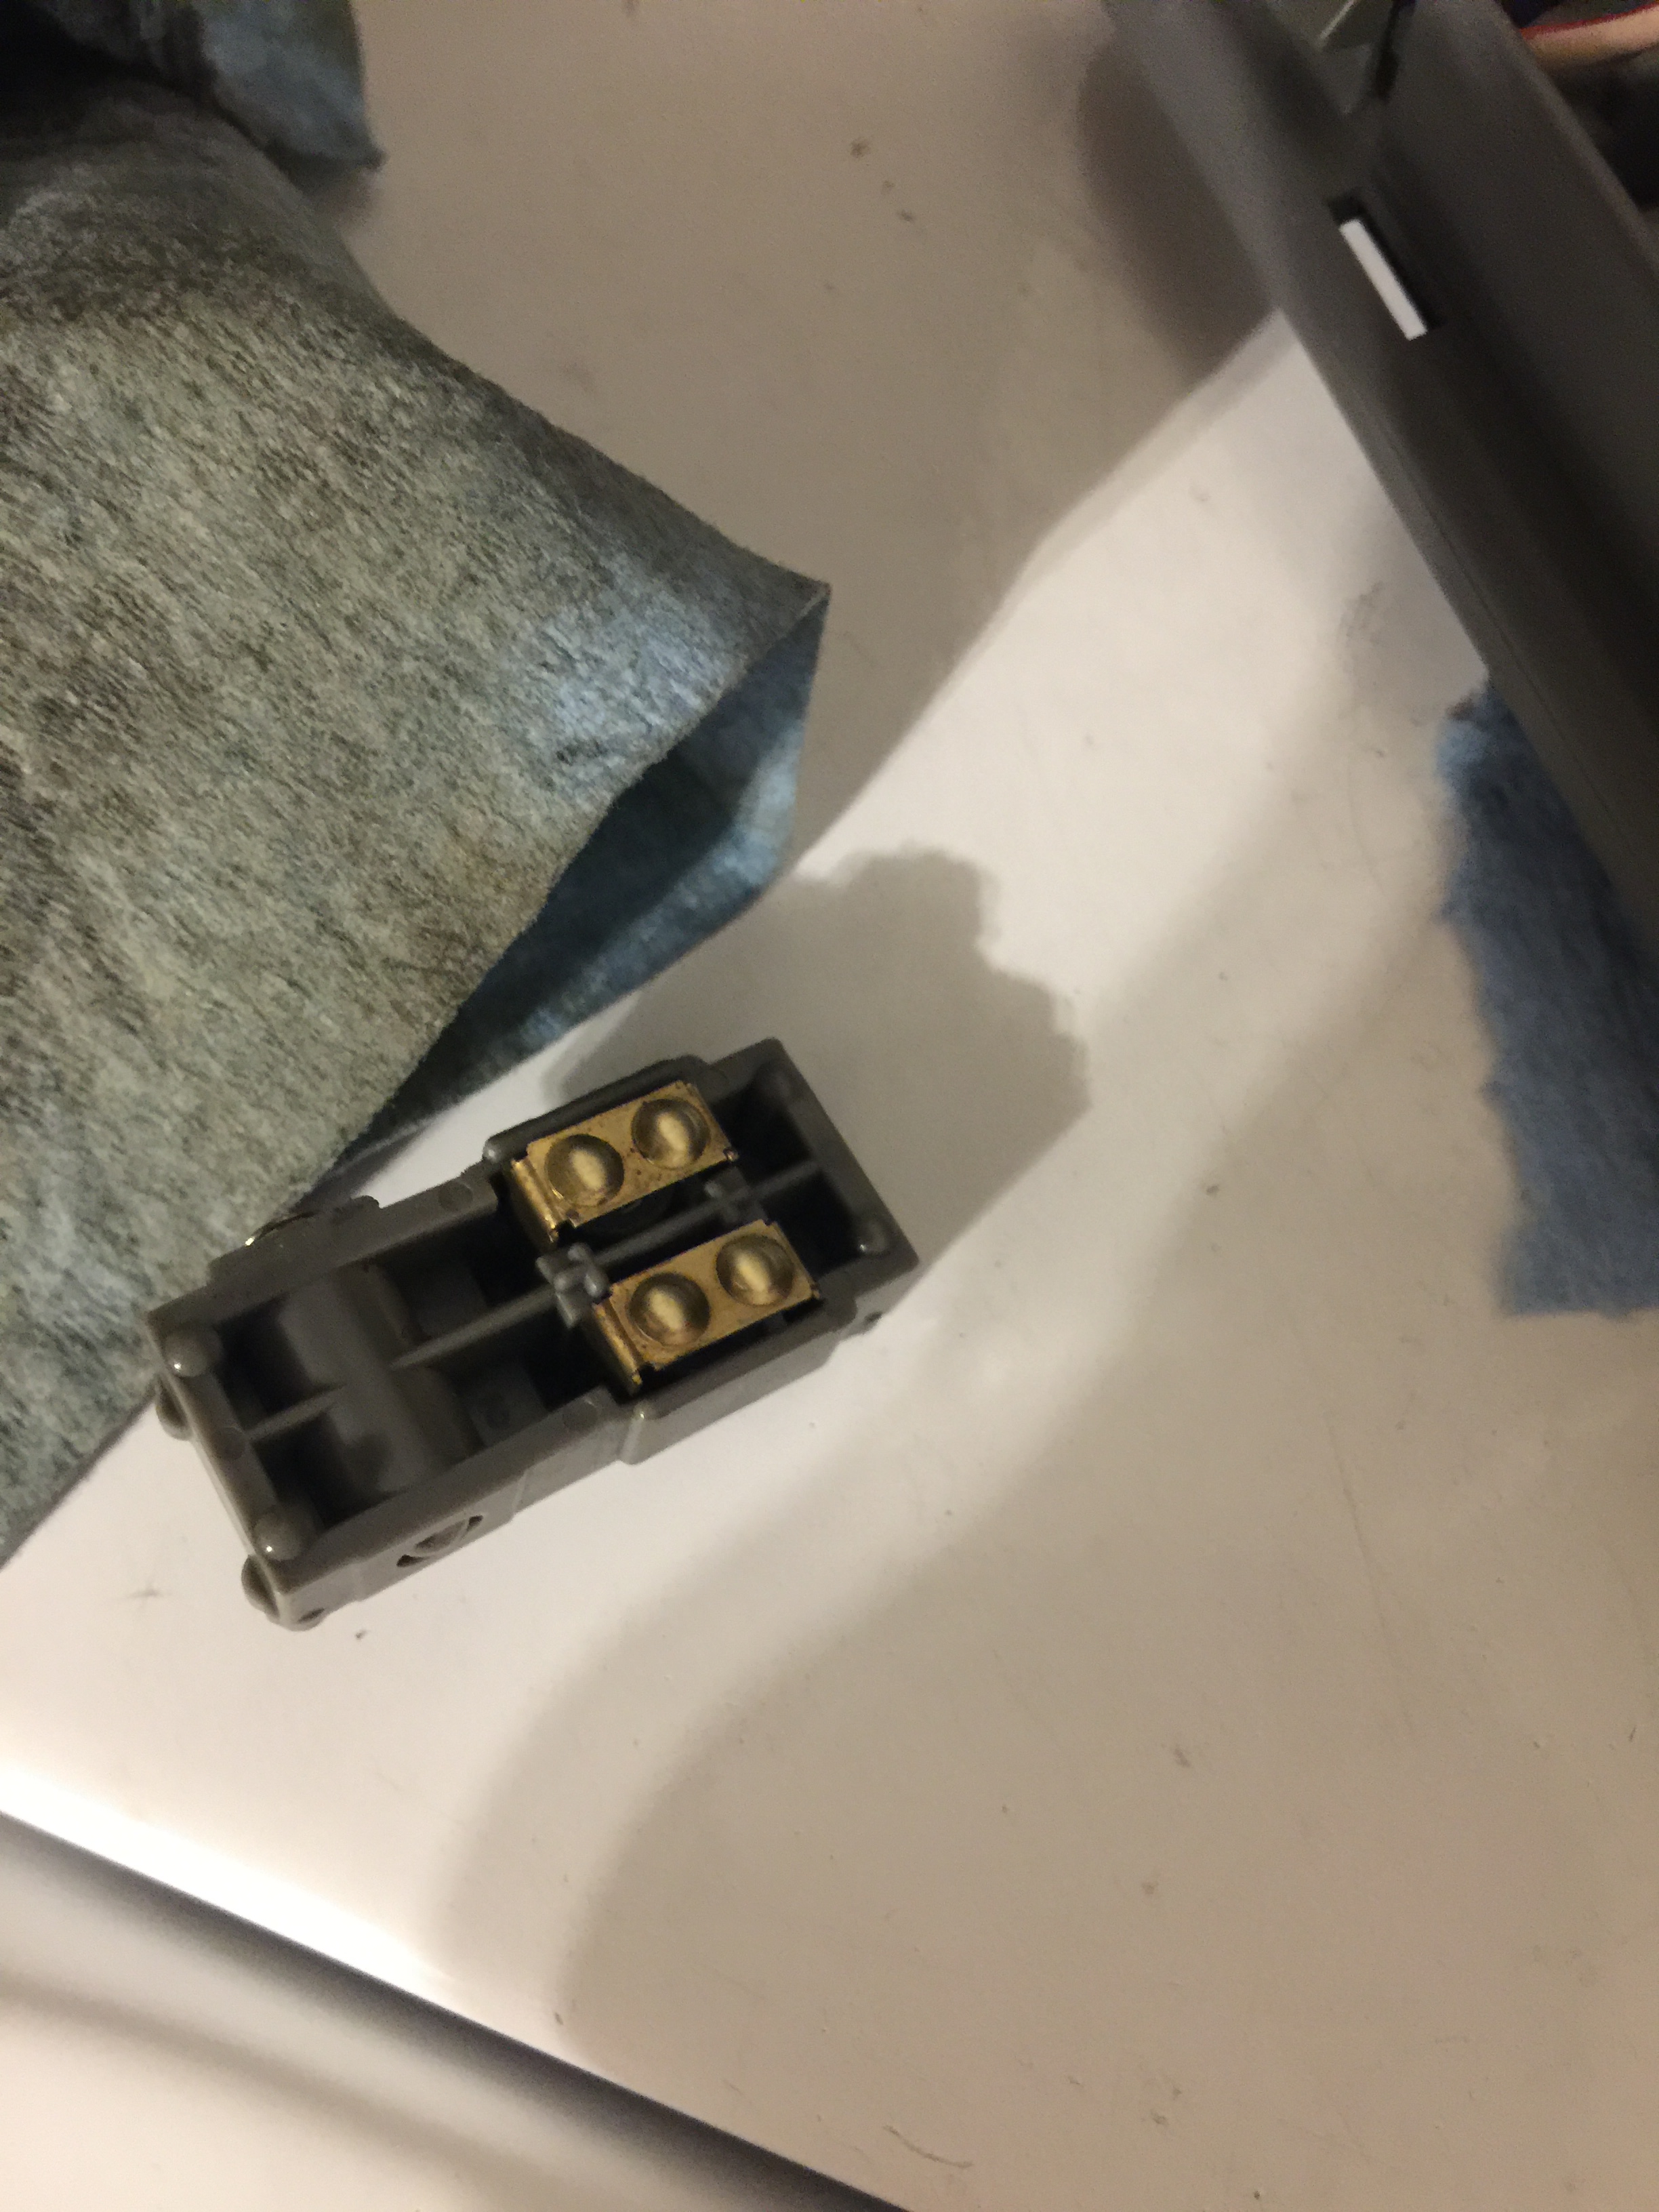
With the headliner out I had access to the guts of the dome light assembly, and since the main 3-position switch had gotten pretty finicky I took it apart and found the contacts heavily corroded. Getting to the switch guts is simple, just remove the two screws holding the top part down and pull it back as shown.
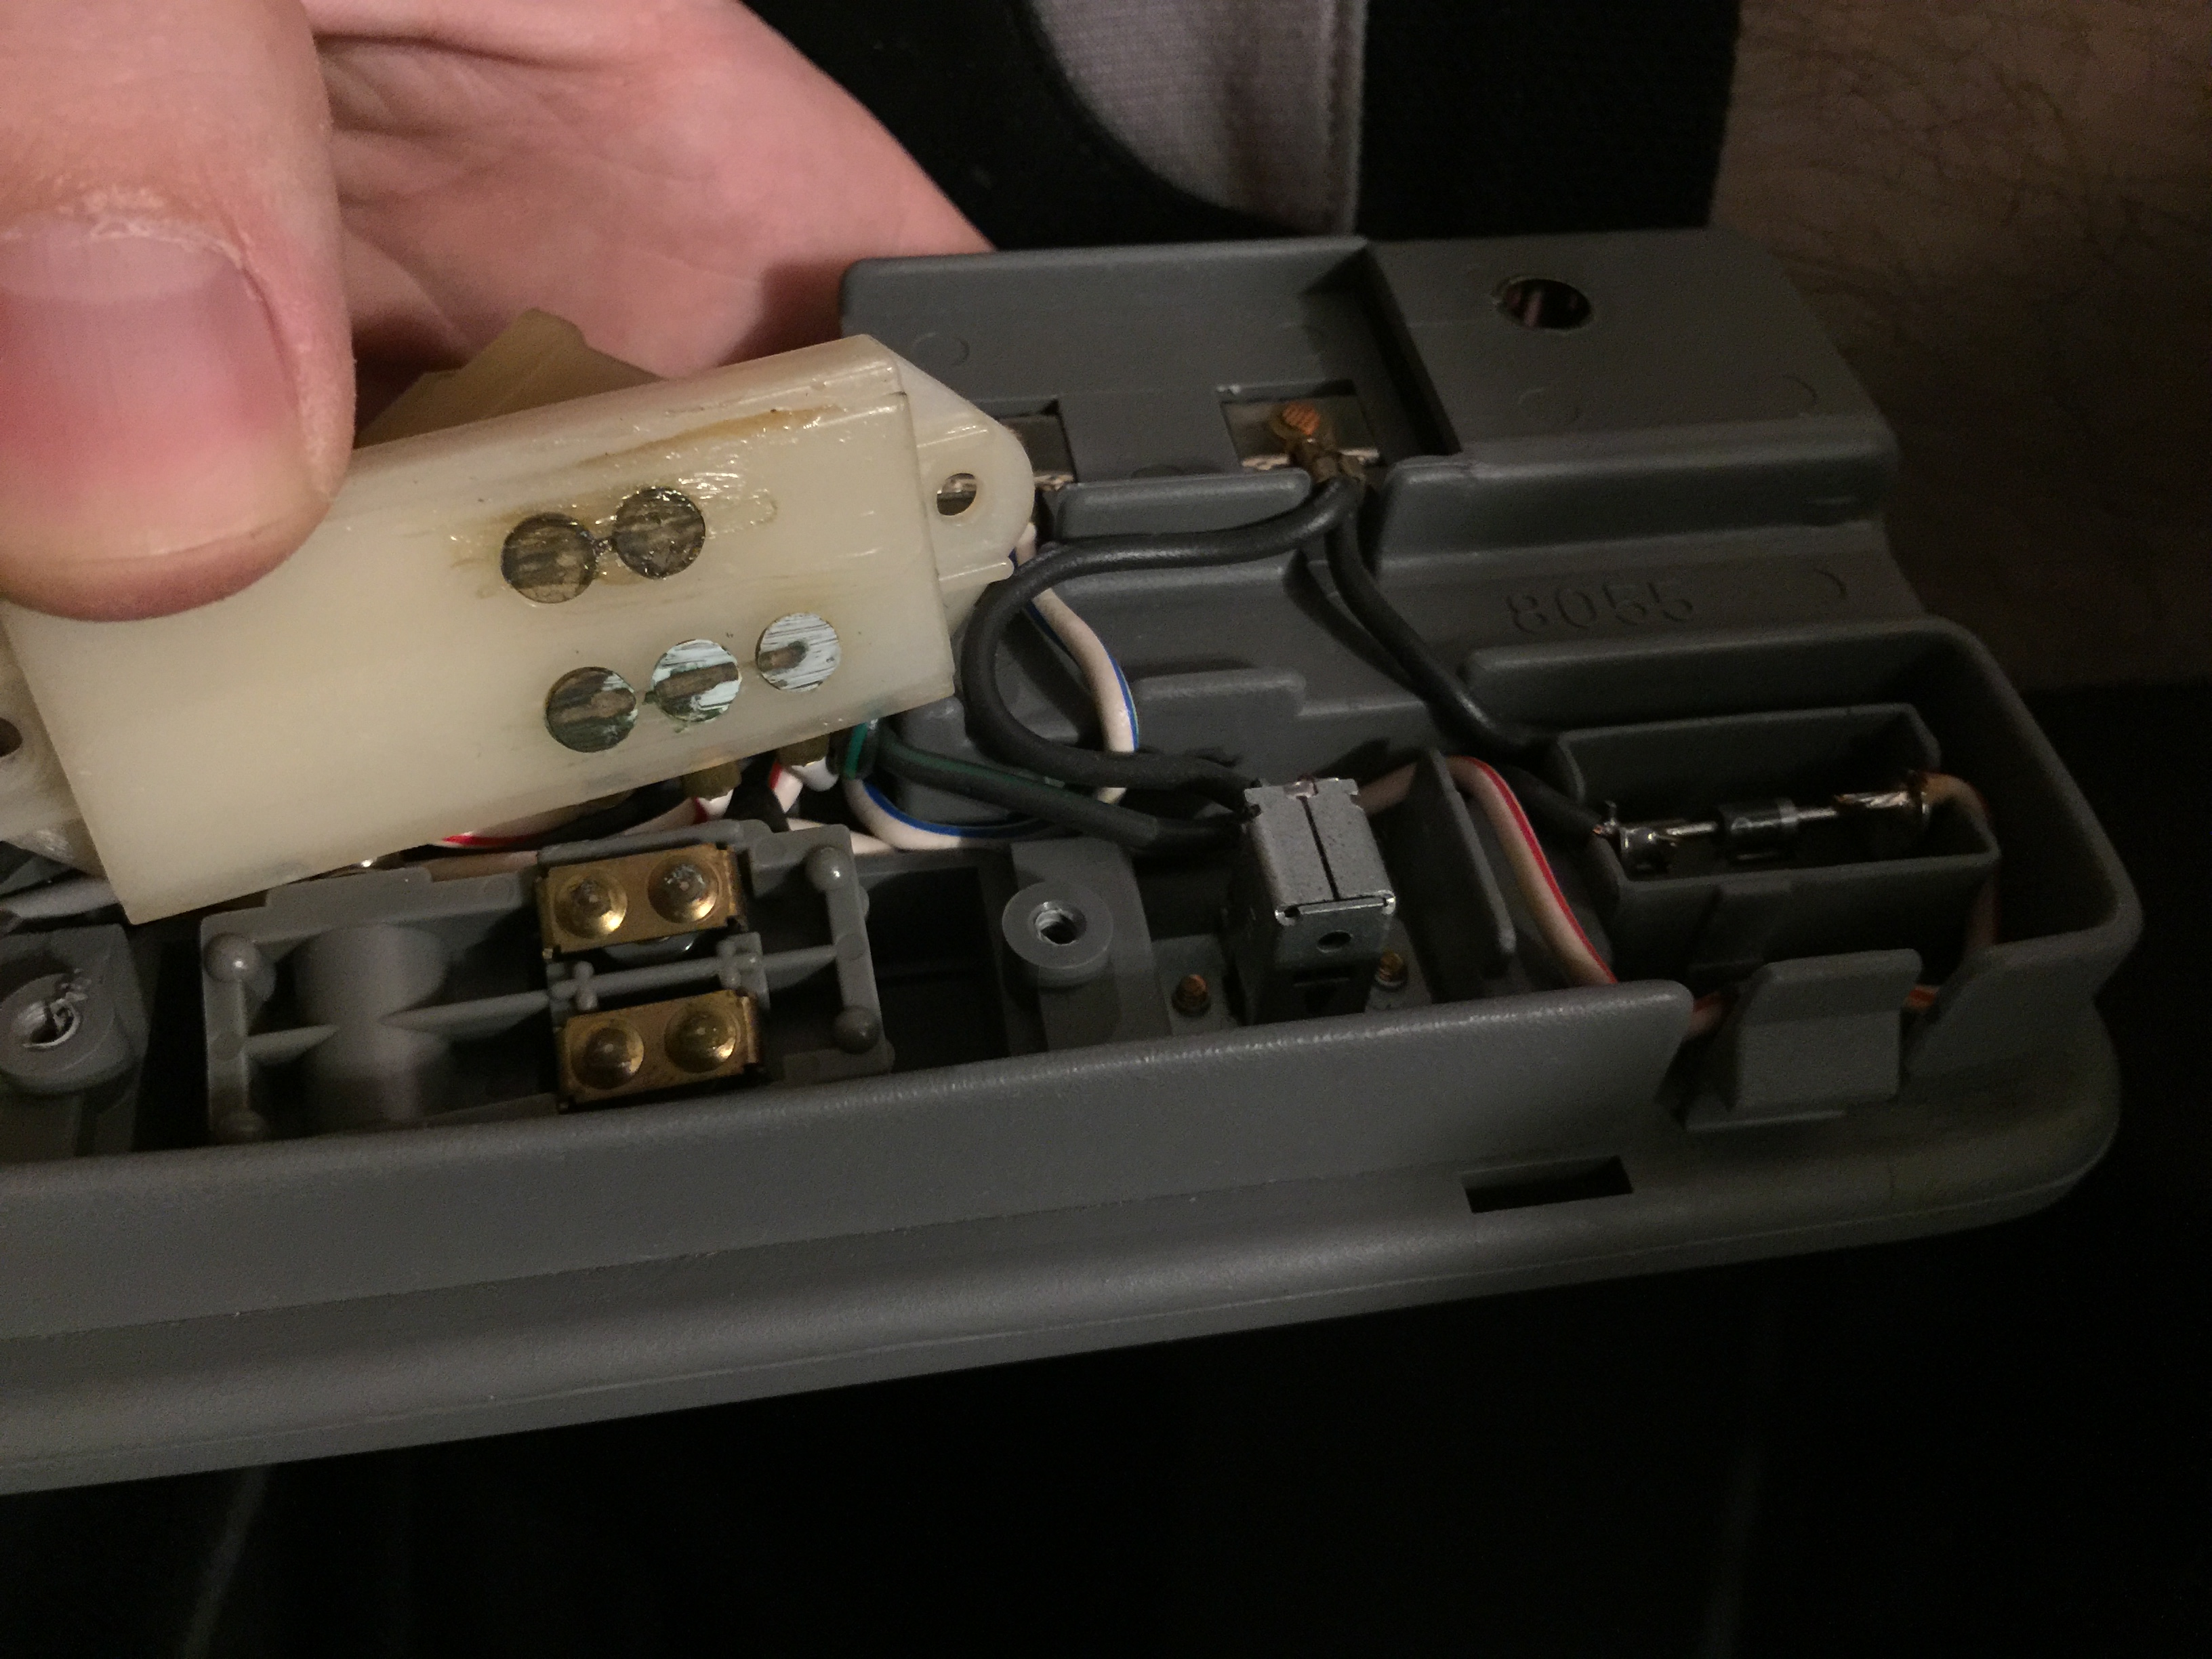
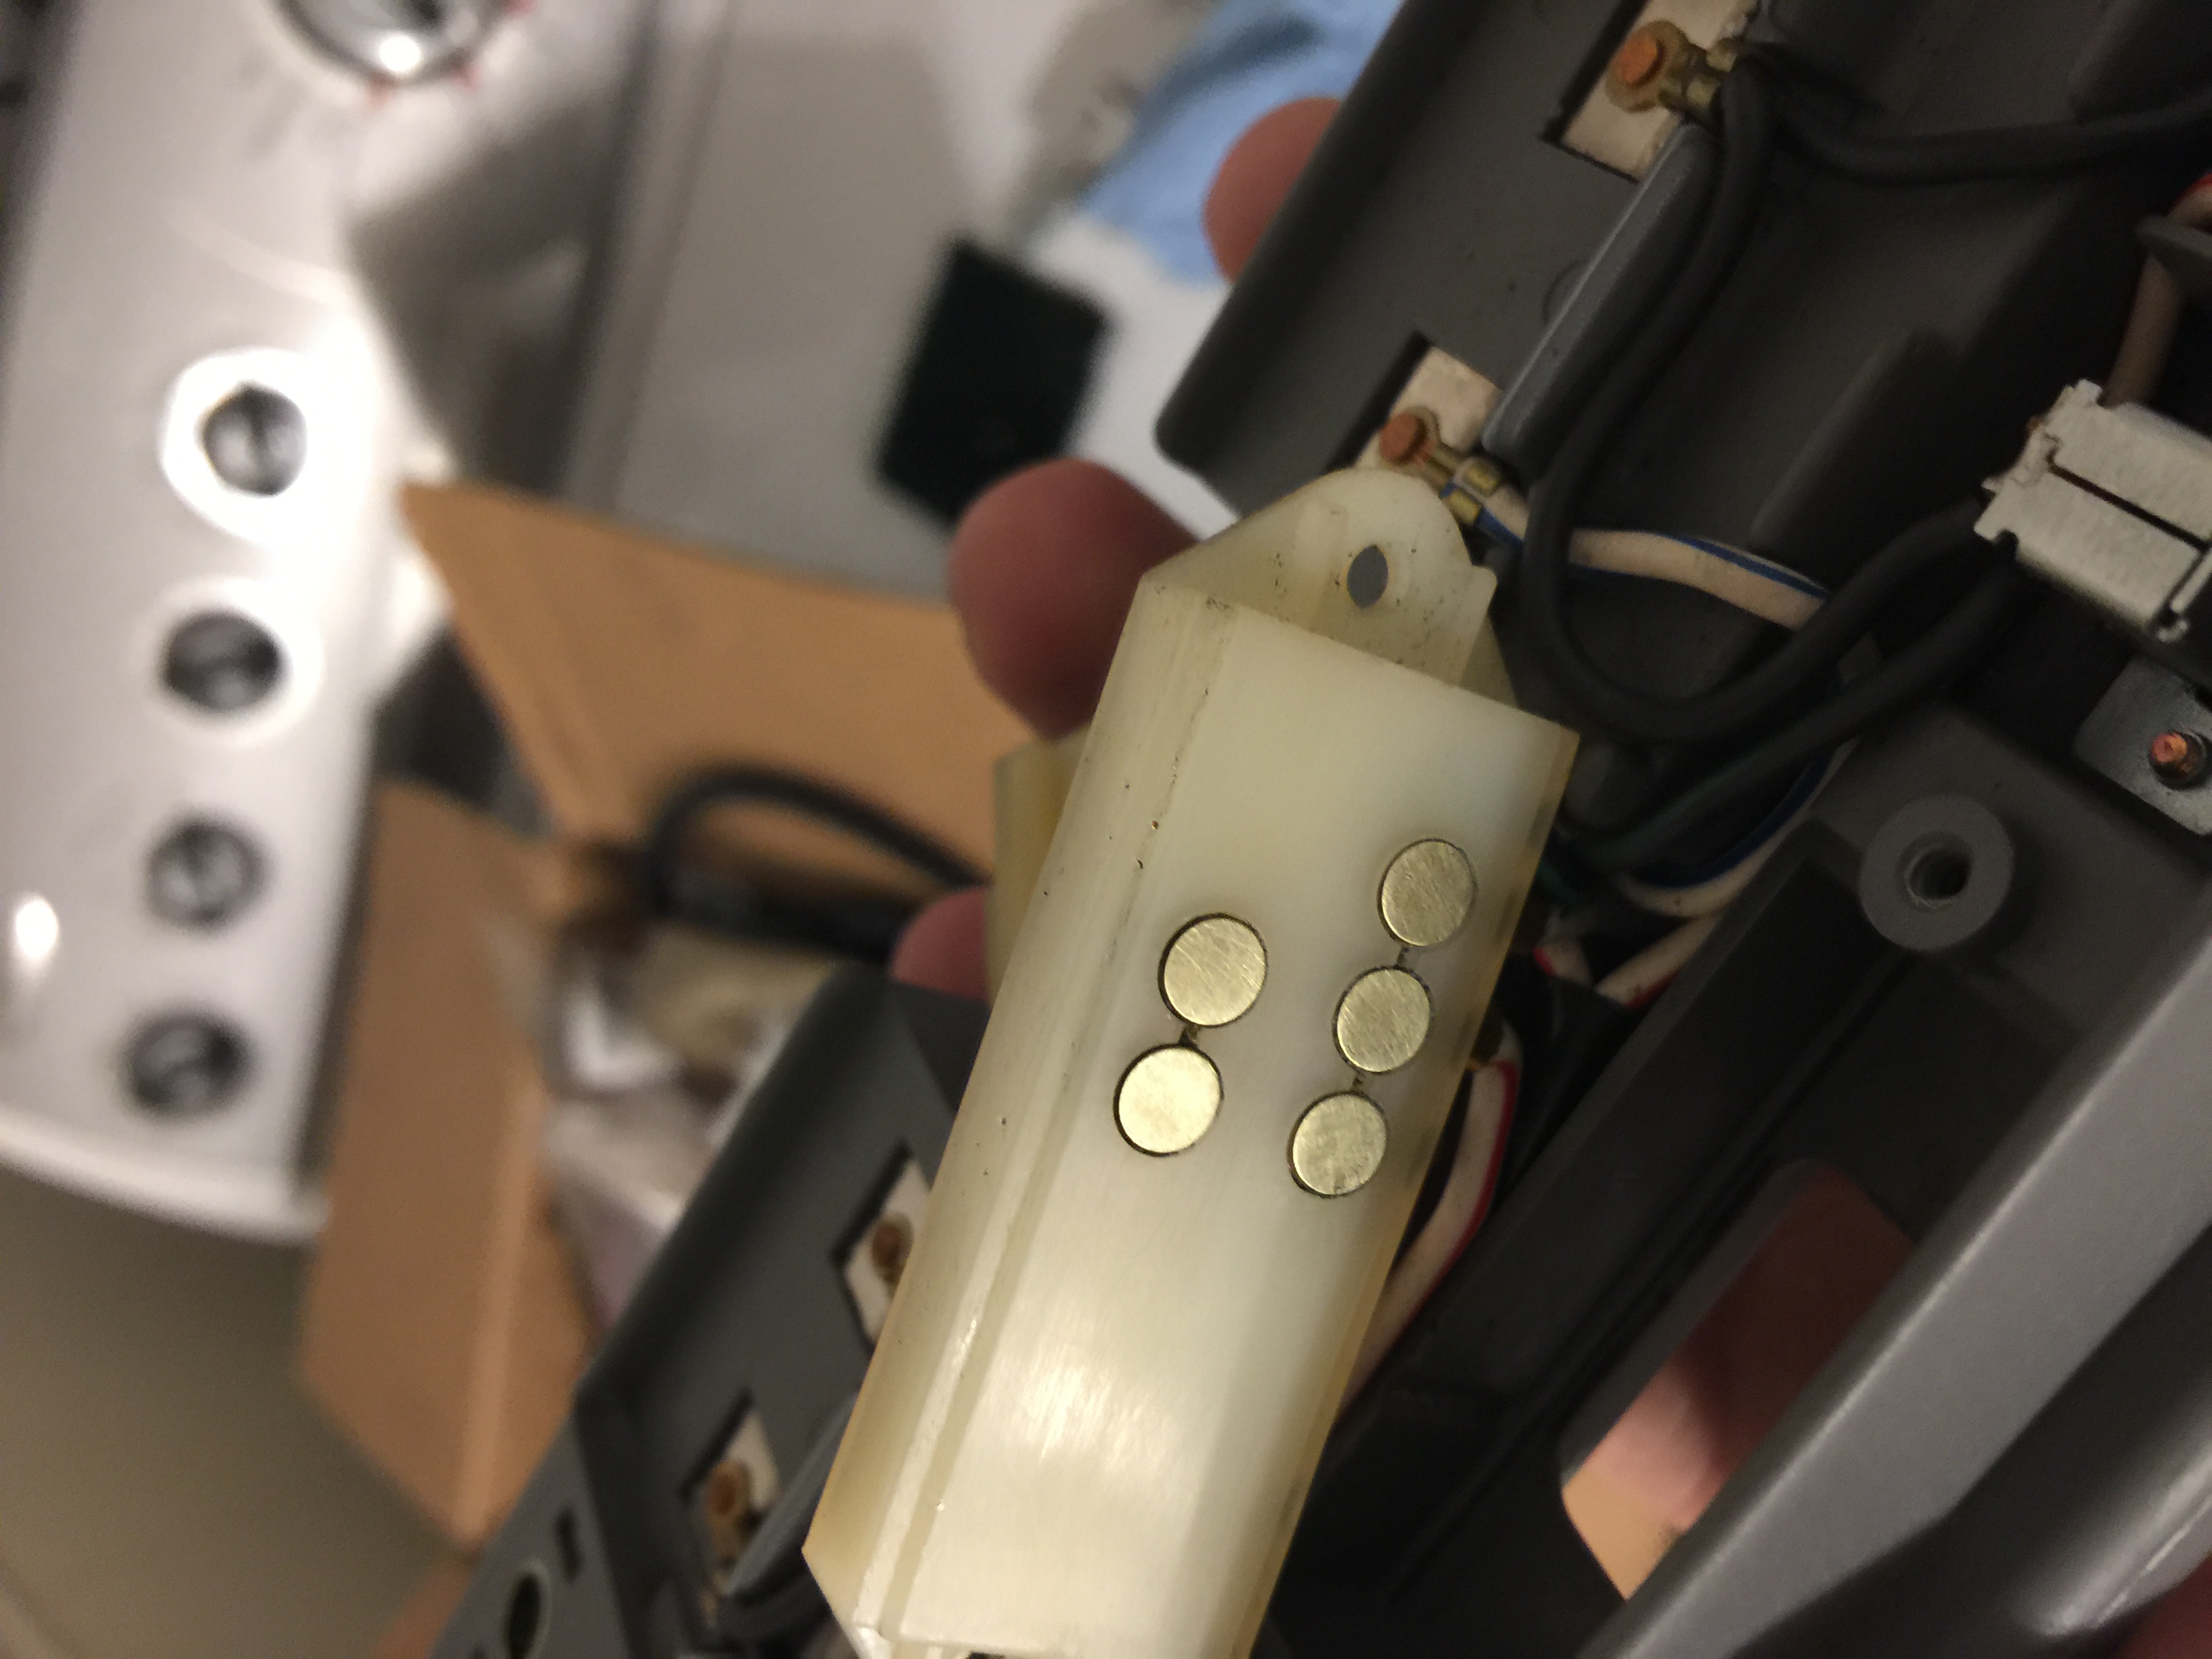
Scrubbing them off with a green scotch bright pad worked very well. Same for the contacts on the slider portion. After cleaning everything up I liberally applied dielectric grease to all the contacts to slow down future corrosion and reassembled, the switch works flawlessly now. Not that interesting but it might help someone in the future so here it is.
Anyways, with the headliner pulled down I was able to easily route the cables for the dash cam setup using small bits of paint safe tape to secure the wire.. The cable to connect the front to the rear was about 20 feet long, and since it's a RG174 coaxial cable with proprietary connectors there isn't really a way to shorten it without seriously degrading signal quality so I just coiled it up in the back, it's a bit messy but given the circumstances I'm not sure what else I could have done about it.
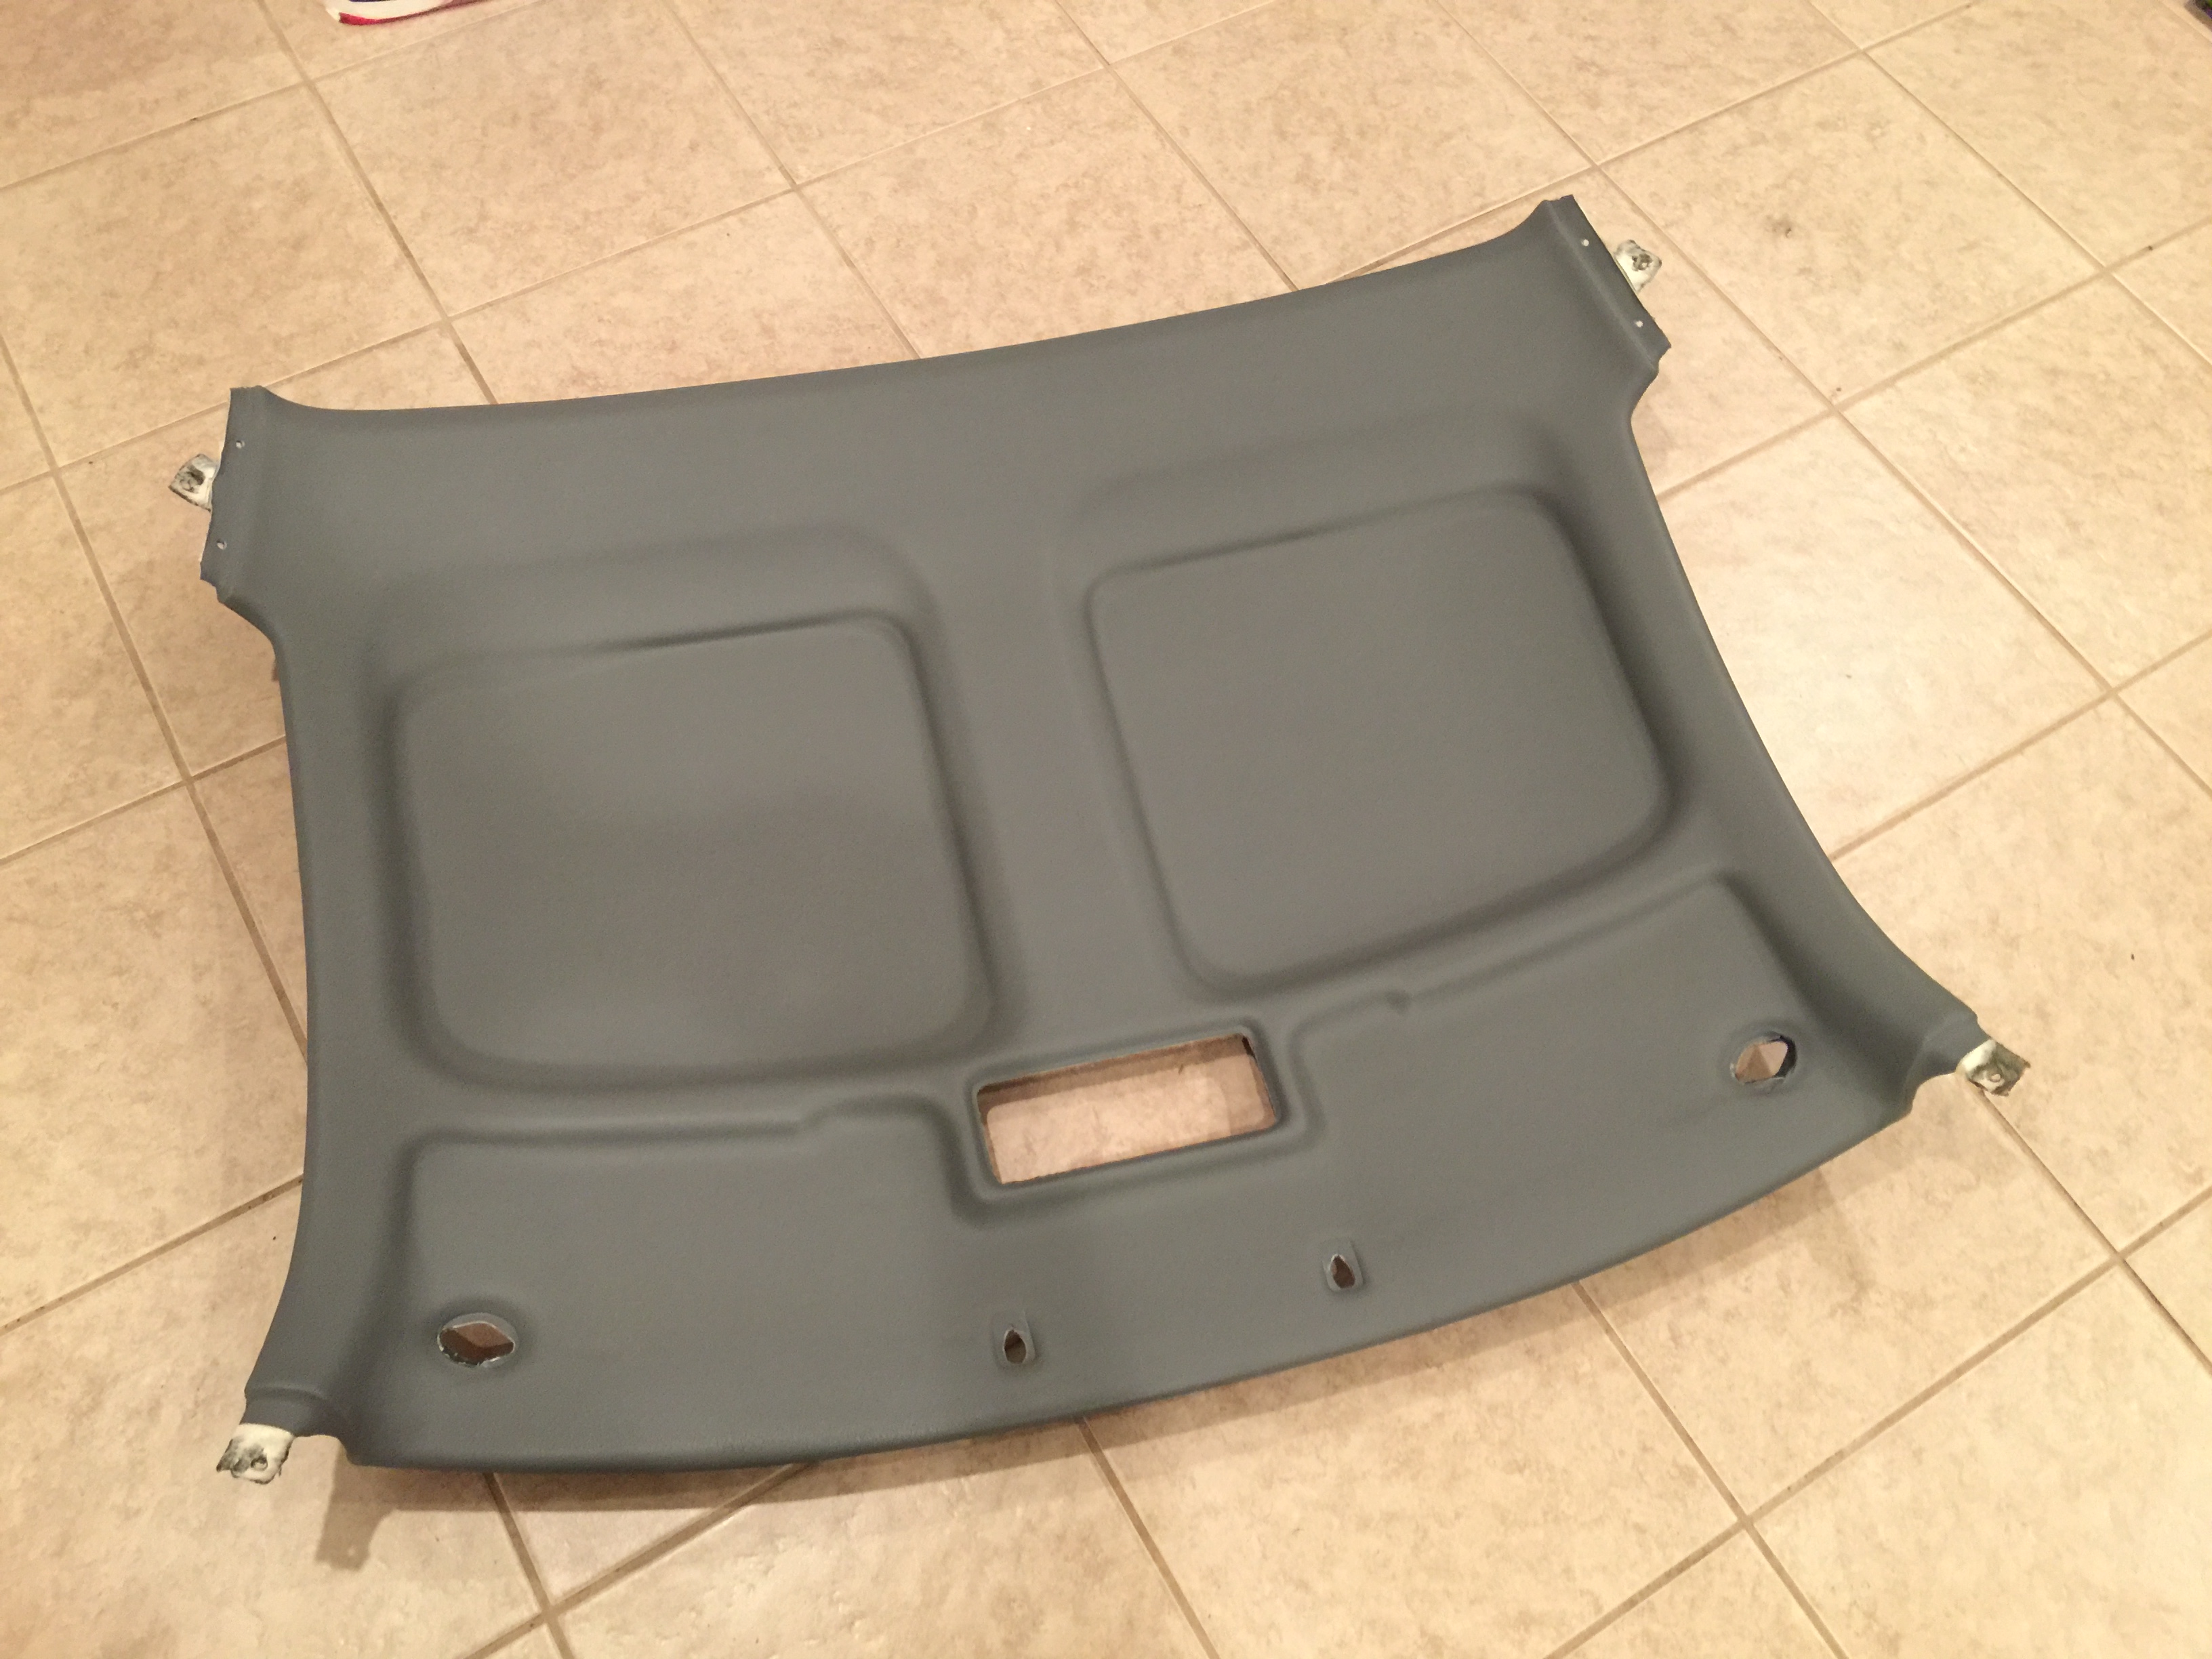
With the headliner out, I took the opportunity to really get it clean. It had a bunch of small markings from almost 25 years of use, so letting it soak in a 5:1 dilution of Optimum Power Clean (amazing general purpose detailing cleaner BTW) for a minute or so then wiping down with a microfiber cloth made it look almost new. There's a few corners in the skin that are pulling away a bit but it's not really noticeable with the liner in the car and definitely not worth several hundred dollars to fix. I also replaced the plastic clips that hold it up for good measure.
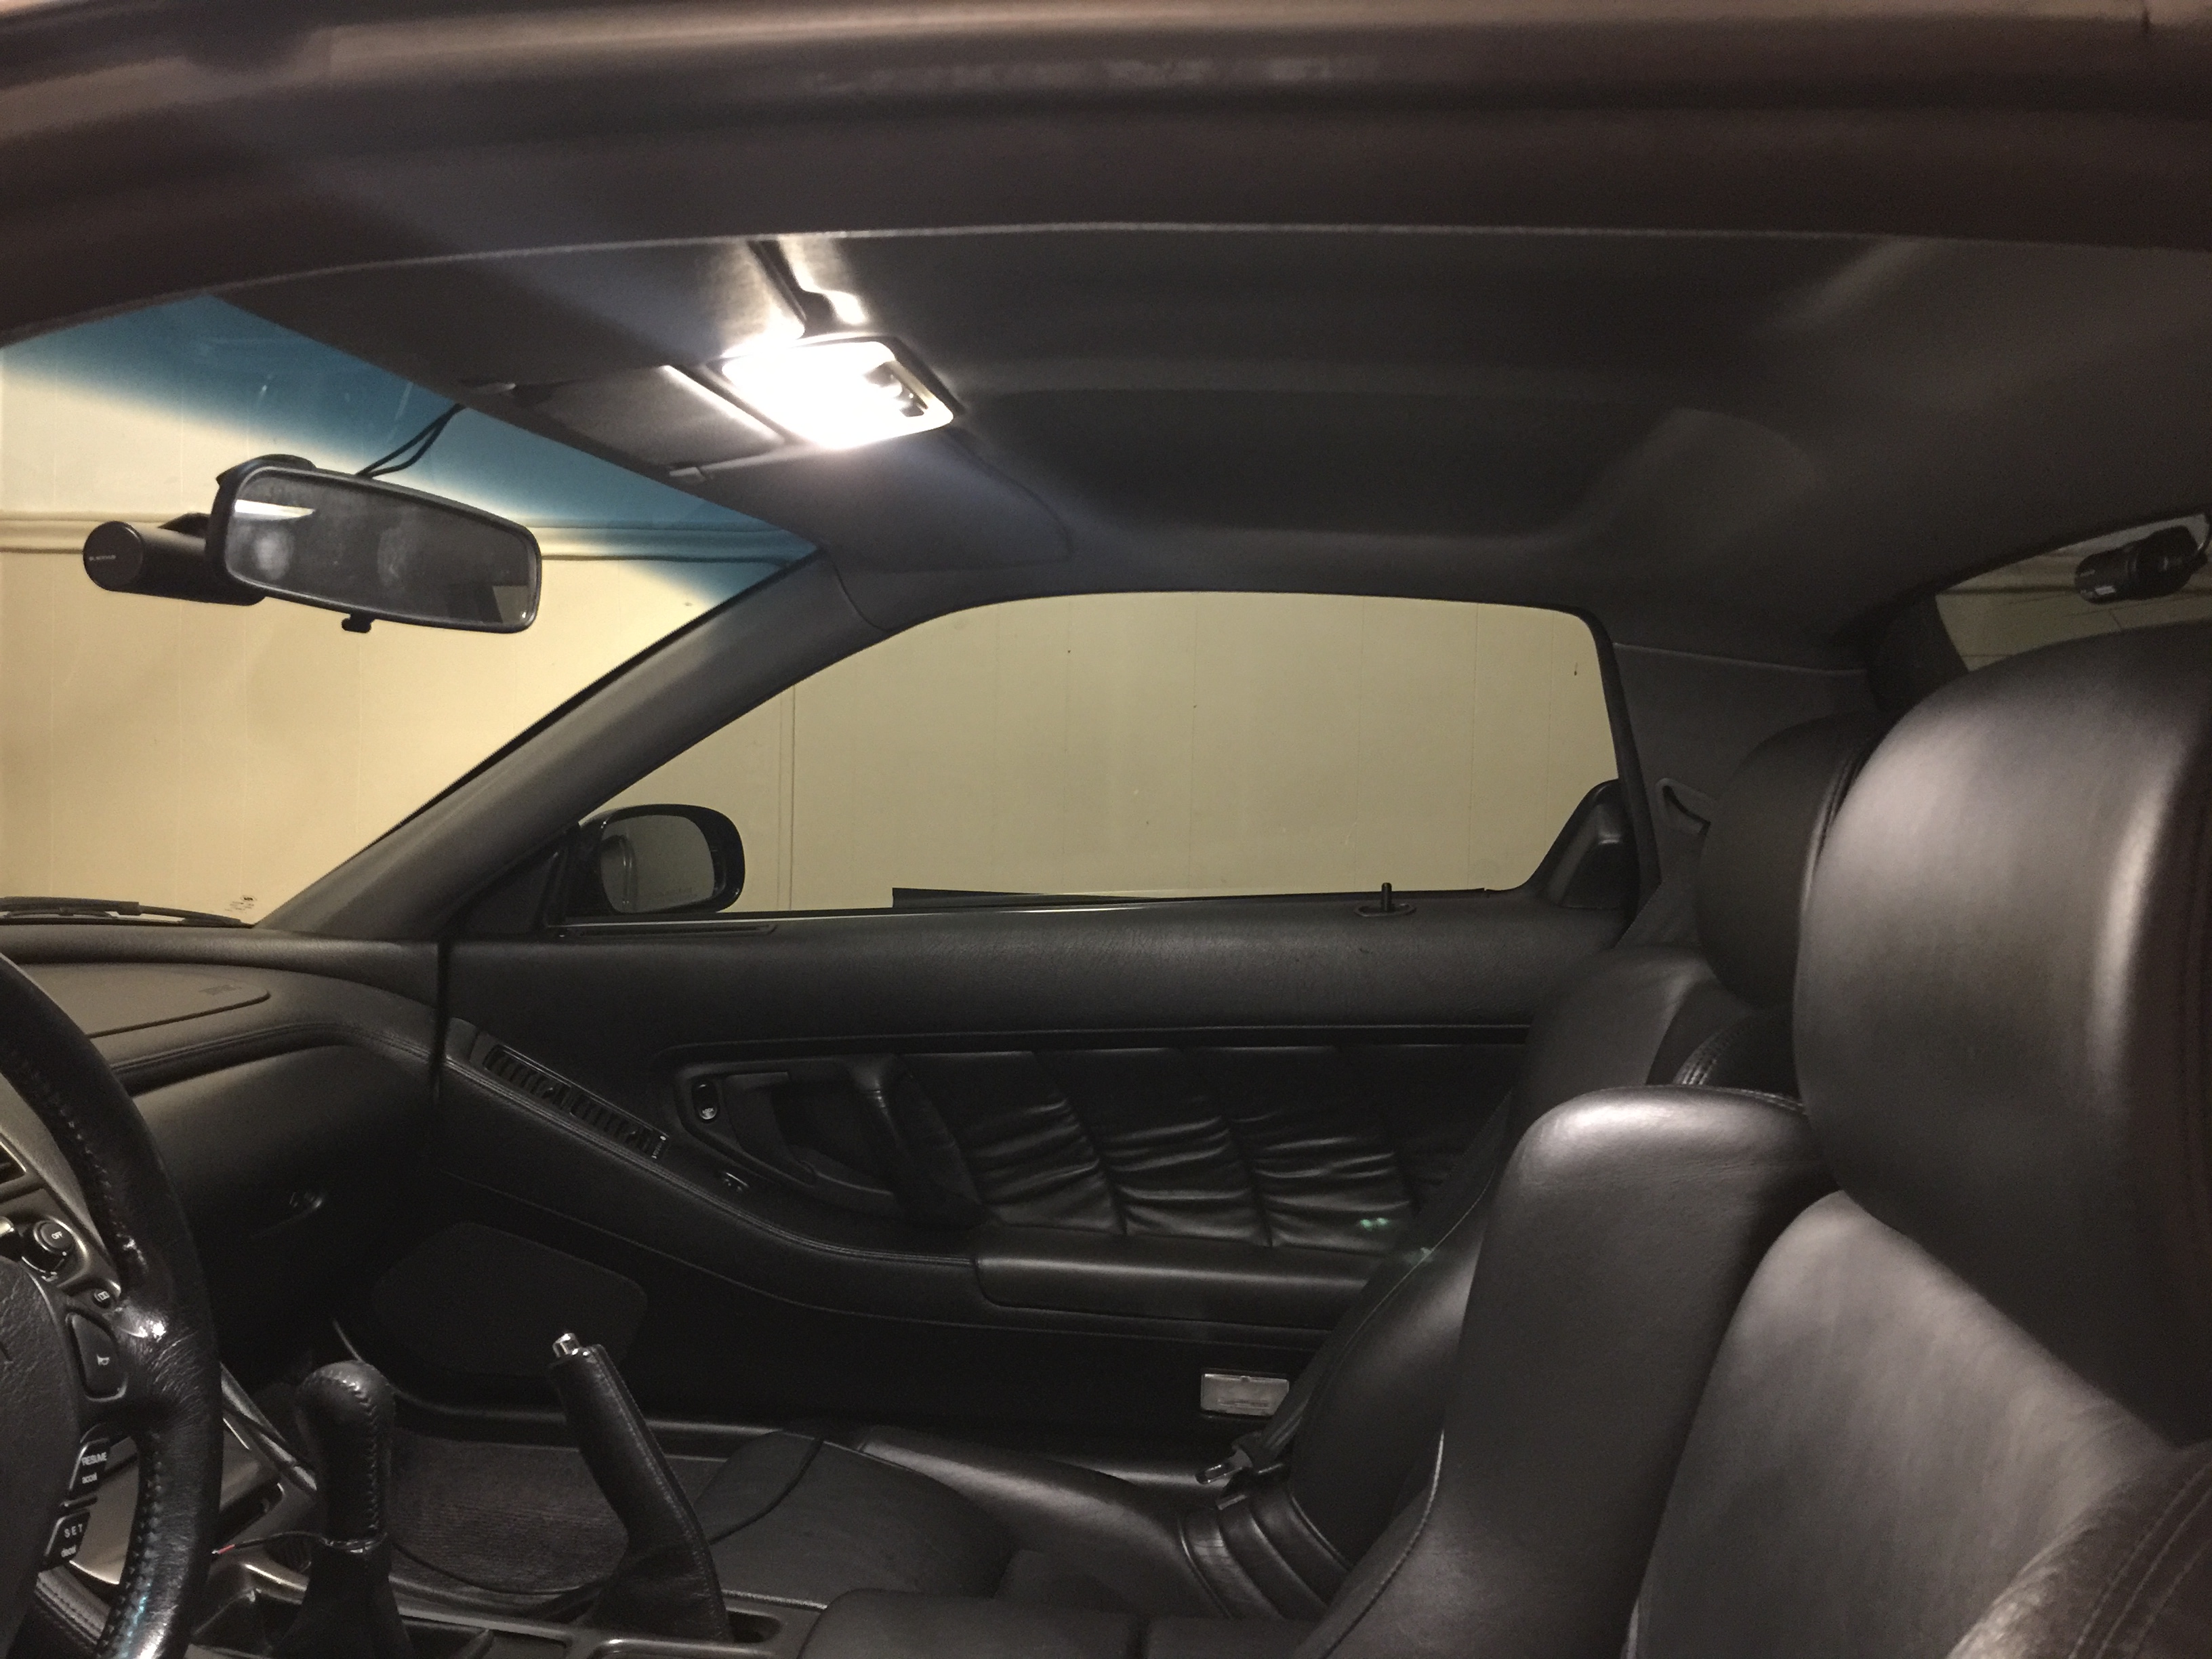
Everything reassembled, the mirror completely hides the front dash cam from the drivers seat view and the rear camera is just a blurb in the rear mirror, overall a pretty clean install if I do say so myself. It's still powered by the cigarette lighter though, so when I remove the center console plastics to refinish them I'll hardwire it into the accessory power circuit for a completely invisible install.
Also, I changed the oil last weekend since I'm coming up on 5000 miles since the last change, I have a Blackstone Labs kit so I took a sample to have analyzed, should be interesting to see the results.
And a bit of bad news, when I went to drive the car after putting the interior back together I found that the clutch master cylinder had run dry and was barely working, apparently it developed a leak recently so I guess I get to replace that too....
Taking the headliner out according to the manual is an insanely long and brutal process that requires removing the seats and most of the interior panels, however I was able to do it just by pulling back the weather stripping, removing the A pillar covers, and popping out the top clips of the B-pillar covers and bending them back enough to get the headliner out. Nothing broke and it ended up being a fairly quick and easy process.
With the headliner out I had access to the guts of the dome light assembly, and since the main 3-position switch had gotten pretty finicky I took it apart and found the contacts heavily corroded. Getting to the switch guts is simple, just remove the two screws holding the top part down and pull it back as shown.
Scrubbing them off with a green scotch bright pad worked very well. Same for the contacts on the slider portion. After cleaning everything up I liberally applied dielectric grease to all the contacts to slow down future corrosion and reassembled, the switch works flawlessly now. Not that interesting but it might help someone in the future so here it is.
Anyways, with the headliner pulled down I was able to easily route the cables for the dash cam setup using small bits of paint safe tape to secure the wire.. The cable to connect the front to the rear was about 20 feet long, and since it's a RG174 coaxial cable with proprietary connectors there isn't really a way to shorten it without seriously degrading signal quality so I just coiled it up in the back, it's a bit messy but given the circumstances I'm not sure what else I could have done about it.
With the headliner out, I took the opportunity to really get it clean. It had a bunch of small markings from almost 25 years of use, so letting it soak in a 5:1 dilution of Optimum Power Clean (amazing general purpose detailing cleaner BTW) for a minute or so then wiping down with a microfiber cloth made it look almost new. There's a few corners in the skin that are pulling away a bit but it's not really noticeable with the liner in the car and definitely not worth several hundred dollars to fix. I also replaced the plastic clips that hold it up for good measure.
Everything reassembled, the mirror completely hides the front dash cam from the drivers seat view and the rear camera is just a blurb in the rear mirror, overall a pretty clean install if I do say so myself. It's still powered by the cigarette lighter though, so when I remove the center console plastics to refinish them I'll hardwire it into the accessory power circuit for a completely invisible install.
Also, I changed the oil last weekend since I'm coming up on 5000 miles since the last change, I have a Blackstone Labs kit so I took a sample to have analyzed, should be interesting to see the results.
And a bit of bad news, when I went to drive the car after putting the interior back together I found that the clutch master cylinder had run dry and was barely working, apparently it developed a leak recently so I guess I get to replace that too....
[MENTION=33247]MotorMouth93[/MENTION]
You can buy the Centric brand master and slave clutch cylinders from Rock Auto - they're oem.
I was quoted $350 cad for both cylinders at Honda. People on the Facebook group told me about the Centric ones and it cost me less than $150 cad. They also have "nissin" on them. I also ordered the stainless steel slave hose and damper delete from SOS since I figured I should replace the old hose while I'm down there and flush it all at once.
@MotorMouth93
You can buy the Centric brand master and slave clutch cylinders from Rock Auto - they're oem.
I was quoted $350 cad for both cylinders at Honda. People on the Facebook group told me about the Centric ones and it cost me less than $150 cad. They also have "nissin" on them. I also ordered the stainless steel slave hose and damper delete from SOS since I figured I should replace the old hose while I'm down there and flush it all at once.
Thanks for the heads up! I didn't realize the Centric parts were identical to OEM, looks like both together are less than the cost of just the master cylinder from Honda so I guess I'll just replace both of them at once and install the SoS clutch damper delete while I'm at it. It's a very slow leak though so I'll probably hold off on it, I have a few other things I want to take care of right now.
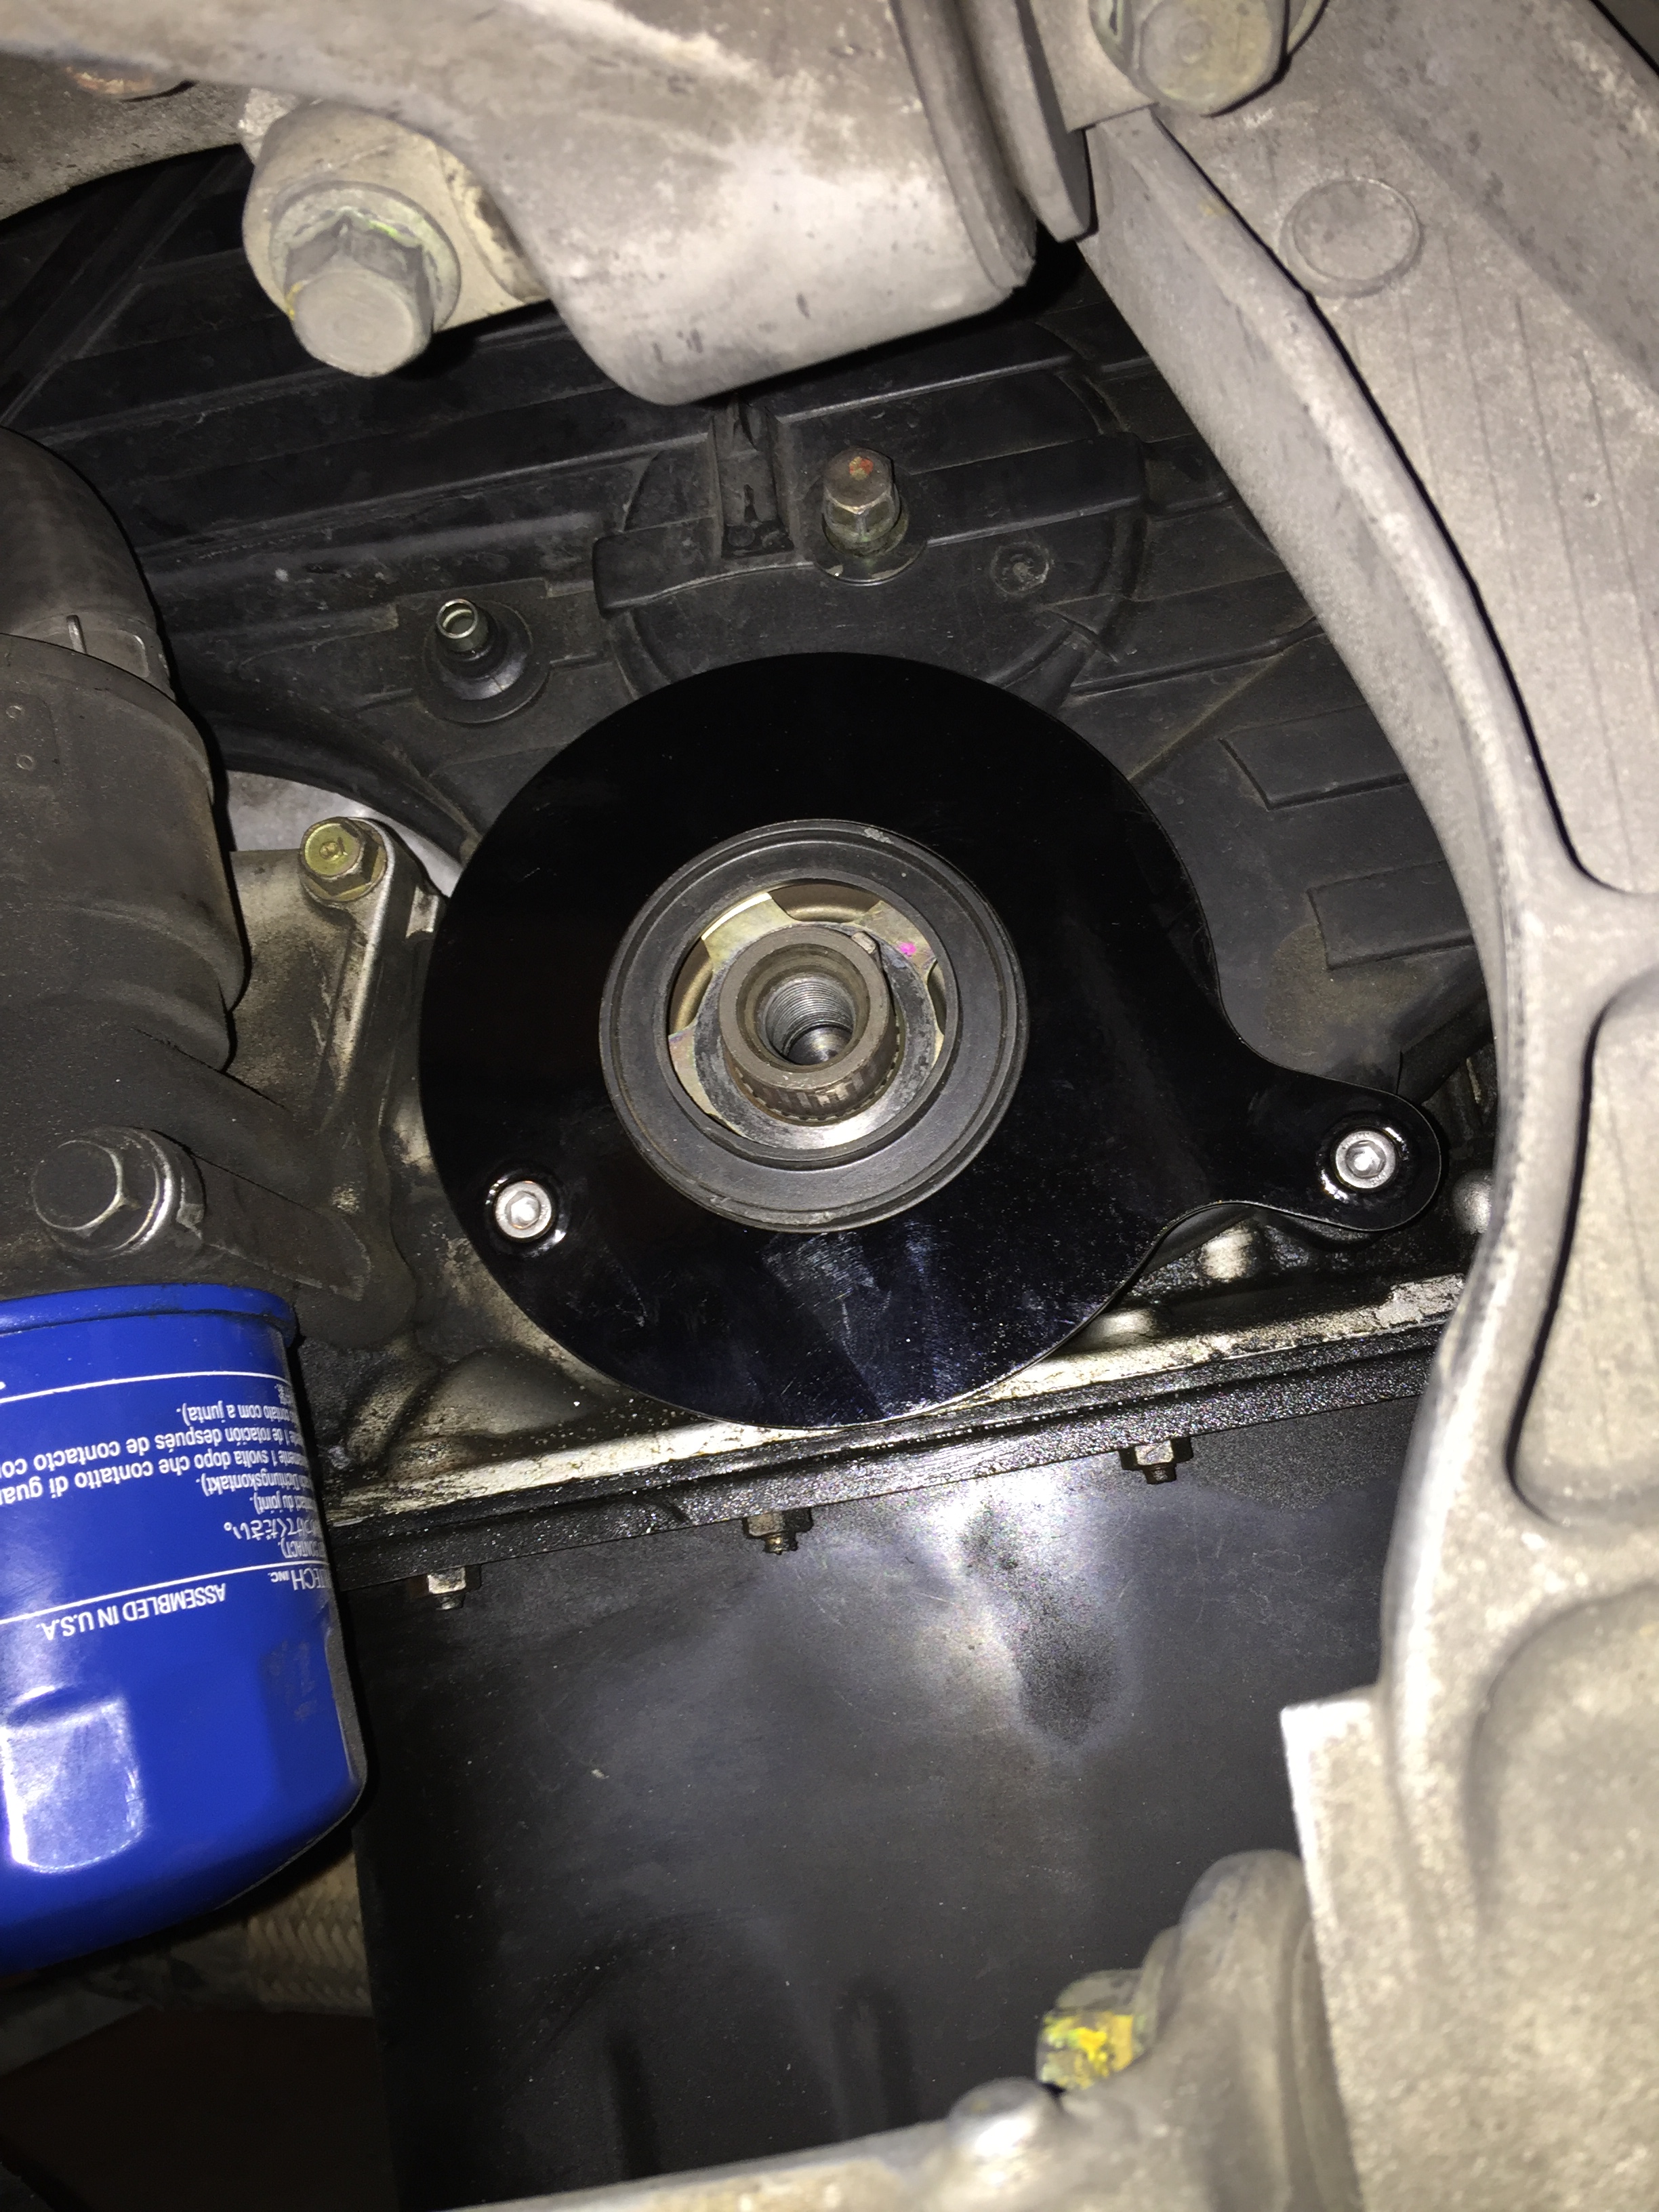
Another minor update, I picked up the Cedar Ridge Fabrication heavy duty timing belt shield for $60 with the sale they had going, and since I had some powder left over from my brake calipers I bead blasted it and powder coated it black.
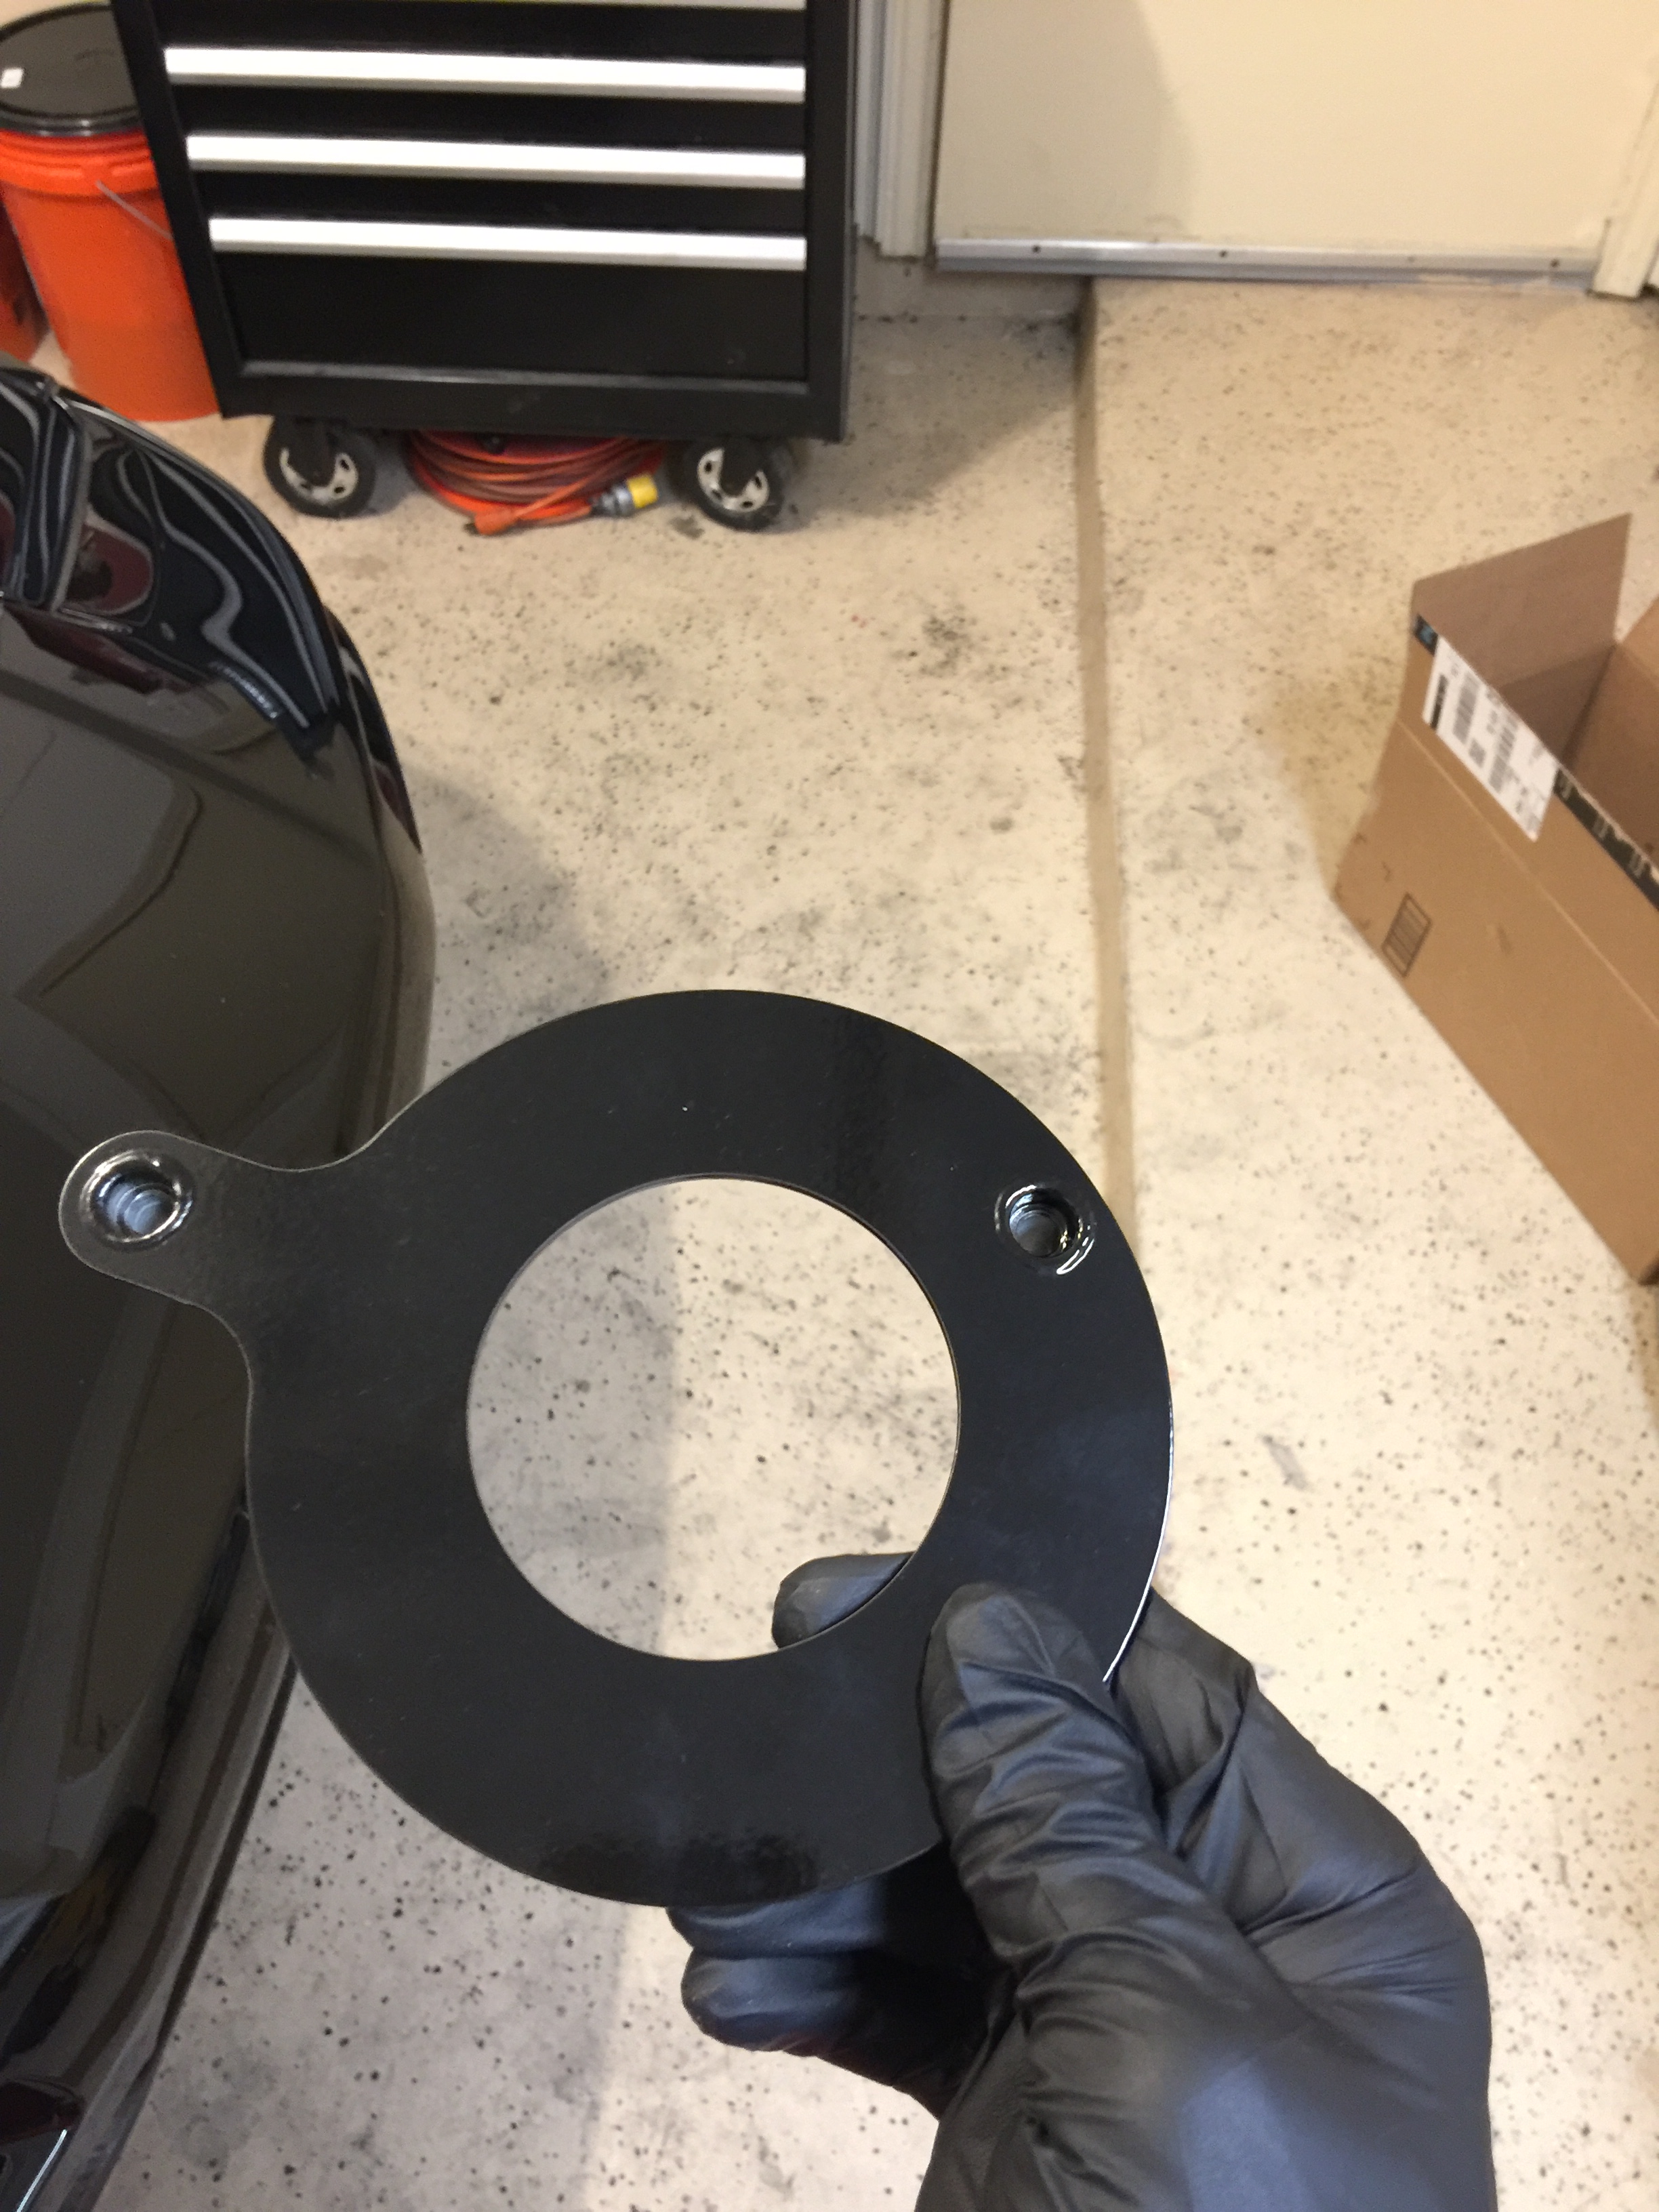
Installation was pretty simple, just loosen the alternator and AC belt tensioners, remove belts, remove crank pulley, install shield. Took about an hour start to finish. The fit is spot on and IMO the black powdercoat came out great. Now I just need to replace the crank pulley for good measure, but now that the shield is there I don't need to worry about it so much.
And coming up next: refinishing my peeling interior trim pieces. I used to build model airplanes and had good experiences with Testors enamel paints, so I bought a few different colors including black and metallic silver so I'm going to start mixing them to try to match the factory finish as closely as possible, then airbrush it on. Since the factory finish is a chrome (or more likely aluminum) plated base with a semi-translucent film on top, perfectly matching the sheen will be impossible but I should be able to get it close enough that anyone who doesn't know what it originally looked like won't see anything out of place, especially once finished with a satin clear coat.
Last edited:
Not being single anymore has made it a bit more difficult to devote my life to this car, but here's another update.
I started off by replacing the super long rear dash cam cable with a much more appropriate one and moving the rear camera to the passenger side so it's not constantly visible in the rear view camera. It's much more out of the way now which I like, and the cable isn't wrapped all over the place anymore either.
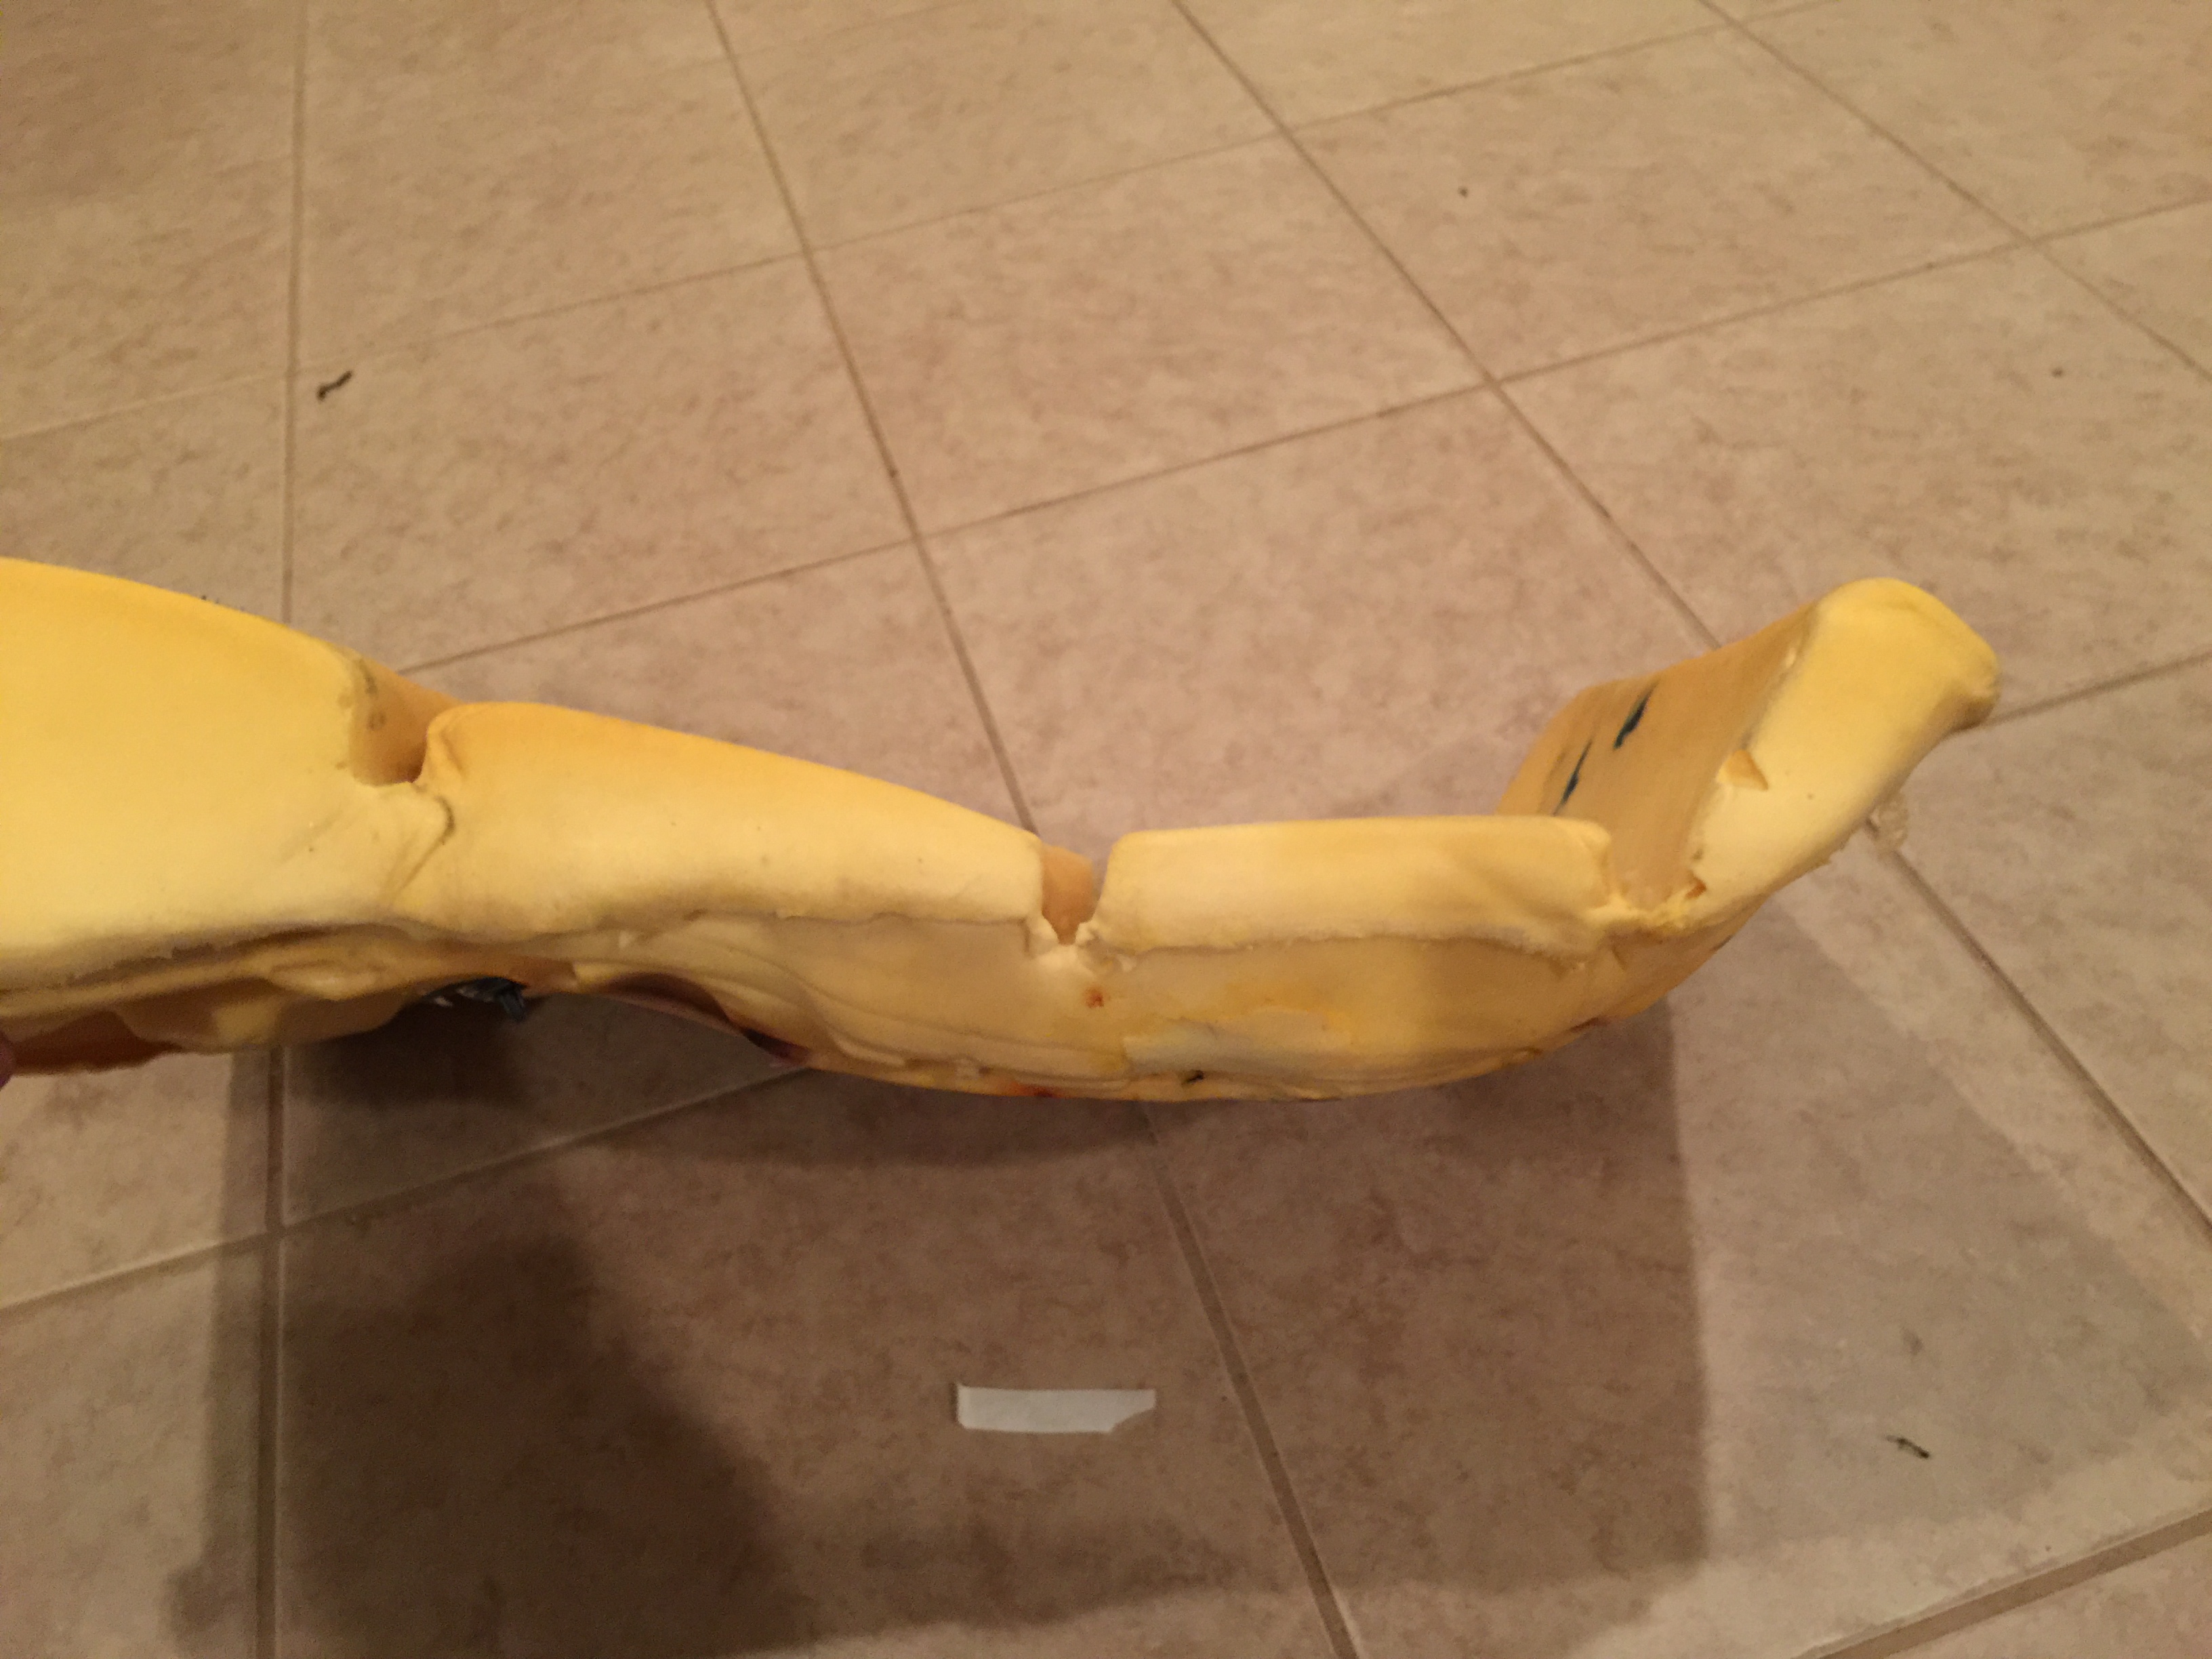
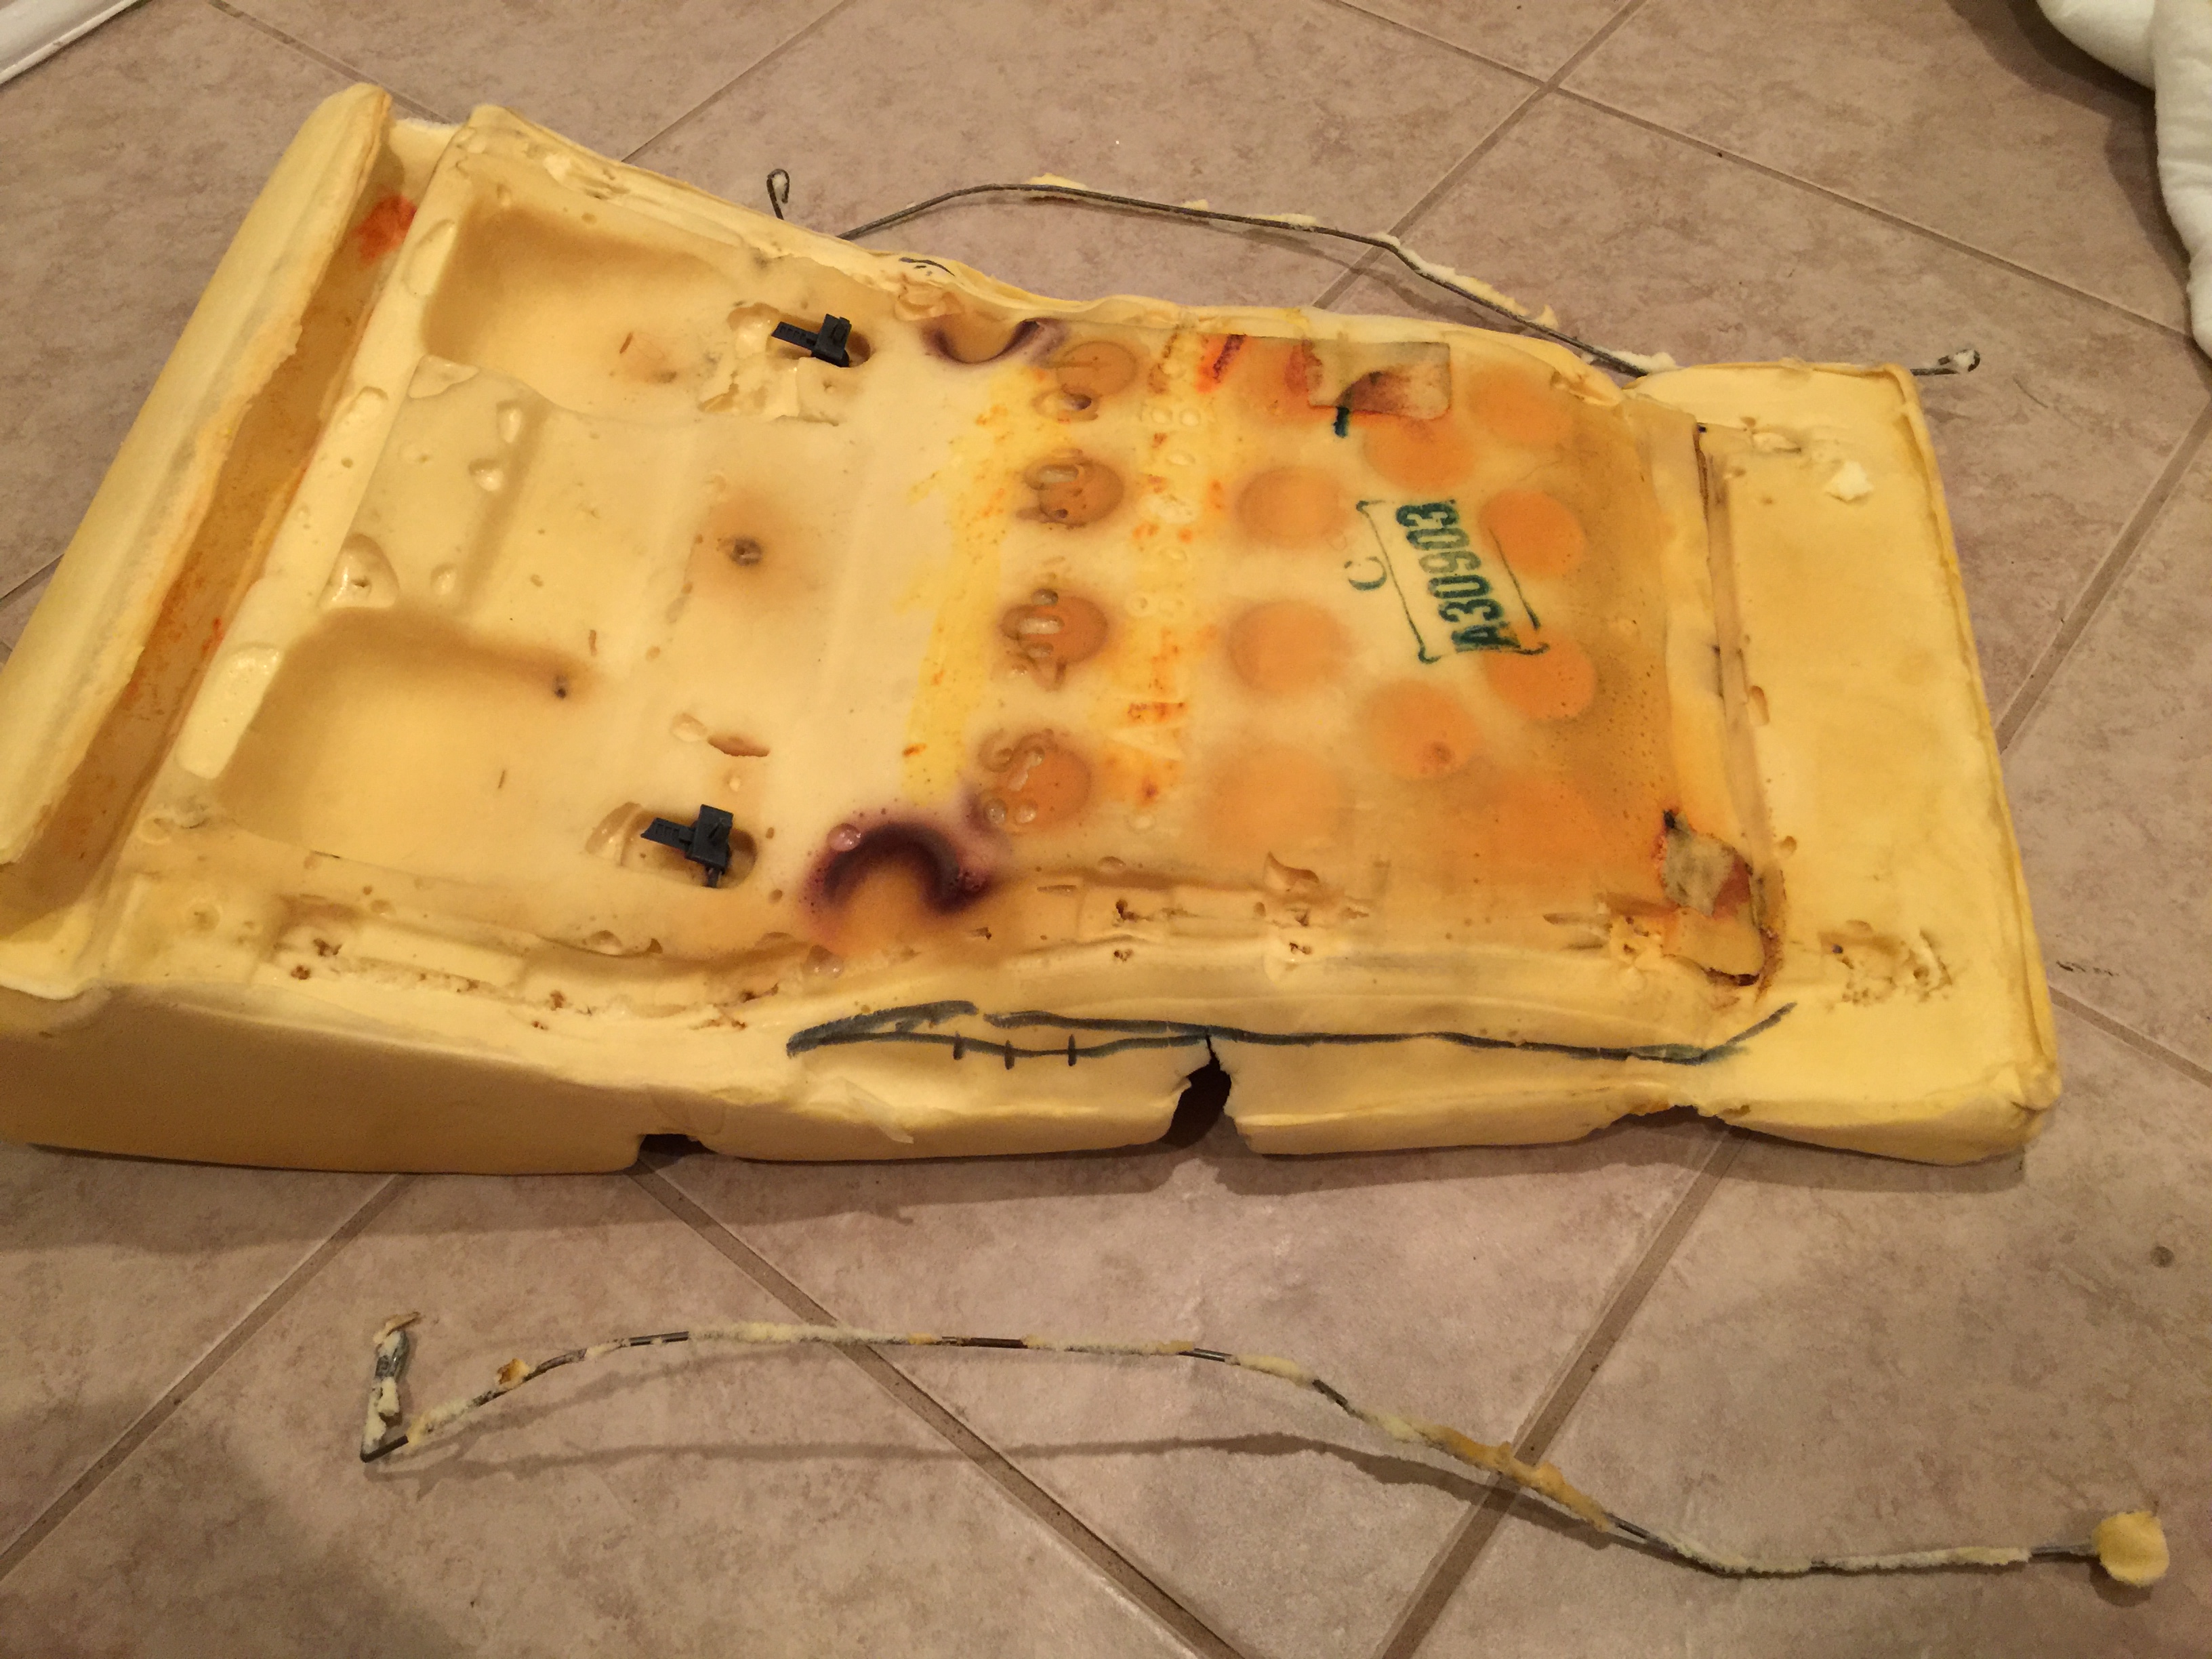
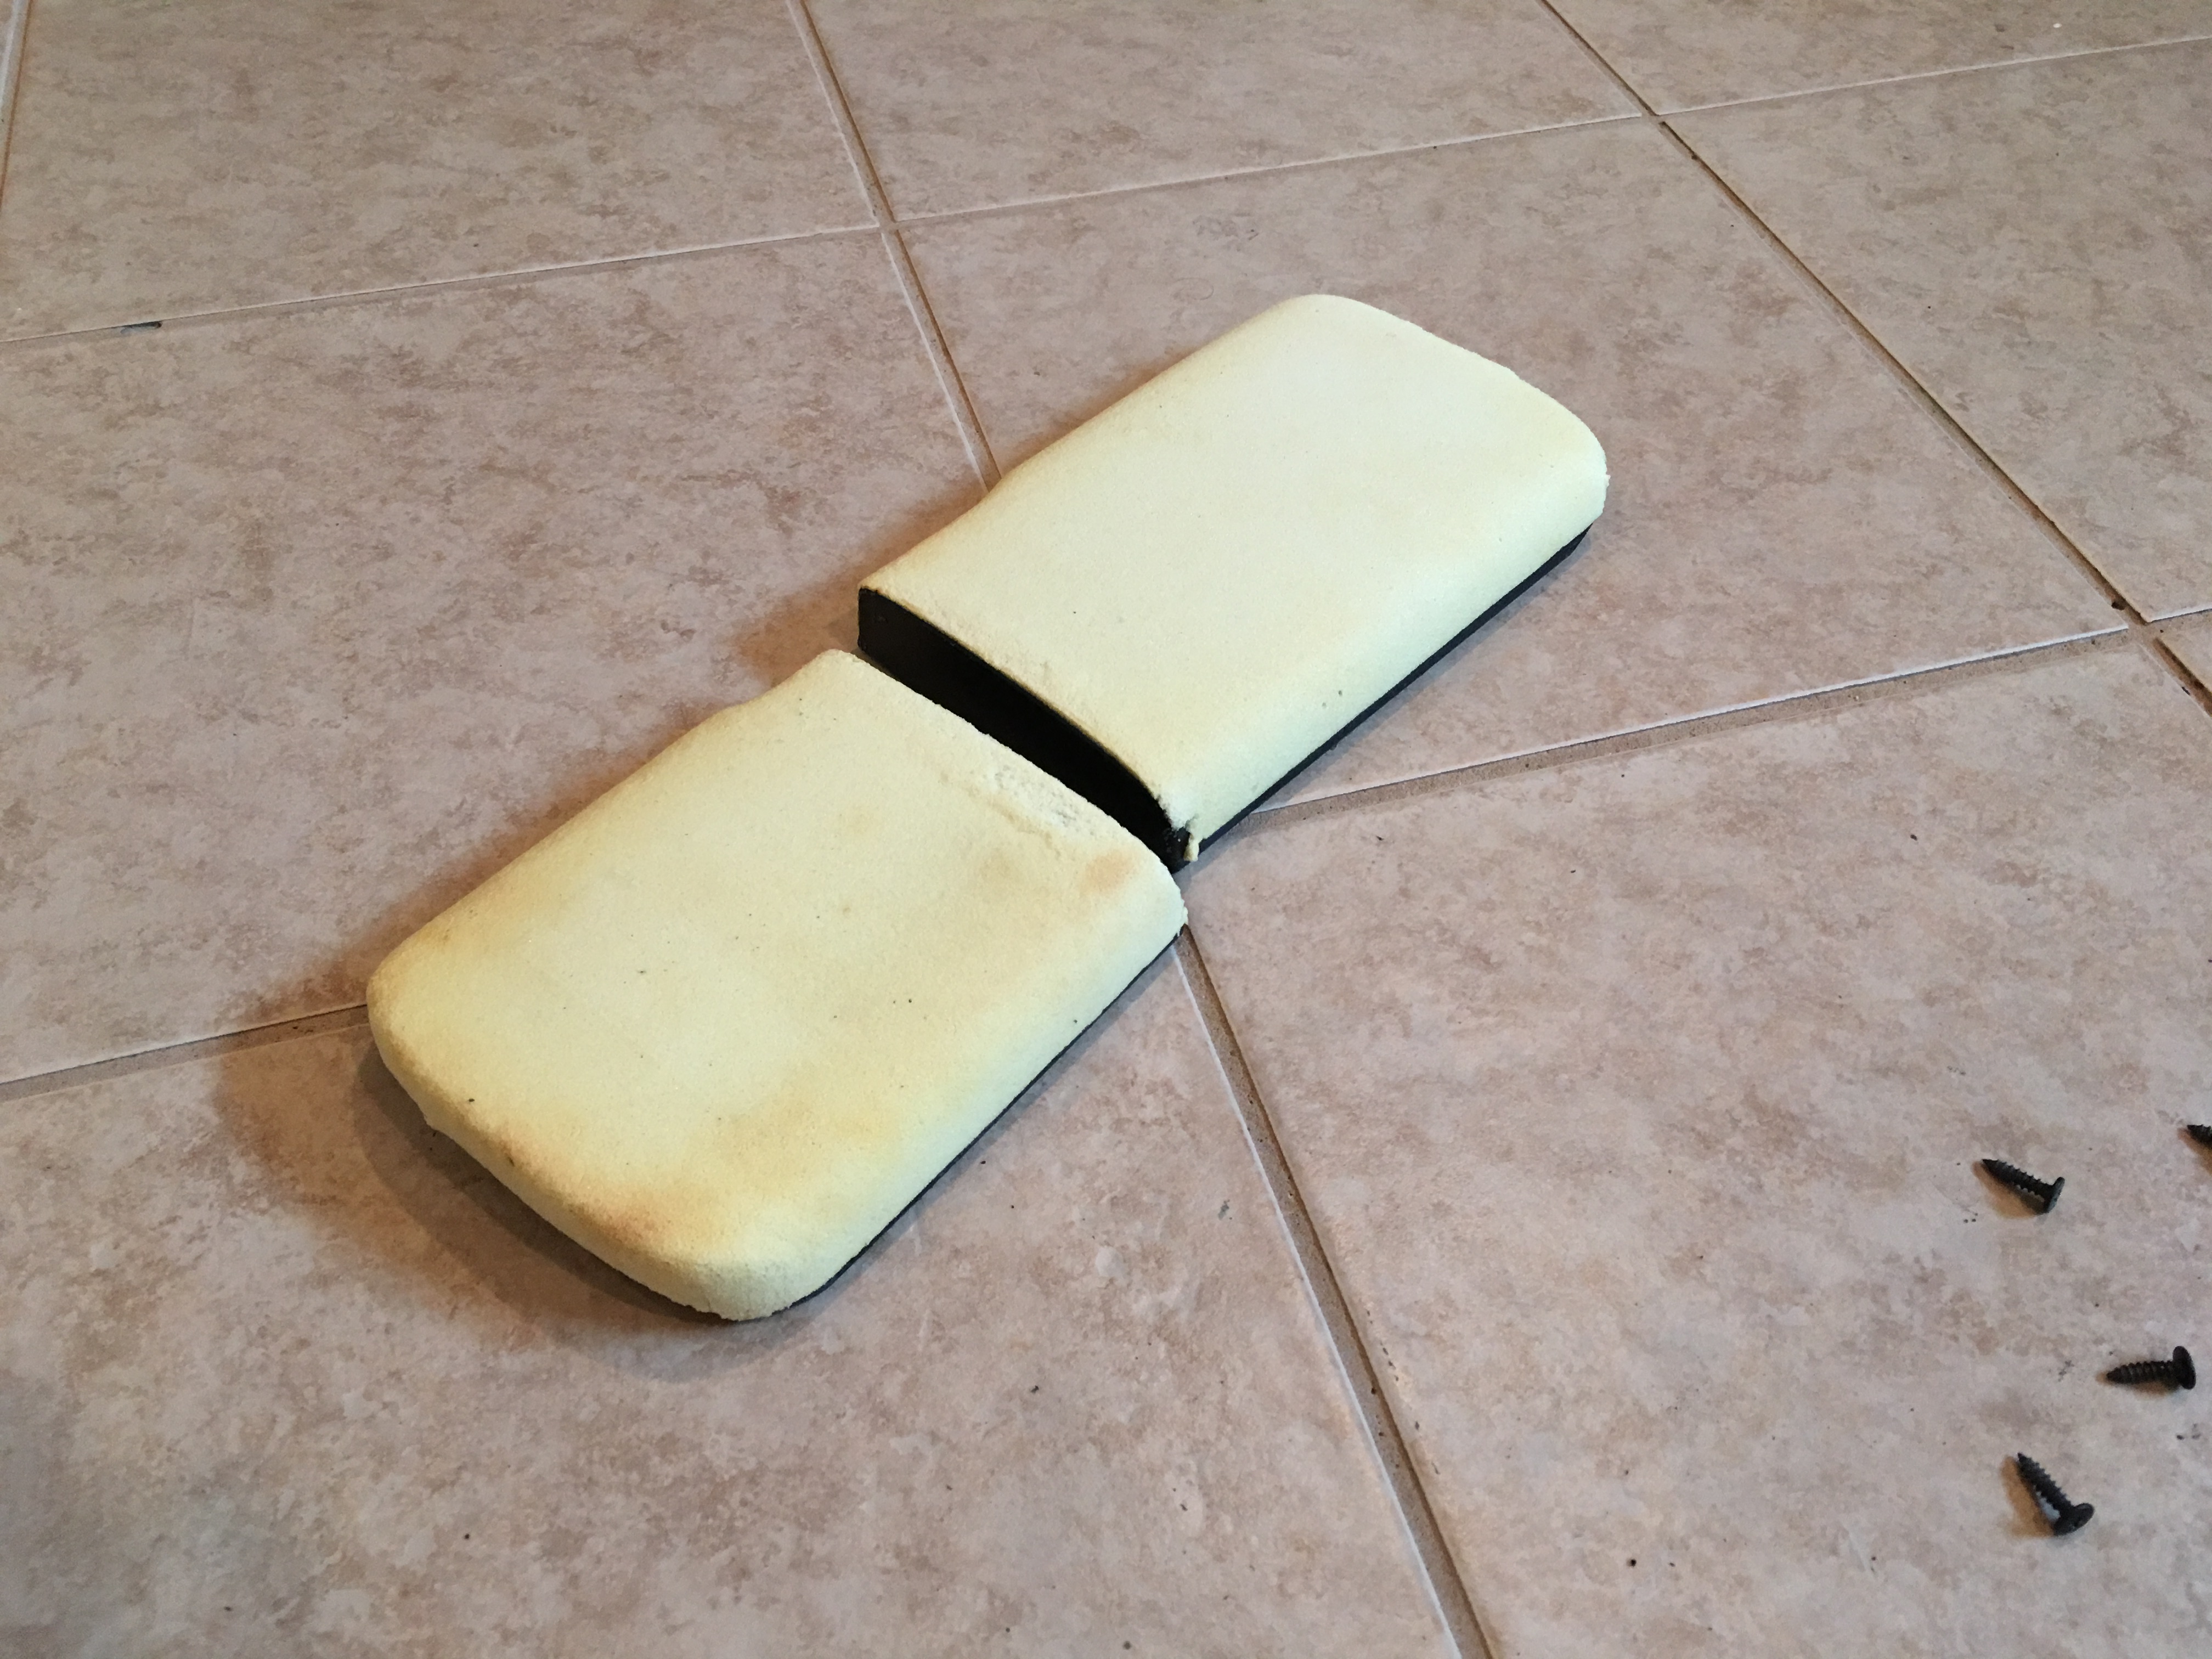
I also decided I needed more head room, I'm 6'1" and had MAYBE 1/2" of head room, so I cut about an inch of foam out of the bottom of the seat and it makes a bigger difference than you'd think. At first I attempted a "hot wire" approach that involved a hack saw blade, a propane torch, and some dangerous smelling fumes (see the burned stripe across the back of the bottom of the cushion?) but that didn't work so I just used a hacksaw properly to cut straight across the bottom of the seat foam, and then used zip ties instead of hog rings since for the reassembly since I absolutely hate hog rings. Overall it isn't noticeable at all and seat comfort seems unchanged.

Also picked up a set of sun visors to replace mine that are splitting like crazy, the new ones have giant air bag warnings on them though which is annoying... For whatever reason Acura has discontinued them in North America so I had to order them from some guy running an NSX parts shop in Japan.
I also starting taking apart the interior to repaint the trip pieces, then discovered that it takes weeks for the ferric chloride to dissolve the coating on them, so in the meantime I decided to take care of a few others things, so I replaced the clutch cylinders.
After doing some research I found that the cheap Centric branded clutch master and slave cylinders are the exact same parts as the OEM cylinders, but less than half the price. Sure enough, the markings are identical and the master cylinder are both Nissin and the slave cylinders are both made by AS.
While I was replacing the clutch cylinders I decided to install a ScienceOfSpeed clutch damper delete kit since the clutch damper doesn't do a whole lot besides wear down the clutch faster. It's a much cleaner look too since it gets rid of a bracket and extra tube, as well as replaces the rubber line with a stainless line. I'm not a fan of stainless lines but since it's the clutch and not the brakes I can tolerate it. My only real issue with this kit is that the fitting to connect the SS hose to the new slave cylinder was just ever so slightly too large to fit, so I had to sand it with 800 grit sandpaper for a proper fit. After removing one of the brackets I found that the holes were pretty sticky so I ran an M6x1.0mm tap through them and wire-wheeled the bolts for good measure.
With the door panels and center console out I decided it was time to come up with a final solution for the stereo. I have yet to see an actually good looking aftermarket radio install in an NSX, some look okay but mostly they just look tacky, and I don't need audiophile-level sound in this car since I mainly want to hear the exhaust anyways, so I decided to just rebuild the factory amplifiers and get an aux adapter that plugs into the CD changer port on the radio since it gives much better quality than my tape player aux adapter does. As far as I can tell, my amplifiers hadn't actually failed yet, but it's a lot easier to rebuild them before the capacitors start leaking than it is after because the electrolyte damages the circuit traces and just makes everything more difficult, and parts cost almost nothing.
During the rebuild process, I found a bunch of rat poison in the subwoofer box...my only guess is that a mouse set up camp after crawling in through the port then grabbed a bunch of poison bait pellets and stashed them in there. The weird thing is I haven't seen any other evidence of rodents in this car at all, no chewed wires or carpet, no droppings, nothing. I almost think that the sub box must have come from another car and been used to replace the original, since the capacitors in the subwoofer amplifier were different than the ones in the door speaker amp.
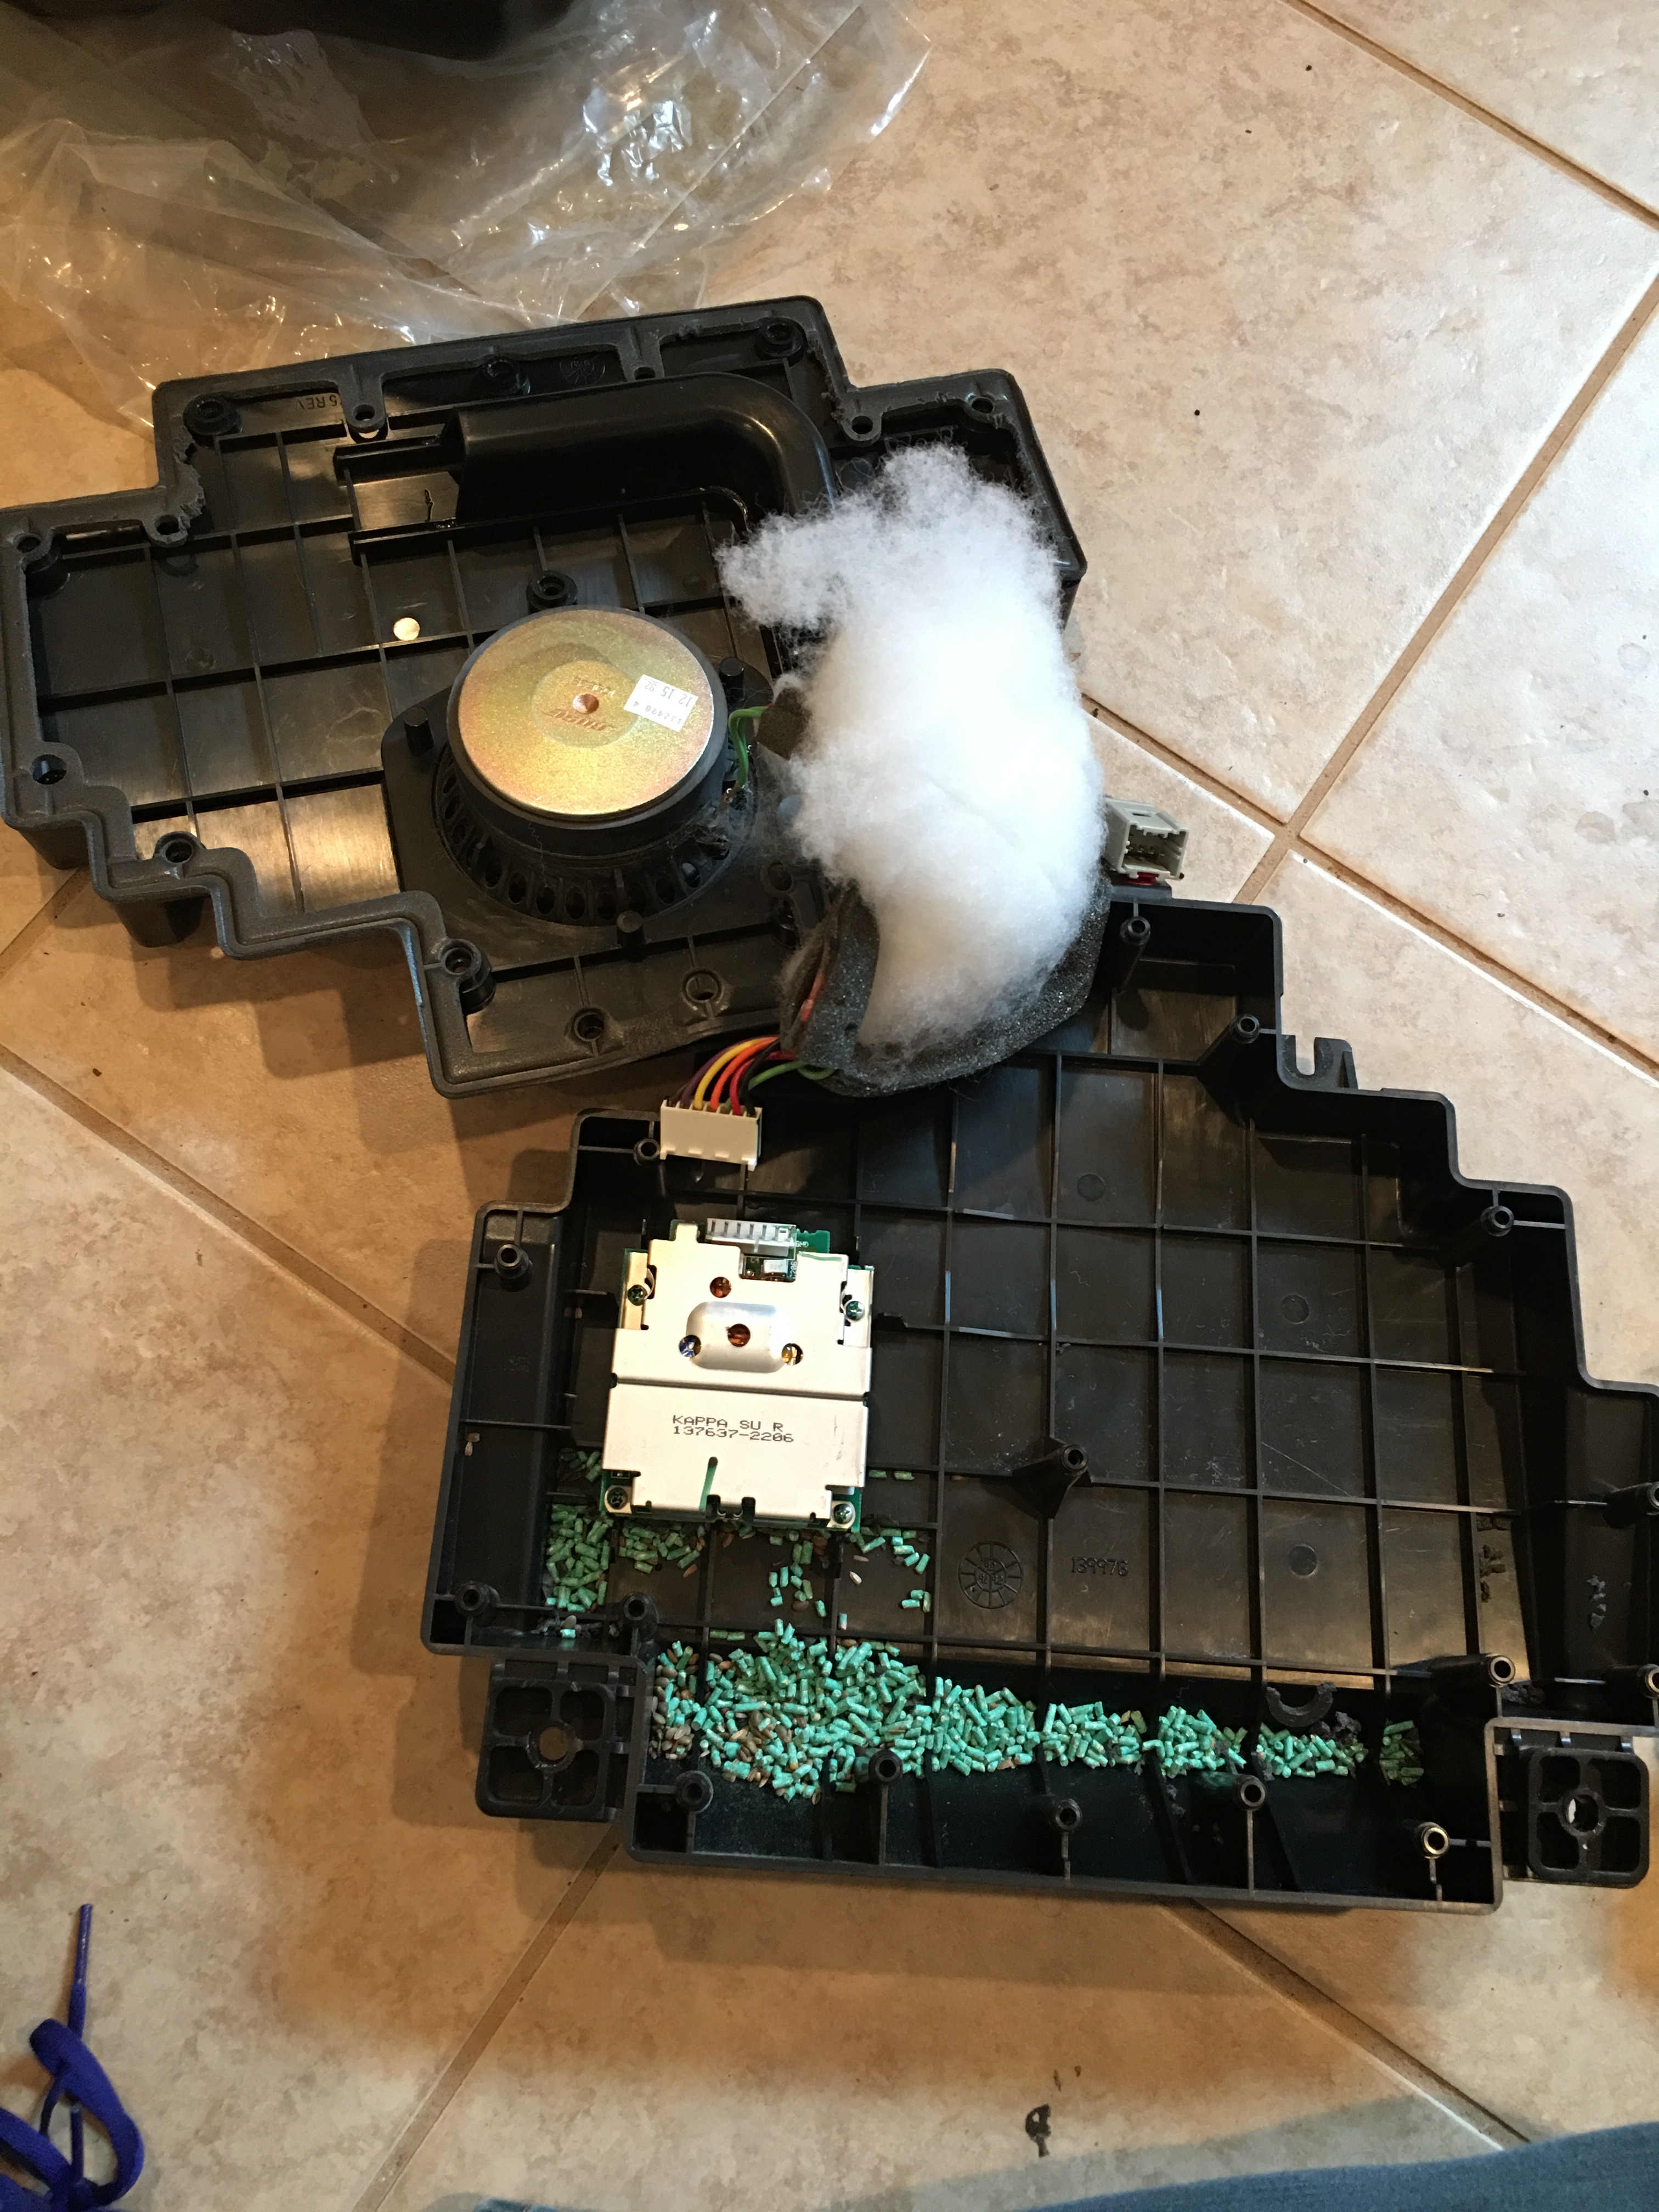
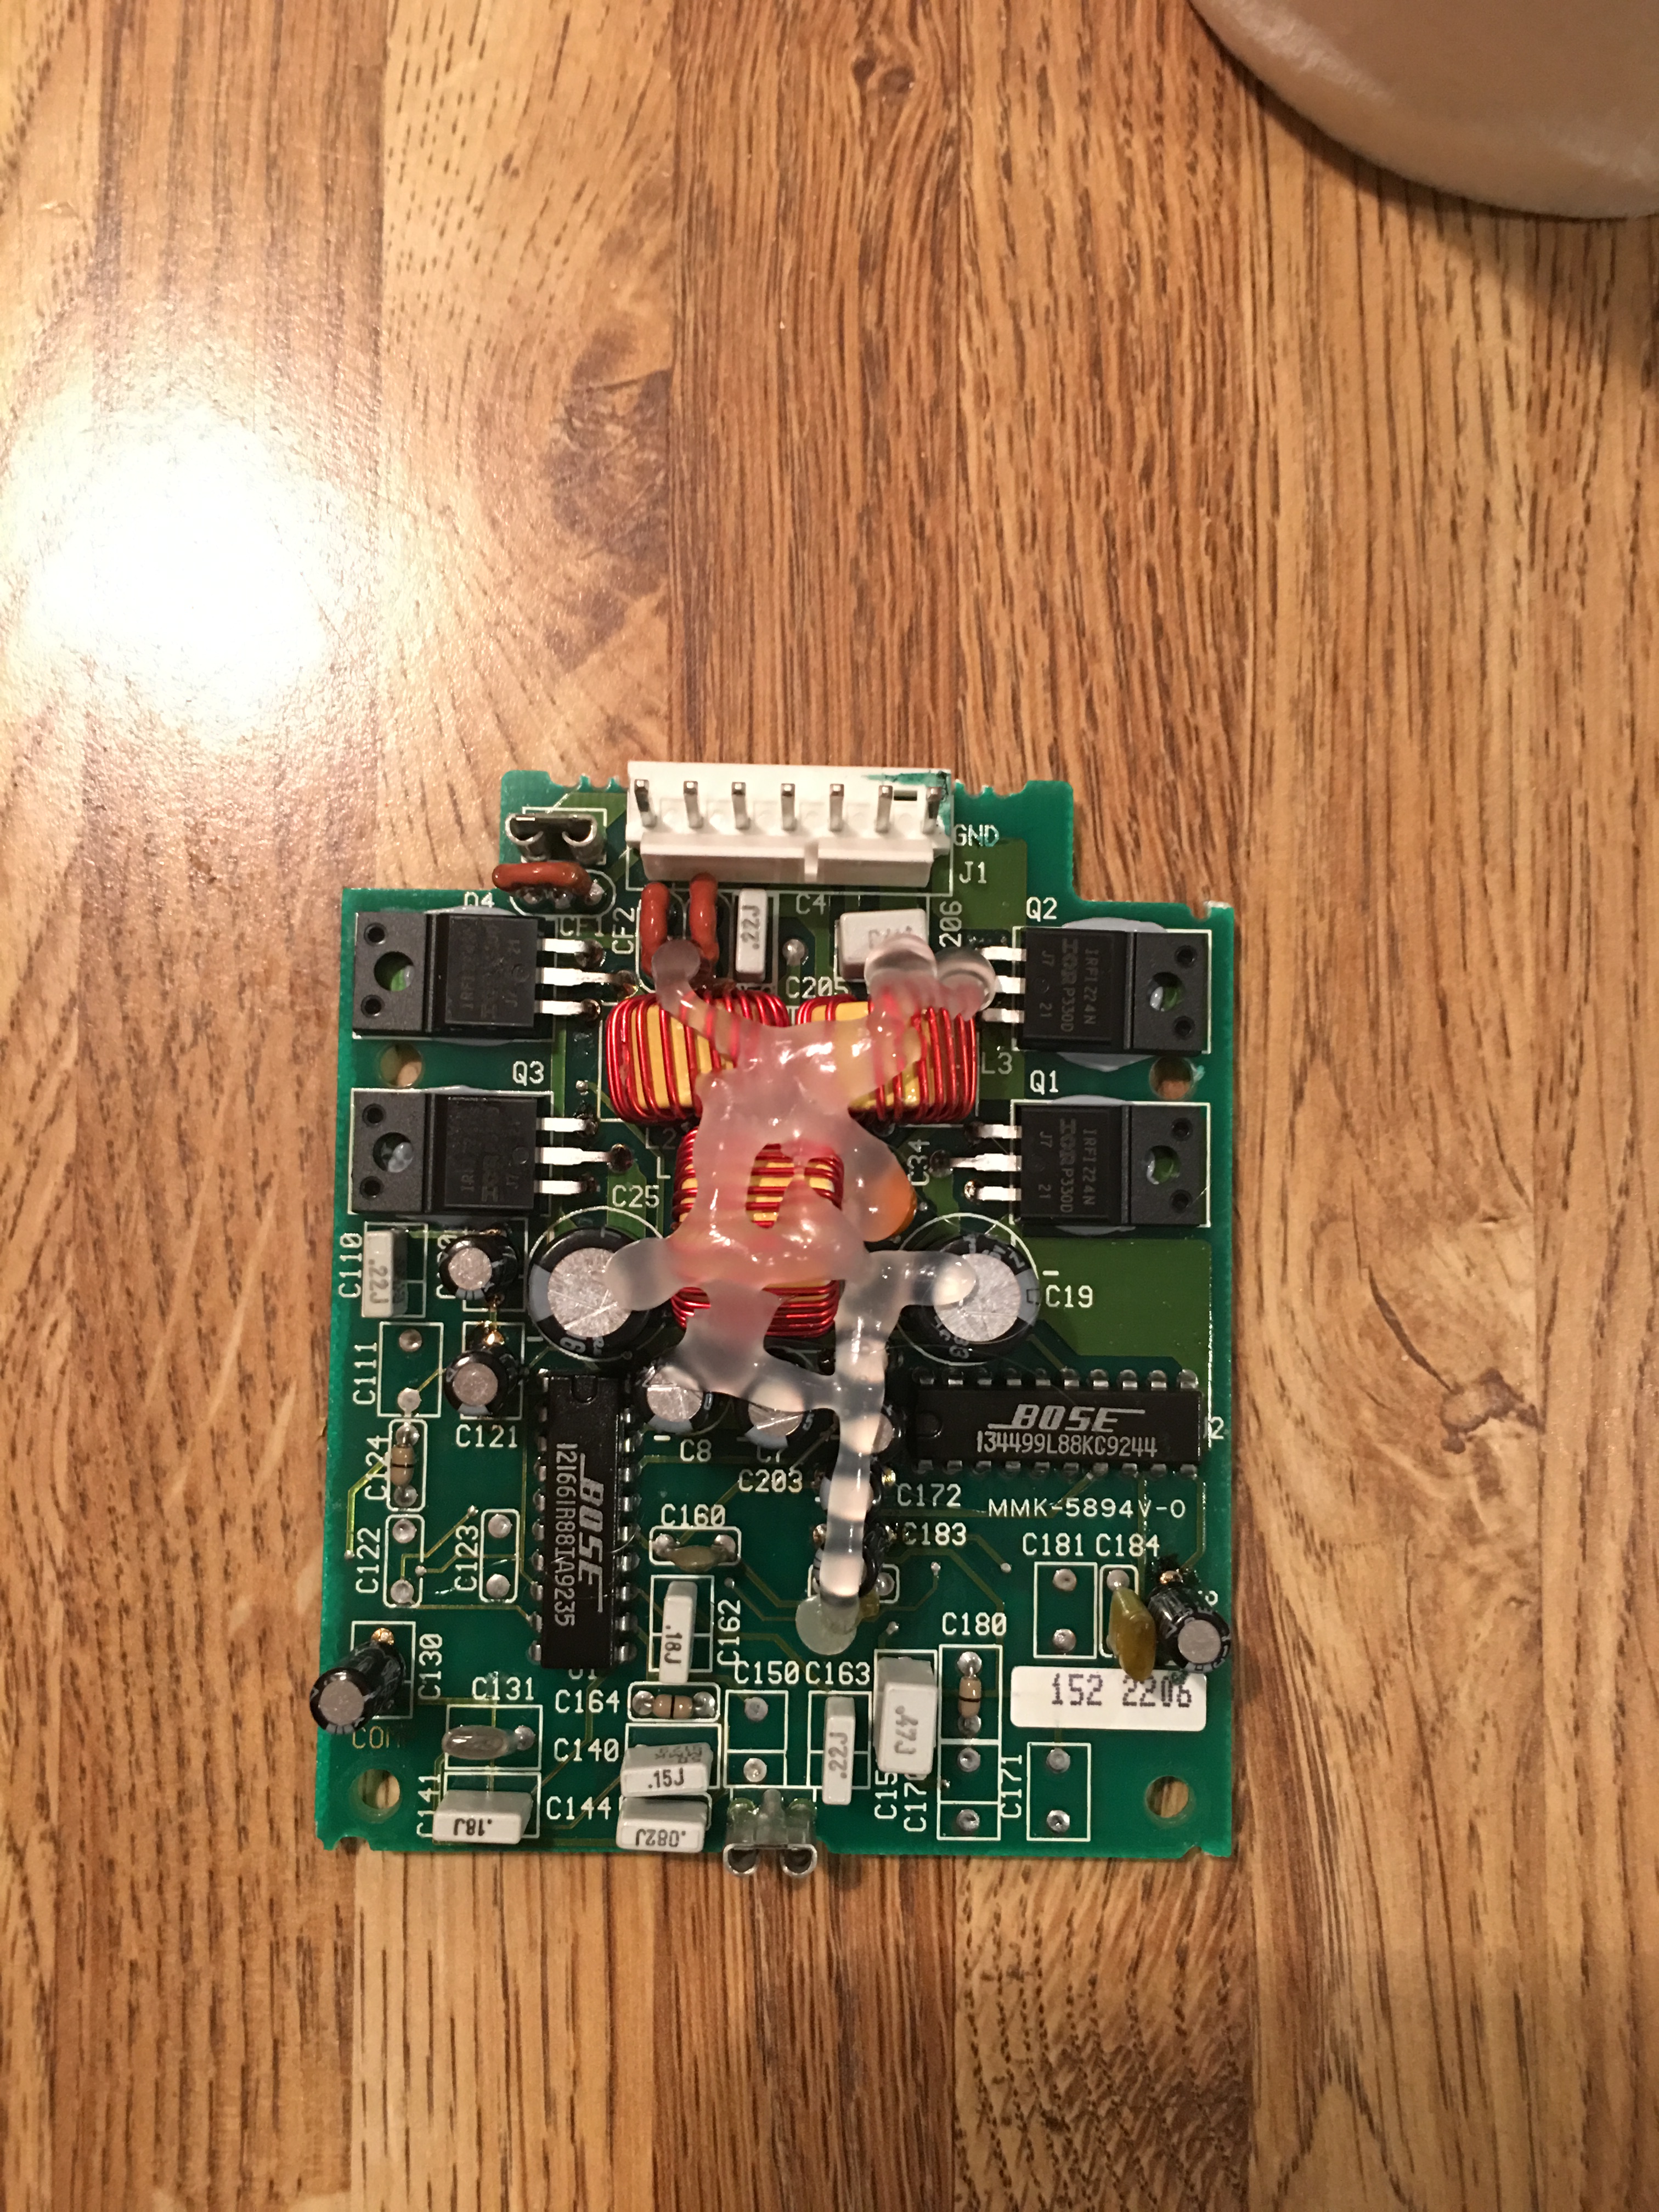
After obsessively cleaning up everything in the vicinity of the box after discovering the rat poison, I took it all apart and washed everything with hot soapy water to get rid of any traces of the poison remaining and went ahead with the amplifier rebuild. New capacitors, new MOSFETs, and new conformal coating.
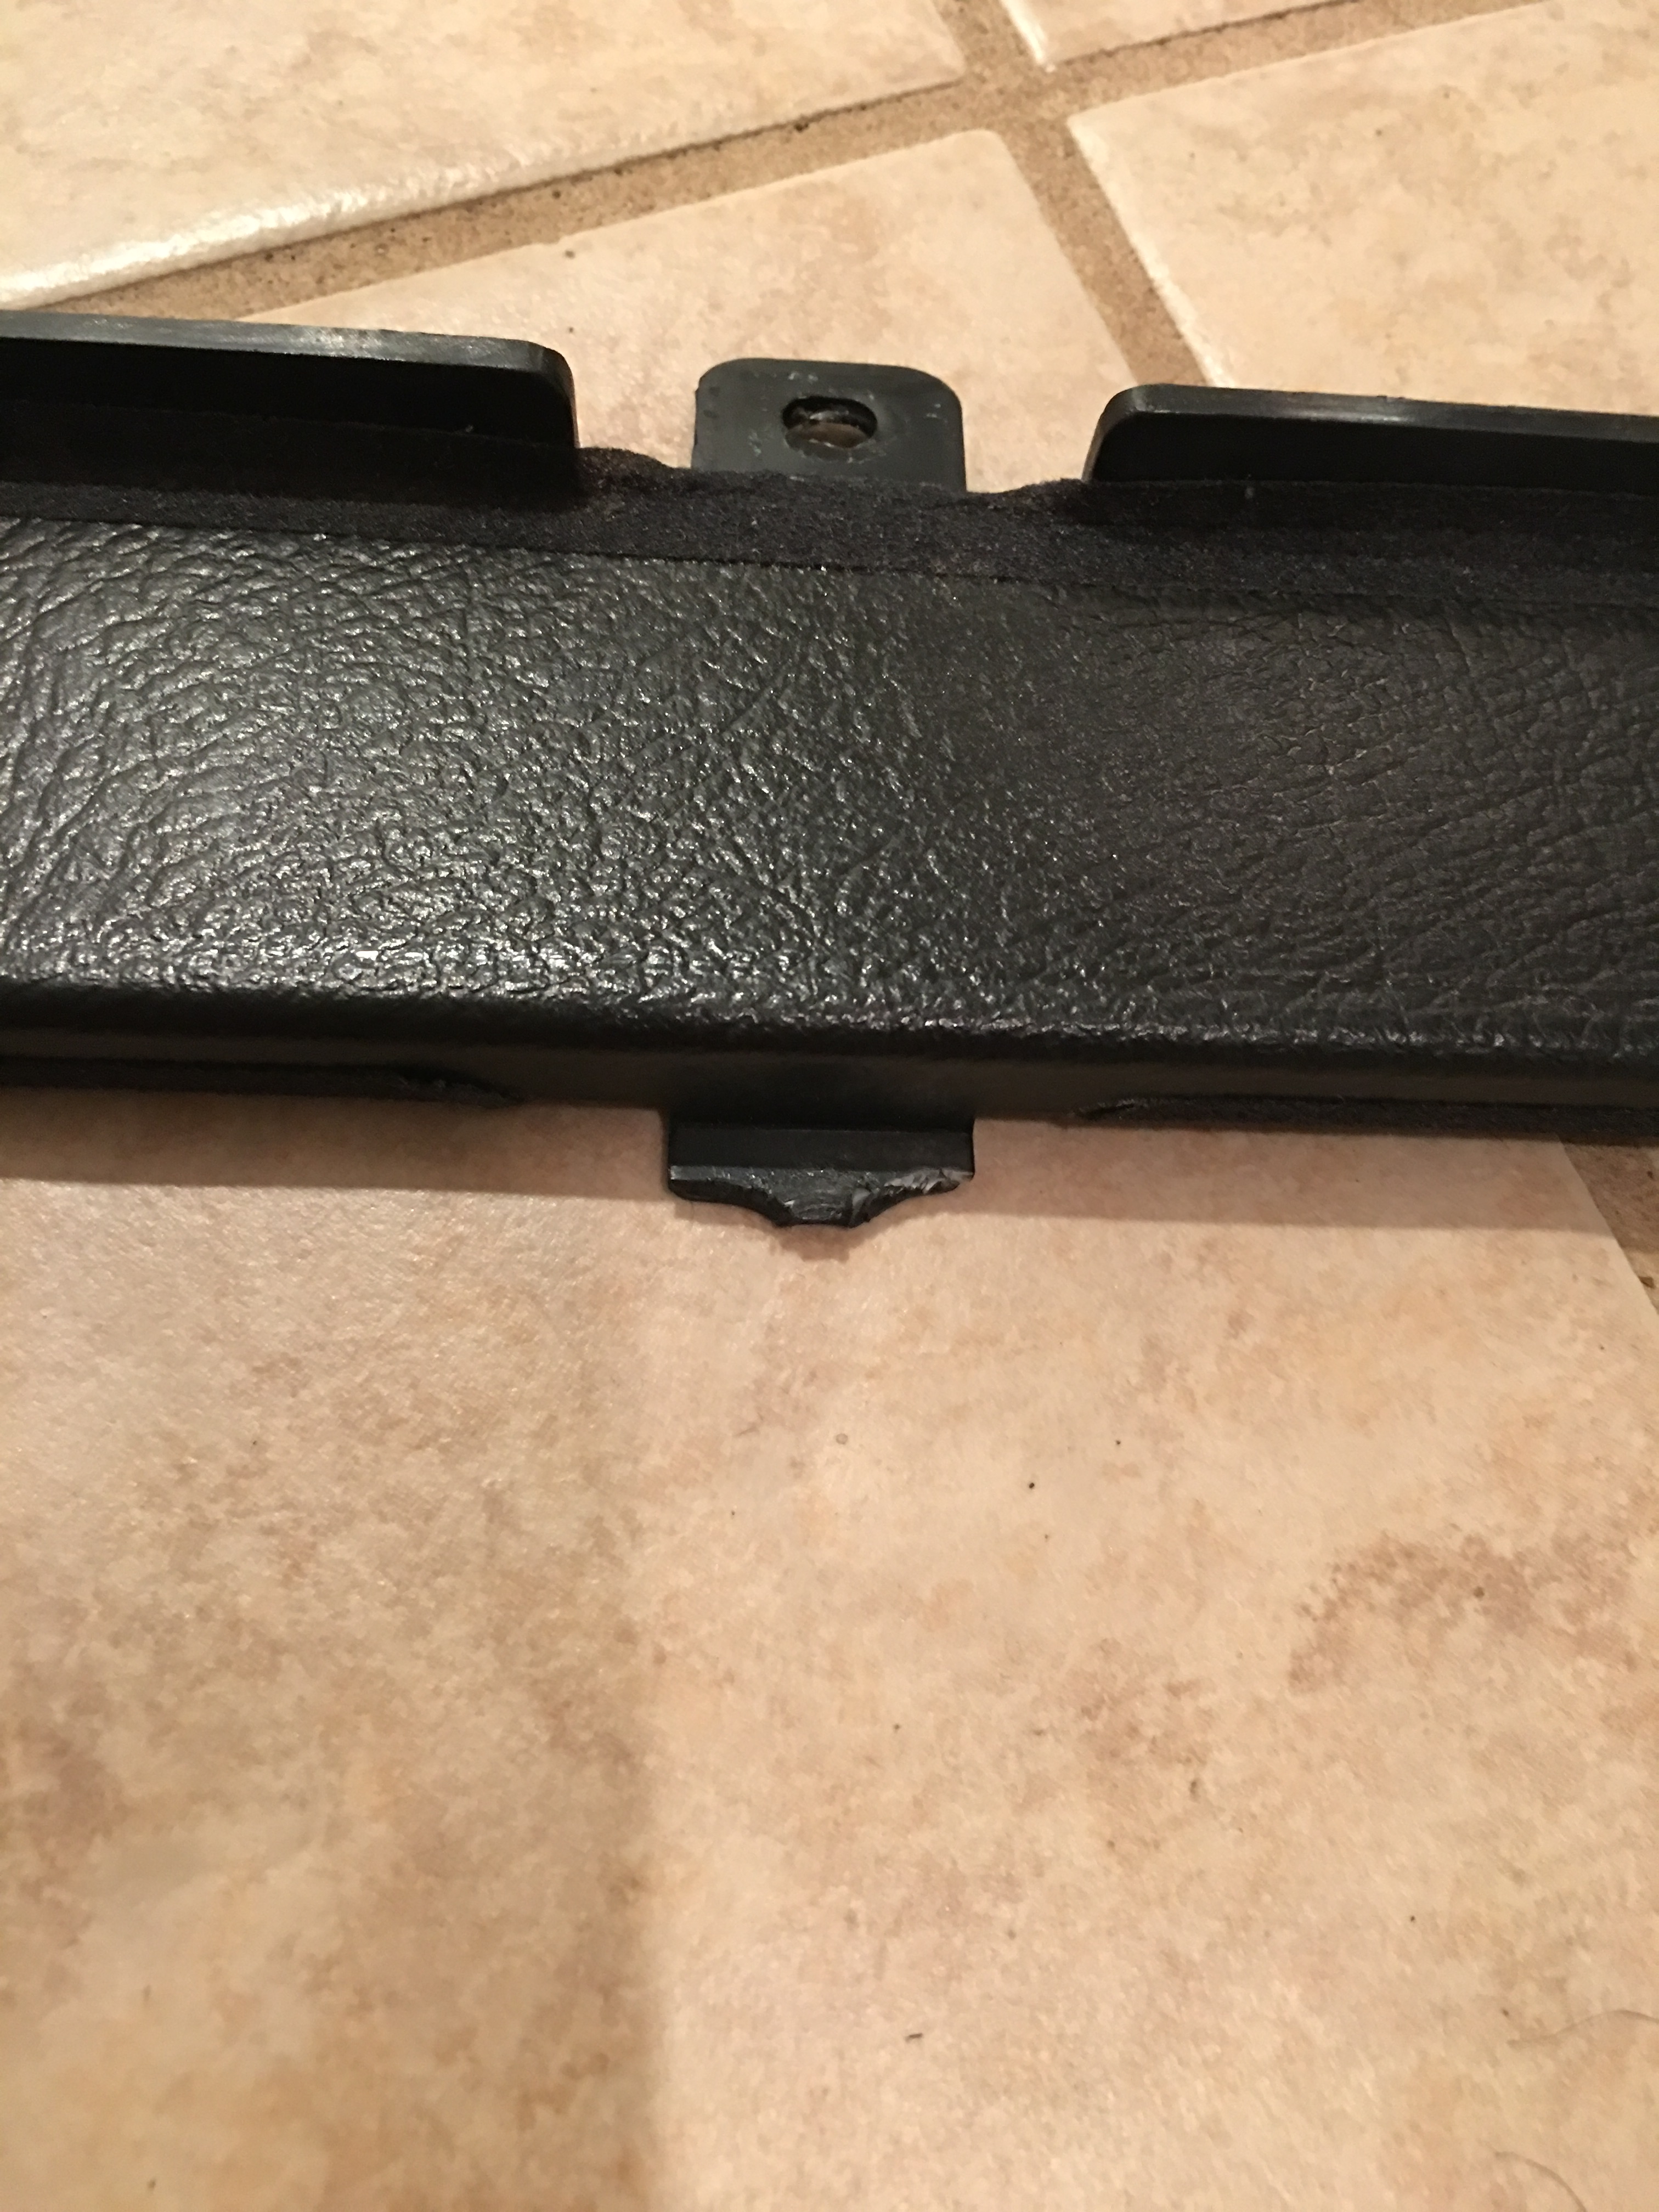
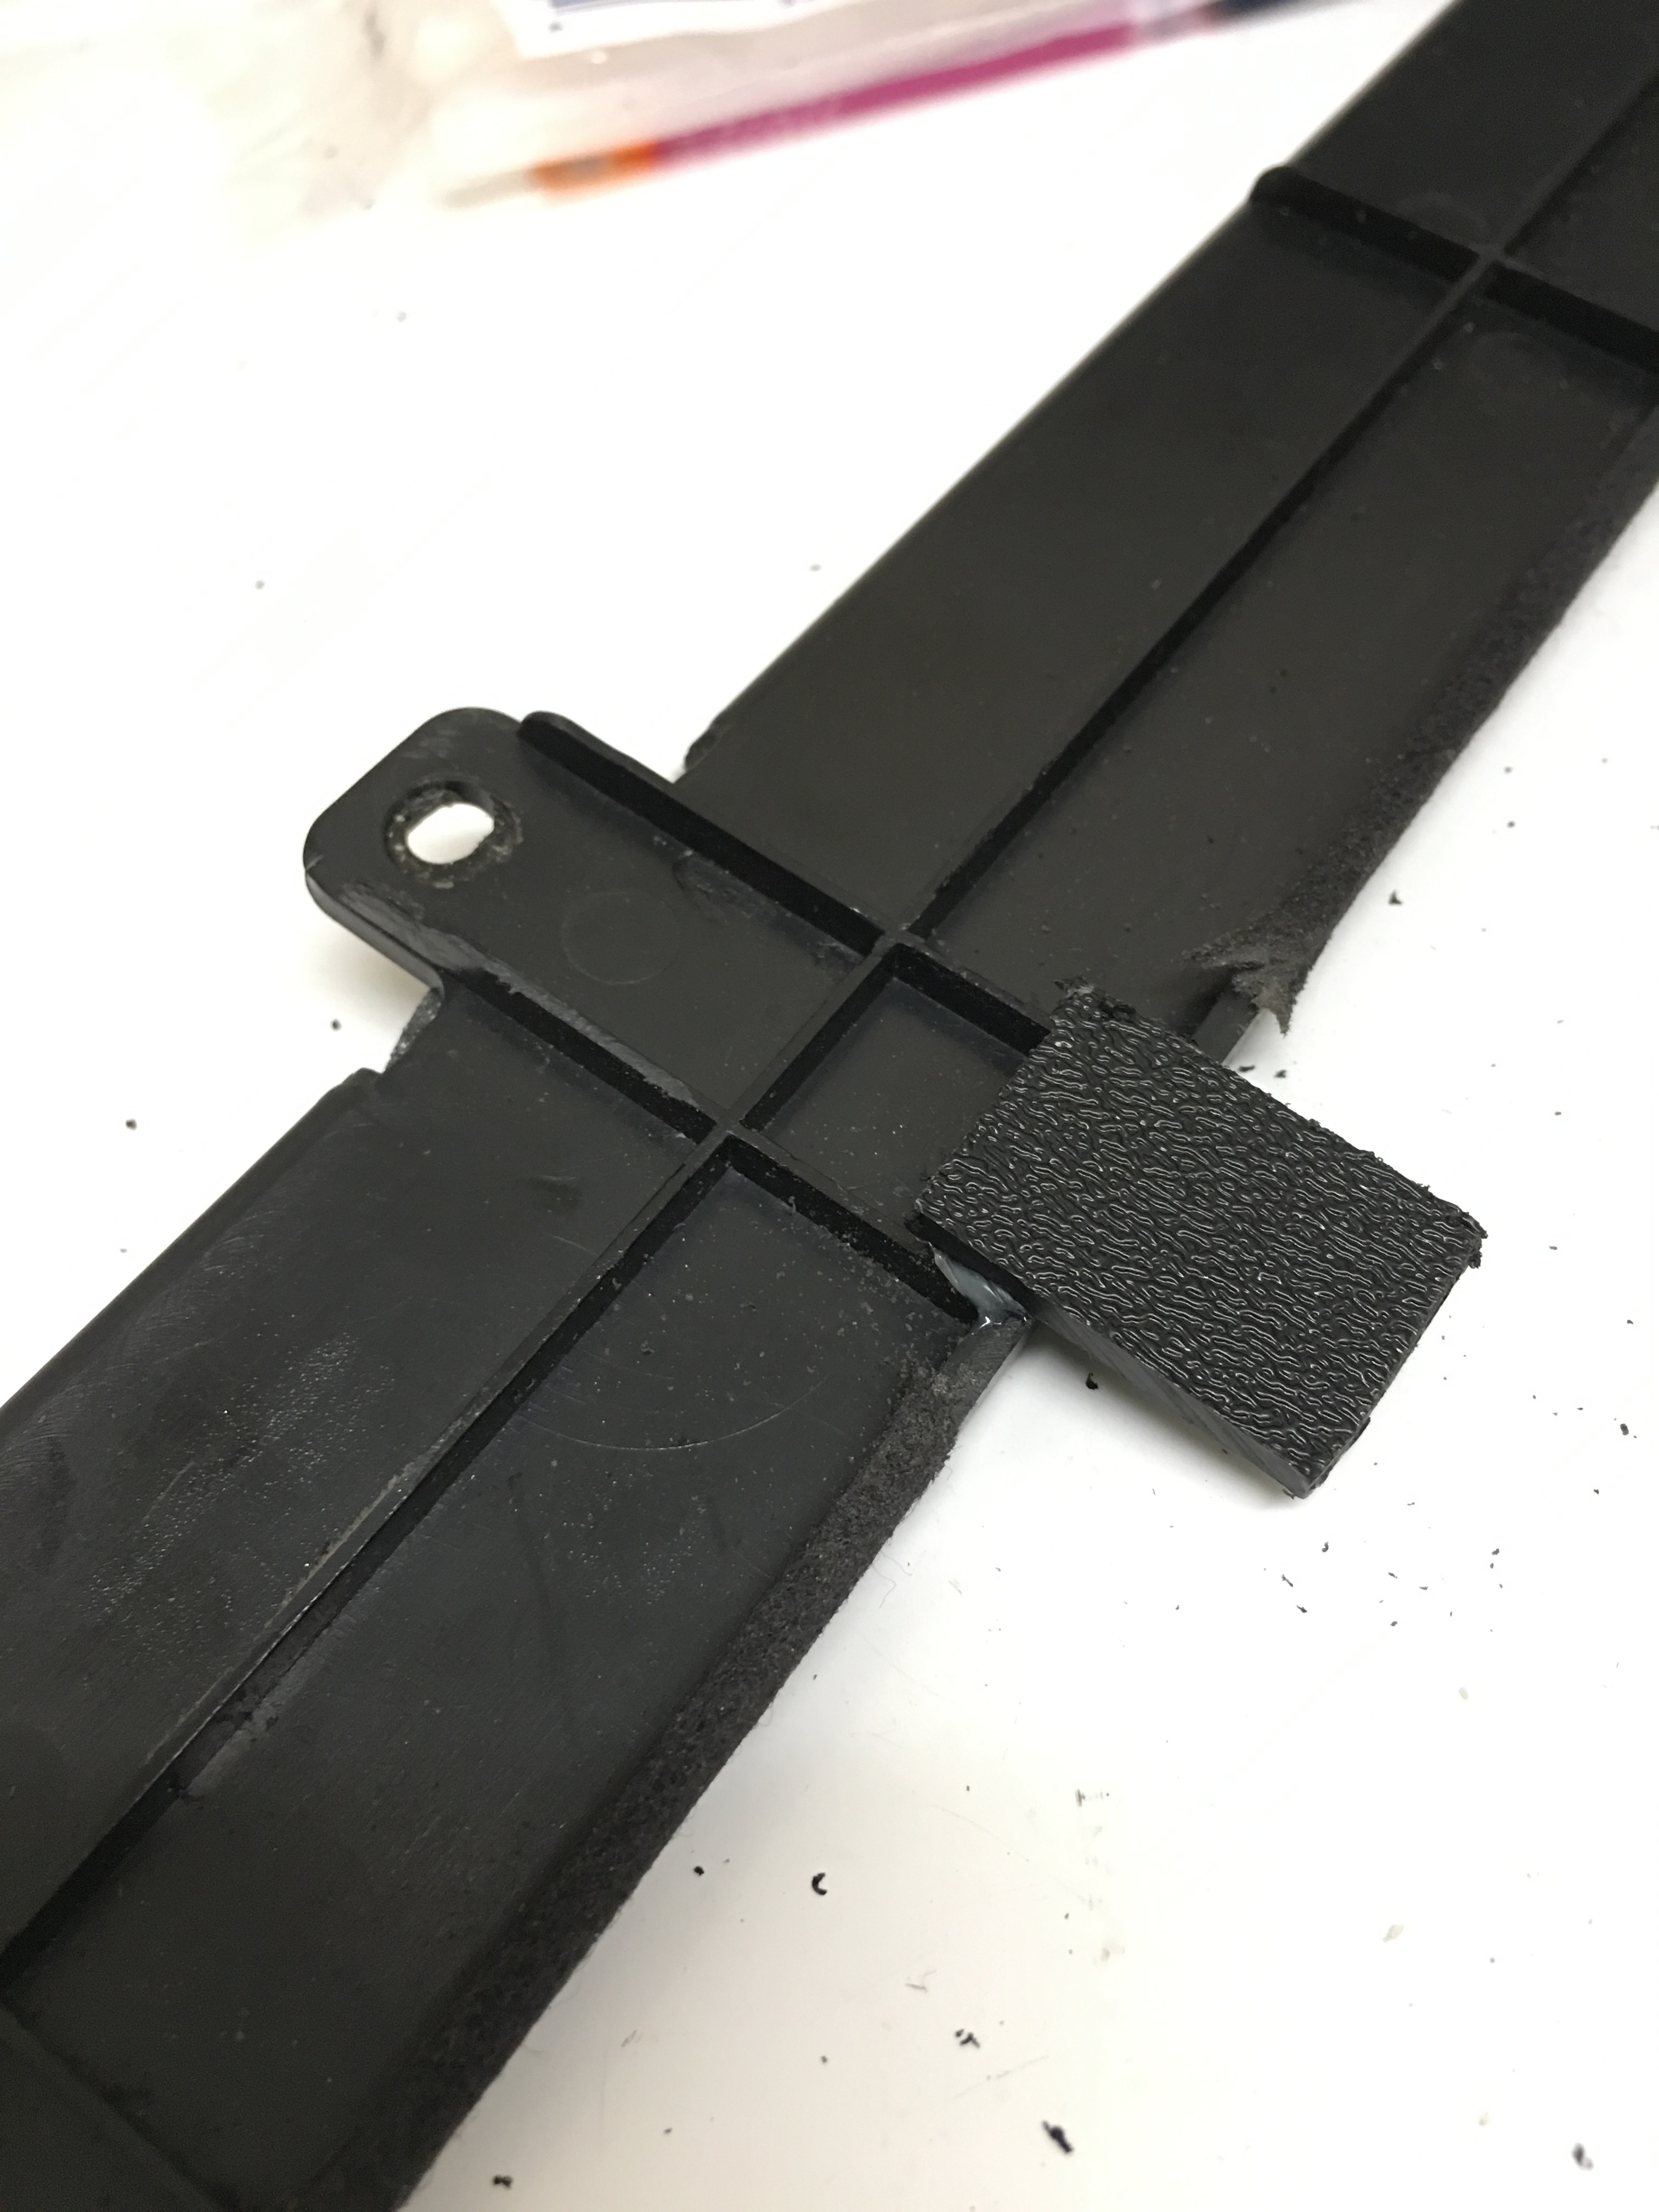
I also fixed a few broken tabs on the speaker box and door panel. Since they are made from ABS plastic I just bought a 12"x12" sheet of 1/8" thick ABS plastic on Amazon, cut pieces to fit the broken tabs, dremeled away the old tabs, and solvent welded the new ones on. So far they seem to be plenty strong but only time will tell how well this fix holds up, I still need to drill the holes and clean up the edges a bit.
I started off by replacing the super long rear dash cam cable with a much more appropriate one and moving the rear camera to the passenger side so it's not constantly visible in the rear view camera. It's much more out of the way now which I like, and the cable isn't wrapped all over the place anymore either.
I also decided I needed more head room, I'm 6'1" and had MAYBE 1/2" of head room, so I cut about an inch of foam out of the bottom of the seat and it makes a bigger difference than you'd think. At first I attempted a "hot wire" approach that involved a hack saw blade, a propane torch, and some dangerous smelling fumes (see the burned stripe across the back of the bottom of the cushion?) but that didn't work so I just used a hacksaw properly to cut straight across the bottom of the seat foam, and then used zip ties instead of hog rings since for the reassembly since I absolutely hate hog rings. Overall it isn't noticeable at all and seat comfort seems unchanged.
Also picked up a set of sun visors to replace mine that are splitting like crazy, the new ones have giant air bag warnings on them though which is annoying... For whatever reason Acura has discontinued them in North America so I had to order them from some guy running an NSX parts shop in Japan.
I also starting taking apart the interior to repaint the trip pieces, then discovered that it takes weeks for the ferric chloride to dissolve the coating on them, so in the meantime I decided to take care of a few others things, so I replaced the clutch cylinders.
After doing some research I found that the cheap Centric branded clutch master and slave cylinders are the exact same parts as the OEM cylinders, but less than half the price. Sure enough, the markings are identical and the master cylinder are both Nissin and the slave cylinders are both made by AS.
While I was replacing the clutch cylinders I decided to install a ScienceOfSpeed clutch damper delete kit since the clutch damper doesn't do a whole lot besides wear down the clutch faster. It's a much cleaner look too since it gets rid of a bracket and extra tube, as well as replaces the rubber line with a stainless line. I'm not a fan of stainless lines but since it's the clutch and not the brakes I can tolerate it. My only real issue with this kit is that the fitting to connect the SS hose to the new slave cylinder was just ever so slightly too large to fit, so I had to sand it with 800 grit sandpaper for a proper fit. After removing one of the brackets I found that the holes were pretty sticky so I ran an M6x1.0mm tap through them and wire-wheeled the bolts for good measure.
With the door panels and center console out I decided it was time to come up with a final solution for the stereo. I have yet to see an actually good looking aftermarket radio install in an NSX, some look okay but mostly they just look tacky, and I don't need audiophile-level sound in this car since I mainly want to hear the exhaust anyways, so I decided to just rebuild the factory amplifiers and get an aux adapter that plugs into the CD changer port on the radio since it gives much better quality than my tape player aux adapter does. As far as I can tell, my amplifiers hadn't actually failed yet, but it's a lot easier to rebuild them before the capacitors start leaking than it is after because the electrolyte damages the circuit traces and just makes everything more difficult, and parts cost almost nothing.
During the rebuild process, I found a bunch of rat poison in the subwoofer box...my only guess is that a mouse set up camp after crawling in through the port then grabbed a bunch of poison bait pellets and stashed them in there. The weird thing is I haven't seen any other evidence of rodents in this car at all, no chewed wires or carpet, no droppings, nothing. I almost think that the sub box must have come from another car and been used to replace the original, since the capacitors in the subwoofer amplifier were different than the ones in the door speaker amp.
After obsessively cleaning up everything in the vicinity of the box after discovering the rat poison, I took it all apart and washed everything with hot soapy water to get rid of any traces of the poison remaining and went ahead with the amplifier rebuild. New capacitors, new MOSFETs, and new conformal coating.
I also fixed a few broken tabs on the speaker box and door panel. Since they are made from ABS plastic I just bought a 12"x12" sheet of 1/8" thick ABS plastic on Amazon, cut pieces to fit the broken tabs, dremeled away the old tabs, and solvent welded the new ones on. So far they seem to be plenty strong but only time will tell how well this fix holds up, I still need to drill the holes and clean up the edges a bit.
Here's another post filled with my obsessing over minor details.
I finished rebuilding all 3 amplifier boards, so during reassembly I repaired the broken tabs on the speaker boxes, again using solvent cement to weld new tabs on. I'm not sure how long they will hold since each time the doors close the tabs get stressed, but if they fail again I'll make new tabs out of aluminum L-brackets bolted to the sides of the housings that should last more or less forever. I tried to make use of whatever existing supporting plastic I could so hopefully I won't have to do that for a while.
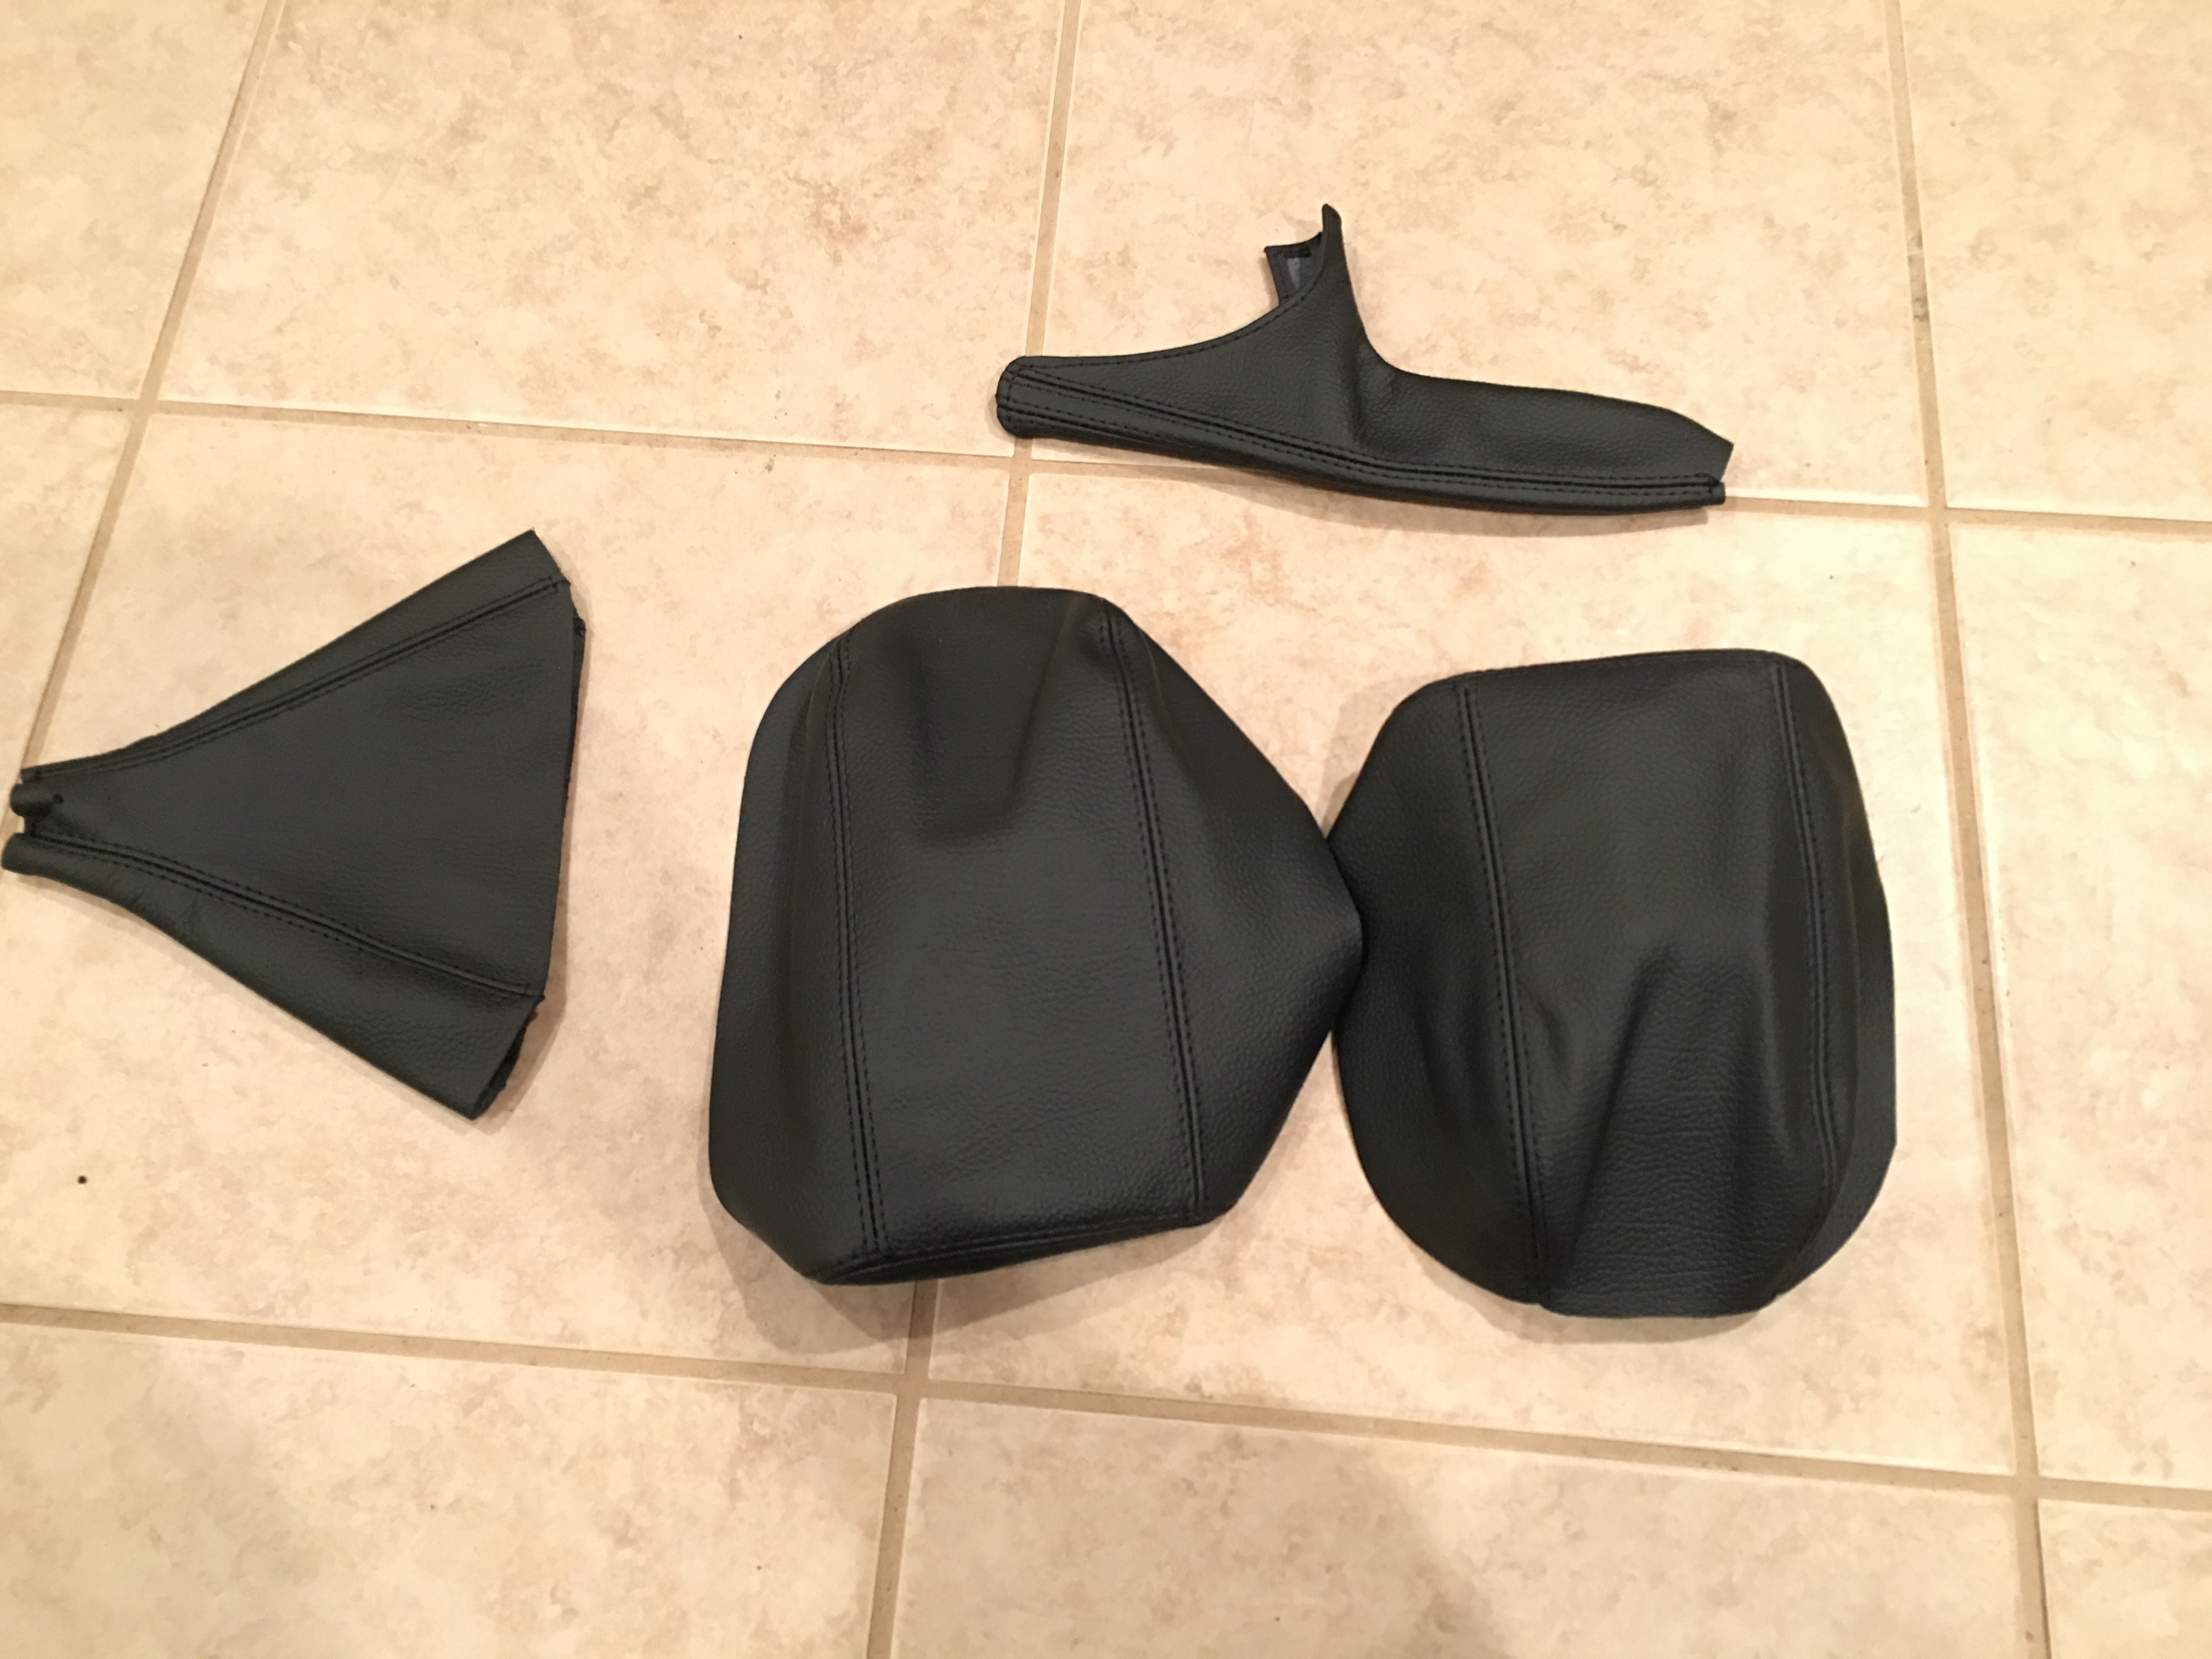
I also got some new interior goodies from RedlineGoods, new shift boot, center console covers, and handbrake boot. I ended up not using the handbrake boot since it fit too loose and looked like crap but the rest of the pieces look great, but I have another, better plan for that.
The original center console upholstery was looking pretty bad, it's scuffed up and hard. I tried leatherique conditioner which helped a bit but I still wasn't happy with it, so off they come (without damaging them of course) and into the bag of removed OEM parts.
Both covers pulled off, the foam underneath is still in decent condition so I didn't mess with it.
Stretching the new covers over and gluing them down. I use Weldwood contact cement around the edges, it works great for sticking down leather since it's pretty thick and doesn't get immediately soaked into the leather.
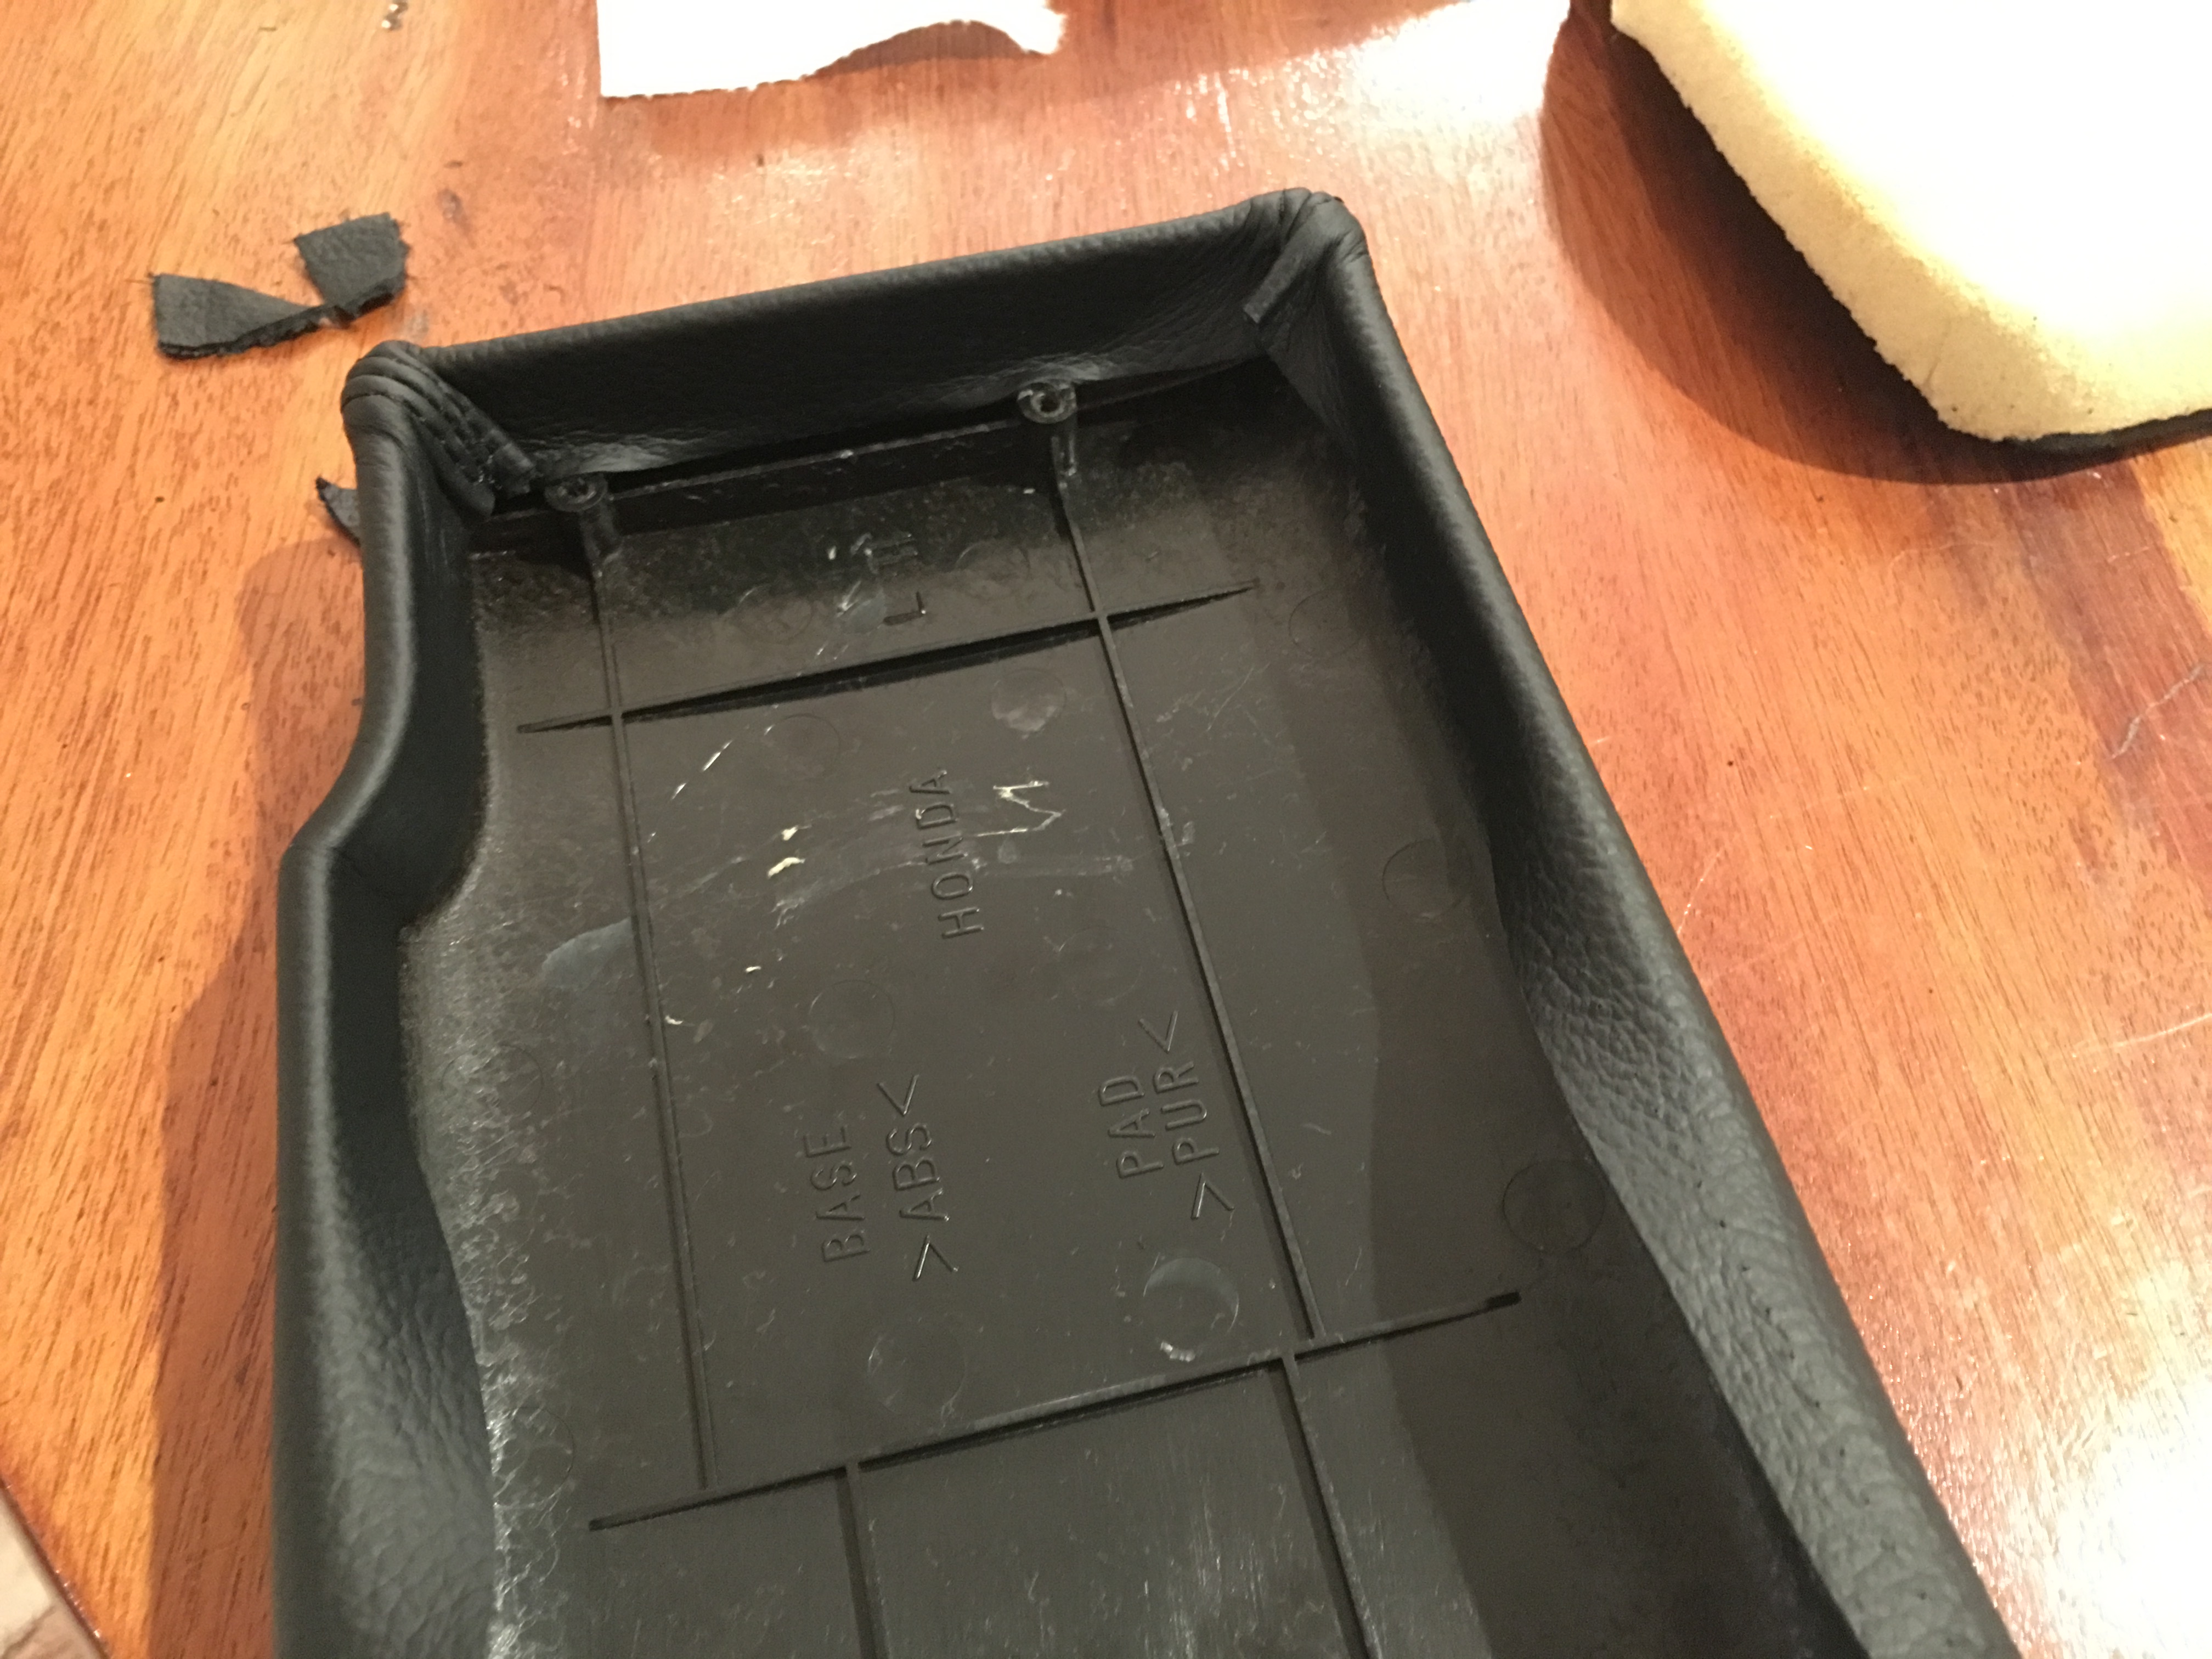
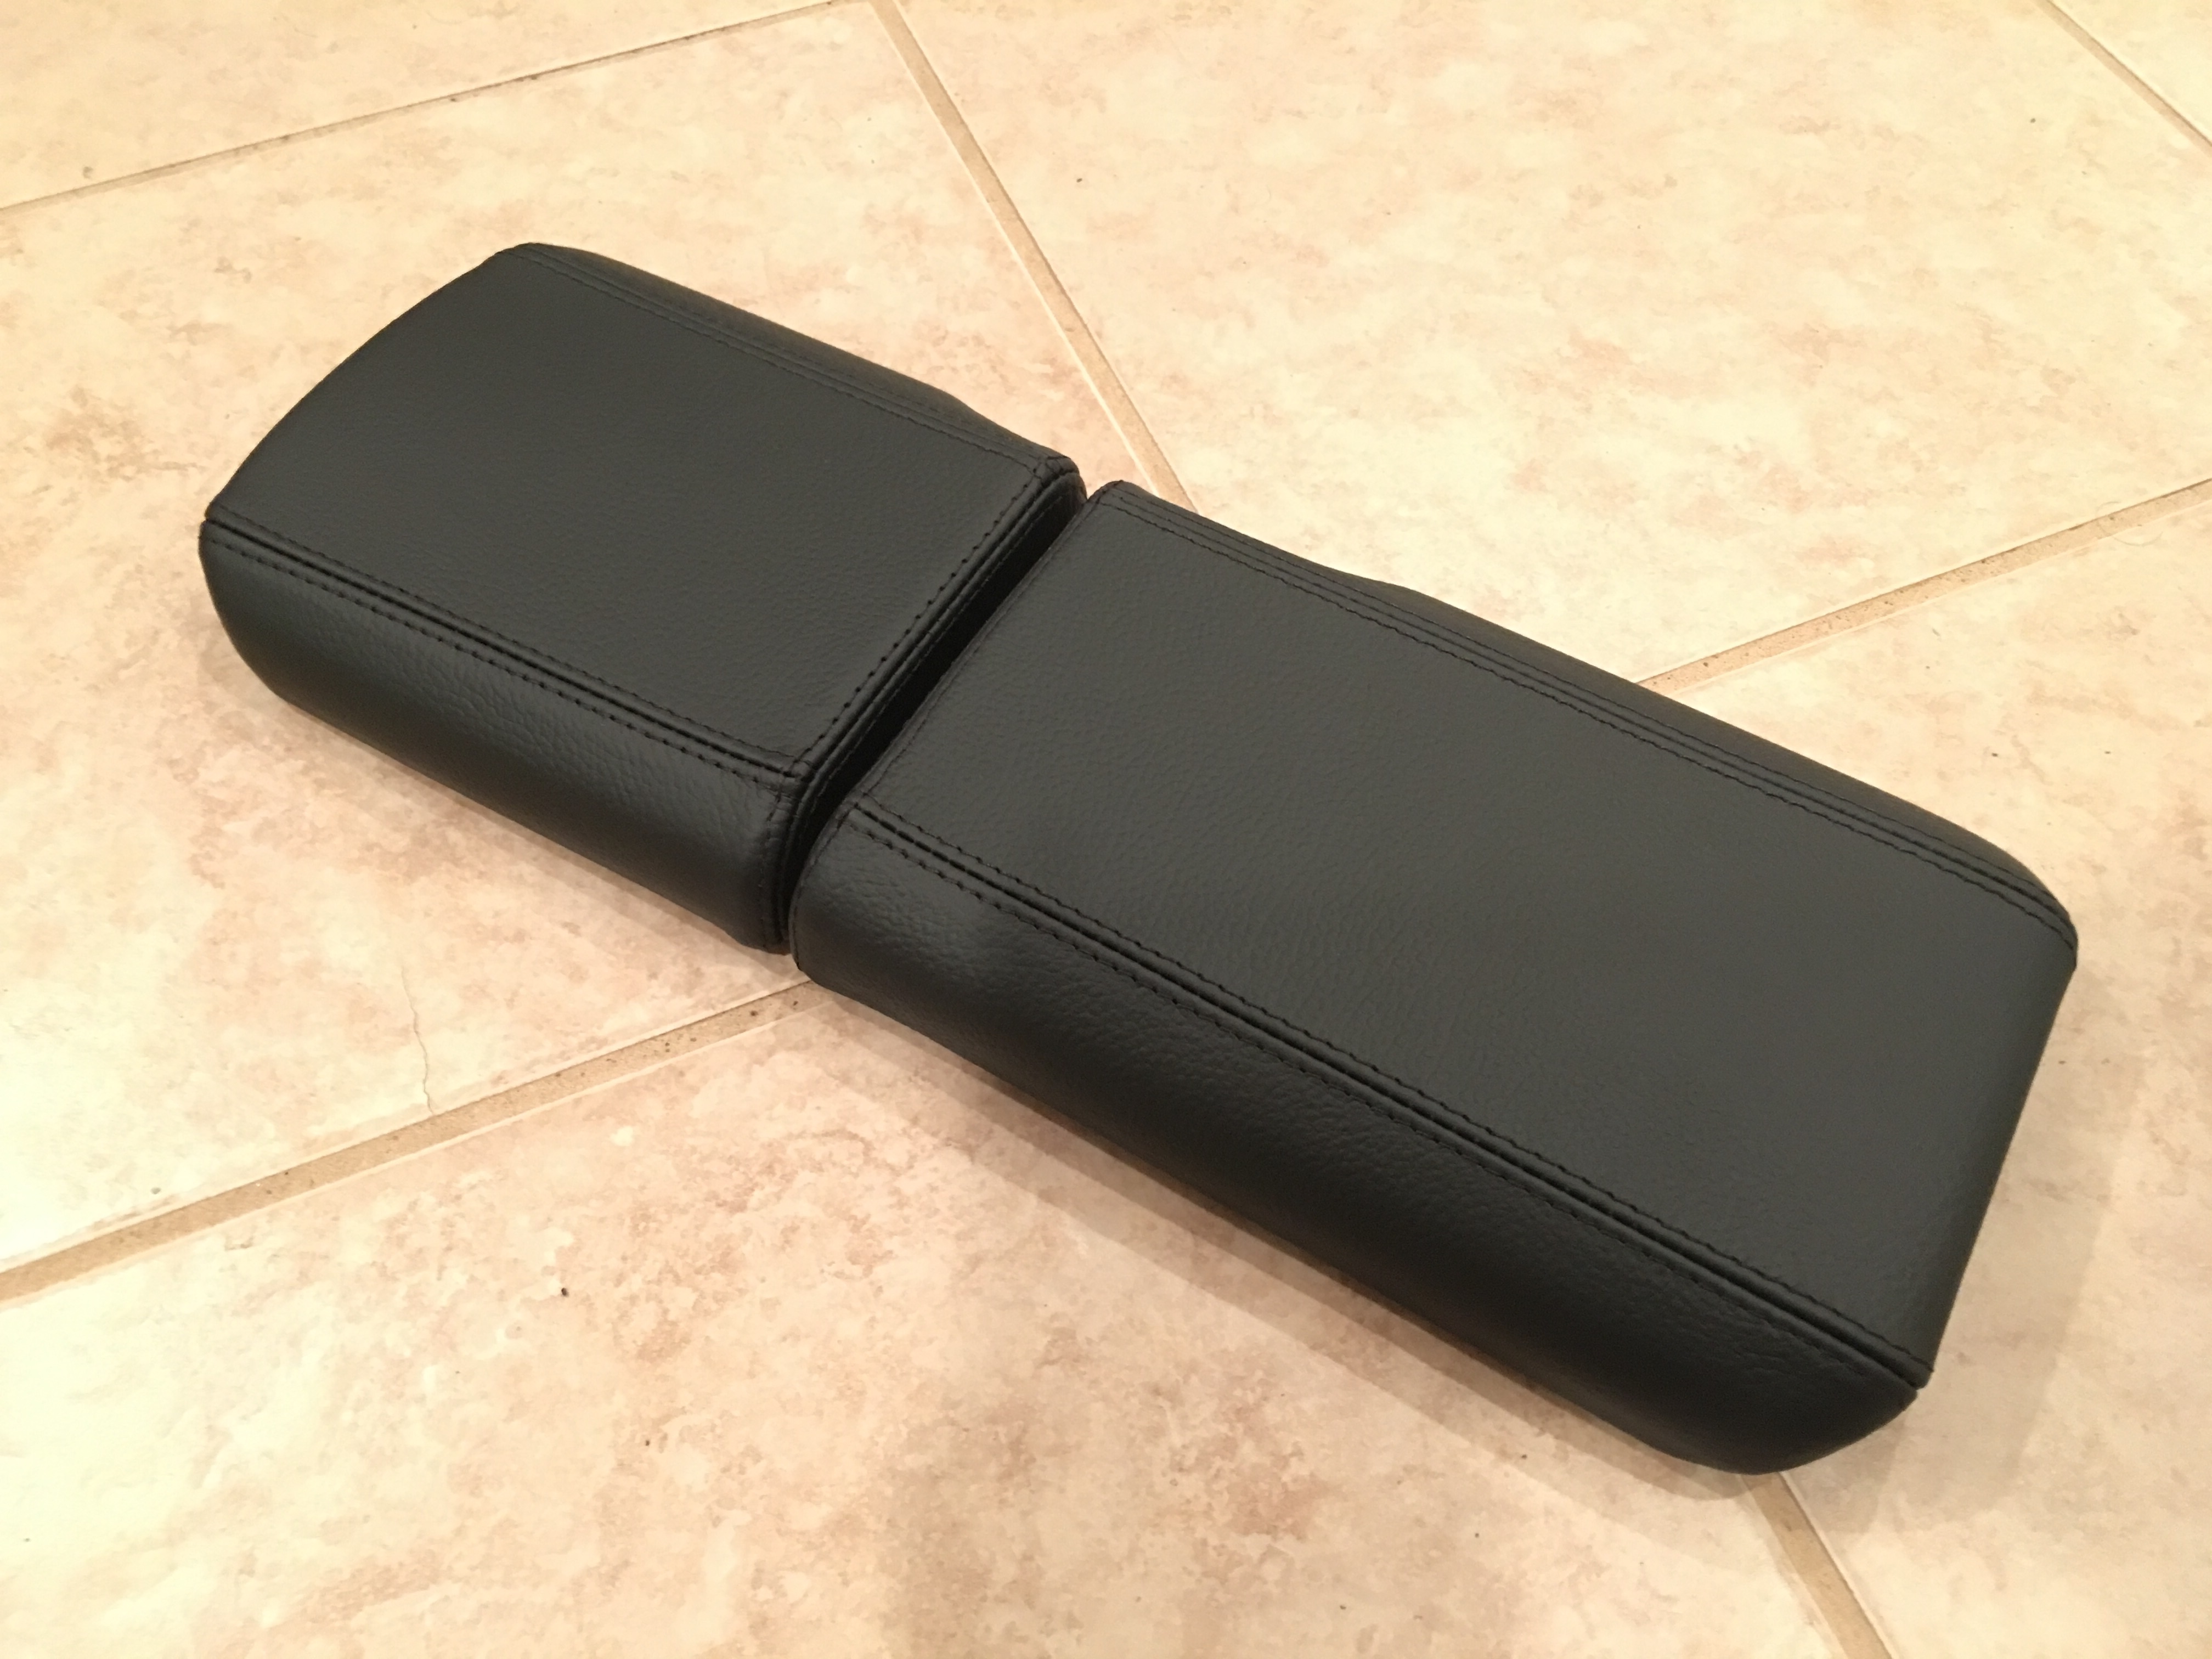
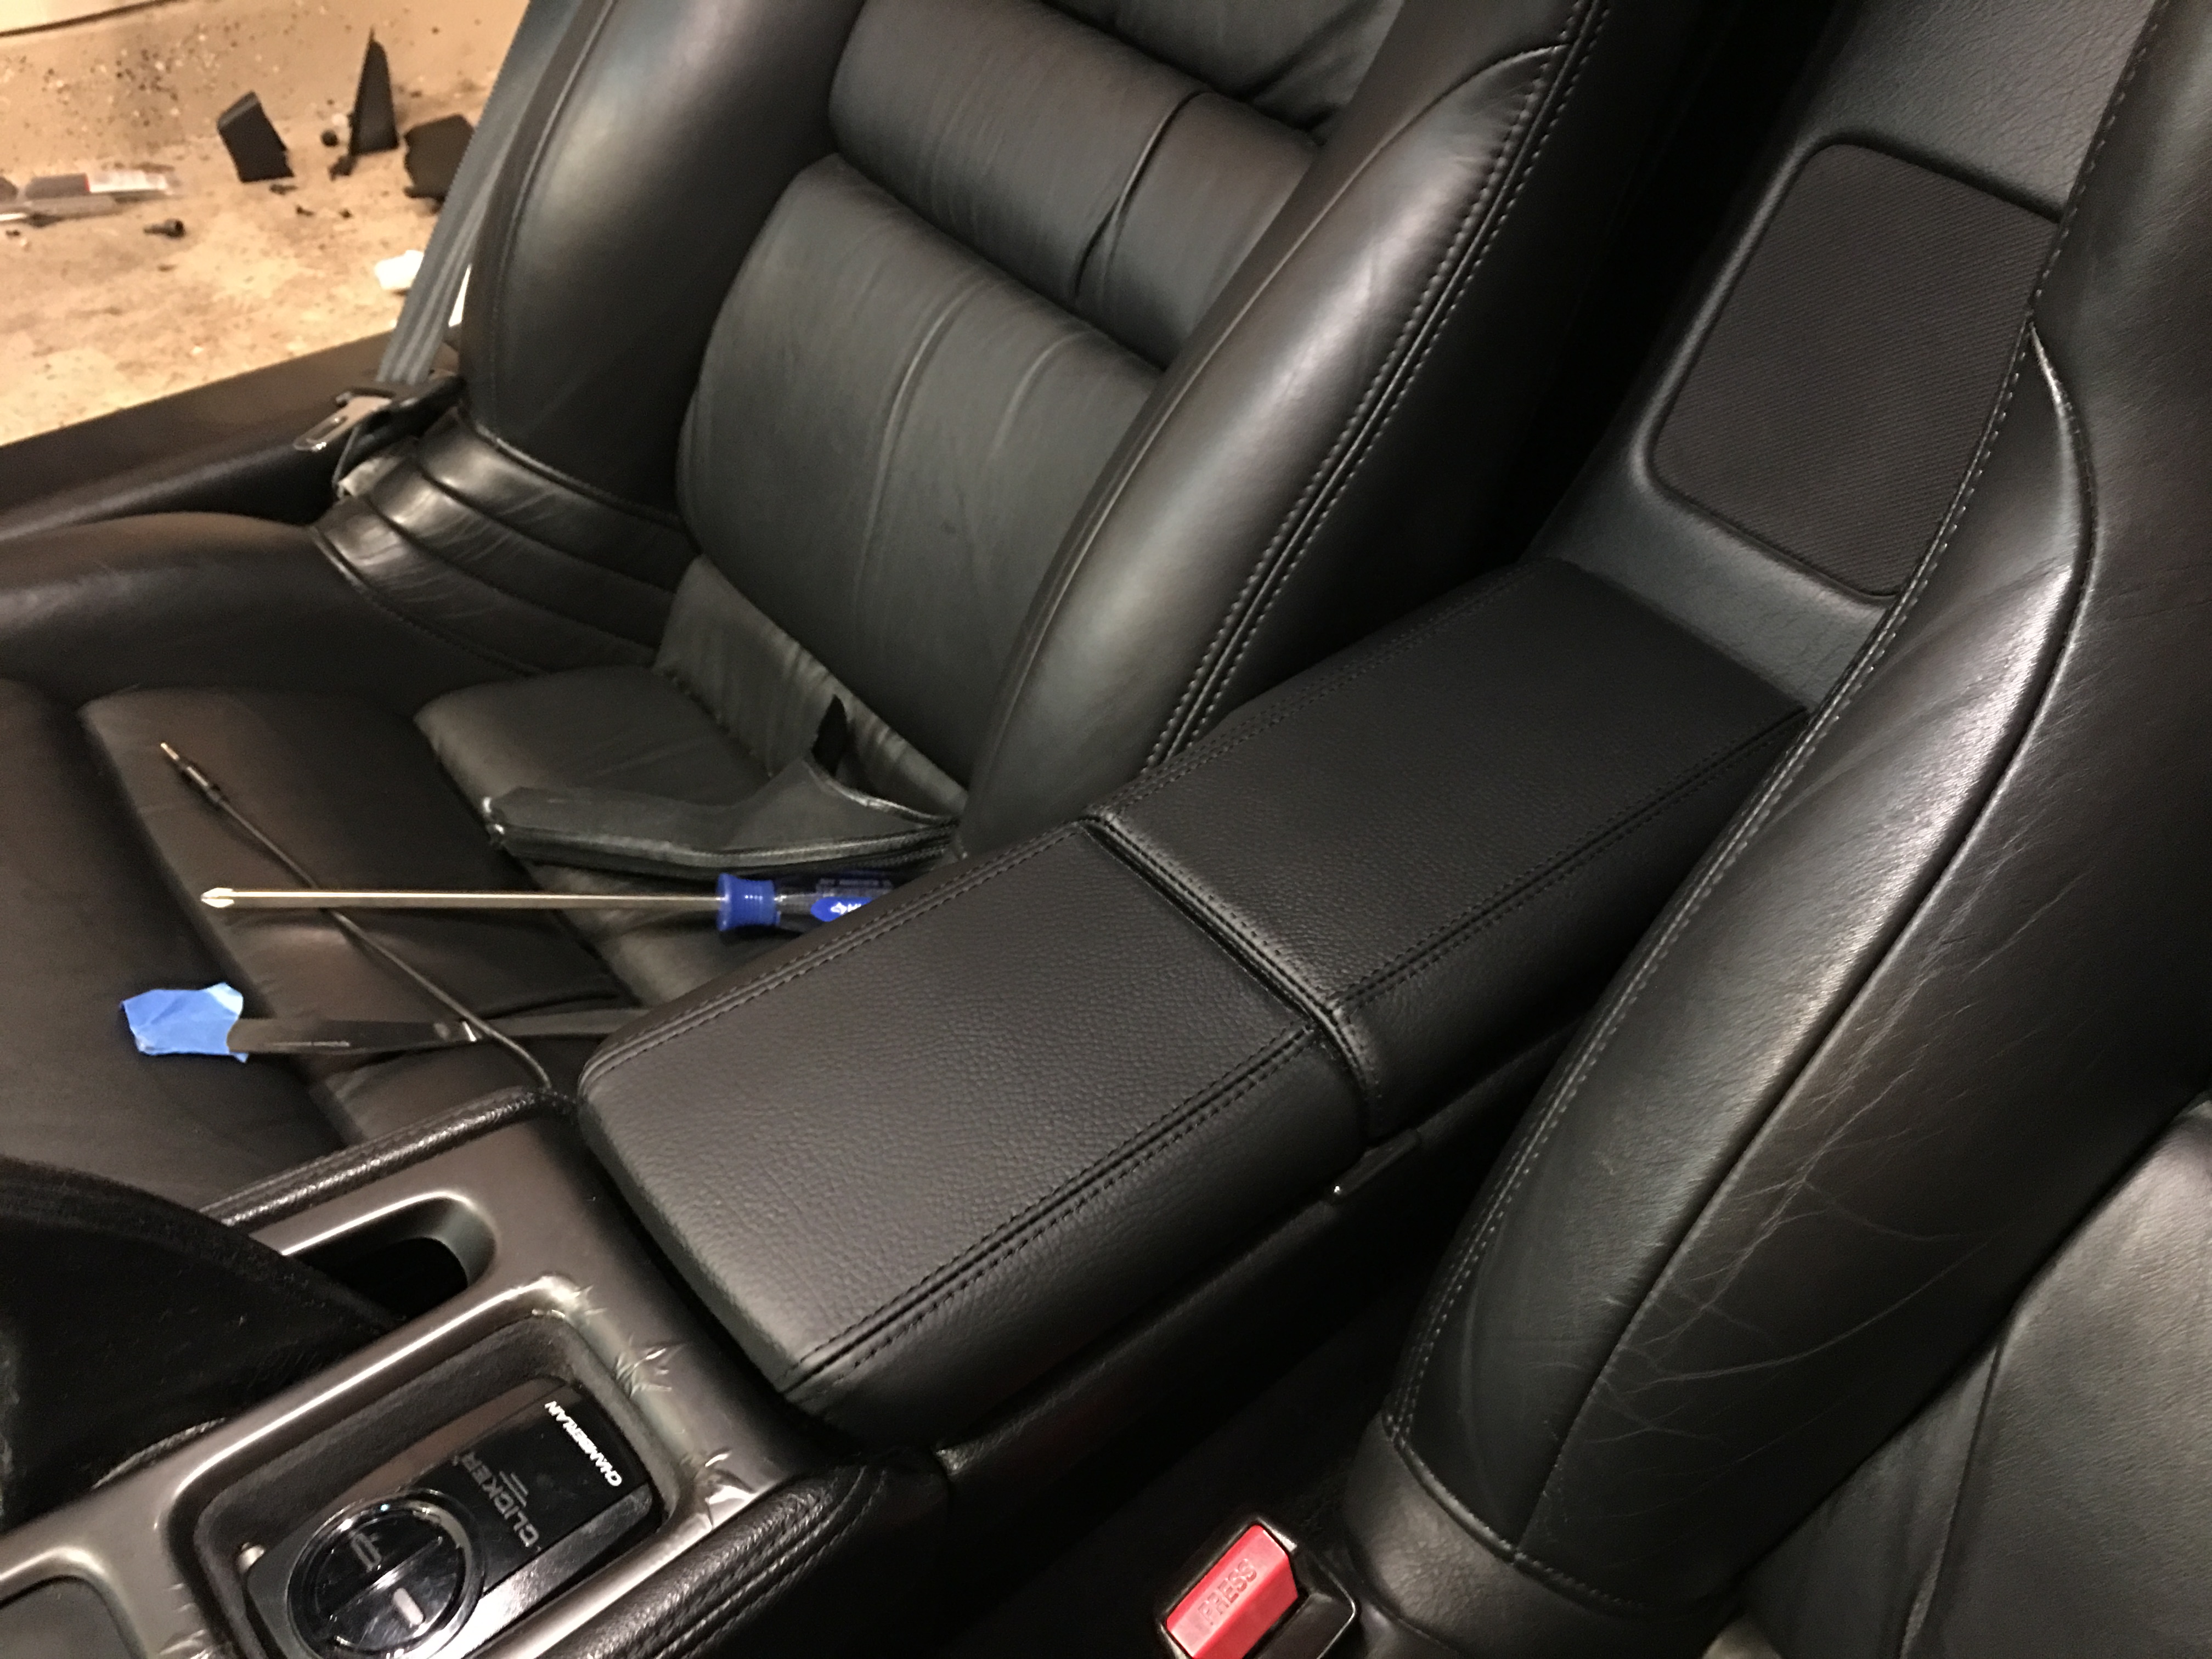
Reinstalled, looks like a factory part but with nicer leather.
But anyways, about the handbrake lever cover. The leather cover from RedlineGoods is way too loose so it looks bad and feels bad to grab onto, I tried shrinking it by wetting it and then putting it in the oven at 170F for a few hours to dry it but that did absolutely nothing, so that leather piece is completely unusable. About this time I also started looking into what shift knob I wanted, since the leather wrapped original was looking pretty bad after 23 years and almost 100k miles. I settled on the NSX Zanardi/Type-S titanium knob, and came across a thread where a guy put one in his FD RX7 and it perfectly matched his titanium handbrake lever, which is a super rare optional MazdaSpeed part made for RX7s and virtually impossible to find.

I love the way that combo looks, and while I won't try to find an RX7 handbrake and make it work in my car, I did however order a chunk of titanium stock and am having a machine shop mill it out to fit, then I'll do some experimenting with my bead blaster to try to get a perfect match with the shift knob.
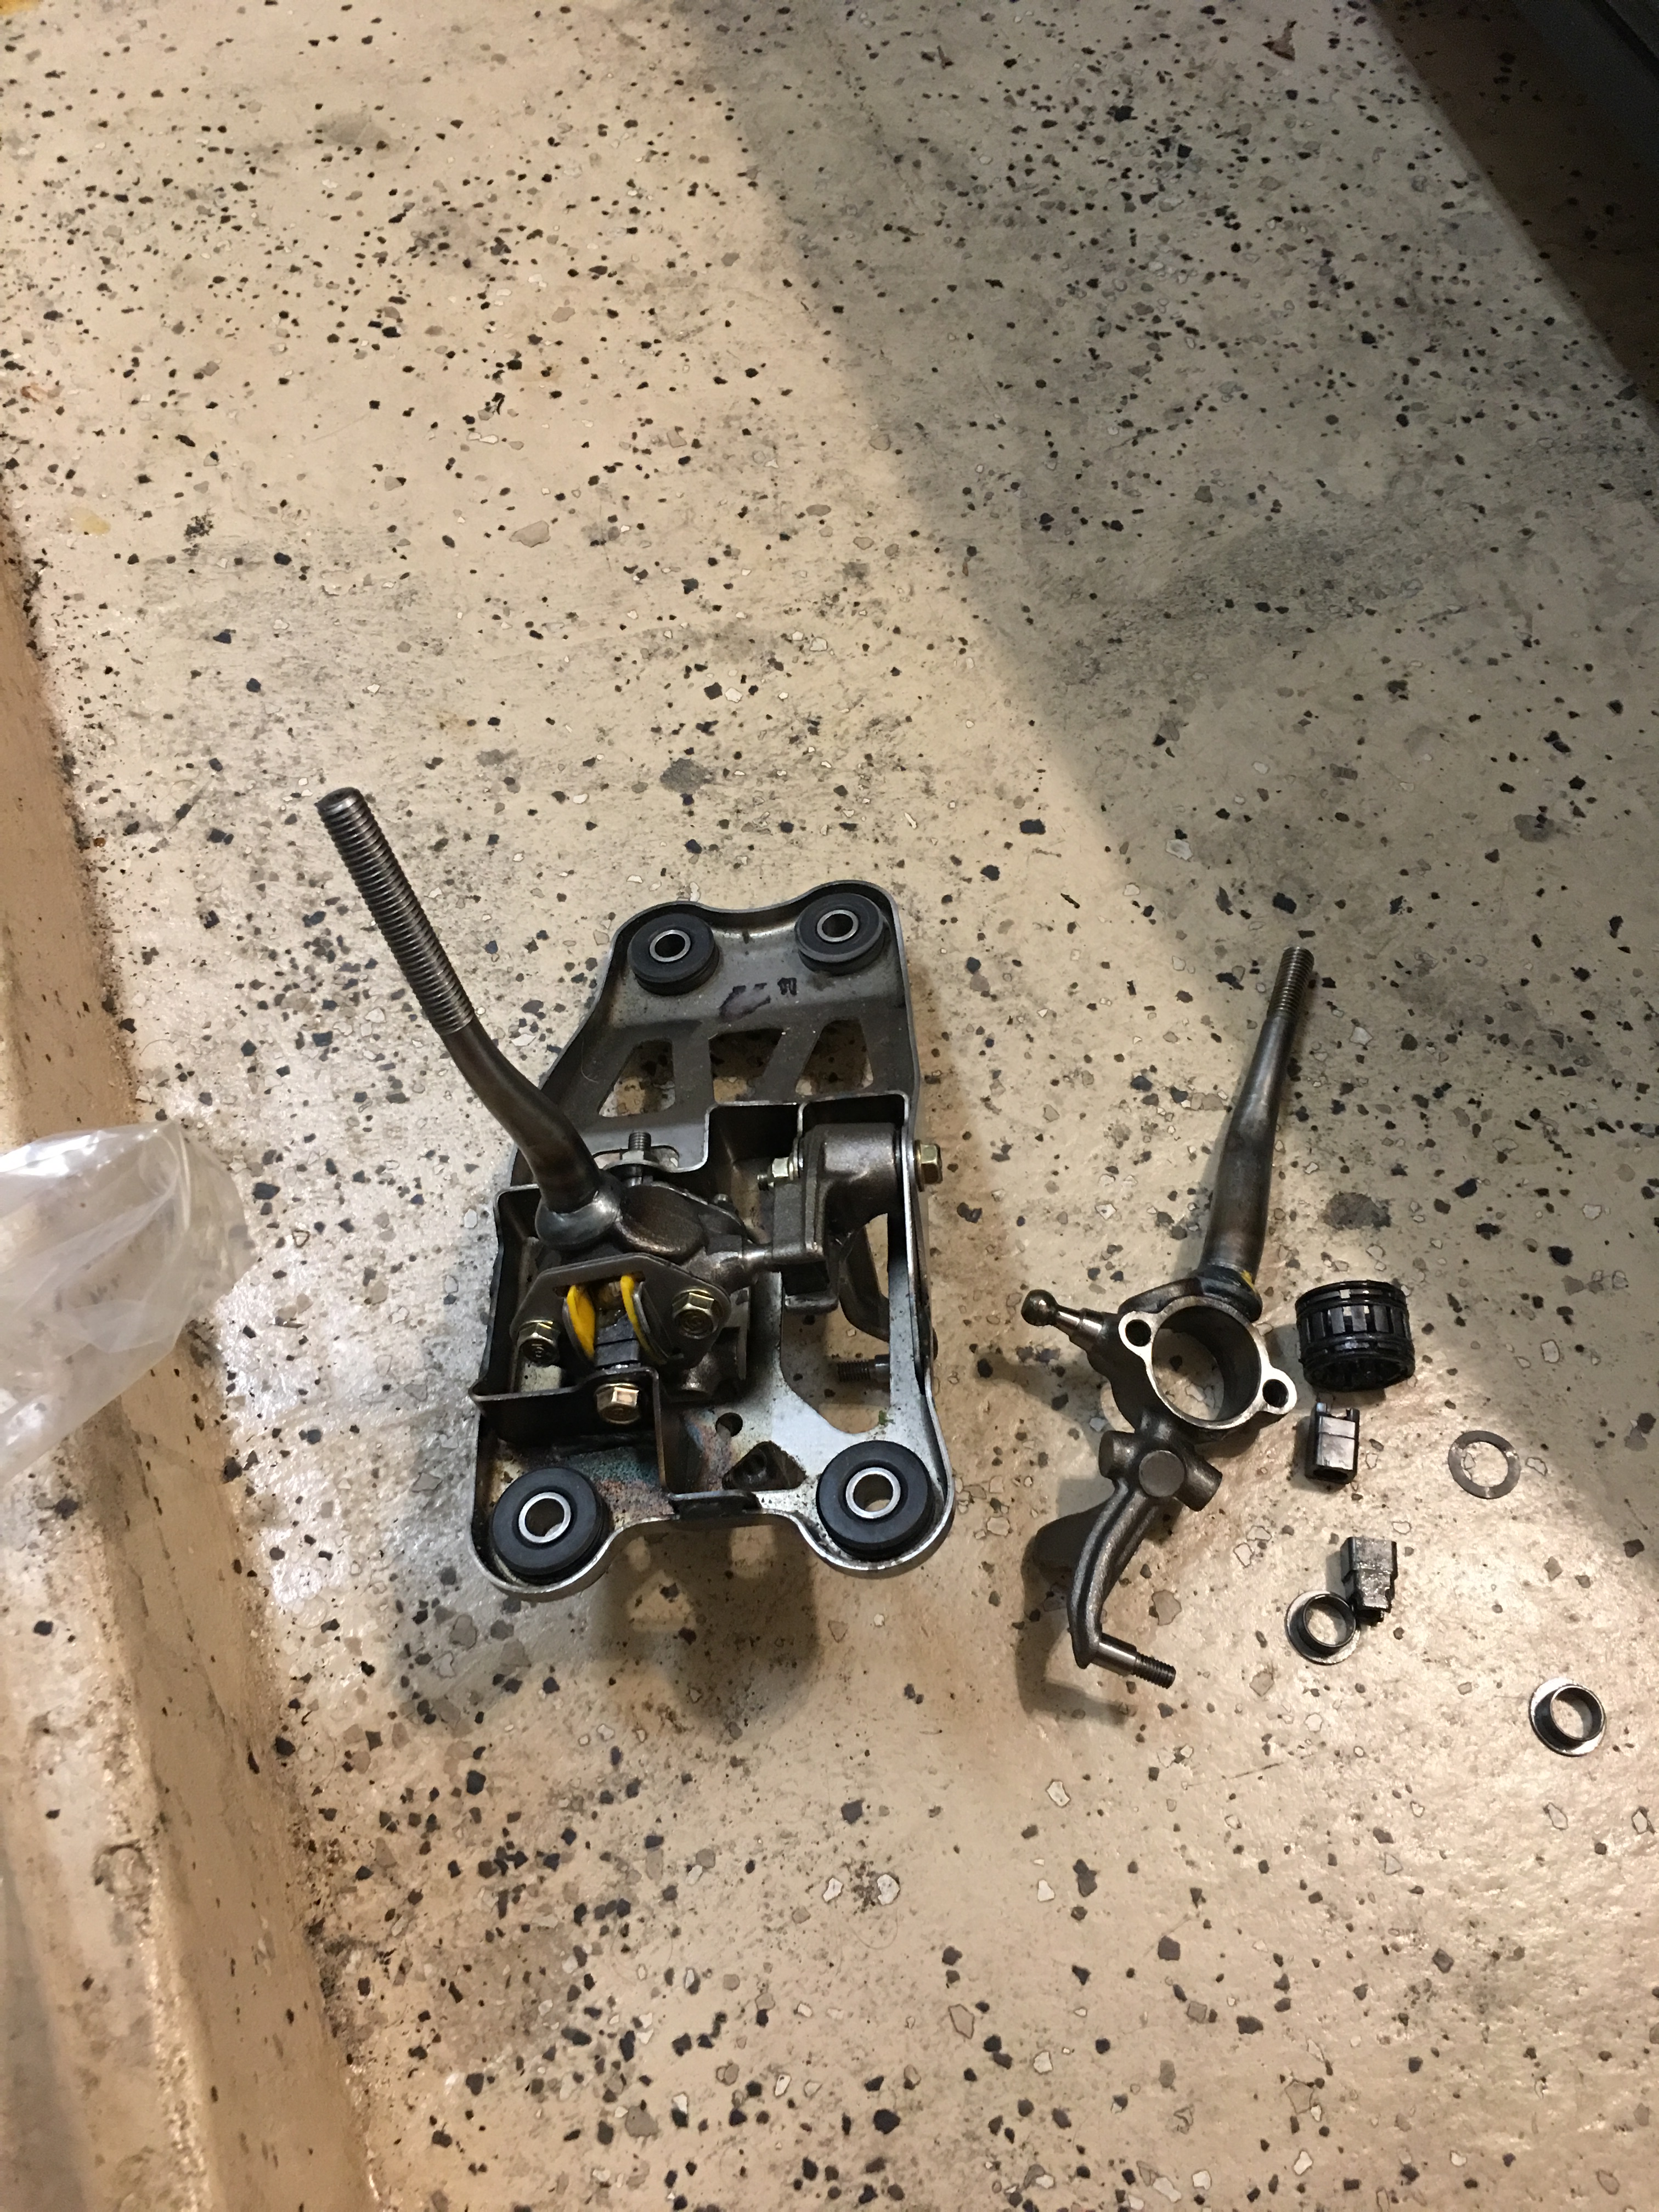
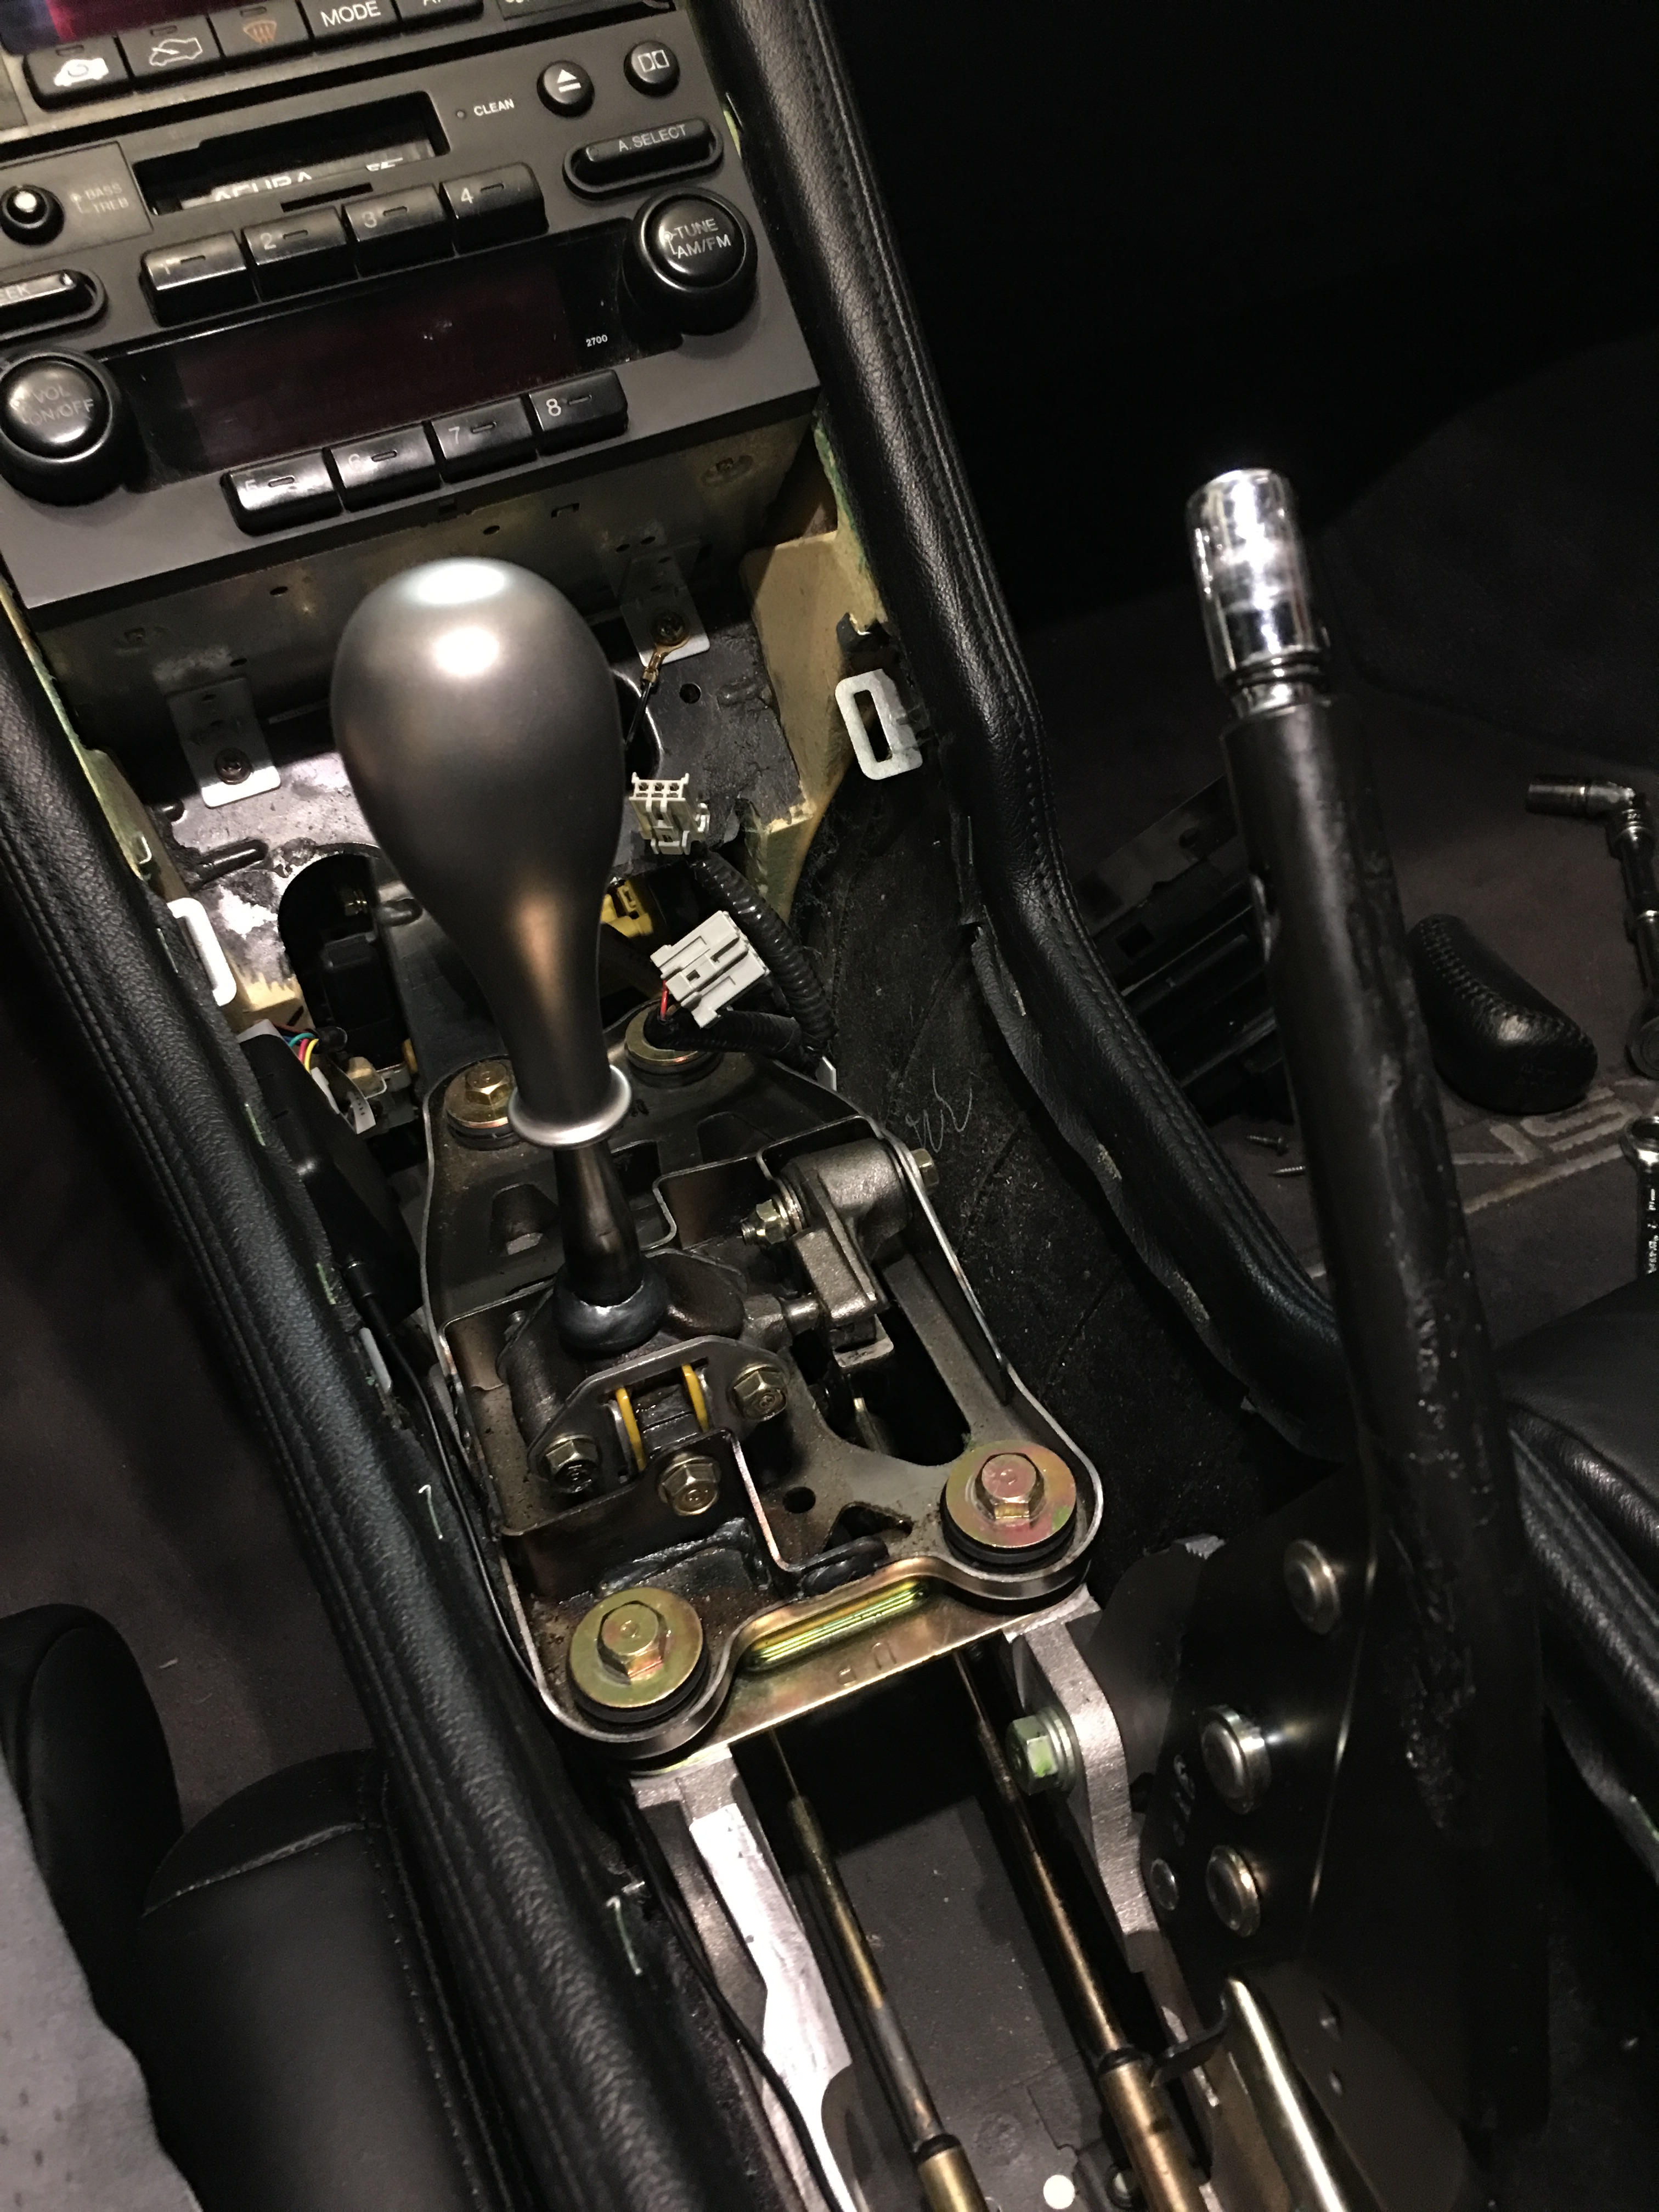
In the process of installing the Zanardi knob and shift stalk I rebuilt the shifter assembly as well since it had to come apart anyways, replacing all of the little plastic bushings and O-rings that keep everything tight. The shifter was good before but now it's great, there is absolutely zero play in the assembly, everything you feel in the shifter is straight from the transmission.
You can also see my new Grom Audio CD changer auxiliary input adapter in the top right corner. The factory stereo isn't great but it sounds way better than the tape player adapter I've been using, the bass comes through much better and overall is a much better sound.
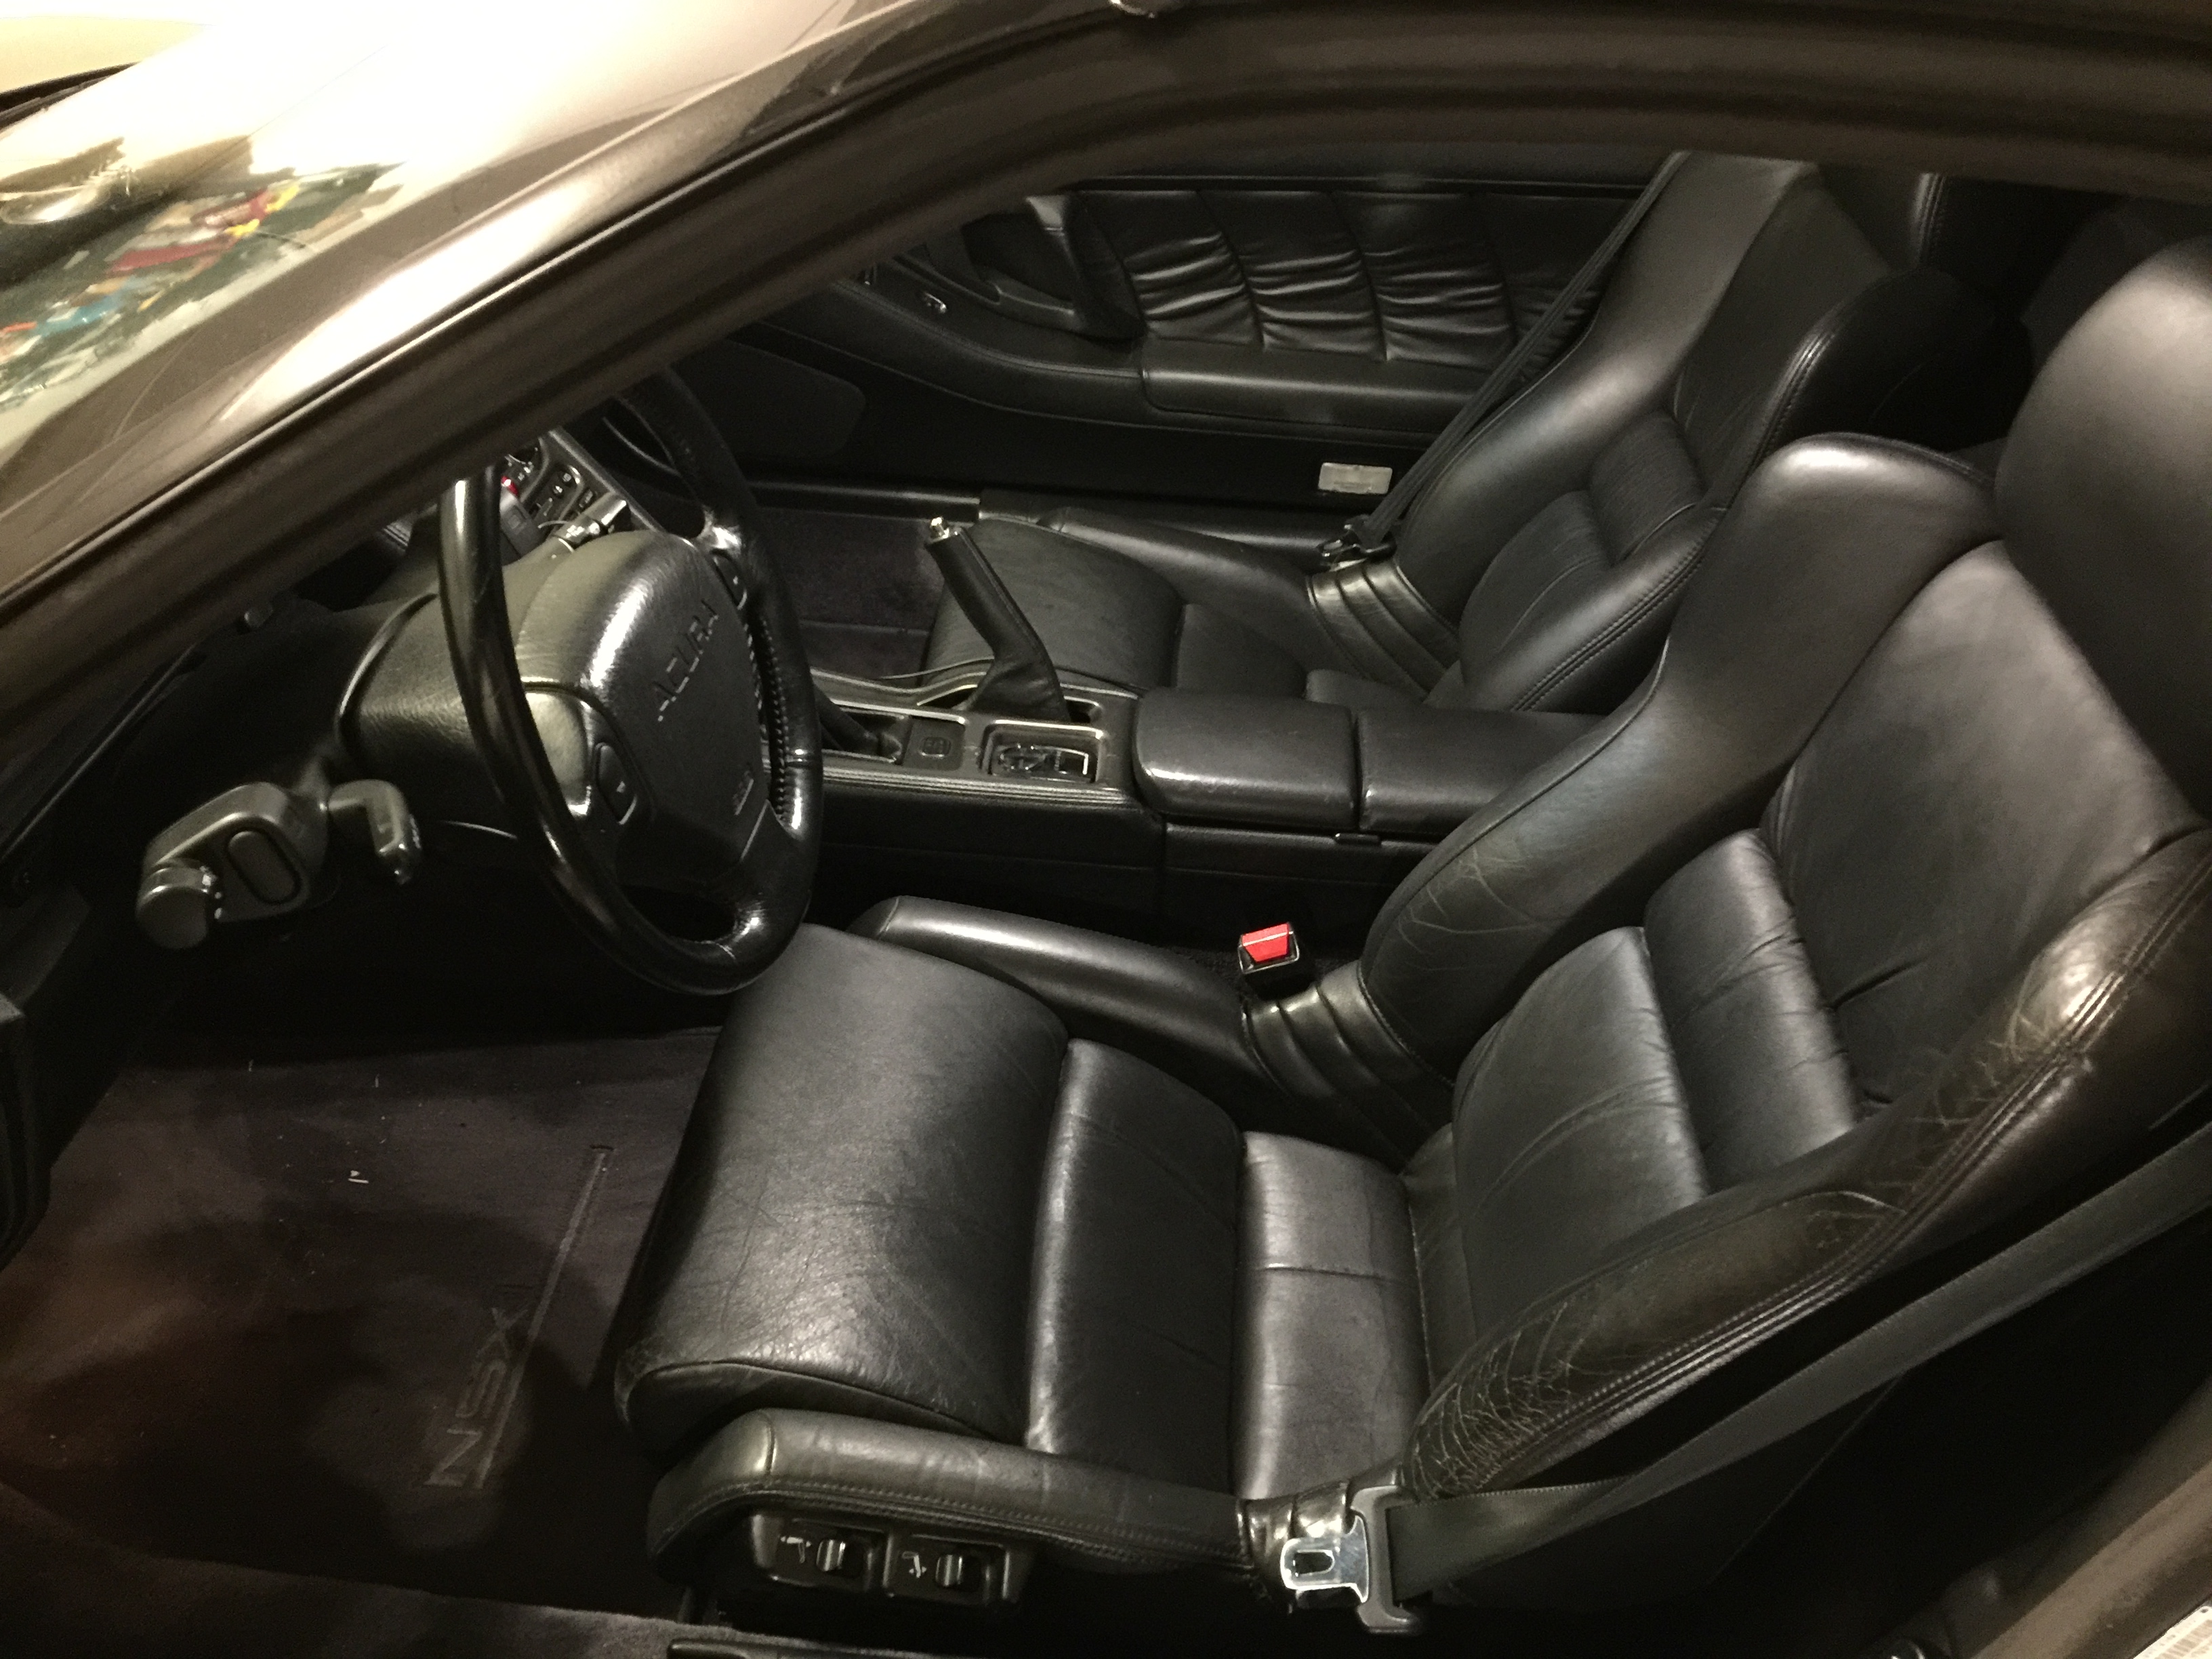
I'm also stripping down the center console to fix the nasty cracking and bubbling in the finish, in a few more days that will be done and I can have them repainted and finally get the interior back together. Since the Integra is stuck in the garage waiting for new wheel bearings I've been dailying the NSX even with the door cards and center console missing.
I finished rebuilding all 3 amplifier boards, so during reassembly I repaired the broken tabs on the speaker boxes, again using solvent cement to weld new tabs on. I'm not sure how long they will hold since each time the doors close the tabs get stressed, but if they fail again I'll make new tabs out of aluminum L-brackets bolted to the sides of the housings that should last more or less forever. I tried to make use of whatever existing supporting plastic I could so hopefully I won't have to do that for a while.
I also got some new interior goodies from RedlineGoods, new shift boot, center console covers, and handbrake boot. I ended up not using the handbrake boot since it fit too loose and looked like crap but the rest of the pieces look great, but I have another, better plan for that.
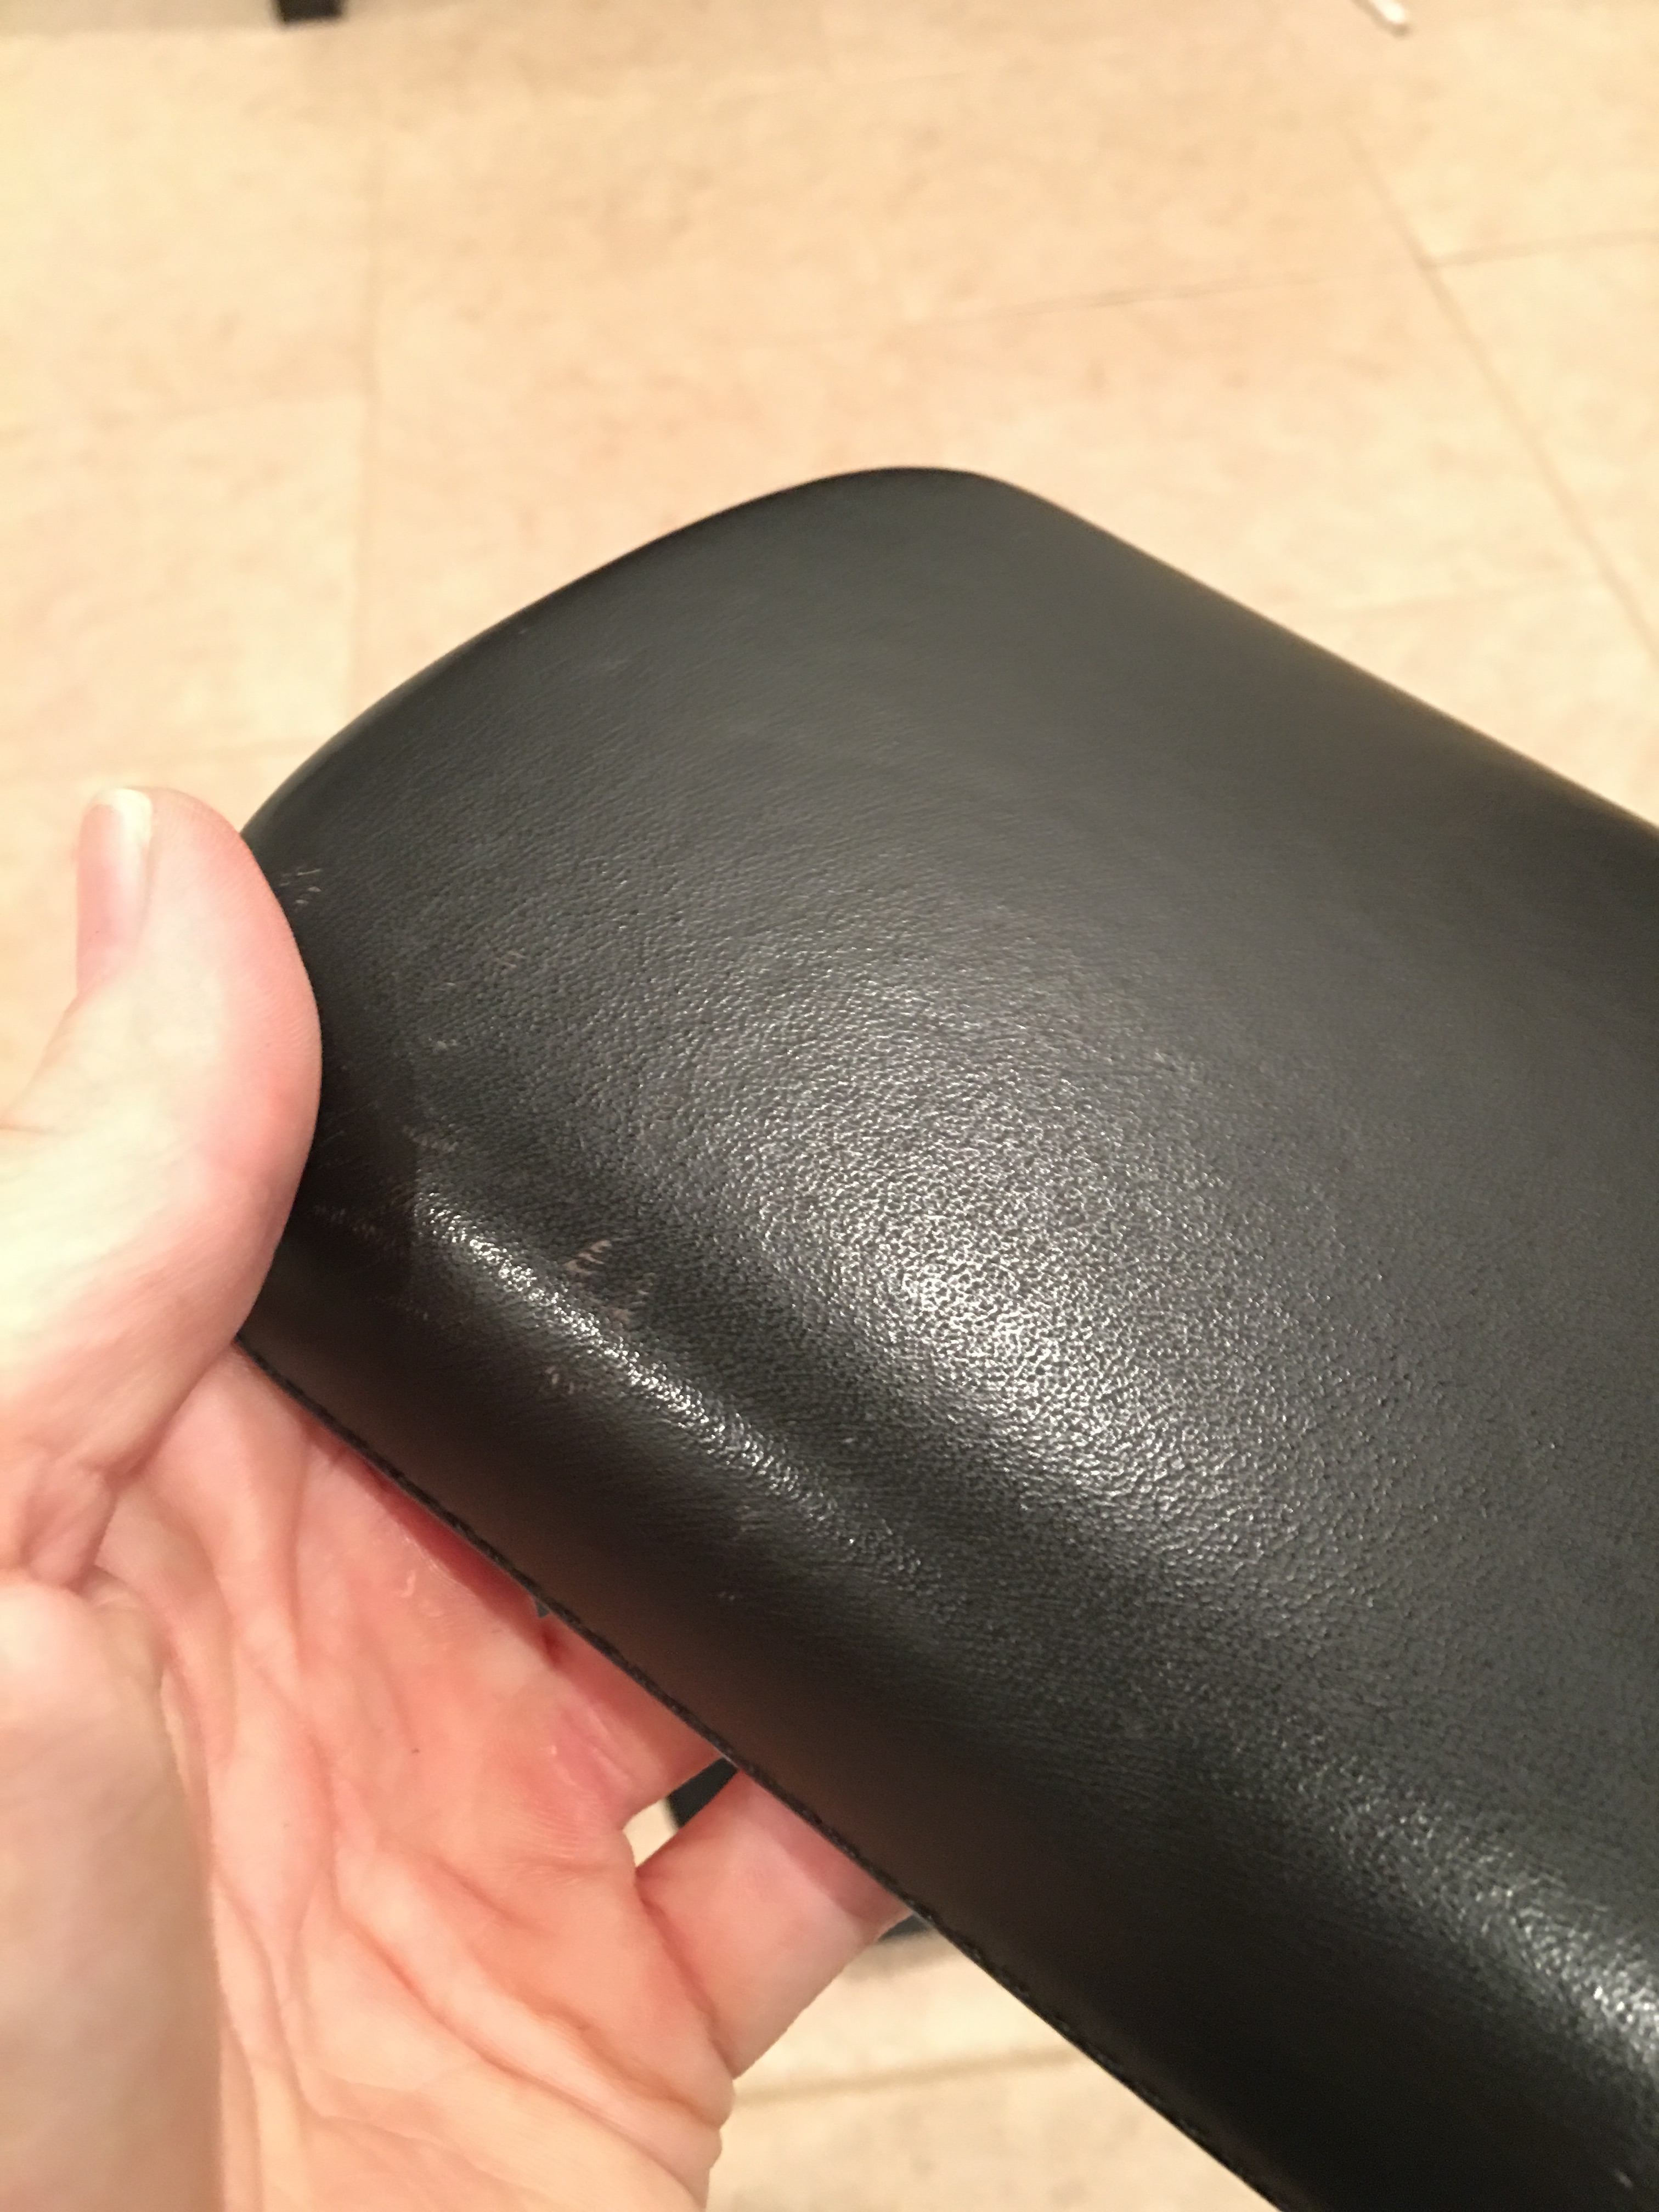
The original center console upholstery was looking pretty bad, it's scuffed up and hard. I tried leatherique conditioner which helped a bit but I still wasn't happy with it, so off they come (without damaging them of course) and into the bag of removed OEM parts.
Both covers pulled off, the foam underneath is still in decent condition so I didn't mess with it.
Stretching the new covers over and gluing them down. I use Weldwood contact cement around the edges, it works great for sticking down leather since it's pretty thick and doesn't get immediately soaked into the leather.
Reinstalled, looks like a factory part but with nicer leather.
But anyways, about the handbrake lever cover. The leather cover from RedlineGoods is way too loose so it looks bad and feels bad to grab onto, I tried shrinking it by wetting it and then putting it in the oven at 170F for a few hours to dry it but that did absolutely nothing, so that leather piece is completely unusable. About this time I also started looking into what shift knob I wanted, since the leather wrapped original was looking pretty bad after 23 years and almost 100k miles. I settled on the NSX Zanardi/Type-S titanium knob, and came across a thread where a guy put one in his FD RX7 and it perfectly matched his titanium handbrake lever, which is a super rare optional MazdaSpeed part made for RX7s and virtually impossible to find.
I love the way that combo looks, and while I won't try to find an RX7 handbrake and make it work in my car, I did however order a chunk of titanium stock and am having a machine shop mill it out to fit, then I'll do some experimenting with my bead blaster to try to get a perfect match with the shift knob.
In the process of installing the Zanardi knob and shift stalk I rebuilt the shifter assembly as well since it had to come apart anyways, replacing all of the little plastic bushings and O-rings that keep everything tight. The shifter was good before but now it's great, there is absolutely zero play in the assembly, everything you feel in the shifter is straight from the transmission.
You can also see my new Grom Audio CD changer auxiliary input adapter in the top right corner. The factory stereo isn't great but it sounds way better than the tape player adapter I've been using, the bass comes through much better and overall is a much better sound.
I'm also stripping down the center console to fix the nasty cracking and bubbling in the finish, in a few more days that will be done and I can have them repainted and finally get the interior back together. Since the Integra is stuck in the garage waiting for new wheel bearings I've been dailying the NSX even with the door cards and center console missing.
Lots of useful tips in this thread.......THANKS, and keep up the good work!
Glad to see you found a solution to your shifter skin peeling. Would titanium get hot in the sun?
The center storage cover looks like a good fit. I may look to source mine from there as well.
The center storage cover looks like a good fit. I may look to source mine from there as well.
Hi,
great job... love that you show all the details in what you do.
On the shifter refresh... did you use brand new OEM parts?? are all those tiny pieces available ?
Thanks,
Nuno
great job... love that you show all the details in what you do.
On the shifter refresh... did you use brand new OEM parts?? are all those tiny pieces available ?
Thanks,
Nuno
Thanks for the kind words guys.
Yeah it can get hot but I've had an aluminum shift knob on my Integra for years in Texas heat and, while it can be a bit uncomfortable if it's been sitting in direct sunlight for a while, I've never come close to burning myself despite trying on more than one occasion to get the shift pattern to show up on my palm from the heat.
The center console pieces require a good deal of stretching and positioning to get them to look good, it was by no means a simple task to get them on but with patience it's doable. I started by gluing just the flat sides in the middle, then stretched it over the other end and glued it there, then worked my way down the sides.
Yup, all the little plastic bits in the shifter assembly are available new from Acura and cost about $50 total, they can be found under the "Shift Lever" category on parts sites. The parts you need are listed below:
#5 (x2, 54109-SC2-003)
#6 (x1, 54110-SF1-003)
#9 (x2, 54113-SM4-000)
#10 (x2, 54114-SM4-003)
#19 (x1, 54210-SM4-000)
#20 (x1, 54211-SD9-010)
#26 (x1, 54340-SC2-000)
#37 (x4, 91301-SD9-000)

Glad to see you found a solution to your shifter skin peeling. Would titanium get hot in the sun?
The center storage cover looks like a good fit. I may look to source mine from there as well.
Yeah it can get hot but I've had an aluminum shift knob on my Integra for years in Texas heat and, while it can be a bit uncomfortable if it's been sitting in direct sunlight for a while, I've never come close to burning myself despite trying on more than one occasion to get the shift pattern to show up on my palm from the heat.
The center console pieces require a good deal of stretching and positioning to get them to look good, it was by no means a simple task to get them on but with patience it's doable. I started by gluing just the flat sides in the middle, then stretched it over the other end and glued it there, then worked my way down the sides.
Hi,
great job... love that you show all the details in what you do.
On the shifter refresh... did you use brand new OEM parts?? are all those tiny pieces available ?
Thanks,
Nuno
Yup, all the little plastic bits in the shifter assembly are available new from Acura and cost about $50 total, they can be found under the "Shift Lever" category on parts sites. The parts you need are listed below:
#5 (x2, 54109-SC2-003)
#6 (x1, 54110-SF1-003)
#9 (x2, 54113-SM4-000)
#10 (x2, 54114-SM4-003)
#19 (x1, 54210-SM4-000)
#20 (x1, 54211-SD9-010)
#26 (x1, 54340-SC2-000)
#37 (x4, 91301-SD9-000)
Last edited:
Wow I didn't know you were in Austin, TX. I was just there this past weekend (I am a UT alumni). Would love to know what the software culture is like there. I heard conflicting reports that all the VCs and money hungry brogrammers are moving to either Austin or Seattle. Also I use onedrive for pics. It's probably not as cheap as your option but they have a nice UI which allows you to share different size thumbnails and they have a phone app. I pay $3 a month.
That being said, I read a little more of the build thread. A lot of this info is useful. Any reason why you went with Suntek over the much cheaper Xpel? I am looking at removing my current wrap and getting Xpel on it... Suntek is flashier and all but I heard the newer Xpel films don't yellow as much. Plus, I keep my car covered so there is less sun exposure anyway. The clear bra installer here even said there is a new Suntek ppf called dynaprism which is super expensive but would look great on black. I personally am okay with plain old BB now. Are there parts of the car you feel like you shouldn't have wrapped?
Must be nice to not have a real cold winter. It's 15 F here in NJ and I'm putting my 92 into storage this weekend.
I'm also UT alum, 2015. I don't have enough experience with different companies to really be able to comment on software culture, and I'm also more on the embedded side of things twiddling register bits so I interact with a lot more hardware people than software people.
My original reasoning for Suntek was that a friend already had experience working with it and it had *supposedly* less orange peel texture than Xpel. I'm not sure about yellowing, I keep my car waxed on top of the film and parked in the garage unless I'm driving it so yellowing hasn't been an issue for me. I'd say wrap as much as you possibly can, the more wrap the less you have to worry about the black paint which shows EVERY little imperfection.
My original reasoning for Suntek was that a friend already had experience working with it and it had *supposedly* less orange peel texture than Xpel. I'm not sure about yellowing, I keep my car waxed on top of the film and parked in the garage unless I'm driving it so yellowing hasn't been an issue for me. I'd say wrap as much as you possibly can, the more wrap the less you have to worry about the black paint which shows EVERY little imperfection.
Similar threads
- Replies
- 3
- Views
- 595
- Replies
- 7
- Views
- 2K