• Protip: Profile posts are public! Use Conversations to message other members privately. Everyone can see the content of a profile post.

Faux Vent that replaces ashtray for vent-mount phone holders

Joined
11 January 2021
Messages
611
Location
Ontario, Canada
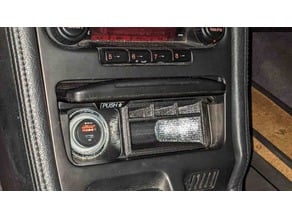
As requested, here is a faux vent to replace the ashtray so you can mount a phone/tablet holder to it. It's much more solid than the actual vents and also easier to reach.

card_preview_NSX_ashtray_vent_holder_77710-SL0-A01.png

Original Part #: 77710-SL0-A01
Revised Part #: 77710-PID-A03
Print details on thingiverse: https://www.thingiverse.com/thing:4855834
(Latest update: 2021/5/14)

Note: This is a work-in-progress, so feel free to provide feedback and, more importantly, some pics for the thread since I don't actually have a vent phone mount myself.
 
Last edited:
As requested, here is a faux vent to replace the ashtray so you can mount a phone/tablet holder to it. It's much more solid than the actual vents and also closer to you.

card_preview_NSX_ashtray_vent_holder_77710-SL0-A01.png


Original Part #: 77710-SL0-A01
Revised Part #: 77710-PID-A03
Print details on thingiverse: https://www.thingiverse.com/thing:4855834

Note: This is a work-in-progress, so feel free to provide feedback and, more importantly, some pics for the thread since I don't actually have a vent phone mount myself.

I have a pretty nice vent mount (swag from a big law firm that works for me), so I will try it (once the car is back together). I just need to find someone with a decent ABS printer. I know nothing about 3D printing lol.
 
Here are a couple photos of it 3D printed:

attachment.php

attachment.php

attachment.php


Good news it fits. Bad news it's stuck in there. I would change it to remove the printed tab on the side that holds it in...

[MENTION=18194]Honcho[/MENTION], I have an extra that I printed. Send me your address and I'll ship it to you. Make sure to pull off the tab.
 
Here are a couple photos of it 3D printed:
Good news it fits. Bad news it's stuck in there. I would change it to remove the printed tab on the side that holds it in...

Thanks for the photos, and the feedback. (I assume you're talking about the retention tab on the TOP that holds it in, not the 2 alignment tabs on the sides.) I was worried about the release "button" on the front cover releasing the retention clip to remove the assembly, so I designed a second removal technique as well. (explained on the Thingiverse page) There is a triangular opening in the "roof" of the assembly to put a small flathead screwdriver in to pull down the retention tab and release it. The retention tab has a lip to catch on. (Looking at the activator on the cover, the rubber seemed like it could wear a bit and then not push the retaining clip enough.) PM me if you want me to send a pic of how to do it. Also, is it printed in ABS? I print in PETG mostly and I'm wondering if the retention clip is stiffer when printed in ABS or if was printed with higher infill ratio? I only used 10% gyroid pattern.

Based on your feedback, I've made the access hole a bit larger and the lip a bit sharper for the screwdriver and updated the stl file. Let me know if you have any other suggestions - I hope you don't have to use a side cutter on the faux vent to remove it.

Most importantly, the pics also look like the 1st draft with uneven openings (center slightly narrower) that was uploaded when Thingiverse was having issues with editing pages and updating files (the draft I PM'd you I believe). I had to delete that faulty thingiverse page because it wouldn't show in my designs and the descriptor fields were missing. The file at https://www.thingiverse.com/thing:4855834
has the file with the "even" front openings, as well as the updated larger hole for the screwdriver to remove it.

One other note: you can print it at draft quality (.3), but print the last 3 mm at fine quality (.1-.15 mm layer height) to get a nicer surface on the visible component.

Best,
 
Last edited:
Thanks for the tip Tim. It isn't the release button that's causing it to stick, so I'm not sure why it's stuck. I was able to stick a screwdriver in to pull the button down, but it's still stuck. Any ideas?

Worst case I do have another ash tray assembly so I could always swap it out. Another thing to note, it protrudes too far for me to close the lid so perhaps the depth should be adjusted slightly as well.
 
Yup, we chose Thingiverse to recommend for this sub-forum because there were already several NSX related stl's posted and it can host our files, as opposed to hosting them ourselves in case someone's gmail account goes down. I'm hoping that's just the start on Thingiverse & that we'll have lots more to come.
BTW, I'd definitely go with https://www.thingiverse.com/thing:4846135 over https://www.thingiverse.com/thing:3809388 :)
 
Thanks for the tip Tim. It isn't the release button that's causing it to stick, so I'm not sure why it's stuck. I was able to stick a screwdriver in to pull the button down, but it's still stuck. Any ideas?

Worst case I do have another ash tray assembly so I could always swap it out. Another thing to note, it protrudes too far for me to close the lid so perhaps the depth should be adjusted slightly as well.
When I designed it, I noticed 2 rivets in the top of the opening and that they were a bit irregular. I wondered if they were perhaps slightly irregular in the manufacture, but I designed the grooves to align with them. Now I wonder if they are done by hand and not the same in every NSX. If that's the case, I could expand the grooves.
With respect to not closing, it should close, so I wonder if it's getting stuck on a rivet without going in all the way. Mine closes easily for the cubby that this was based on - I just added the grills. (The GPS holder is intentionally too large to close since you don't want it to close when that is inserted.) If you can disengage the upper tab, I'd grab it with a pliers and it should come out with some elbow grease. Hopefully looking at it will then reveal where it's jamming. Worst case, use a side cutter to cut the interior struts out and then cut it out from the inside, which shouldn't damage the outer ashtray. I know one of my first drafts missed with one of the top rivets and it was a bit of a challenge to get out, but the groove cut into it showed me where to put the groove in the design!

Other than that, I can't think what it's stuck in since it's basically a trapezoid to that should pull out. I'm going to print another now and try it in my car again.
 
Last edited:
The one I reprinted just now works perfectly in my '95. It engages the upper locking tab when the part is inserted with about 20 lbs of insertion force, and ejects it perfectly when the cover is lifted. The cover closes easily with it inserted. Looking at the original ashtray part I based it on, it doesn't seem to have changed from year to year, although it has much more room side to side for the rivets?

If your top rivets line up with the grooves in the design, I'm wondering if your printer is calibrated correctly? I made the specs very tight so that it would be rock solid when installed. If your printer prints a bit too large, it might bind, even at 1 or 2%. Or if my printer was printing a bit small maybe the design is too large? Lots of folks printers are out by a % or 2 and it doesn't usually matter.

The piece should be 75.3 mm tall by spec on the stl and mine printed at 75.27 mm, basically spot on. Width should be 86.3 mm & my print is 86.15, ~-0.2%. Maybe check your pieces and print at 99% or whatever you need to get the spec on? Do you have a digital caliper?

One other idea: To check the rivets and the centering groove on the bottom, print the first 3-4 mm of the design and abort the print. See how that piece slides in and if it goes all the way in and engages the spring at the back nicely. Be sure to use the latest file from thingiverse. It should have even spacing of the grills and a TT imprint on the outside that's hidden once it's installed.

Let me know how it goes. I was going to check the part on a friend's NSX, but he has replaced his ashtray with a turbo gage.
 
Last edited:
Thanks Tim, I was able to remove it using needle nose pliers. You were right, it was just in very tightly. It does work as intended and I'm happy with the use of it. Thank you!
 
I've updated Thingiverse, adding the Honcho special. The Honcho special has the curvature of the coin holder swapped, illumination, and slots for mounting the vent-mounts with a hook design. Put vent mount hook on top.
card_preview_PXL_20220303_042743071-min.jpg
 
Last edited:
Back
Top