• Protip: Profile posts are public! Use Conversations to message other members privately. Everyone can see the content of a profile post.

NSX-R bars DIY install procedure

MJK

Legendary Member
Joined
23 April 2003
Messages
3,125
Location
Tucson
Ok, so I have learned a lot from this forum and am trying to give a little back. Here is how you install the NSX-R bars, or at least how I did on a stock 94.

Tools Needed:
3/8” ratchet
3” extension
10, 12, 14 & 17mm sockets
flathead screwdriver
Jack/supports or ramps
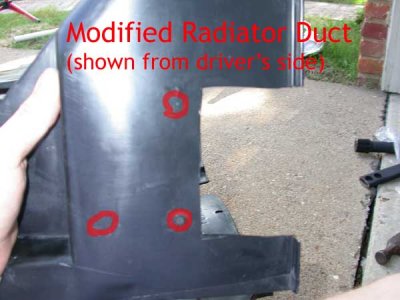
Utility knife
(optional) Flat black spray paint
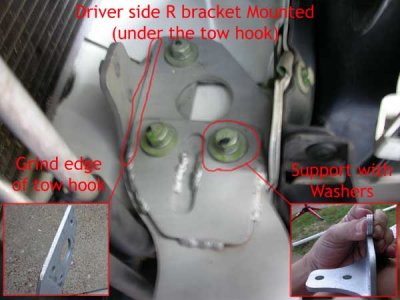
(optional) Electric grinder
(optional) breaker bar

Parts Needed:
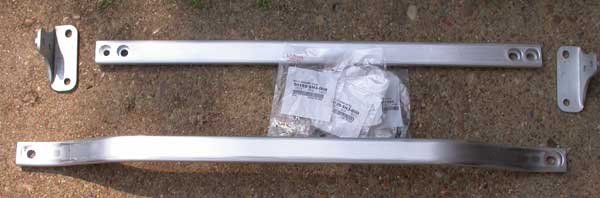
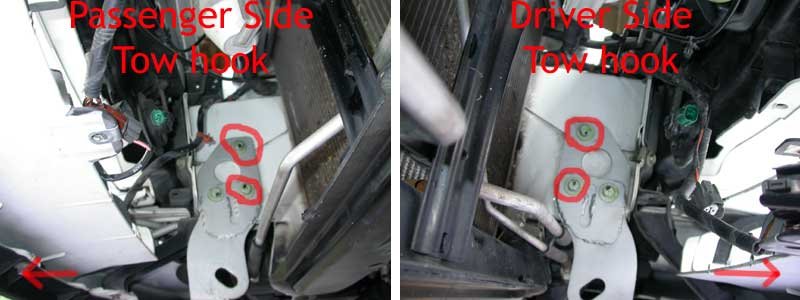
Front Support Beam (included in ‘Dali kit’)
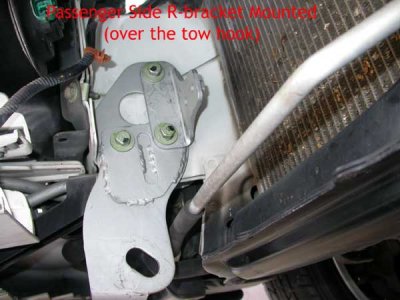
2 mounting brackets (included in ‘Dali kit’)
4 screw/washer combos (included in ‘Dali kit’)
Lower support beam (included in ‘Dali kit’)
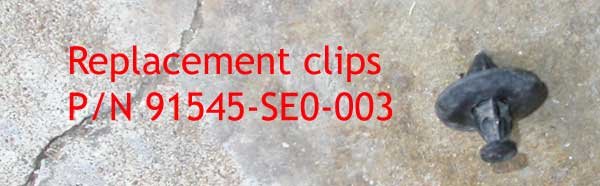
(optional) Replacement clips P/N 91545-SE0-003 (qty 12)
 

Attachments

  • Parts.jpg
    Parts.jpg
    17.2 KB · Views: 1,680
  • Clips.jpg
    Clips.jpg
    20.4 KB · Views: 1,422
Steps:

1. Raise the car to give yourself room to work under it. I used a jack and floor stands. Be sure to take the time to brace everything for safety so you don’t get squished in an earthquake or something.

We’ll begin by installing the front bar first. This is by far the harder of the 2 to put in. and will use the straight bar, mounting brackets and screws from your kit. The first thing you want to do is remove the black plastic radiator duct to give yourself room to work. If you can do this without breaking every single clip, you are a better man than me.

2. As viewed from the bottom, there are 7 plastic clips to be removed and one bolt. From the top, there are an additional 5 plastic clips. Take them all out using a cloth covered flathead and then pull the duct out from the bottom.
 

Attachments

  • Radiator-Duct-Below.jpg
    Radiator-Duct-Below.jpg
    45.1 KB · Views: 2,073
  • Radiator-Duct-Removed.jpg
    Radiator-Duct-Removed.jpg
    48 KB · Views: 1,987
3. The next step is mounting the support brackets for the front bars. The picture below shows which screws will support the brackets. For each side, the arrow points towards the nose of the car, and the bracket arm would be mounted to the rear.
 

Attachments

  • Bracket-Mounting-Points.jpg
    Bracket-Mounting-Points.jpg
    33.6 KB · Views: 2,176
Due to spacing issues, there are many ways you can ‘make this work’. They are:
a.) Remove one of the tow hooks, and it all bolts up.
b.) Keep both tow hooks and modify the bar
c.) Keep both tow hooks by modifying the way everything mounts.
I chose option c, but it requires the use of a grinder. If you don’t want to do that, I recommend you pursue option a.

4. Side A (in my case passenger) would mount the R-bracket in front the tow hook. This is the same for step 3 option A or C. Remove the 2 bolts and mount the bracket as shown.
 

Attachments

  • Passenger-Bracket.jpg
    Passenger-Bracket.jpg
    32.2 KB · Views: 1,870
Side B (in my case driver) would either remove the tow hook completely (Step 3 option A), or modify the tow hook to mount the R-brace behind it. (Step 3 option C). I’ve shown option C.
 

Attachments

  • Driver-Bracket.jpg
    Driver-Bracket.jpg
    30.3 KB · Views: 1,790
5. Bolt up the front R bar cross member with the 4 bolts circled. I’ve chosen to paint mine flat black before installing so my car does not look like it has chrome dental appliances.
 

Attachments

  • cross-bar-installed.jpg
    cross-bar-installed.jpg
    19.4 KB · Views: 2,146
6.Modify and reinstall your radiator shroud. You’ll need to cut a chunk out from each side to allow your new crossmember to pass. You can see how big to make it by where your tow hook bolts have left scratches on the duct (circled in red).
 

Attachments

  • Modified-Radiator-Duct.jpg
    Modified-Radiator-Duct.jpg
    29.2 KB · Views: 1,859
You are done with the hard part! All you have to do now is install the bottom bar, which is REALLY easy.

7. Loosen the bolts supporting the battery tray, remove the 17mm mounting nuts (bet you thought you were not going to use that breaker bar huh?), slide the lower bar in and tighten everything back up. Pics below show which bolts to loosen, and the final installed lower bar.
 

Attachments

  • Battery-tray-bolts.jpg
    Battery-tray-bolts.jpg
    29.7 KB · Views: 1,718
  • lower-bar--installed.jpg
    lower-bar--installed.jpg
    34.3 KB · Views: 2,092
Done - Clean up and go for a spin!
:D

(or in my case wait for the damn clips to get here).
:rolleyes:
 
Thanks for the write-up, I just received my NSX-R bars from SoS the other day as well. Just curious why doesn't the bar fit with the tow hooks. i.e. How does the bar fit perfectly, with no tow hooks at all, or one? Just trying to figure out what the NSX-R setup is.

BTW the SoS set come with the same stuff, the 2 bars, 2 mount brackets, and the 4 bolts.
 
great write up... I was in the middle of doing one myself... I decided the modify my bar... enlarged the holed on the bar to make it fit with the tow hooks...
 
satan_srv said:
Thanks for the write-up, I just received my NSX-R bars from SoS the other day as well. Just curious why doesn't the bar fit with the tow hooks. i.e. How does the bar fit perfectly, with no tow hooks at all, or one? Just trying to figure out what the NSX-R setup is.

BTW the SoS set come with the same stuff, the 2 bars, 2 mount brackets, and the 4 bolts.

It fits perfectly with one tow hook. You'd have to modify something (bar or bracket) to keep both. I don't believe you could make it work without the tow hooks unless you fabricated some kind of spacer.
 
White94 said:
Due to spacing issues, there are many ways you can ‘make this work’. They are:
a.) Remove one of the tow hooks, and it all bolts up.
b.) Keep both tow hooks and modify the bar
c.) Keep both tow hooks by modifying the way everything mounts.
I chose option c, but it requires the use of a grinder. If you don’t want to do that, I recommend you pursue option a.

4. Side A (in my case passenger) would mount the R-bracket in front the tow hook. This is the same for step 3 option A or C. Remove the 2 bolts and mount the bracket as shown.

Thanks for the write up White 94, i wonder did you add washer to the top bolt since there is a step between the 2 bolts?? Thanks.

I got both bars too but i haven't have time to install it yet. But your write-up really clear my worry.
 
No problem, the install is easy to do. Don't worry.

I did not add any spacers to the top bolt when the R-bracket is outside the tow hook (the USM passenger side as I installed it). I thought I would have to, but it appears to me that the bars were designed to work as I installed them (without the spacers on the top bolt). I tried it both ways, and the holes lined up much better without the spacers on the top bolt than than with them. It *appears* to me, that the bar was designed to work with only one tow bracket. I can only assume that this is the case for weight savings on the type R?
 
Last edited:
White94 said:
No problem, the install is easy to do. Don't worry.

I did not add any spacers to the top bolt when the R-bracket is outside the tow hook (the USM passenger side as I installed it). I thought I would have to, but it appears to me that the bars were designed to work as I installed them (without the spacers on the top bolt). I tried it both ways, and the holes lined up much better without the spacers on the top bolt than than with them. It *appears* to me, that the bar was designed to work with only one tow bracket. I can only assume that this is the case for weight savings on the type R?

Thanks for your quick reply!!
 
I just want to share my procedure here.......I think it is easier....

You guys may not believe it. I just got my Type R bars installed last weekend and I didn't take off the battery tray and radiator duct.
If you unscrew the 17mm bolts first, you will find an angle to place the lower bar on the right position. No bolt for the battery tray is needed to be taken off.

For the front bar, I had a local machine shop to enlarge the holes for me (make sure you enarge the holes on both (fonrt and back) sides, otherwise, you won't have enough space to place the socket to tighten up the bolts to the brackets.
For the radiator duct, I just hold a blade and extend it into the front hole of the front bumper and cut the duct until I see both bolts on each side (you will need to cut more area than when you take the duct out, and the cut area will not look as nice either, because it is much harder to cut).
After you see the bolts, loosen them and bolt the brackets on. If you have the holes on the bar enlarge, it is easy to bolt on the bar to the bracket without take the tow hook out. Just make sure you tighten the bolts tight enough.
Oops.....Almost forget to let you guys know how to place the front bar behind the front bumper......just take couple of the clips off one side under the radiator duct. Then insert the bar into the gap above the bottom of the duct. Room is very tight behind the bumper, but also, you will find an angle to place it to the right position.
Hopefully, this trick will help you guys installing the bar. If you are located in the SF Bay Area, I will be happy to help.
 
Last edited:
Well let's first clarify some terms. First those items called tow hooks are really tie down hooks which are used when the car is shipped and also tied down on the car movers to the dealers. The real tow hook is on the right front covered with a plastic painted cover. The tie down hooks are not needed for anything except maybe to keep the car from bouncing off some curb or large dip. You can install the front bar without any of those tie down hooks installed. I did and it fits just fine.

My technique was still different from everyone else. I moved the radiator back after loosening it's upper brackets and the spare removed. I then held the radiator back using a small 2x4 block which gives you enough room to get your hand and arm in there to cut the plastic shroud over the tie down hooks, remove them, and install the brackets. You can also slip the bar from the top opening into the area and then finish the installation. Once everything is bolted down, you then remove the 2x4 and tie down the radiator as normal.

As you can see there is more than one way to skin a cat.
:D
 
I moved the radiator back after loosening it's upper brackets and the spare removed. I then held the radiator back using a small 2x4 block which gives you enough room to get your hand and arm in there to cut the plastic shroud over the tie down hooks, remove them, and install the brackets.
That's what I did, however if I had to do it again I would just take the whole radiator out. It would save my arms from getting all cut up. Plus, it's a good excuse to flush the system:)
 
ATERPAK said:
My technique was still different from everyone else. I moved the radiator back after loosening it's upper brackets and the spare removed. I then held the radiator back using a small 2x4 block which gives you enough room to get your hand and arm in there to cut the plastic shroud over the tie down hooks, remove them, and install the brackets. You can also slip the bar from the top opening into the area and then finish the installation. Once everything is bolted down, you then remove the 2x4 and tie down the radiator as normal.

As you can see there is more than one way to skin a cat.
:D

Good Idea :) I should have done that, it was hard for me to tighten the bolts behind the bumper.

Just wondering how do you guys feel after the bars are installed. I think the steering response is improved, and there is less body roll when I am cornering. But I am not sure if it is only psychologic effect :p
 
With any luck, I will be able to answer that tomorrow. My car has been up on jack stands for nearly a week now. Withdrawl is killing me!
 
Well, I'll try to be as honest as I can and say that unless you are at the instructor/professional driving level I don't think we will really be able to "measure" any difference. I'm definitely not at that level yet, I think it feels better, but it's probably just in my head. To me the car feels tighter, with better turn in response.
 
I also think it responds better in it's turn in and also seems to hold the corner under high speed and load more effectively. I do sense that the front end doesn't give as much over bumps and seems to have a sharper rise than in the past . :(
 
Got everything sorted out!

Car is off jackstands and running like a champ. I installed the CT sways at the same time as the NSX-R bars, so I can really only give a 'joint' impression. Turn in seems much crisper and the front end seems a little more solid. Cornering was flatter, and understeer reduced a little as well, but I think that is entirely the sways. They are definitely a winning combo!

sweetheart.gif
 
Back
Top