

I just finished this. Larry has sort of alluded to this, but IMO forget the damn pins as i'm afraid some might rely on them instead of the marks. This motor is no different than any other OHC. STUDY the marks alighnment "anomolies" BEFORE you take the belt off and duplicate that when you reinstall. I look "down" the marks instead of trying to look at them at the ends FWIW. I did this as well as the mark the belt trick which is a pretty easy double check. i did the pins also but i doubt i'd bother next time. Thanks for the help, all. Came away with an oil leak though that i'm working on now.
-
Protip: Profile posts are public! Use Conversations to message other members privately. Everyone can see the content of a profile post.
You are using an out of date browser. It may not display this or other websites correctly.
You should upgrade or use an alternative browser.
You should upgrade or use an alternative browser.
DIY Timing Belt Question
- Thread starter Russ White
- Start date
I R&R'd the timing belt and all looks well. I can rotate the crankshaft and everything lines up at TDC. The old belt was nearly 3/4 of a tooth longer than the new one.
However, I have a question on the
Book Instructions:
1. install timing belt with piston #1 at TDC
2. temp tighten tensioner
3. temp install harmonic balancer and lower timing cover
4. rotate crankshaft ONE revolution (#1 now at BDC) clockwise
5. continue crankshaft rotation until blue mark is at timing cover center marks
6. loosen tensioner bolt half turn, allow spring to tension belt, tighten bolt at 31ft/lbs.
A couple of questions with the belt slack:
a. At TDC, the belt loop around the water pump is very loose--can rotate water pump by hand...
b. At BDC + blue mark (one revolution of the crank + distance to blue mark), the slack is very loose between the front exhaust pulley and the crank pulley. But the loop around the water pump is now tight.
Is this normal behavior?

Hi, drew.
Your Timing Belt (TB) is way too loose.
I think you skipped one step in your procedure.
After you installed the TB, you must remove all of the slack in a specific sequence by applying anticlockwise force on each cam pulleys one by one while holding the crank pulley.
If you are doing this with the engine inside the engine bay, you almost need three hands........
Then, you loosen the tensioner to absorb the last slack between the rear exhaust cam pulley and the tensioner by the force of tensioner spring.
Please double check your valve timing because you may have already skipped a tooth at the rear bank or even at both the rear and front bank if your TB was that loose.
Even if you have installed the TB at the correct valve timing, if the tension was too loose, it could jump a tooth after the service if you stall the engine while the CL was engaged or spun off on track.
I saw this happening on several engines in the past.
You can see very loose TB and wrong valve timing in the video in my blog on NSXCB site.
http://www.nsxcb.co.uk/entry.php?807-Eng-Refresh-Stage-1-%E2%80%93-06
After removing the slack, then you are ready to adjust the belt tension by following the procedure (blue mark or 9 teeth at the cam pulley) in the manual.
The key is to let the tensioner spring do the job and no extra force or resistance applied during the process.
If you adjust it too tight, it will cause whine noise but this won’t happen if you follow the procedure.
If it is tensioned properly and if you rotate the crank to #1 TDC, you should have very little slack between each pulleys plus WP and just small amount of slack between the rear exhaust cam pulley and tensioner.
Kaz
Last edited:
- Joined
- 15 May 2004
- Messages
- 6,898
Even with the engine out it takes more than two hands to take the slack out first.
The key is to put it on stronger first and release it a little bit by the tensioner spring. The tensioner spring won't bring you the correct tension back if the TB has been on too loose initially.
Skipping a tooth is one problem, reduced cooling capabilities is the next one.
The key is to put it on stronger first and release it a little bit by the tensioner spring. The tensioner spring won't bring you the correct tension back if the TB has been on too loose initially.
Skipping a tooth is one problem, reduced cooling capabilities is the next one.
Last edited:
I don't think I skipped any teeth....everything still lines up on TDC.
I did the counter clockwise pretensioning and it was pretty tight, and I was happy.
However, when I loosened the tensioner bolt on the blue mark: the tensioner jumped back toward the rear exhaust pulley. This jump introduced all this slack. So I wasn't sure if this was by design or what...
All the marks still line up. I have to get a new mirror just to be absolutely sure on the rear pulley front marks...as my mirror shattered. Hopefully, I don't have 7 years back luck with this timing belt job.
- Joined
- 15 May 2004
- Messages
- 6,898
Most reports say that the tensioner didn't move very much at the blue mark....the tensioner jumped back toward the rear exhaust pulley.
Most reports say that the tensioner didn't move very much at the blue mark.
I also did mine recently on a 91 I also replaced with new tensioner, spring, washer & bolt. I didn't have it move very much when at the blue mark. I did many rotations to TDC and then to the blue mark, and many times checked to make sure it was tensioned correctly. I don't have the slack your describing.
I did my '96 and a '91 & didn't see the slack you mentioned. Sounds possibly like something is amiss with your tensioner. I'd PM Larry B for the "done a million of them" opinion.
Hi, drew.
If the TB was installed and tensioned properly, under no circumstances should be able to rotate the WP on alone by hand.
Please do not rely on the holes at the cam shaft and holder plate for valve timing especially on the front exhaust side if you have an early model NSX.
At TDC, if you can rotate WP with your hand, you have too many teeth (i.e. loose) between the front and rear intake pulleys so you have jumped a tooth at one or both sides.
This is the reason why the tension adjuster jumped rearward when you loosen the adjuster bolt because the belt between the [crank drive pulley – tensioner – rear exhaust pulley] was missing some teeth and under really high tension.
Please double check the position of crank drive pulley as well.
When the crank is rotated and held at TDC, the TB between each cam pulleys plus WP are under tension so you can’t rotate the WP by hand.
I’m in the middle of carrying out the engine refresh service for another owner so following video will show you how it should look like at TDC after the TB was installed at the correct valve timing and tensioned using the blue mark or 9 teeth at the cam.
As you can see, there is no way you can rotate the WP by hand.
Almost no slack at every point (because they are under tension) except for the last section between the rear exhaust pulley and the tensioner. When you press down on the belt at each point (like when you check the tension at ACG and A/C belts), it is firm but you should have some movement and this will prevent the whine noise.
<iframe src="http://www.youtube.com/embed/AR-YZ1YqnoU" allowfullscreen="" frameborder="0" height="360" width="640"></iframe>
Kaz
<!--[if gte mso 9]><xml> <w:LatentStyles DefLockedState="false" LatentStyleCount="156"> </w:LatentStyles> </xml><![endif]--><!--[if gte mso 10]> <style> /* Style Definitions */ table.MsoNormalTable {mso-style-name:標準の表; mso-tstyle-rowband-size:0; mso-tstyle-colband-size:0; mso-style-noshow:yes; mso-style-parent:""; mso-padding-alt:0cm 5.4pt 0cm 5.4pt; mso-para-margin:0cm; mso-para-margin-bottom:.0001pt; mso-pagination:widow-orphan; font-size:10.0pt; font-family:"Times New Roman"; mso-fareast-font-family:"Times New Roman"; mso-ansi-language:#0400; mso-fareast-language:#0400; mso-bidi-language:#0400;} </style> <![endif]-->
^^LOL^^
^ Kaz doesn't say much, but he knows what he is talking about .. :biggrin: ^
Great video!
I am gaining more and more confidence to do my own TB job next winter..
thanks Kaz and Larry. You guys are invaluable! Acura Dealerships should go to school on you two.
^ Kaz doesn't say much, but he knows what he is talking about .. :biggrin: ^
Great video!
I am gaining more and more confidence to do my own TB job next winter..
thanks Kaz and Larry. You guys are invaluable! Acura Dealerships should go to school on you two.
Kaz that video rocks, thank you!
I'll redo the pre-tensioning and report back.
I have an early NSX #2737 (?) and I find that the rear cam marks don't line up all that well....kinda strange for car that is so precise.
I'll redo the pre-tensioning and report back.
I have an early NSX #2737 (?) and I find that the rear cam marks don't line up all that well....kinda strange for car that is so precise.
If your NSX is 90-91 model, then the hole at the front exhaust cam shaft and the one on the holder plate won't line up even at the correct valve timing.
Therefore, please do not rely on the locking pin method to check the valve timing.
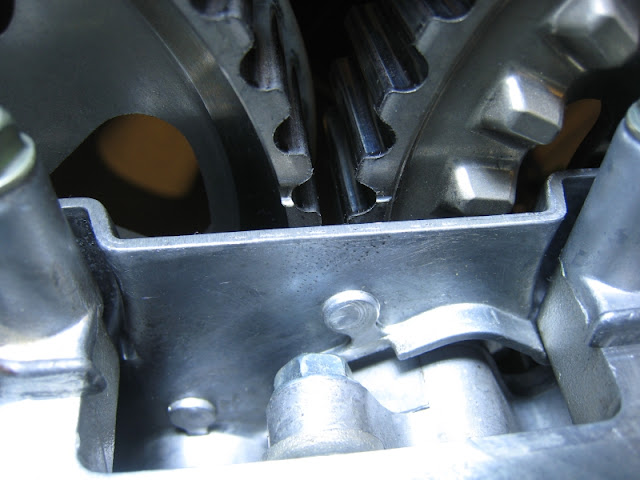
For the marker on the cam pulleys and cover plate, please refer to the following.
I'll just cut and paste part of the info from my blog on NSXCB site.
TB installed and just check and check and check like ten times to be
200% sure that the valve timing is correct.
The marker at the crank drive pulley.
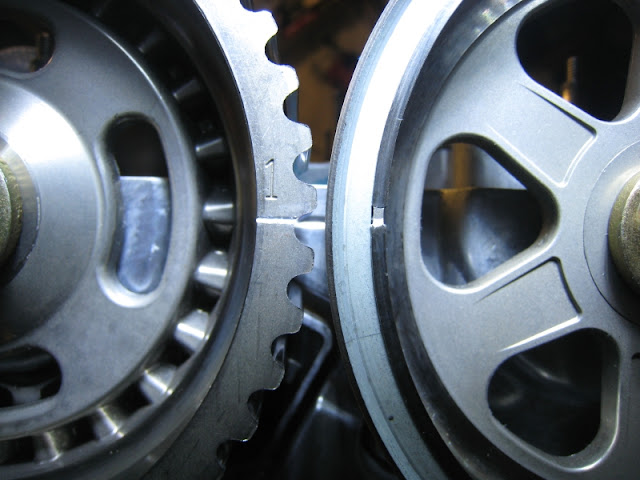

The marker at the front and rear bank outer surface of the cam pulleys.
As mentioned previously, starting from the marker on the outer surface,
follow the gear teeth towards the inner side where it meets the
marking on the cover plate.
At the TDC when the TB is under tension, the lower side of the marker at the
front exhaust pulley and also the upper side at the rear intake will
meet the marking on the cover plate.
If you make mistake, you can't miss by 1/2 tooth but
it has to be in the order of 1 so it will be a big difference from
the above photo.
When this NSX arrived at my place, the timing at the rear exhaust cam was
wrong and off by 1 tooth.
It looked as below.
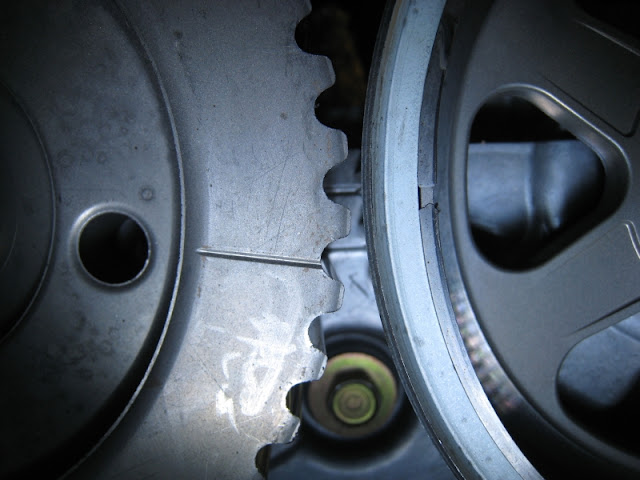
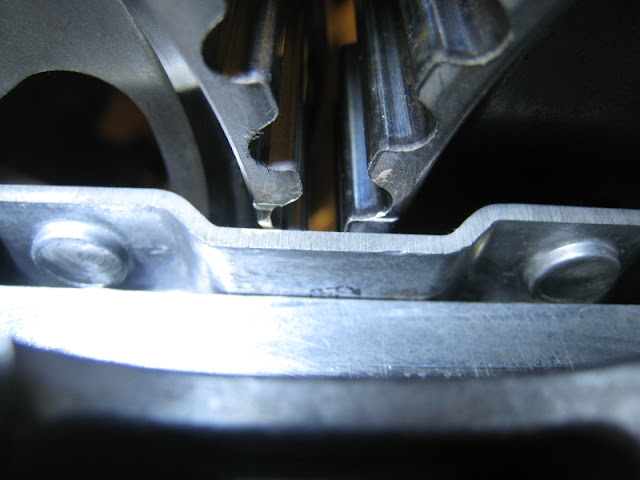
From the cam shaft side, the marker on the cam pulleys will meet the top edge of
the cover plate.
I can’t put the camera in the correct angle but you should be able to get the idea.
If you use a small mirror, you can easily confirm this by placing the mirror
inside the engine.

TB tension properly adjusted and ready for the 4Hr marathon process of valve clearance adjustment.
Kaz
Therefore, please do not rely on the locking pin method to check the valve timing.
For the marker on the cam pulleys and cover plate, please refer to the following.
I'll just cut and paste part of the info from my blog on NSXCB site.
TB installed and just check and check and check like ten times to be
200% sure that the valve timing is correct.
The marker at the crank drive pulley.
The marker at the front and rear bank outer surface of the cam pulleys.
As mentioned previously, starting from the marker on the outer surface,
follow the gear teeth towards the inner side where it meets the
marking on the cover plate.
At the TDC when the TB is under tension, the lower side of the marker at the
front exhaust pulley and also the upper side at the rear intake will
meet the marking on the cover plate.
If you make mistake, you can't miss by 1/2 tooth but
it has to be in the order of 1 so it will be a big difference from
the above photo.
When this NSX arrived at my place, the timing at the rear exhaust cam was
wrong and off by 1 tooth.
It looked as below.
From the cam shaft side, the marker on the cam pulleys will meet the top edge of
the cover plate.
I can’t put the camera in the correct angle but you should be able to get the idea.
If you use a small mirror, you can easily confirm this by placing the mirror
inside the engine.
TB tension properly adjusted and ready for the 4Hr marathon process of valve clearance adjustment.
Kaz
Drew,
I do have one question, since I do not want to assume. Spark Plugs are all out at this time, correct?
Regards,
LarryB
I do have one question, since I do not want to assume. Spark Plugs are all out at this time, correct?
Regards,
LarryB
I do have one question, since I do not want to assume. Spark Plugs are all out at this time, correct?
Your question is spot on. They are not completely removed, but I have loosened them several turns. I don't like to remove spark plugs completely to reduce the possibly of debris or fasteners falling in.
I will now remove them completely just to eliminate all questions (and pack the holes with rags).
**
However, both cam sets of my NSX *started* in what appears to be the "1 tooth off" as depicted in post #37 photo #5 from Good Guy Kaz's post. Not as far off, but not lined up exactly either. I chalked it up to production variance.
The car ran just fine for the past 9-10 years....
Get the plugs out completely, NO RAGS EITHER....you are causing your issue by having back pressure from cylinder compression. ALWAYS turn the engine when you are doing a timing belt with NO resistence on any kind, other then the valve train itself. The clue for me was when you said you stopped at TDC, and the belt was loose between the crank and front exhaust. After well over 100 of these that only happens if backpressure from compression is making that cam move in a odd manner, in your case possibly more forward in it's rotation.
The only way to properly tension the belt is to have all the slack out of the system, and then loosen/tighten the tensioner bolt. As mentioned above, if done properly, all the slack will be between the rear exhaust cam and the tensioner pulley.
HTH,
LarryB
.The only way to properly tension the belt is to have all the slack out of the system, and then loosen/tighten the tensioner bolt. As mentioned above, if done properly, all the slack will be between the rear exhaust cam and the tensioner pulley.
HTH,
LarryB
Your question is spot on. They are not completely removed, but I have loosened them several turns. I don't like to remove spark plugs completely to reduce the possibly of debris or fasteners falling in.
I will now remove them completely just to eliminate all questions (and pack the holes with rags).
**
However, both cam sets of my NSX *started* in what appears to be the "1 tooth off" as depicted in post #37 photo #5 from Good Guy Kaz's post. Not as far off, but not lined up exactly either. I chalked it up to production variance.
The car ran just fine for the past 9-10 years....
The clue for me was when you said you stopped at TDC, and the belt was loose between the crank and front exhaust. After well over 100 of these that only happens if backpressure from compression is making that cam move in a odd manner, in your case possibly more forward in it's rotation.
Very good and very observant on your part Larry, appreciate the close reading. All the plugs are out and I'll remove any rags when I do the tensioning process. (I have an strong, possibly irrational, fear of dropping something into the combustion chamber)
I had a really hard time lining up the harmonic balancer with the front timing cover. Which is why my cam's weren't lining up to my liking...
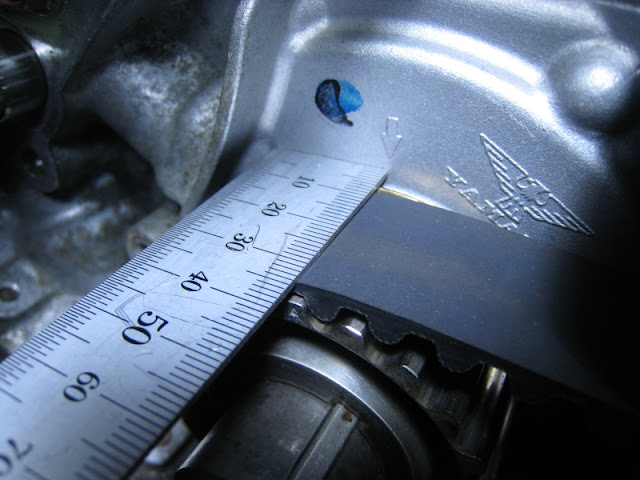
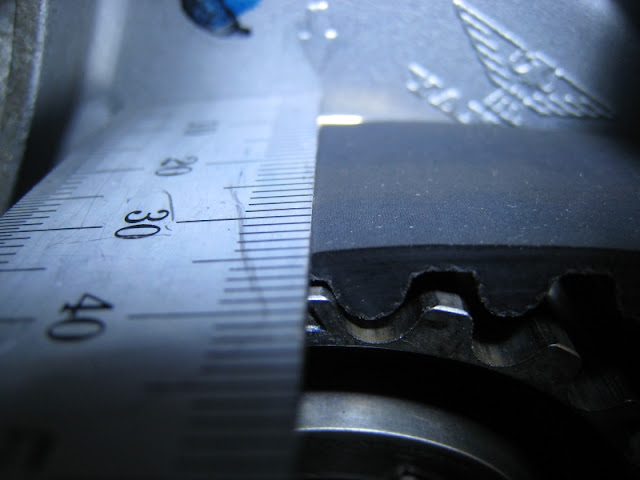
Kaz's photo of the crank pulley and rear timing cover indexing was really helpful to me. I can now measure it accurately and quickly.
Hats off to Larry because I didn’t even think about the presence of the spark plugs.
At the time of TB service, it is common among the NSX specialist in Japan to take compression before opening the engine so the spark plugs are removed at the very beginning of the service.
As soon as I remove the IG coil or spark plug, I use rolled ‘bubble wrap’ in the hole to prevent dust or anything from falling inside the cyl.
Because of the zigzag layout of the ‘air cap’, it is impossible even for the smallest washer to fall and also because of the surface oil, it can trap the air dust as well.
Yet, the cyl air can escape through the zigzag air cap because it won’t seal the cyl like spark plug so it won’t create any resistance or back pressure when you rotate the engine.
Please note that the marker on the TB lower cover won’t be positioned properly especially if you have replaced the expensive one piece gasket on the cover until you tighten all of the fixing bolts including the two long ones used at the A/C idle pulley bracket.
I prefer using the arrow marker on the oil pump and not to install the TB lower cover until after I’m 100% sure about the valve timing and properly tensioned the TB.
Hope you can finish your TB service in the near future.
If you need extra photo, please let me know.
You can also find lots of TB service photo in the blog section on NSXCB site as well.
Kaz
<!--[if gte mso 9]><xml> <w:LatentStyles DefLockedState="false" LatentStyleCount="156"> </w:LatentStyles> </xml><![endif]--><!--[if !mso]><object classid="clsid:38481807-CA0E-42D2-BF39-B33AF135CC4D" id=ieooui></object> <style> st1\:*{behavior:url(#ieooui) } </style> <![endif]--><!--[if gte mso 10]> <style> /* Style Definitions */ table.MsoNormalTable {mso-style-name:標準の表; mso-tstyle-rowband-size:0; mso-tstyle-colband-size:0; mso-style-noshow:yes; mso-style-parent:""; mso-padding-alt:0cm 5.4pt 0cm 5.4pt; mso-para-margin:0cm; mso-para-margin-bottom:.0001pt; mso-pagination:widow-orphan; font-size:10.0pt; font-family:"Times New Roman"; mso-fareast-font-family:"Times New Roman"; mso-ansi-language:#0400; mso-fareast-language:#0400; mso-bidi-language:#0400;} </style> <![endif]-->
Status report: I have installed the belt.
It lines up 100% at TDC #1 and is taunt between all pulleys except between rear exhaust and tensioner (slightly loose). I can replicate the proper indexing at will and I believe this to installed properly.
However, at BDC #1 + blue mark (ie +9 cam teeth*) the belt loop around the water pump becomes slack and I can easily turn the water pump pulley.
Kaz, can you tell me if the water pump slack at the "blue mark" is normal behavior?
Drew
*Anybody know how they measure the "9 teeth"
Last edited:
Hi, drew.
I still think you have TB installation issue.
Under no circumstances (apart from creating back pressure by having spark plug, etc, as Larry pointed out), when you rotate the crank shaft clockwise, the TB is always under tension between each pulley (inc. WP) and the only small slack is between the rear exhaust pulley and the tensioner.
Thus, you should not be able to rotate the WP with your hand with ease at any time.
You may have not noticed it but the very last photo in my post #37 was taken immediately after the TB tension was adjusted.
That is when the Blue marker on crank pulley meets the arrow on TB lower cover and also 9 teeth past the #1 TDC marker on front intake pulley.
As you can see, there is hardly any slack that you can rotate the WP by hand with ease at that point although I didn’t try it after taking that photo.
While installing or tensioning the TB, you must not rotate the crank in anti-clockwise even for a tiny bit.
You could jump a tooth at the rear intake pulley.
It sounded like you already checked the valve timing many times and I hope you managed to get replacement mirror to check the marker on the cam pulleys.
I just re-read your post #27.
Not sure whether it was typo or misunderstanding but in your procedure #4, you used the upper case [ ONE revolution ] on turning the crank.
This means that you started the TB tensioning process at #5 TDC and not #1. Or, did I misunderstand?
If your crank shaft moved while you were removing the slack from the TB, you must rotate it nearly two revolutions to put it back to #1 TDC and then start the tensioning process.
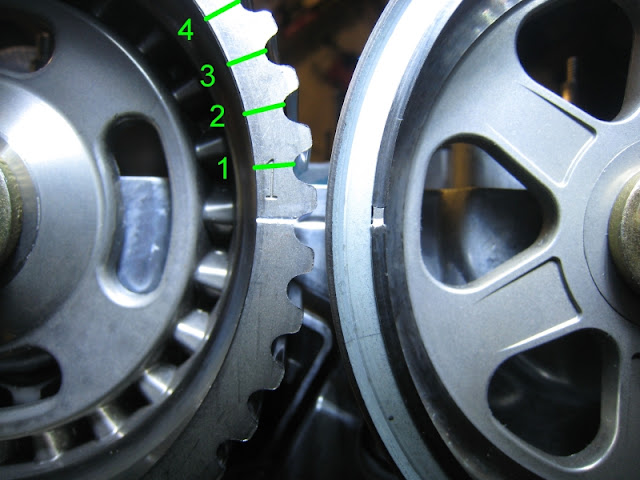
For 9 teeth at the cam, you just count and mark the pulley.
As I normally take the engine out of the engine bay, I just use the marker on the cover plate and count the teeth at the outer surface of the front intake pulley like in this photo. I couldn't find better photo so just showed up to 4 teeth. 9th will be just after #4 TDC.
Please note that the #1 TDC marker is not at the bottom of the concave so you need to be careful when marking the pulley.
If you are working with the engine inside the bay, then it would be easier to use the marker at the inner surface (camshaft side) of front intake pulley (same pulley in the photo but you count and mark on the back side) because there is only a single line marker there and not like the two lines at the front exhaust one.
Please note that there is an offset between the marker on the outer and inner surface of the pulley.
Kaz
<!--[if gte mso 9]><xml> <w:LatentStyles DefLockedState="false" LatentStyleCount="156"> </w:LatentStyles> </xml><![endif]--><!--[if gte mso 10]> <style> /* Style Definitions */ table.MsoNormalTable {mso-style-name:標準の表; mso-tstyle-rowband-size:0; mso-tstyle-colband-size:0; mso-style-noshow:yes; mso-style-parent:""; mso-padding-alt:0cm 5.4pt 0cm 5.4pt; mso-para-margin:0cm; mso-para-margin-bottom:.0001pt; mso-pagination:widow-orphan; font-size:10.0pt; font-family:"Times New Roman"; mso-fareast-font-family:"Times New Roman"; mso-ansi-language:#0400; mso-fareast-language:#0400; mso-bidi-language:#0400;} </style> <![endif]-->
I still think you have TB installation issue.
Under no circumstances (apart from creating back pressure by having spark plug, etc, as Larry pointed out), when you rotate the crank shaft clockwise, the TB is always under tension between each pulley (inc. WP) and the only small slack is between the rear exhaust pulley and the tensioner.
Thus, you should not be able to rotate the WP with your hand with ease at any time.
You may have not noticed it but the very last photo in my post #37 was taken immediately after the TB tension was adjusted.
That is when the Blue marker on crank pulley meets the arrow on TB lower cover and also 9 teeth past the #1 TDC marker on front intake pulley.
As you can see, there is hardly any slack that you can rotate the WP by hand with ease at that point although I didn’t try it after taking that photo.
While installing or tensioning the TB, you must not rotate the crank in anti-clockwise even for a tiny bit.
You could jump a tooth at the rear intake pulley.
It sounded like you already checked the valve timing many times and I hope you managed to get replacement mirror to check the marker on the cam pulleys.
I just re-read your post #27.
Not sure whether it was typo or misunderstanding but in your procedure #4, you used the upper case [ ONE revolution ] on turning the crank.
This means that you started the TB tensioning process at #5 TDC and not #1. Or, did I misunderstand?
If your crank shaft moved while you were removing the slack from the TB, you must rotate it nearly two revolutions to put it back to #1 TDC and then start the tensioning process.
For 9 teeth at the cam, you just count and mark the pulley.
As I normally take the engine out of the engine bay, I just use the marker on the cover plate and count the teeth at the outer surface of the front intake pulley like in this photo. I couldn't find better photo so just showed up to 4 teeth. 9th will be just after #4 TDC.
Please note that the #1 TDC marker is not at the bottom of the concave so you need to be careful when marking the pulley.
If you are working with the engine inside the bay, then it would be easier to use the marker at the inner surface (camshaft side) of front intake pulley (same pulley in the photo but you count and mark on the back side) because there is only a single line marker there and not like the two lines at the front exhaust one.
Please note that there is an offset between the marker on the outer and inner surface of the pulley.
Kaz
<!--[if gte mso 9]><xml> <w:LatentStyles DefLockedState="false" LatentStyleCount="156"> </w:LatentStyles> </xml><![endif]--><!--[if gte mso 10]> <style> /* Style Definitions */ table.MsoNormalTable {mso-style-name:標準の表; mso-tstyle-rowband-size:0; mso-tstyle-colband-size:0; mso-style-noshow:yes; mso-style-parent:""; mso-padding-alt:0cm 5.4pt 0cm 5.4pt; mso-para-margin:0cm; mso-para-margin-bottom:.0001pt; mso-pagination:widow-orphan; font-size:10.0pt; font-family:"Times New Roman"; mso-fareast-font-family:"Times New Roman"; mso-ansi-language:#0400; mso-fareast-language:#0400; mso-bidi-language:#0400;} </style> <![endif]-->
I now have a telescopic mirror assortment and I marked the rear cam markings with nail polish.
Yes, I wasn't thinking properly and I don't know the firing order off hand. I am aware of the 2:1 cam to crank ratio. Apparently, I do not know how to properly describe the relation to the piston to the cams at TDC.
I was fairly confident that I have (or had) properly adjusted the belt at the white mark: the cams/crank line up super nice and the belt is taunt.
I'll post back later as I have to skip off to work.
I'll go back and amend my prior posts so I don't confuse anybody with my indexing descriptions.
status report: tensioning process
At TDC I can take all the tension out, everything lines up and all is taunt. Water pump pulley cannot be turned unless I put the hurt on it.
At the blue mark (9 teeth), I loosen the tensioner bolt <= 180 degrees and I can observe the tensioner move very slightly (1-2mm?). This causes a bit of slack at the water pump pulley loop, between the intake cams, and allow the pulley to be turned reasonably easy by hand.
If I rotate the crank to the white mark, then all becomes taunt again...and I cannot easily rotate the pulley.
I can repeat this tensioning process at will and the results are the same. The cams seem to be at some "sweet spot" at 9 teeth and completely relaxed. If I do NOT loosen the tensioning bolt: water pump pulley cannot be turned.
Kaz I have studied your tensioning video and it appears that the crank timing mark is on TDC...not at the blue mark. Which is extremely helpful (THANK YOU!), but I'm going crazy trying to make sure I'm 100% correct.
EDIT: I have reread post #37. And the photo of the state of the engine is at the blue mark and you are stating that the water pump pulley cannot be easily turned. Well heck.
My conclusion that my adjustments are correct. (EDIT: maybe not?)
EDIT: Now what? Just not crack open the tensioning bolt? If I do not touch the tensioning bolt at the blue mark: the water pump belt loop is taunt and the pulley can only be moved with some pretty good effort.
Kaz would it be reasonable to have you put the engine at blue mark and test tension at water pump pulley?
Last edited:
Status report: Kaz and I have been PM'ing over the details for quite some time.
One of us will post with any answers, or additional questions, once they are discovered.
One of us will post with any answers, or additional questions, once they are discovered.
After exchanging lots of PM and email with Drew, confirming that he is happy for me to post some of the info that we exchanged and finally having access to another engine, I would like to update this thread.
Hope I found the answer on why he managed to rotate the WP by hand so easily.
Additional info;
Drew managed to spin the WP with just one finger so easily when the crank pulley was at the blue marker.
He didn’t remove the cam shaft during the TB service and thus, the valve clearance was never touched.
I now have access to another engine and before start removing the internal parts, quickly took some videos.
It was recorded without changing anything on the engine so the internal parts/adjustments were exactly the same as they were when I test driven and parked this NSX last week.
Please note that while the cam timings were correct, the TB tension was bit low when I opened the engine.
Not sure who carried out the last TB service in UK but being told it was done at Honda main dealer with NSX experience…..
At the blue marker (9 cam teeth) after #1 TDC, there was no way I could turn the WP.
Please refer to the following video;
As you can see, I tried to even press on the TB to introduce some slack between the front and rear intake cams.
The WP is located between these two cams and when the crank is at blue marker past #1 TDC, both cams will try to rotate themselves towards exhaust side resulting in tensioning the TB around the WP.
Thus, there was no way I could even move the WP in any direction.
The friction from the TB was just too high.
As I was amazed by the fact that Drew managed to spin the WP so easily with just a single finger, I decided to rotate the crank 720deg slowly with my right hand while keeping the tension on the TB and at the same time kept my left hand on the WP to feel for it.
I found very interesting fact.
There were three windows while rotating the crank 720deg that you can turn the WP by hand if you apply enough force.
From about 2 cam teeth after #1 TDC until about 1.5 cam teeth before #4 TDC.
From about 1.5 cam teeth after #2 TDC until about 1.5 cam teeth before #5 TDC.
From about 1.5 cam teeth after #3 TDC until about 1.5 cam teeth before #6 TDC.
While exchanging PM and email with Drew, I even spoke with some of the most experienced NSX engine people in Japan and even they thought that there was no way one could rotate the WP by hand so thank you to Drew for highlighting this. I learnt something new even after knowing NSX for more than 20 years.
The last window is the most interesting one.
The 1.5 cam teeth after #3 TDC is when the blue marker on the crank pulley faces up.
This is 9 cam teeth after #5 TDC.
Please refer to the following video;
As you can see, initially, I couldn't rotate the WP.
However, when I pressed down on the TB around the WP using my three fingers, it introduced significant amount of slack and allowed me to rotate the WP fairly easily.
However, I still couldn't rotate it with just a single finger but probably, I was not strong enough like Drew.
So, based on these two videos and also what he wrote in the past in the email and in this thread, my conclusion is that he tried to rotate the WP at blue marker after #5 TDC instead of #1 TDC.
Or, he adjusted the TB tension at blue marker past #5 TDC instead of #1 TDC.
I hope this was the case and already sent the info to Drew.........
When removing the entire slack from TB just before adjusting the TB tension, the position of crank/cam doesn't really matter. You will be applying enough force to overcome the valve spring rate and all you are doing is eliminating the slack between the two pulleys and nothing related to the cam timing.
Even if you have misaligned the cam and jumped a tooth, you can still eliminate the slack and adjust the tension so needs to be very careful.
However, you have to be at the 9 cam teeth after #1 TDC and not #5 when adjusting the tension.
I’ll touch on this in the next post as it’s getting too long…..
Kaz
- - - Updated - - -
As a side note and for those interested in the timing and numbers........
When the crank is at blue marker past #1 TDC, it’s about 147deg ATDC #1.
The VTEC is not engaged obviously so the cam lobe is at the low speed side.
In this mode, the Pri Inlet valve opens at 7.5deg ATDC and the Sec Inlet valve opens at 12.5deg ATDC.
Both Inlet valves close at 25deg ABDC.
The Pri Exh valve opens at 25deg BBDC and the Sec Exh valve opens at 30deg BBDC.
Both Exh valves close at 7.5deg BTDC.
I won’t comment on the detailed cam lobe profile (symmetrical, asymmetrical, etc).
When the crank is at this position (blue marker past #1 TDC) and locked.......
The front exhaust cam is kind of locked or tries to rotate itself clockwise due to #6 exhaust phase past mid point.
The front intake cam will try to rotate itself clockwise due to #5 intake phase in final stage.
The rear intake cam will try to rotate itself anti-clockwise due to #3 intake phase in initial stage.
The rear exhaust cam is kind of resting due to #1 exhaust phase just about to start.
Hence, it is at ideal timing to adjust the TB tension considering the position of the tension adjuster.
When the crank is at blue marker past #5 TDC, it’s the same 147deg but ATDC #5.
At this position, if you press on the TB around the WP, both rear exhaust and intake cams will move clockwise resulting in passing any slack at the TB tensioner towards the belt between the WP and the rear intake cam.
Addition to this, the front intake cam will try to rotate itself anti-clockwise so because of the slack introduced above, it will relax the entire TB around the WP allowing it to be turned by hand.
Similar thing is happening at other two windows where you can turn the WP by hand.
Kaz
- - - Updated 27/DEC/12 - - -
As mentioned at the beginning of this post, I took above two videos on the engine with bit loose TB that covered some mileage and years since last TB service.
Now that I installed new TB, new WP and tensioned the TB properly, I took another video at 9 cam teeth past #5 TDC where it was possible to rotate the WP fairly easily on loose TB.
As you can see, again, initially it was not possible to rotate the WP.
After pressing on the TB several times like last time to introduce some slack on TB around the WP, I did managed to rotate it but this time, it required significantly more force to do so.
In fact, I couldn’t move it at all even using two fingers and just about managed by using three fingers.
This was similar at all three windows mentioned above.
So, as a final note, if the TB was new and properly tentioned, it would be still possible to rotate the WP at these three windows but with fair amount of force and not like spinning freely with ease.
Kaz
Last edited:
Kaz and Drew thanks for these very informative posts!
- Joined
- 15 May 2004
- Messages
- 6,898
This is also very important for the last tensioning step at the blue mark. You turn the engine clockwise from TDC to the blue mark slowly in ONE MOVE. You should NOT rotate back even 0.000000000001 degrees. If you passed the blue mark, start the process all over again, don't turn anti-clockwise. If you do you induce a very differnt slack distribution. The key idea is that while turning clockwise the tension is stiff on the cams but not between the tensioner and the rear exhaust cam. That's where the spring comes into effect. It allows a certain amount of slack by design. If the engine runs the slack will be distributed allover the moving parts. As it's nearly not doable to specify a slack between each pulley, they stiffen all up except one.While installing or tensioning the TB, you must not rotate the crank in anti-clockwise even for a tiny bit.
You could jump a tooth at the rear intake pulley.
Even more, before adjusting the tension at the blue mark don't touch anything at all because you disturb the slack distribution elementarly. It's self-speaking that the plugs have to be removed for the same reason.
Honda has designed a very simple procedure to tensioning the belt. It absolutely no rocket-science. Just do what they tell you, nothing else.
Similar threads
- Replies
- 2
- Views
- 162
- Replies
- 0
- Views
- 360
- Replies
- 0
- Views
- 78