• Protip: Profile posts are public! Use Conversations to message other members privately. Everyone can see the content of a profile post.

Uncoupling headlight-on and interior-dim

Joined
2 December 2004
Messages
183
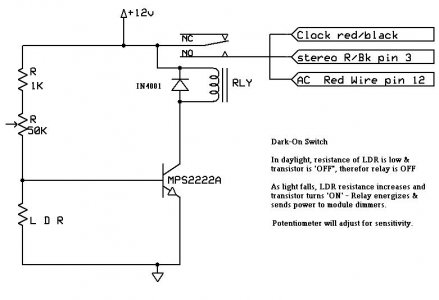
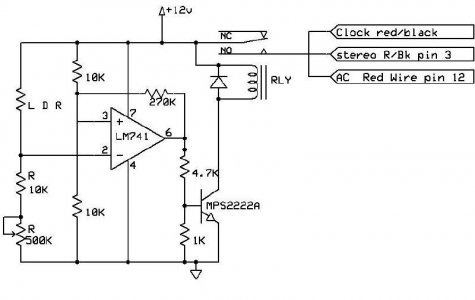
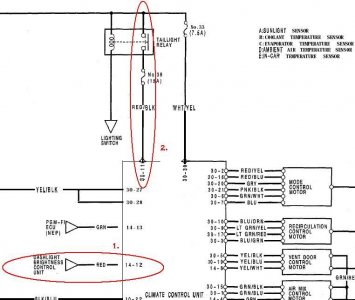
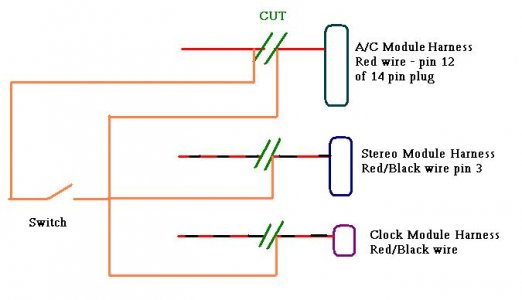
Does anyone know how to uncouple the dimming of the interior instrumentation lighting (i.e. amber/red lighting on stereo components and meters) when the headlights are turned on?

Sometimes you need your headlights on at dusk, but the ambient lighting is still so bright that you can't see your stereo readout in the dimmer setting.
 
There's no single point unfortunately where you can just disconnect a wire or unplug a fuse. You pretty much have to clip the wire at each of the three modules (there may be a common point for where these come together for the centre console modules but I have no idea where - it's a substantial bus that carries the power to all the functions that illuminate with the light switch including the parking lights themselves.)

On the stereo plug, clip the red/black wire to pin 3;
http://www.blazen.com/mike/nsxmanual/page.php?page=1220

On the A/C module it's the red wire on the 14-pin plug pin 12
http://www.blazen.com/mike/nsxmanual/page.php?page=903

On the clock it would be the red/black wire.

Anything else?

This is going to be permanent - once it gets fully dark it's possible they will be too bright so experiment before you cut them.
It would be pretty simple however to just take three wires, one from each cut wire (module end) and tie them together to one pole of a switch with the other to one of the opposite cut ends (only one is necessary). Locate the switch conveniently somewhere.
See Ruined 2 's posts (posts 26 & 27)regarding switch location for an antennna switch - this type switch/location would work well for this application also
Here's a very simple schematic or what you would do electrically.
 

Attachments

  • dim_switch.JPG
    dim_switch.JPG
    26.8 KB · Views: 494
Last edited:
Or instead of a switch, possibly a resistor that drops part of the voltage so that dimming is less drastic? If feasible, when the parking or headlights go on, the dimming is automatic, just not as drastic.

Of course, determining the optimum R-Value and making sure the wattage was adequate would be the trick!
 
Shaun Ray said:
Or instead of a switch, possibly a resistor that drops part of the voltage so that dimming is less drastic? If feasible, when the parking or headlights go on, the dimming is automatic, just not as drastic.

Of course, determining the optimum R-Value and making sure the wattage was adequate would be the trick!
Don't think it works that way - remember the light is already on and you are supplying 12 volts from that input to enable the dimming mode i.e. it is essentially a 'high' logic signal that will enable the low intensity mode which will be catered for within each module itself.
Bottom line reducing the voltage by a resistor or whatever will do nothing - you will reduc eto the point wher eit will just revert back to the non-dim setting. i.e. digital - one way or the other depending on the threshold volts for the trigger.

You would really need to get inside the module to change any resistor values that determine the voltage & current out to the lights.
 
Ken, you could be right. I just figured the dimmer control was lowering the voltage. Not thinking it as a logic function. I thought an in line resistor or a voltage divider circuit would serve the same as the dimmer control.

Also, disconnecting the line (simulating zero volts) I equated to turning the dimmer all the way up. By supplying a high resistance path (but not an open circuit) I thought is would be an in between. However, if it is discrete then I guess no dice.
 
Shaun Ray said:
Ken, you could be right....
Ya think?
hysterical.gif


... I just figured the dimmer control was lowering the voltage. Not thinking it as a logic function. I thought an in line resistor or a voltage divider circuit would serve the same as the dimmer control. ....
The dimmer control has no effect on the module light intensity, just the dash lights. The functions are separate.
 
What about automate this process by a photo resistor. Assuming that you always drive with the lights on: During daytime the photo resistor doesn't switch/dim and during night it dims. Maybe some input for Züblin. :)
 
goldNSX said:
What about automate this process by a photo resistor. Assuming that you always drive with the lights on: During daytime the photo resistor doesn't switch/dim and during night it dims. Maybe some input for Züblin. :)
That wouldn't be hard to do at all - I'm pretty sure that I could put together a simple circuit for that. It would be good to have manual overide on it too though.
 
We'll need a transistor (BC 546 ?), an LDR (photo resistor), a potentiometer (to fine-tune the dimming) and a relais and some resistors, very simple. Maybe someone has some parts or parameters for input.
 
Could be as simple as this attached - easy to make from readily available components at Radio Shack or equivelant for those overseas.

A slightly more sophisticated version would be the second one with a comparitor that will make for a 'cleaner' switch - that would only be a couple of resistors & the 741 op-amp which only adds about another $1.50 to the investment! The second one I found on-line here That one will give a much more discreet 'switch" but I think the first one is probably fine unless you have the adventure & skills to do a little more!
 

Attachments

  • ldr.JPG
    ldr.JPG
    45 KB · Views: 304
  • ldr2.JPG
    ldr2.JPG
    42.3 KB · Views: 300
Last edited:
Thanks, Ken.
Where to locate the LDR? One problem: If the car is a highly illuminated tunnel or other light source at night, the dimmer might oscillate. Matter of caching the LDR's value.
 
Ok, this project soon drives my completely nuts! :( I tried to do it today. But I had really surprising results.
I think the one on the AC is wrong.
 
Last edited:
NEED HELP ASAP as I do need my car get completed tomorrow. :)

Problem: On the AC Pin 12 of the 14 Pin doesn't show me 12V while light is on. It just shows nothing at all. If I measure it with the ground of the bigger PIN I have 2.5V ???
 
Last edited:
But even more confusing is the following: If I have only the clock and the stereo on

1. If the light is OFF and the light Signal OFF the stereo is dark and the clock is bright. 1st pic

2. If the light is OFF and the light Signal ON both are bright as they has to be. 2nd

3. If the light is ON and the light Signal ON both are dark as they has to be. 3rd

The problem is 1. If I take the clock away the stereo works perfectly.

What I did: I used the clock light signal and passed it to my switch and then gave them to all three components at once just like the schema above shows it but I've used the clock light signal instead of the AC light signal. But this shouldn't make any difference, does it?

Please help me out of this! :) I don't think I need 3 switches or a three-channel switch.
 
goldNSX said:
Problem: On the AC Pin 12 of the 14 Pin doesn't show me 12V while light is on. It just shows nothing at all. If I measure it with the ground of the bigger PIN I have 2.5V ???
My apologies Thomas!
On the A/C module there are two dimming functions -
One is for the backlight for the control knobs and the second is for the digital display.
The one I incorrectly identified before (the red one on pin 12) is actually the one from the dimmer control (which is why you see the lower voltage - adjust the dimmer control & you should see the voltage change).
The one you need for the display is on pin 11, the red/black wire.

Again, my apologies for misleading you.
 
D'Ecosse said:
My apologies Thomas!
On the A/C module there are two dimming functions -
One is for the backlight for the control knobs and the second is for the digital display.
The one I incorrectly identified before (the red one on pin 12) is actually the one from the dimmer control (which is why you see the lower voltage - adjust the dimmer control & you should see the voltage change).
The one you need for the display is on pin 11, the red/black wire.

Again, my apologies for misleading you.

No problem, Ken. I've tried the red/black wire an got some really funny results. If the light signal is on the AC light is flackering, not steady, just curious to me. With my Voltmeter I get 12 V as the headlight switch is on, so this must be it.
 
On the AC the 14P Pin 11 says illumination control and the 30P Pin 11 says Small Light. What is the difference? I can't see any red/black on the 30P.

I guess that the Stereo is reacting different than the clock as soon as the circuit is open.
 
Last edited:
On page 1038 of the service manual there is a 'Daytime running light control unit (IG2)' where there must be a fuse in the dash fuse box No. 3 (7.5A). Anyone tried to remove this fuse?
 
Thomas - there are apparently differences between the US & Euro versions

Are you looking at Euro manual?

Any way to scan the schematic & post image?
 
This is the US print - Maybe you can find the corresponding pins for your system?

"1" is the input from the dimmer control for the background lighting of the controls
"2" is the digital dimmer control for the LCD display

attachment.php
 

Attachments

  • AC_dimmer.JPG
    AC_dimmer.JPG
    64.7 KB · Views: 1,626
Ken, thanks for your reply. I don't know at which version I'm looking at but I believe it's the US version as it's english and incorporates the Canada version.
 
Back
Top