• Protip: Profile posts are public! Use Conversations to message other members privately. Everyone can see the content of a profile post.

DIY: Gauge Cluster/Tripmeter Removal

Joined
6 October 2002
Messages
339
Location
san jose, ca
Here is my contribution to the forum. I recently had to replace my tripmeter which was stuck clicking. Hopefully the step-by-step pictures will help others with their projects.

This was on annoying task. The NSX is great to sit in when driving but not great at all for crouching down around the foot well.

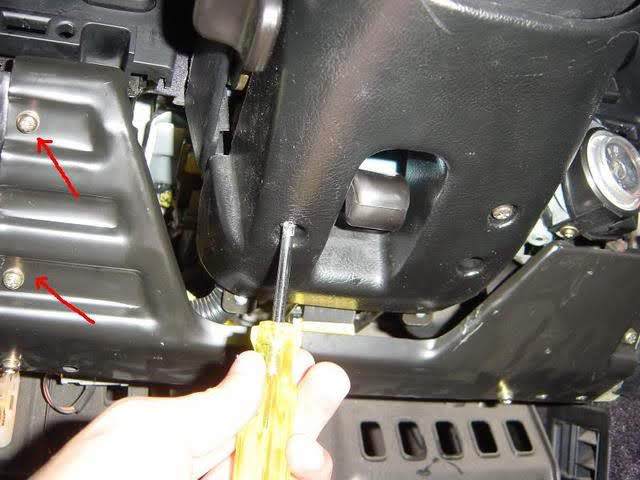
- First remove the foot well panel

pwun1pTLvs9yHL4SZmR7jCP0Mp7NsoTBlLX_p4lAsjK_592doAofr7P2fHxzaZpyTZj-wkS-10AtKrMnB1dKFG-hjiobp7gO7pZ7jq4_90qFOGzdIR1MXLWeMuTH0lIxvuxgGo499A=w2400


- Remove the dashboard lower center panel. After removing the screw near the foot well, you have to pull the top portion out. It's clipped in at the top so don't twist or bend too much.

TfWWv2trG8IonMAnnEplRHa6vhXEwSvI7cDVbvwk7FwFaNqkgNWSNuhtNHzLWsOBFnw1gLUmnBFTKHwP9_VxfYrC9kJg1YOXSCdGVRB6tspOZZDjyvA8ZPo4ybB9pnP7UEbzf11h_A=w2400

mxVZ9lXq8kmBk2_Ps8LQXuXwZZLKbhFK9t5fx3a4pfU-3mCiVSxvRJ7rWxaCTe54Kk1aCpvnCRPJzLPZ11GE4TolOgwugxwQh16vkv-HAPw2SC8nOFu8yLoR_xoeBDRriMPNrIfffA=w2400


- Now you have to remove the tilt cover. There are three screws I believe. Once you remove them, you have to jiggle it out and lower it as much as you can to make room for later.

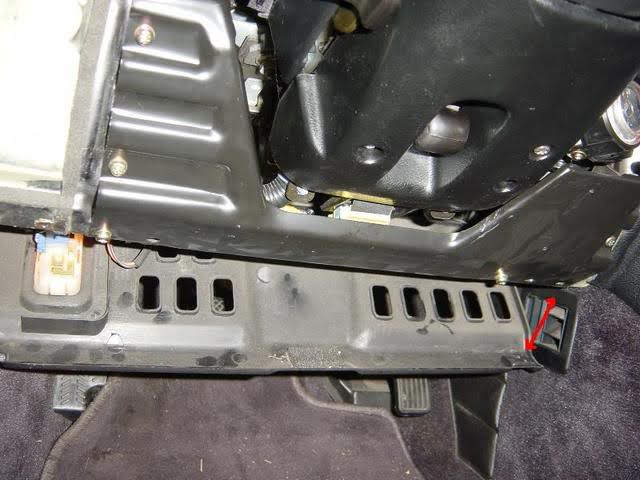
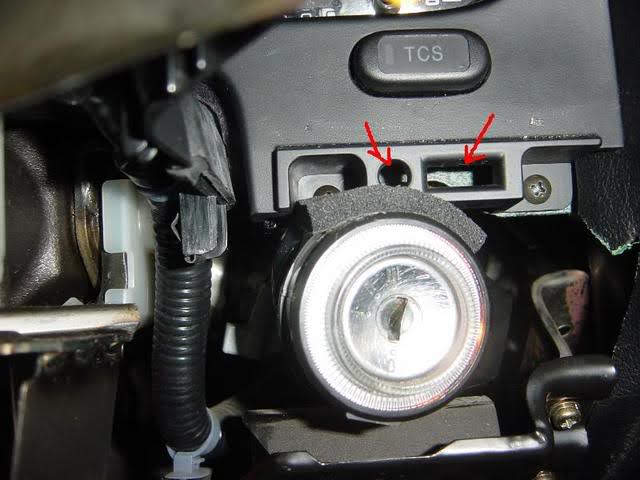
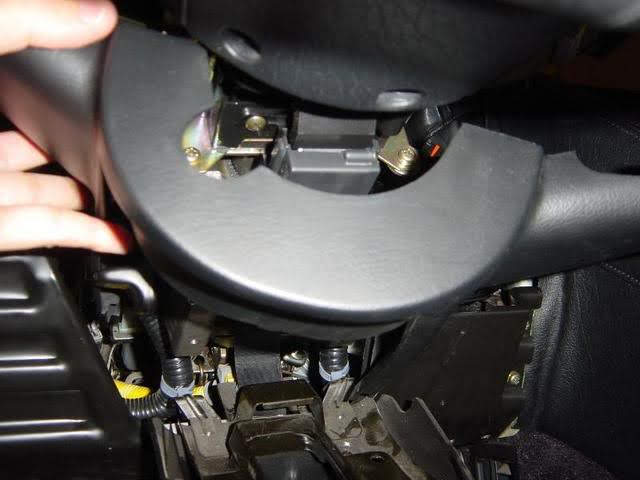
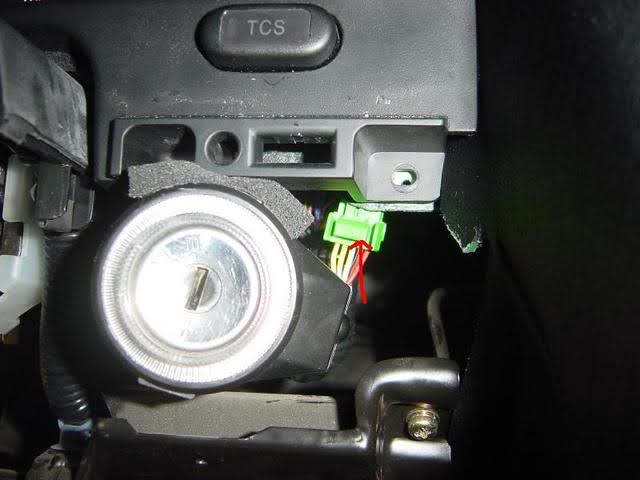
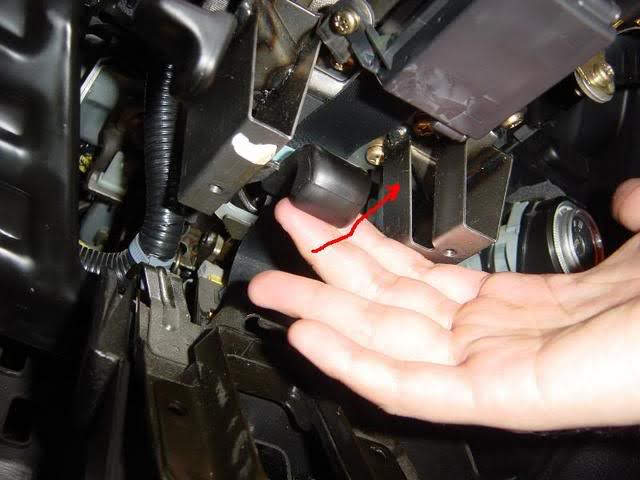
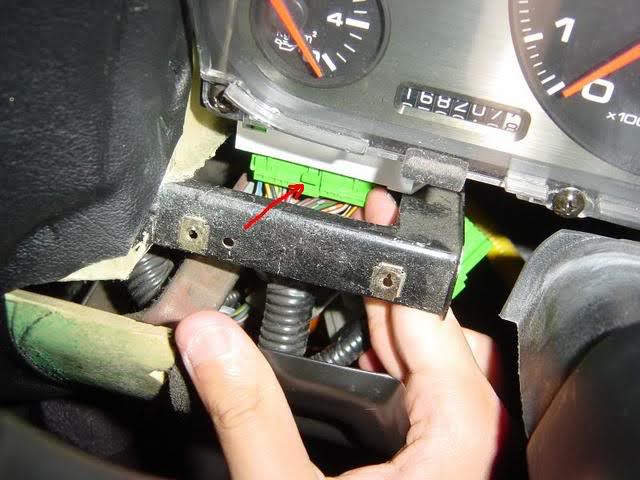
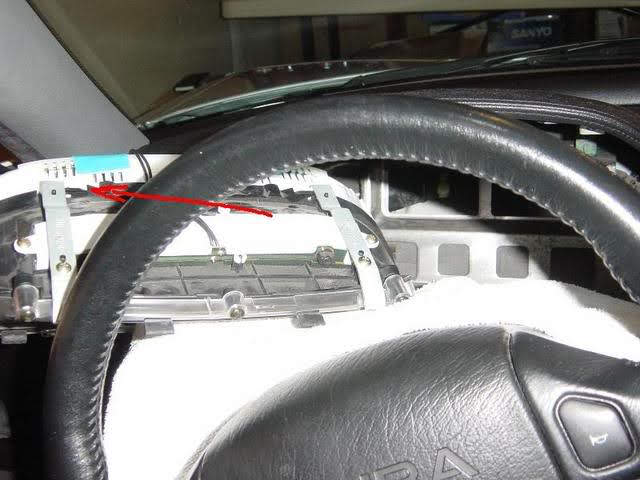
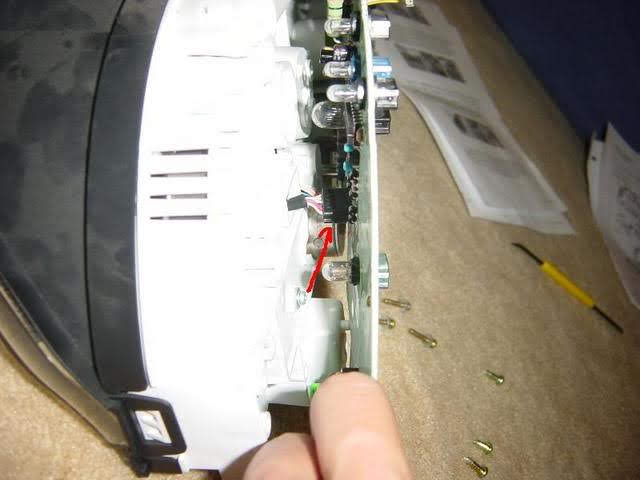
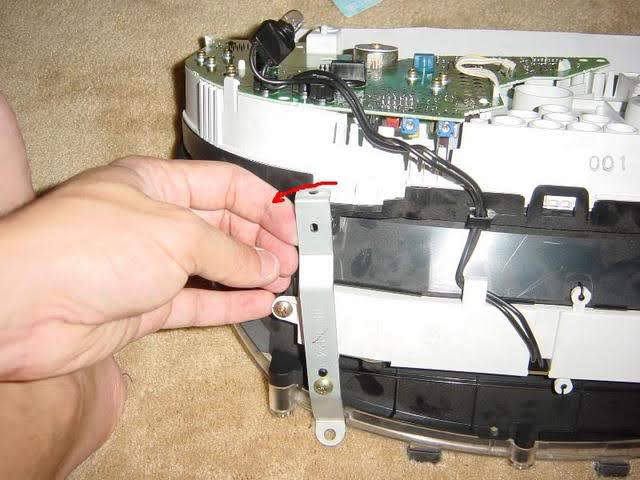
If you can remove the steel panel screws (red arrows pointing), you can have an easier time disconnecting the electrical connectors later on. I tried to remove mine but they wouldn't budge and I almost stripped one.

VWs14sZDsHmAOIk5X9D7sD--CVmyzPnfsxKMUMD-r_yvbCpvtWul_zjoCmZBvcZXxuhEr1n1Nq6hHrmNy5OuW7y2lCuTRCmuc70N0akGPNDZ4wLQ2r2ZOBrDB0Js1yR_7vua79Nyzg=w2400

s1IAyiKGYo8YHt-U11B5i7E0rs4xQfWPXh_R46J_yO28iAQosOeh9dSzksK9CzqzdCU_c-BonBBr1XhnYxmlcqdBRDAVbPZL1bOpWU5x_tHNYl_qUQBWH1yTd5m3ia32skVUOKp07w=w2400


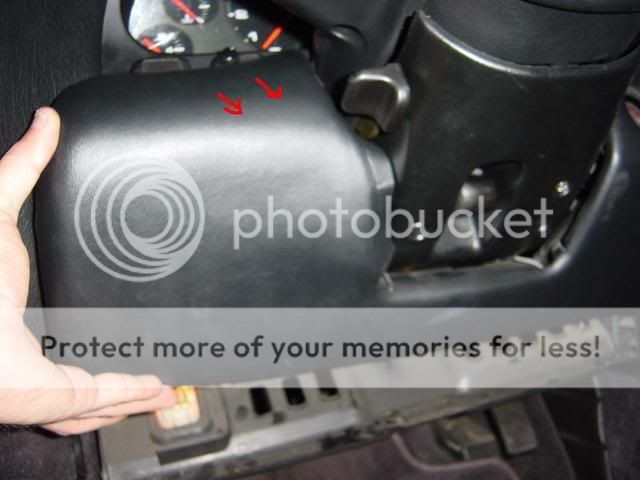
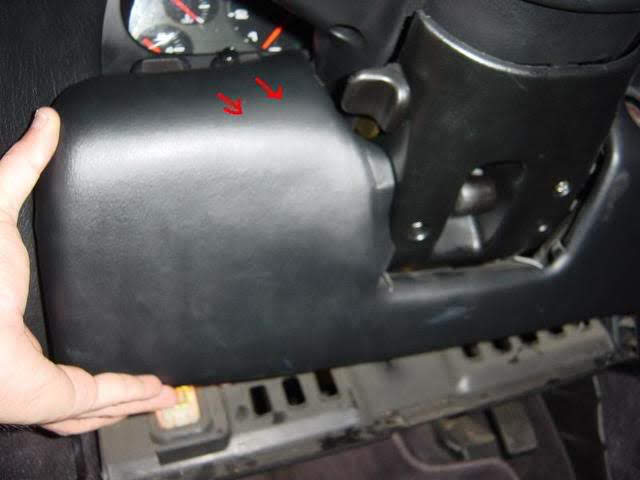
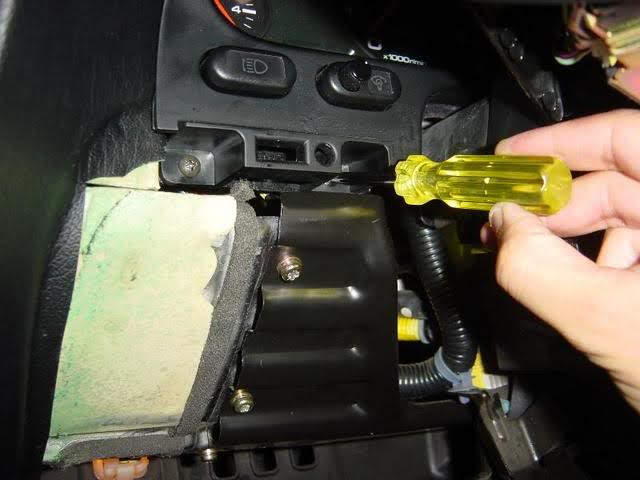
- Next is the lower steering column cover. The manual said that both the upper and lower covers should be removed. Getting the upper cover off makes it easier to remove the gauge cluster. However, after getting the lower cover off, I was unable to get to the screw holding on to the upper cover. For me it was in an impossible position.

xp4AauJdKq-hIx3hbOqFb4Ij3tkA44fjrIJ3T9SCLDJodmSrqtGq0hTnmgXWrhF3xQpKHt_MwI-8-1AF24D9CW0XgCcRwxZYKghZL9RroOWK0pPTdxiSuSFFZDyPRonWfVu1x2BdRw=w2400

dVUcSjauc4DPW1vrFkqOlLIx96DU_xYv-w3jeJ0KbCm_4L-rnqiAbSe-GBE5usCJpKiA8Aqb0nsQ5V-YXgcfi3sm-E3sgtFhXPUi3qx-ejjQotAVUD_0YMYO4dBSWR2Rx-9efU1ztg=w2400


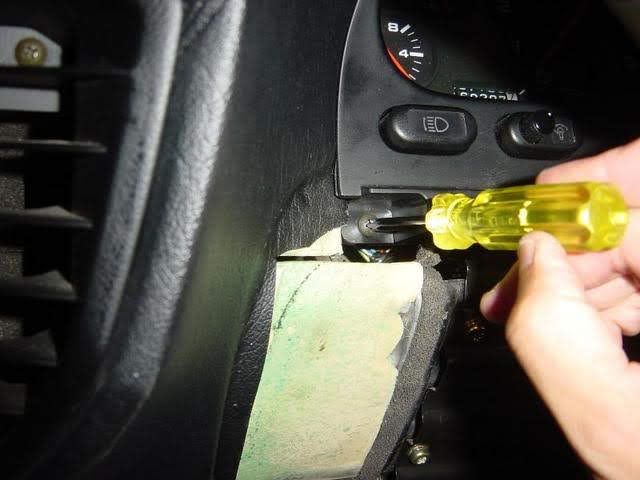
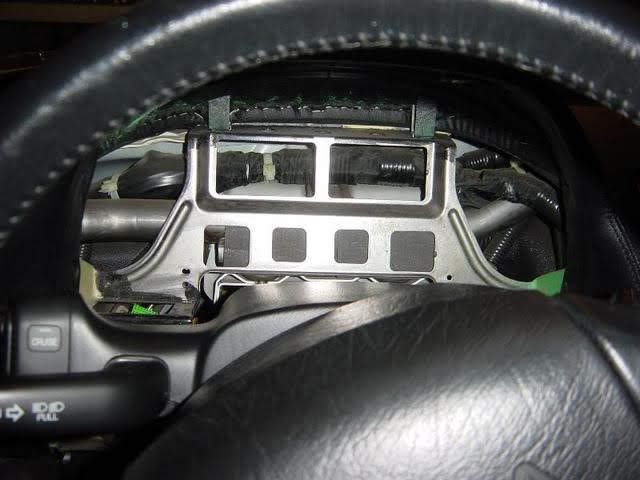
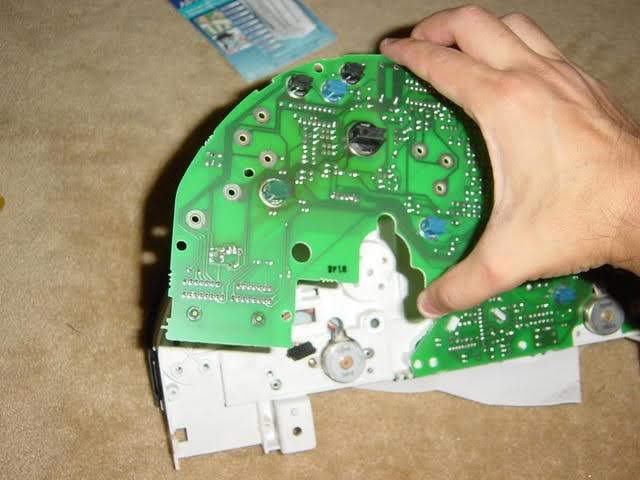
- I moved on to the cluster panel frame. You need to remove all the screws, including the two at the top.

ZJmPzpSaPM7QfqwtfRSygAMkzvOC9nwJGHircbdRzfeYaQePEsBiBf_qboF7d0eGpFk0s0OXjTbbowgFQj-HevxObxW6R6StulUADKFFbGpi0krvQF5WiLPrCLaYF97L-vJ4AlEueg=w2400

KYtqkA_Enn8-TEiJxgE8bb5HpUM4pN9vm4CVqzn9oKEKd0U8o9C8ngDVG0DLnylVq-kc8ccuhOW9FbIpaPELRT7Lo_c-M_14-vzLlBm5rUzoR_BTXJDdV1KCTGl4JJcxHlSp7L-qPw=w2400

6YqUIj5NHX47tv-rhInrEwmE-k6xbtr2Xy429B772_7VeOX1DjSpJcqjGj1j5gWguN76zpHfN0S7Pkl-YI4TV1uud7yJrWhcTBf6GtWuu4GxyCo_VVRDiUYb7q8UseGXQHETcX_4Hw=w2400


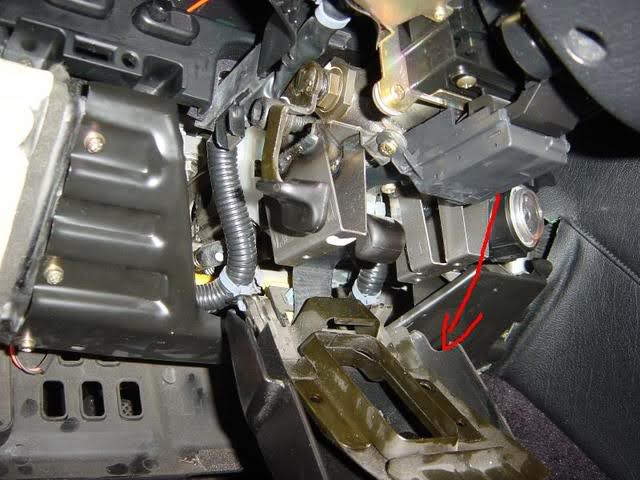
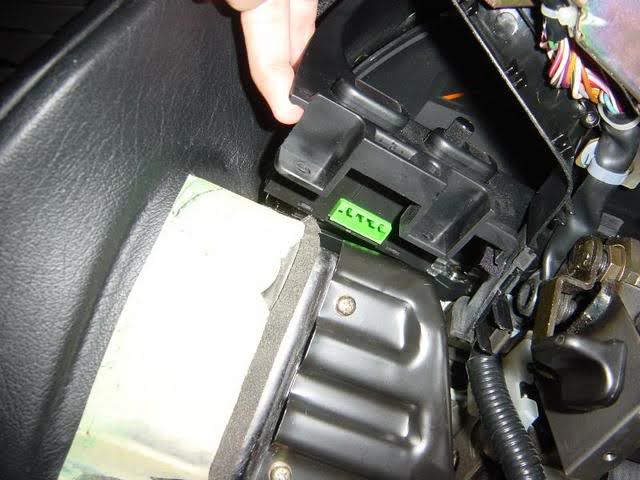
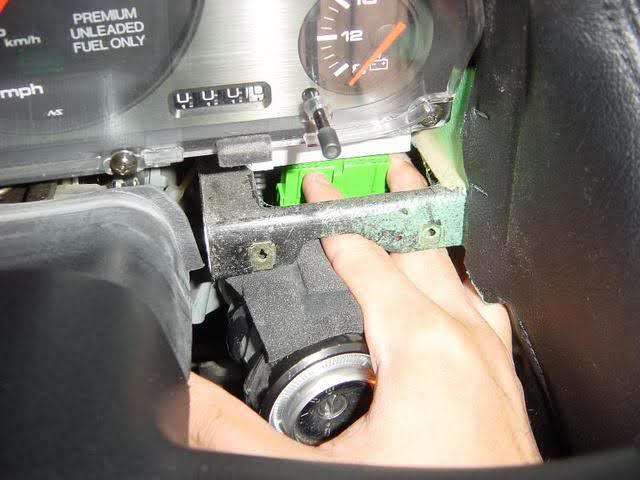
- Even when you have all the screws off, you still can't remove the frame. The two bottom ends are connected with the headlight/interior light and tcs connectors.

If you were able to remove the steel panel near the foot well, you might have an easier time getting to these connectors. I wasn't so I had to wriggle my fingers in as much as I could. This part took forever as I didn't know where the connectors were at first and how they were attached.

The connectors have a little tab that you need to press to release it. Hopefully this little tid bit will help you waste less time than I did.

fhnST4lnP2dR0sT-DoHQcCeZgLFqb2N9M3JVRIdtFq_dWLwlMxsSWIsaibNrivzWKOuQ0Ubd0RKPdAN0TgJExCUJ-rdLJhGLXeD9sPdqiBjyN2-duzhS6ZksnlgfHAuZdK0CppFUOQ=w2400

zba9LDbsIEvREolzAgn6B71ExmPGsYIn57iNluEahY3mZwaIbbEQmuH6b6975N2CXhBIP5IJjKAAI4PuG7xI6TPapfZidg06kH802aHbfF8SlR8tUZKcptaDSp_6TrYt3eKsFNc7xw=w2400


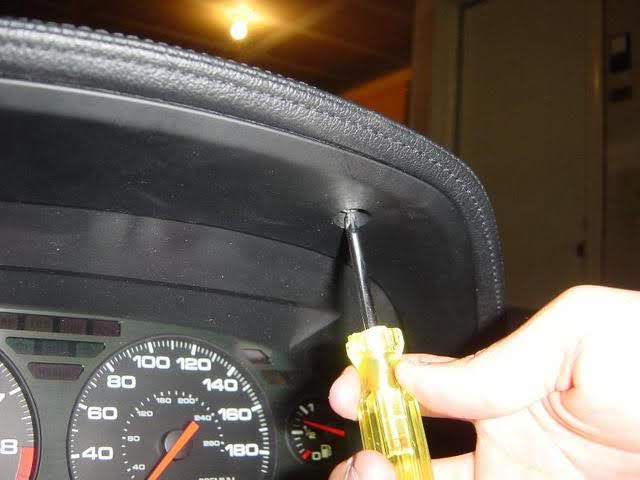
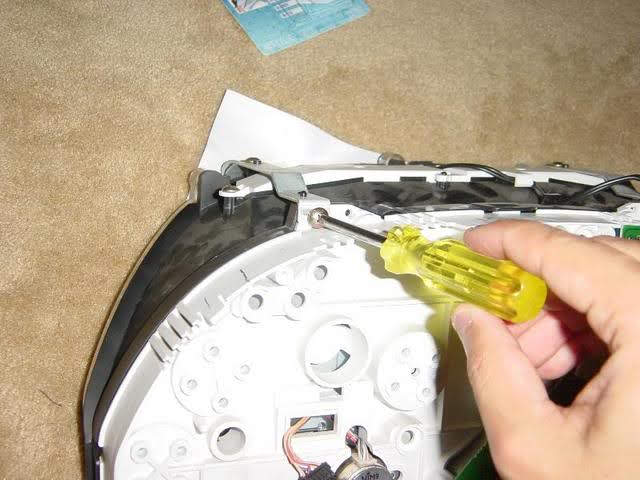
- Now the panel frame can come out. If you have trouble, you may want to use the telescopic and tilt levers to move the steering column out of the way.

0191lNYTvPSPTbHptVNsuoOqJqtlbu0MskTqR7uaJThOfvnvp2iwSzy_3zeQqtYcN56N1Aw_xgxf1xcTmRO6nPg-3m3g_byXJ36G9R0c73Xt1hXvAfvdcocRdRwbA-ZH2tbfKWu-rQ=w2400

5nC2ze5fKiwvCeH8K15mHS5n07bHngoOjLR98jnj8EuFRK0fcO3x_0I70Zz4KT2OBNX1TmSaIHQphuwptj639fD1q20lgXlN_3YzhtDvHbeTwJwn3wXz8yhWcWpGxnUyxR5-N4ttNw=w2400

UTJE3m3ZsU9VnsRhRpFW1P2hEDRX2xQYyfRML_0WztzfBySL9yYAhjA4mAN0rqqU_O9W0Jujqz0RCc7D0A_9QR3IPtZe1-GUYGqxm0tdSz0Q5UnU1IwRoJaiOQ619v6C23IbpU52BA=w2400


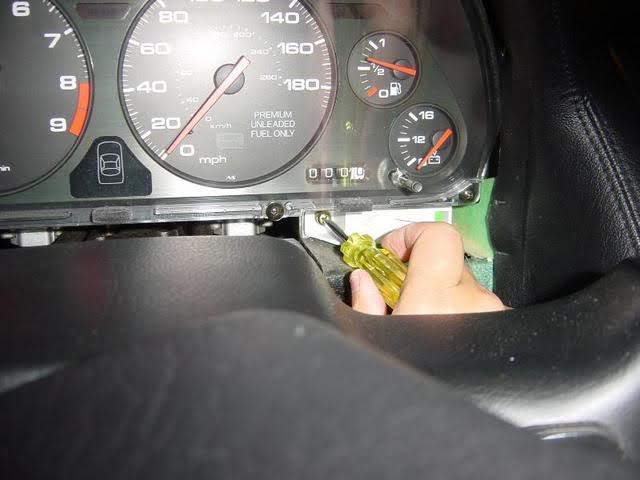
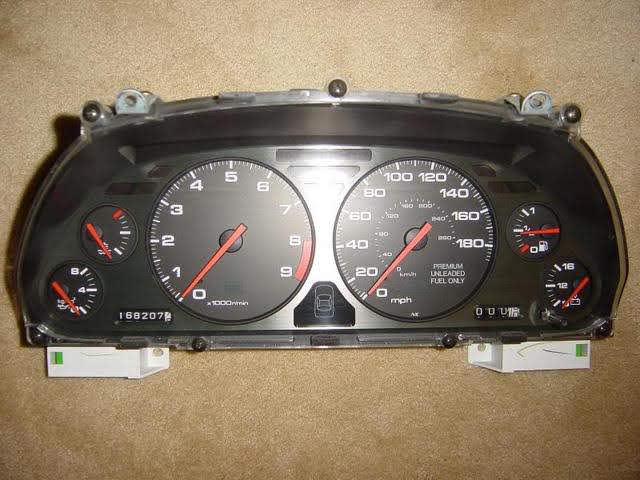
- You're almost there now. The gauge cluster is pretty easy to remove. There are several screws that hold it down.

p1rwe7PivTaYb072SywSkFAXG92i8WaXLCkKXkhtgWfea-sjUfobHEOA9vkGl88haOYBqbE-tgjOqP_1t5EaCqvPnN53iYMWJiFcoBl8IF5LROx0qCzEmuGKhdmqlbwnAuFp-r8J1Q=w2400

XRitifKLtBjmvW0AKXDs3YAvhdwQhQtykgv3sgn2oqzCMsxhaIX8O3zd68Ofcko9M5bXymg4OsikfsjaeIFKKdpeLSmM-WzH8iVghWP2JgbD2p0r3MPxkyJ3kNrZOKiUxdQDWbCzHA=w2400


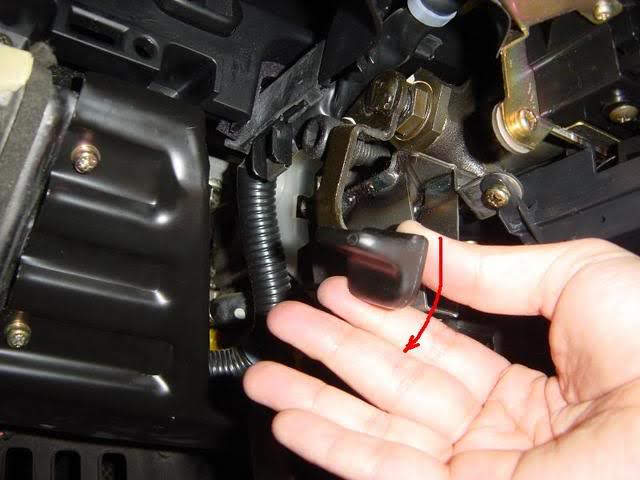
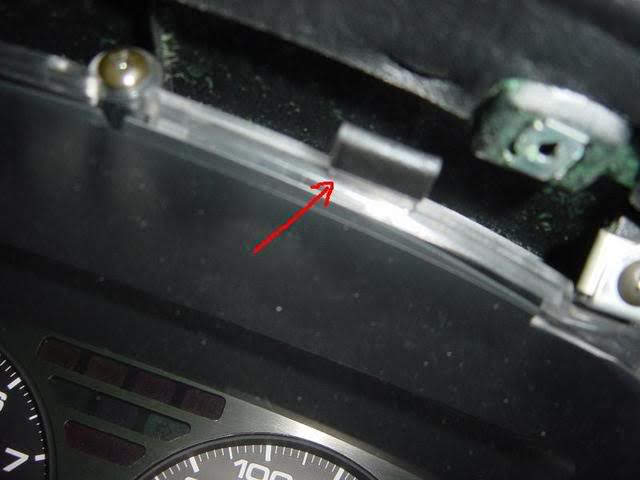
- Be careful not to lose these rubber protectors.

1yFXlXEH51GncpE_UdszWf9HGsVHwGoqNYIcwhWvEn39lO8-atfRioeE2dnA988K0h-upF5lx9_jLKNah7xt3wshVT8kcAZzozXa-0aDCW1akxg27rJF3atLHry2UEdThIjjRJ4_8Q=w2400

e7Ec2C4ebgs4l5sZxrgiDIE9Khz4zwZx38UZ5Ito-4nm5yW2lbZr51J3rG3Tp6cXqaqdwIJXcnCO-F7L5AtOPGboNdMAxWK34lLV4KdLDkT6JFT7wp7t_6agG0Jqob7kaFp_ZYw55w=w2400


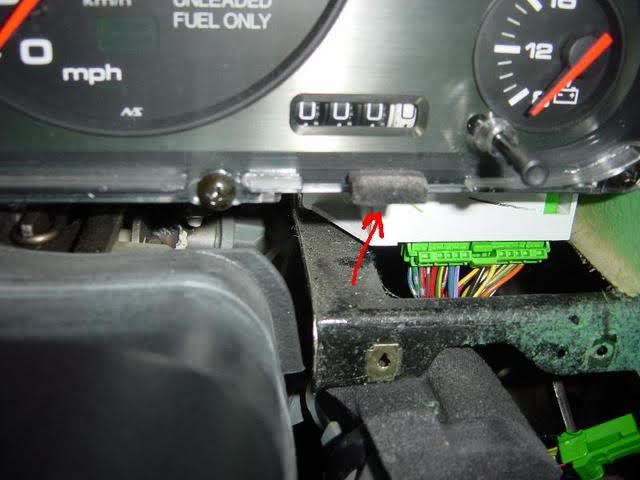
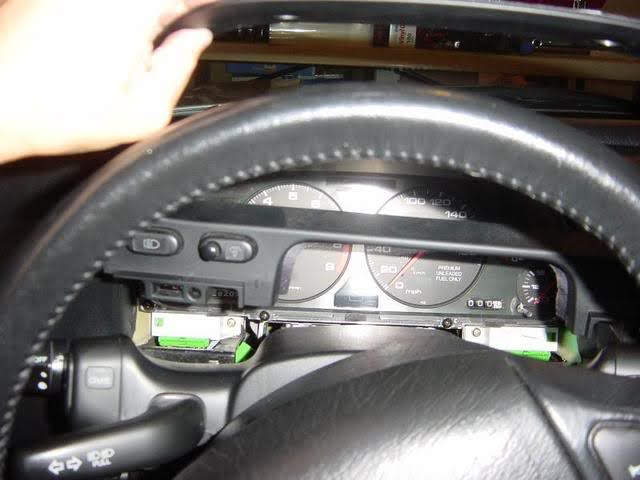
- Similar to the panel frame, the gauge cluster assembly will not come out because it has two 30P connectors at the two ends on the bottom.

Again, I had very little space to get in there. These connectors also have a tab that let you release them.

T8LDqUczGOYIwBizP8aTZkcIJg9mTbJ89d5Au3YcuGhxlUrwo0h9qvaxIxieXu54OvwnyXl2pI1uF1w1eyXZa6CI4-TxbGCSXu4joFSX1iyBqJdTd2hdQb5pgZg--FVpqURc0IAadw=w2400

PFphjjqD0i6jEPezbMi9dQH5pGclKTH8QYVUaJc03n-KttFUZut5sjhjM3EB2Zp28cTqA9jfX_vc-0yYlcE8KFF6TOaUHVAGtu1M9kdzuYDDTU5Oa8tHNizz5q-2_Pvp-HeREZN4Wg=w2400


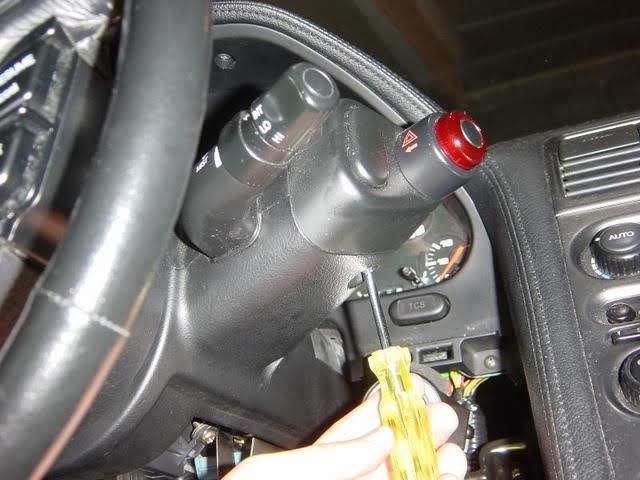
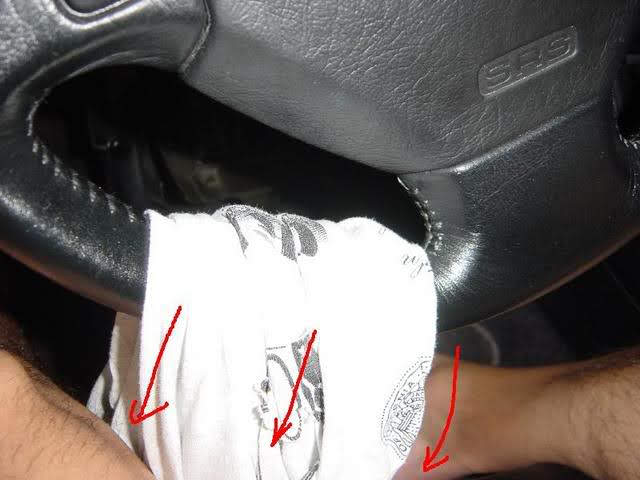
- Now, you're almost ready. To make the most room, I pulled out the steering wheel using the telescopic lever. To get it to tilt in the lowest angle possible, I decided to use one of my t-shirts as a strap to keep the steering wheel pulled down as low as possible. When you use the tilt lever to tilt the column down, the column clicks into different position. The last possible clicked in position doesn't offer enough room for the cluster assembly to come out. Fortunately, there is a bit more movement "after" the last clicked position, but you hav e to hold it down yourself.

8K0L1v2dTQvyWTvVk-gd4hz1LirY3NyKvwGIHlm7qCqtBvsAYncf31kZzscZpZi1GOKon0pd7PQTQhq6g35VBzT89WMCnMRTnCGuFKEKiv_qvt6ODEpiWGW5Qy4WWUKg0RnLYaMnNg=w2400


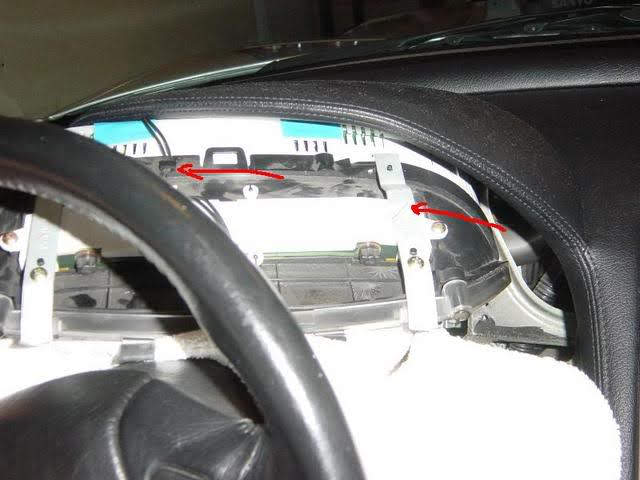
- Place a towel or something soft, but not too thick, on top of the upper steering column cover. Otherwise, you may end up scratching the clear plastic gauge cover.

Gently, pull out the cluster assembly. You will probably need to flex the top of the dash and wiggle the cluster out. I chose to pull it out towards the left.

EJ5YzFM2APXqPvIFZJ5D-JlYBB_dFTpPbyyix2eIFYzwHLmqH-yJI-J0YYxDa-oyhe7oVyxJ0mdloqy3NS_gMewRyaHbbfHhy-pbMaKfJ33GjRiV5eADbS97j_8kQNxzXp9qbS4K-g=w2400

EBuRpfgxXpKunGxEAPpK_XTOHMVqLxjyVw2_q1ld-IR3Cn0boCR-ukLMvJotJ6wBk8lypqjkwxQDhTfMHABUKAfiVBgvL1cW-IlqpE7bRuc26FWOGFW_C37QIHozaAJ2MkGXtWEXxA=w2400

zXJsVk7XxMdItnPxOb8zyERVlektdBvX126TplueoVYr8j72u1_tfXwdZkcvfj4pR_DVc0zMFcrnffXtLtjKYRdUqOSOxqnrF5kD19gS45yZ2V1h7r_6RLTfUZHE1hWeg18Cxu9CBA=w2400


- At last, the assembly is now out but I'm exhausted after being hunched over for a long time.

-UR1cvaTjIJI6QOtJIhr-LWnGSnbdmGf0WFghGK37hVtoa0HD3CN853pWlHHEjgxhMhfEK9KvjGKQafE2Q3lIeWuaJBc2_dXy0bLF3KrFQaSRYamRZsCvQw9tJllPOhjuJjFxmT-Tg=w2400

mZ4VzpE_ccqEX6m58BBD0UHW8hlfmQ536qi94M47vHYME-MJBqasxcm_7GjVfgcr7kNekaaCiLi3ZbvjS2Pgf8lkTEp1jgTDaYNguPU-n9yB-QHSCr05j3YvWMmvS4jniHzi_YOoiQ=w2400

XygZKcbzoAQeoZAp8qUcK-NrcRHzjmd0Kd2TqRvhPcFFx-8epHByoluALJK5G2zjqzwfgEeq9CvrrRLIjSWpVvjUHMsWLCa-_BYfGyV4MRJ_q9heakXLlzaY1497sKXxAB20bF0W-Q=w2400


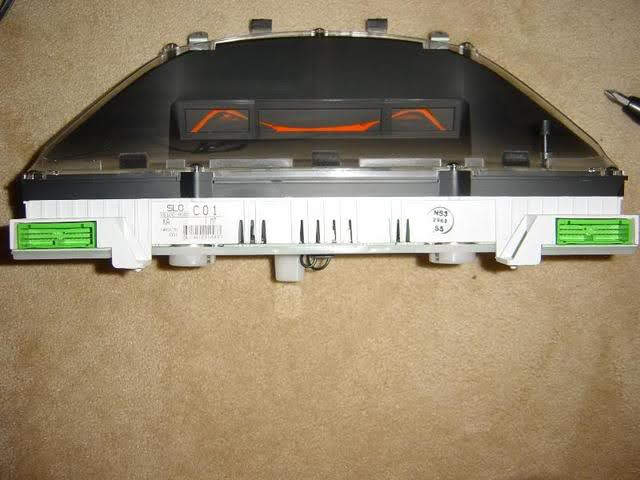
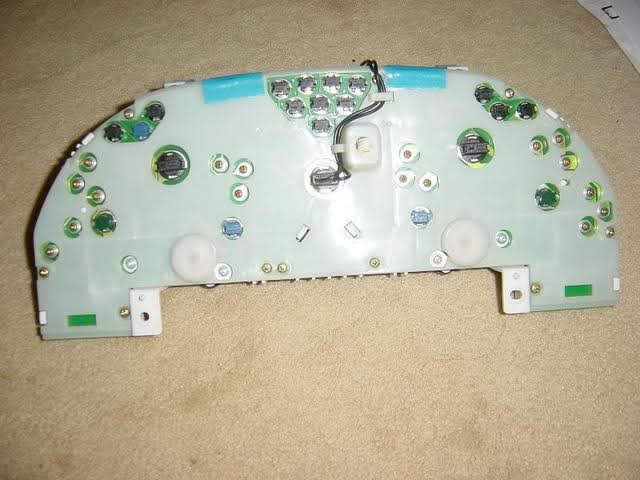
- Now start out by removing the background light and removing the back panel screws.

cD8gj-RGTE1MnnLtteG8_2eVQUfGxQAEgAHDGogk8u1VPGpa-yydTwa2Uvq8gnl1O36C5K-lfBOFk2TNRRfQsVszqjzu4-6ztIO9WjlMK9SypHu4FpVeUIIsfrcrf-gUU7ALGH9a9Q=w2400

b031bQP2xa1ZAvK-nbgpy0YWhmx5_shvzv84jopn8YYce9sI8Tg1O7atRBhsqRTkfJbiIgGLSPTsO8H48kbTyH0QPWo5x5EO4CDCG41ol_iuBjzENPGtxnKDiQvW2K_2aApwvJYkDw=w2400

b031bQP2xa1ZAvK-nbgpy0YWhmx5_shvzv84jopn8YYce9sI8Tg1O7atRBhsqRTkfJbiIgGLSPTsO8H48kbTyH0QPWo5x5EO4CDCG41ol_iuBjzENPGtxnKDiQvW2K_2aApwvJYkDw=w2400


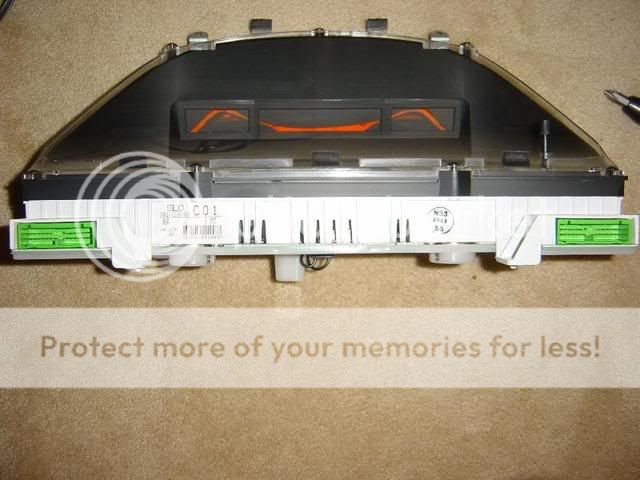
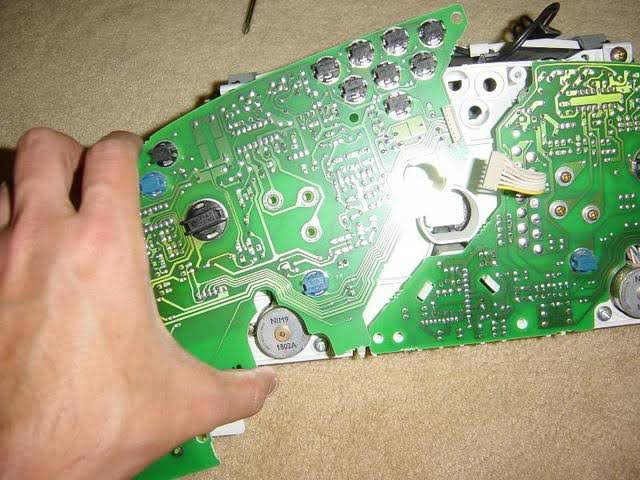
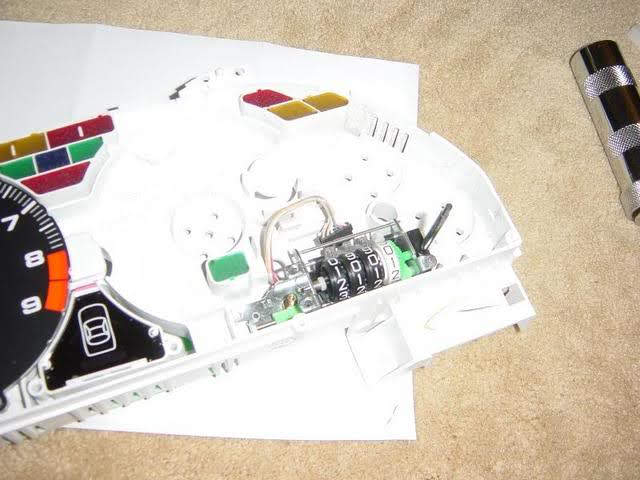
- The tripmeter is on the left side of the assembly when looking from the back. The circuit board on the back is actually split into two parts. Before removing the left circuit board, you have to remove a connector that's holding the circuit board.

S07BTZfF_uSUWB-lw4lhxvsIzGwMh7uB6P5ijmpxjMACgJ7U0O_5UvCmPj5mY0CauLx7icgKAhTWQj2nmh4cO1y8N4v3IRP57j1043nPKZWx7cNtrAhMPycqdRFzC9l430AZ5t_OCA=w2400

BltHPxB93GFuRIumXXLyzfWjpGfqtrn78GSVXG1aPwJsgItxsc9GKblimmH2b9FVsTyBQF2eOmTI22pIAA9QlCRiP6dU9QEGawy9LEQBt9CGYdFYPeOVqdLCqtoPyOEbOyCGnvzeuA=w2400

PEj8Vckx-WdvMTDzlfrzczzJTppYhRvtc3kfzuMvwmCvxrUcDW6FU7sw4ir3s85lNXhoCc9w9Ktf95X7-DTu-NKXUzjF1PjyZ4PZEOqcE4lFVpBGb7xbDVmXM67i8kWZejjfaABVBQ=w2400


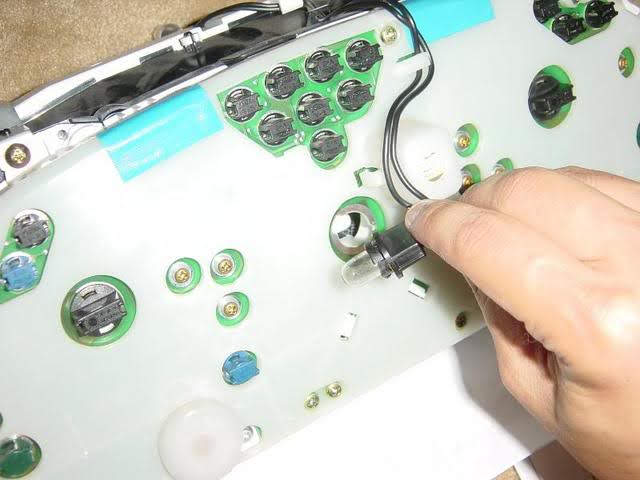
- Cool! Now to get to the tripmeter you have to take apart the assembly. You need to remove the back assembly housing (light colored plastic piece).

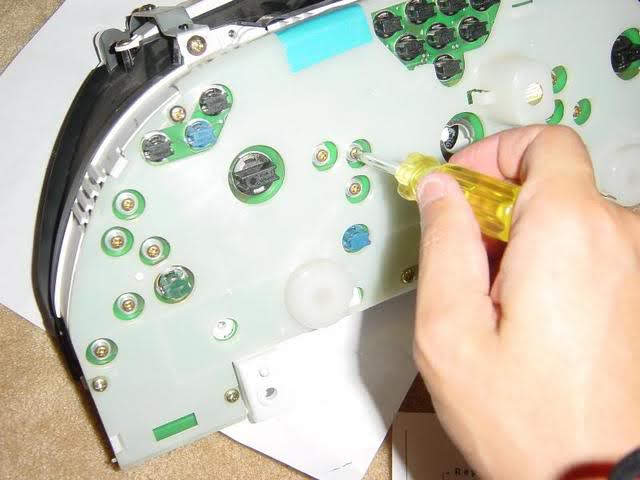
First remove the bracket screws.

whdzof17N0zwf_N8ZE9aMN3ZQ8rwxF-rUwV4LaZ492uuG4bPB90nayM6KY_Q6hpEOZciKKKgmT5dr1qpAPea_ZcKuBir5XSl3KxEJDQ7jOA5w7wmWHAHbXOHW7YvYomkLbo4hRcNRQ=w2400


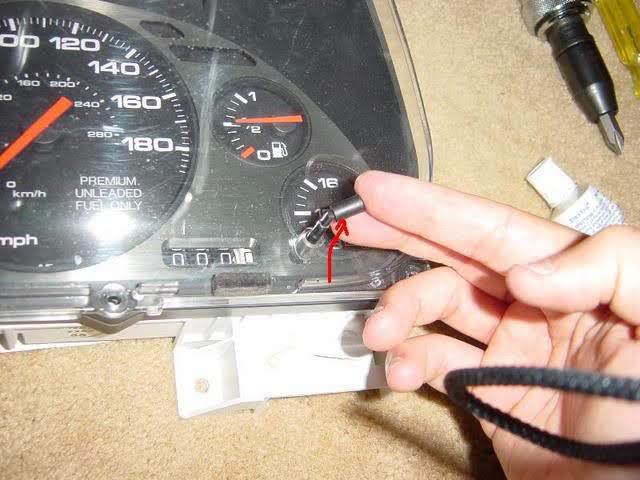
- Now, flip to the front and remove the bottom screws. Also, remember to remove the rubber tip on the tripmeter.

Dw2M29MAO4YFIIi4VWVi_Pd2NQs3HlG1DEfAR7qbi6gWovHiSBXSX0KBoFlhe1OiKkOZksmdIh3mkNaogutmwrJkaO2_gB9jfyn3G8x8dbTInj9pMlrVlGQ-hAQ9cBq68S5yVal6pw=w2400


- Finish it up by moving aside the brackets and remove the housing. Take care to place the assembly on its back when remove the housing. Otherwise the cluster components may fall out (and break?).

5ysvvuRfUJrkDobJIHDyB8fToGJq_RlcXrSQ7ye4-t250iweOucrcCkehI8ofI8GP2WpVFoHaYjgiuEJklB3qmqveIJP2LBB3gdda8lHEL0aCoAN2-dxjA1zqPcvCvJ4D6r3o0hUSw=w2400


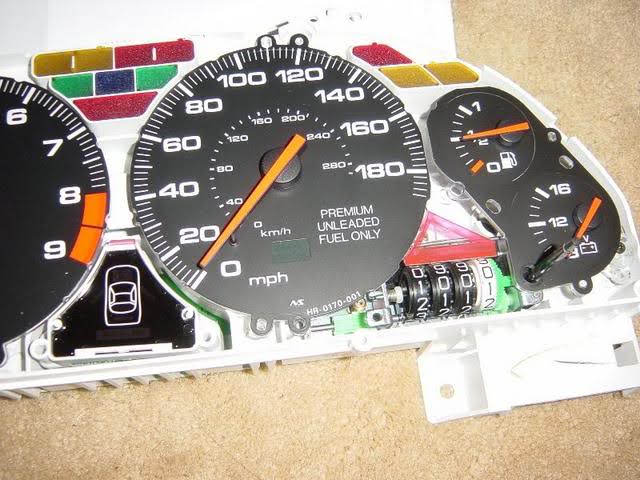
- All you have to do now is pull out the speedometer, fuel/voltage gauge, and tripmeter. There you have it!!!

d1z13-saEkL0JQ8YGEeAtwjIcFuVtk7HR2eZe1te1n_wmiVFiSzb4Y5G8dJUmDdOIXNUEiXQaMZbc5c7CW8UlCH6cjp0lltDzFzHg33HjAMcOUETX9ReqiSm3i7zIu7KK8gSjso8tQ=w2400

RYx27d6EUlBrcQkfAOmwJWHxrgkp6Yb82c2Uxik5AnXKXfDdvEY7D__8SYFPZZS3mu9Acyrfi_LuFEDy7bTeNF32DKzHV-A32WgEazbKCANknF2vt6XUPV0mIcB1iOSwJ8V_KG7yaw=w2400


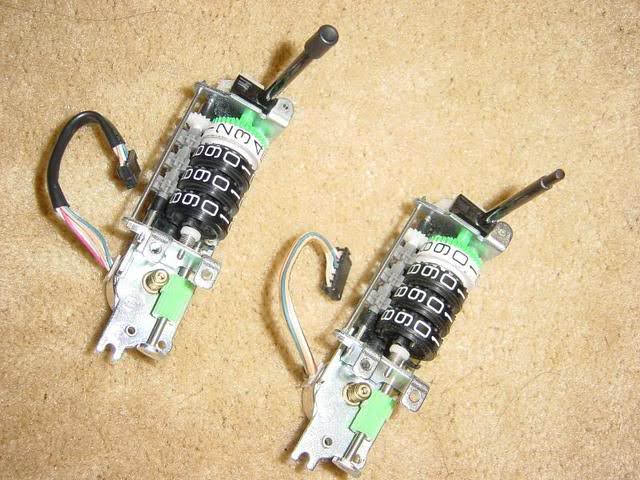
- Here is my stuck tripmeter and the new replacement.

Hs6C3dHLPUO5ZlTvftjFfrsIvrK9_7jv10PJUWBj0Y8gkJ63B6gQaboAdqHuV3n92i89y4jpHuWh_R0piAM3KE9kIk9MO1XkqqoTcQwNe0kqsUb6xnyBfPEXTS9YdHlcipFrcWlujg=w2400


Just follow these steps in reverse to put it back. Make sure to keep track of all the screws and where they go. It's really easy to forget what goes where.

Please take care not to over-tighten the screws that go on the circuit board. They attach to the posts inside the speedometer/voltmeter/fuel meter. Over turning the screws (like I did) can rip the tiny hair-thin wires that make up the coil in the meters. My speedometer died because one of the wire were disconnected and I had to redo everything and solder the wires.

Hope you find this helpful.

Thanks.
 
Last edited by a moderator:
JDM,

Excellent write-up !! Thank you very much for taking the time to do it.

Like you I have a stuck tripmeter and this has been on my to-do list for quite some time. Ever since your last post about doing a write-up on this I have waited patiently for it.
Áctually, I am planning to do the tripmeter and the cluster rings at the same time.
How many hours did it take you to take all the stuff out ??
 
great written DIY ... :smile:

I'm probably going to do this myself so its much appreciated ...


btw, anybody know if there is someone selling white gauges ??
 
JDM,

Excellent write-up !! Thank you very much for taking the time to do it.

Like you I have a stuck tripmeter and this has been on my to-do list for quite some time. Ever since your last post about doing a write-up on this I have waited patiently for it.
Áctually, I am planning to do the tripmeter and the cluster rings at the same time.
How many hours did it take you to take all the stuff out ??

You're very welcome. I was very cautious not to break anything and I took the time to mark and note everything I did. I actually ended up breaking a couple of plastic tabs inside the gauge assembly but they were minor thing so no biggie. I would say it took me about 4.5+ hours in total to remove and put back everything. This was, of course, spread over three days. This was my first time working on the interior for the nsx and I'm not the fastest DIY'er, so you might be able to do it more quickly.
 
I wonder if there is a way to change the odometer and tripmeter to a digital read-out instead of an analog one? I thought it was all mechanical until I saw that it has an electrical connection behind it. I wonder if you might be able to use one from a later model honda that has the digital display? Just a thought ;)

This would also be a good time to change the color of the lighting behind the gauges too ;)
 
this is EXACTLY what i needed to see. i wanted to purchase some gauge cluster + rings and do this. thank you.
 
- Remove the dashboard lower center panel. After removing the screw near the foot well, you have to pull the top portion out. It's clipped in at the top so don't twist or bend too much.

02-dashboardcenterpanel-1.jpg


I wanted to take my gauges out today and I am having some trouble removing this part. I took the bottom two screws out and the clips up top won't budge. I tried putting some force on it and I can see its pulling on the gauges all together. Is there another screw located somewhere that needs to be removed? I took the bottom corner screws out. Is there another way to help release the clips? Please help.
 
If the bottom portion of this piece is out and dangling, there is no other screw. Make sure you did not unscrew anything on the actual instrument gauge before you take this piece out.

The top clip is clipped onto the gauge assembly. So you need the gauge assembly to be locked in so it won't be moving as you pull.

I had to squeeze my finger into the gap at the top and pull hard. Do not pull on the bottom portion.
 
Wow, this is a great write-up. This will come in handy for many Prime members. Thank you for your write-up.
 
Man this sucks. I finally got around to test drive my car with the new tripmeter in place. It's been about 2 weeks since I installed it and I guess I forgot to hook up some wire on the gauge assembly.

The speedometer DOES NOT WORK!!! :(

I guess I'll be using my own DIY write up along with the rest of the folks... Hopefully I won't have to tear apart the whole assembly to get at the wire.
 
Last edited:
I wanted to take my gauges out today and I am having some trouble removing this part. I took the bottom two screws out and the clips up top won't budge. I tried putting some force on it and I can see its pulling on the gauges all together. Is there another screw located somewhere that needs to be removed? I took the bottom corner screws out. Is there another way to help release the clips? Please help.

I can tell you from experience, that piece is a real mother Fxxxx to get out. They should use these clips to secure the heat tiles to the Space Shuttle, they would never have to worry about them coming loose.
You really need to just grab that bolster and pull out towards you and believe it or not the clips will release. I damn near sprained my thumb when mine finally came loose. Good luck.
 
Man this sucks. I finally got around to test drive my car with the new tripmeter in place. It's been about 2 weeks since I installed it and I guess I forgot to hook up some wire on the gauge assembly.

The speedometer DOES NOT WORK!!! :(

I guess I'll be using my own DIY write up along with the rest of the folks... Hopefully I won't have to tear apart the whole assembly to get at the wire.

If I recall correctly, there is no wire on the gauge assembly that goes to the speedometer, just one that connects the two circuit boards and the green harness plugs that go in the bottom of the assembled cluster.

The spreed gauge is held in place with 4(?) screws that if not sufficiently torqued will not work.
The gauge makes electrical contact via the screws that hold then in place in the rear.
Check these out as one or more may not be tight enough. Hopefully that will cure your ills.

BTW. The donor car for your part. What year car was it from? Was it 91-94?
Make sure all the screws holding the gauge in place are seated snug and making electrical contact. The same for the circuit boards. I hope you were careful with the needles on the gauge, they don't take well to manhandling. They can be fragile and fussy.

I hope you did not damage the speedo (it is easy to do) but if you did you can get a new one and it comes with the trip meter too. I believe it costs about 10x what it cost for just a used trip meter. You can't buy them separately.

BTW. What year was the donor car that your trip meter came from? Was it 91-94 vintage?
 
Last edited:
I can tell you from experience, that piece is a real mother Fxxxx to get out. They should use these clips to secure the heat tiles to the Space Shuttle, they would never have to worry about them coming loose.
You really need to just grab that bolster and pull out towards you and believe it or not the clips will release. I damn near sprained my thumb when mine finally came loose. Good luck.


This has been covered before (search is your friend :smile: ).

As I explained back when, the trick is to softly curse while pulling it straight toward you with even pressure.
 
Last edited:
If I recall correctly, there is no wire on the gauge assembly that goes to the speedometer, just one that connects the two circuit boards and the green harness plugs that go in the bottom of the assembled cluster.

The spreed gauge is held in place with 4(?) screws that if not sufficiently torqued will not work.
The gauge makes electrical contact via the screws that hold then in place in the rear.
Check these out as one or more may not be tight enough. Hopefully that will cure your ills.

BTW. The donor car for your part. What year car was it from? Was it 91-94?
Make sure all the screws holding the gauge in place are seated snug and making electrical contact. The same for the circuit boards. I hope you were careful with the needles on the gauge, they don't take well to manhandling. They can be fragile and fussy.

I hope you did not damage the speedo (it is easy to do) but if you did you can get a new one and it comes with the trip meter too. I believe it costs about 10x what it cost for just a used trip meter. You can't buy them separately.

BTW. What year was the donor car that your trip meter came from? Was it 91-94 vintage?

Thanks for your reply. I was in the garage all day today trying to fix this.
I finally figured out that the wire in the coil that drives the speedometer was disconnected. These wires are hair-thin and very fragile. I think I overtighten the screws in the back and bascially rotated the connection point... ripping out the wire.

It was very easy to miss as they are so small and hard to see. Soldering the wires back was no easy feat. My fuel gauge also suffered from the same problem so I fixed it the same way. Before it was stuck at "full" all the time.

Unfortunately, in the process, I opened the back cover (silver cap) of the voltmeter. There was this weird little plastic/magnet piece that sat on the inside wall of this cap. when I put it back, I wasn't sure about the exact location, as it can sit high and low. I went through 5 iterations to get the right voltage reading... torture I tell ya.

After all that I have more problems. The gauge backlight seems dim and the gauge needles have no light at all. I believe whatever is driving the light to the needles is either disconnected or dead.

I "think" it might be this light that isn't lighting up... can someone confirm?

15a-gaugeassemblybottom.jpg
 
Last edited:
if you had a detachable quick release steering wheel system,
your cluster removeable wouldve been so much easier and less painful. :biggrin:


Those are great for the track where you should have a four point harness and a helmet as well. With that steering wheel and no harness, and no helmet, in a head on crash things could be a whole lot more painful.:wink:
 
Last edited:
Thanks for your reply. I was in the garage all day today trying to fix this.
I finally figured out that the wire in the coil that drives the speedometer was disconnected. These wires are hair-thin and very fragile. I think I overtighten the screws in the back and bascially rotated the connection point... ripping out the wire.

It was very easy to miss as they are so small and hard to see. Soldering the wires back was no easy feat. My fuel gauge also suffered from the same problem so I fixed it the same way. Before it was stuck at "full" all the time.

Unfortunately, in the process, I opened the back cover (silver cap) of the voltmeter. There was this weird little plastic/magnet piece that sat on the inside wall of this cap. when I put it back, I wasn't sure about the exact location, as it can sit high and low. I went through 5 iterations to get the right voltage reading... torture I tell ya.

After all that I have more problems. The gauge backlight seems dim and the gauge needles have no light at all. I believe whatever is driving the light to the needles is either disconnected or dead.

I "think" it might be this light that isn't lighting up... can someone confirm?

15a-gaugeassemblybottom.jpg


Updated my other thread regarding the snapped coil wires on the speedometer/voltage meter motor at http://www.nsxprime.com/forums/showthread.php?t=91341
 
hi, i had the same type of problem, the reset button wouldn't reset the counter, and the trip meter wasn't turning... i did it much the same way, but didn't need to remover the column bottom cover, or the back of the instrument panel, I just took off the front cover, and lighty oiled the trip meter and worked it until it moved freely, and all the barrels spun easily. So don;t always need a replacement trip meter, just a little service!

the main thing to watch our for is bending the pins when the green connectors are replaced, the connectors click home as they should, but the pin can sometimes miss the socket, and bend out of the way, as they are quite flimsy!!!! just watch out for that!
 
if you had a detachable quick release steering wheel system,
your cluster removeable wouldve been so much easier and less painful. :biggrin:

This is not accurate; the space concern is between the top of the steering column and the gauge cluster, the wheel is much easier to slide past, once the cluster is out of its housing, and removal is not necessary.
 
it's very accurate, john.
im speaking from experience.

i pulled my cluster out before along with many other people's cluster before we had quick release steering wheels and sliding it sideways is tricky while not scratching because of the limited space.

since then with the added quick release, i was able to pull mine, vance's, art's, shiftybob's and many others very easily without sliding it sideways.
 
Dashboard Center Panel DIY removal

Today 4-3-2016, I tried to remove the Dashboard Center Panel and had no luck. I knew it was clipped in but was afraid to break it.
On my panel the vinyl is coming apart and I want to reupholster it with leather.
I will give this another try with a little more force next time.

thanks for the write up and images.


- Remove the dashboard lower center panel. After removing the screw near the foot well, you have to pull the top portion out. It's clipped in at the top so don't twist or bend too much.

02-dashboardcenterpanel-1.jpg
 
Back
Top