• Protip: Profile posts are public! Use Conversations to message other members privately. Everyone can see the content of a profile post.

How do I replace the black trim between doors and roof/A pillar?

Joined
26 August 2021
Messages
77
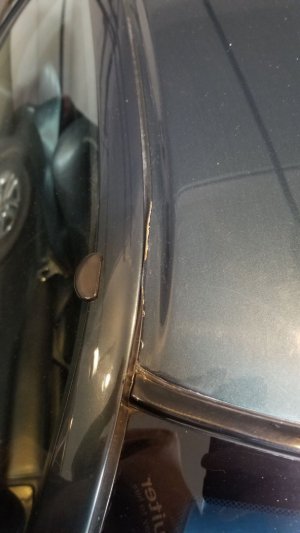
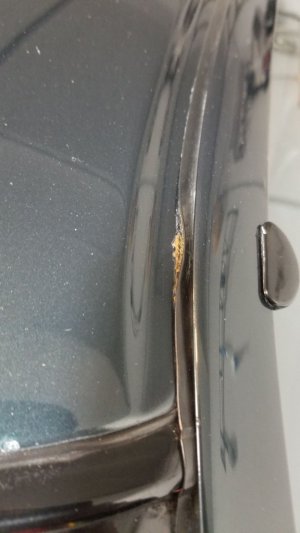
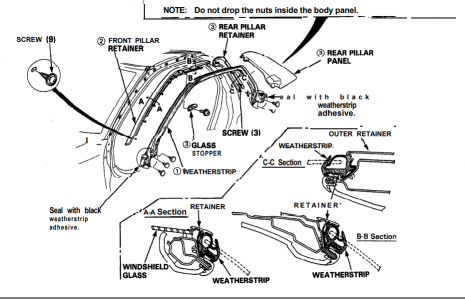
94 NSX. This rubber moulding is sticking up and looks like an eye sore. I think the previous owner tried to glue it back in, which now looks even worse because the glue has dried an orange color and did not work. I can't seem to ascertain if the black rubber piece is a separate piece that I can buy and replace. Anyone know? I found some diagrams but they seem to indicate this might be one piece with the body colored panel?

I looked up some parts on Amayama, I think it might be 14 and 15 on the first diagram here but also thinking it might include the body color piece?

Also wondering if anyone has any great solution to this problem without shelling out $1k.
 

Attachments

  • 20231109_151634.jpg
    20231109_151634.jpg
    88.6 KB · Views: 34
  • 20231109_151647.jpg
    20231109_151647.jpg
    72.6 KB · Views: 31
  • 20231109_151651.jpg
    20231109_151651.jpg
    79.1 KB · Views: 31
  • diagram.PNG
    diagram.PNG
    151.7 KB · Views: 34
Last edited:
I have a T roof, so different arrangement; but, I am pretty sure that the little plastic / rubber trim piece is part of the molding / retainer which needs to be color matched (if it is no longer available in your color). So, yes its going to be expensive. I had a similar slightly less expensive experience when I wanted to repair a small missing chunk in the plastic trim on the door molding at the base of the driver side door glass. Same deal, complete new molding. At least they are still in production.

Based upon the service manual, the weather strip has to come off to get at the molding / retainer. On the T roof, any maintenance to do with the door weather stripping on an NSX is complicated. The SM devotes multiple pages to weatherstrip R&R. The SM devotes a single 'seal with black adhesive' note for the coupe weather strip so maybe R&R is a lot simpler. If you are going to try to do something with the trim piece you might want to consider having a new weather strip on hand since the old one has to come off and it may get damaged in the removal process. Whatever you do, be prepared to have to go through the glass adjustment after the weather strip is replaced.

If you remove the molding / retainer, you may find that it is possible to glue the plastic / rubber trim piece back together. I have had excellent results using Loctite 406 on plastic and rubber. Loctite has other 'active surface' cyano adhesives that may be better; but, so far I have not been motivated to explore those options because of the excellent results that I have had with 406. The plastic / rubber piece will have to be scrupulously clean and de greased with no residue from the previous gluing effort present. 406 is not a slow set cyano adhesive so you need good conditions for setting up the repair. The first touch will be the final touch. No repositioning is possible.
 
The rubber trim is not available separately- you need to buy the entire plastic trim piece. They are sold pre-painted in the factory colors. I was able to restore mine and re-glue the rubber after the trim pieces were painted. In my case, I was able to do this because the rubber trim was still in good shape. It is a miserable process and by the end, my fingertips hurt for days. I used a 1/4" 3M two-sided adhesive tape heated with a heat gun. It's holding up quite well, even after many washes and a torrential rain storm.

20210404_153509.jpg20210404_153505.jpg20210404_154507.jpg
 
Honcho's trim tape is a better choice if the lip is intact and just detached. The 406 will work better if the lip is actually torn - as long as there are no chunks missing.
 
This is great advice thanks all! I don't see paint codes attached to this trim on Amayama which is odd. I actually wouldn't mind paying for the pre painted piece if I knew it came color matched. The rubber trim is not torn so hopefully the tape will work!

Honcho why did you need the heat gun to attach the tape?
 
72420-SL0-013ZA and 72460-SL0-013ZA are the Brooklands Green versions. They say (G70P) after the part number.


You have to use the heat gun because the tape adhesive becomes more tacky and adheres properly once heated. You have to work a little section at a time and squeeze hard with your fingertips to make sure the rubber/adhesive sets in the plastic channel.
 
You have to use the heat gun because the tape adhesive becomes more tacky and adheres properly once heated. You have to work a little section at a time and squeeze hard with your fingertips to make sure the rubber/adhesive sets in the plastic channel.

That 3M tape looks like it might be a useful product. What is the product number? In your photo it looks like 167MP; but, the only search hits I get are for 467MP.
 
Back
Top