• Protip: Profile posts are public! Use Conversations to message other members privately. Everyone can see the content of a profile post.

Newbie coil cover question

Joined
11 April 2001
Messages
193
Location
Near Houston, TX
Hi, guys,

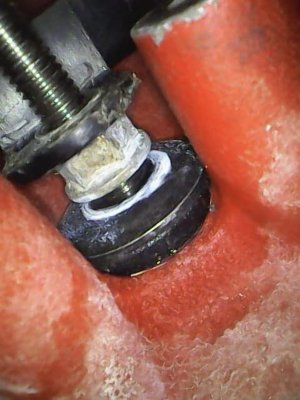
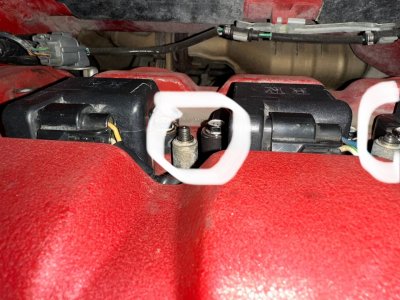
Thanks in part to all of the great info on this site from everyone, I was able to change out the spark plugs in my ‘99 NSX recently! Everything went well, except when I tried to reinstall the rear coil cover, one of the acorn nuts would not screw in, so when I took the coil cover back off, I noticed that there was very little exposed thread for the acorn nut to screw back in, especially compared to the exposed thread for the other acorn nut. Did I do something wrong on my first DIY spark plug service? Any help is greatly appreciated - please see pic below of the exposed threads highlighted - one side has very little exposed thread for the acorn nut. Please click on photo to see the full pic of both threads circled:
 

Attachments

  • IMG_7606.jpeg
    IMG_7606.jpeg
    273.5 KB · Views: 32
It has been a while since I have been in there.

Isn't the threaded part a stud which threads down into a steel collar/insert in the aluminum cover? If so, I think it should be just a matter of unscrewing the stud to expose more threads. The stud should unscrew relatively easily. I might try grabbing the exposed stud with some suitable pliers to unscrew it. Once removed, apply some loctite thread locker (blue should be adequate) to the end of the stud and then screw it back into the collar to the correct depth. Once the loctite has cooked you should be good to go in terms of attaching the coil cover.

That is my memory from 'looking at it', not actually having to repair it. I could be wrong; but, if the stud unthreads easily then I think I am correct. If the stud does not unthread easily do not force it. Wait for someone who really knows what they are going on about.
 
It could also be that you got the collar upside down on that side. Take the cover off and confirm that you have them both on correctly. I seem to recall I did the same once and was scratching my head for a few minutes...
 
Thank you, all, I will give it a try later tonight and will update 👍
 
Hi all,

Just to follow up, I took the middle ignition coil off to get a better picture, please look at the two circled areas in the attached photo. Notice that the blackish hardware (?) that encircles the right threaded piece/stud is not seated all the way down as it is on the left stud (collars (spacers?) removed btw). I can’t seem to get it to move or reposition deeper to seat it all the way in like the other side!

Forgive my non-mechanic/layman’s language there!

Any ideas of why this may be the case? Thank you all for any insight!
IMG_7616.jpeg
 
Last edited:
From the picture it looks like the stud on the right side is shorter. You can measure those to confirm. If that's the case then it's possible / likely that the right stud got turned, so turning it counter clockwise may sort it out. I'd put a couple of layers of painters tape over the jaws of some pliers and carefully try and turn it to the left. If it turns, back it out gently until it matches the other stud length, being careful not to crush the threads. Also be sure to turn it from as low down on the stud as you can to avoid the threads on the end. Otherwise the cover will stay put just fine on one stud until someone else can take a look at it.

Hope that helps! :)
 
Thank you, will try it next weekend! 👍
 
Ok, those don't look right. Here are my heads at the end of my engine refresh. You're supposed to screw the hollow acorn nuts down on the rubber washers. This is what fixes the valve cover to the head (including the four corner nuts).

20211007_145901.jpg

In this picture, you can see the spacers. They sit on top of the acorn nuts. There should be enough thread on them to attach the coil cover nuts.
20220125_075557.jpg

Here's another look at them on the rear head. The thread length should be equal.

20220828_141354.jpg
 
Here is a different view of the coil cover hold down bolts.
valve cover.jpg

From the top going down, you can see the acorn nut, the collar that holds the coil cover up, the nut that holds the cam cover down and the washer that fits below the cam cover retaining nut. Here are photos of the cam cover nut and the washer that fits under the cam cover nut.

cam cover nut.jpg

washer.jpg

All of this is visible in Honcho's photos once you know what you are looking for. These are the bolts / stud like things that are mounted in the head and stick through the cam cover to hold it down.

stud  _  bolt.jpg

And you can see them in place

head wwith bolts.jpg

The thread diameter that fits into the head is different than the part that sticks up through the cover so my comment about the stud screwing down into the head was out to lunch (I don't know where my 'head' was at).

In post #5, your right hold down nut (the nut above the washer) looks odd. It does not look like the correct cam cover hold down nut that I have shown above or it looks like there is no nut at all and somebody has added a spacer as a substitute for the nut. It is really hard to tell what is in there. I am wondering if during a timing belt service somebody lost the correct hold down nut when the cover was off and they substituted a thicker nut or just put a spacer in there which forces the collar up leaving less exposed thread for the acorn nut to grab. They might be relying on the acorn nut to hold everything in place.

That is my latest late-night guess as to what is going on.
 
Double check that you've got the right spacers. Fixing another car, I once found that a similar spacer had been replaced with a piece of pipe cut with a hacksaw - just a little off! Sourcing the correct spacer fixed everything.
 
Wow! Thank you all for the excellent advice and information! Since this was my first DIY spark plug service, I thought I screwed something up, but it looks like something already was amiss. I think it's time to take it to a real mechanic (ha!) to correct this issue. Have a nice week and Halloween, all!
 
Wow! Thank you all for the excellent advice and information! Since this was my first DIY spark plug service, I thought I screwed something up, but it looks like something already was amiss. I think it's time to take it to a real mechanic (ha!) to correct this issue. Have a nice week and Halloween, all!

Careful with your expectations. It might have been a real mechanic who bodged it up in the first place. Most mechanics work by the hour and the objective is to get it to the point where it is working and out the door. Generally works OK if the subject is a 2005 Cobalt where perfection is not a requirement. You may have to search really hard to find a mechanic who is going to fuss about an ignition coil cover.
 
Careful with your expectations. It might have been a real mechanic who bodged it up in the first place. Most mechanics work by the hour and the objective is to get it to the point where it is working and out the door. Generally works OK if the subject is a 2005 Cobalt where perfection is not a requirement. You may have to search really hard to find a mechanic who is going to fuss about an ignition coil cover.
Very true, unfortunately!

Do you suggest leaving it alone? I won’t be able to tighten down that acorn nut to the proper 7 ft lb torque, due to very little exposed thread on the stud.

As long as it is not risking harming anything, I won’t mess with it, if you advise. I know very little about this subject matter, and never did my own service until now (even though I’m on my 4th NSX, ha!), thank you!
 
As @Honcho noted, something does not look correct. In your photo, the left arrangement looks correct.

correct.jpg

The blue arrow shows what appears to be the correct cam cover retaining nut and the green arrow shows what looks to be like the correct washer under the nut. In the photo of the right retaining bolt
incorrect.jpg
The blue arrow shows a 'I don't know what it is; but, it does not look like the cam cover retaining nut'. It looks like a spacer of some kind. The green arrow where there should be the washer looks like there is nothing there. That almost looks like the machined boss on the cover. If the thing that the blue arrow points to just lifts off then it is definitely not a nut. That would allow you to confirm whether there is a washer underneath. I would pull them off and see what you find.

The correct parts are
Nut
Washer

If you can confirm that the parts are not correct, I would be inclined to order a new nut and washer and install them to see if that resolves the fit problem. The big long cam cover retaining stud that extends up to hold the coil covers cannot be shortened by screwing it further into the head and in the photo the end of the stud retains its original machined surface so it has not snapped off. So all that stuff appears good. That leaves something strange with whatever is in your photo of the right mounting bolt which I suspect might be a bodge by a real mechanic.

You are going to need a really deep socket to torque that retaining nut correctly.
 
As @Honcho noted, something does not look correct. In your photo, the left arrangement looks correct.

View attachment 185155

The blue arrow shows what appears to be the correct cam cover retaining nut and the green arrow shows what looks to be like the correct washer under the nut. In the photo of the right retaining bolt
View attachment 185156
The blue arrow shows a 'I don't know what it is; but, it does not look like the cam cover retaining nut'. It looks like a spacer of some kind. The green arrow where there should be the washer looks like there is nothing there. That almost looks like the machined boss on the cover. If the thing that the blue arrow points to just lifts off then it is definitely not a nut. That would allow you to confirm whether there is a washer underneath. I would pull them off and see what you find.

The correct parts are
Nut
Washer

If you can confirm that the parts are not correct, I would be inclined to order a new nut and washer and install them to see if that resolves the fit problem. The big long cam cover retaining stud that extends up to hold the coil covers cannot be shortened by screwing it further into the head and in the photo the end of the stud retains its original machined surface so it has not snapped off. So all that stuff appears good. That leaves something strange with whatever is in your photo of the right mounting bolt which I suspect might be a bodge by a real mechanic.

You are going to need a really deep socket to torque that retaining nut correctly.
This is great info, thank you for sharing your expertise and knowledge! I will look into it this weekend! 🙏🏻👍
 
The black thing Old Guy circled is the wire harness retainer. It goes under the holding nut and then the spacer sits on top of the nut. This appears to be backwards (assuming the holding nut is under the harness loop).
 
The black thing Old Guy circled is the wire harness retainer. It goes under the holding nut and then the spacer sits on top of the nut. This appears to be backwards (assuming the holding nut is under the harness loop).
Thank you! That does appear to be a possibility - if so, can this be addressed by a novice (me!), or do you recommend I take it to a Tech Expert (such as yourself and Old Guy)?
 
This is a simple fix and you just need to get enough slack on that wiring harness in order to pull it up off the stud. Once it's off the stud, remove the nut and put them in the correct order (harness first, nut second). You MAY need to remove the nut on the left side of that harness as well as remove some surrounding coils in order to get enough slack.
 
This is a simple fix and you just need to get enough slack on that wiring harness in order to pull it up off the stud. Once it's off the stud, remove the nut and put them in the correct order (harness first, nut second). You MAY need to remove the nut on the left side of that harness as well as remove some surrounding coils in order to get enough slack.
Makes sense, will definitely look into it this weekend, thank you! Once I figure all this out/resolved, I will post an update 🤞🙏🏻
 
Hi all,

Just wanted to thank all of you for the knowledge you all provided to help me figure out this issue! The space to work is too tight for me, so I will probably hire someone to help me correct the issue! Here is a better photo of the stud without spacer that i was able to capture, for future reference. Looks like the wiring harness retainer clip is indeed incorrectly above the nut, instead of below! At least I know that I wasn’t the one to screw it up on my first DIY spark plug job!

Please see below image, and thank you all, again! 🙏🏻 Happy Halloween! 🎃
 

Attachments

  • Image_2023-10-28 00_25_05_669.jpeg
    Image_2023-10-28 00_25_05_669.jpeg
    112.7 KB · Views: 9
Last edited:
follow-ups are greatly appreciated by those willing to help!
 
What can’t you double nut the top of the stud lock them against each other so the stud don’t loosen loosen as you remove the lower retaining nut pictured. Put it in the right order and tighten it down in reverse. I wouldn’t use the tape and vice grip method you could score the threads.

You can probably find just standard nuts at any decent hardware store to make your stud lock tool.
 
Something looks really screwy with the washer that fits under the cam cover retaining nut. I don't know what that spacer is between the washer and the bottom of the nut (noted with the green arrow).
Upside down washer.jpg
The washer that fits under the nut has a metal surface on top and a rubber seal bonded to the washer on the side that faces the cam cover. The rubber seal has a small lip that fits down around the long retaining bolt to seal oil. It almost looks like somebody has installed the washer upside down with that rubber lip on the up side.

The washer / rubber seal is Acura part # 90442-PR7-A00. They are less than $8 each so I would order one from your dealership because I think the existing washer might now be compromised. Plus, I am curious as to what that white stuff is. I would also be inclined to order a new cam cover nut because that one is looking a little rough. The part number is 90212-PR3-000.

I think the repair of this is relatively simple. You already have the coil cover off and the cover collar has been removed and all the coils have been disconnected. It should be relatively easy to lift the wire harness and its retaining clip up and off the long cam cover retaining bolt. If it does not lift easily, come back and request advice. With the wire harness clip out of the way this should expose the mounting bolt. A 10 mm deep socket should reach the nut and allow removal.
With some long needle nose pliers you should be able to inspect and remove the washer / seal or anything else that happens (and should not be) down there. Replacement should be a snap. Push the new washer down on the bolt with the rubber facing down, install the wire harness clip and then thread the cam cover bolt down on top of the retainer clip. Torque to spec and then install the collar and reconnect your coils.

This fix should take 15 minutes at a relaxed pace. Unless you get a mechanic with a lot of NSX experience they may not be able to fix this for you. The mechanic may be a pro; but, if they have not worked on an NSX before, when they take stuff apart they normally put it back the way they found it. That is not going to fix this particular problem.

 
Something looks really screwy with the washer that fits under the cam cover retaining nut. I don't know what that spacer is between the washer and the bottom of the nut (noted with the green arrow).
View attachment 185275
The washer that fits under the nut has a metal surface on top and a rubber seal bonded to the washer on the side that faces the cam cover. The rubber seal has a small lip that fits down around the long retaining bolt to seal oil. It almost looks like somebody has installed the washer upside down with that rubber lip on the up side.

The washer / rubber seal is Acura part # 90442-PR7-A00. They are less than $8 each so I would order one from your dealership because I think the existing washer might now be compromised. Plus, I am curious as to what that white stuff is. I would also be inclined to order a new cam cover nut because that one is looking a little rough. The part number is 90212-PR3-000.

I think the repair of this is relatively simple. You already have the coil cover off and the cover collar has been removed and all the coils have been disconnected. It should be relatively easy to lift the wire harness and its retaining clip up and off the long cam cover retaining bolt. If it does not lift easily, come back and request advice. With the wire harness clip out of the way this should expose the mounting bolt. A 10 mm deep socket should reach the nut and allow removal.
With some long needle nose pliers you should be able to inspect and remove the washer / seal or anything else that happens (and should not be) down there. Replacement should be a snap. Push the new washer down on the bolt with the rubber facing down, install the wire harness clip and then thread the cam cover bolt down on top of the retainer clip. Torque to spec and then install the collar and reconnect your coils.

This fix should take 15 minutes at a relaxed pace. Unless you get a mechanic with a lot of NSX experience they may not be able to fix this for you. The mechanic may be a pro; but, if they have not worked on an NSX before, when they take stuff apart they normally put it back the way they found it. That is not going to fix this particular problem.

Thank you, this is very encouraging to hear that it should be a quick fix!
I plan on taking the NSX to get all the coolant hoses replaced as preventative maintenance, and will have the NSX tech remedy this issue, too, I will print out this thread for him to go by, thank you!
 
Back
Top