


This is the best rebuilt on any of these CTSC's i've ever seen. Great find! This is huge for the community assuming Jon Bond can do more.
-
Protip: Profile posts are public! Use Conversations to message other members privately. Everyone can see the content of a profile post.
You are using an out of date browser. It may not display this or other websites correctly.
You should upgrade or use an alternative browser.
You should upgrade or use an alternative browser.
bogle's 1991 mild build thread
- Thread starter bogle
- Start date

Cant wait to get it going! Yeah they seem to have a lot of knowledge about this blower and the comptech kits. Sounds like they’ve been working with these blowers since they came out and are privy to all the changes and reasons for them. At a minimum they are a great source for parts. They are sort of the only place on the internet I was able to find things like the dipstick, gaskets, specific oil, etc.
That said, it wasn’t cheap. Knowing what I know now, I could have sold this kit at a bit of a discount, bought the new SoS sc kit, and only paid a small spread. But it is what it is. This thing has plenty of power and does it reasonably efficiently
That said, it wasn’t cheap. Knowing what I know now, I could have sold this kit at a bit of a discount, bought the new SoS sc kit, and only paid a small spread. But it is what it is. This thing has plenty of power and does it reasonably efficiently
Supercharger mounted
I’ve been slowly chipping away at putting the car back together. The weather’s been nicer so the girl doesn’t want me in the garage all weekend. Gotta keep the peace and also slot in honey-dos. I get an hour here or there for the car. Yesterday I was able to get the manifold back together and on the engine. Still a lot to do, but big milestone achieved.
First up was getting the blower bolted up to the manifold. Big reasons for pulling the supercharger was sandwiching an AS Motorsports phenolic plate between the blower and manifold, then moving the WMI nozzle into the manifold to spray after the blower.
When it’s running and I have data, I’ll do a special post or thread on the phenolic plate with details and all the parts I needed to make it work. But tl;dr: it should insulate the blower from the engine heat, and let the spray focus on cooling the intake charge instead of the TB and rotors.
One inch phenolic plate on the manifold:

Then blower attached:

Something that was unclear to me when buying the plate was: what is the orientation of the nozzle in the plate? Well here you go: it goes under the drive snout, so passenger side of the car.

Then onto the underside of the manifold. There are a lot of bits that chill in the valley between the heads. First up was the bypass elbow. I got new clamps and a new silicone 6” hose to connect the elbow

Bypass elbow installed. You can see the 1” extension here necessary because the phenolic plate raises the blower up an inch.

Also on there are a couple new vacuum lines: between the bypass and the diaphragm, one to the FPR, and one to the map sensor.
The last thing there is a new aftermarket map sensor (it’s a lowdoller 2 bar). The car had one already on there with a mystery connector zip tied to the throttle cable, probably for the dyno. I replaced it with a known sensor and made a new harness with known wiring. The harness will have a plug that hangs out somewhere accessible on a proper oem connector stay.
I triple checked everything was tight, then put the whole unit (minus tb) on the car.

I did this on my own. It was hard, the whole package is heavy, awkward, and there are things kinda in the way preventing a clean plop down. After a couple stressful minutes it was on and brand new bolts/nuts were torqued.
I gotta say working with brand new and/or super clean parts is awesome. Everything about the manifold is new, freshly coated, or heavily cleaned. I wish this were the case all car projects. Working on the car without getting dirty is the dream.
Next project is connecting everything up!
I’ve been slowly chipping away at putting the car back together. The weather’s been nicer so the girl doesn’t want me in the garage all weekend. Gotta keep the peace and also slot in honey-dos. I get an hour here or there for the car. Yesterday I was able to get the manifold back together and on the engine. Still a lot to do, but big milestone achieved.
First up was getting the blower bolted up to the manifold. Big reasons for pulling the supercharger was sandwiching an AS Motorsports phenolic plate between the blower and manifold, then moving the WMI nozzle into the manifold to spray after the blower.
When it’s running and I have data, I’ll do a special post or thread on the phenolic plate with details and all the parts I needed to make it work. But tl;dr: it should insulate the blower from the engine heat, and let the spray focus on cooling the intake charge instead of the TB and rotors.
One inch phenolic plate on the manifold:
Then blower attached:
Something that was unclear to me when buying the plate was: what is the orientation of the nozzle in the plate? Well here you go: it goes under the drive snout, so passenger side of the car.
Then onto the underside of the manifold. There are a lot of bits that chill in the valley between the heads. First up was the bypass elbow. I got new clamps and a new silicone 6” hose to connect the elbow
Bypass elbow installed. You can see the 1” extension here necessary because the phenolic plate raises the blower up an inch.
Also on there are a couple new vacuum lines: between the bypass and the diaphragm, one to the FPR, and one to the map sensor.
The last thing there is a new aftermarket map sensor (it’s a lowdoller 2 bar). The car had one already on there with a mystery connector zip tied to the throttle cable, probably for the dyno. I replaced it with a known sensor and made a new harness with known wiring. The harness will have a plug that hangs out somewhere accessible on a proper oem connector stay.
I triple checked everything was tight, then put the whole unit (minus tb) on the car.
I did this on my own. It was hard, the whole package is heavy, awkward, and there are things kinda in the way preventing a clean plop down. After a couple stressful minutes it was on and brand new bolts/nuts were torqued.
I gotta say working with brand new and/or super clean parts is awesome. Everything about the manifold is new, freshly coated, or heavily cleaned. I wish this were the case all car projects. Working on the car without getting dirty is the dream.
Next project is connecting everything up!
Last edited:
It’s alive
Everything is back together! I fired up the car for the first time today! It’s been down for almost 6 months, feels good. I still haven’t driven it yet tho
Here it is cooling down after the post-coolant-bleed run:

There are a million details in there. I’ll add a couple other posts soon explaining everything.
Coolant fill and bleed
Adding coolant was the last project before firing it up. I was dreading the process. Fortunately it went pretty smoothly for me, but was time consuming, burning half the day.
I followed Kaz’s guide in honcho’s build thread. I initially bought a vacuum tool to aid filling, but after reading kaz’s post, I just used a big coolant funnel for both the fill and bleed.

The rough process for me was basically to fill with all the bleeders open, then run through kaz’s steps a few times in bleeder order: thermostat, radiator, heater, firewall.
Fill:
-open all 3 bleeders and the top petcock on the radiator
-make sure heater valve was open (set car temp to 90)
-fill coolant via the big funnel. It accepted about 3 gallons before the bleeders started spewing
-close the bleeders in the order they started bleeding: firewall bleeder, radiator, heater bleeder, then lastly the thermostat bleeder. I had a hose on the thermostat bleeder into a container so I was able to close it last.
Then I bled based on kaz’s post:
-fill the funnel half way up (waaay above the top of the tank)
-open thermostat bleeder and bleed half a gallon
-fill funnel again
-open radiator petcock until it’s a steady stream (messy)
-fill funnel again
-open heater bleeder and collect a half gallon
-fill funnel again
-open firewall bleeder and collect half gallon
-fill funnel again
-bleed the thermostat cover again
I put the rad cap on to the first notch, started the car for 30 seconds, and did the bleed process above all over again.
In the end I ended up bleeding a half gallon from the thermostat cover 2 extra times because there were a ton of little bubbles coming out the prior bleeds.

Maybe this was block air via the little hole in the thermostat? Idk
After bleeding, I put the rad cap on to the first notch and started the car. I connected the laptop so I could watch the temp and also mess with idle. With all the changes I made, the car of course idled totally differently. It no longer idles high when cold, and then when warm it idled on the lean side. Le sigh. Never ending fiddling.
Maybe cold idle issue is the fast idle valve? Could have something do do with the new diaphragm? It pulls a bit more vacuum at idle than it did before…
In any case, it got up to temp and held at 176-180. Operating temp with the sensor scale I have in the ECU is 176. It’d hit about 180, the fan would kick on, then it’d go back down to 176. Cool, normal behavior.
The coolant tank went from max to min during warmup. After it cooled down I topped it up.
Random question, reading the coolant level on the oem tank is impossible through the little window on the type-r condom. Even shining a light behind parts of it does not really help. Any tips on easy reading of the level? Maybe my tank is just really opaque…
Everything is back together! I fired up the car for the first time today! It’s been down for almost 6 months, feels good. I still haven’t driven it yet tho
Here it is cooling down after the post-coolant-bleed run:
There are a million details in there. I’ll add a couple other posts soon explaining everything.
Coolant fill and bleed
Adding coolant was the last project before firing it up. I was dreading the process. Fortunately it went pretty smoothly for me, but was time consuming, burning half the day.
I followed Kaz’s guide in honcho’s build thread. I initially bought a vacuum tool to aid filling, but after reading kaz’s post, I just used a big coolant funnel for both the fill and bleed.
The rough process for me was basically to fill with all the bleeders open, then run through kaz’s steps a few times in bleeder order: thermostat, radiator, heater, firewall.
Fill:
-open all 3 bleeders and the top petcock on the radiator
-make sure heater valve was open (set car temp to 90)
-fill coolant via the big funnel. It accepted about 3 gallons before the bleeders started spewing
-close the bleeders in the order they started bleeding: firewall bleeder, radiator, heater bleeder, then lastly the thermostat bleeder. I had a hose on the thermostat bleeder into a container so I was able to close it last.
Then I bled based on kaz’s post:
-fill the funnel half way up (waaay above the top of the tank)
-open thermostat bleeder and bleed half a gallon
-fill funnel again
-open radiator petcock until it’s a steady stream (messy)
-fill funnel again
-open heater bleeder and collect a half gallon
-fill funnel again
-open firewall bleeder and collect half gallon
-fill funnel again
-bleed the thermostat cover again
I put the rad cap on to the first notch, started the car for 30 seconds, and did the bleed process above all over again.
In the end I ended up bleeding a half gallon from the thermostat cover 2 extra times because there were a ton of little bubbles coming out the prior bleeds.
Maybe this was block air via the little hole in the thermostat? Idk
After bleeding, I put the rad cap on to the first notch and started the car. I connected the laptop so I could watch the temp and also mess with idle. With all the changes I made, the car of course idled totally differently. It no longer idles high when cold, and then when warm it idled on the lean side. Le sigh. Never ending fiddling.
Maybe cold idle issue is the fast idle valve? Could have something do do with the new diaphragm? It pulls a bit more vacuum at idle than it did before…
In any case, it got up to temp and held at 176-180. Operating temp with the sensor scale I have in the ECU is 176. It’d hit about 180, the fan would kick on, then it’d go back down to 176. Cool, normal behavior.
The coolant tank went from max to min during warmup. After it cooled down I topped it up.
Random question, reading the coolant level on the oem tank is impossible through the little window on the type-r condom. Even shining a light behind parts of it does not really help. Any tips on easy reading of the level? Maybe my tank is just really opaque…
I use one of these flexible bar-style LED work lights from HF. If you shove it behind the bottle, you get a very bright indicator.Random question, reading the coolant level on the oem tank is impossible through the little window on the type-r condom. Even shining a light behind parts of it does not really help. Any tips on easy reading of the level? Maybe my tank is just really opaque…

Thanks for the pic! I did do something like that but still could hardly read it. It was kinda sunny in the garage today, maybe it just needs to be darker ambient. I ended up pulling the cover up a bit and putting the light behind it, but still really hard to read
I hadn't thought of doing it Paul's way. I need to try that. I do it the exact opposite. I shine a bright light outside the window and look from inside thru the radiator cap opening. Kind of a pain
Little stuff
As mentioned there were a million details that went into putting the car back together. Here’s kinda a pic dump
Spoon rad cap, gotta have the bling. I wanted the Mugen one for no reason, but could only find it from king motorsports and they wanted to charge me like $30 shipping. Seemed excessive so I got the spoon one instead.

Torquing the front block drain was a pain. I managed to torque it with the extension going through this little space.

Harness plug brackets
I got a bunch of random brackets my car was missing and some others that could help holding plugs for aftermarket wiring
First one is for the k-series coil harness plug. This plug was for the igniter and I couldn’t figure out where to route it in the last configuration. With the supercharger much higher off the block, there is more space. This crazy bracket is for something on the front of the head iirc, but it works here…

My knock sensor harness plug bracket was missing. Yay brand new one:


I have a map sensor on the bottom of the intake manifold for maybe the dyno or I could feed it into the can bus. I dunno yet. It needed a place to live. Previously to the rebuild there was a map sensor already there, but it was an unknown plug zip tied to the throttle cable. Zip ties in a prominent location are ghetto, instead I used a bracket originally for the o2 sensor plug on the rear head. It worked out nicely:

I also added a whole bunch of zip tie clippy things all over cause all mine are broken:

As mentioned there were a million details that went into putting the car back together. Here’s kinda a pic dump
Spoon rad cap, gotta have the bling. I wanted the Mugen one for no reason, but could only find it from king motorsports and they wanted to charge me like $30 shipping. Seemed excessive so I got the spoon one instead.
Torquing the front block drain was a pain. I managed to torque it with the extension going through this little space.
Harness plug brackets
I got a bunch of random brackets my car was missing and some others that could help holding plugs for aftermarket wiring
First one is for the k-series coil harness plug. This plug was for the igniter and I couldn’t figure out where to route it in the last configuration. With the supercharger much higher off the block, there is more space. This crazy bracket is for something on the front of the head iirc, but it works here…
My knock sensor harness plug bracket was missing. Yay brand new one:
I have a map sensor on the bottom of the intake manifold for maybe the dyno or I could feed it into the can bus. I dunno yet. It needed a place to live. Previously to the rebuild there was a map sensor already there, but it was an unknown plug zip tied to the throttle cable. Zip ties in a prominent location are ghetto, instead I used a bracket originally for the o2 sensor plug on the rear head. It worked out nicely:
I also added a whole bunch of zip tie clippy things all over cause all mine are broken:
Hardlines
Something that’s bothered me forever was how chipped the hardlines on top of the engine were. There is this vacuum line block:

And then the combination crankcase breather / coolant line. MotorMouth93 sold me his and even painted it for me!

I bought a new vacuum block:

You have to cut the passenger side mount as it interferes with the sc intake snout.

The oem finish was still not great and I had that chopped off bit, so I painted it black.
Both installed:

Because of the supercharger and the new phenolic plate, both of these pieces needed some massaging. For example, it hit the strut bar

Then massaged:

It also rubbed on the sc snout, so I had to bend the mounting bracket a bit to make it fit and clear everything. Look close, the bracket is rotated:

Something that’s bothered me forever was how chipped the hardlines on top of the engine were. There is this vacuum line block:
And then the combination crankcase breather / coolant line. MotorMouth93 sold me his and even painted it for me!
I bought a new vacuum block:
You have to cut the passenger side mount as it interferes with the sc intake snout.
The oem finish was still not great and I had that chopped off bit, so I painted it black.
Both installed:
Because of the supercharger and the new phenolic plate, both of these pieces needed some massaging. For example, it hit the strut bar
Then massaged:
It also rubbed on the sc snout, so I had to bend the mounting bracket a bit to make it fit and clear everything. Look close, the bracket is rotated:
Airbox
The Airbox was ashy and the sticker was bubbling. Must clean, very prominent:

Solution finish is magic

New sticker


Cleaned comptech air filter (I oiled it after this!)

New hose clamps

Then installed

Oh yeah, supercharger and everything was raised up an inch. I had to put standoffs under the airbox. It’s still too low, but this was as good as I could get it with stuff I had on hand:

The Airbox was ashy and the sticker was bubbling. Must clean, very prominent:
Solution finish is magic
New sticker
Cleaned comptech air filter (I oiled it after this!)
New hose clamps
Then installed
Oh yeah, supercharger and everything was raised up an inch. I had to put standoffs under the airbox. It’s still too low, but this was as good as I could get it with stuff I had on hand:
WMI nozzle
The WMI nozzle was in the intake tube pre-TB, but now it’s in the phenolic plate, post-supercharger. Cool.
I needed to get line from the driver side over to under the drive snout. So new line with 1/4” ID fire sleeve

It comes out the solenoid on the drivers side:

Passes by the front injectors and ends up in the nozzle under the drive snout:

The WMI nozzle was in the intake tube pre-TB, but now it’s in the phenolic plate, post-supercharger. Cool.
I needed to get line from the driver side over to under the drive snout. So new line with 1/4” ID fire sleeve
It comes out the solenoid on the drivers side:
Passes by the front injectors and ends up in the nozzle under the drive snout:
Fuel lines
Through the whole process, I noticed that there were tiny cracks on part of the outer layer of the fuel return line:

They freaked me out. Shad from driving ambition made the lines, so I emailed him asking him if I should replace it. He said, no, it’s fine, it won’t leak or cause issues. It’s sort of normal for this particular hose, the outer layer doesnt like UV at all. Okay.
Well, I don’t want it to get worse and I don’t want any of the other lines to develop them, so I wrapped all the lines in more fire sleeve. My lines are -6AN and this stuff is 1/2” ID

This place (anhosefittings.com) also sold shrink tube for the ends of fuel lines. Seemed clean:

Alright, return line before:

And after

Then all of them wrapped

Through the whole process, I noticed that there were tiny cracks on part of the outer layer of the fuel return line:
They freaked me out. Shad from driving ambition made the lines, so I emailed him asking him if I should replace it. He said, no, it’s fine, it won’t leak or cause issues. It’s sort of normal for this particular hose, the outer layer doesnt like UV at all. Okay.
Well, I don’t want it to get worse and I don’t want any of the other lines to develop them, so I wrapped all the lines in more fire sleeve. My lines are -6AN and this stuff is 1/2” ID
This place (anhosefittings.com) also sold shrink tube for the ends of fuel lines. Seemed clean:
Alright, return line before:
And after
Then all of them wrapped
Might I suggest against using a high pressure radiator cap. With a good radiator there's no need to increase the system pressure of which it just adds pressure stresses to the cooling system.
Yeah the path to the higher pressure cap was kinda winding. I suppose you haven’t have any issues with the stock cap even on the track, eh?
I was originally going to run the oem cap. When buying the catch can setup from SoS, I looked around for other random stuff I might want. They sell a a radiator cap and the page for it it says:
ScienceofSpeed previously reported new factory expansion caps failing. A batch of factory caps were tested. Factory caps are holding only 8-12 PSI. This creates an increased of coolant fluid boiling resulting in less efficient cooling of the engine and potential damage.
So sometimes maybe the oem caps don’t hold rated pressure. Not ideal. I bought their Sankei cap, but looked around and did some reading. I planned on (and now am) running one gallon of distilled water which would put my mixture at about 60% water. More water than coolant results in slightly better cooling performance, but also a lower boiling point. A higher max cap pressure raises the boiling point, and this 1.3bar max one pushes it back up to just about where it would be with 50/50 mixture (3 deg F per psi max cap pressure)
Unless I am not understanding all this correctly, under normal conditions, the pressure in the system would be the same between the high and low pressure caps. The higher pressure situation should only happen if I get close to actual boiling point (like 270 deg iirc). I am super paranoid about the temps and I would chill if the coolant temp ever got remotely close to that anyway.
The thought with the higher cap pressure is 2 things: it will probably hold at least stock pressure without boiling, and my max boiling point should be about the same as with the stock cap and 50/50 mixture
This is my understanding and also these have been the result of our extensive yet relatively brute force crude testings (i.e. not lab tested but real life tested) with the MASiV.
Cliff Notes: Stock cap is best even if it can't hold higher pressure than ambient IMHO. If your system is going past the boiling point of water you might have bigger issues? That's kind of my mindset, which might not be ideal - I get that.
Boiling point of 50/50 is ~223F. The NSX with a MASiV has a hard time getting past 200F and in our testing I've gone as high as 206F in 140F Palm Springs Thermal track temps. That's a really extreme example. IIRC Correctly Coz and Ravi see even hotter but they don't usually go over 210-215F max and they both have built race motors. I can check with them again if you'd like me to. The point being... just straight distilled water boils at 212F so the water doesn't turn to gas until past that. The boiling point goes up 3° F for every pound of pressure (psi) so you're not really increasing the boiling point much with a "racing radiator cap" anyway, but the pressure increase can be significant. I like to have a soft stock radiator cap to bleed off pressure early. It's just added safety in my mind. Hell, i'd take one of those faulty SoS caps anyday! My ECT never gets hot enough to need the extra overhead anyway. So, in a 50/50 we've never seen ECT it go past 223F so even if you left the cap open to atmosphere a 50/50 mix is still not going to turn to gas.
Therefore, I just don't see the point of pressurizing the system more than necessary. Those poor rubber hoses, but in reality it's the entire cooling system from the radiator, tank, hoses, head gasket, water pump, etc.
Note: In my car I do think I have some kind of a very small leak that introduces air into the system when my car gets hot. This is the only way I can explain why my cooling system is pressurized. It hasn't been a problem and I don't loose coolant, nor am I burning any but the pressure build up is still occurring on my 1bar oem cap.
Hopefully that made some kind of sense. I've had a long day lol
Last edited:
- Joined
- 12 May 2023
- Messages
- 7
Nice build. I remember watching this on BaT back in 2020 and thinking that it would go higher than it did.
Thanks for the info @RYU, so far after one drive, the masiv radiator seems to keep things a couple degrees cooler than before. Data coming soon…
Thanks @extraextra! I also honestly thought it would go higher. It was my first bid and no one outbid me. Now that I’m in it this deep, though, turns out it needed a lot!
Thanks @extraextra! I also honestly thought it would go higher. It was my first bid and no one outbid me. Now that I’m in it this deep, though, turns out it needed a lot!
A couple tiny things.
I finally have a good way to read coolant level. It was just too bright in the garage last time. I shut the garage door and the light truck works for me:

I bled the heater again twice more. Once after running it until the fans kicked on and it cooled down. There was a ton of hissing!

I bled it again after a proper drive + overnight cooldown. After the drive, no air bubbles came out, so I guess it should be in a reasonable state. Both times it required filling the tank up from min to max. The system took a hair over 4 gallons total, all in, which seems normal?
I tensioned the belt:

The tension gauge pushes the blue bit up to give a reading. It seems really imprecise, but actually gives pretty consistent readings.

Since the beginning of the issues with the sc prior to rebuild, I’ve been measuring the belt tension under different situations. I learned that new belts stretch a lot, and when fully stretched out, they are much tighter when hot than they are when cold. Even after 2 run cycles and a drive, this new belt still seems to be stretching out. More data to come when it’s finished stretching and not producing boost fade.
Topped up all the fluids after running it. I used the Jon bond oil for the supercharger. For posterity, it took 120ml from totally dry

Ok! I have a bit of air temp and coolant data from the drive to share soon!
I finally have a good way to read coolant level. It was just too bright in the garage last time. I shut the garage door and the light truck works for me:
I bled the heater again twice more. Once after running it until the fans kicked on and it cooled down. There was a ton of hissing!
I bled it again after a proper drive + overnight cooldown. After the drive, no air bubbles came out, so I guess it should be in a reasonable state. Both times it required filling the tank up from min to max. The system took a hair over 4 gallons total, all in, which seems normal?
I tensioned the belt:
The tension gauge pushes the blue bit up to give a reading. It seems really imprecise, but actually gives pretty consistent readings.
Since the beginning of the issues with the sc prior to rebuild, I’ve been measuring the belt tension under different situations. I learned that new belts stretch a lot, and when fully stretched out, they are much tighter when hot than they are when cold. Even after 2 run cycles and a drive, this new belt still seems to be stretching out. More data to come when it’s finished stretching and not producing boost fade.
Topped up all the fluids after running it. I used the Jon bond oil for the supercharger. For posterity, it took 120ml from totally dry
Ok! I have a bit of air temp and coolant data from the drive to share soon!
One way I've had success measuring belt tension is by monitoring the boost curve. Not saying this is the best way but it sure has worked well for me.
1. Tighten the belt clearly over reasonable spec but not overtightened to where it would cause damage.
2. Log your target boost curve. Boost may drop a tiny bit... Approximately 1psi from max torque into redline. It's a slow downward sloping curve iirc
3. Start to loosen the belt until you notice a drop in boost up which is a sign of a slipping belt.
4. Tighten the belt until you notice zero boost drop.
5. Check the boost curve every so often and check if the belt is getting excessively hot. Make adjustments as necessary. Like your said belly stretch it's a thing but the original CT belt tensioner seems to have done a good job for me.
I've had the best luck with the lowest belt tension from the Goodyear Gatorback style belts.
Yep that’s the plan! The goal is to have good tension data when it bleeds and doesn’t bleed. Then when I need to set the tension again, I have a reference point. The tricky part is your first step: “Tighten the belt clearly over reasonable spec but not overtightened to where it would cause damage.” And the twist method is just guessing.
I have some data where it bleeds and doesn’t bleed from pre-rebuild. But every time I have run the car with the new belt, it has been significantly looser after. So kinda a moving target until it settles in.
It’s a continental elite belt which is what gatorback turned into.

I’m also planning to have griptec make me a pulley. With it I should be able to run a lower tension and not have any slip. I just have to ship them the high boost pulley so they can replicate it
I have some data where it bleeds and doesn’t bleed from pre-rebuild. But every time I have run the car with the new belt, it has been significantly looser after. So kinda a moving target until it settles in.
It’s a continental elite belt which is what gatorback turned into.
I’m also planning to have griptec make me a pulley. With it I should be able to run a lower tension and not have any slip. I just have to ship them the high boost pulley so they can replicate it
Last edited:
I drove the car several times over the last couple weekends. It has some quirks I have to work out but overall feels pretty good. I did a lot of tweaking and I feel like I have a decent sense for how things move.
Here's the engine in its current running state. I got new carbon fuel rail covers from Shad at driving ambition, they look good and really pop in the sun!

As a refresher, a number of things changed; the big chunks:
* The supercharger was rebuilt
* There is a 1" insulating plate between the supercharger and intake manifold
* The water meth nozzle was moved from before the throttle body to now spray after the supercharger
* A new Masiv radiator
Because of the new plate, the supercharger is now really prominent in the rear view mirror:

I also replaced some smaller things like new VTEC solenoids, new knock sensors, and all new coolant sensors. All that little stuff works. The knock sensors are less noisy than the old ones. It looks like it's going into VTEC and has the same oil pressure behavior in VTEC as before. Coolant sensors all work and appear to be the same scale as the prior sensors. Coolant level has stabilized, likely no more air bubbles. Also no leaks!
Air temps
A major goal of all this work was improving the air temps.
The supercharger tended to heat soak. For example: let it sit in a parking lot after driving then start it back up, air temps would be close to coolant temp. Then it'd be tough to get them down. The new insulating (phenolic) plate under the supercharger is supposed to solve this, it should keep the intake manifold heat from transferring to the supercharger.
I already have water / meth injection (WMI), but it seemed pretty inefficient with the nozzle in front of the throttle body. It used a lot of water and it was slow to reduce the intake temps. I'd go through a couple gears where the temp would spike pretty hard before it finally came down. Not great for a street car that is only in boost occasionally
You can read all about there air temp woes in this post in the build thread.
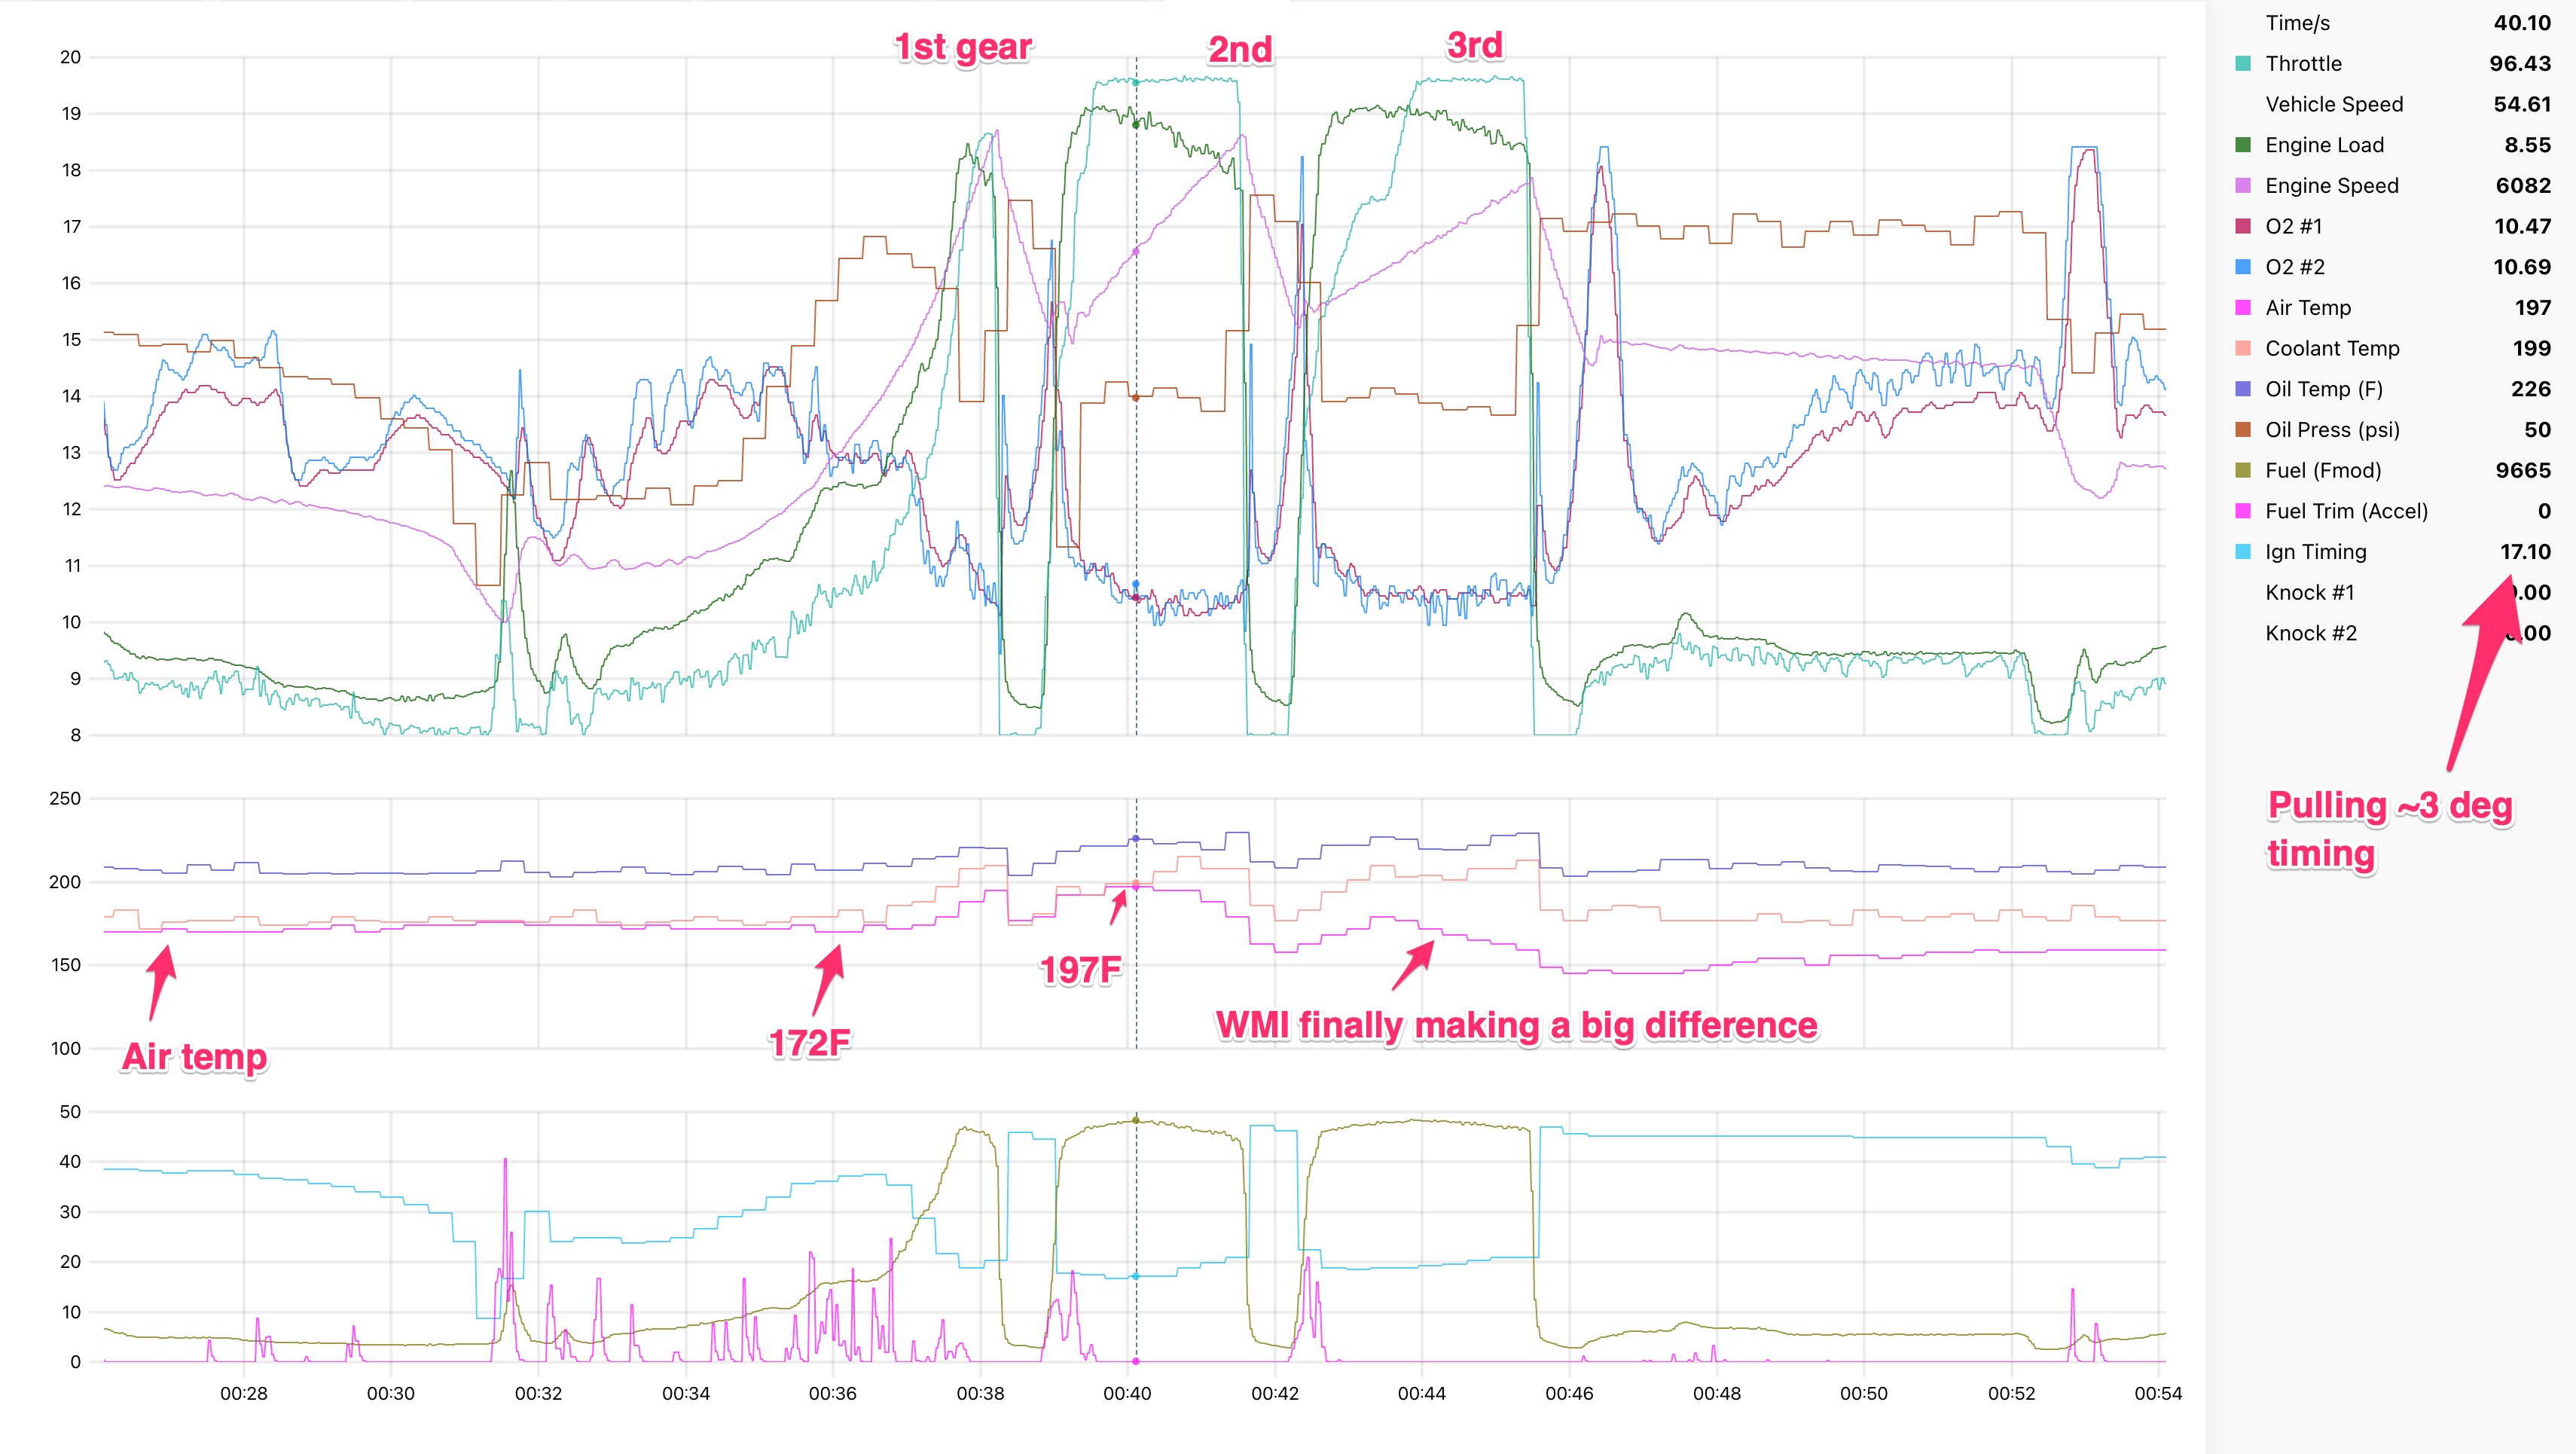
The pic below shows all the air temp issues from the previous setup. It was a hot day, I had stopped and started the car several times so the sc was fully heat soaked, and it took a while for the WMI to actually affect the air temps:
Soooo, is it better now??
Yes! It uses significantly less water and has a much larger and more immediate effect on air temps. I have it set up to use about 40% of the water it was using previously:

And some partial throttle action, you can see it has a huge effect bringing the temps pretty immediately down from 150 to 125

Heat soak tho
The promise of the phenolic plate is insulating the supercharger from the engine heat. I was hoping that it would totally eliminate heat soak, keeping the baseline cruising temp down in the 120s or 130s or so. For example, the pic of the new setup above shows the baseline temp at 125deg, then a lot lower after the pull. That was my expectation! I was pretty excited after seeing that.
Does that mean the heat soak is gone?! Nope, It's still there, but it does seem to be a little better.
After taking the 125F baseline logs above, I started and stopped the car several times to adjust the belt tension and tinker with other stuff. It would sit in the sun for 20 minutes, then I'd take it back out.
Baseline air temps with the new setup would hover right around 150 when heat soaked, then they'd come down during a pull. Better than 170-180, but still not amazing. Check it out:

Why? Over time, the supercharger itself seems to get really hot. No matter the belt tension, my temp gun would read around 180-185F on the gearcase and around 175F on the rotor housing.
Note in the pic above that after the pull, the temp pretty quickly returns to baseline, in this case 150. This feels like one downside to spraying water after the supercharger. When I was spraying before the supercharger, water would cool the sc and other parts down, reducing the baseline after the pull. I'm considering adding a second tiny nozzle in the old location in front of the throttle body just to cool the sc itself down a bit.
Here's the engine in its current running state. I got new carbon fuel rail covers from Shad at driving ambition, they look good and really pop in the sun!
As a refresher, a number of things changed; the big chunks:
* The supercharger was rebuilt
* There is a 1" insulating plate between the supercharger and intake manifold
* The water meth nozzle was moved from before the throttle body to now spray after the supercharger
* A new Masiv radiator
Because of the new plate, the supercharger is now really prominent in the rear view mirror:
I also replaced some smaller things like new VTEC solenoids, new knock sensors, and all new coolant sensors. All that little stuff works. The knock sensors are less noisy than the old ones. It looks like it's going into VTEC and has the same oil pressure behavior in VTEC as before. Coolant sensors all work and appear to be the same scale as the prior sensors. Coolant level has stabilized, likely no more air bubbles. Also no leaks!
Air temps
A major goal of all this work was improving the air temps.
The supercharger tended to heat soak. For example: let it sit in a parking lot after driving then start it back up, air temps would be close to coolant temp. Then it'd be tough to get them down. The new insulating (phenolic) plate under the supercharger is supposed to solve this, it should keep the intake manifold heat from transferring to the supercharger.
I already have water / meth injection (WMI), but it seemed pretty inefficient with the nozzle in front of the throttle body. It used a lot of water and it was slow to reduce the intake temps. I'd go through a couple gears where the temp would spike pretty hard before it finally came down. Not great for a street car that is only in boost occasionally
You can read all about there air temp woes in this post in the build thread.
The pic below shows all the air temp issues from the previous setup. It was a hot day, I had stopped and started the car several times so the sc was fully heat soaked, and it took a while for the WMI to actually affect the air temps:
Soooo, is it better now??
Yes! It uses significantly less water and has a much larger and more immediate effect on air temps. I have it set up to use about 40% of the water it was using previously:
And some partial throttle action, you can see it has a huge effect bringing the temps pretty immediately down from 150 to 125
Heat soak tho
The promise of the phenolic plate is insulating the supercharger from the engine heat. I was hoping that it would totally eliminate heat soak, keeping the baseline cruising temp down in the 120s or 130s or so. For example, the pic of the new setup above shows the baseline temp at 125deg, then a lot lower after the pull. That was my expectation! I was pretty excited after seeing that.
Does that mean the heat soak is gone?! Nope, It's still there, but it does seem to be a little better.
After taking the 125F baseline logs above, I started and stopped the car several times to adjust the belt tension and tinker with other stuff. It would sit in the sun for 20 minutes, then I'd take it back out.
Baseline air temps with the new setup would hover right around 150 when heat soaked, then they'd come down during a pull. Better than 170-180, but still not amazing. Check it out:
Why? Over time, the supercharger itself seems to get really hot. No matter the belt tension, my temp gun would read around 180-185F on the gearcase and around 175F on the rotor housing.
Note in the pic above that after the pull, the temp pretty quickly returns to baseline, in this case 150. This feels like one downside to spraying water after the supercharger. When I was spraying before the supercharger, water would cool the sc and other parts down, reducing the baseline after the pull. I'm considering adding a second tiny nozzle in the old location in front of the throttle body just to cool the sc itself down a bit.
Where did you source the Masiv radiator from? I've been looking for one.
This brings back memories! Great job. I had also concluded that the phenolic plate didn't prevent heatsoak as much as I expected but given that the IAT sensor in my setup was after the phenolic plate I attributed some of that heat as coming from a heat soaked IAT sensor itself and the metal around it - pure speculation but my best guess.
Do you have your old CF injector covers? I'm in search of the front bank or even both.
Do you have your old CF injector covers? I'm in search of the front bank or even both.
Where did you source the Masiv radiator from? I've been looking for one.
I got it from @RYU below a long time ago. You’ll have to ask him to see state of things with them.
This brings back memories! Great job. I had also concluded that the phenolic plate didn't prevent heatsoak as much as I expected but given that the IAT sensor in my setup was after the phenolic plate I attributed some of that heat as coming from a heat soaked IAT sensor itself and the metal around it - pure speculation but my best guess.
Do you have your old CF injector covers? I'm in search of the front bank or even both.
Thanks! I’ve been worried about my IAT sensor in the past, so now it is super insulated. The sensor itself is also designed to not heat soak. It now has a silicone gasket and PEEK plastic bolts:

I think the heat is just from the sc itself. The case gets pretty hot, def over 150F. I assume the rotors are similar. That’s why I think I’ll try a little nozzle before the TB just to see if I can lower the baseline
I only have the old front Kevlar cover and it’s is in really rough shape. The detailer a while back used some chemical on it that made it all cloudy. I’ll take them off before detailing next time!
Last edited:
Ben got literally one of the last ones from the last batchWhere did you source the Masiv radiator from? I've been looking for one.

Similar threads
- Locked
- Replies
- 4
- Views
- 387