• Protip: Profile posts are public! Use Conversations to message other members privately. Everyone can see the content of a profile post.

Dang oil pan gasket: new but leaking

Joined
16 August 2022
Messages
55
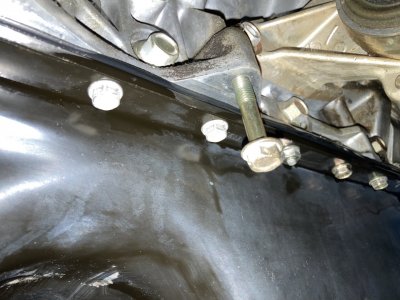
So, I read up on oil pan gasket installation before changing it while removing the small dent in the pan (which seemed to be successful). I got a new Fel-pro gasket, I elected to just use the Permatex Permashield only at the corners that correspond to the seams in the bottom of the block (I applied it to the top of the gasket and the bottom of the block). I have a 1/4" Tekton clicker torque wrench and torqued the bolts in sequence per the FSM, first to 42 in-# and then to 84 in-#. Despite all of the above, I have seeping after simply filing the sump! Grrrr. Any recommendations? Can I re-use the new gasket or should I get another? Incidentally, it looks quite squished out the side to me in spite of the low torque?Image(48).jpeg
 

Attachments

  • Image(47).jpeg
    Image(47).jpeg
    254.5 KB · Views: 11
I would be inclined to order a new gasket. I use Permatex Permashield almost exclusively and it allows for repeated separation of parts when it is used in place of the gasket (metal to metal flange). You are using it as a gasket dressing which falls within the Permashield use guide (this is the way I also typically use it) ; but, I don't know whether the gasket will survive when you separate the pan.

The instructions for Permashield are kind of minimal. It just says "Apply thin film or bead to both surfaces". I have always assumed that since Permashield is intended as a gasketless flange sealant, this meant apply Permashield to both sides of the surfaces to be mated. In this case, if you were assembling without a gasket, you would run a bead on the mating surfaces of the oil pan and the block surface. If you are using a gasket, then I would run a bead on the block surface, a bead on the top side of the gasket, a bead on the bottom side of the gasket and a bead on the pan mating surface. This is what I did on a vintage '70s Volvo which was a chronic leaker from the pan and it seems to have fixed the issue.

First observation is that if you applied Permashield only to the top of the gasket and the bottom of the block. the gasket - pan interface remains unsealed. The second observation is that if you just apply the permashield in the corners, you potentially create a gap in the gasket - block mating surface between the corners because the pernashield in the corners does not squish to zero. If you followed the Permatex instructions to allow the Permashield to completely dry before assembling the parts this makes the Permashield even more resistant to being squished flat).

From personal experience, you do need to let the Permashield dry before assembling. Applying the Permashield to the mating surfaces and then assembling before it was dry resulted in a non sealing joint for me.
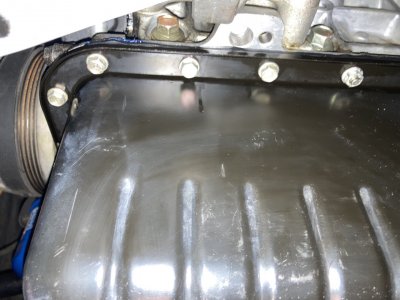
 
The oil pan gasket is just a really frustrating part of NSX ownership. You can re-use the gasket if it's been squished for only a short time. But, eventually the rubber will take a set and stay flat. You can usually tell by handling it- if the rubber appears to "spring back" when released from the pan, you're probably ok.

In my experience, most NSX oil pan leaks derive not from some kind of torque/installation error, but instead an inadequate prep of the mating surfaces. The pan, gasket and engine block surfaces need to be surgically clean. I wipe all of these with a microfiber soaked in acetone until I am satisfied. Also, I've noticed that the gasket itself (especially the aftermarket ones) usually has some amount of the rubber mold release agent left on the surface. I give it a quick wipe with the acetone to make sure I have pure rubber. All of this stuff can create a pathway for the oil to flow and leak through.

I can see from your picture that you look a little over-torqued around the Permatex (I prefer Hondabond, but that's just me). There really is no set torque value- it's when the gasket squishes out to the edge of the pan- yours looks like it went past that point.

Hope this helps.
 
If the Fel pro gasket is rubber then it should be re useable after cleaning. If it's the normal compressed kind of stuff that a lot of Fel pro gaskets are made from I am not sure that it would survive removal.
 
Just a follow up on this: I bought an OEM gasket. It came in a ball in a bag instead of nicely flattened on a big sheet of cardboard like the Fel-Pro (it also cost a bit more than 2x). I didn't like the packaging as much, but I swapped out the OEM gasket. Then I was certain to follow the torquing sequence in the FSM in 3 rounds. The first two rounds were just to snug them lightly by hand, and each round found them loose again so it was brining the entire pan tighter, and then the third time I torqued them to just 4 [HASH=56]#-ft[/HASH]. This method squeezed the gasket right to the edge of the flange on the pan around the entire perimeter, with no strange bulges anywhere. I elected to do this dry, without any RTV or gasket dressing. I haven't run the car yet, but it looks much better than before.
 
Back
Top