• Protip: Profile posts are public! Use Conversations to message other members privately. Everyone can see the content of a profile post.

Engine Mount Install with Pictures

Joined
11 June 2015
Messages
346
Location
Los Altos, CA
Good morning NSXPrime!

I was noticing a "clunk" when pulling into my garage or parking spaces, which I found was due to a torn front engine mount. I decided that it was time to replace all of them while I'm at it. In doing some research, I found 4 options at the moment:


  1. OEM - Most expensive, but usually can't go wrong with fitment or manufacturing issues
  2. SOS - They offer a core exchange program where they modify the original mounts with a more durable design (https://www.scienceofspeed.com/inde...ofspeed-sport-engine-transmission-mounts.html)
  3. Innovative - These were by far the cheapest option. However, they would require shorter bolts than factory, and the mounts are steel. Mixing steel and aluminum had me concerned about the possibility of corrosion in the future.
  4. Foundry3 - The set of all 4 is less expensive than OEM or SOS, the material is billet aluminum, and bushings that won't tear like OEM (https://www.foundry3studios.com/product/91-05-nsx-billet-motor-mounts). I must also add that these look absolutely beautiful!

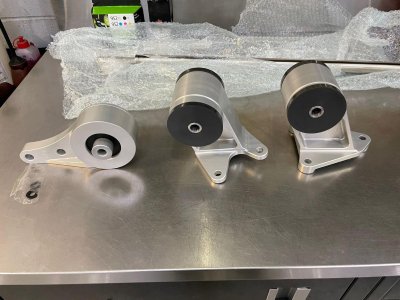
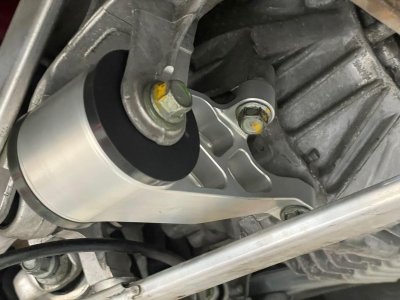
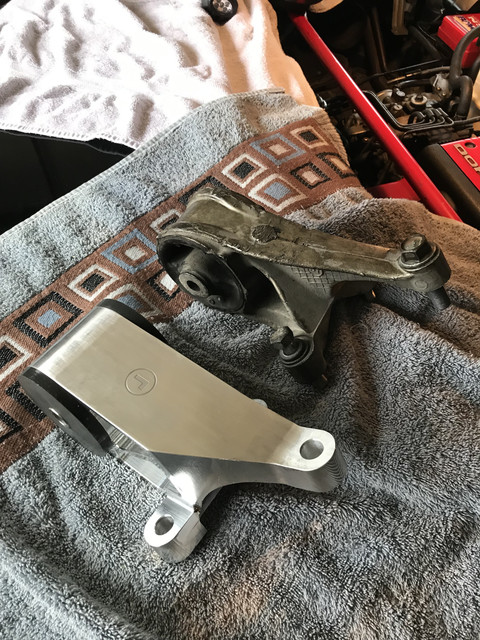
So I pulled the trigger and purchased the Foundry3 mounts. Chris was quick to provide the mounts and responsive during the purchase process. The mounts arrived exactly as advertised. Here is a side by side of the rear mount:


cCpggy7

cCpggy7


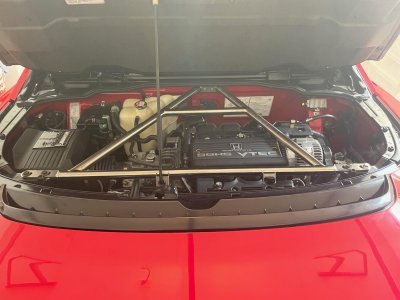
During my research, I found very few pictures or notes about engine mount replacement on NSXPrime, so I took a few pictures during the job and I've included a few notes to help out future owners replacing their mounts.

Lift the rear of the car and set on a pair of jack stands. Have a floor jack (with a 2x4) supporting the engine when changing the mounts.

Passenger Side Mount - You will need to remove the alternator first. Once removed, it is easy to swap the mount.


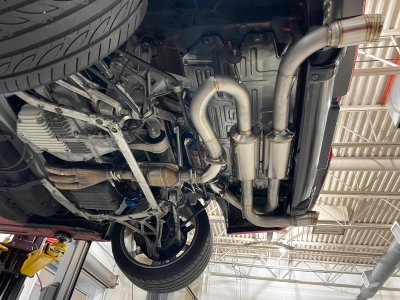
Driver Side Mount - Remove the air filter housing and a couple small hoisting brackets on the transmission.


Rear Mount - This is by far the easiest mount. If you are replacing only this mount, you can remove the 4 bolts on the rear of the brace below the mount and actually use a prybar to get the 1/2" of play needed to get one of the bolts out. If you are replacing the front mount as well, then you will need to remove the whole brace anyways, so just replace the rear after you have removed the brace. (I didn't do it in this order, and looking back it would have saved me an hour or so of work.)


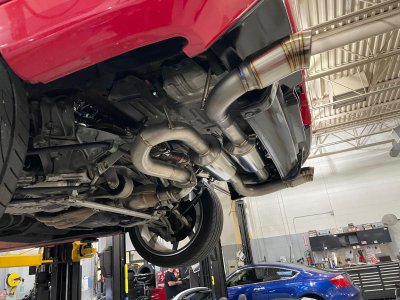
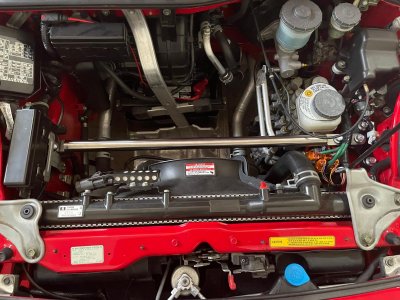
Front Mount - This is the most difficult mount. You will need to remove the shifter linkage to the transmission, the brace under the engine, and the cross-member. I recommend making sure you have a wobbly socket to access the engine mount bolt to loosen it. I couldn't imagine doing the job without that. Once the cross-member is removed, the mount is easily accessible for replacement.

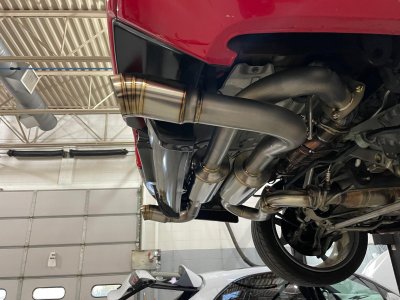
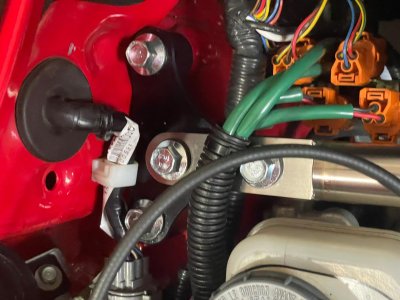
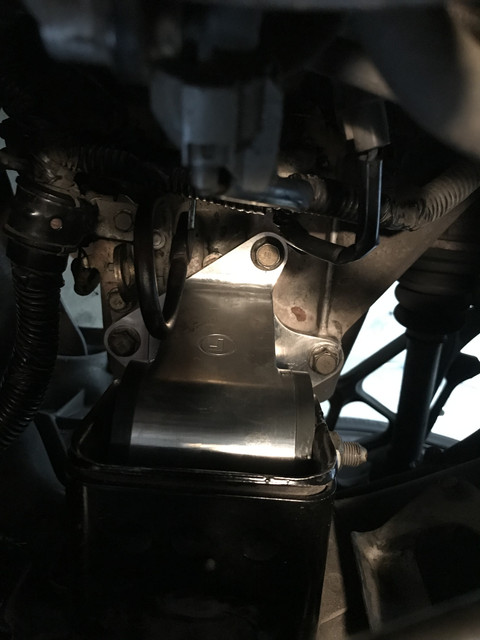
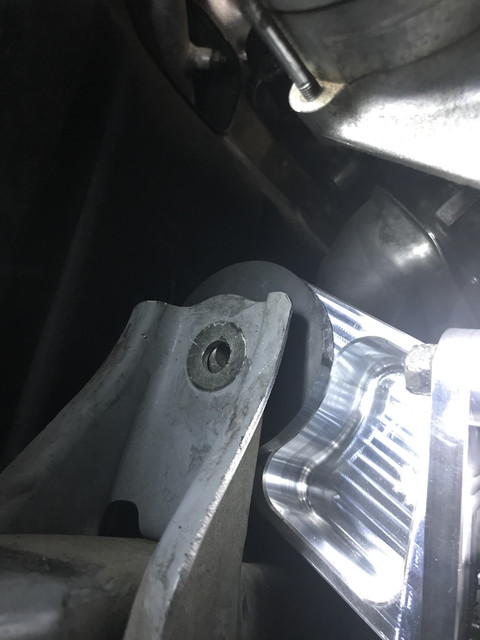
Now came the tricky part for me. I installed the new mount and after re-installing the cross-member, found that the mount did not quite line up with the hole anymore:


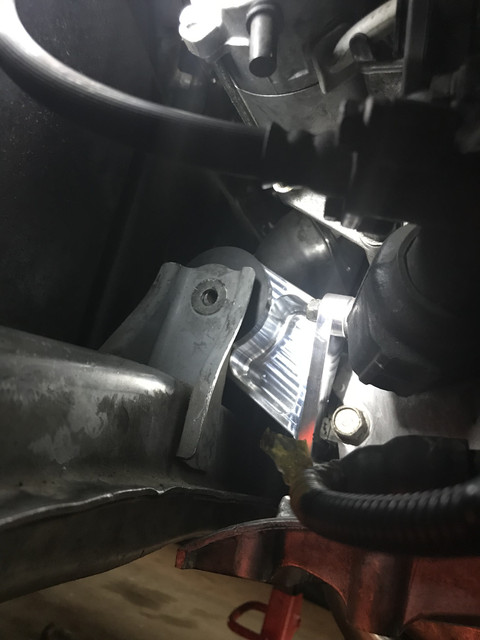
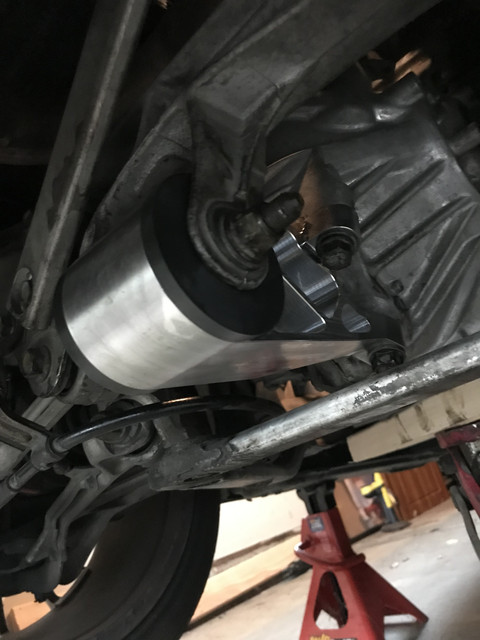
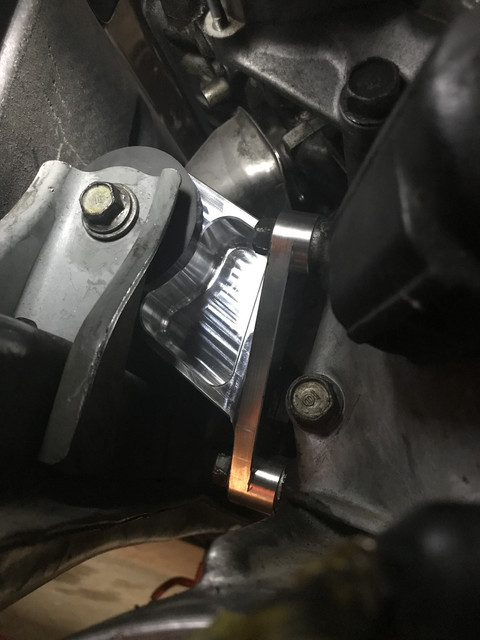
The above pictures were taken with the other 3 mounts already replaced. Ultimately, I had to go back to the rear mount and loosen it, then using a prybar on the rear mount, and the jack under the transmission, I was able to get this lined up:


I'm not sure if this would have been the same headache with OEM mounts, but I wanted to make a note of it here. Looking back, if I would have done the rear last, this job probably would have been a bit easier. Overall, the fitment of the drivers, passenger, and rear mounts was absolutely perfect. As mentioned above, the front mount did require a little work to line up, but the mounting fitment was perfect. I split this project in half, and found the drivers, passenger, and rear mount took about 2-3 hours total, and the front mount took about 4 hours.

Took the car for a drive afterwards, and immediately upon backing out of the garage I noticed an improvement. The "clunk" was gone and everything felt tighter when initially releasing the clutch from a stop.

I hope this write-up helps future owners. Feel free to PM me directly if you have any questions!
 
Great write up and glad it resolved your clunking issue.
As our cars get older, I image we will start to have more and more of these types of write ups to keep them on the roads.
 
Nice write up
Thanks for this.
Do you have a picture of the worn engine mounts?


Sent from my iPhone using Tapatalk
 
Nice write up
Thanks for this.
Do you have a picture of the worn engine mounts?


Sent from my iPhone using Tapatalk

Hey Warren!

Here's the old mounts. You can see the front mount is completely torn, and the rear is showing early signs of cracking. The sides are fine, but this was to be expected.

<a href="https://ibb.co/hZMQJbX"><img src="https://i.ibb.co/WP384ZD/IMG-5824.jpg" alt="IMG-5824" border="0"></a>
 
A set of factory NSX-R motor mounts is under $700 shipped from Japan so that's another option. (NSX-R used the normal left and right mounts that are the same across all M/T NSXs, NA2 front mount, and Zanardi rear mount.)

Nice writeup, I'm glad I decided to do my mounts with the engine out.

Good to know there's another option. Thank you!
 
Thanks, it is nice to see how they fail, so I can get under the car and take a look.
I couldn't tell what was going on for my front mount, but now I know what to look for.

Great to have the comparison from old to new.
 
Thanks, it is nice to see how they fail, so I can get under the car and take a look.
I couldn't tell what was going on for my front mount, but now I know what to look for.

Great to have the comparison from old to new.

Glad this helps Warren!
 
Engine Mounts

Hi Lude,
How are the mounts holding up? Do you feel that these are better than stock?
Great install notes. (thanks)
Best regards,
Dean
 
torque sequence

I see this is an older thread but I don't for see any mention of the mount torque sequence . This is very important when your dealing with a transverse engine tranny combo. I believe the NSX is Front ,Right ,Left ,Rear , I am sure someone can correct me if I am wrong (maybe Larry B ) .
I spent quite bit of time with a GM engineer dealing with the Oldsmobile Toronado when it first came out (yea I am an old bastard ) but he explained the drive train problems they were seeing with engine mounts . Now most smart techs are aware of the problems that can arise if the mounts are not torque properly , just dont want see anybody end up some end up with vibrations or clutch chatter.
 
This was all I found in the manual.
No specific order listed, but notes that the sequence should be followed (what sequence???).
I checked my 93 hard copy (page 5-30) and it was the same; no specific sequence (like on oil pan etc).
Sorry, not much help
Engine-Mounts.JPG
 
Great minds think alike!

In addition to a few other parts which were all as equally beautiful/well made, I bought the Foundry3 engine mounts as well. Build quality, as mentioned by Lude_2_NSX mentioned, are outstanding and absolutely gorgeous. Something Lude_2_NSX didn't mention however was the incredible care in how these mounts are wrapped. Using a combination of newspaper and something like saran wrap they were a little bit of a pain to unwrap but I'm pretty confident that these could have been thrown out of the cargo hold of an airplane and still arrived without a scratch or mark on any of them.

For anyone that's interested I asked to have mine powder-coated or anodized (I think he powder-coated them) to match the look/finish of the original mounts so they won't stand out and to the untrained eye, appear stock. I also bought their billet alternator mount (Which I also had powder coated to match the rest of the aluminum in the car) as well as their titanium targa brace and upper chassis bar. Each and every component were extremely well made and are genuine car-porn. Unfortunately I haven't installed any of it yet but hope to have that all done soon.

I know it's probably difficult to comment or quantify any improvement you experienced being that one of your original mounts were broken, but do you feel as if there are any noticeable changes/improvements?

We need pics!! :)
 
Oh don't you worry...

There will definitely be pics once we get around to installing them. The alternator bracket necessitates intake manifold R&R so I'm waiting on the gaskets. In the interim, and not to hijack the thread, here are a few pics of the titanium J's Racing exhaust I installed recently...
 

Attachments

  • IMG_7263.jpg
    IMG_7263.jpg
    271.4 KB · Views: 276
  • IMG_7265.jpg
    IMG_7265.jpg
    286.8 KB · Views: 273
  • IMG_7260.jpg
    IMG_7260.jpg
    207.3 KB · Views: 273
Interesting on the exhaust design...Does it sound like 2 tandem 3 cylinder engines...:eek:
 
Interesting on the exhaust design...Does it sound like 2 tandem 3 cylinder engines...:eek:

This is a similar layout to the old-school ARK DTS exhaust. On the NSX, a parallel system like this with no X-pipe has a much more raspy, rough sound. They sound really aggressive! I find it interesting that Mr. Umemoto went in this direction for the NSX, since the X-pipe sound is popular in Japan. Exhaust is gorgeous- can't wait to see it blued in!
 
Surprisingly there is ZERO rasp...

This is a similar layout to the old-school ARK DTS exhaust. On the NSX, a parallel system like this with no X-pipe has a much more raspy, rough sound. They sound really aggressive! I find it interesting that Mr. Umemoto went in this direction for the NSX, since the X-pipe sound is popular in Japan. Exhaust is gorgeous- can't wait to see it blued in!


Good observation by both docjohn and Honcho in that there isn't ANY type of cross-over. No X-pipe, H-pipe or anything of the sort. Somewhat surprisingly it has ZERO "rasp" and actually has a very nice, smooth, deep "burble". A few co-workers joked that I must out a V8 in the car and even the people who thought I was crazy for changing the exhaust admitted that it sounds really good. Unfortunately I can't figure out how to upload a video file otherwise I'd have posted it by now.

I'm curious about how much the exhaust will discolor over time. As it was made to order (It took almost 11 months to get) I asked for the natural titanium finish and not to "blue" any part of the exhaust. If that happens as a natural result from exhaust heat, great, but I'm not too hip on titanium that's intentionally blued during the manufacturing process. Same reason I got my targa brace and upper chassis brace in the natural titanium finish...
 
I just ordered a set of Foundry3 billet motor mounts. Kuya Automotive had them in stock. After 30 years on the same mounts figure it’s time.
 
I have Innovative engine mounts, i wouldn't recommend.

Well, they are very competitively priced, however they are not billet bling like the ones here.

The reason why i wouldn't recommend, the top engine side mount simply does not fit without trimming. It's too big and clashes with the alternator bracket, the bolt holes are so close but don't line up, no matter how much you jiggle the engine about.

It took me good couple hour to fit, maybe longer, i was cautious not to remove too much material so took a little at a time.

If i was to purchase again, i would purchase some like the original post.

Just saving someone hassle trying to save a few bucks as the cheaper ones are more hassle than it's worth.
 
One thing to consider with the aftermarket mounts is the right-side. The OEM mount (and alternator bracket) is solid steel for a reason- it's a key structural member for the entire transaxle and carries a significant load. If you do decide to go aftermarket, I advise you keep the OEM right mount. I would not trust aluminum here, or welded steel.
 
Ti exhaust

There will definitely be pics once we get around to installing them. The alternator bracket necessitates intake manifold R&R so I'm waiting on the gaskets. In the interim, and not to hijack the thread, here are a few pics of the titanium J's Racing exhaust I installed recently...

Looks good.
 
FINALLY got them installed!

So I finally got my Foundry3 mounts installed now that spring like weather is more or less here in the north east. In addition, I installed their titanium front chassis brace and titanium targa brace. I still have their billet alternator bracket but the intake manifold gaskets I had ordered didn't arrive in time so I'll need to do them at another date. To echo Lude_2_NSX, these are VERY high quality and fitment was a breeze.
As I remarked in a PM to Lude_2_NSX I feel like shift quality has improved and MAYBE the steering is slightly more direct, but that could be my imagination. I've also noticed that the "staccato" engine note is a little more pronounced and I think there may be slightly more vibration. Here again that MAY be my imagination. I think there's a bit more gear whine from the transmission as well. It's slight and not unpleasant, but I don't recall it being that loud before the mounts. As I had just un-mothballed the car in order to get these parts installed I really didn't get the opportunity to get a good "before and after" feel. I'll have more input once I drive it a bit more.

Anyway, pictures are below. Note that I had them anodized to match the natural/sand cast aluminum so they don't stand out as obviously being aftermarket. While I am "resto-modding" the car so to speak I'm trying my best to keep the stock appearance...

P.S.) I took a pic of the scale as we weighed the car when we were done. It's down to 3027lbs with a full tank of fuel but WITHOUT the spare as the front chassis brace requires the spare to be removed,
 

Attachments

  • Mounts1.jpg
    Mounts1.jpg
    218.3 KB · Views: 135
  • Mounts2.jpg
    Mounts2.jpg
    308.4 KB · Views: 135
  • Mounts4.jpg
    Mounts4.jpg
    162.7 KB · Views: 130
  • Scale.jpg
    Scale.jpg
    304.7 KB · Views: 130
Last edited:
Foundry3 titanium upper chassis and targa braces

For anyone that's curious, here are a few pictures of the Foundry3 titanium upper chassis and targa braces. Like my exhaust, I opted for the natural finish titanium, and like everything else I've gotten from Foundry3, these are beautifully made with unmatched quality. Chris at Foundry3 is definitely an artist...
 

Attachments

  • UpperChassis.jpg
    UpperChassis.jpg
    261 KB · Views: 106
  • IMG_8919.jpg
    IMG_8919.jpg
    180 KB · Views: 108
  • TargaBrace.jpg
    TargaBrace.jpg
    196 KB · Views: 111
Can you elaborate a bit more on this? Would be very nice some more information because I have the aluminum mount to install on my car, together with the alternator bracket and was planing to install them on the near future… looking at the mount it looks like a very solid part, I believe that before the mount fails you would rip the housing where it attaches… my biggest concern are the bolts that attach the alternator bracket to the engine, as the OEM part uses 4 bolts and the aluminum bracket uses only 2… maybe some members running this setup could give some insight here!

Thanks!

One thing to consider with the aftermarket mounts is the right-side. The OEM mount (and alternator bracket) is solid steel for a reason- it's a key structural member for the entire transaxle and carries a significant load. If you do decide to go aftermarket, I advise you keep the OEM right mount. I would not trust aluminum here, or welded steel.
 
Last edited:
Back
Top