• Protip: Profile posts are public! Use Conversations to message other members privately. Everyone can see the content of a profile post.

Experiences with Prothane bushing kit?

That was so good. Now i'm actually motivated to do this

still down to help you out, so lmk!

Even though this is probably outside of my realm of expertise for completing, I appreciate recording this into great detail. Helps me to slowly learn how these cars were engineered. Are bushings best replaced due to aging, miles, or combination of both?

Combination of both typically. Rubber is rubber and will deteriorate as it heat cycles and is pounded by the elements and use. Mine were heavily cracked due to 126k miles worth of driving and so the old, not-so-supple rubber gave out.

Bushing life/longevity is also the reason why you should "clock" your bushings when reinstalling bolts that go through rubber bushings and generally doing things like changing ride height. If your car is up on jack stands or a lift and your suspension is at full droop and you torque all your suspension bolts, then when you set the car down the bushings will twist as the arms rotate to the natural resting position on the ground. That twisting is not good for the rubber bushings since they're press fit into the arms and the inner sleeve is molded to the rubber. Anyway, so if you don't clock your rubber bushings, you will decrease their life as cracks are more likely to form as the rubber gets more brittle.
 
Oh the things we do for our NSXs... ;)

AM-JKLVYILZqi67OSj_zGiz5Ab6weWUmzJaXLX1DzgvZEbJOf5byEFrUhFpms7oeRwQUANyIi08L684DsOMIlOmg1DDDTWxhv3SQLkBa8fGuJddyM1NUcXhdyudXsH2DknWaSsabeItOou8BiOzEQEN0AMqktw=w973-h1296-no
 
[MENTION=36904]Chris_Lum[/MENTION] did you do the rear ones? I noticed AJ on Facebook ran into a lot of fitment issues, especially with the upper control arms. Based on his posts, it looks like some grinding of the arm bushing castings is necessary.
 
Last edited:
FWIW AJ is the only owner i'm aware of that has ever done the rears.

The OP and another on this thread has F and R done, but they were done by shops who likely did all the fitting and grinding. I'm doing my front knuckles tonight. The shop finally got the bushings pressed out. At least now I know
when I get to the rears, I should test fit everything first.
 
@chris Lum did you do the rear ones? I noticed AJ on Facebook ran into a lot of fitment issues, especially with the upper control arms. Based on his posts, it looks like some grinding of the arm bushing castings is necessary.

Do we have any other options besides the Poly parts for any of our bushings? I looked on amayama and only saw full arms available.

Edit: Also have any of you pressed out/in your own bushings? I've got a 12T press, just assumed I would do it on my own.
 
Last edited:
Do we have any other options besides the Poly parts for any of our bushings? I looked on amayama and only saw full arms available.

Edit: Also have any of you pressed out/in your own bushings? I've got a 12T press, just assumed I would do it on my own.

Full pillowball kits are available from T3TEC and RF Yamamoto. Bring your wallet though...

I attempted with my 12T press, but I don't have the right combo of sockets and sleeves. In addition, the rear upper arms require some demolition (angle grinder) to be able to get a sleeve on the bushing. I gave up and just took them to my local 4WD shop.

I'm going to press the poly myself though. You just need a big C-clamp and some flat plates (like the seal driver kit). I'm going to use the silver anti-sieze. I'll post pics from tonight.
 
The front knuckles were pretty crusty (137,500 miles), so there was some light scoring when the bushings were pressed out. Shouldn't be an issue with the poly though. I'll clean them out with some 1000 grit first. Just a note for other owners to keep in mind.

AM-JKLVB237N4xEibnQvLd7DKR3kF1IdBriU0hX9U5zpYO-u6xVovi0xmIXad52osKFqLVxTambjWSjjuHbjVxTk96ZCDDgmLb6VWMSse-bvHcLwmGavtDtjXU8SZSkkmJa5kCRzCAaDR8nfxAehO0Sw8Ync4Q=w768-h1024-no


AM-JKLUQQo63Gcl4gJGrffKEOEZ_ZwmguTBCrZGfxLLfAcpipqfXdtkgPL8GG6JPtlHjLAEkA5p9ufeEkg3RudFhEo1IsMhLA13_kjFG_6Wu-Bbgan8PxmOvJTjDJo3FaYlR6mom7Zb8fsHXD81CJIbvbeKZ-A=w768-h1024-no
 
Front Install

Got one knuckle done last night. After handling the parts and seeing how they work, the silver anti-seize is the way to go. It's going to be virtually impossible to wash out and the metal powder will just stay and stay, providing anti-stiction for years. If you have ever worked with anti-seize, then you know the stuff gets everywhere and is tough to wipe off. Use nitrile gloves and keep plenty of rags around to wipe the excess.

I found it helpful to trim the sharp corner off of the outer lip with a razor knife one it is pressed in. This makes it easier to get the bushing into the control arm. It is a tight fit and I had to bang on it with a rubber mallet to get it into place. Still haven't managed to get the small end lined up yet. I was sweating from all the hammering.

My 12T press made short work of installation and there were no issues. It is worth it to note that once the bushing is completely pressed in, you sometimes have to press on the sides to make sure it is uniformly seated. The anti-seize really helps it "relax" into place one you've relieved the pressure.

At least for the front knuckles, with proper metal surface prep, installing these bushings is the easy part, especially if you have a press. Getting them into the front control arms is the hard part. It sucks. And my subframe is even off of the car! I still have to figure out how to get the small bushing to line up- I'm thinking a tapered punch next...

The Prothane instructions are lacking- it's just a big box of bushings, so here are the part numbers (they are cast into the bushings):

Front Small: 74064
Front Big: 74065

Some pics.

Before and after prep of the large bushing. I used a sanding sponge of about 400 grit. The key here is to knock down any sharp edges from the galling, not to polish the surface. You want to keep the inner diameter as close to spec as possible and not remove too much metal. But still, you need to make sure there is nothing sharp that would cut the bushing rubber and/or prevent it from moving smoothly. Also sand down the sharp edge of the inner lip, which makes it easier for the bushing to seat properly when pressing.

AM-JKLVqyOWEZjn4Cud_IGl3Ro1fVHr1F2QOlbK2oKsYEXTp54lxYWM2u0a355MiNRqNztupXO-n26XHBPWhAx4UuRTeFgVM3S_S7WwdQu8s_u2ahZsVf-CGbY1tXhdi_9mRL57a5062NfOY27N6LnB9s52JzA=w768-h1024-no

AM-JKLV0EGzpoWl6uPzlDYDzVKmqJVs8LZ-mlZpZKQ7q8GTjUAiBbEvSqR1NLTz93qQ78OrJgKmEvIYCCE5gX7woFo5SwoCw3w1g7R4XuqVuOUiEOJFOhlFNPC7Lzh2qG_I2gJDYU8kEYSBZ9ZEaV_zqvBOGcA=w938-h1250-no

AM-JKLWi2f4SoDdp119SOgF-GYhxjqovvpetAcKUqvKPngz8vKAS_2e6Z8VSuYpq2gEZQTxwXb1_rp39E92IYEzCGTTRkeOFFm60wGtkQ2eiw2lWjWgrWBVVJifuIXiNZGxPX-3hu_-WMwQUhpae4DxlNxQBlA=w938-h1250-no


This is the amount of anti-seize I used for each side. I just spread it evenly. In truth, most of this is pushed out by the bearing.

AM-JKLUcPlOoNlXMr2hfLLhI6OslXBbVdV5u8n3XfFuFeDYtvpsFfhzq8itRpaQBdnsmK6DU8brx_zNgv9Y33c7u30OcQ0VdIVESp3S4Bq1YIkFZ0fxvMXr4U7aCLNh6w3CFUs4E0Ia1kSUOwUsPsfs2Y6HFSw=w938-h1250-no


Also coat the bushing.

AM-JKLUuM813VnGLwsk-0V6uirUclo3bFBzat_3Pqdi9cTWufsK1w3zjMy7VuEg-z6rBiAv-DT1_CiR9RaWDk-Vf9IZ0FdHVVwRrNpb0E7qGO5932-19wMUEBmwEOzakoI5sN7zgdkt4knIQuYEF_j8Kp0R-Kg=w938-h1250-no


Pressing in the bushing using my oil seal driver plates. Note the anti-seize everywhere- that stuff is so messy.

AM-JKLX_Ajj0BQjFbHagbOta-sFe-X6G7bfkOFFwCyj_nbfrNmgEfIE27m77i2cMgDnO6paF9pCCau2Nw4BtbWJfgF7AQTrBmeeVAs4hRgPsCE-zZZall_toaTuOgUks4oEStRJYPTQZicQ_2PP4mDzKWkvuhA=w938-h1250-no


Here's the bushing pressed from the other side. Most of the anti-seize is pushed out, which is why I think it's better to use than the silicone grease. It's a very thin layer between the rubber an metal. I just leave this in here to provide extra grease for longer life.

AM-JKLUn1kUMxxw9HyLA0eAbf9w5U9uxvZa8b_sCN4YLFONYr5hfj0QS3ZVyfAzUgMpDdnj5_CV234l2AfRHx8rv3pYxzp8t8v6sX13iE1RKzdal57dqjcZUTdbytuEELvnQEGqQA6IW_Hc522aYCnOZ0wMeWQ=w938-h1250-no


Small bushing prepped. I wiped these out with an alcohol soaked microfiber.

AM-JKLVv7LLu7tN94GHvL3Td1y6UiTeARaMdQMc1d_RgWY0LotkpeP9eL5HGWLU-lDWt1H_JIRlPBjEMU0UDlDJvOeaAkxiaaeNRU8-ezkQN7Cbr7-jfFBimgQlJiOMEVqT_IDxqjlZRg2em2uODJ78KrPSKdA=w938-h1250-no


Pressing the bolt sleeve. Again, super easy with the 12T press.

AM-JKLWRImP63_wo36FavTcXmcIxdisVuDSy1g00vFykFRMHuuFLp_W8CxbKhaA1B_rW28LtmDT5j6nZpZ0cViRU_JXfSPUDvqXk_MPG7lHRnoeJXFvXcUzkdbQfpdwIbtF2flwCptM1jyFaTPbkDOqUbVGWhg=w938-h1250-no


Completed knuckle. This is where it gets miserable.

AM-JKLWz632DXVze3IBWSfCIWk8FA8cASWsensMYZibjnGOdVEAJsijXIqRmqqgkT6L7f1OcwVuOfM9_8nKZ51WPNnZWQsJDLp1W1BowfQeXR13YHTgd1bd8UcxqNDexO_Fz8krncz995LSXjh2zaNMH9TlBPA=w938-h1250-no


Big bushing in and aligned. I may have the bolt backwards- I just used it for alignment. LOTS of hammering with the rubber mallet. You can see the trimmed lip on the left bushing versus the sharp edge on the right one.

AM-JKLWNtRkbySmfQQv5PbYzdztkWqlMGnMQbvq8ZC41Xup4aaq0ApUNpx5cNe7xwjrEkDTbi0K47wYnGzJ_04tnCYSKbWX4kBGIyFniKEvhTHytk1-GJT_ATjI22lJKdLp6x03apHxbSObDax0XedQzW-Rmbg=w938-h1250-no
 
Thank you for the writeup @Chris_Lum ! I will definitely be doing this in the fall....
Happy to help

@Chris_Lum did you do the rear ones? I noticed AJ on Facebook ran into a lot of fitment issues, especially with the upper control arms. Based on his posts, it looks like some grinding of the arm bushing castings is necessary.

Sorry I don't check back here much and not getting email notifications for some reason. No I have not done the rears. I saw the issues someone (probably AJ) was having with the rears. I would imagine the issues he's having are mainly pandemic related issues with Prothane mixing up parts but I could be wrong.
 
I'm in the middle of the prothane install myself. Once I complete the install i'll document it here. I appreciates everyone pioneering this prior to me as I would have not wanted to be the first due them not really being a plug and play solution

I wanted to create this post in the meantime to share a Facebook post by Murhamdilah Morni. From his license plate he appears to be from Europe somewhere. He's showing in these pics the usage of the Energy Suspension red versions. I'm 99.9% sure these are the same bushings sold by Prothane and in fact it's Energy Suspension that likely rebrands the original Prothane bushings. Notice the prothane part #'s and the prothane instruction sheet. I didn't bother researching the connection any deeper between the two companies. BTW I noticed Prothane/Energy Suspension includes Ball Joint Boots - I've looked at them closely. I won't be using them as there's no provision for the circlip retaining ring on the base of the boot which OEM uses.

Many photos below but please let me know if the pictures DO NOT show up for you. If they do not i'll have to figure out how to host them myself.

41457991_10155917481592861_4684227646689640448_n.jpg

41454239_10155917474642861_5481699968571932672_n.jpg

41482810_10155917474767861_7537821768036122624_n.jpg

41667444_10155917474952861_2178333960000503808_n.jpg

41469755_10155917475592861_3505000725820211200_n.jpg

41598583_10155917475607861_7897047472554377216_n.jpg
41466098_10155917475742861_232885071093170176_n.jpg

41546085_10155917475982861_1024998862927953920_n.jpg

41514539_10155917476092861_4188319718987268096_n.jpg

41517476_10155917476917861_8413235943770685440_n.jpg

41519853_10155917477392861_5348831723591303168_n.jpg

41447942_10155917477587861_5973101814155837440_n.jpg

41467894_10155917477792861_4171369024963215360_n.jpg

41671491_10155917478072861_2092134829658210304_n.jpg

41603581_10155917478377861_5082007949774159872_n.jpg
 
Thanks for sharing those pics [MENTION=20915]RYU[/MENTION], my feeling on the ball joint "boots" is that they're just covers to go over the OEM boots. I would doubt they're replacements since there's no way to keep the grease in. And in that case, i'm not sure if i would even run them... they could protect the boot from external heat or debris, but smaller debris could probably get trapped between the oem boot and the urethane and possibly rub/wear causing damage to the OEM boot. I guess it's up to the user to figure out which has the lesser risk.
 
Thanks for sharing those pics @RYU, my feeling on the ball joint "boots" is that they're just covers to go over the OEM boots. I would doubt they're replacements since there's no way to keep the grease in. And in that case, i'm not sure if i would even run them... they could protect the boot from external heat or debris, but smaller debris could probably get trapped between the oem boot and the urethane and possibly rub/wear causing damage to the OEM boot. I guess it's up to the user to figure out which has the lesser risk.
I believe the design is to seal upon compression between the ball joint and the control arm. Seems like a poor solution either way because there's no way to keep the grease contained. You might be right about them being sleeves going over the OEM balljoint but just eyeballing it.. seems like it might not fit. I'm sticking to OEM myself.
 
Thanks for sharing those pics [MENTION=20915]RYU[/MENTION], my feeling on the ball joint "boots" is that they're just covers to go over the OEM boots. I would doubt they're replacements since there's no way to keep the grease in. And in that case, i'm not sure if i would even run them... they could protect the boot from external heat or debris, but smaller debris could probably get trapped between the oem boot and the urethane and possibly rub/wear causing damage to the OEM boot. I guess it's up to the user to figure out which has the lesser risk.

Agree 100%

I believe the design is to seal upon compression between the ball joint and the control arm. Seems like a poor solution either way because there's no way to keep the grease contained. You might be right about them being sleeves going over the OEM balljoint but just eyeballing it.. seems like it might not fit. I'm sticking to OEM myself.

Yeah, I just ordered new OEM boots too. The Prothane seem to be poorly designed with respect to keeping moisture and debris out of the ball joint.
 
I used energy suspension/prothane boots on my Integra suspension maybe 8 years ago and I agree that they are not particularly well designed. They are intended to replace the OEM boot not go on top of it, there is no room for that inside them, and they don't really have a retention mechanism they just kind of sandwhich between the ball joint and the control arm. I only used them for a few years so I can't speak on the long-term effects of running them but it seems to me that without a retaining clip moisture and dirt would eventually work their way in.
 
I used energy suspension/prothane boots on my Integra suspension maybe 8 years ago and I agree that they are not particularly well designed. They are intended to replace the OEM boot not go on top of it, there is no room for that inside them, and they don't really have a retention mechanism they just kind of sandwhich between the ball joint and the control arm. I only used them for a few years so I can't speak on the long-term effects of running them but it seems to me that without a retaining clip moisture and dirt would eventually work their way in.

wow i didn't want to believe it, but i found a video in this link. What a terrible design. https://www.energysuspensionparts.com/16.13101
 
Here's my Prothane update. Btw.. thanks to the guys that went before me! I wouldn't have been able to prepare for this w/o your pioneering. @Chris_Lum [MENTION=32030]SoloNSX[/MENTION] @Honcho .. Thanks also to @MotorMouth93 for letting me bounch ideas off of him.

Takeaways:
1. It's not a plug-n-play kit
2. It can be made to work quite well but requires modifications
3. The durometer is good and the important parts like bushing OD and ID and overall quality of the parts are good.

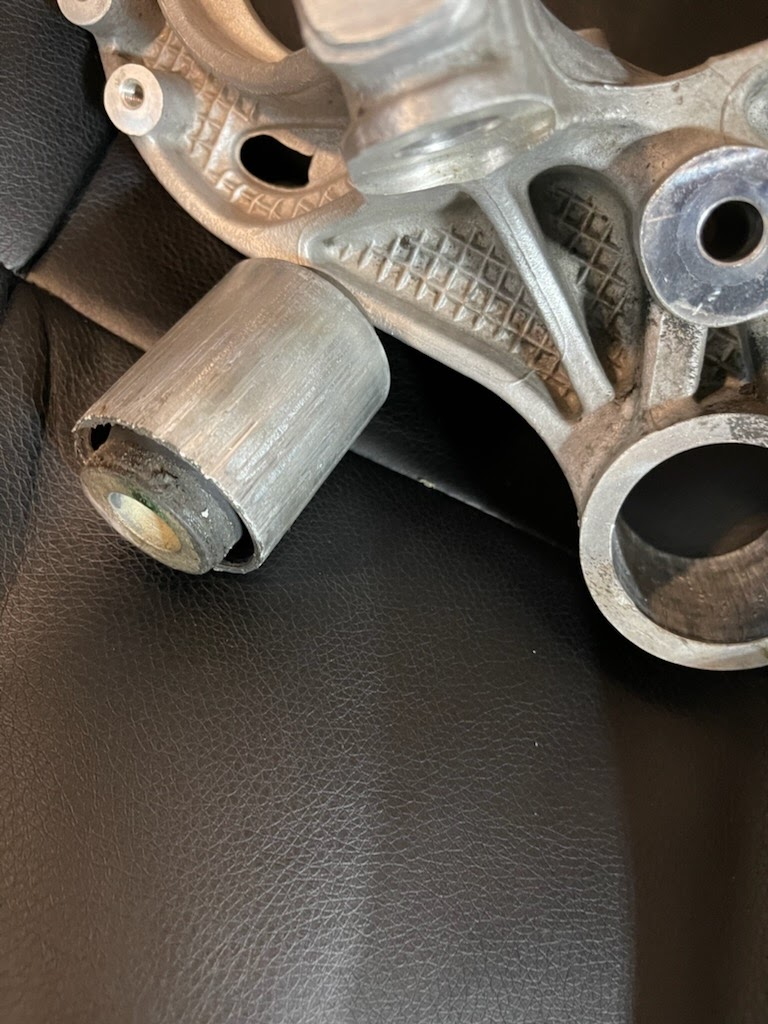
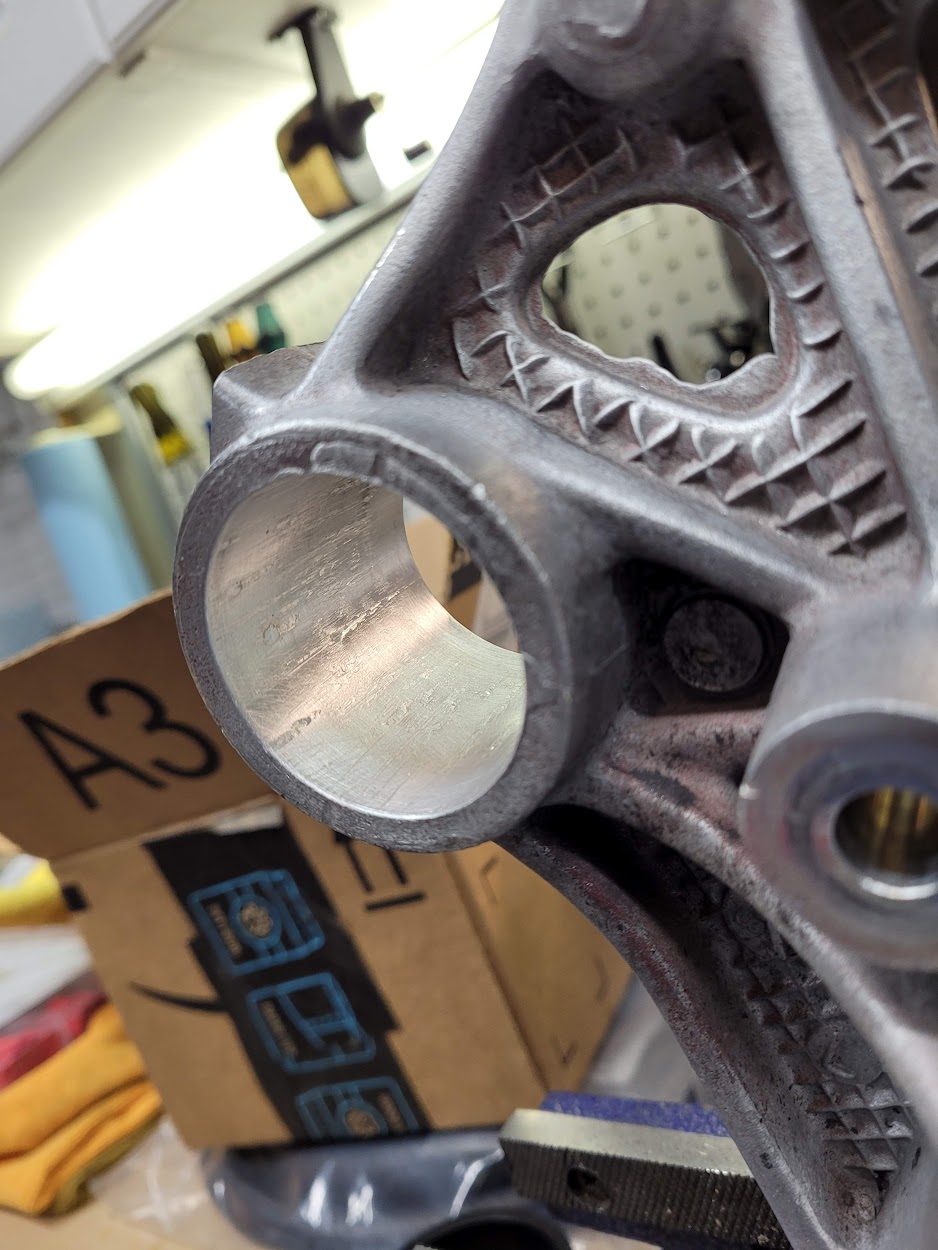
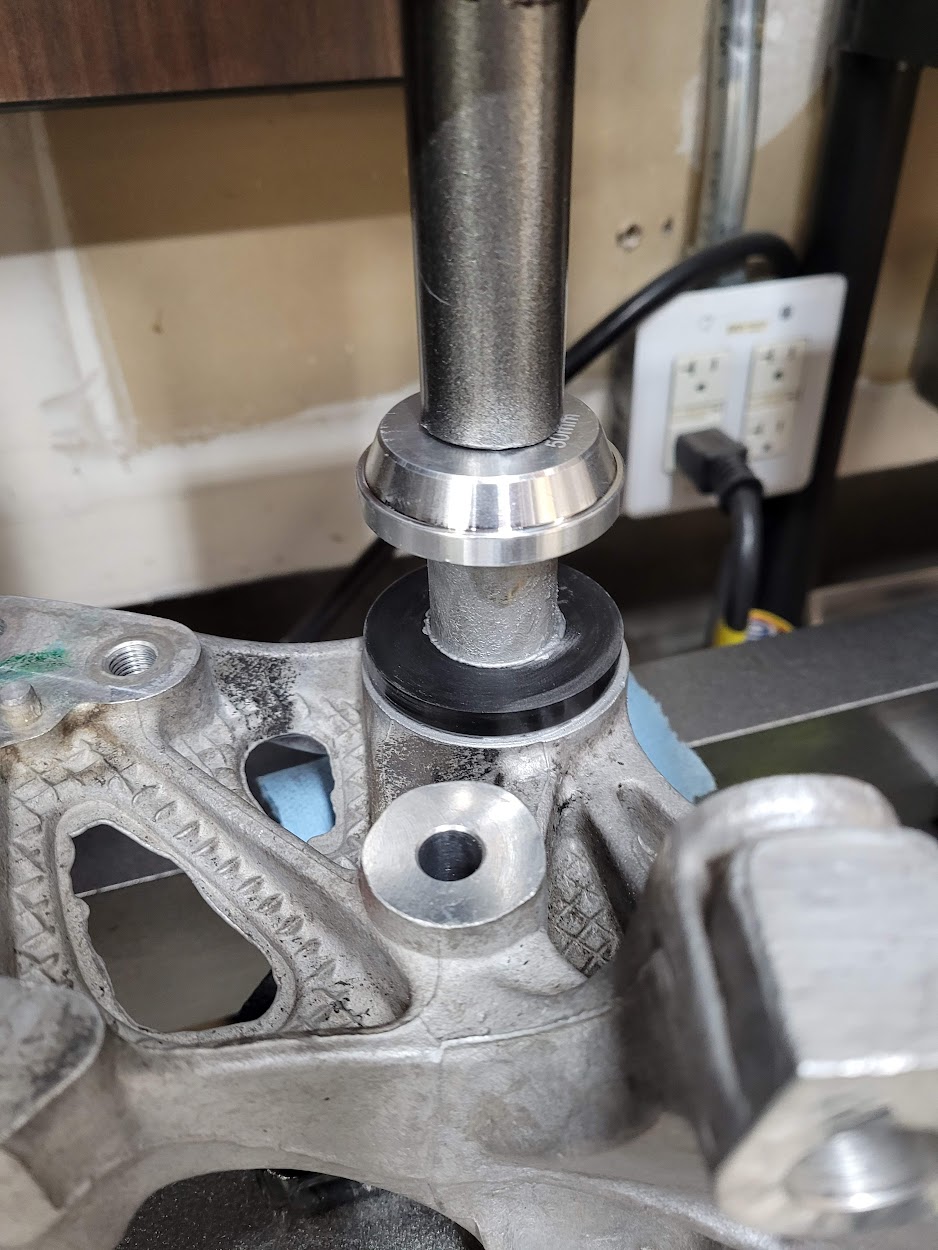
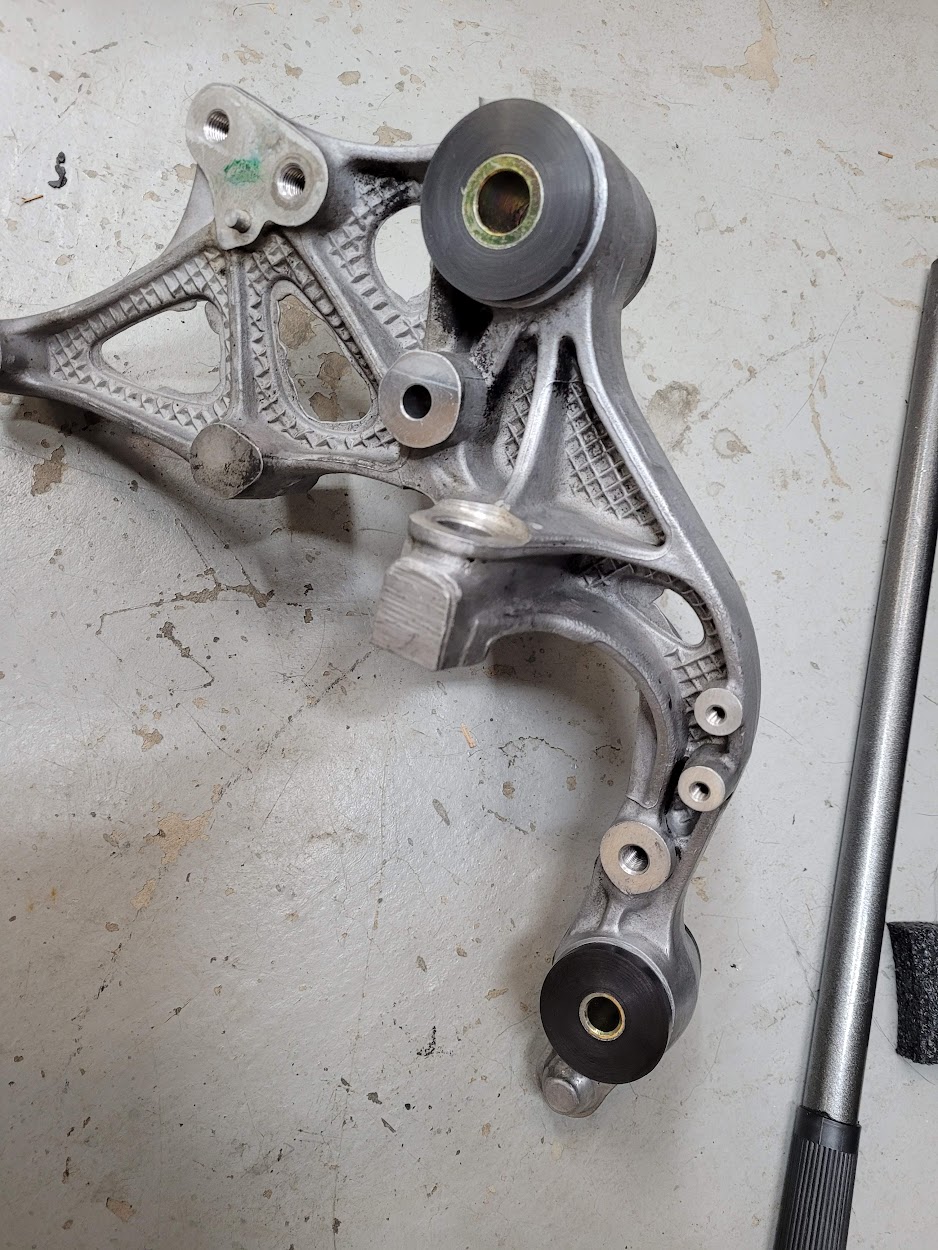
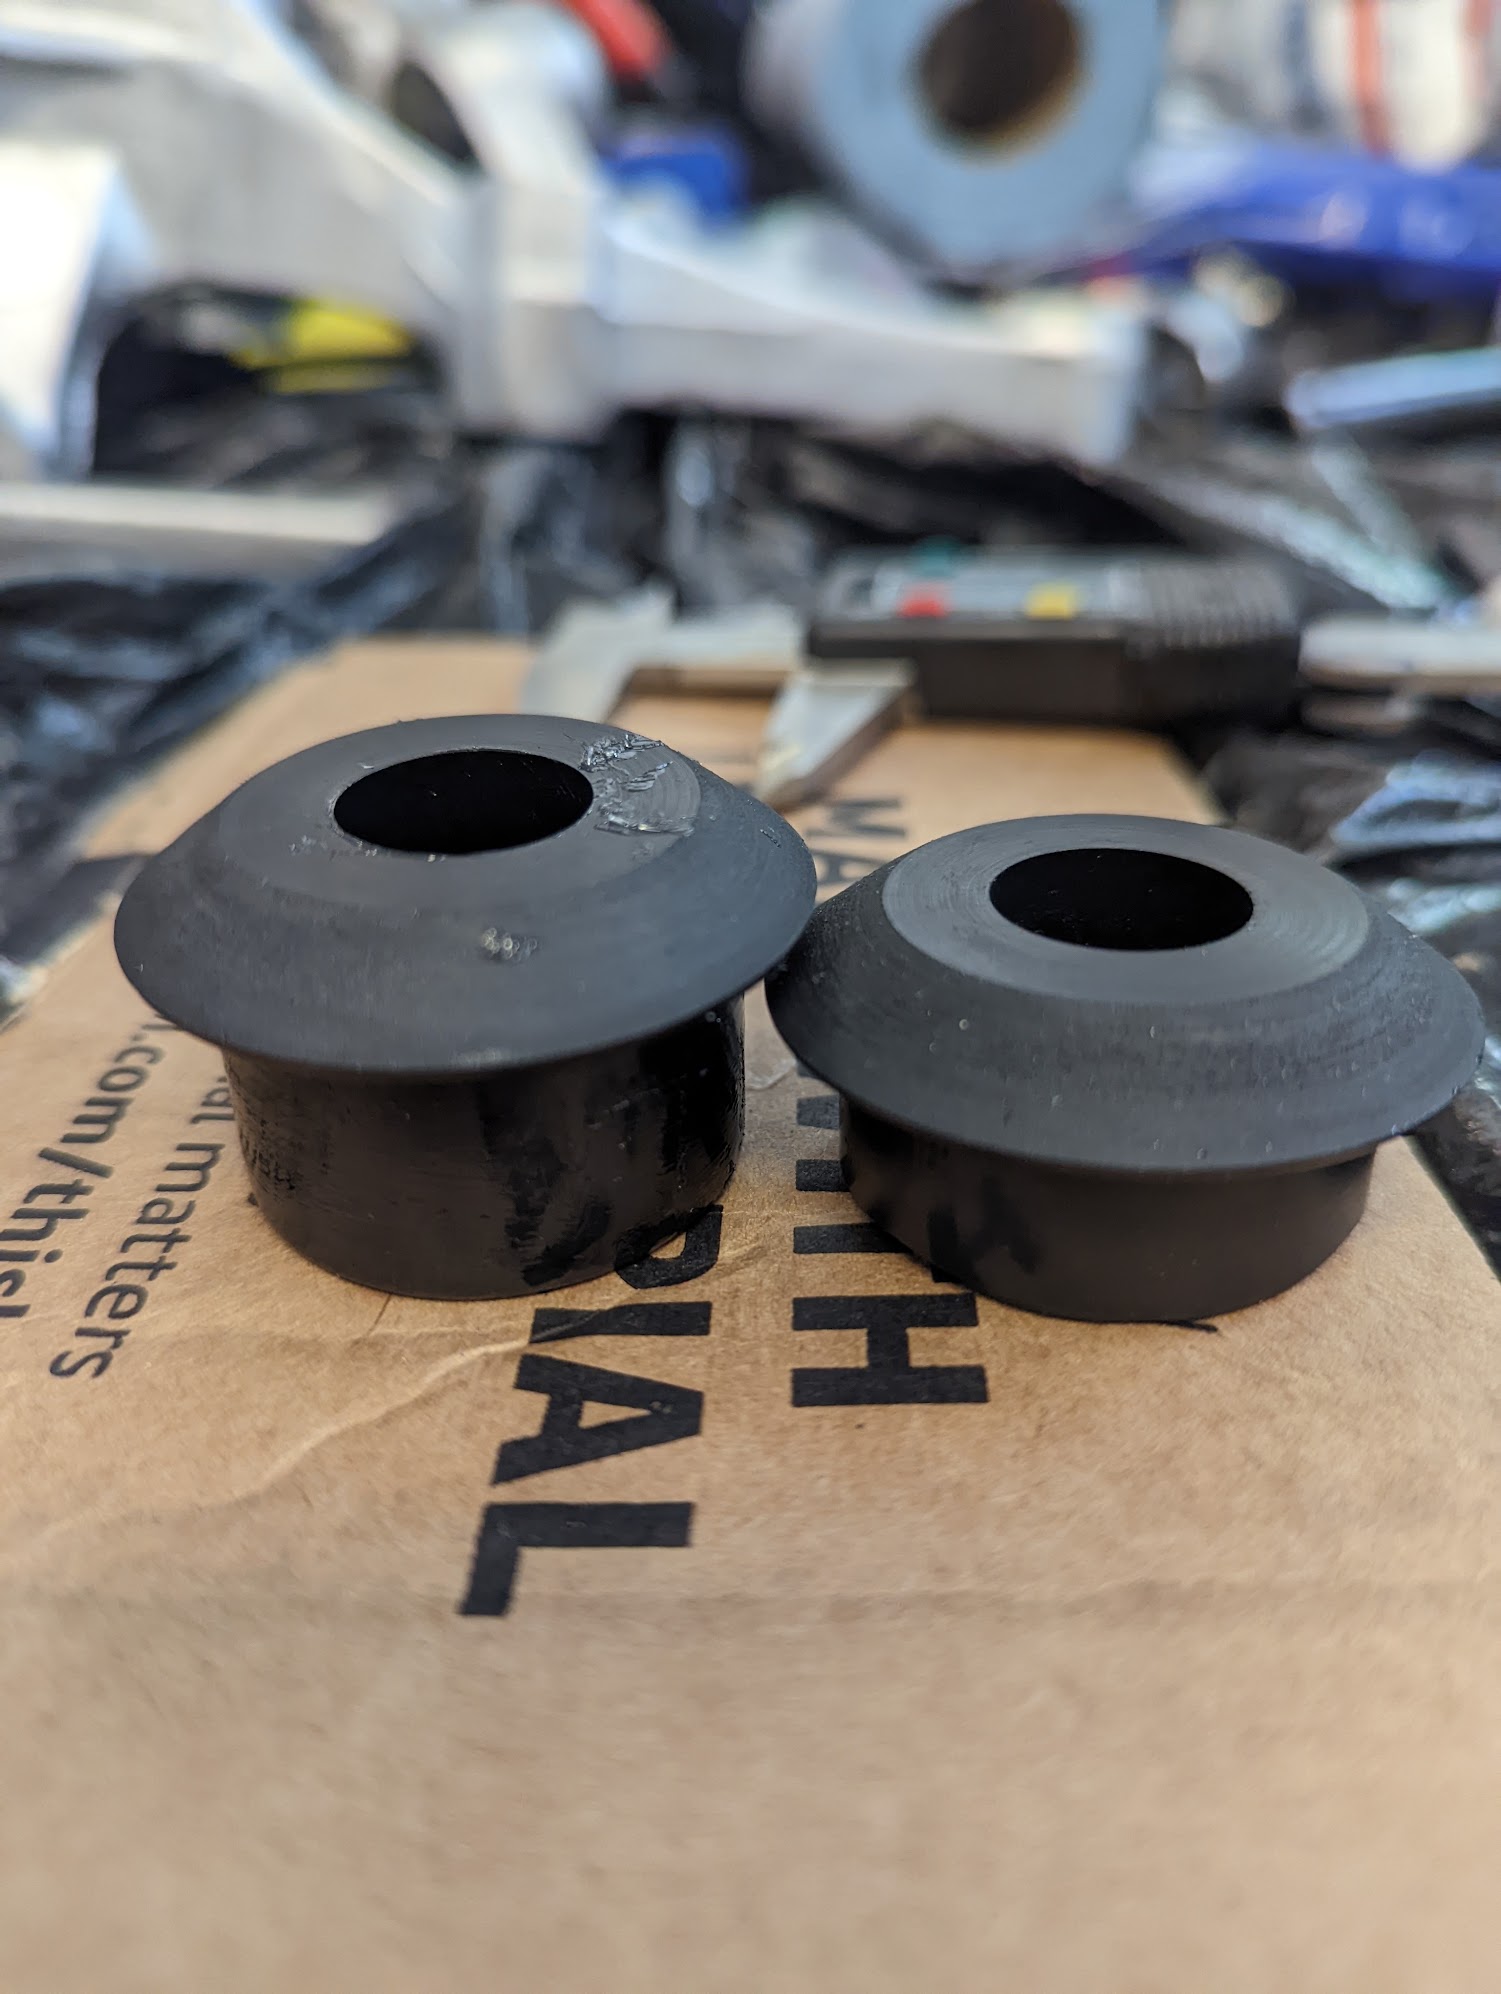
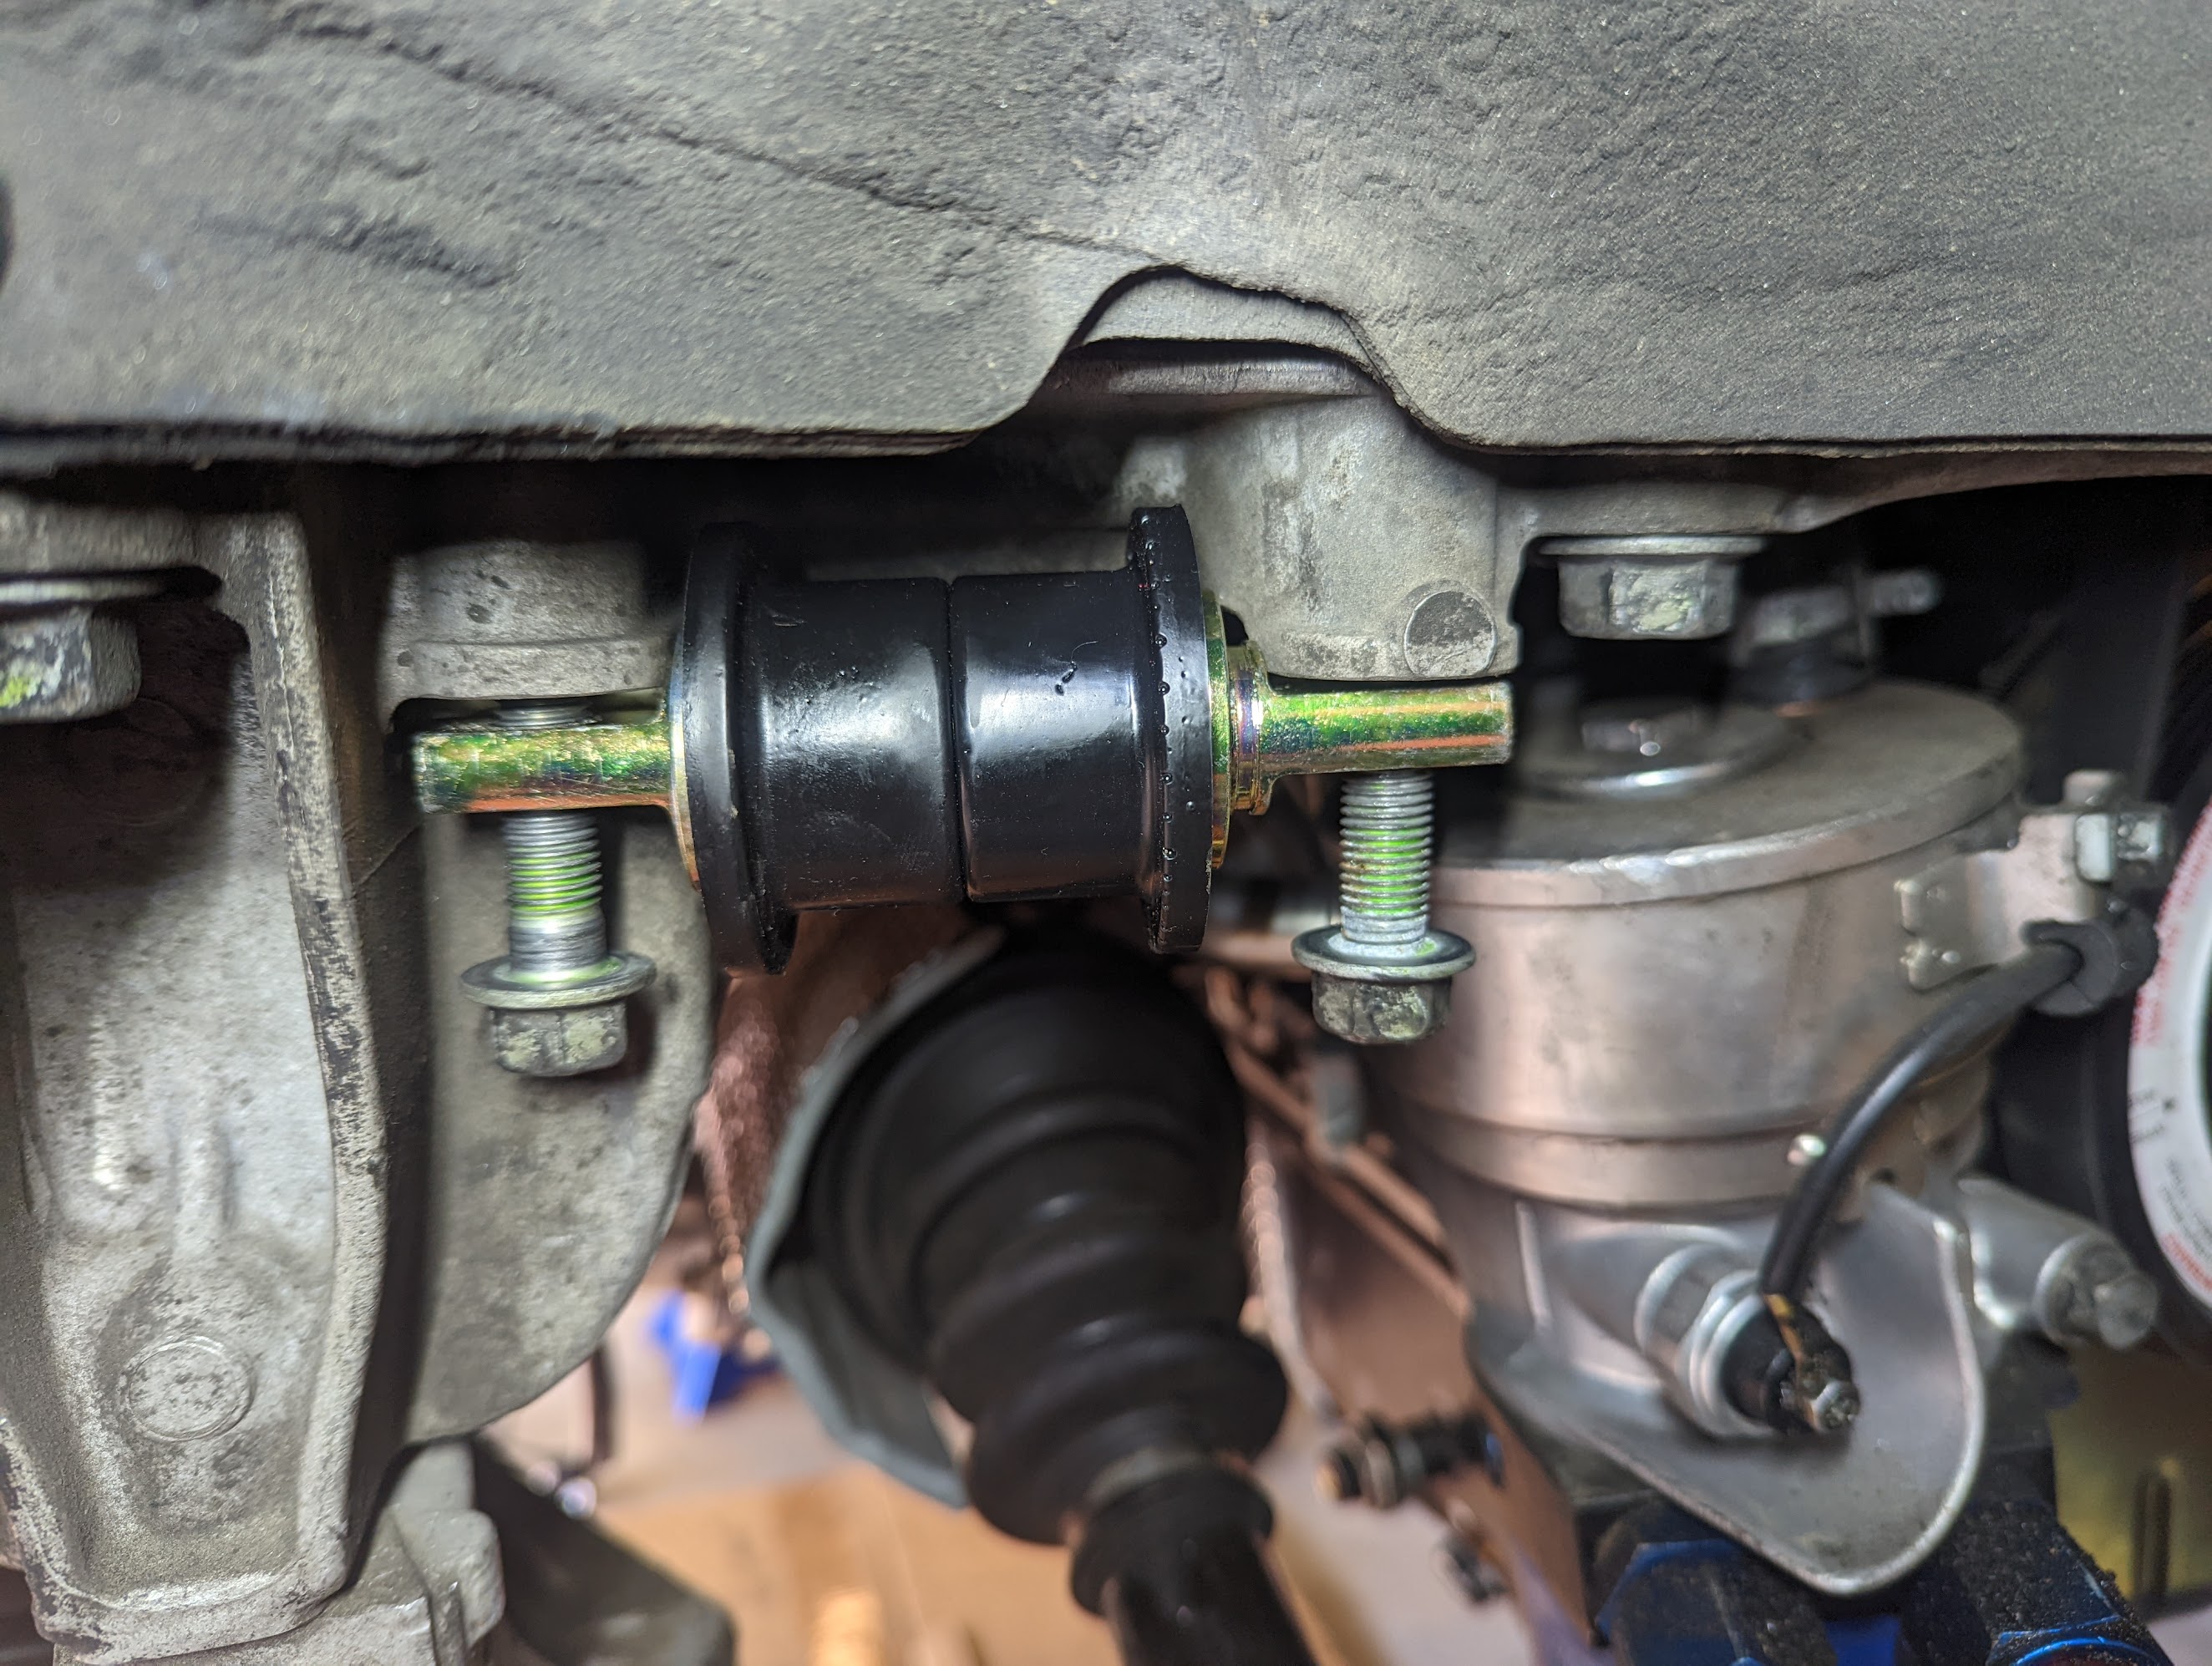
The front inner uprights have 4 bushings on each side. Each pair is a small (UCA) and large (LCA). They will require some kind of "rounding off". I'm lucky enough to have access to a lathe.
AM-JKLXpH4tfLH_bOpI_s1aGpivVa1y0QyitbJ5dAx6OQkeH3-NquZnAWhstaLOpnEnuS6m2eouXmC1t1v7JebB3qjj1jK3N2P2zAbzuFC8HZQgRvD3aSDK_l_TIb6KGvmJEQqvnjOdyjzYfpPBRxMfgOGmfhg=w1502-h1994-no


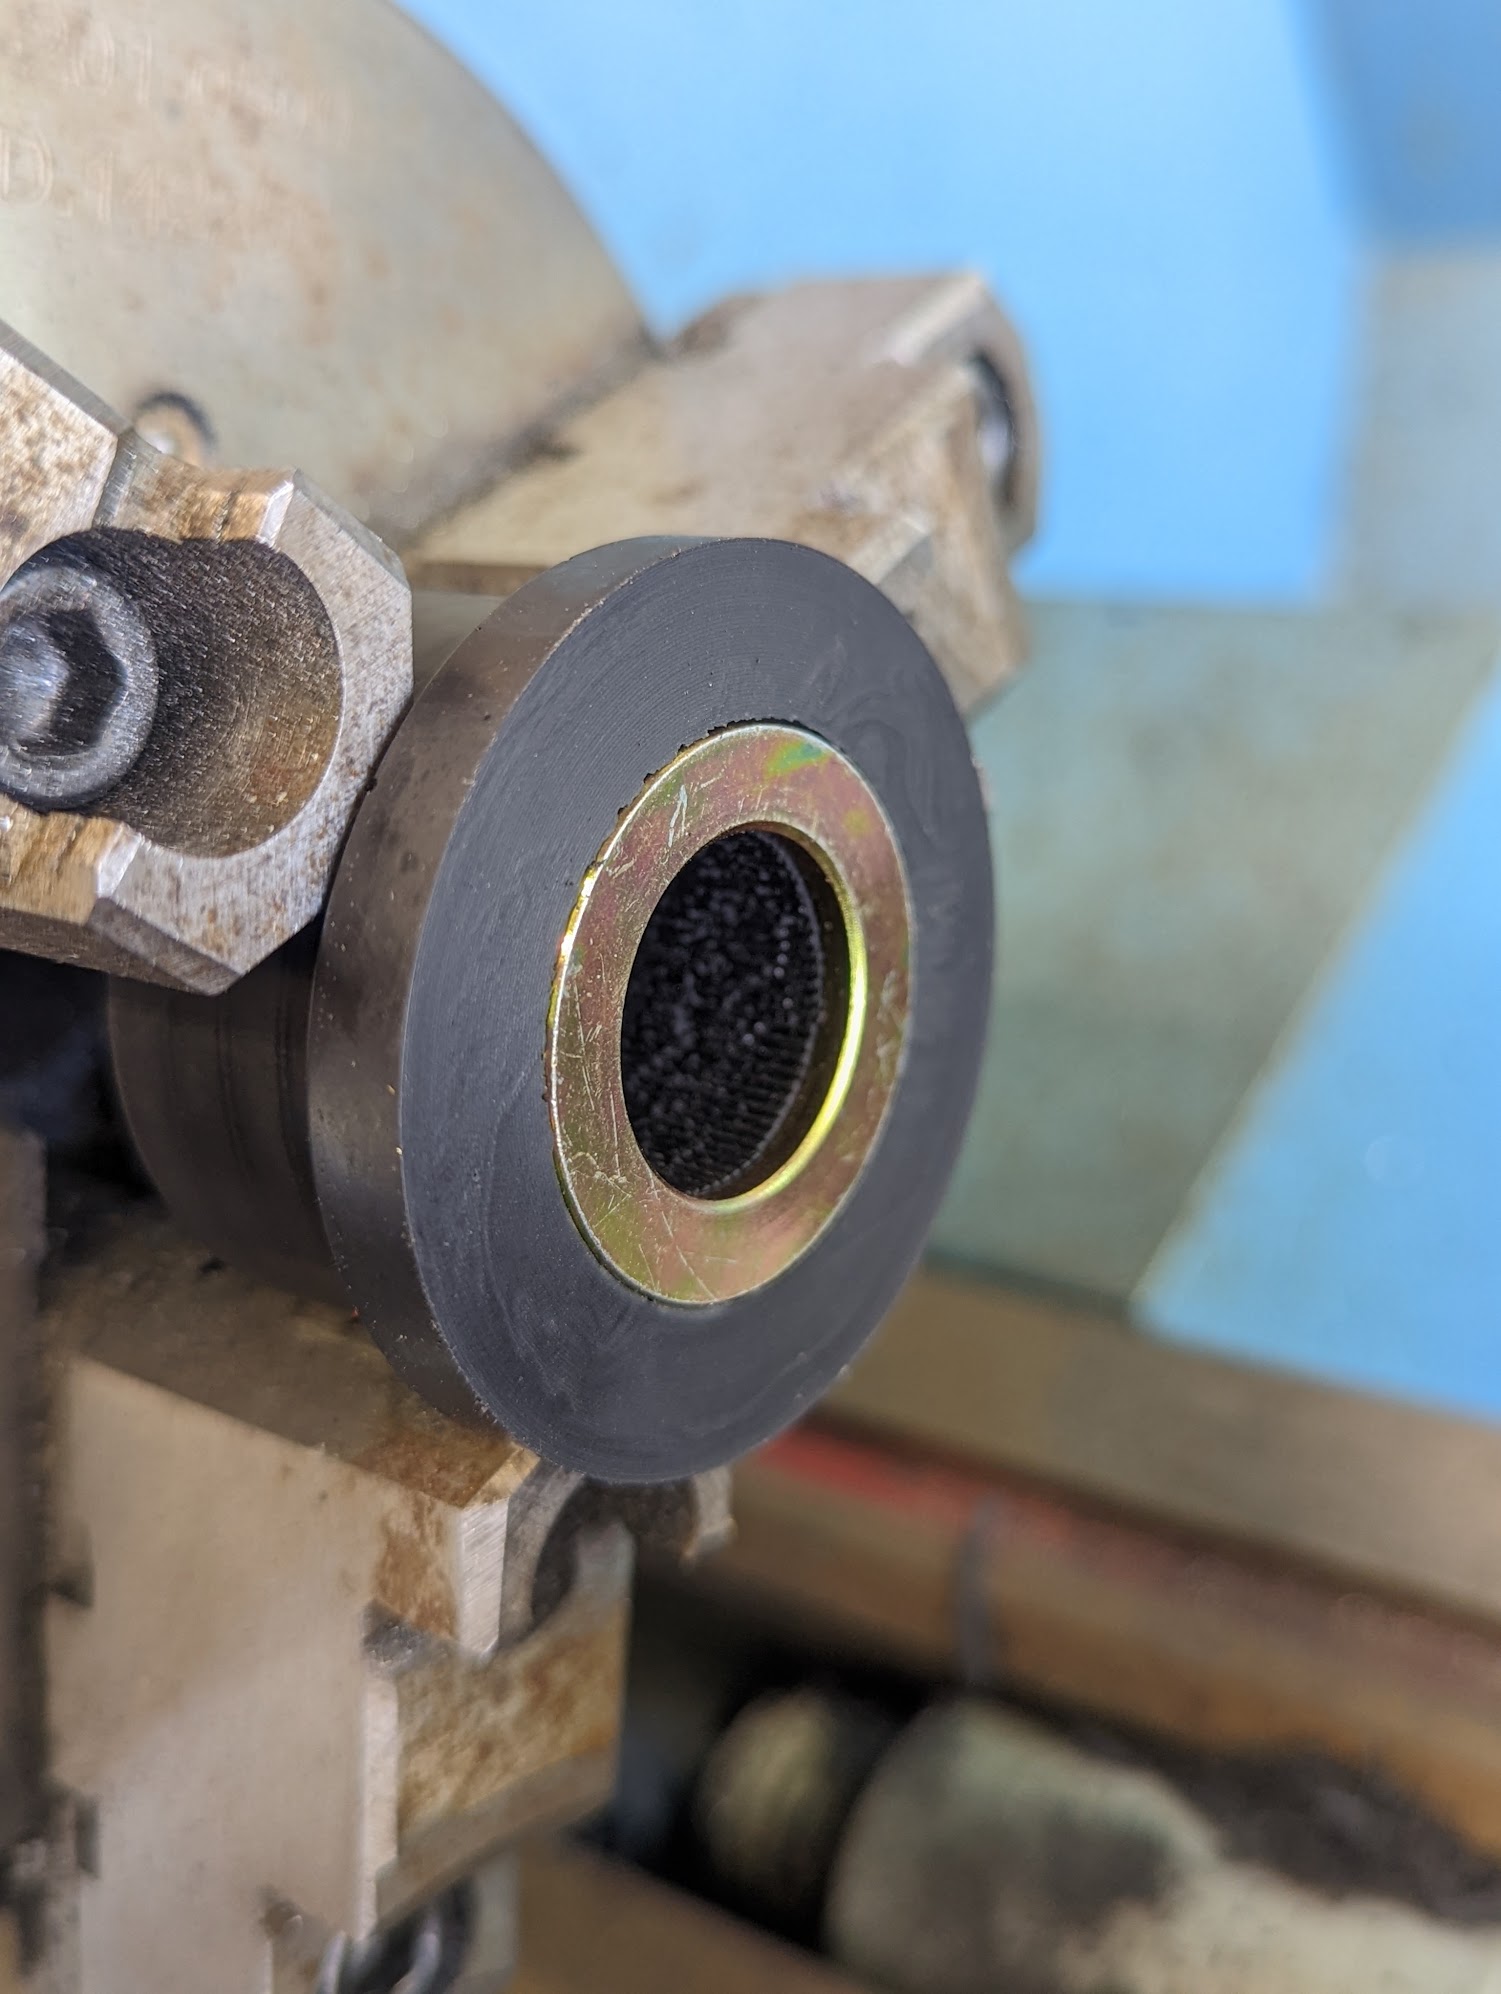
It's important to note here that the OEM bushings have a metal insert that effectively fuses the control arm to the bolt to the upright. You can see this inner flattened area here. I tried to mimic this flat surface area to minimize any future squeaker and ease of install.
AM-JKLUFdyxwVgiTs736435nIYCzsQUV05zJ8e3F6i8qpgXo8KhSEISPFI-dTTXCpdbt4m1bsFrFwX5jyC1_BMKCoTSFLeyxsY5KFikjADjGHBXjJVUquUx1sFcRFd_b2sjTJX8kA-iAod7cD63pkE-Ga5zzlA=w2649-h1994-no


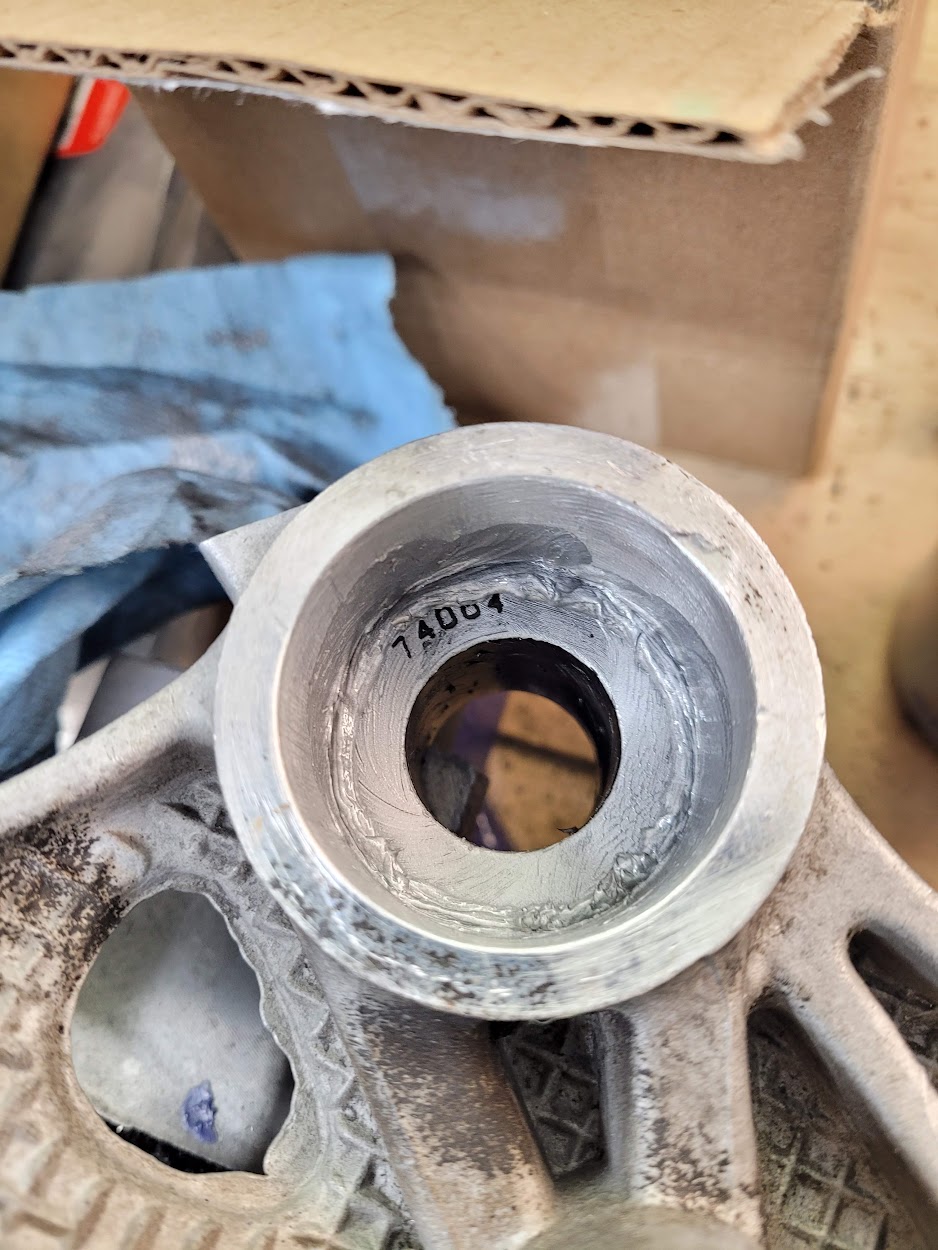
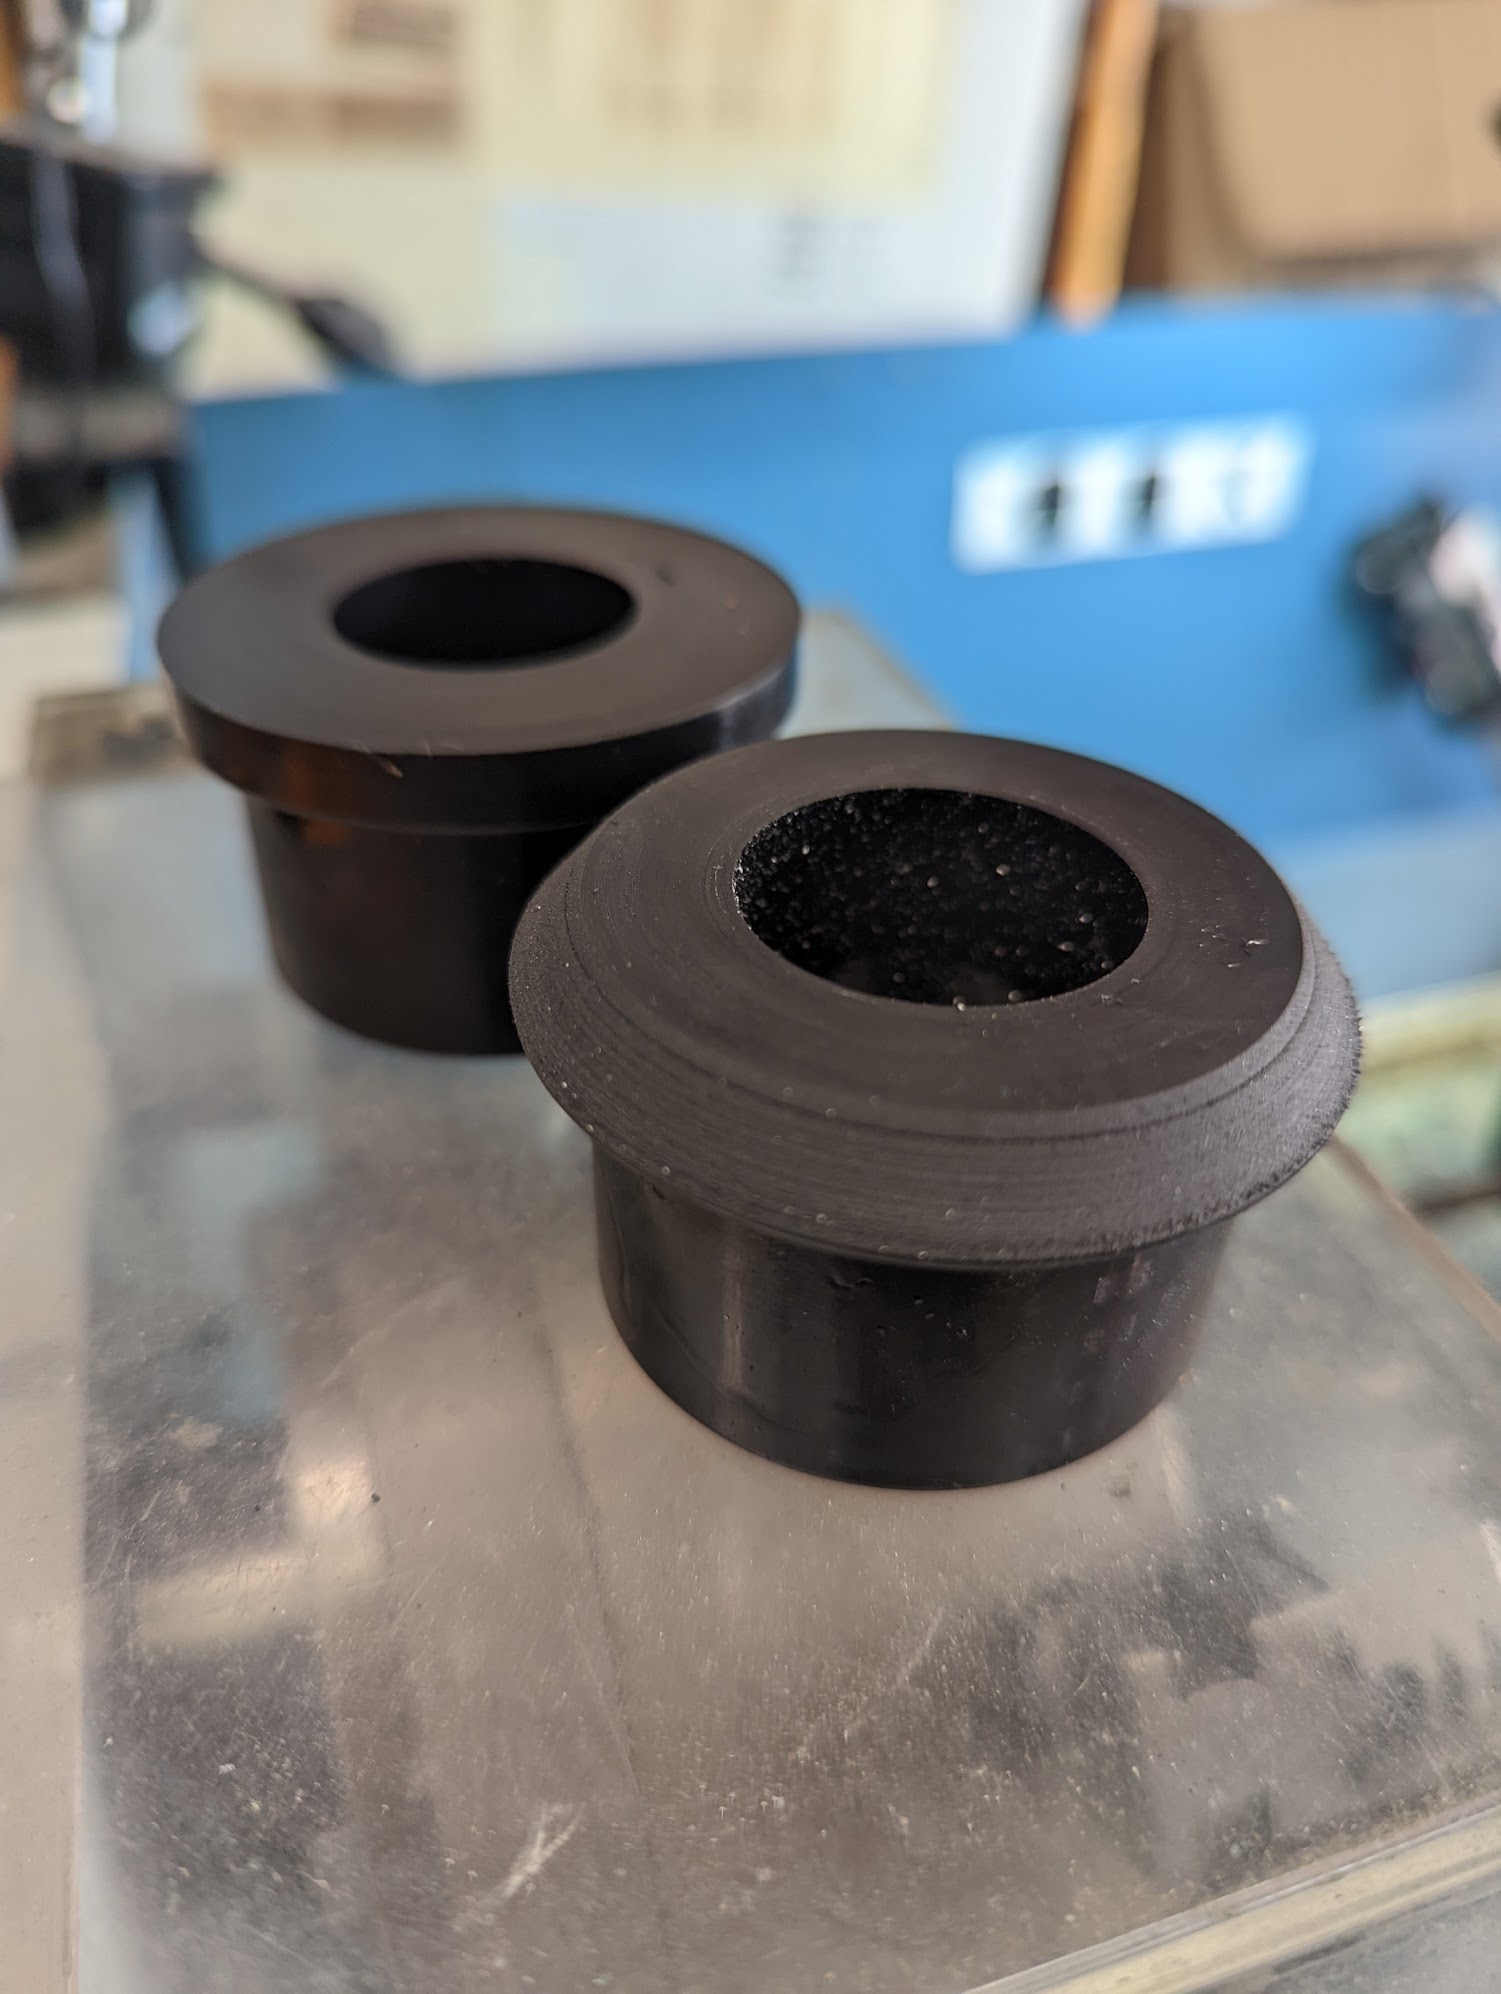
You will need to shorten one (or both) of the upper smaller bushing by 5mm in order for it to fit completely inside the upright. I was struggling with this for a while as I don't believe I saw this mentioned by anyone else, but after pressing both sides of the bushings in it kept wanting to work itself off by 5mm.
AM-JKLUZ7varjdoUxzDEYCBbCl0g5optV1P8PD6lv0RuBKna8iQdCKIUMtdHwpf_ed7X8CfKEjcp1bKDDSMPyWUi14fP3GttRFU6DPhd8rFz8eV8WrQ-sdlZY8RvPzW0PfdfGDXrEdJpDf29yUbQTOwVmYR-SA=w1502-h1994-no


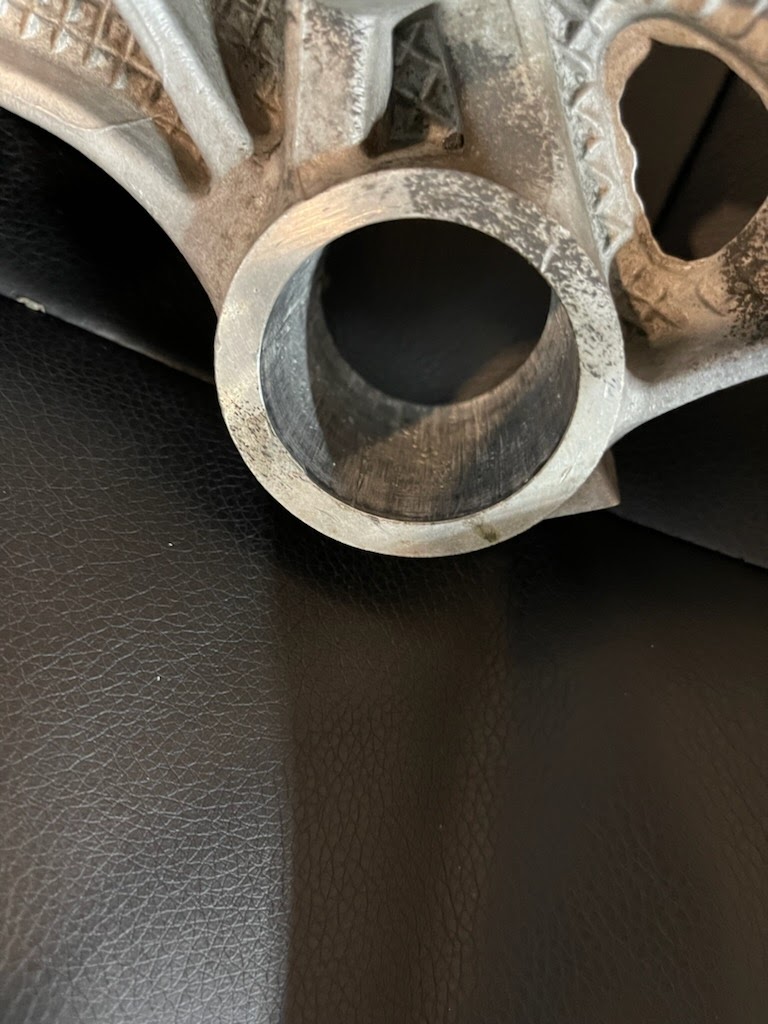
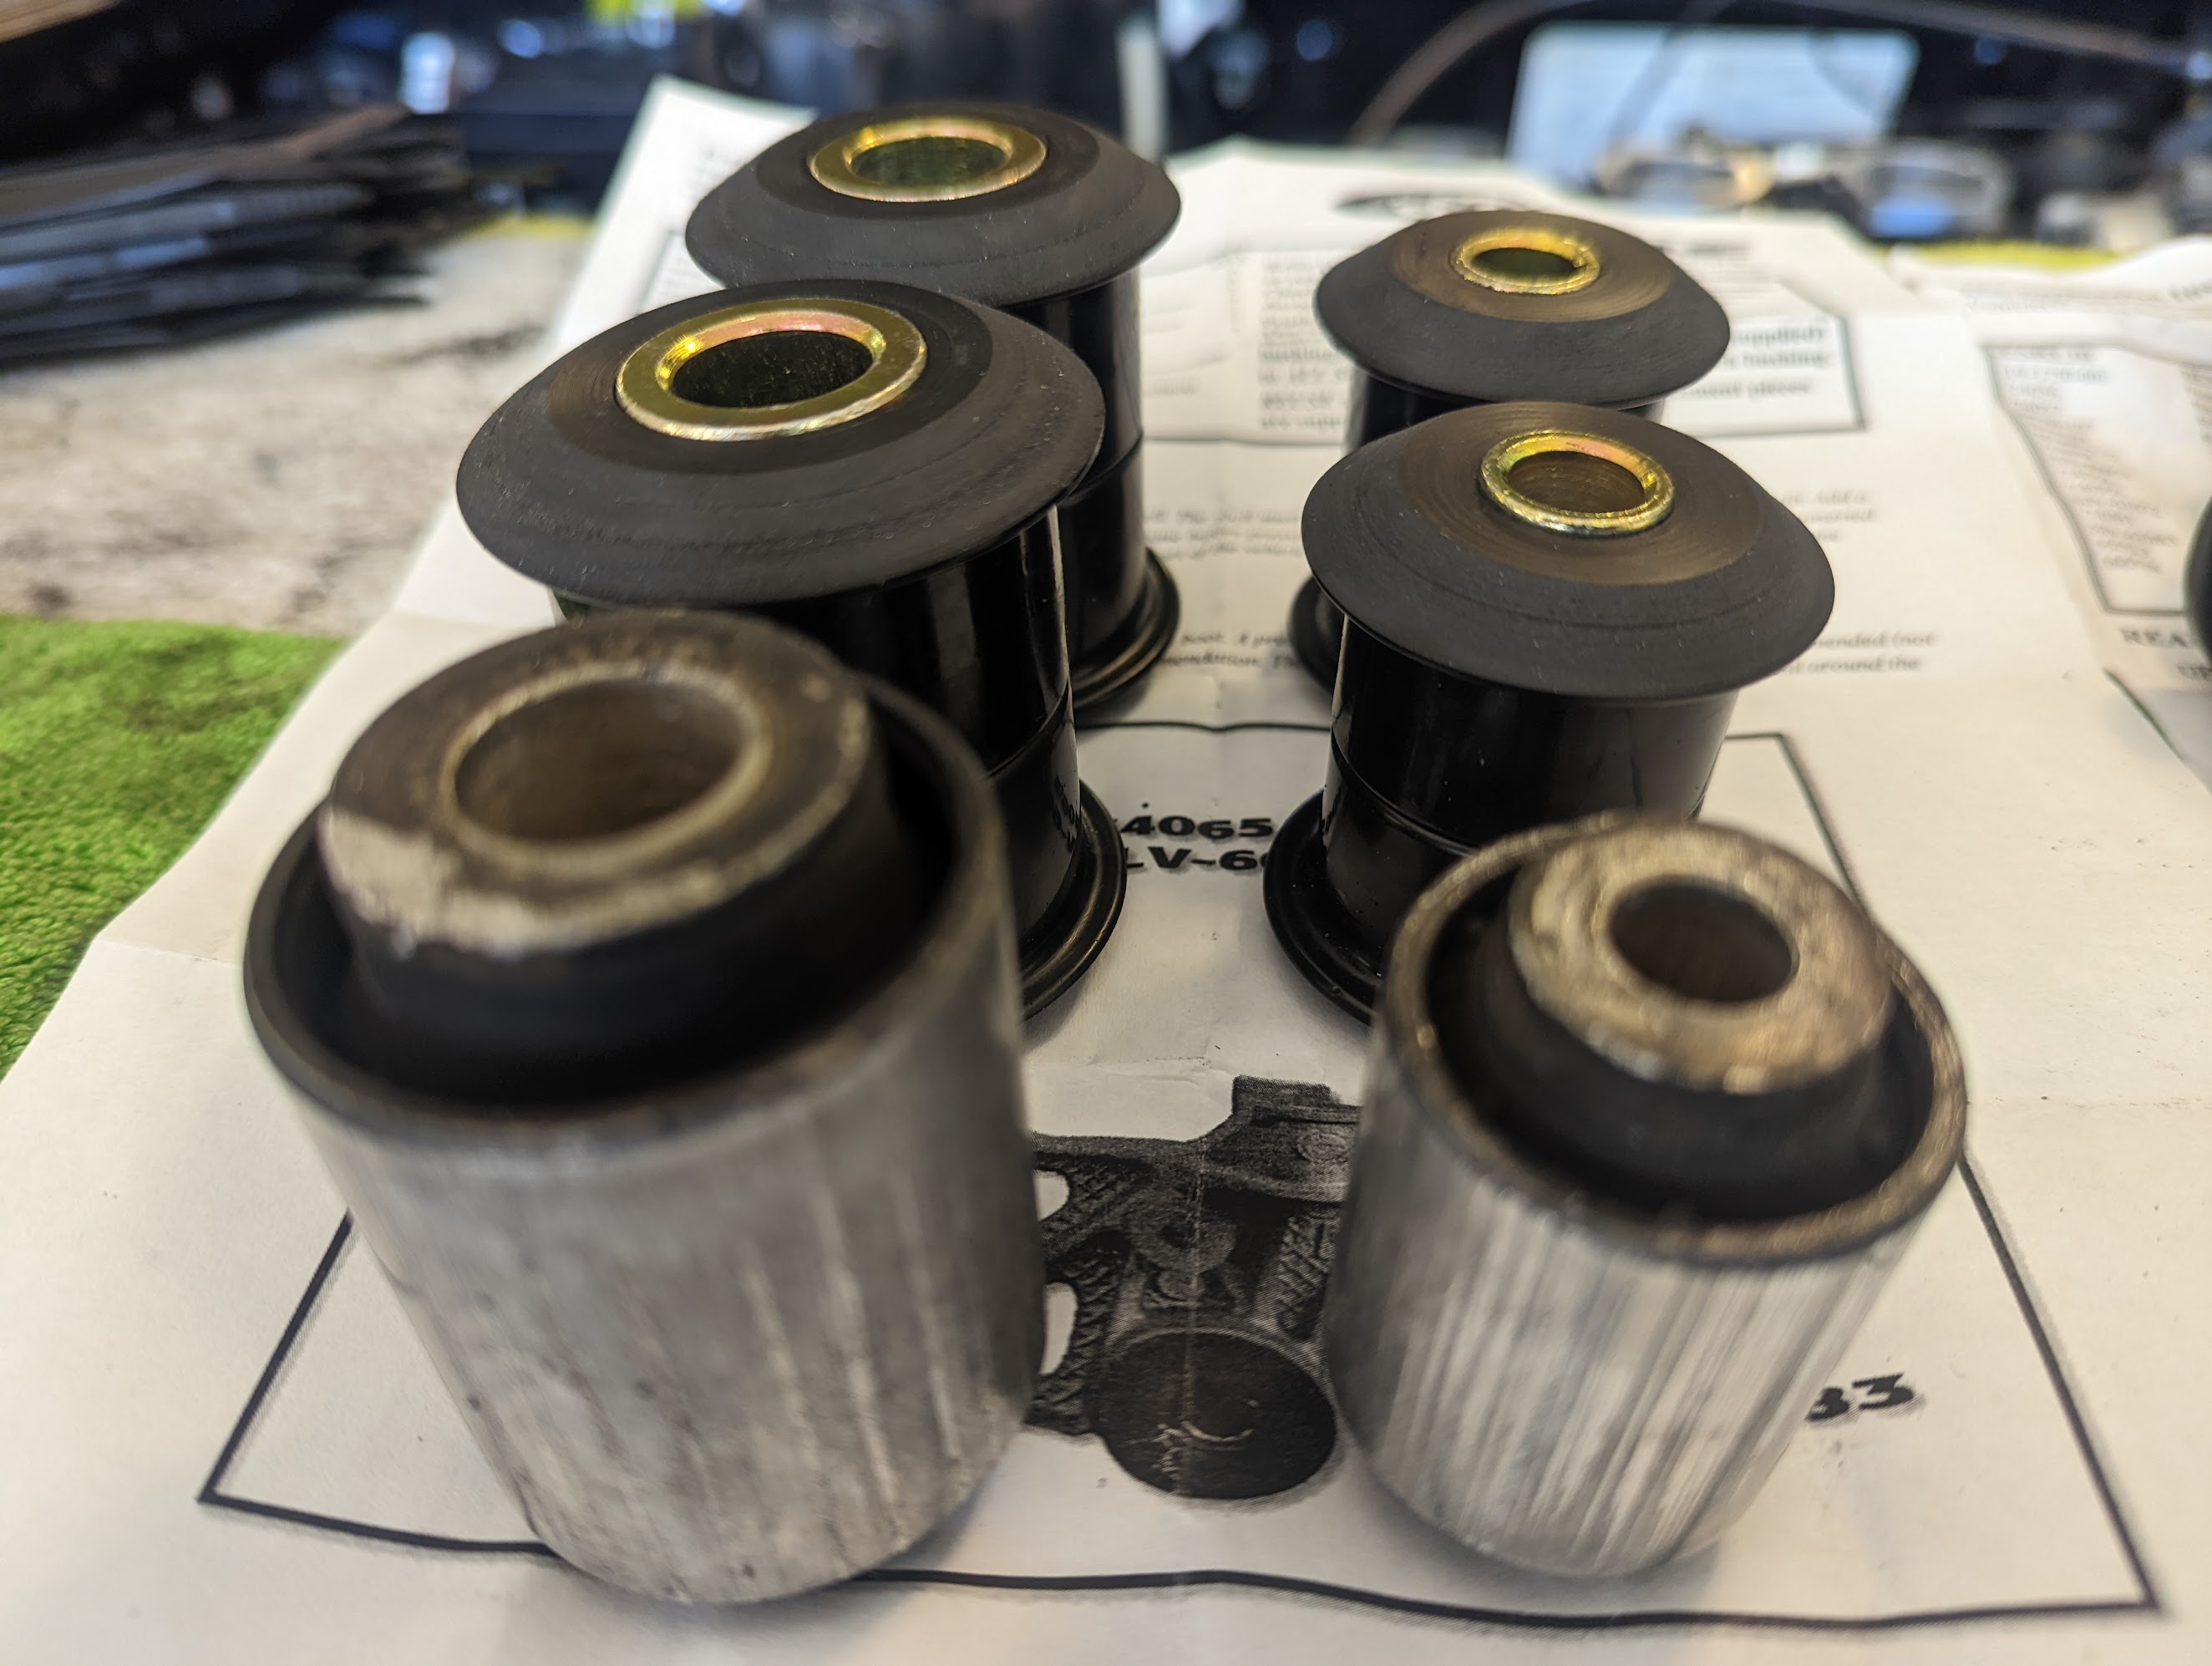
The bushings above press into the front inner uprights as shown on the left most and right most parts here. This was also prior to cleaning. You'll see towards the end how incredible these ended up. Almost @Honcho perfect! almost.........
AM-JKLXtZIZJ8QChVnTpxzm8VHD9jm5LbRJ8VlNGgQrrEYkf4NCXtmYcX-hJdmMHs23BOTkFfimfNyRSwyChZE2AaXqdm7vciNXHkWJQA-onZNLOrcKStPbA4Nfi0B6D7uVUUg6hjX2XVBcVn_vlGH9YxM8rtA=w2649-h1994-no


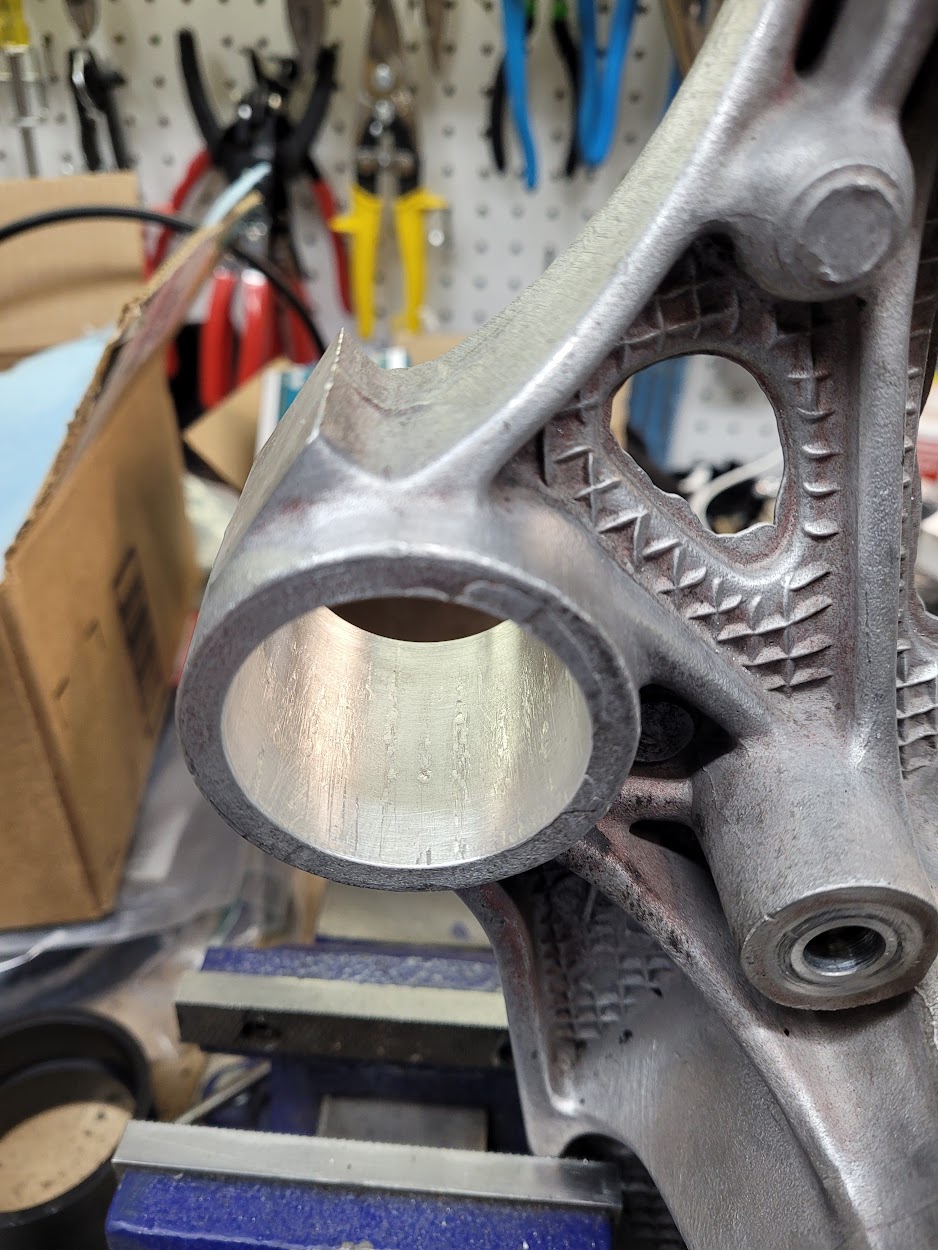
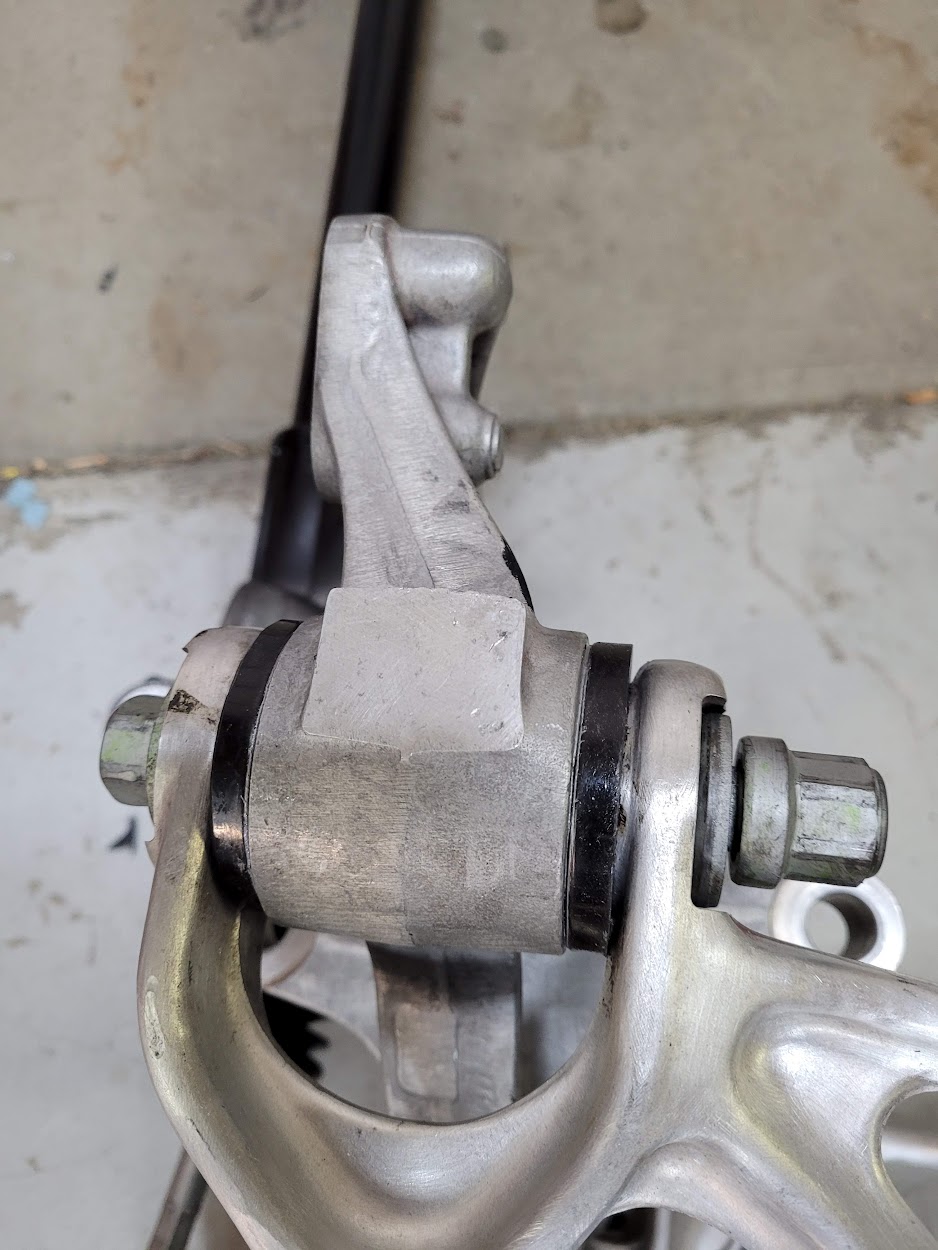
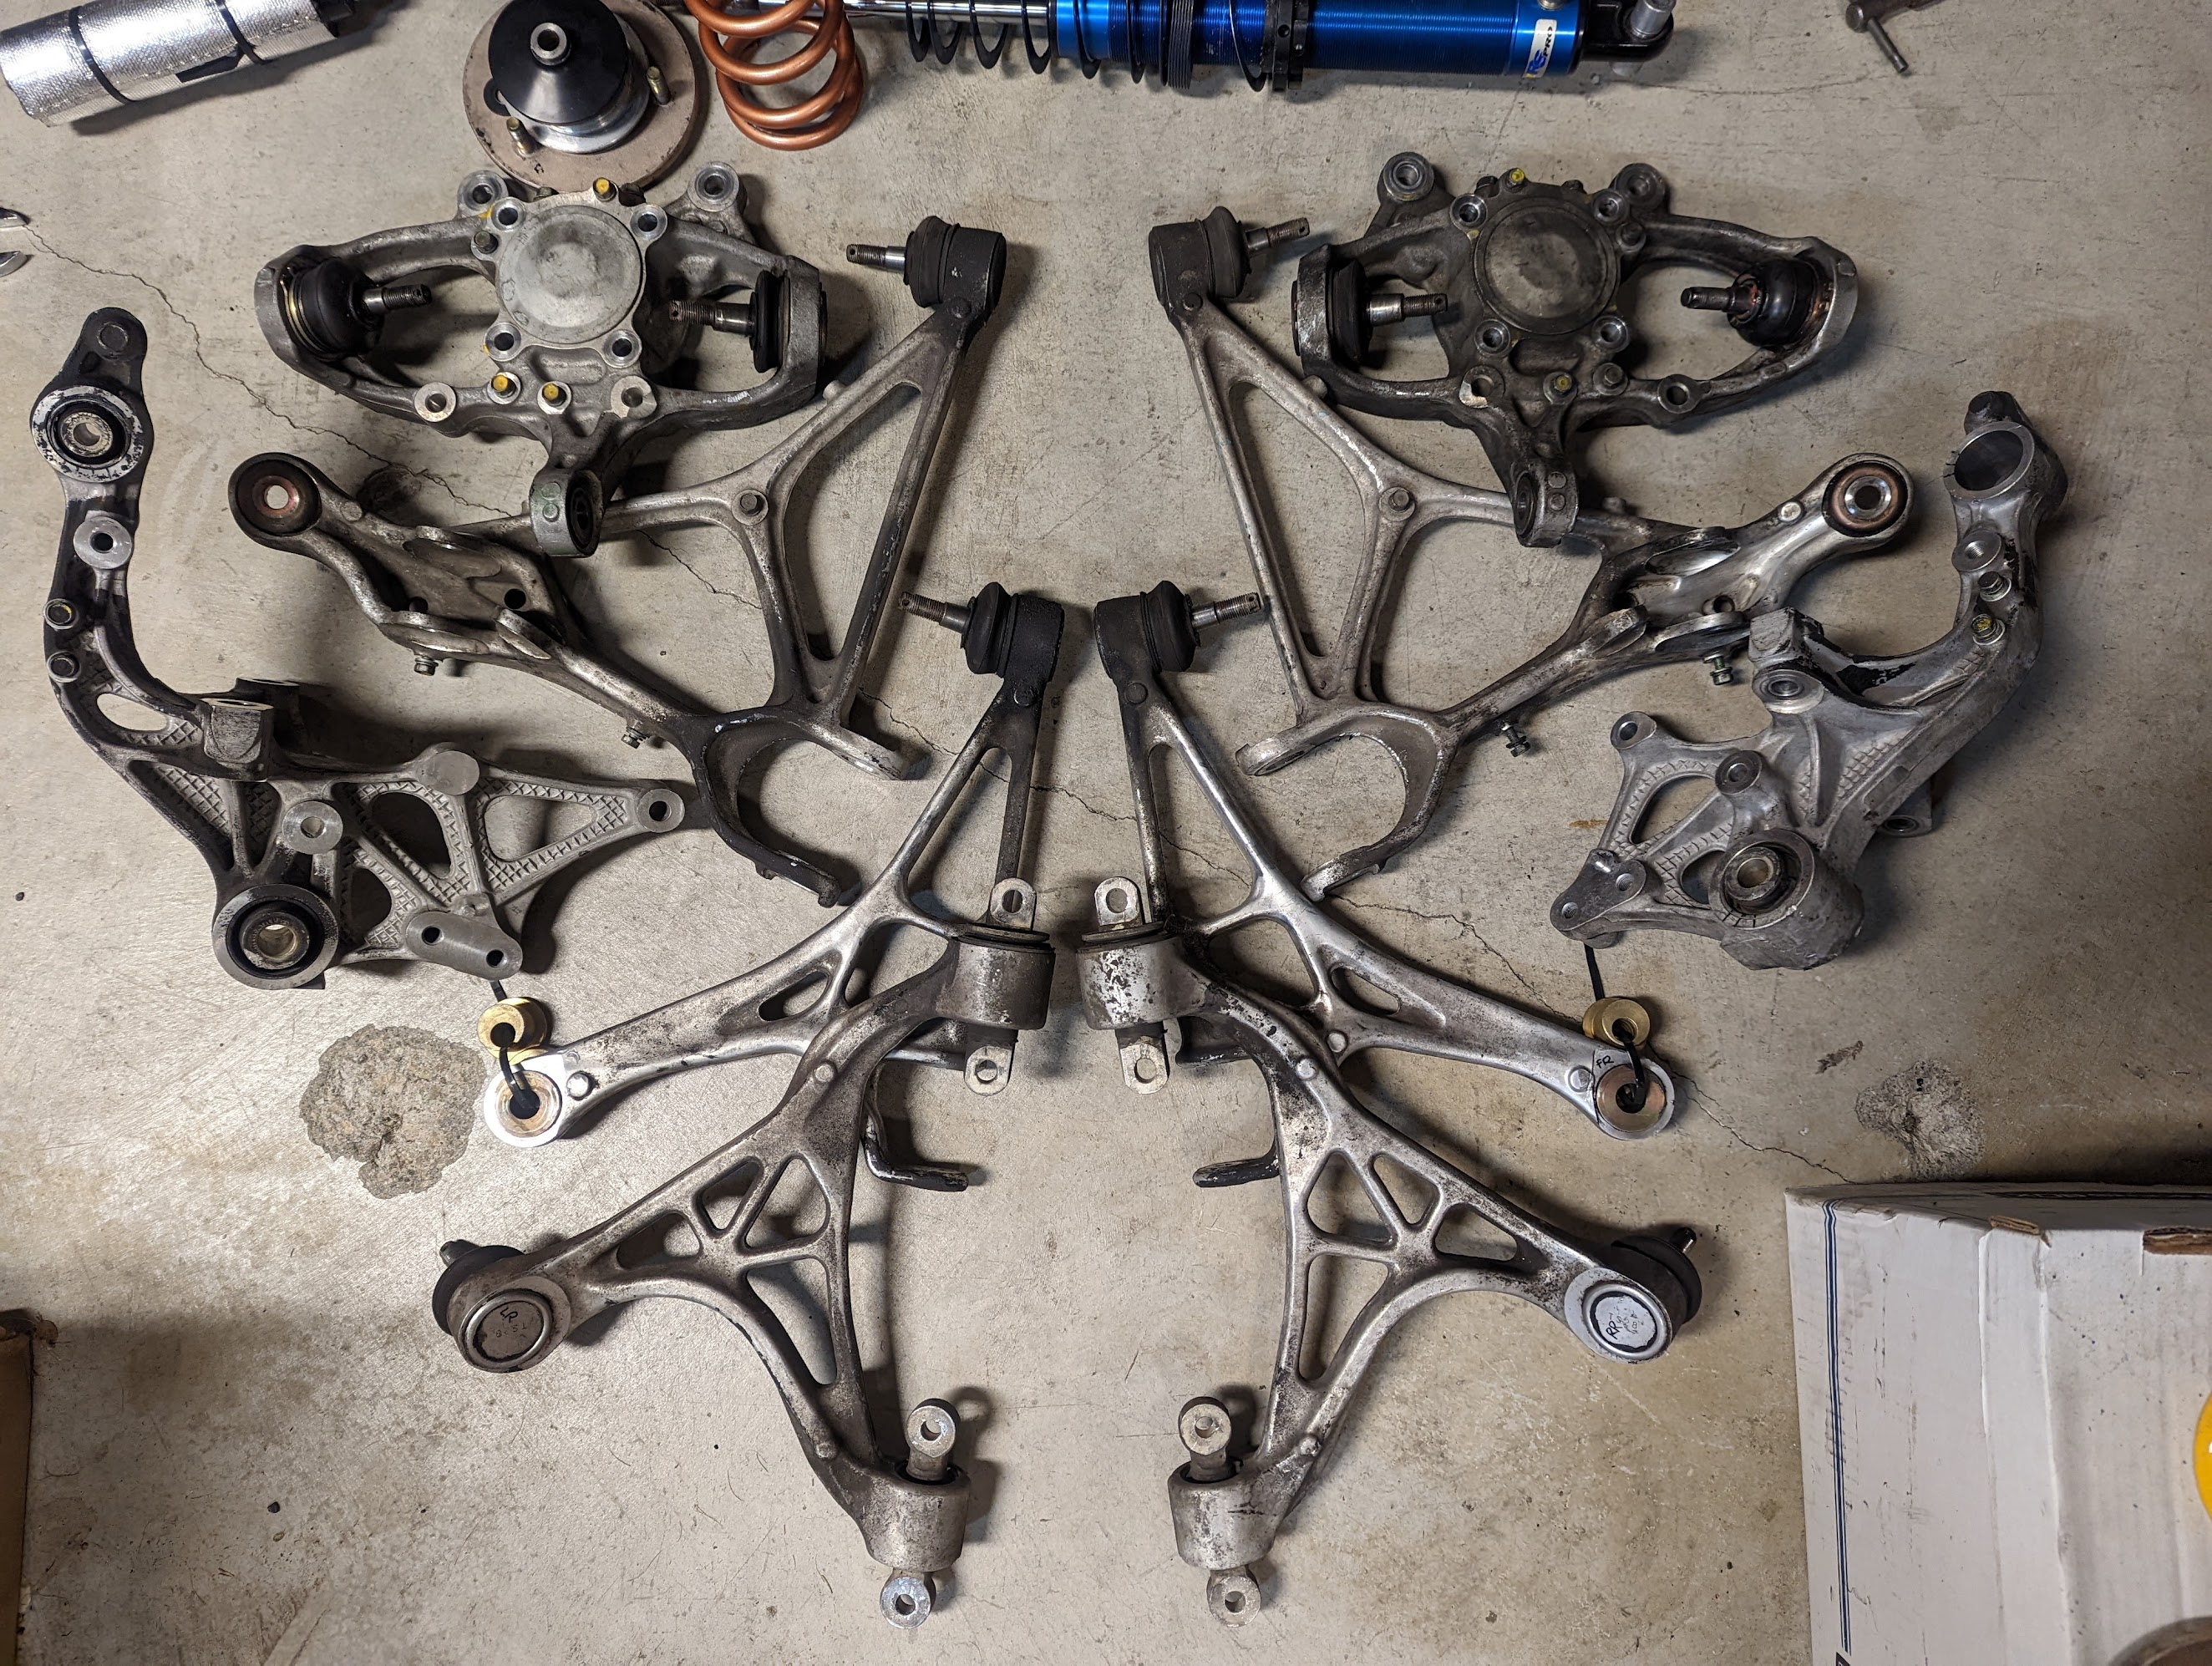
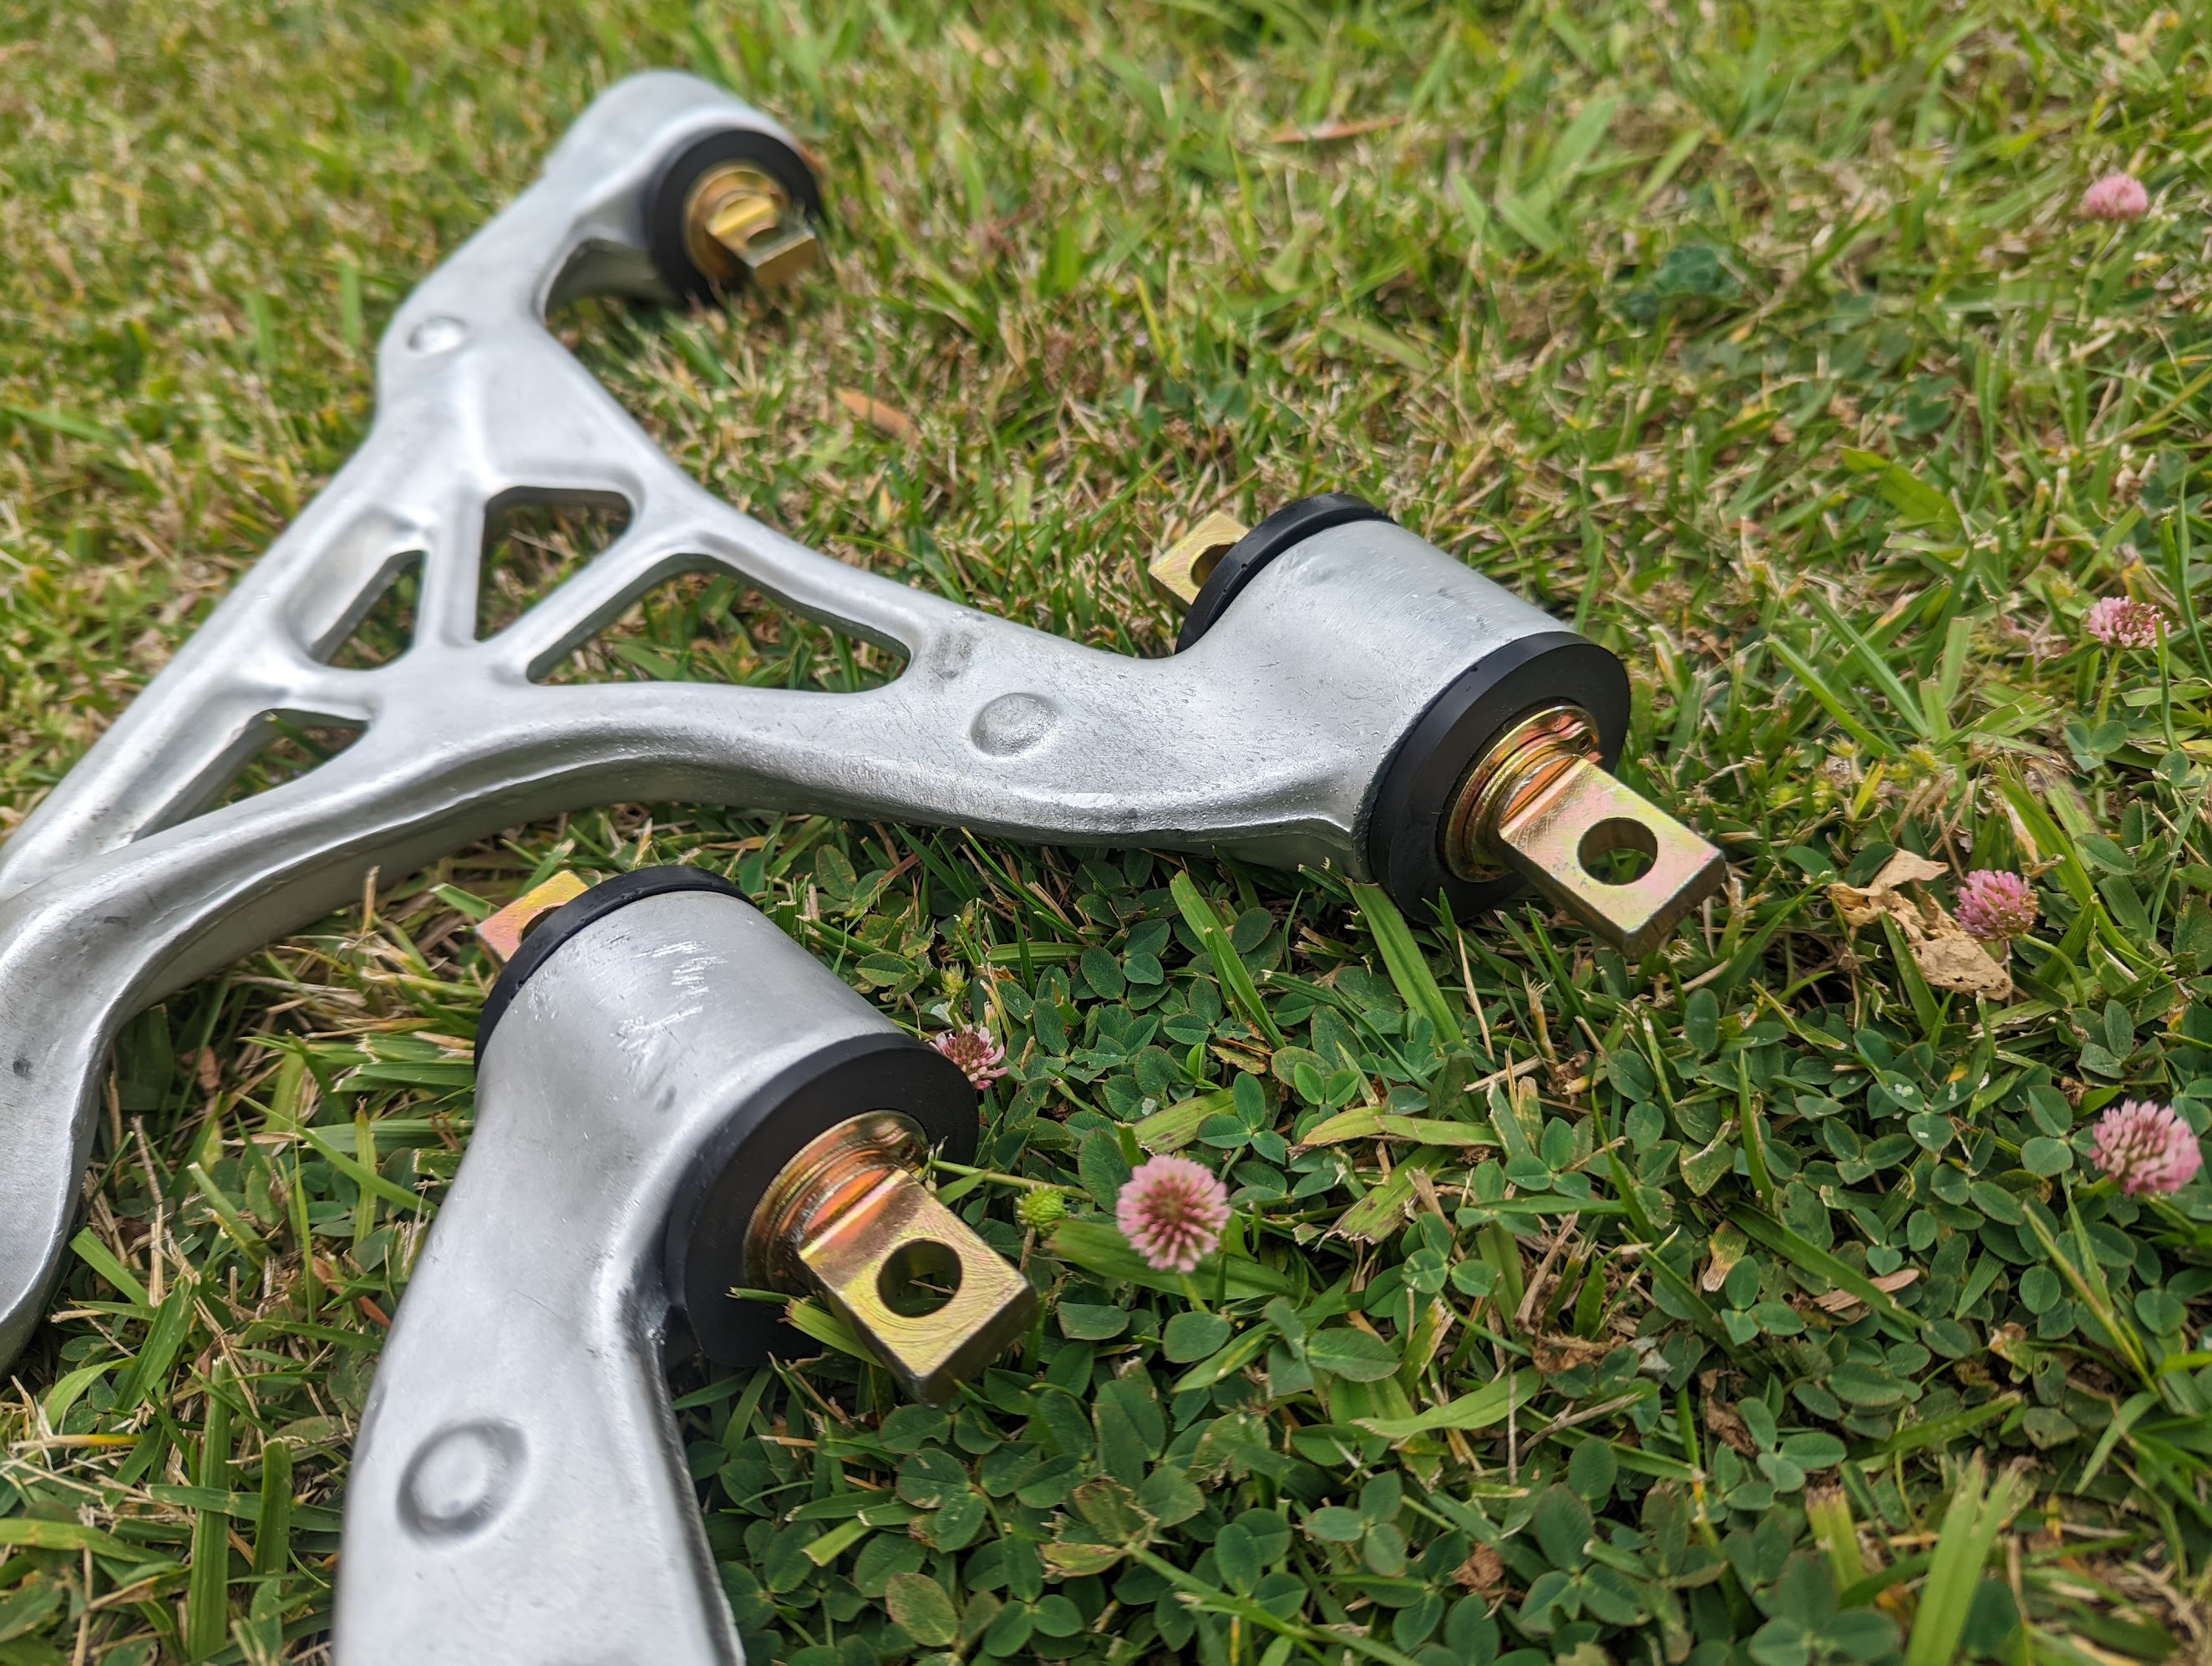
This is the front rear LCA after rounding off. Keep in mind most guys on here use the Cedar Ridge solid rear bushings so these will be an extra set. Though for a street car I would consider using the prothane for the rear LCA rear bushing location as well.
AM-JKLVf5ETBsPWRn3eKXohje9UCEC1OtgF6zT1PATIaYhpVsqAWGbge8AJFpO60oNEb7qPUbAz_Nim4g3RuWeh2cMgs--pxkvEwoGGhy6H3w5O08-Cz7ledXDkk1kX_m9EstQSY3Rzsvglfm1s1SmDV1VPuaw=w1502-h1994-no


Manually turning stuff on the lathe is actually a soothing relaxing process. I think I'm going to buy one for my garage.
https://www.youtube.com/shorts/3jHaACQcrwY

Let's move to the rears. The upper rear inner bushings probably required the most time on the lathe.
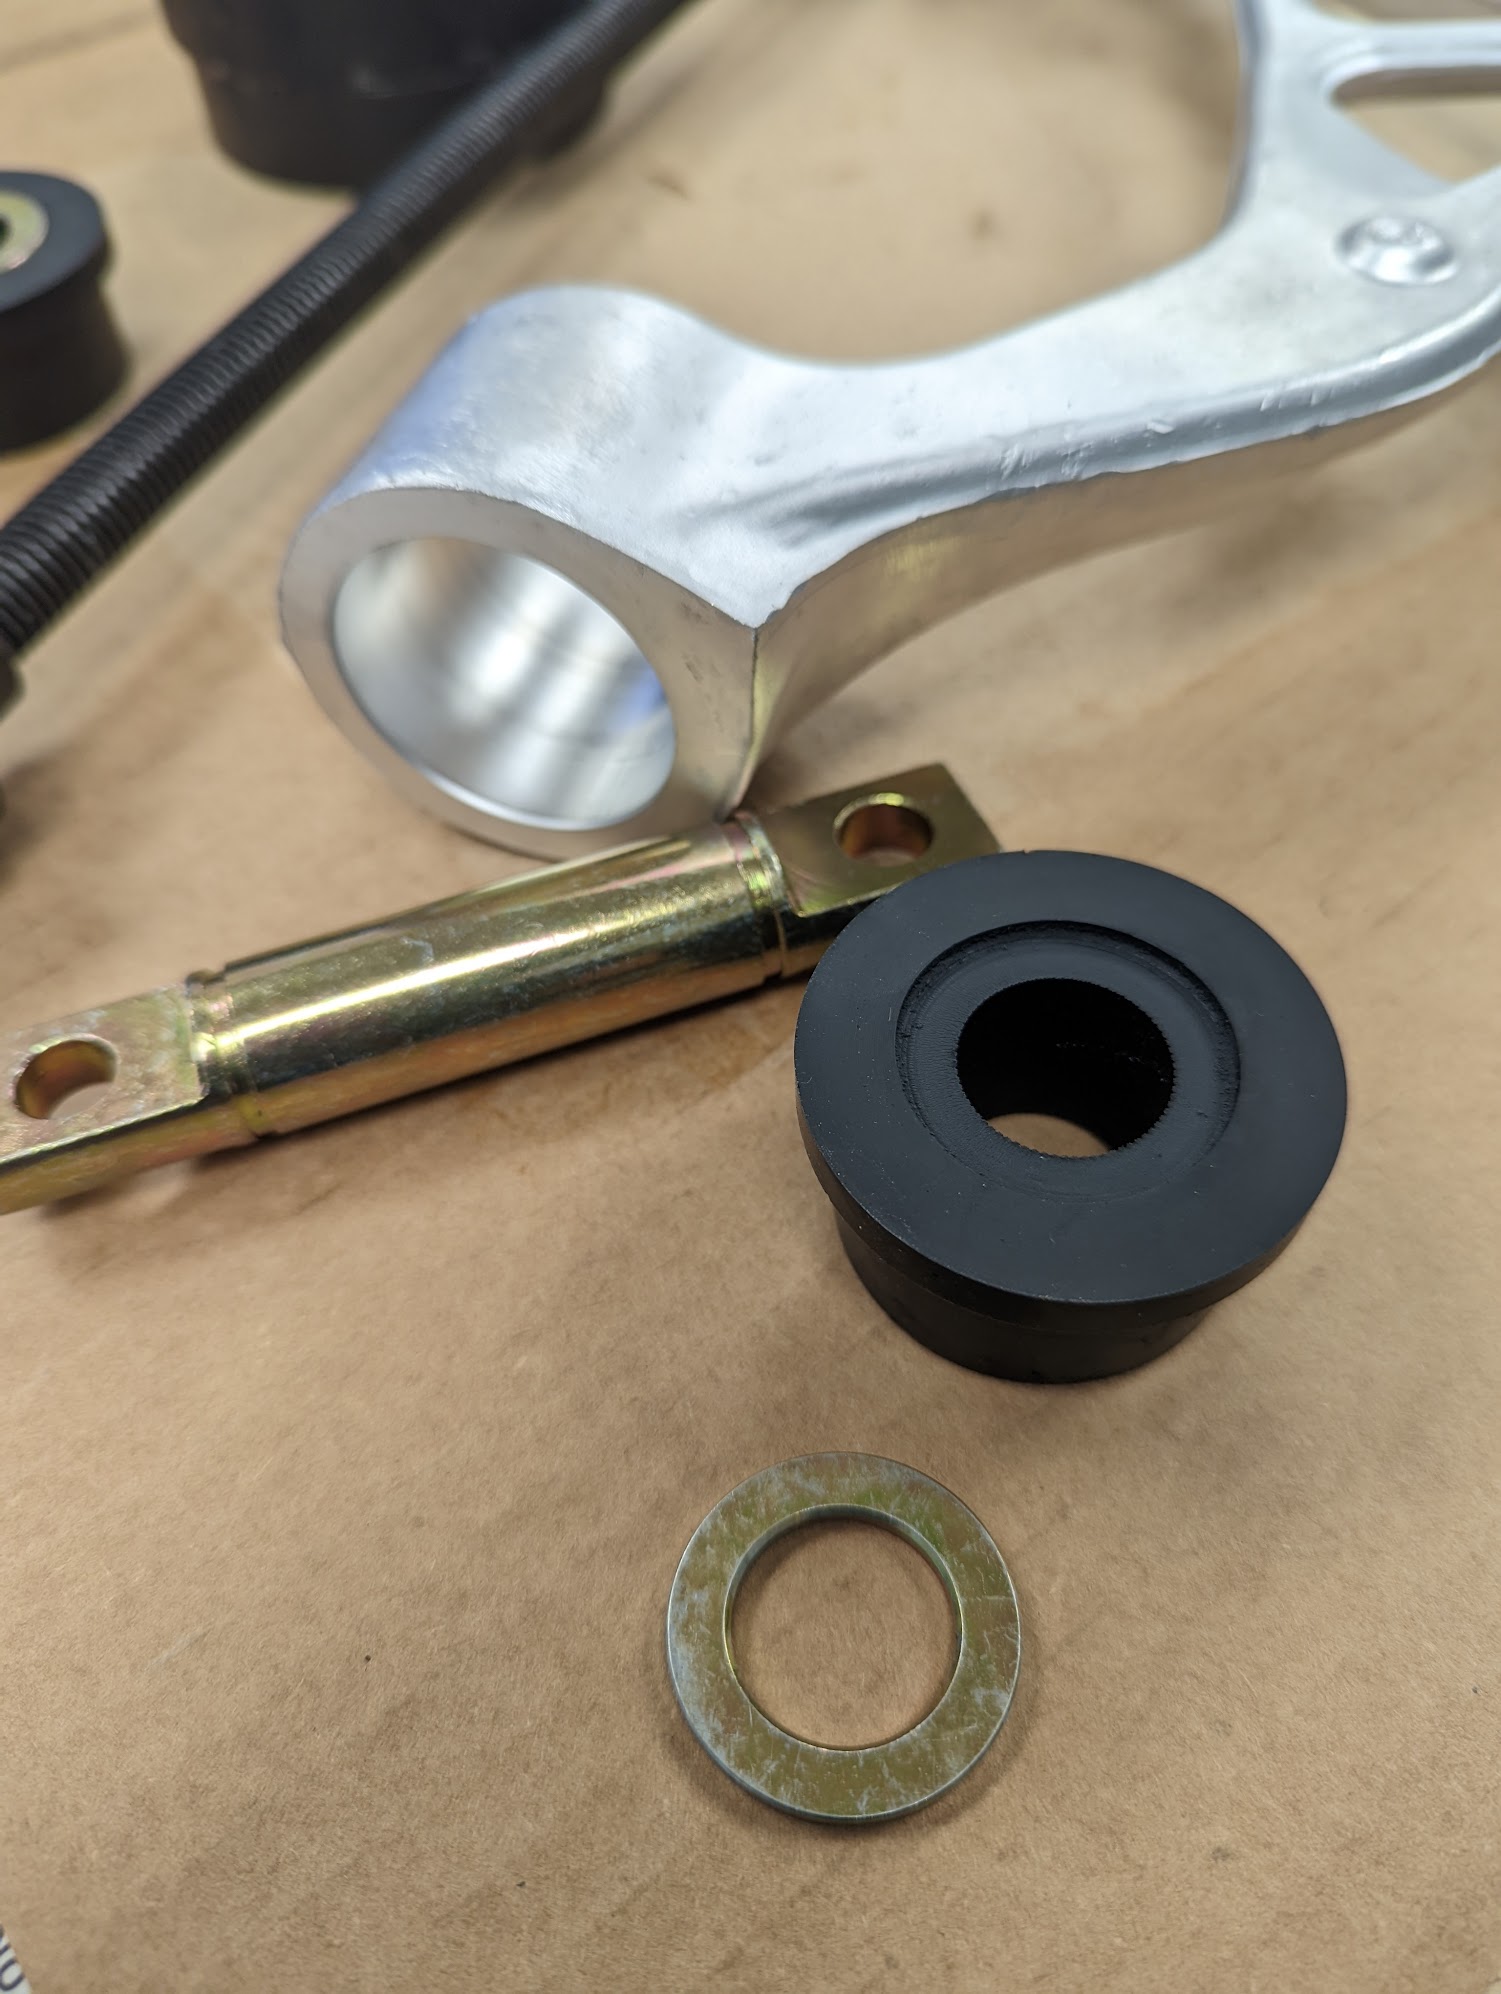
The rear "dogbones" require much lathing and measuring. If you have to get the offsets correct or the entire control arm will not align to the mounting bolt holes. The OEM units have a oval orifice just for this provision, but we're better than that!!!
AM-JKLWH9XqkqvsTq7UiX2yotq22j_1jR8jbv2GLVFRECcKWGQO81B6WaNWdfYqmlCFWn7fZMOtshshi0PwBP26gmGlK4Fe-gFG5GwbCkI0agp7oSZWWGH5ytyp8mU50wmeLE8Dh4zqy1QHb4ToTBUiVXZPsHw=w1502-h1994-no


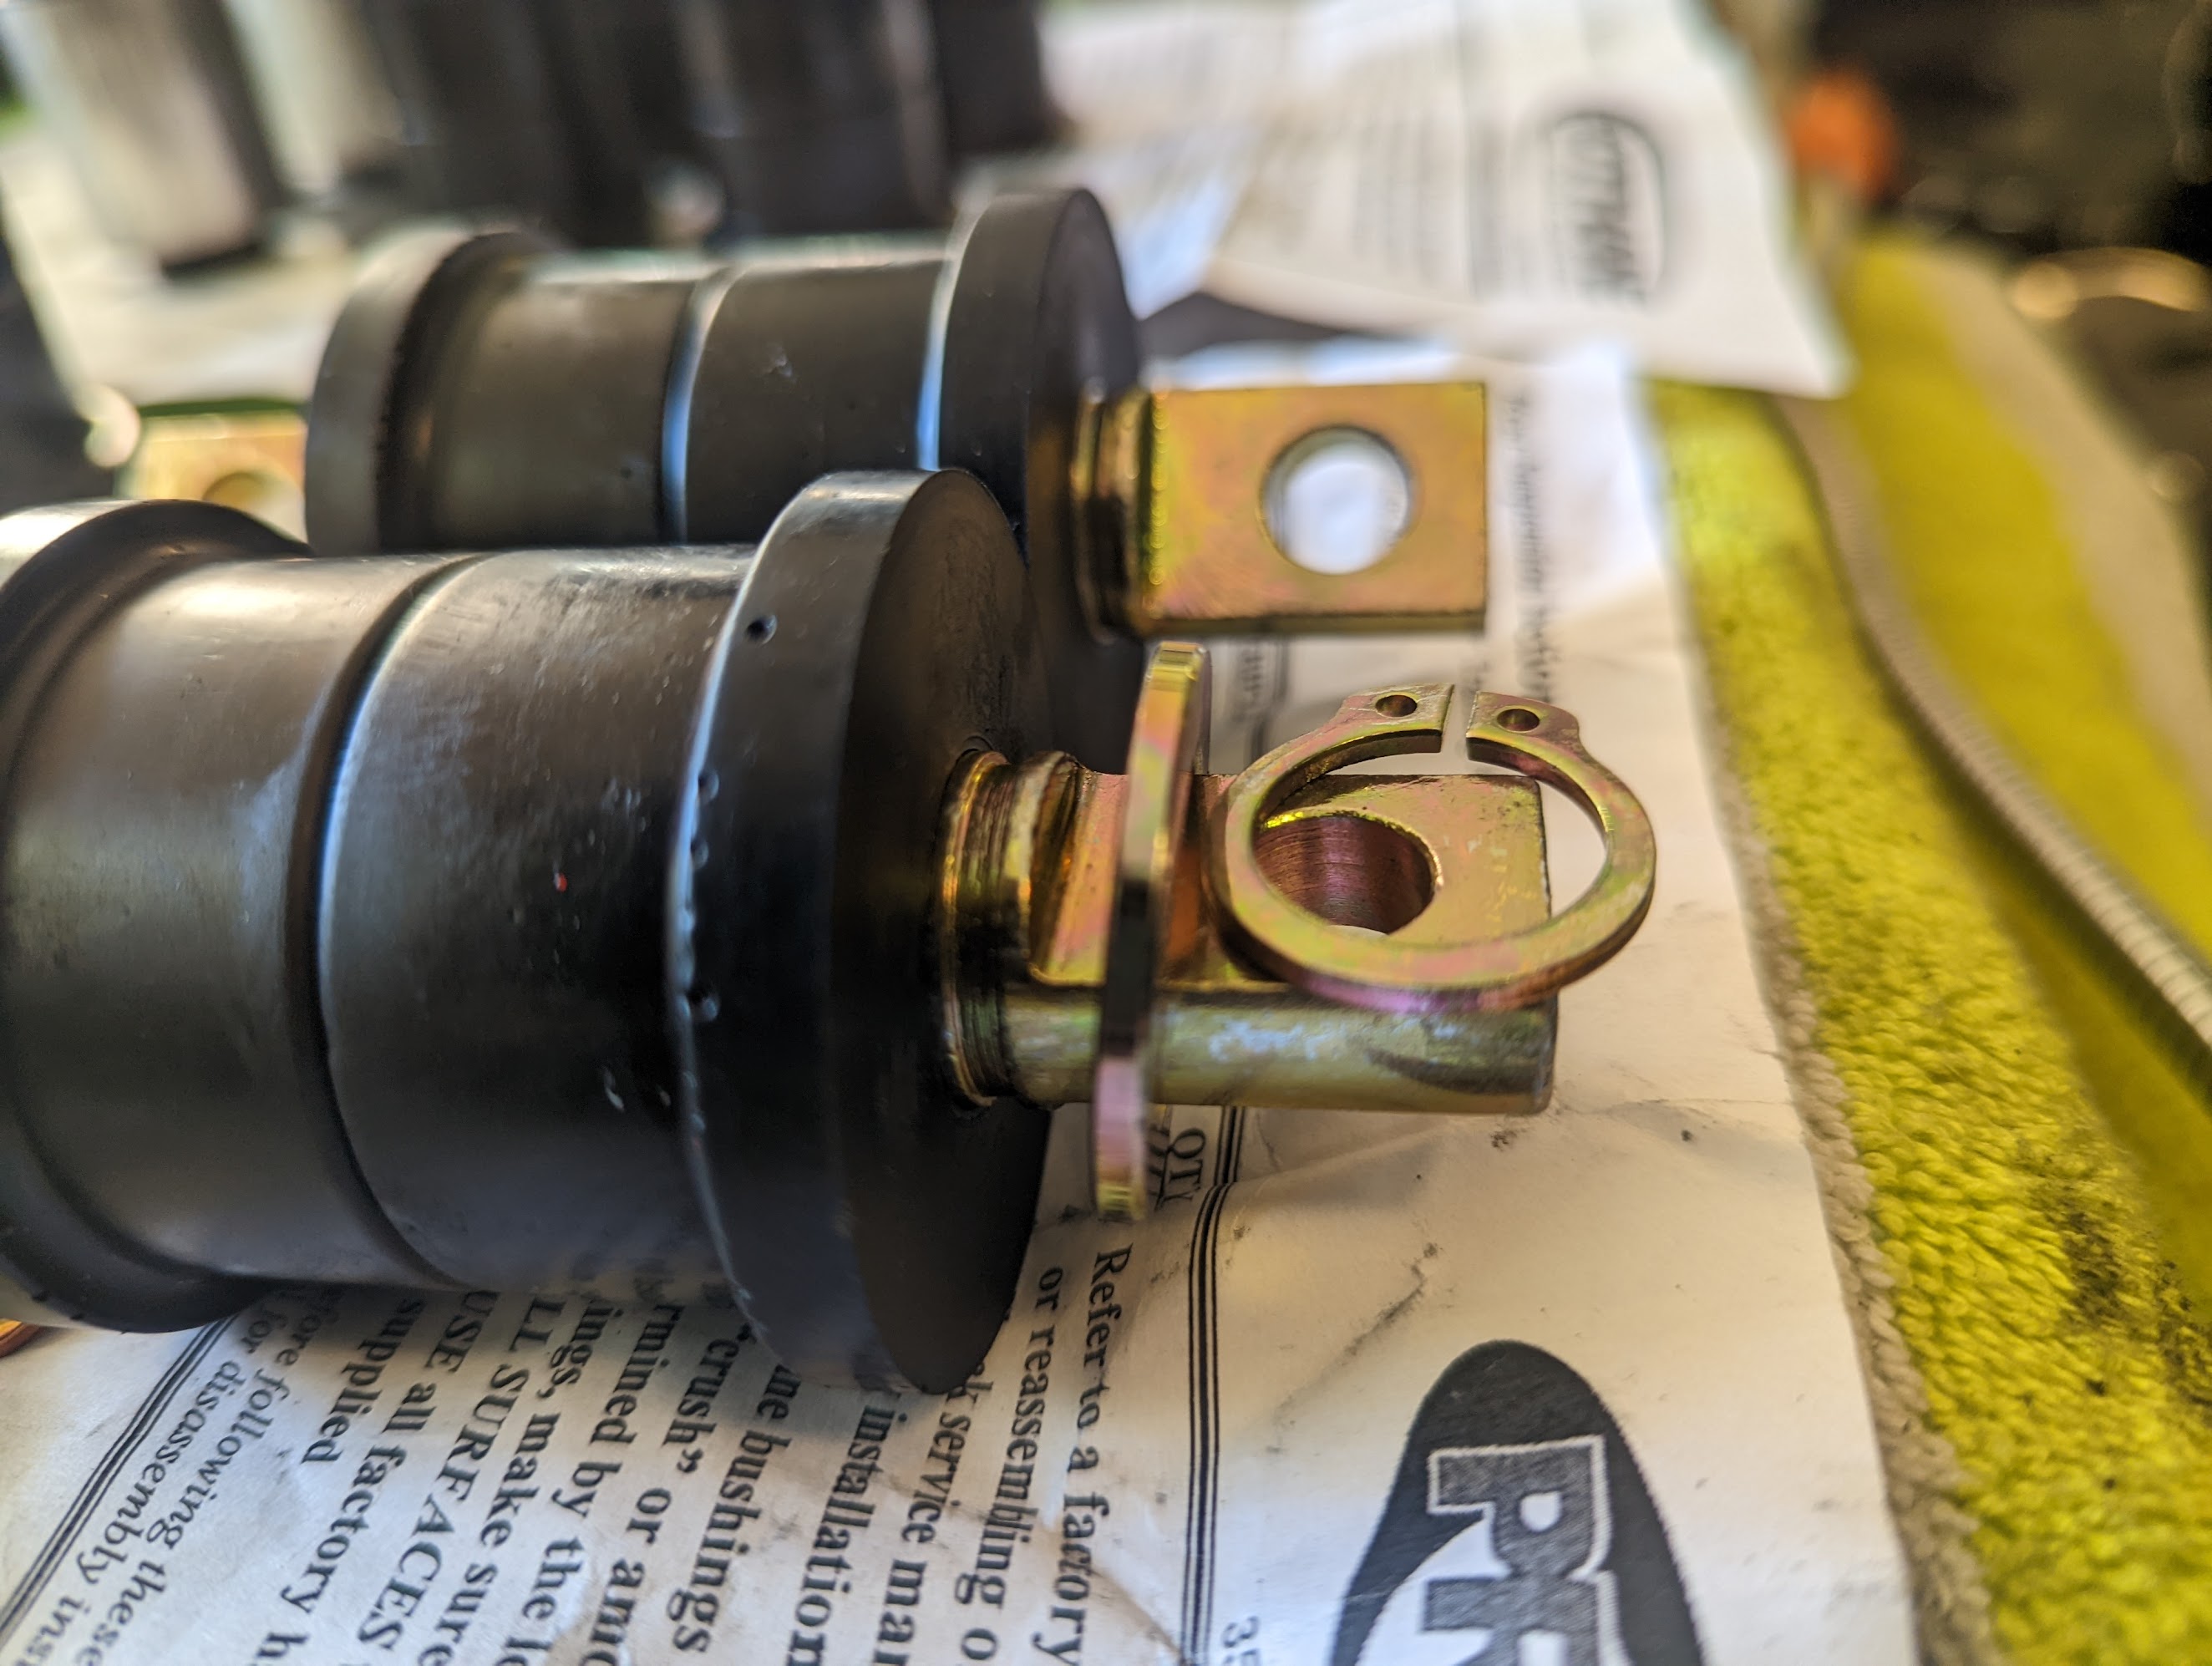
You can see here there's no way you're going to get those circlips in there especially once the bushings are pressed in and they laterally expand outwards.
AM-JKLWok7GeVKiM4UlMByUjtIm1UFVRn4N_mC0DSyBpeeI4nYk8hiT8S26NgN5uZj12PPMTZwme5xPKAn-CyZzs9gPF4OZmGNaTBzcme_KOHbbFFDvqs83taEOHBIYLcFaUMUHW5NDQhos0pn2p4hgtlRp8lA=w2649-h1994-no


Each bushing required varying degress of bevel to, more or less, have the washer sit flush. You can install the bushing with just the circlip but because I drive like an A-Hole I didn't want to risk that.
AM-JKLV14NL8ZUq-IaxChiSerRUjxiAyJEKZUE6Rah9mxC2vmm6sLNCvpdFNCcVESYO_3zLaEDKrzDu8kMztpaXQ2KChAMjytgosVTxzxS_SVC9hGkZ_vkWb-qAjo1u42UrxpjVkMiM-hGNPlGiEM6P_EFq7Sg=w1502-h1994-no


It all worked out in the end. You can see some of the bushings didn't require as much clearancing. You wouldn't want these loose either.
AM-JKLWcUtk5QHkb3-_7jDviNlXXe5DIU1RcecrG2cdDXHSu7pRmwH7FOWUz7_DnbIZF_pRqY7CLCV2BdueMebxgl4bQnlIGehFf4HUGM5bUk-CGg5pIhAhORltjFs54B6BH9gsMYa3qrPETwZkZwbOTwCFWOw=w2649-h1994-no


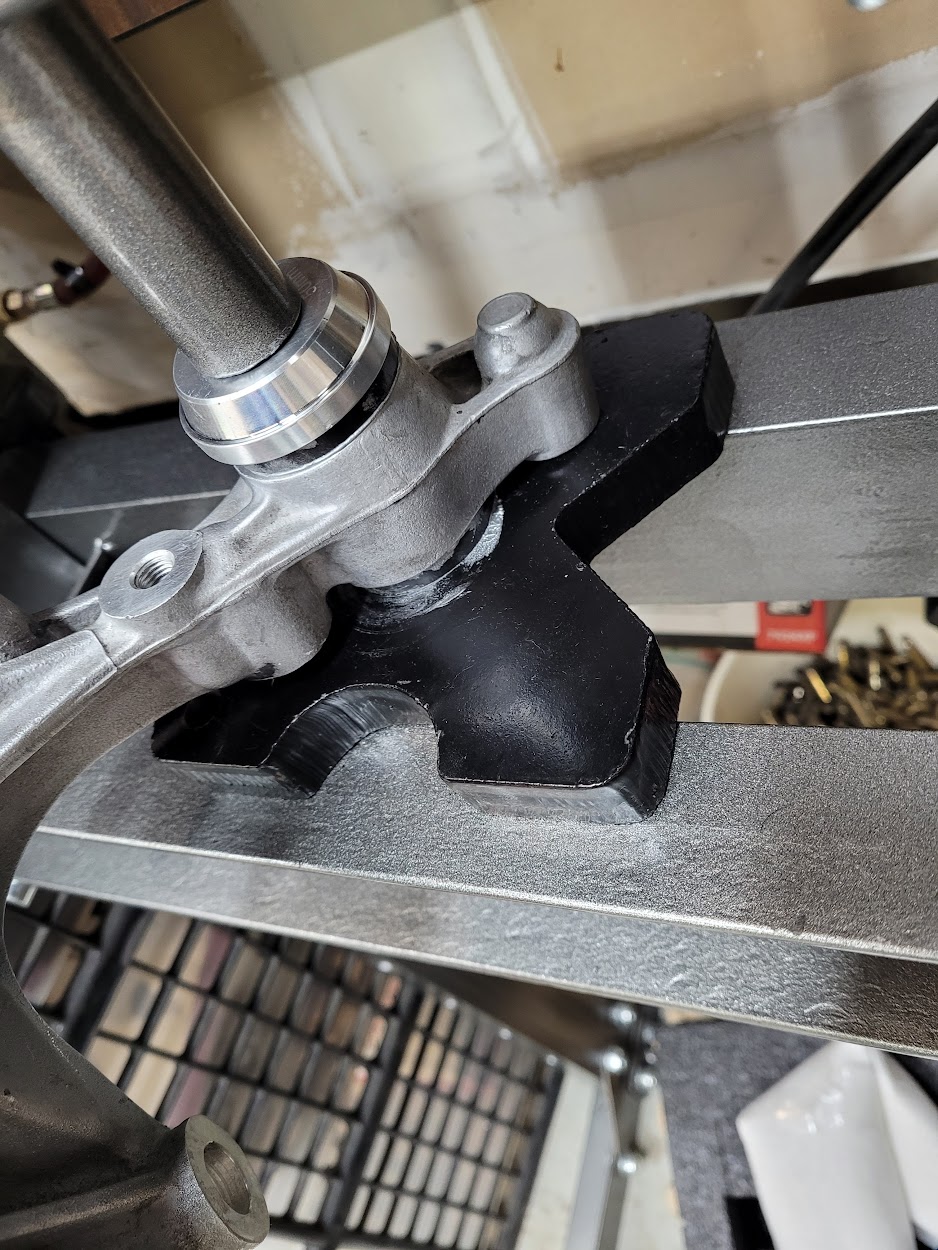
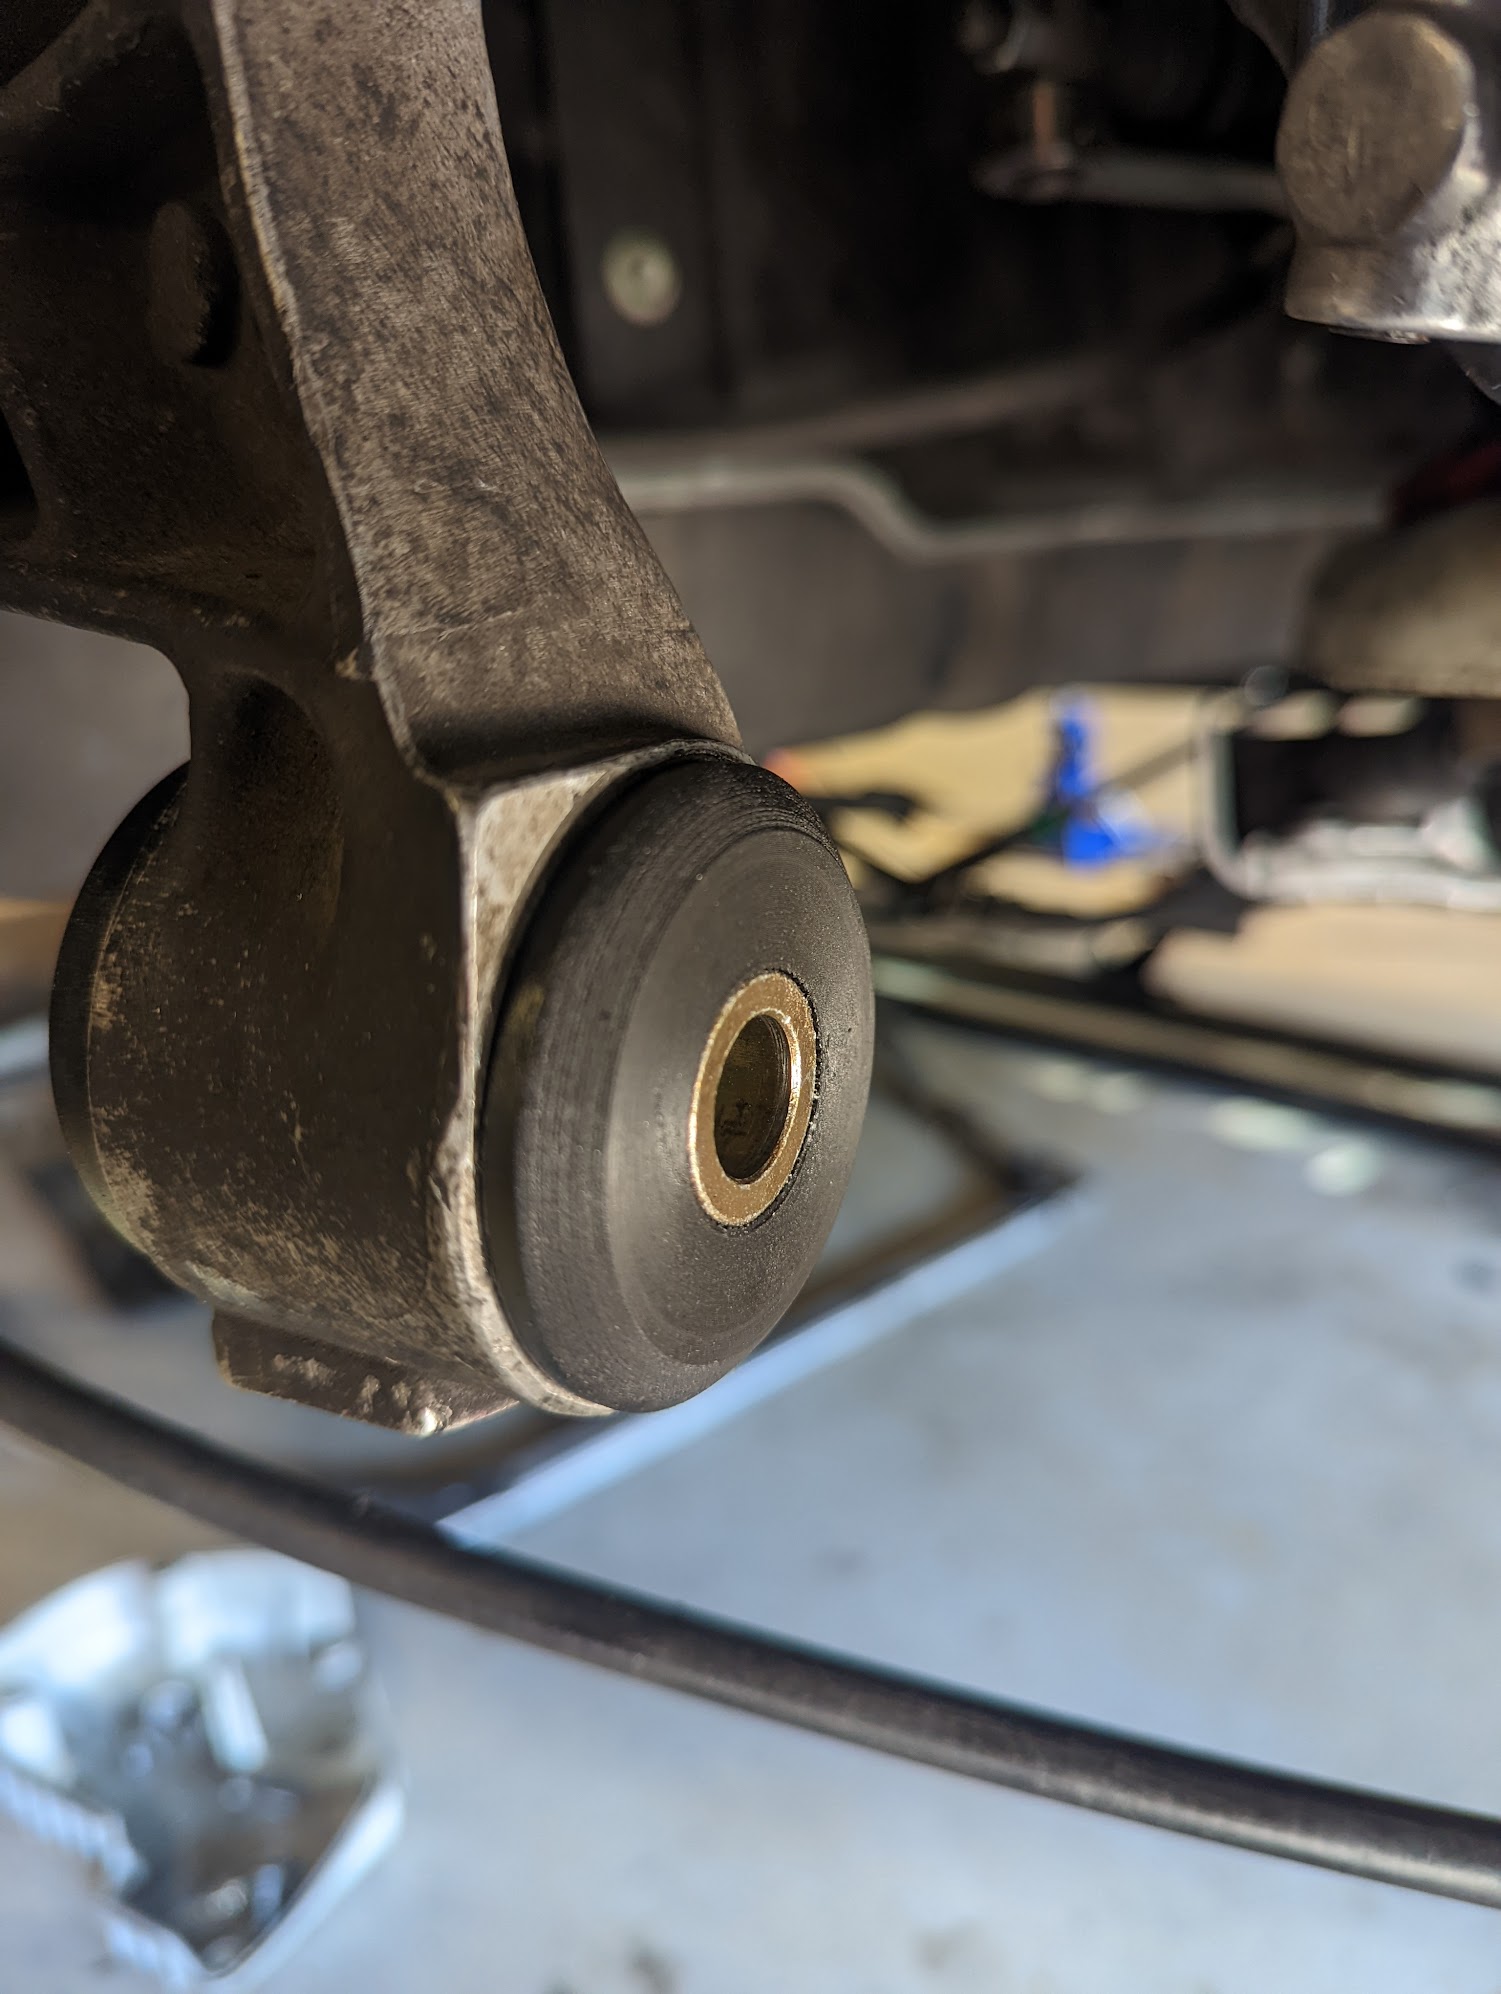
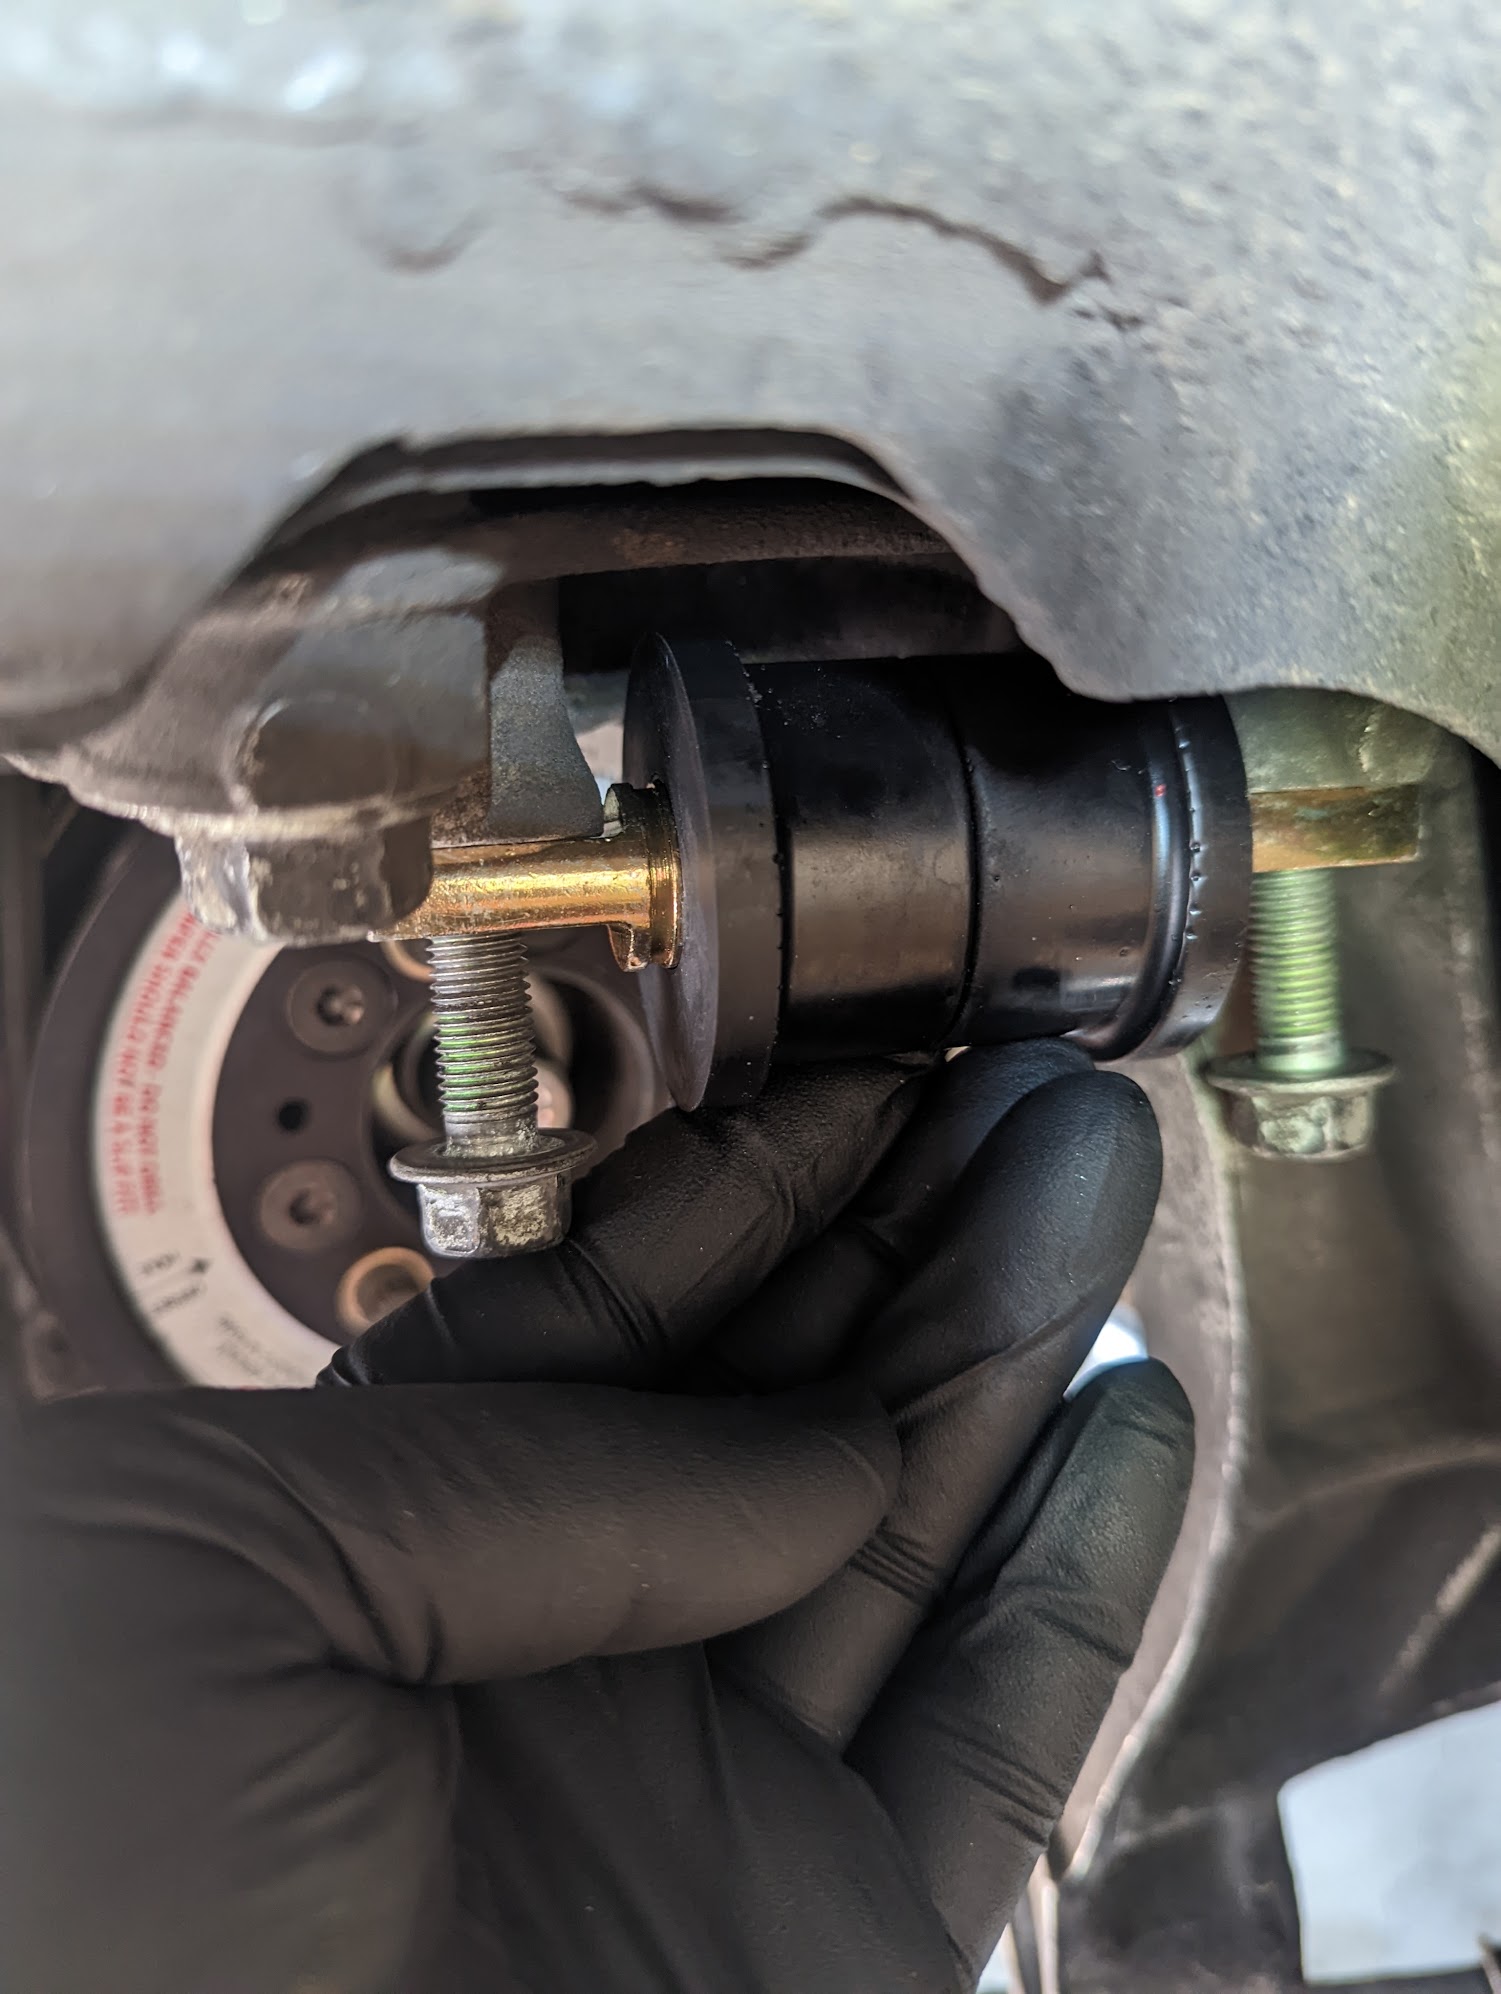
The dogbones in the front fit just fine... but the rears requires about 0.5mm clearances where it makes contact with the chassis. I thought about this a while... I decided to take a manual file to the chassis to clearance some of the casting imperfections instead of shaving down the dogbone. That area of the dogbone is structural support for the circlip.
AM-JKLX8UKe8FrsiQYuuvj7vpvGurcrkz5gXfLFvJDsXnAB7YXydyA40Kt5w9Bijh5XGVg-RhmqCaJKWLQbUvpi0VAX_Fn0qsFeFtg4jOiAr1BvwvVYvlNrQExi0mINzw5zCR24wIu3lIrL4j4X8QOhLqYrH9A=w1502-h1994-no


You can see they touch on both sides of the rears upper dogbones
AM-JKLXO4U9m_eTPfrs13IoW_a9HpXkGx3YT7EUQL5LnIkmiQP798bX7fWIN7yD4xRmeT1gXyTHkCSflUHtOvUvV77TRBsLTVQo1W7fOOKh4PU4haV_d16E3WPkyzb_WF3uuwATge9Tj54j8V9D5AfzljkvI0Q=w2649-h1994-no


Lastly, not sure how particular you guys are but I hate it when my alignment settings move around. One area that will cause this is loose tolerances.

All of the Prothane sleeves have varying levels of looseness. The upper fronts were the worse (not shown in this video). This is probably not a problem for most cars but it was irritating to me. I took some stainless steel shim stock to get rid of the tolerance gap.
Before:
https://youtube.com/shorts/p72SgtSfWPs?feature=share

After:
https://youtube.com/shorts/Q2PLKe9Q6cQ?feature=share

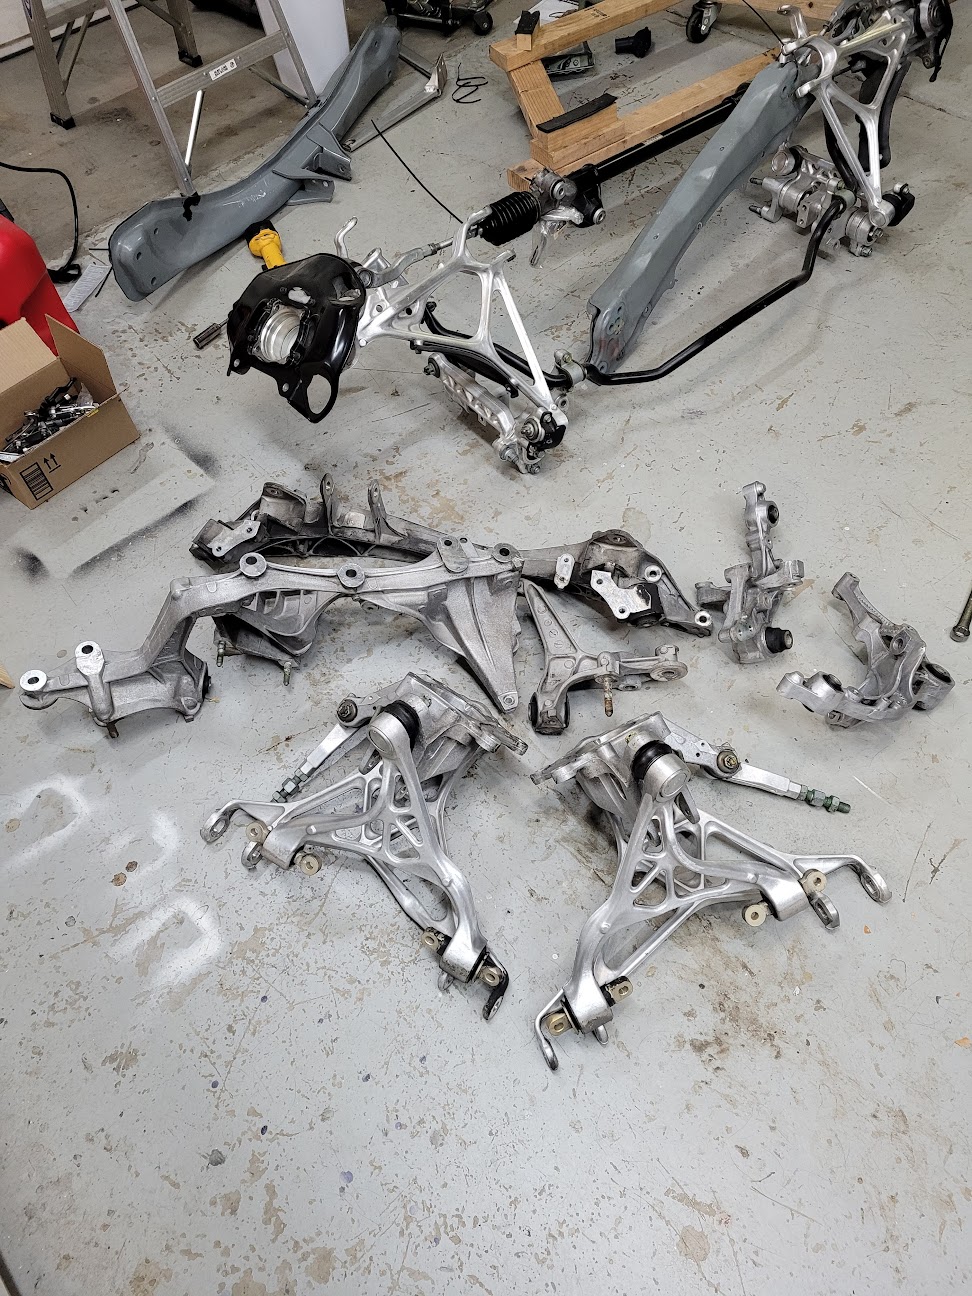
Lastly here's some NSX Suspension Pr0n for your enjoyment
https://youtube.com/shorts/RiiQWEkt9JQ
 
Last edited:
Wow, it’s really crazy these require so much extra work. Unfortunate that it seems there is no other option for upgrading the bushings. Any other suspension companies we could reasonably lobby for a better engineered set?
 
Awesome that you walked us through this. Have you thought about sending this feedback to prothane? If they are a stand up company they should revise their kit with your input.
 
Awesome that you walked us through this. Have you thought about sending this feedback to prothane? If they are a stand up company they should revise their kit with your input.
[MENTION=32030]SoloNSX[/MENTION] has mentioned much of this to Prothane. In my case, I think it's a futile effort. If I was them, if they didn't get it right the first time they're not going to try again. Making the molds for our car, which was sold in limited volumes to begin with, was expensive i'm sure. I doubt they even recouped their investment especially now many have found the issues. I'd be shocked if they continued to make a run of these bushings.

In fairness, I'm pretty glad I went with theirs. It's as close to a solid pillowball type setup as i'd want.
 
Some of the pics no longer work when we moved over to the new forum but I think it's time for me to order these bushings unless anyone has more install friendly suggestions.
 
Back
Top