Feedback on headless audio system plan

Joined
24 March 2023
Messages
30
Hi all,

I'm planning a "headless" audio system upgrade with the following main elements:
  1. Take OEM headunit out of the equation (but leave in place to keep the OEM look).
  2. Utilize the Sony xm-gs6dsp with built in bluetooth/DSP (and an auxiliary line in) as the source and DSP and amplifier for an active system (mounted behind the passenger seat)
  3. Replace the footwell sub with a SoS enclosure and JL Audio 10wv3 sub
  4. Replace the door speakers/amplifiers with SoS mounts and Dayton Audio RS180 woofers I had lying around with new Hertz MP25 tweeters. The tweeters will fit in the Mita tweeter mounts.
My question is around door speaker wiring. Since I'm running an active system, I need to run speaker wire from BOTH the tweeters and the woofers all the way to the amplifier. I was hoping to use existing wires and thus, here are my questions:
  1. I'm confused as to what wires actually go to the door from the head unit. It looks like A1 (WHT) and A9 (ORN) are the signal wires for the passenger woofer, A2 (WHT) and A10 (ORN) for the driver woofer. So I could extend these to the amp to run my tweeters as they are the thinner 18 gauge. Is that accurate?
  2. It looks like the amps are powered by a 14 gauge yellow/red wire and then are grounded, but I can't figure out if those wires go all the way back to the head unit and can be extended from the head unit to my amplifier to be used as woofer wires. Would love clarity on this and of course, other options if this route is not tenable.
  3. Assuming I can go this route, I was thinking about getting the SoS harness (factory speakers, aftermarket headunit) so I wouldn't have to modify the OEM harness in case I wanted to go back to stock. On the door side, I think I would have to cut the plugs off unfortunately. Is that true or would there be another option? Perhaps the stock plugs can be de-pinned?
I think that's it for the moment. I do have a question about the remote wire for the amplifier since I'm taking the head unit out of the system, but that's probably more a question about different options for the amp to be triggered on that specific to NSX stuff.

Thanks in advance for any advice!
 
BMW F20 speakers fit into the NSX enclosure nicely.

The Bose amp power comes from a relay. Not sure about the ground. You should be able to intercept the wires though...

There is no reason to cut wires as the Sumitomo HD 090 connectors and shells are readily available either from a junkyard has has 90-00's Honda, AliExpress, or CycleTerminal.com

I highly discourage cutting the door cards. You can put the tweeters in the front window sash cover (I think somebody has some custom ones) or maybe put them in the A-pillar cover (instead of a gauge).

You should get a copy of the ETM, I can email it to you...
 
With respect to your 3rd question.

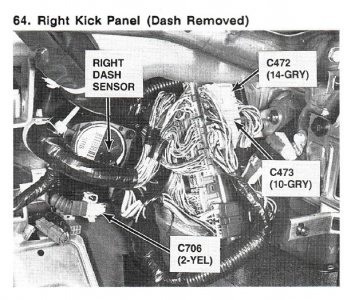
Orange and white are the line level signals and yel/red and black are the +12v and ground respectively. All 4 of those wires to each speaker enclosure are in a common harness which connects to a 4 pin connector, C 409 for driver's side and C472 for passenger side which is inside the car. C409 is behind the left kick panel on a bracket and C472 is 'placed' behind the right kick panel. At that point the power and signal circuits split with the signal lines going to the head unit and the +12v going to the amp relay and ground going to G402. C409 and C472 are the best place to pick up the 4 wires to each door without butchering up the harness. Do as @drew suggested and get a matching shell and crimp terminals so that you can create custom plugs so that you can interface with the OEM wiring harness. Cycleterminal.com may be able to supply you with the correct terminals and plug bodies. Email them if you don't see what you need on the website.

I also agree with drew about the door cards. Don't modify them. At this point NSXs that are OEM probably bring the highest resale value. Tweeter's in the door are not going to add to the car's future value.

As an observation, the NSX is a rather challenging auditory environment. Sound deadening and absorption did not appear to be a design priority. You are literally inches away from the engine and I find that there is a lot or road noise from the rear tires transmitted to the cabin. On my car, if there is any kind of crosswind at highway speeds the wind noise from the door glass combined with road and engine noise places the stereo system into the 'why bother' category. Around town fine. At highway speeds I travel in stereo silence. If I want to listen to the stereo while I drive I take my Audi. My way of saying that if you are looking to replace a dead head unit OK. If you are looking to try and improve the audio system, personally I would not bother.
 
Thanks for the input.

I'm going to get the Mita window sash tweeter mount so no door card modifications needed.
I am doing some sound deadening in the doors. I didn't go crazy, but I did manage to get about 3 sq ft of dynamat style material on the inner and outer doorskins. I'll also be using some foam "surrounds" to help maximize the woofer sound quality. I also redid the vapor barrier since it was falling apart.

I didn't realize there were plugs C409 and C472. I thought wires went straight from the head unit to the doors. I think those are the Sumitomo HD 090 style plugs? No reason to go to the headunit plug at all then since I'll intercept the wires here?

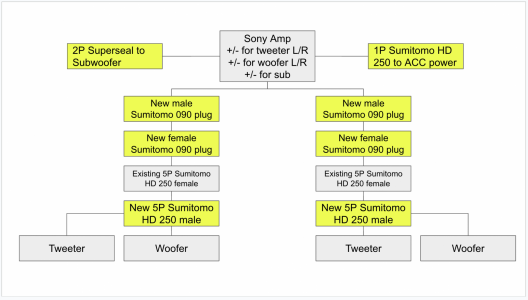
Does this look right?
Screen Shot 2023-05-07 at 11.21.27 PM.png
 
Last edited:
All will become clear with an ETM. It makes identification with precise planning and discussion possible.

We have pdf copies of the ETM, just need your email.

For some reason, I find it challenging to interpret wiring diagrams on my phone.

What side is the steering wheel on?
 
Last edited:
Seems to be an issue with New Member status.

There should be an 18P (or 20P) connector that connects up each door to the main harness. You can gracefully splice there.

You can make a tap harness or depin the door side terminals from the connector shell and insert them into another HD090 shell. Then you can create your own harness that is robust and easy to reverse if there is an issue...
 
Last edited:
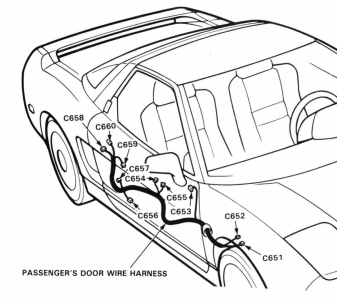
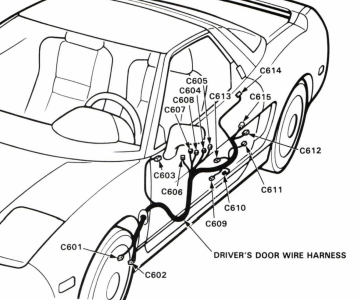
After studying the ETM, it looks like I would want to pick up the wires for the doors at C601 or C602 on the driver side and C651 or C652 on the passenger side. Am I reading these right?Screen Shot 2023-05-08 at 2.45.17 PM.pngScreen Shot 2023-05-08 at 2.45.05 PM.png
 
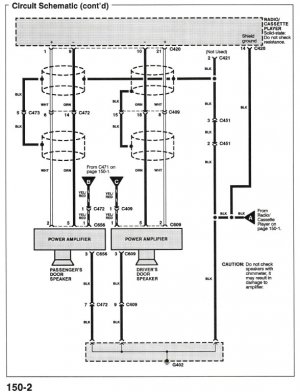
According to the 1992 ETM, C609 is the connector in the driver's side door amplifier / speaker and C656 is the passenger's side door amplifier / speaker. Since you nave an ETM, go to page 150-2 which describes the audio system and you will see the connector numbers on the schematics.

Your diagram is confusing. You need new plugs and terminals to interface with C409 / C472 in the footwells and new plugs and terminals to interface with C609 / C656 at the OEM amplifier / speaker housing. I can't comment on what is the correct model of plug and terminal number.

As an aside to the wiring issues, I would not get too enthusiastic attempting noise reduction. Its your car so you get to try stuff. I won't advise against doing things; but, offer the following observations about noise reduction.
  • Viscoelastic damping pads on the outer door skin may help because it is a moderately flat surface that can resonate. Once you get past about 40% surface coverage you are just adding weight. The inner door skin has a highly convoluted / stiff surface and is probably not prone to drumming so I would not bother with damping pads. If you want to try and reduce noise transmission through the door I might try a thin closed cell foam decoupler followed by a layer of mass loaded vinyl over the inside surface of the plastic vapour barrier. However, there is not a lot of space between the inner metal door skin and the door card so not much room to squeeze that material in there. I assume your 'foam surrounds' are on the dry side of the vapour barrier otherwise you are going to have problems in the future. The inside of the doors do not stay dry unless you never drive in the rain or wash your car.
  • I experimented with lining the complete rear bulkhead and the areas over the front of the rear wheel wells and up the B pillar with 3M Accoustic which is a lightweight sound absorber that you typically find stuffed everywhere on modern cars. That did squat in terms of reducing noise transmission into the car.
  • On my car, when there is a cross wind the noise generated at the base of the A pillars where it interfaces with the front door sash drowns out any noise transmission through the door (or the rest of the car). That is a design problem and through experiment I have discovered that adjusting the glass so that it fits tighter against the body gasket makes the noise problem worse. I expect that is because tight against the gasket makes the glass less flush with the A pillar leading to vortex formation at the base of the A pillar.
 
Hmm, I don't see any other ETM references to C601, C602, C651, and C652.

Those drawings with C601, C602, C651, and C652. connectors are on ETM 203-9

I think @Honcho R&R'd a door, maybe he recalls what type of connector was used?
 
Last edited:
Hmm, I don't see any other ETM references to C601, C602, C651, and C652.
I also noticed that the door side harness connectors do not appear in the ETM.

That diagram posted by @oneplustwo appears to be the harness diagram from the service manual. If it is the 1991 service manual there are some known problems with the 1991 service manual's description of the electrical system. There are outright errors in the service manual and I believe there were also some production changes. Those 4 connectors might be early production or they might be an error or the ETM might be incomplete in its description. However, my 1997 service manual also shows the same connectors and harness diagram so it might be an ETM problem. The connector list in the service manual confirms that C609 and C656 are the 5 cavity connectors that connect to the door speakers. The routing diagram indicates that C601 (18 cavities) connects to C409 and C651 (14 cavity) connects to C472. I am guessing that C651 and C601 are the respective door side harness connector numbers that match up with floor harness connectors C409 and C472. This will need to be confirmed by visual inspection since the door harness connectors do not show up anywhere in the ETM.

Assuming I am correct, @oneplustwo will have two options for connection. He can de pin the 4 door side wires from C601 and C651 and create new matching 4 pin connectors for the 4 wires to the door or he can de pin the 4 wires from the back C409 and C472 and insert the new tweeter and woofer wires into C409 and C 472 with the correct crimped terminals.

Here is page 150-2 from the 1992 ETM (which is consistent with the 1997 ETM)

Stereo.jpg

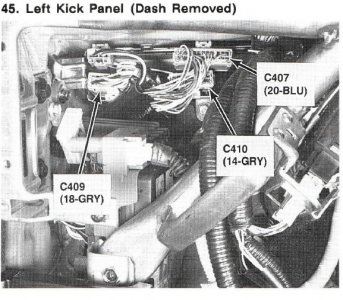
Just for reference, here are the location pictures for C409 and C472. Its very crowded so the option of depinning C601 and C651 to create new 4 pin plugs may not be doable because of space limitations.
C409.jpg

C472.jpg
 
concur with 1993 ETM for LHD

LH door
C409/18P (aka C601 in 1991 FSM)
C410/14P (aka C602 in 1991 FSM)

RH door
C472/14P (aka C652 in 1991 FSM)
C473/10P (aka C651 in 1991 FSM)

For those in the RHD world, I find that the RHD car follows the LHD wiring as much as practicable.

FWIW: I have successfully created an 8"/200mm 20P tap harness to gracefully activate the trunk release for a keyless entry unit. It is tight, but there is enough room for an installation. I had @tturkstra install a test unit on a LHD car and he said the connectors were buried and significant disassembly was required.
 
Hmm, I don't see any other ETM references to C601, C602, C651, and C652.

I think @Honcho R&R'd a door, maybe he recalls what type of connector was used?
I pulled the harness out of the door for painting and left it connected to the car, so I never disturbed those connectors.
 
Space may indeed be the main issue. Do all those wires end up back at the end of the head unit? Might it be easier to intercept the wires there?
 
If you make 8"/200mm long tap harness: there is enough space. I know because I've done it, I created a whole keyless product around this.

Getting to the connector is the challenge on LHD.

The reason you can't use the head unit native connector is that you are trying to repurpose the power and ground wires used to power the Bose amps. So you will have to intercept the wire between the relay and the door.

The power antenna request wire from the head unit triggers the Bose amp power relay.
 
Ah right. Can you help me understand the details of the tap harness? Why is it 20P? Which plugs does it connect to?Anything else that I'm not thinking of already? Thanks!
 
Sorry, I made a tap harness C407-20P is how I got to the trunk release.

You will need to do similar with two of the above-listed connectors. There is enough room to stuff an 8"/200mm harness.
 
Gotcha thx. I’ll be back with questions I’m sure! Waiting for some connector parts and should be able to get moving then. I should probably work on my yoga in the meantime so I can get in there and find all these plugs!
 
Oh, in other news, the tweeter sash bits from MITA finally came back in stock so I ordered a pair along with the rear pair since mine are about to fall apart.

Related question, anyone have a reco for an apple car play unit that has dash cam and backup cam functions? I’m considering this one but it doesn’t have a front cam.

Also, I was going to use this or a modified version to mount.

 
If you make 8"/200mm long tap harness: there is enough space. I know because I've done it, I created a whole keyless product around this.

Getting to the connector is the challenge on LHD.

The reason you can't use the head unit native connector is that you are trying to repurpose the power and ground wires used to power the Bose amps. So you will have to intercept the wire between the relay and the door.

The power antenna request wire from the head unit triggers the Bose amp power relay.
Hi All,

I made some progress in the last couple weeks and I'm back with questions now that I've gotten a closer look at where these plugs are buried! Mostly around the fact that the space on the driver side seems impossible to get to without removing the full dash.
  1. What is a tap harness? Does that imply depinning from the OEM plug so I can put them in my own new plug and wire to where I need them? Or is using those wire tap connectors? I ask because depinning and re-terminating into a new plug seems impossible on the driver side. Even wire tap connectors would be a challenge if I'm looking at things right.
  2. It appears that I can intercept the signal wires to the doors from behind the head unit. Would it be any easier to intercept the power wires for the amps between the relay and the connector?
 
A tap harness is a pure plug-and-play system where an M-F connector is separated and an aftermarket F-M connector set with wires is inserted.

It can also be called "extension harness", search up "ECU extension harness" to see some other examples.

This keyless system taps into the NSX stock connectors, the bottom one is 200mm/8" (20P for the trunk actuator) and the top right is a 50mm/2" tap harness (18P for the marker lights).
 

Attachments

  • NSX_Keyless_RHD_01[1].jpg
    NSX_Keyless_RHD_01[1].jpg
    144 KB · Views: 18
Did you finish this build and what can you share about sound quality etc?
 
I did. Sounds good to my ears. The nice thing about the setup is the ability to tune it. You may need to assistance of an experienced tuner to get the most out of it. At the end of the day, I probably would have left out the sub since I’m not a bass head and the enclosure does take up a fair amount of space. Also the new door drivers are much larger than the oem ones thus making them inherently more capable of making reasonable bass notes themselves. Hope that helps. Lmk if you have any specific questions.
 
Back
Top