• Protip: Profile posts are public! Use Conversations to message other members privately. Everyone can see the content of a profile post.

Honcho's Long Road to Imola Type-S Zero

General Update

Due to Mrs. Honcho's ACL surgery, there has not been more time for tuning. So, I've just been using the NSX like a, well, NSX. We've had good weather so I've been taking the car to work. I forgot how great it is as just a car.

This morning on the way into work, I was just tooting along at 40 mph when a white Tesla Model 3 (Dual Motor) blew by me. It was a straight, empty road, so I figured why not work the VTEC system a little? Imagine his surprise when he cut back over and saw me directly in his rearview mirror! He tried to floor it to get away, but my 30-year old VTEC engine was able to stay on his bumper just fine. And, my car sounded SOOOOOO much better while doing it. :) Tech Bro shocked and humiliated by an old Honda. Also got a thumbs up from a nice guy in a R8 V10 a the light after that. It's a fun car.

Of course, all that VTEC left some soot on the bumper because the car is still running at 11:1 AFR. I need to get some more logs to @MotorMouth93 ...
 
Salvage Title

Had the car at my son's soccer game and came back to this. The bird got it right into the vent. That's it- off to the scrappers. :)

20230506_083945.jpg
 
40th Annual Colorado Concours

Preparation, Wash, Etc.


Preparing the NSX for the big car show. While the car is not fully completed, it is close enough to put on display. Thankfully today was a rare Colorado day where it rained all day. This was an ideal opportunity to wash the car and use the neutral rainwater to help with the rinse and avoid water spots. It worked quite well.

Brought the car back in the garage for the dry-off and wax. I used Turtle Wax Ice, which was recommended to me by Joe L. formerly of Vince's Auto Body. It is an easy to use spray mixture of polymer and carnauba waxes that applies smoothly and wipes clean. I have been testing it on our much abused Ford Explorer Sport and have been impressed with its durability.

I used the Ice to dry off the rain water for a streak-free finish. Then, I went over the car with a light spray application and buffed with a dry microfiber to finish. I'm quite impressed with the gloss of this product, even on the Xpel PPF.

Next was to treat all black rubber with 303 protectant and then treat the entire interior. I have always been happy with 303 and have not found anything better for black rubber and vinyl. My final step is a car show trick I use- I wipe all the glass with a dry microfiber. It makes the glass really pop- almost like a museum display case.

Not many pictures due to the effort, but it's ready for the show. Unfortunately, there is rain in the forecast tomorrow, so this may be the best the car will look. I may have to wash it again when I get home...

20230603_160011.jpg20230603_160041.jpg
 
40th Annual Colorado Concours

CANCELLED!!


Massive rain this morning. Still, I decided to brave the storm, since we have had many shows go forward in the rain in past years. I saw a red 360 and an Atlantic Blue Bugatti Chiron going the other direction and waved them off. Happy to see the car owners using their cars despite the weather. I'm also pleased to report the Continental Extreme Contact Sport are excellent in heavy rain conditions. There was 1/4" of standing water on the expressway and the car was rock solid stable up to 70 mph. Very confident and planted. I did notice that a white residue appeared on the tires after the rain drive. Not sure if this is mold release agent or what, but it does come off. You can see where I wiped it with my finger on the right side. I will use a bucket and bristle brush to try and get it off. Left rear is the worst one.

20230604_083722.jpg

The NSX is back in the garage. I had to dry everything off. Good news is that all of the body seals performed their jobs. That means I did my job right. Also, no water intrusion at the driver's window, despite the less than ideal window alignment from the door beam issue.

Leaving all of the panels open in the garage to air dry the jambs. It's important to do this because the panel bolts are not yet painted, so I must prevent the surface rust.

20230604_083654.jpg
20230604_083704.jpg

Once the car is dry, I will go over it with the detail spray. Should be good to go after that.

Special thanks to NSX Prime member @LrdVader, who always works hard each year to make sure the NSX has a good place at the car show. Steve was at the location and was out in the rain helping direct cars home. He said it will be rescheduled, so hopefully I will be back if I am not in Europe.
 
If I remember correctly the guys used expel on your car..did they not apply the expel ceramic coating?
 
Idle Timing

20230604_143709.jpg

One nagging task I did not complete is setting the engine base idle. To date, the ECU could quite happily maintain idle at 800 rpm via the IACV. And, frankly, I was having too much fun driving the car. However, I know that the IACV is a hack "bandaid" way of holding idle and I should adjust it using the factory setting. There were symptoms of the "bandaid":
  • When cold, the A/C clutch would drop idle to about 700 and recover sluggishly randomly
  • Every once in a while, idle would drop to 600-700 rpm and nearly stall
  • With cold trans fluid, releasing the clutch pedal in neutral could cause the idle to drop
  • STFT warm idle adjustment was around -16%, meaning the ECU was pulling a ton of fuel out to get it to idle properly
Basically, all of this is because the car wasn't getting enough base idle airflow. The ECU idle circuit is sort of "dumb" in that it can use the IACV to maintain a stable idle if the base idle airflow is within its expected parameters. If the airflow is too little, weird things start happening as the ECU gets confused.

Thanks to Kaz, I learned that the base idle screw setting is around 1 full turn from closed, and then needs to be slightly adjusted depending on the engine state, cleanliness, etc. However, my engine is modified with larger intake valves and fuel injectors. Starting at 1 turn caused the engine to immediately die when I released the throttle. I kept adjusting out by 1/2 turn at a time and attempting to get the car to idle. At 3 turns, the C30A wheezed into a low, stumbling idle of about 500 rpm and surged badly. I ended up at 4.25 turns.

20230604_151234.jpg

Any more than that and the idle went above the factory range. Closing the screw caused surging. At 4.25 turns, the car idled relatively smoothly at 675 rpm, with just a tiny bit of surging. Considering the factory spec is 650 rpm +/- 50, this is about as good as I could get it. This may be a hard limitation of the RDX 410cc injectors ability to idle stably.

Plugging the IACV back in gave me a nice stable idle of 800 rpm. And, look at the STFT- hovering around 0%. Perfect!


View attachment 20230604_151623.mp4
 
Cable Runs

Prime's own @MotorMouth93 has created an extremely useful tuning script that eliminates a lot of the hunt-and-peck involved with manual ECU tuning. However, it's a bit buggy and he's ironing out the glitches. Once it's ready, I'll be able to get the car as close as possible to ideal (it's already pretty close, on v1.8 of my map) with respect to fueling. Based on how the script works, I'll probably only need 2 or 3 more iterations to get it fully dialed in on both closed and open loop fueling. Then, it will be off to the dyno for timing tuning. In the meantime, I can turn to other tasks.

Due to my enthusiasm in getting the car to be driveable back in February, I hastily zip-tied these wires to the main harness. Unlike a stock NSX, I'm routing several extra wires across the rear head: Front O2, Wideband O2 and Oil Temp Sensor. I also have leftover bits from deleting the engine cooling fan, which according to @Kaz-kzukNA1 must be addressed to prevent future problems. Here's the mess:

20230520_144839.jpg

First order of business was the cooling fan components. According to Kaz, these plugs must be sealed against moisture intrusion to avoid major electrical problems with the entire car. I cut the zip ties and exposed the cooling fan power connector. A large amount of current goes through this plug.

20230520_145646.jpg

Next, I applied the self-amalgamating tape. This was my first experience using this material and it took a while to realize that you must stretch the tape out before you wrap it. Once I figured that out, I quickly sealed up the plugs.

20230520_150655.jpg

Same for the cooling fan relay. I removed the relay and sealed the harness connector.

20230520_151943.jpg

Finally, the last part of the cooling fan items is the fuel return line. On NSXs with the engine fan, this line is anchored into the fan mounting bracket. Once removed, it is somewhat "free-floating."

20230520_144933.jpg

The solution is to zip-tie the floating bracket to the engine main harness. This should secure it enough.

20230520_154655.jpg
 
Cable Runs 2

With the cooling fan related components properly stowed, it's time to move on to the main harness routing. Got everything running in the same direction and used the Termiflex vinyl tape to "cradle" the sealed cooling fan connectors for a clean look.

20230520_154711.jpg

I also found that the NSX-R/Type-S prop rod holder has a mounting tab for the fuel injector plug, so I mounted it there.

20230520_154715.jpg

Wideband O2 harness plug secured. Eventually I hope to remove this sensor and use a EPROM chip once the the tune is finalized.

20230520_154729.jpg

Used a 90-degree bracket to secure the rear O2 sensor wire up away from the hot manifold.

20230520_154741.jpg
 
A/C Woes

After a more rainy than usual start to the summer, the temperatures in Denver have started to climb into the mid-90's. The hot summer is upon us. Of course, this is when my A/C decides to crap out. The same A/C where I replaced basically everything in the system. Oh well, I kind of assumed that with so many joints disturbed that I may have pinched an O-ring somewhere.

It was a slow leak. In February, I had the 4WD shop evacuate and charge the system while the car was in for its alignment. They reported no issues during that process. I had cold A/C for most of the spring, but by June it was cold-ish. Right before our annual trip to France at the end of June, it was barely enough charge to keep the compressor on. Upon my return from France, there was no longer enough refrigerant in the system to allow the compressor to turn on.

Rather than spend another $1,000 to have the shop leak test and repair, I got inspired by @Big McLargeHuge 's A/C adventures here: https://www.nsxprime.com/threads/bi...-adventure-thread.212895/page-12#post-2041603

I'm now armed with a UV light, HFC leak sniffer, vacuum pump, manifold gauges and several cans of R134. In fact, Tyler himself will be over this weekend to help troubleshoot.

With the Zero still on the ground, I decided to go around and check for leaks with the UV light on the fittings I can see. I was able to check the drier fittings, condenser fittings, evap fittings and the crimped fittings of the suction/discharge hoses at the engine. There was no dye anywhere except at the schrader valve on the low side line. The high side cap was dry, but the low side cap was wet with oil and there was a visible layer of dye around the lip of the schrader valve where it meets the cap seal (there is a O-ring inside the cap).


I'm hoping this is the leak and all I need is a new cap. Otherwise the leak could be at the A/C fitting under the center tunnel or, in the worst case, at the flexible hoses on the compressor (like Tyler's was). Replacing those is $300 and means removing the front beam...

Next step will be to pull the tunnel cover and inspect the fittings under the car and at the engine. Then, the service manual says to charge the system to 14 psi and use the leak sniffer to pinpoint the leak. I need cold A/C...
 
Hi and wow!
I stumbled across this thread as I was searching for help on the web. Just finished it all. It made me feel proud of you!
I’m in the middle of doing a power train swap; C30A AT swap out for a complete Type S C32B 6speed ECU and speedo, much less work required that you have done. The problem I have is trying to figure out what the black/yellow wire is on the Transmission side harness where the AT has a 14pin connector vs the Manual 8pin. Anyway, i will create a new thread and hope you and the community could help me out. I discovered that Ill have to also troubleshoot the wiring of Clutch switch and Reverse switch since the chassis is AT.
 

Attachments

  • 20230428_165256.jpeg
    20230428_165256.jpeg
    133.5 KB · Views: 12
  • 20230630_221822.jpeg
    20230630_221822.jpeg
    352 KB · Views: 11
  • 20230428_165312.jpeg
    20230428_165312.jpeg
    135.4 KB · Views: 10
A/C Woes 2

The day started out here. Yes! Cold A/C.

20230730_100617.jpg

We ended here. Uh oh.

20230730_184722.jpg
Not ideal.

So what happened? The initial plan was simple- pull a vacuum on the system to dry it out, charge to 14psi as directed in the service manual, and finally check for leaks. However, we noticed that while charging, the car would stop taking the refrigerant. We noticed that the the compressor kept shutting off and then kicking on for just a few seconds before shutting off again. We initially thought perhaps the triple pressure switch was malfunctioning, but then discovered that the condenser fans were not turning on. This meant that the refrigerant was not being cooled. So basically the switch was doing what it is supposed to do- shut off the compressor when the pressure gets too high. Hot refrigerant compressed by the compressor raises the pressure. This also may explain my mystery leak- there was no trace of dye on any of the fittings. However, the excess pressure in the system may have slowly forced out the freon past the O-rings over time.

We followed the service manual steps on testing the condenser fans and, finally, after putting 12V directly to the fans, determined that both condenser fans were dead. :( This put quite a dent on the project, as now I have to wait until the parts arrive from Japan to have cold A/C.

Oh hey look, it's the new condensers with the fan shroud on my garage floor- totally open and available for testing...3 years ago. I never tested them. :mad:

20201101_151048.jpg

Question for Prime: Is it possible to replace the condenser fans without removing the front bumper. @Ojas seems to have done it here, but the DIY description is vauge:

https://www.nsxprime.com/threads/a-c-condenser-motor-replacement.39415/
 
Funny you ask. I removed my entire front NSX-R undertray system and was inspecting both condensers (fixing insulation, etc) just yesterday. While I haven't tried it, I do think you have enough room in there to swap condensers w/o removing the bumper. It's so easy to remove the bumper though so why not just take it off? Otherwise, you'll have to be on your back looking up the entire time.

Btw... good thing you caught your compressor turning off and on before the safety blow-off valve on the dryer blows up. Don't ask me how I know.
 
Yes you can get to the fans without removing the bumper but as @RYU states, it's way easier with the front off the car. And if you are thinking of replacing the condensers, then you have to remove the lower bumper, which is easy.
 
Yes you can get to the fans without removing the bumper but as @RYU states, it's way easier with the front off the car. And if you are thinking of replacing the condensers, then you have to remove the lower bumper, which is easy.
Funny you ask. I removed my entire front NSX-R undertray system and was inspecting both condensers (fixing insulation, etc) just yesterday. While I haven't tried it, I do think you have enough room in there to swap condensers w/o removing the bumper. It's so easy to remove the bumper though so why not just take it off? Otherwise, you'll have to be on your back looking up the entire time.

Btw... good thing you caught your compressor turning off and on before the safety blow-off valve on the dryer blows up. Don't ask me how I know.
Already replaced the condensers, but I am an idiot and didn't bother to test the fans. :(
I guess it's the psychological effect of taking the car apart again- I feel like I'm past that part of the resto, you know? But you guys are right- the bumper is easy to remove. Looks like I'll do it that way when the parts get here- I'm hoping my order will go out before the golden week shutdown in Japan...
 
Engine Cover

While we waited for the vacuum on the A/C system (and before we realized the depth of the problem), I decided to complete another task that would "finish" the car. The @MITA Motorsports engine cover is their original fiberglass version. This is now discontinued in place of their excellent aluminum version that is virtually identical to the Honda genuine part. I have commented on the cover's visual and build quality on other posts in this blog, but to sum it up it's very good. The only real issue is that it does not have any reinforcement and is quite floppy when raised up.

After examining the genuine Honda cover, I decided that a simple L-channel aluminum beam would really help, and provide a good portion of the OEM stiffness. Here is the beam laid out on the cover for fitting.
20230730_104103.jpg
20230730_104108.jpg
We mocked it up with some tape to test on the car to make sure the beam didn't hit anything in the engine bay.
20230730_104534.jpg
Next, I cut notches and bent the beam by hand to match the contours of the cover. Next, after some debate about the right adhesive, I went with JB MarineWeld. Here it is after the clamps came off and it dried:

20230730_163138.jpg20230730_163131.jpg20230730_163126.jpg
Finally, I applied a few thin coats of Rustoleum black enamel paint. Looks great!

20230802_082732.jpg20230802_082725.jpg20230802_082710.jpg
 
Last edited:
A/C Woes 3

Good news, Impex Japan beat the golden week shutdown and I now have my new condenser motors. Interestingly, although the catalog part number (80151-SL0-A01) includes the fan blades, the box includes just the motor.

I also took advantage of the cheap yen to grab some spare OEM fuses.

Originally, I planned to go through the wheel well. However, I recalled that it's possible to remove just the bumper cover instead of the entire bumper. It's only 8 bolts and the whole thing lifts off. This will give me easy access to the condensers so I can swap the fans.

Thus tonight I will try to accomplish two tasks: (1) pull vacuum on the A/C system again to "start over"; and (2) remove the front bumper. I'll leave vacuum in the system until the condenser repair is complete. This should hopefully completely dry the system and provide clues to any leaks before I charge it. @Big McLargeHuge and I could not find any trace of a leak anywhere. We still think the overpressure from the hot refrigerant caused it to slowly blow past the seals over months- each time the compressor kicked on. I'm hoping that's the case, since the car appears to hold vacuum fine and there is no leak dye anywhere.

Bonus tasks will be to get the fans swapped out. Likely not enough time tonight for that, so it may have to wait until tomorrow. We'll see.
 
Radiator

Also, while troubleshooting the A/C system, we noticed a disappointing leak.

20230820_114435.jpg


hansolo-notmyfault.gif

This time, it's a failure that wasn't due to me. Unfortunately, this is a manufacturing defect from Koyorad. The leak is tiny (at the weld seam) and won't affect the operation of the car, but it presents problems. Obviously the total solution is to replace the radiator with a new unit from Koyorad. However, I'm not sure about their warranty and have to check if it's even covered. Barring a full replacement, it appears that one can braze the weld with something like a Super Alloy 1 and a propane torch.


This is a repair I can do in my garage with the rad still on the car and Muggy Weld claims its brazing alloy will hold to 20,000 psi. However, either solution will require a complete coolant drain and refill. I really don't want to get into that big of a job right now, so I will address it later this year.
 
Last edited:
AC Woes 4

Once again, @Big McLargeHuge stopped by to lend his A/C system wisdom. Thankfully, I now have cold A/C. Since the process has been sporadically covered on Prime over the years, I'll try to provide more detail to help future owners.

First, the real key is to remove the condenser support bracket. It is held to the body with three 10mm bolts and a nut on the condenser. This provides you plenty of room to access the four bolts holding the shroud together and, more importantly, to pry apart the shroud halves.

20230820_102709.jpg

Keep in mind that with the bracket removed, you must support the condenser to avoid stressing the A/C line connections. We used a zip tie.

20230820_102738.jpg

The job can be done with the bumper on the car, but we chose to remove it to improve access. We removed the shroud on the LH side with the bracket still installed, but it involved some scary prying of the condenser forward and up to create room to slide the rear half of the shroud out. Thus, for the other side of the car, we just removed the bracket and it was much, much easier. My recommendation then is to remove the front bumper and the condenser bracket. It will save you an hour of prying and fumbling with the shroud.

Next tip is to make sure the condenser is sitting flush inside the rear half of the shroud before installing the front half. If it's not in flush, the front half won't snap into place.

Finally, we found that installing the metal sleeves for the bolts first helped. And, we installed the hardest access bolts (the top ones closest to the car's body) first because you could still move the condenser around to gain better access. Still, you'll need to get a little creative. On the LH unit, for example, the A/C lines prevented a straight shot with a socket, so I had to use pliers to install the washer on the bolt and then taped the nut to a box wrench to get it on the bolt. Tyler then spun the bolt to seat it in the nut. Two people really helps.

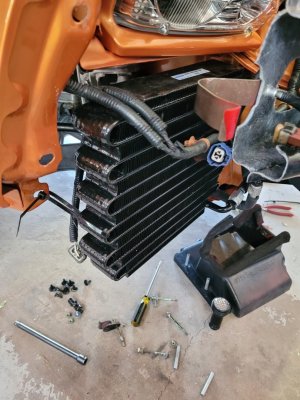
Now, back to the job. Nice new condenser.

20230820_102813.jpg

You can see the space we gained by removing the bracket.

20230820_102713.jpg

The crusty old fan motor.

20230820_090758.jpg

The old nut, washer and shaft collar. The new motors come with all of these new.

20230820_090804.jpg

Also, the new motors ship with three spacers for the shaft collar. We just copied the original install- one space on the LH fan and two on the RH.

20230820_090807.jpg

New nut on the old fan blades. We spin checked them to make sure there was no interference. Tyler also tested both new motors with 12V to make sure they ran.

20230820_090751.jpg

New fan installed in the shroud. They only fit one way. I regret not ordering new screws- they were pretty crusty. The JIS screwdriver was necessary to avoid stripping.

20230820_102719.jpg

Our initial check of the system revealed a low pressure (at idle) of about 5 psi. This means we lost a good amount of gas. So now, we had no idea how much gas was left in the system. After a heavy search of Prime threads, we decided to charge the system to 28 psi on the low side and use the CFC sniffer to check for leaks.

20230820_114420.jpg

The sniffer revealed nothing. Nothing. However, using a UV light, Tyler found a very slight trace of dye on the inside seam of the high pressure line on the compressor- at the crimp ferrule. But, putting the sniffer on this joint indicated no CFC leakage. So, it's a mystery. I have new compressor hoses in a box, so we decided to address it later, since the leak appears to be too small to be detectable.

A 15 min test drive revealed that the passenger side was ice cold, but the driver side was just a "cool breeze" as Tyler put it. This means the car was still low on gas, so I filled another 100g. Final pressures (at idle) were 40 on the low side and 250 on the high side. Air temp in the garage was 95 and humidity of 30%. Plenty of bubbles in the sight glass, which I understand is normal for R134. Prime threads are all over the place on this. Some say that anything over 30 on the low side will blow up your car. Others (including Acura and NSX certified techs) say that they charge to 40-45. Others with HVAC careers say they just charge until it is cold on both sides and they see bubbles in the drier sight glass and call it good. I realize, however, that temp and humidity make a difference here, so all of them may be right lol. For my conditions, 40/250 is about right where I should be on the 91 manual chart and a little high for the 97+ chart. I may do the proper test, which is to run the car at 1,500 rpm for 15 minutes (with no one in it) and then check pressures, but the air is cold on both sides now.

So, not totally solved. The car will need to go down for a radiator repair/replacement service. At that time, I may drop the front beam and replace the compressor lines at the same time. However, I think after all this DIY stuff, I might just bring the car to a trusted shop with a A/C machine, have them finally find the leak, evac the system, let me replace the hoses, and then bring it back and fill with exactly 850g of gas.
 

Attachments

  • 20230820_102703.jpg
    20230820_102703.jpg
    185.9 KB · Views: 9
A/C Woes 5

Sigh.

I have to bust out an old Vance Hu move:

picard-meme-facepalm.jpg

I was so excited to drive my NSX home from work today with my nice and cold A/C. It was 96F at work this afternoon. To my horror, the car was blowing hot air when I started it. Temp to 60, max blower, recirc mode. It's ok, I thought, I'll give it a few minutes to cool off. It never did. The drive home, in full sun, was BRUTAL.

SO...once I calmed down from my internal rage (or rather Mrs. Honcho calmed me down), I went over the car with the UV again. How could it lose a full charge of R134 overnight? My answer was on the compressor discharge line. It was coated with dye. Both at the top and bottom of the crimp ferrule. The bottom had a long spray pattern down the hose indicating a very strong outflow of gas. I'll update with a pic once the engine cools off.

20230822_080831.jpg

Now I must replace the compressor lines. Tyler and I checked them over and over with the sniffer and the UV light yesterday and nothing. Maybe the full charge (250 psi on the high side) was just too much for those 31-year old crimps to bear anymore?

Good thing I thought ahead and bought new ones...just in case. :) With the impending Honda NSX parts shutdowns, you can't be too careful these days...

20230821_183055.jpg

I have to give credit to @Big McLargeHuge here. He suspected these lines, though we could not find any leak. Also a PSA to other owners with early cars. Looks like these lines are good for about 30 years.
 
Last edited:
Back
Top