• Protip: Profile posts are public! Use Conversations to message other members privately. Everyone can see the content of a profile post.

My mis-adventures in engine-out maintenance...

Joined
14 August 2016
Messages
200
Location
Seattle, WA
Semi-experienced shade tree mechanic here taking some time to tackel some deferred maintenance on my 1991 Formula Red NSX. Had the car since the end of 2020 and finally figured it's time as the weather is no longer freezing here in the PNW. This will include the timing belt, water pump, all seals, LMAs, hoses, valve adjustments, and getting rid of the heavy Comptech competition clutch for something closer to OEM.
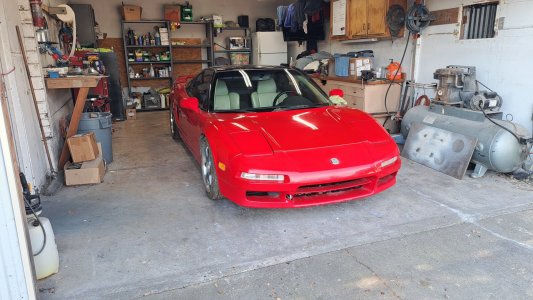
First, a pic:
IMG_0099.jpg

I've not done much work on an NSX before save for replacing the cats and shrunken upper windshield molding on my previous NSX. Aside from a few small mods on this lovely Formula Red, I've certainly not done anything approaching major service. Much of my experience wrenching stems from swapping an Honda K24 into my Lotus Exige (since sold) and before that I had only done oil changes. So it's with an over-abundance of misplaced confidence and a smattering of still lingering misguided youth that I dive into this.

With all the items to address, many people told me I should just yank the whole powertrain out along with the subframe. Begrudgingly, I agreed. So I made an engine cradle from scrap wood I had laying around the house:
IMG_1501.jpg

Then I started removing anything connected to the powertrain. I used the service manual as a loose guide, deviating where I thought was possible to suit my needs (rather, laziness):
PXL_20230510_224707492.jpgPXL_20230510_224729484.jpgPXL_20230501_011436298.jpg

Some of the electrical connectors probably hadn't come apart in 30 years and definitely put up a fight -- not fun. Eventually, with the car raised up on my humble scissor lift, I was able to lower the car onto the engine cradle, undo the engine mounts and subframe bolts, then lift the car up leaving the entire subframe behind:
PXL_20230501_011455609.jpg
PXL_20230513_194610592.jpg

Was able to squeak it out from underneath with an 1/8" to spare:
PXL_20230513_195056763.jpg

And now the real work can begin!
PXL_20230513_195317172.jpg
 
Last edited:
Kudos on your engine cradle.

Were you able to leave the a/c compressor pressurized?

Discuss your Exige: I'm considering adding another owner to my life.
 
Kudos on your engine cradle.

Were you able to leave the a/c compressor pressurized?

Discuss your Exige: I'm considering adding another owner to my life.
Yup! AC lines stayed connected to the compressor. Removed it then used a bungie cord to secure it away from the subframe as it came out.

What would you like to know about the Exige? I swapped in a K24A2 and bolted a roots supercharger to it with a2w charge-cooling. It was tuned pretty conservatively and made about 315hp at the wheels. In a 2000lb car that was plenty enough to scare the crap outta me.
 
Finally had some time to make more progress on the engine. Was able to install the Lost Motion Assemblies from Science of Speed, upon inspection the stock LMAs were pretty gummed up -- glad to do this upgrade! The rear bank's cam shafts and associated hardware:

PXL_20230710_050305434.jpg

Working on the valvetrain is pretty easy, gotta love Honda engineering:

PXL_20230710_050316912.jpg

However, the service manual documentation kinda fucked me. I went to reinstall the front bank spool valve and noticed the engine called out that the bolts are larger and required more torque, which I thought was strange --- wish I had listened to my gut. I'm tightening with my trusty torque wrench and not feeling any increase in resistance. I stopped to pull the bolts out. Jokes on me, turns out both spool valves use the same bolt size and the documentation is incorrect, as evidenced by the stretched bolts. Here's one:

PXL_20230717_033537956.jpg

Here is the offending page in the FSM:

PXL_20230717_021022377.jpg

I could go to the hardware store and pick up three 6 x 1.00 30mm bolts to replace these stretched ones but I'm wary about getting the correct material. Anyone have suggestions? Otherwise I'm springing for OEM hardware at $1.50 per bolt and paying FIFTEEN DOLLARS FOR SHIPPING.
 
Last edited:
A lot of the places that ship have a pretty flat rate so maybe add some other stuff you might need before pulling the trigger on an order?

The motor of this car is likely only coming out once for this kind of work, so worth doing it right with OEM stuff imo.

Also looks like that issue was fixed in the 97-05 manual, page 6-22.
Love this idea except that I have no way of telling what else I'll screw up in the future that will necessitate another order... I suppose I could hold off on reinstalling the spool valve until after I've done more work.

Interesting about the service manual update. Would the 97-05 manual supercede the 91-96 version for 91-96 owners?
 
Interesting about the service manual update. Would the 97-05 manual supercede the 91-96 version for 91-96 owners?
You'll mostly get different information because of the changes between NA1 and NA2, a lot of which will not apply to C30 engine as NA2 uses C32, which has a lot more differences than just bore size.
 
You'll mostly get different information because of the changes between NA1 and NA2, a lot of which will not apply to C30 engine as NA2 uses C32, which has a lot more differences than just bore size.
Well, that begs the question: what else is incorrect in the 91-96 FSM?? Is there a repository of revisions documented somewhere on the forum?
 
Well, that begs the question: what else is incorrect in the 91-96 FSM?? Is there a repository of revisions documented somewhere on the forum?
Not that I've seen. Honestly, it's pretty good overall. Off the top of my head I can only think of four "mistakes" that I've run into while working on my 92.

1. Final drive gear has no marking to align to Diff case-FSM says out should be there.
2. Something about the crank end that I ran into while replacing the clutch-can't remember what, maybe another marking?
3. Poor translation on the AC ambient vs. HVAC output temp graph
4. Lack of torque specs for something on the top of the engine-can't remember what.

Keep in mind that there are multiple versions o the FSM floating around. I've never been clear on how many actual versions there are, but the later ones have corrected some of this info (ex. #4 above).

Sorry for the thread jack-you're doing a great job!
 
Transmission rear mount to case is way over....Will strip your case threads.

No torque value for the acorn nuts on the windshield wipers.

Kaz has a few too,.knowing him it is likely he has compiled a list.
 
Transmission rear mount to case is way over....Will strip your case threads.

No torque value for the acorn nuts on the windshield wipers.

Kaz has a few too,.knowing him it is likely he has compiled a list.
Hmm, I'm not quite sure what part you are talking about here. Can you be more specific please? This is something I definitely don't want to mess up!
 
More progress on the NSX the past few days. Been cleaning up the engine block, it ain't OCD clean but it is WAY better than it was before -- caked in years of oil and dirt. It was like scraping off 1/8" of gunk that felt like melted fruit rollups. I spent a good amount of time scraping off the melted potting too, so glad that crap is mostly gone. It actually looks quite lovely now, there is a patina that befits a car that gets driven (since it definitely is not a garage queen museum piece).

Some pics of the engine, haven't touched the transmission yet cuz that's gonna come off for a new clutch soon:
PXL_20230805_221843467.jpgPXL_20230805_221852175.jpgPXL_20230805_221859656.jpg

Also replaced all four CV boots, cleaning out the old grease was fun. Waiting on a CV band clamp tool to come in before clamping the boots. I noticed the passenger axle had the spiders offset incorrectly, instead of the spec'd 60 degrees they were around 50 or so -- fixed that.
PXL_20230806_002133073.jpgPXL_20230805_221917682.jpg

Today's task is replacing all the coolant hoses.
PXL_20230807_021324238.jpgPXL_20230807_021330785.jpgPXL_20230807_021339453.jpg

In related news, I discovered the front engine mount rubber has started to tear so I've went ahead and ordered the corresponding Sport engine mount from Science of Speed.

I'm also thinking of replacing the Dali coolant tank with something else but not sure what... OEM? Y'all have any suggestions?
 
More progress on the NSX the past few days. Been cleaning up the engine block, it ain't OCD clean but it is WAY better than it was before -- caked in years of oil and dirt. It was like scraping off 1/8" of gunk that felt like melted fruit rollups. I spent a good amount of time scraping off the melted potting too, so glad that crap is mostly gone. It actually looks quite lovely now, there is a patina that befits a car that gets driven (since it definitely is not a garage queen museum piece).

Some pics of the engine, haven't touched the transmission yet cuz that's gonna come off for a new clutch soon:
View attachment 182839View attachment 182840View attachment 182841

Also replaced all four CV boots, cleaning out the old grease was fun. Waiting on a CV band clamp tool to come in before clamping the boots. I noticed the passenger axle had the spiders offset incorrectly, instead of the spec'd 60 degrees they were around 50 or so -- fixed that.
View attachment 182843View attachment 182842

Today's task is replacing all the coolant hoses.
View attachment 182844View attachment 182845View attachment 182846

In related news, I discovered the front engine mount rubber has started to tear so I've went ahead and ordered the corresponding Sport engine mount from Science of Speed.

I'm also thinking of replacing the Dali coolant tank with something else but not sure what... OEM? Y'all have any suggestions?
Stick with the OEM. It has several chambers designed to purge air from the system. It's quite complex and well-thought out.
 
I'm glad I saw this thread. I'm getting ready to drop my subframe/engine/trans and love seeing photos and how other's have done it. Did you figure out your cradle yourself or go off of an existing plan? I'm using an engine hoist to do mine. I see you didn't need to remove the engine glass cover but it's a little too close for comfort using a hoist. At least it looks like it will be.
 
I'm glad I saw this thread. I'm getting ready to drop my subframe/engine/trans and love seeing photos and how other's have done it. Did you figure out your cradle yourself or go off of an existing plan? I'm using an engine hoist to do mine. I see you didn't need to remove the engine glass cover but it's a little too close for comfort using a hoist. At least it looks like it will be.
Unfortunately, I didn't have access to a hoist nor did I have the room in my garage to use one if I did. So dropping the entire subframe was the answer for me and it's actually really easy to do it that way. Once you've drained the coolant, it's relatively easy and quick to get everything disconnected and the chassis lifted off.

I did have to figure out the cradle myself. I did reference imagery I found online of the factory engine cradle (or maybe it was a replica?) to get me a general idea of what it should end up looking like. I basically just did a bunch of measuring from where the factory cradle supposedly supports the engine. When the engine is reinstalled I'm going to measure every piece of the cradle and put together plans so others can make their own using materials acquired from Home Depot or Lowes.
Nice. I don't have much room either working in a 1-1/2 car garage with benches on both sides. After reading as many threads about dropping the subframe as a could it just seemed like a hoist would be much safer, and probably easier. I'll be doing most of it by myself and given a choice I would rather everything hang from a chain than balance on a jack. Thanks for posting.
 

Attachments

  • 20230722_085621.jpg
    20230722_085621.jpg
    531.3 KB · Views: 9
LIkely i missed a previous thread, so it is possible or desirable to pull this engine thru the top? I grew up with an overhead frame and hoist and long for those days, my home now has no room for an overhead so i've had to use a porta-crane on occasion for front engine stuff. I put in a JaxMax and built a cradle just for the nsx. But it looks like i will i still need an overhead to pull the engine from the tranny? Getting ready to drop the mill just to do the damn valve covers and seals(argh), but will eventually change the mill/engine/motor/lump itself.
 
Nice. I don't have much room either working in a 1-1/2 car garage with benches on both sides. After reading as many threads about dropping the subframe as a could it just seemed like a hoist would be much safer, and probably easier. I'll be doing most of it by myself and given a choice I would rather everything hang from a chain than balance on a jack. Thanks for posting.
Hmm, good luck to you on this. I'd love to see it. I'm clearly no expert but I just don't see how the engine + transmission can come out the top of the engine bay. I definitely have not tried it myself so I could be absolutely wrong.

Speaking of not being an expert. I tried repainting my valve covers today with VHT wrinkle black. It did NOT turn out well. I stripped all the paint, scuffed the surface a bit, and gave it three thick coats (with a light tack coat to begin with, which may have a been a mistake).

Stripping paint:
PXL_20230810_224222226.jpg
PXL_20230810_224229478.jpg
PXL_20230810_224248097.jpg

Masking:
PXL_20230812_025417408.jpg

Painting:
PXL_20230812_205006737.jpg

Results after two hours baking in the sun:
PXL_20230813_021114357.jpg
PXL_20230813_021119939.jpg
PXL_20230813_021255307.jpg

Fart noise -- it's... not great. I'm debating whether or not I want to spend the time and effort to strip it again and attempt another respray. If I did, I'd probably scuff the surface more uniformly, and skip the tack coat, going straight to thick coats. Got any tips for a paint newb?

Alternatively, I could install as-is and move on with my life. In the future I can remove the covers to have a professional refinish them.

Anyway, got the timing side pretty much buttoned up. Here is the oil cooler all cleaned up (as best I can), it was FILTHY:
PXL_20230809_202457944.jpg
PXL_20230809_202205539.jpg

The old lower timing cover cleaned up real nice and can be re-used if need be.
PXL_20230809_202235361.jpg
PXL_20230809_202245236.jpg

Got the valves adjusted:
PXL_20230811_210155746.jpg

New Sport front engine mount arrived from Science of Speed, so pretty:
PXL_20230811_221418392.jpg
PXL_20230811_221436652.jpg

Once the valve covers cure I'll reinstall them with fresh gaskets and the engine will be returned to the chassis. After which I'll remove the transmission to replace the unnecessarily heavy Comptech clutch. I'd love to do it outside the car but I just can't make it work without purchasing a hoist and stand and Daddy ain't got room in his garage for those toys.

Also got this Dali Racing coolant tank for sale if anyone wants it. I'll post up a For Sale listing for it soon.
PXL_20230812_000110935.jpg
PXL_20230812_000051166.jpg
PXL_20230812_000059590.jpg
 
Last edited:
Hmm, good luck to you on this. I'd love to see it. I'm clearly no expert but I just don't see how the engine + transmission can come out the top of the engine bay. I definitely have not tried it myself so I could be absolutely wrong.

Speaking of not being an expert. I tried repainting my valve covers today with VHT wrinkle black. It did NOT turn out well. I stripped all the paint, scuffed the surface a bit, and gave it three thick coats (with a light tack coat to begin with, which may have a been a mistake).

Stripping paint:
View attachment 182960
View attachment 182961
View attachment 182962

Masking:
View attachment 182970

Painting:
View attachment 182971

Results after two hours baking in the sun:
View attachment 182972
View attachment 182973
View attachment 182974

Fart noise -- it's... not great. I'm debating whether or not I want to spend the time and effort to strip it again and attempt another respray. If I did, I'd probably scuff the surface more uniformly, and skip the tack coat, going straight to thick coats. Got any tips for a paint newb?

Alternatively, I could install as-is and move on with my life. In the future I can remove the covers to have a professional refinish them.

Anyway, got the timing side pretty much buttoned up. Here is the oil cooler all cleaned up (as best I can), it was FILTHY:
View attachment 182975
View attachment 182957

The old lower timing cover cleaned up real nice and can be re-used if need be.
View attachment 182958
View attachment 182959

Got the valves adjusted:
View attachment 182964

New Sport front engine mount arrived from Science of Speed, so pretty:
View attachment 182965
View attachment 182966

Once the valve covers cure I'll reinstall them with fresh gaskets and the engine will be returned to the chassis. After which I'll remove the transmission to replace the unnecessarily heavy Comptech clutch. I'd love to do it outside the car but I just can't make it work without purchasing a hoist and stand and Daddy ain't got room in his garage for those toys.

Also got this Dali Racing coolant tank for sale if anyone wants it. I'll post up a For Sale listing for it soon.
View attachment 182978
View attachment 182976
View attachment 182977
As an old custom bike builder, i can tell you wrinkle is a bitch and generally you want to put it in an oven to get consistant wrinkling. Recently i have used Kyrlon Fusion Textured black with pretty good results. Unlike wrinkle which has to be put on thick and then you just pray it wrinkles, this kryon texture is done in two light coats. It can spit a spit so you have to be very light on the trigger and shake like crazy. I can't tell you for sure if it will take the valve cover heat, but i'm fairly sure it will. Obviously powder coating yields the ultimate even texture is you have folks in your area. My experience with the powder coating has been fantastic and cheap, altough i'm sure you can powder coat aluminum since it's not magnetic. Personally i would try the Kryon Textured.
 
As someone who used the VHT product on their covers to good success, I agree it's better to just put a solid coat on there and let it bake.
 
Hmm, good luck to you on this. I'd love to see it. I'm clearly no expert but I just don't see how the engine + transmission can come out the top of the engine bay. I definitely have not tried it myself so I could be absolutely wrong.
Doing the same thing you did except using the hoist to lower the engine/trans instead of using a jack.
 
Doing the same thing you did except using the hoist to lower the engine/trans instead of using a jack.
This is the best way to do it. Raise the car as high as possible on stands, then lower the engine onto the cradle with the hoist. Then, if needed, lift the rear of the car slightly to roll the engine out from under.
 
Back
Top