So ive been quiet but not for lack of progress. I had the car back together for a short while after the LOOONG 7 month down time. During that time I drove it quite a few times to stress test the new trans and sort though some smaller bugs that i was having on track last January.

After putting together a to-do list I promptly took the NSX back apart up on jack stands in the garage. All my friends were telling me I was nuts and that I should just drive it again for a while and be happy. Ive considered that but I do NOT want to finally get it back on the track only to have another catastrophic failure that'll put me down another year, I dont know if I could handle getting set that far back again.
Thankfully ive had the placebo of driving the RSX on track to scratch the itch, im no fan Front wheel drive but Ive managed to place 1st and second in 3 local Honda challenges up against some stiff competition s2000's. Which is pretty funny since the RSX is my full interior/stereo/sparetire daily driver. If anything it spurred me on to get the NSX back and running strong.
Anyways now that I had my list I went and ordered everything i thought i would need to get it all done and started to stack it up in the basement.
this is only about half of what i ordered. just looking at it all is a little daunting.

in the meanwhile I did some maintenance, swapped the 02's, checked all the mounts, re routed some stuff and replaced the crank dampener etc.
I also built an fueltank under tray I have a few pictures of it in construction but none with the NACA ducts cutout finished and painted. Not sure if im going to make another piece or run this one, more on that later


Again nothing too difficult but a lot of install, uninstall and re install to get it all to play nice. Had to get creative with the mounting since I didn't want to drill holes in the chassis. Once again I'm wishing I went with the house with the bigger garage/workshop over this one. Had I known how much id be working on the car this year it would've been a no brainier. I feel like im trying to build the car inside the International Space Station
--
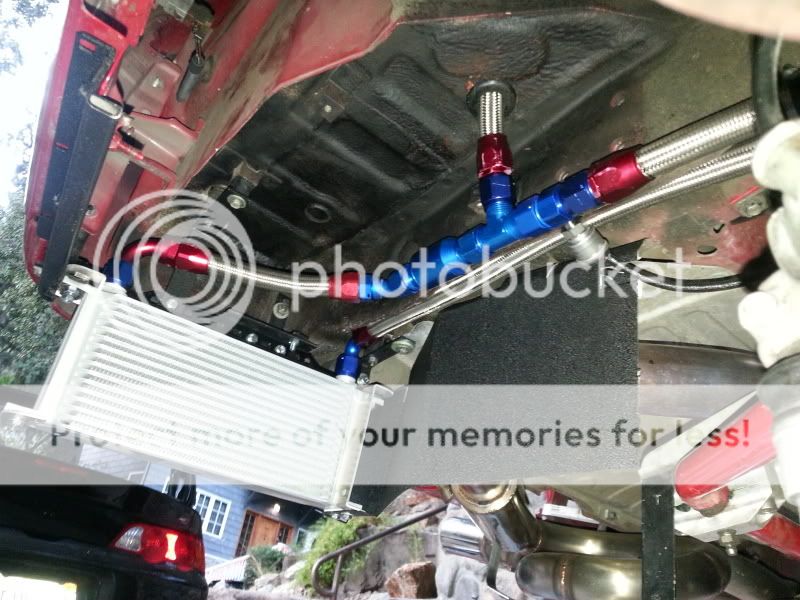
As I was saying earlier in the thread Ive never been really happy about the SOS oil cooler placement and choice of push on barbed fittings and unprotected rubber hoses. After hearing horror stories about them and finding my sump had a defective switch that I need to replace anyways, I decided now was the time that i should change it up. When removing the pressure relief valve after following the depressurization steps it somehow still had enough pressure and oil in it to explode coating the trunk, garage wall, me and my motorcycle in engine oil. sucked.
Now that I had it all apart I started to figure out what I wanted to build. I know I wanted a full flow-through core and after looking at the fan options I decided to skip them all together so uninstalled the SOS kit completely. I was first going to utilize as much of the old kit as I could since I already had the parts in hand. It was a practice in mental gymnastics to build the kit in my head over and over and figure out where the NPT's needed to meet with AN fittings then deciding where I could make improvements. After ordering all the parts I thought i needed and mocking up v1 i decided I wasn't happy with a few things and they needed to change.
I initially ordered Starlite racing hose, basically standard oil/coolant hose but wrapped in Kevlar cloth to cut down the weight %50 over standard stainless braided. Now when I had it here in my hands I just didn't feel confident enough that it could withstand being in the constant line of fire of the rear R-comp tires throwing up rock/glass and whatever else at them. Also the brass check valves and pitch conversions adapters weren't going to cut it. On top of that every NPT fitting must use plumbers dope, Teflon tape or some sort of sealant and when I was taking apart the old system the plumbers tape off the NPT threads was basically just a gooey mess.
Wanting to avoid this as much as possible in the future and in the interest of saving weight with all aluminum, bolt and go parts I figured that getting the 'right' stuff was going to be worth the expense.
I placed another order on almost everything again, this time having benefited from dry mocking everything up with the V1 stuff to settle on rough placement, because I did this step I was confident to up the size of the oil cooler to a 20 row unit where before I wasn't sure id have the room. I hate buying things twice as much as anyone but doing stuff like this is always a learning experience and hardly ever go as planned.
Once all the new stuff arrived I set to work on building the brackety. To safely suspend the oil cooler in the right place using stock provisions took a bit of ingenuity and the most time of everything so far. The biggest bummer was the car was too high to just lay on my back and too low to just sit under and work- everything was done at a weird semi sit-up position. My girlfriend even noticed and took pity and bought me a yoga mat as a joke to use while working like this. I realized that i'm getting too old for this now, gone are the days waking up pain free after a 18 hour day in the garage. :[
Anyways, while building the bracktry I needed it to fill a few criteria.
Firstly it needed to be secure with 4 independent mounting points that are isolated from the chassis so any shocks could be dampened as not to crack the core and develop leaks. Secondly it must be a flow through design and not mounted horizontally; The topography of the bottom is hard enough but when also trying to position everything to mitigate heat transfer from the exhaust and feed the lines fed as directly as possible really starts to limit options. Lastly I wanted to have the option to use ram air ducted from the side scoop or scavenged from the diffuser to blow onto the core, this increases cooler efficiency by up too %30. After trial and error I settled on final layout and bracket design.
Full flow though core placement-

Heat mitigation doubles as flexible mounting points-

isolated mounting-
sump-

I took these before I did any of the final finishing. In addition to what you see in the pictures there are now hose brackets that direct all input and output oil lines so they are securely mounted out of the range of motion of all suspensions components. I also added some ports for a dummy light so that I can tell when my accusump is discharging and oil pressure is coming independently from the oil pump. This should give me warning to shut it all down well before situation gets critical. That port is separate from yet another oil pressure reading that is post the 1 way valve that reads continuous pressure.
With the new oil cooler layout ill no longer be able to run the sides of the Titec diffuser that connect with the bumper. Also the new Sorcery exhaust sits much lower than the Titec before it so I was having to space the center of the diffuser down to clear and wasn't really happy about it.
To rectify, I sourced some Varis dry carbon vortex generators. They were a TOTAL pain in the ass to find but the quality on these is second to none. The plan is to run make a hybrid of the Titec and Varis parts to run a completely suspended diffuser set up. this will allow me to fine tune the Angle Of Attack and find an optimum balance between downforce and drag efficiency. This will connect to the Fuel tank cover and an engine cover that I have yet to make effectively making a full flat bottom car.


It should look pretty mean at the end of the day with this set up, much more aggressive if not sorta ricey, I guess we'll see. I still have the exact ram air ducting and some minor electronics for the new sump switch to figure out this week. Then its onto the big can of worms that is the new Defi ZD display and additional dummy lights. Not looking forward to that epic but I am glad to be making progress. Still shooting to be back on track early November and targeting a sub 2 min lap time at Buttonwillow and break into the 1:21's at Streets


