

There isn't much information on this particular repair other than a few people claiming that you should and a few others claiming that you shouldn't, so I decided to go for it and document the process. If the head gasket blows I'm stuck at home due to COVID-19 anyways so not like I have anything better to do. (other than my long list of home improvement projects, but who cares about that stuff amiright)
The general argument for doing this conversion is that the factory C30A head gaskets are graphite composite and prone to slow coolant leaks from old age and don't hold boost too well in forced induction applications.
The downside is that the block and head deck surfaces are a bit rougher than ideal for MLS gaskets. I haven't been able to find anyone who's actually had issues with Cometic MLS head gaskets on a C30A, and if anyone knows of any please let me know, but there's a few knowledgeable nay sayers who've never actually done it who will probably show up in this thread somewhere, and it's worth taking their points into consideration because frankly there just isn't much reason to do this conversion. It generally takes a very long time for issues to develop with factory gaskets, so just replacing the head gaskets with factory parts and new bolts is likely more than enough to get the motor through it's remaining useful life before a full teardown and rebuild.
The bottom line is that if you're boosting to the point that the stock head gaskets are a real concern, you shouldn't be boosting a stock engine that much. And if you're building an engine for boost, surface finish isn't a concern because both the heads and block will have been properly resurfaced and you should definitely use MLS gaskets and ARP studs, no question.
That said, for the remaining 3 people who still want to install MLS gaskets on their stock motor, here you go. Proceed at your own risk.
I bought a used engine for my car and found that the heads needed to come off, and since I had the head studs and MLS gaskets already for my never ending, ever expanding, money pit of a rebuild project, and buying OEM gaskets and bolts would cost about the same as buying the studs again, I figured I'd go for the MLS conversion since I don't feel like waiting for parts from the Acura dealer.
What you need:
1) All the tools to remove the motor from your car and then remove the heads. (technically it's possible with the motor in the car, but don't do that to yourself, just pull it out)
2) ARP head studs, because torquing bolts to higher than factory spec in a 25+ year old aluminum block is asking for trouble.
3) 2x Cometic MLS head gaskets (0.030" thickness is standard, but if your heads have been machined 0.008" or more you'll need to get a thicker gasket to compensate)
4) Plastic scraper or plastic razor blades
5) Brass bristle brush
6) Cardboard + thick grease to seal off the cylinders
7) Something to seal the oil passages in the block deck (paper towels work)
8) Shop vac
9) Permatex foaming gasket remover
10) Precision straight edge for checking flatness of the heads and decks.
11) A high quality torque wrench for torqing the head studs.
Notice that there are no roloc wheels, abrasives, or power tools on that list. That's because unless you're a dealership monkey you don't use such things to clean aluminum head gasket mating surfaces.
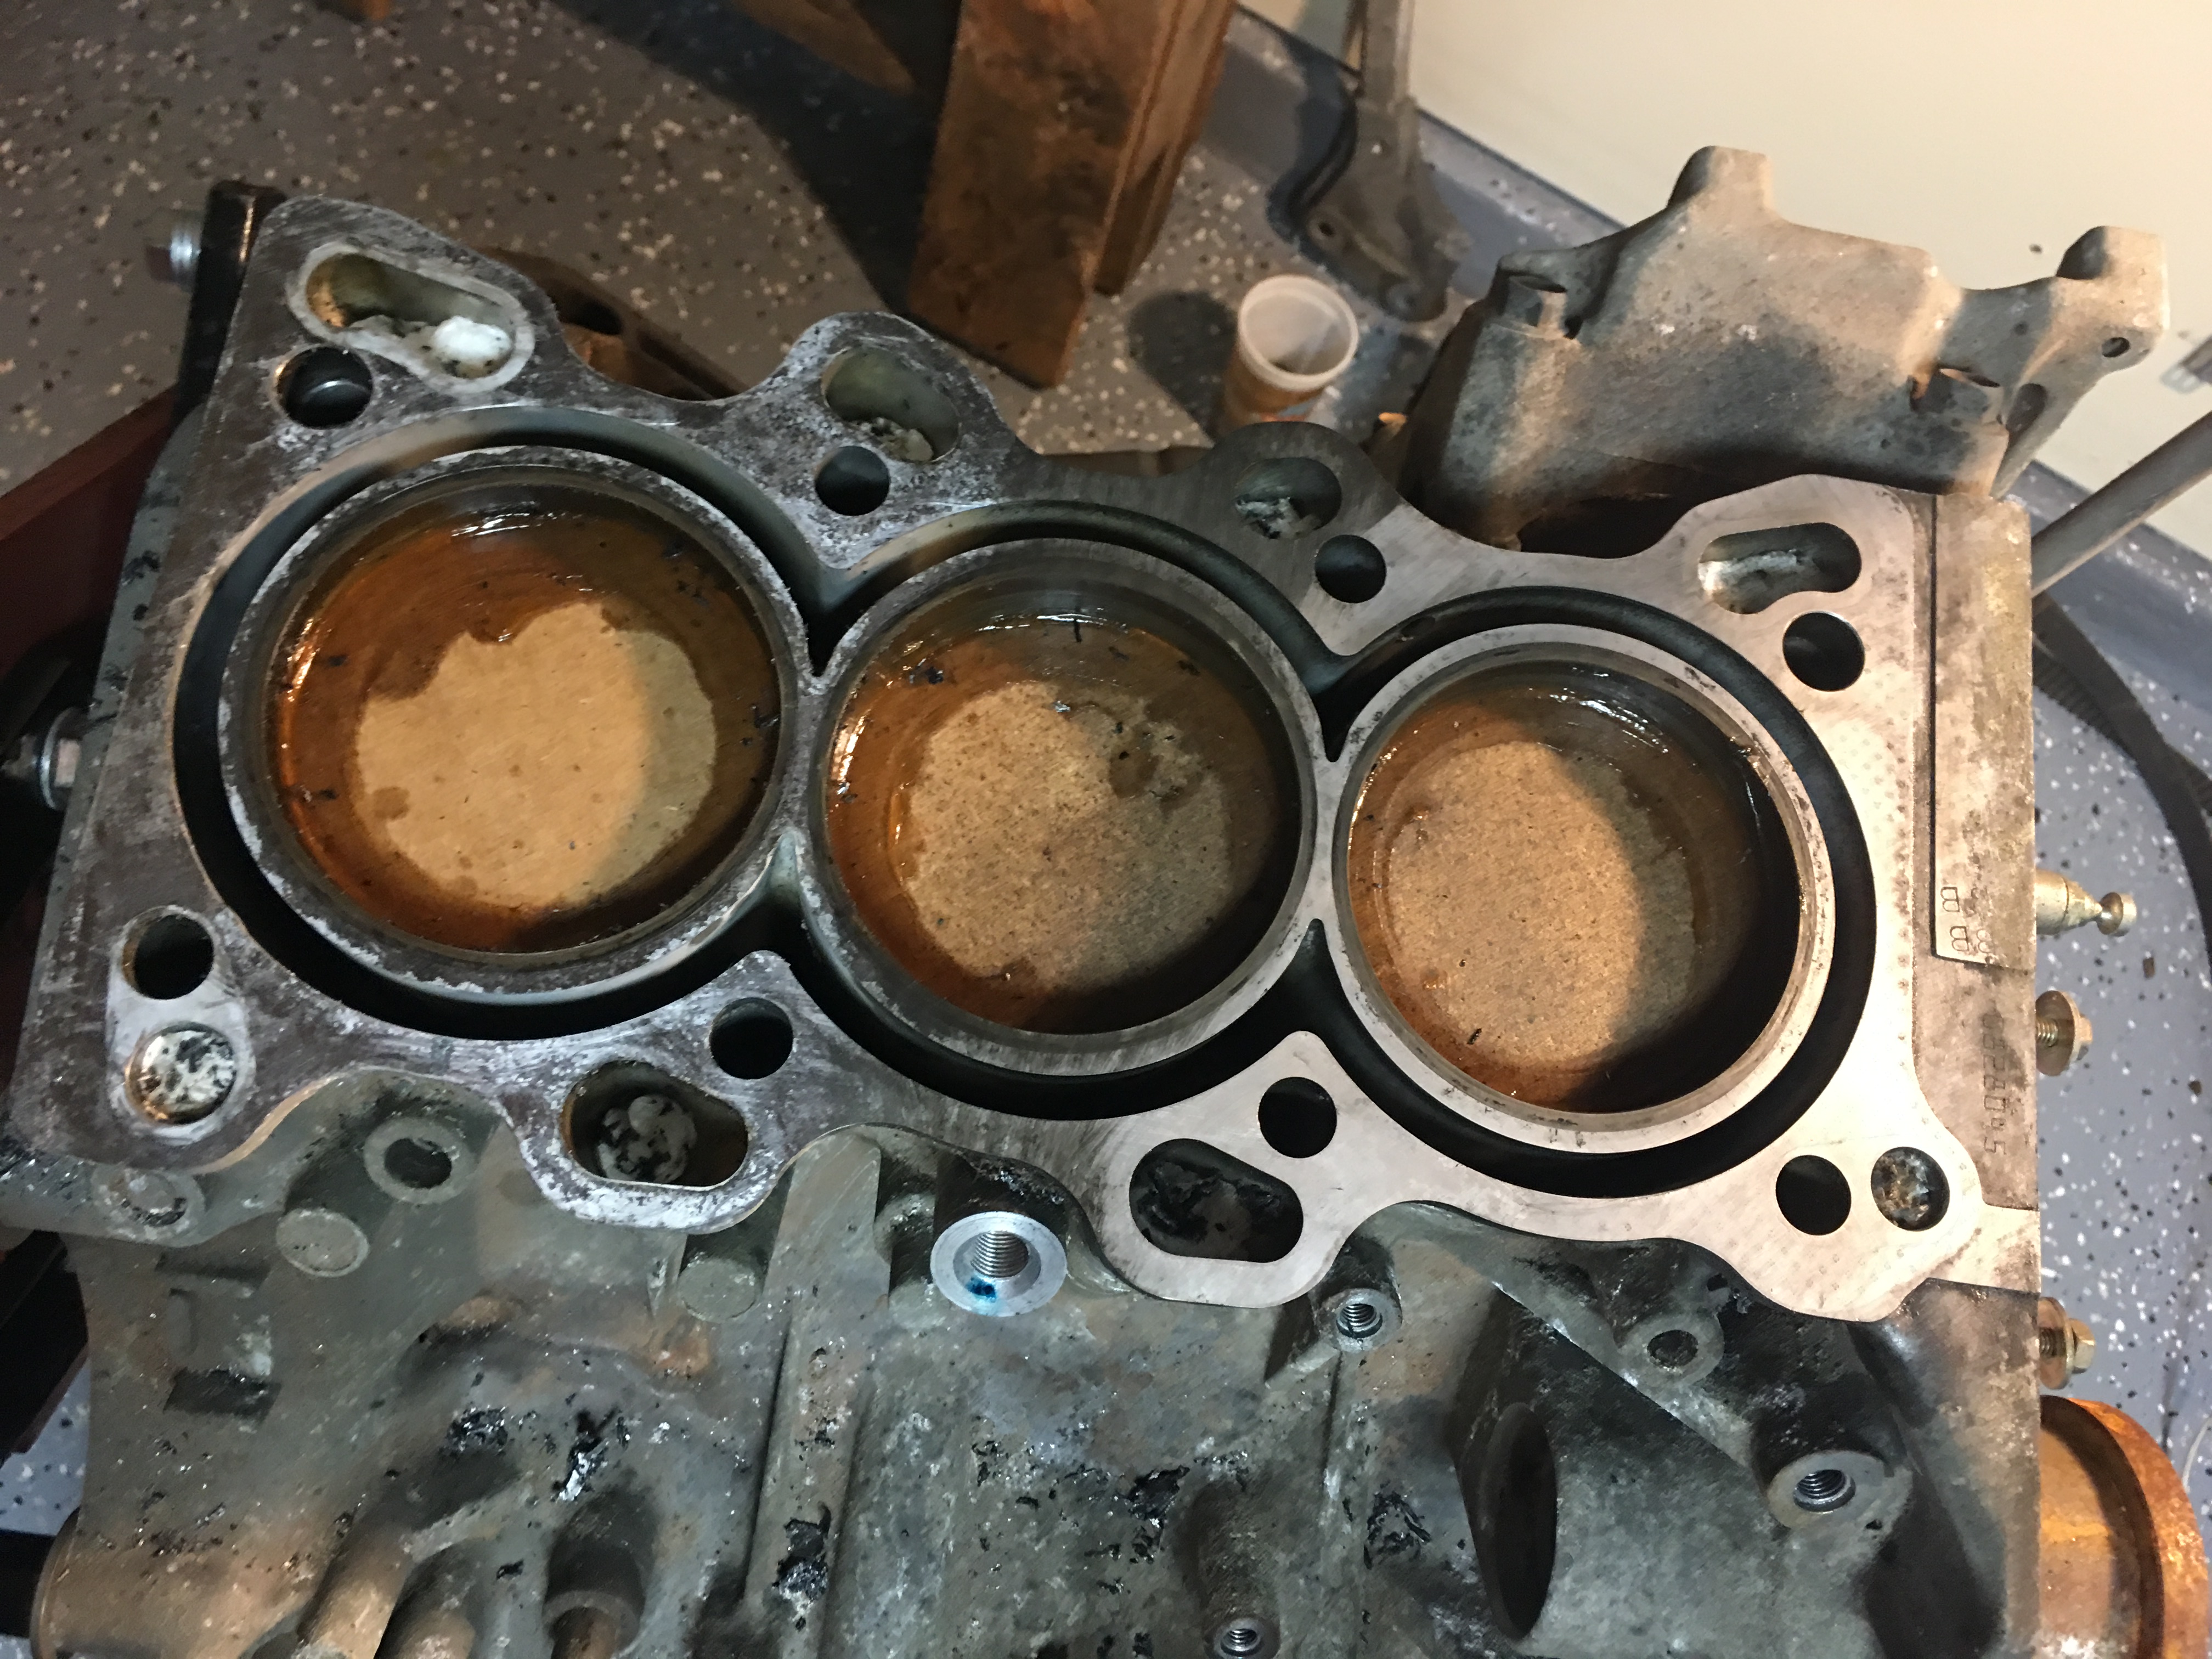
Start off by pulling the heads, it's documented in the service manual so I won't touch on that. You'll be met with the sad remains of a gasket stuck on the block deck, something like this.
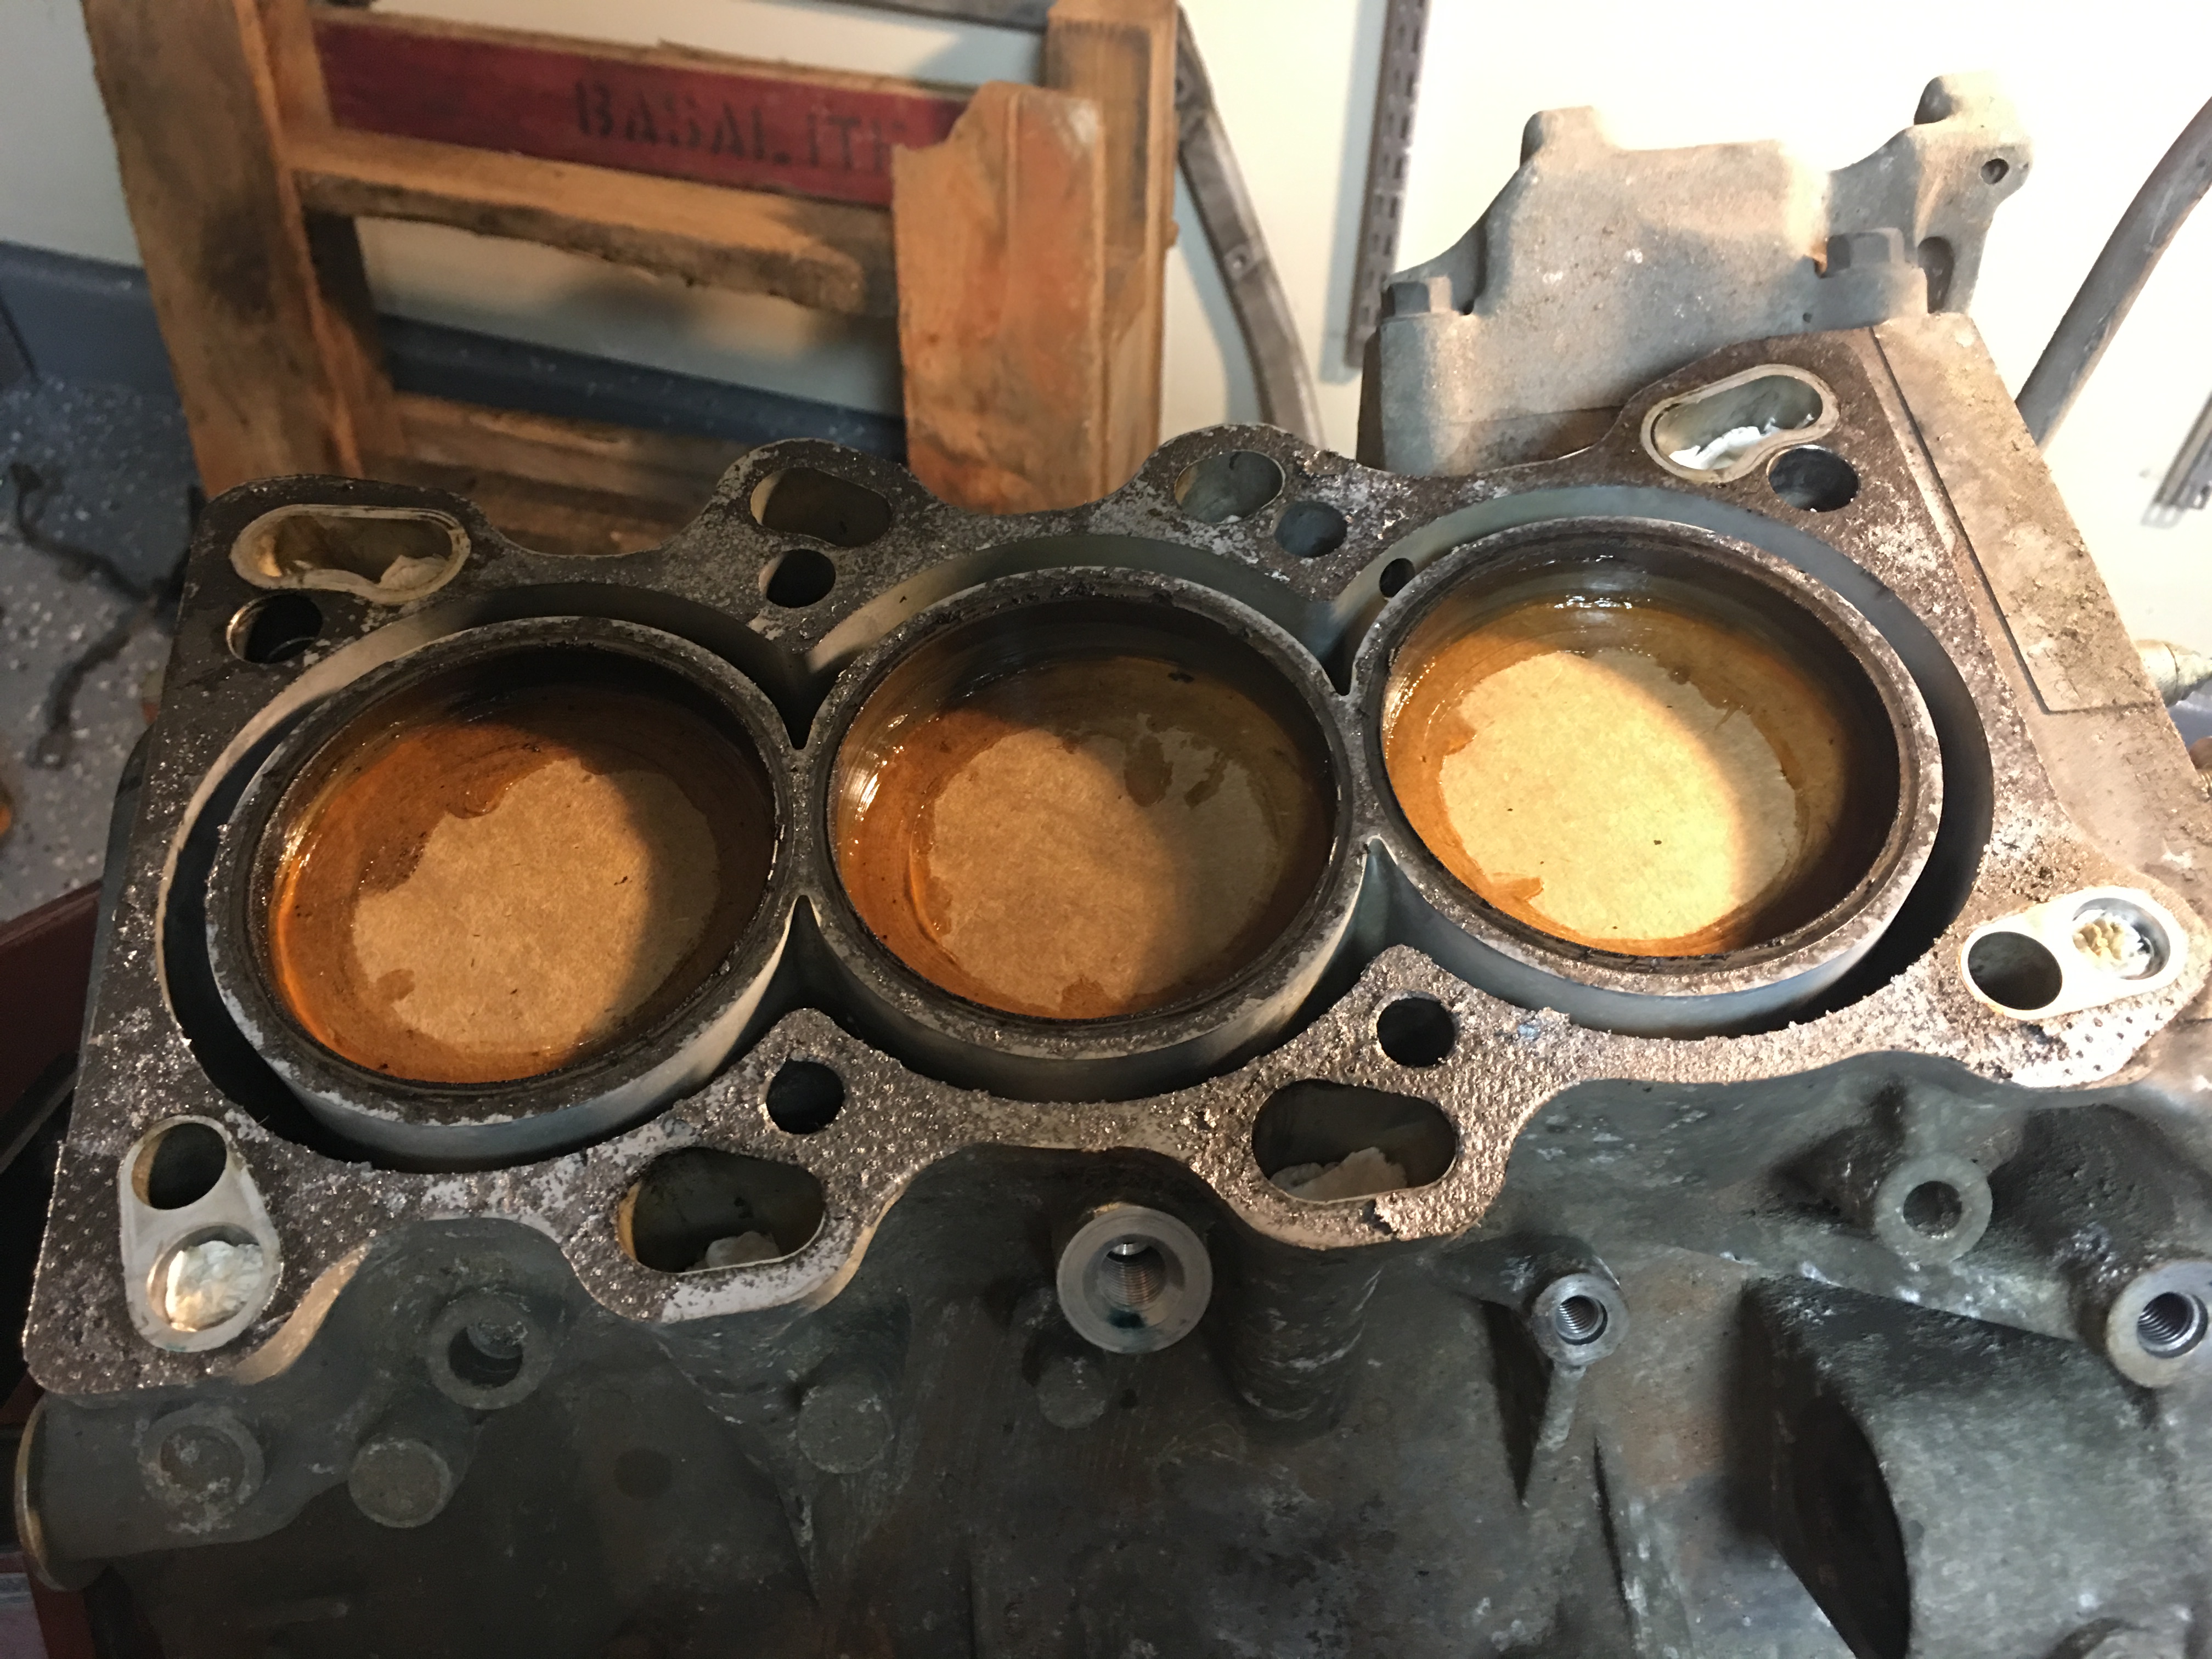
You might also notice that there are cardboard circles in the cylinders, with thick grease all around the edges. This is to keep anything you scrape off the deck from getting into the rings and potentially scoring the cylinder walls. Before you do anything after pulling the heads, plug up the oil pathways and drain holes and cut out cardboard circles roughly the size of the cylinders, vacuum out the cylinders to get any debris that might have fallen in, insert the cardboard circles and smear grease all around to seal them. I use silglyde grease but really any thick grease should work just fine. I didn't bother to plug up the bolt holes since those will be cleaned out later, and the water jacket can also be cleaned fairly easily later but some people like to fill the water jacket with shaving cream to catch any debris that falls in so it can be easily vacuumed out.
Once the cylinders and other important holes are sealed off, start scraping using a plastic scraper or plastic razor blade. I used some plastic scraper thing I had in my toolbox but plastic razor blades would be better. You don't have to get everything off at this stage, just the big chunks of gasket material so it's relatively flat.
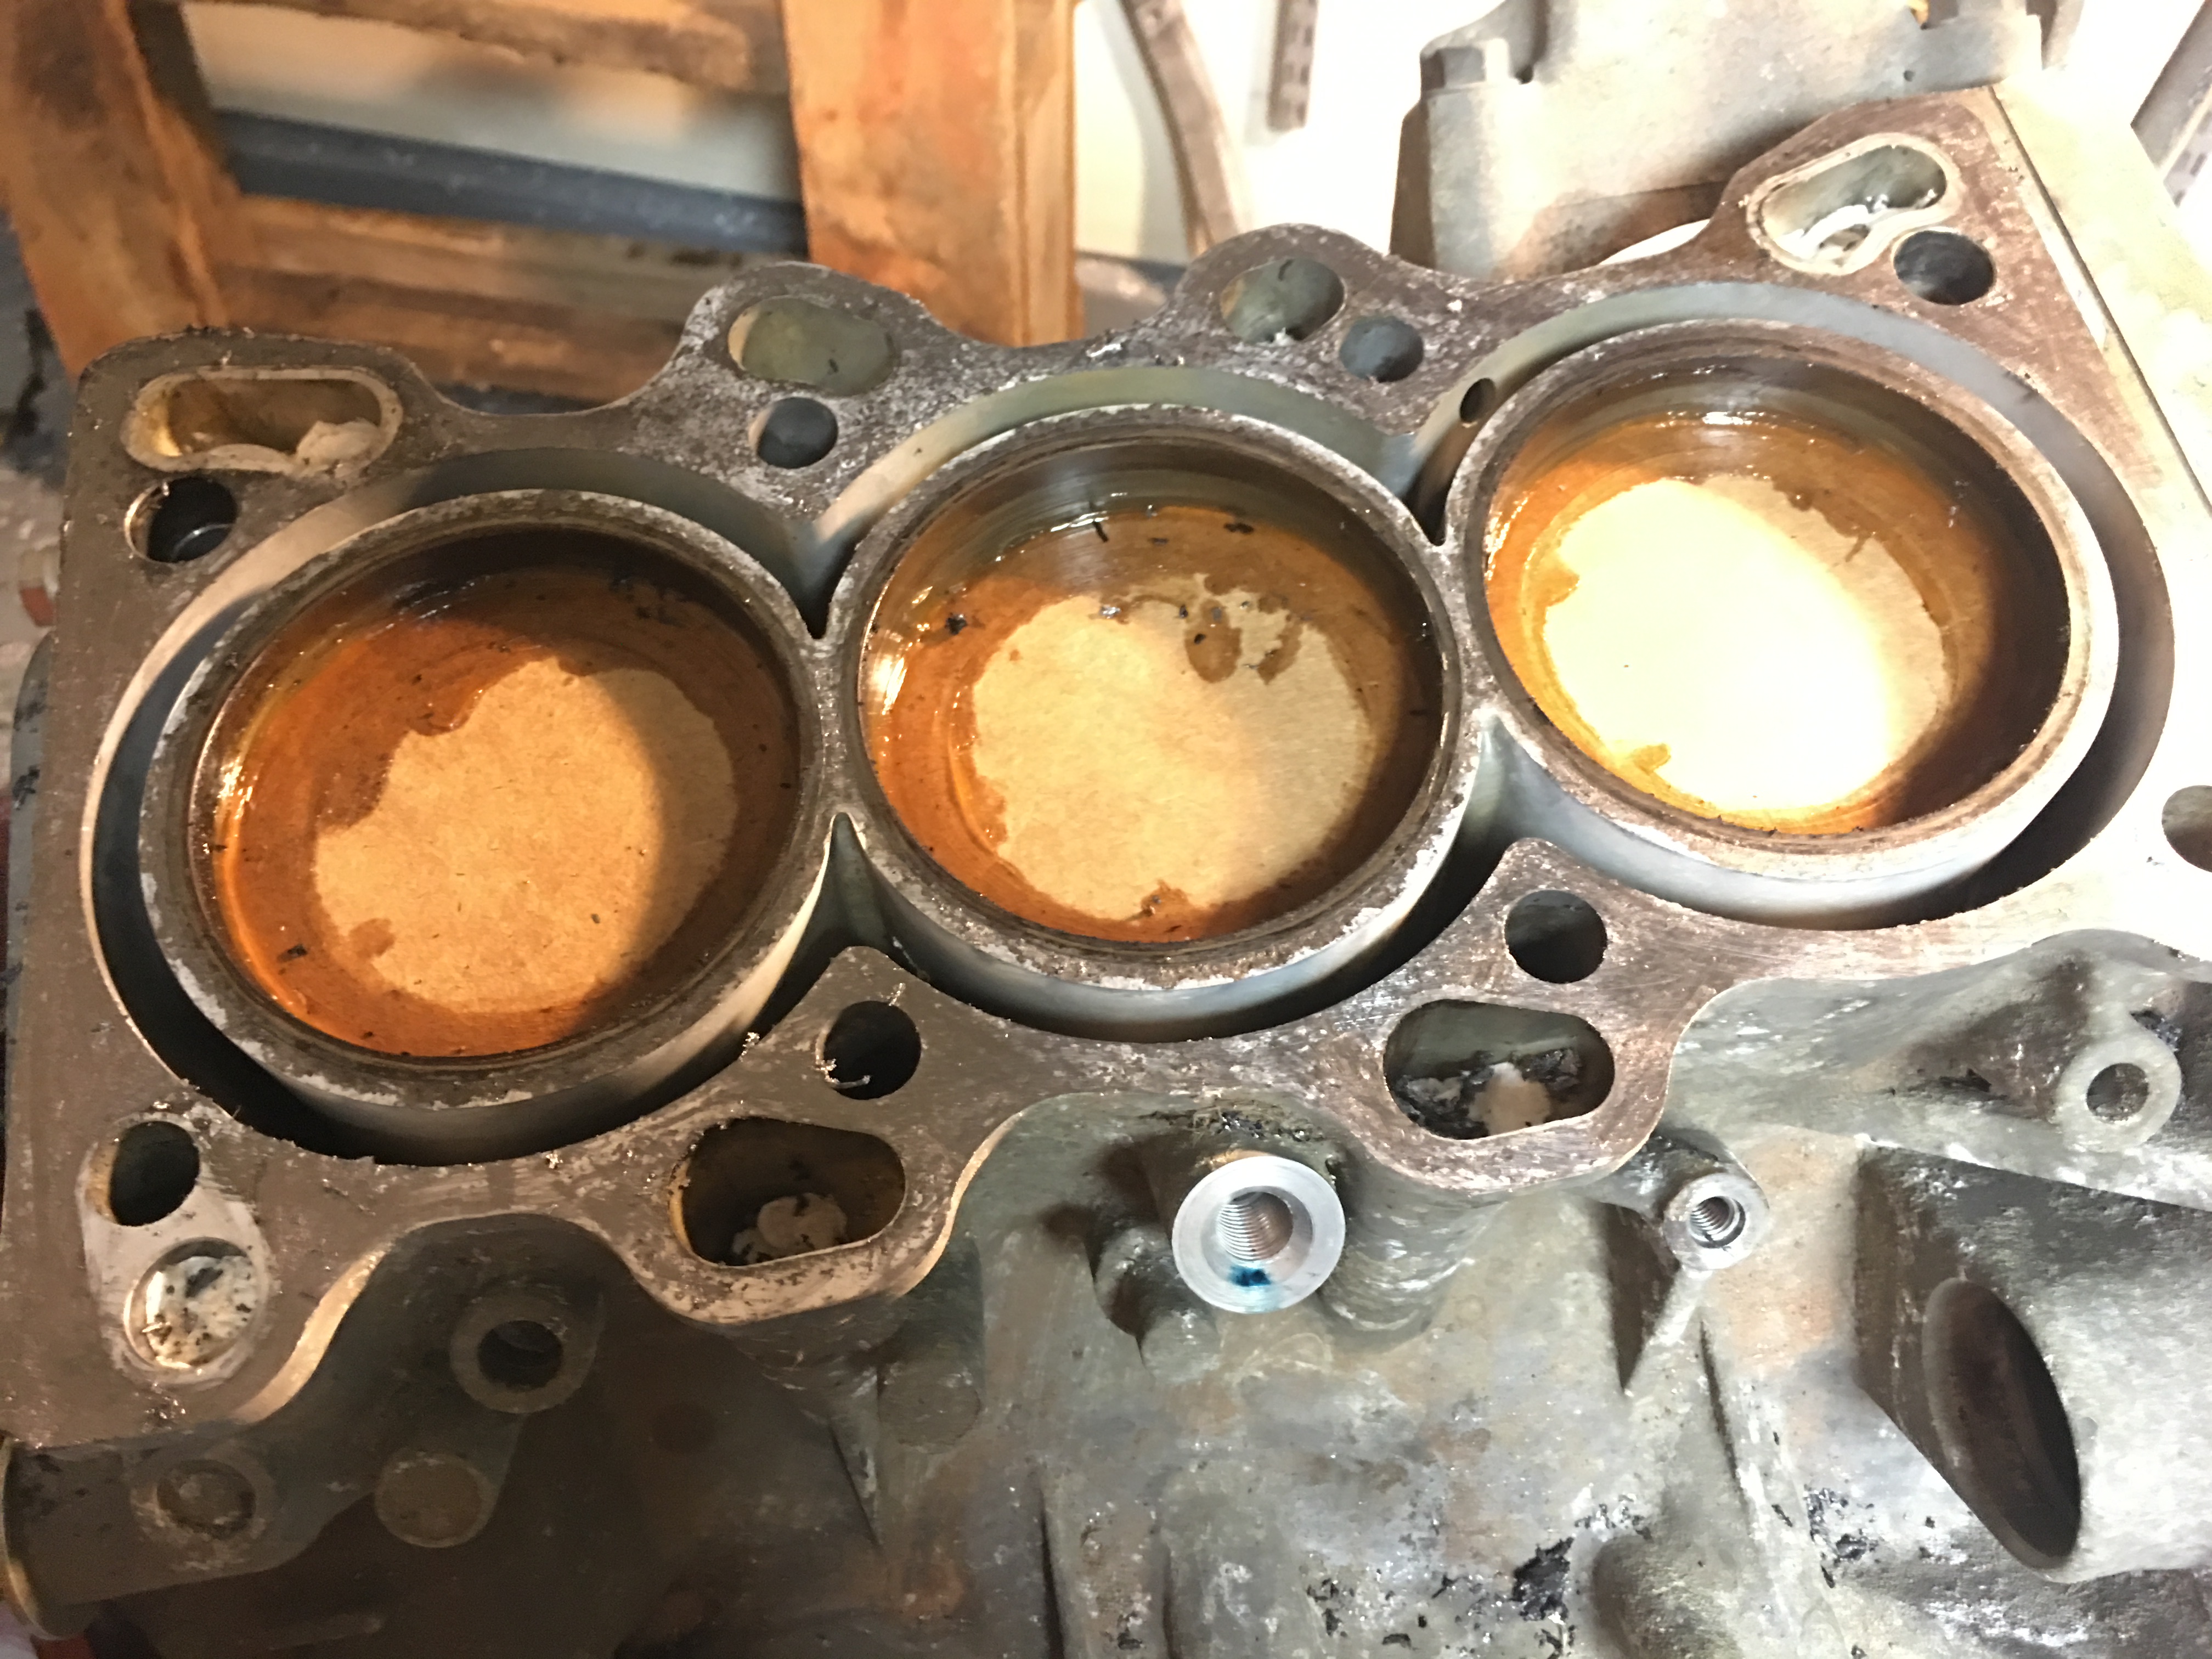
After you're done, the deck should look like this.
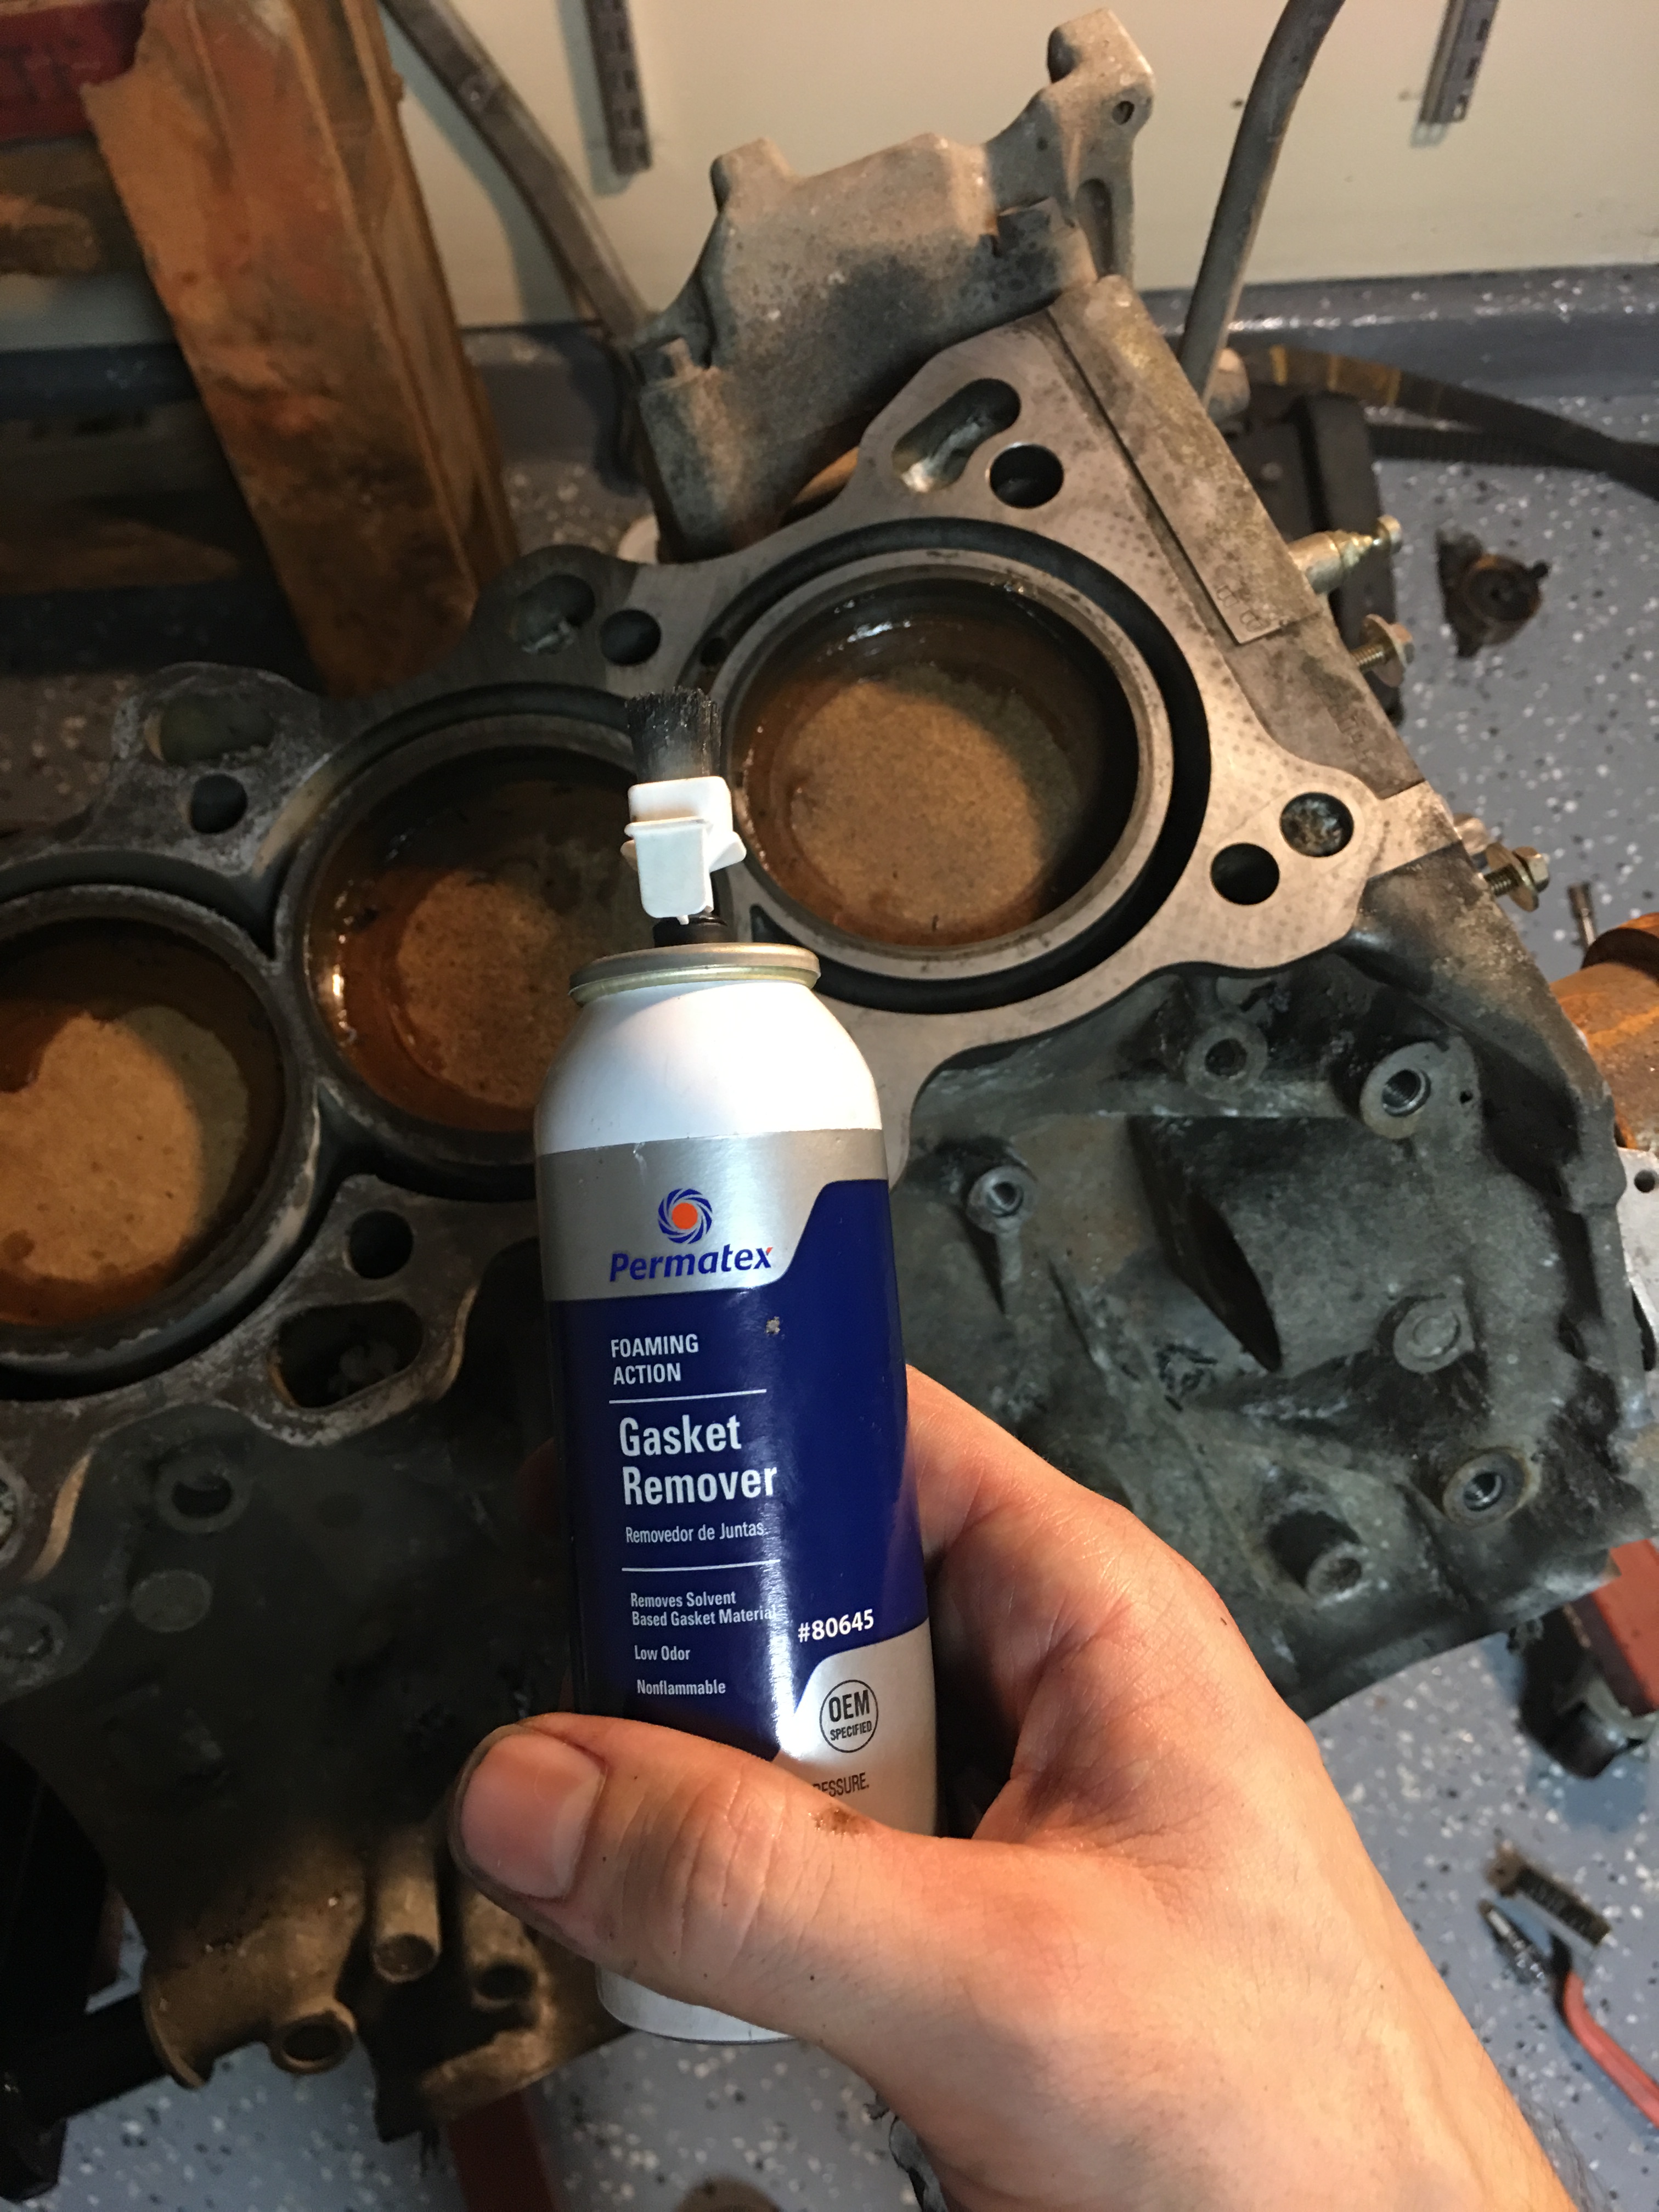
Now apply a good coating of Permatex foaming gasket remover and let it sit for 15-30 minutes. Warning: your garage will smell nasty after this. This stuff is very niche in it's usefulness, but I find that it's actually quite helpful on the graphite gasket crud.
After the gasket remover has sat for a bit, get out your brass bristle brush and go to town. MAKE SURE THAT IT IS BRASS. If you use something with steel bristles or some other harder metal you will wreck your block deck. Halfway through scrubbing it's already starting to look a lot better.
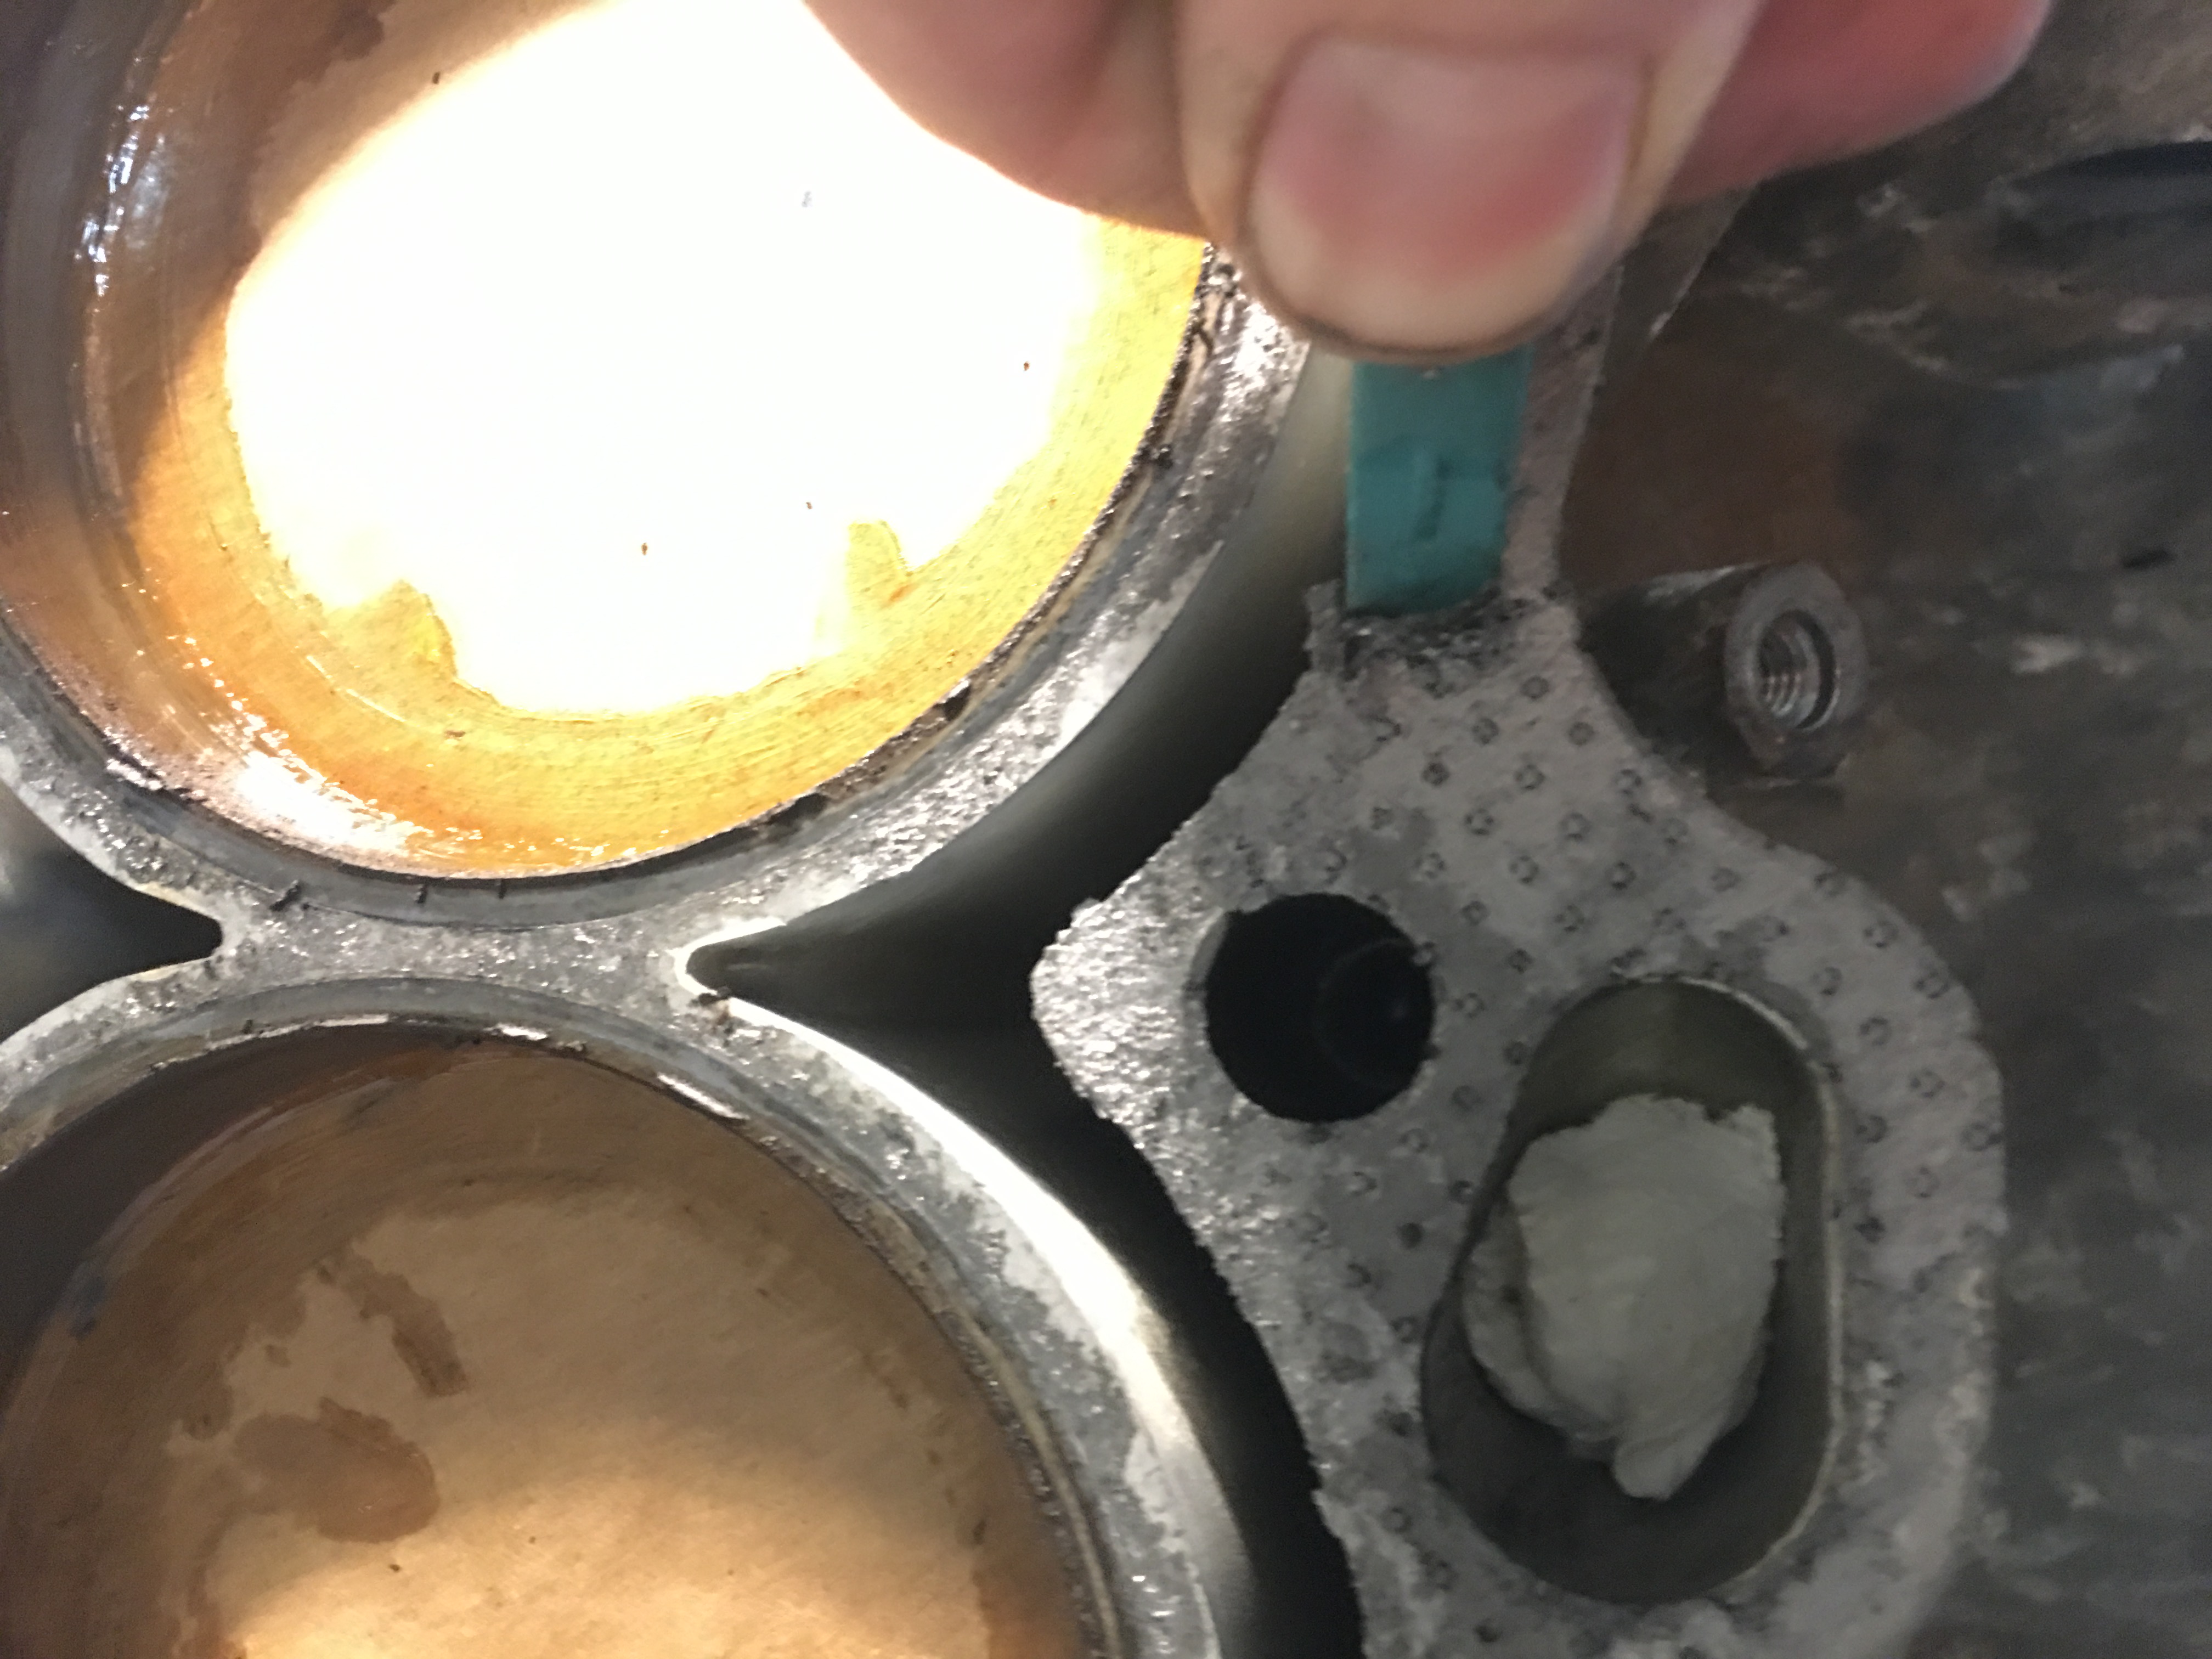
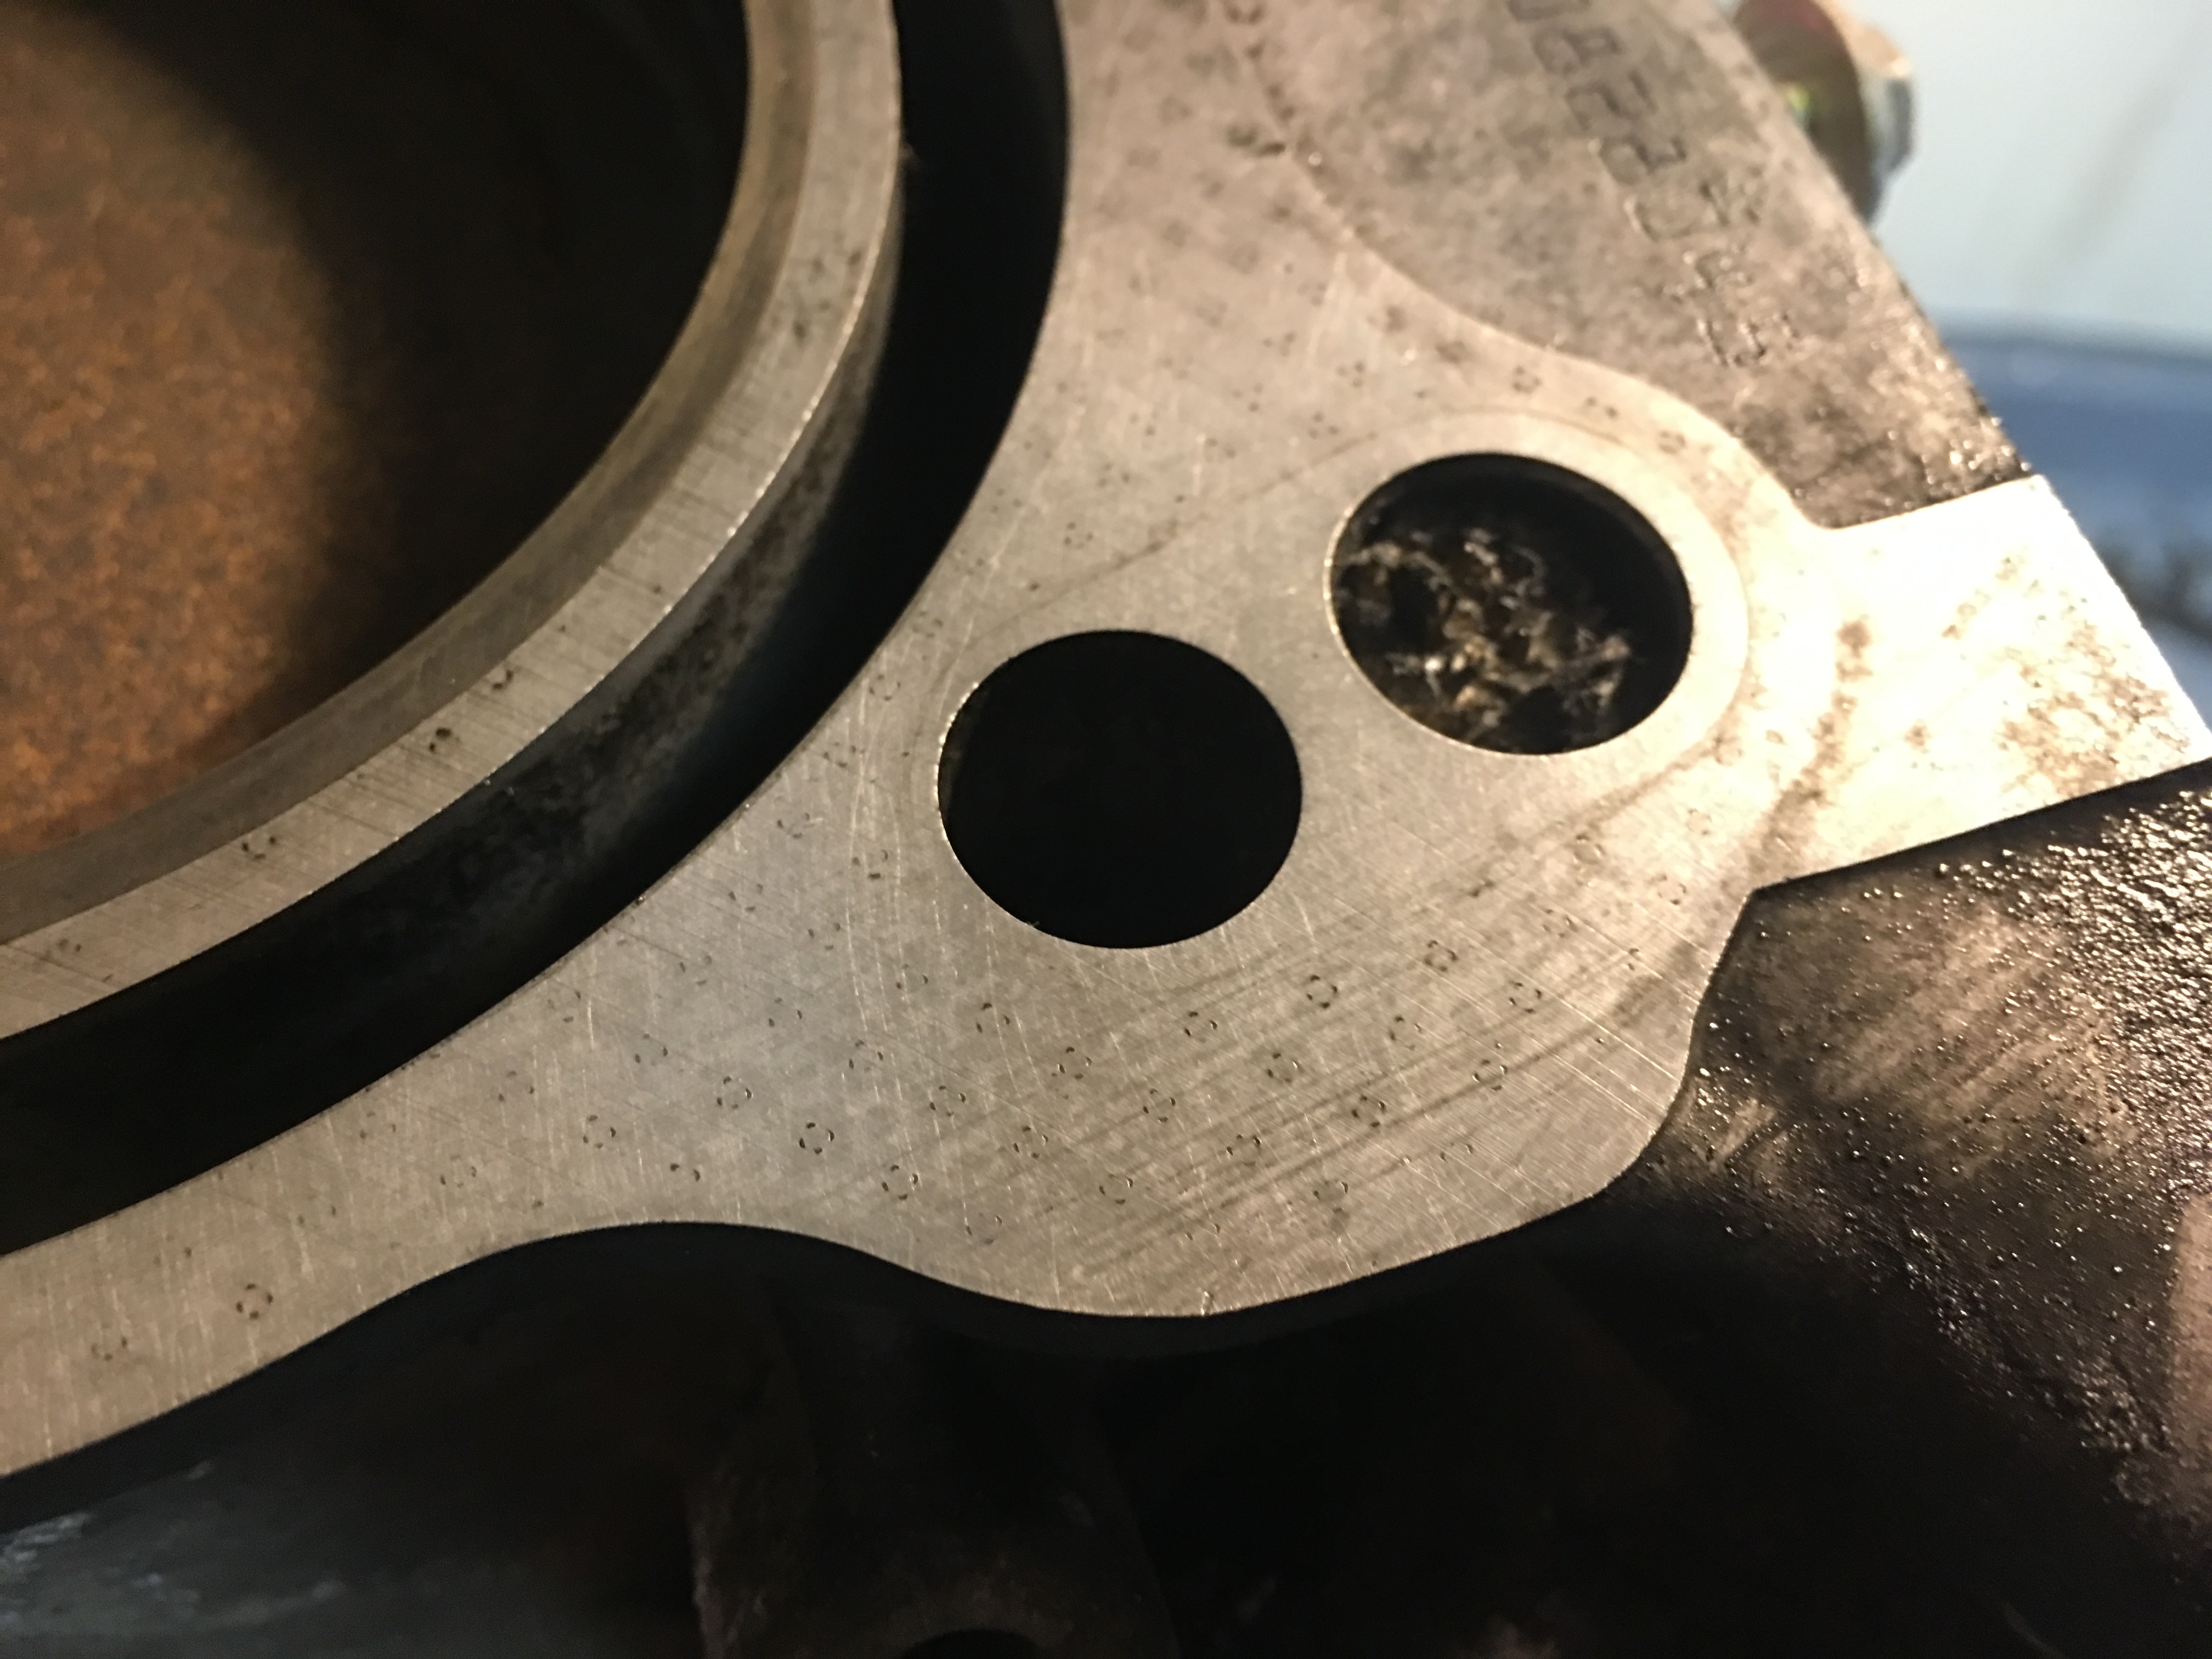
At this point, you basically repeat the process of scrubbing with a brass brush and applying gasket remover until the decks are clean. You'll be left with some stained and discolored metal on the deck in some places but that's normal. You might also find some dark spots around the fire ring, very carefully use a metal razor blade held vertically to the deck to gently scrape them away, you probably won't get perfectly clean looking but it needs to be nearly perfectly smooth.
You'll notice in this close-up photo that even after lots of scrubbing with the brass brush, the factory machining marks are still visible on the block deck, that's how little material is removed with this method. Yes it's time consuming, you'll spend a solid couple hours just cleaning the block, then another few hours on the heads, but you won't hurt the surfaces and it works very well.
Once you've finished cleaning the block decks, check the flatness of the deck with a precision straight edge according to the service manual procedure. You'll also want to check the heads in the same way.
Since everything is all sealed up, I also very lightly deburred the block deck edges with a small file and some 600 grit sandpaper to make sure there were no protrusions that could potentially cause issues with the MLS head gaskets.
This is a good time to clean out the bolt holes, they probably have nasty old oil or coolant in them as well as crud from the head gasket. I find that spraying brake cleaner in the holes then blasting them out with compressed air works really well. You want all the holes to be clean and dry before installing the studs.
This is after cleaning and removal of the plugs.

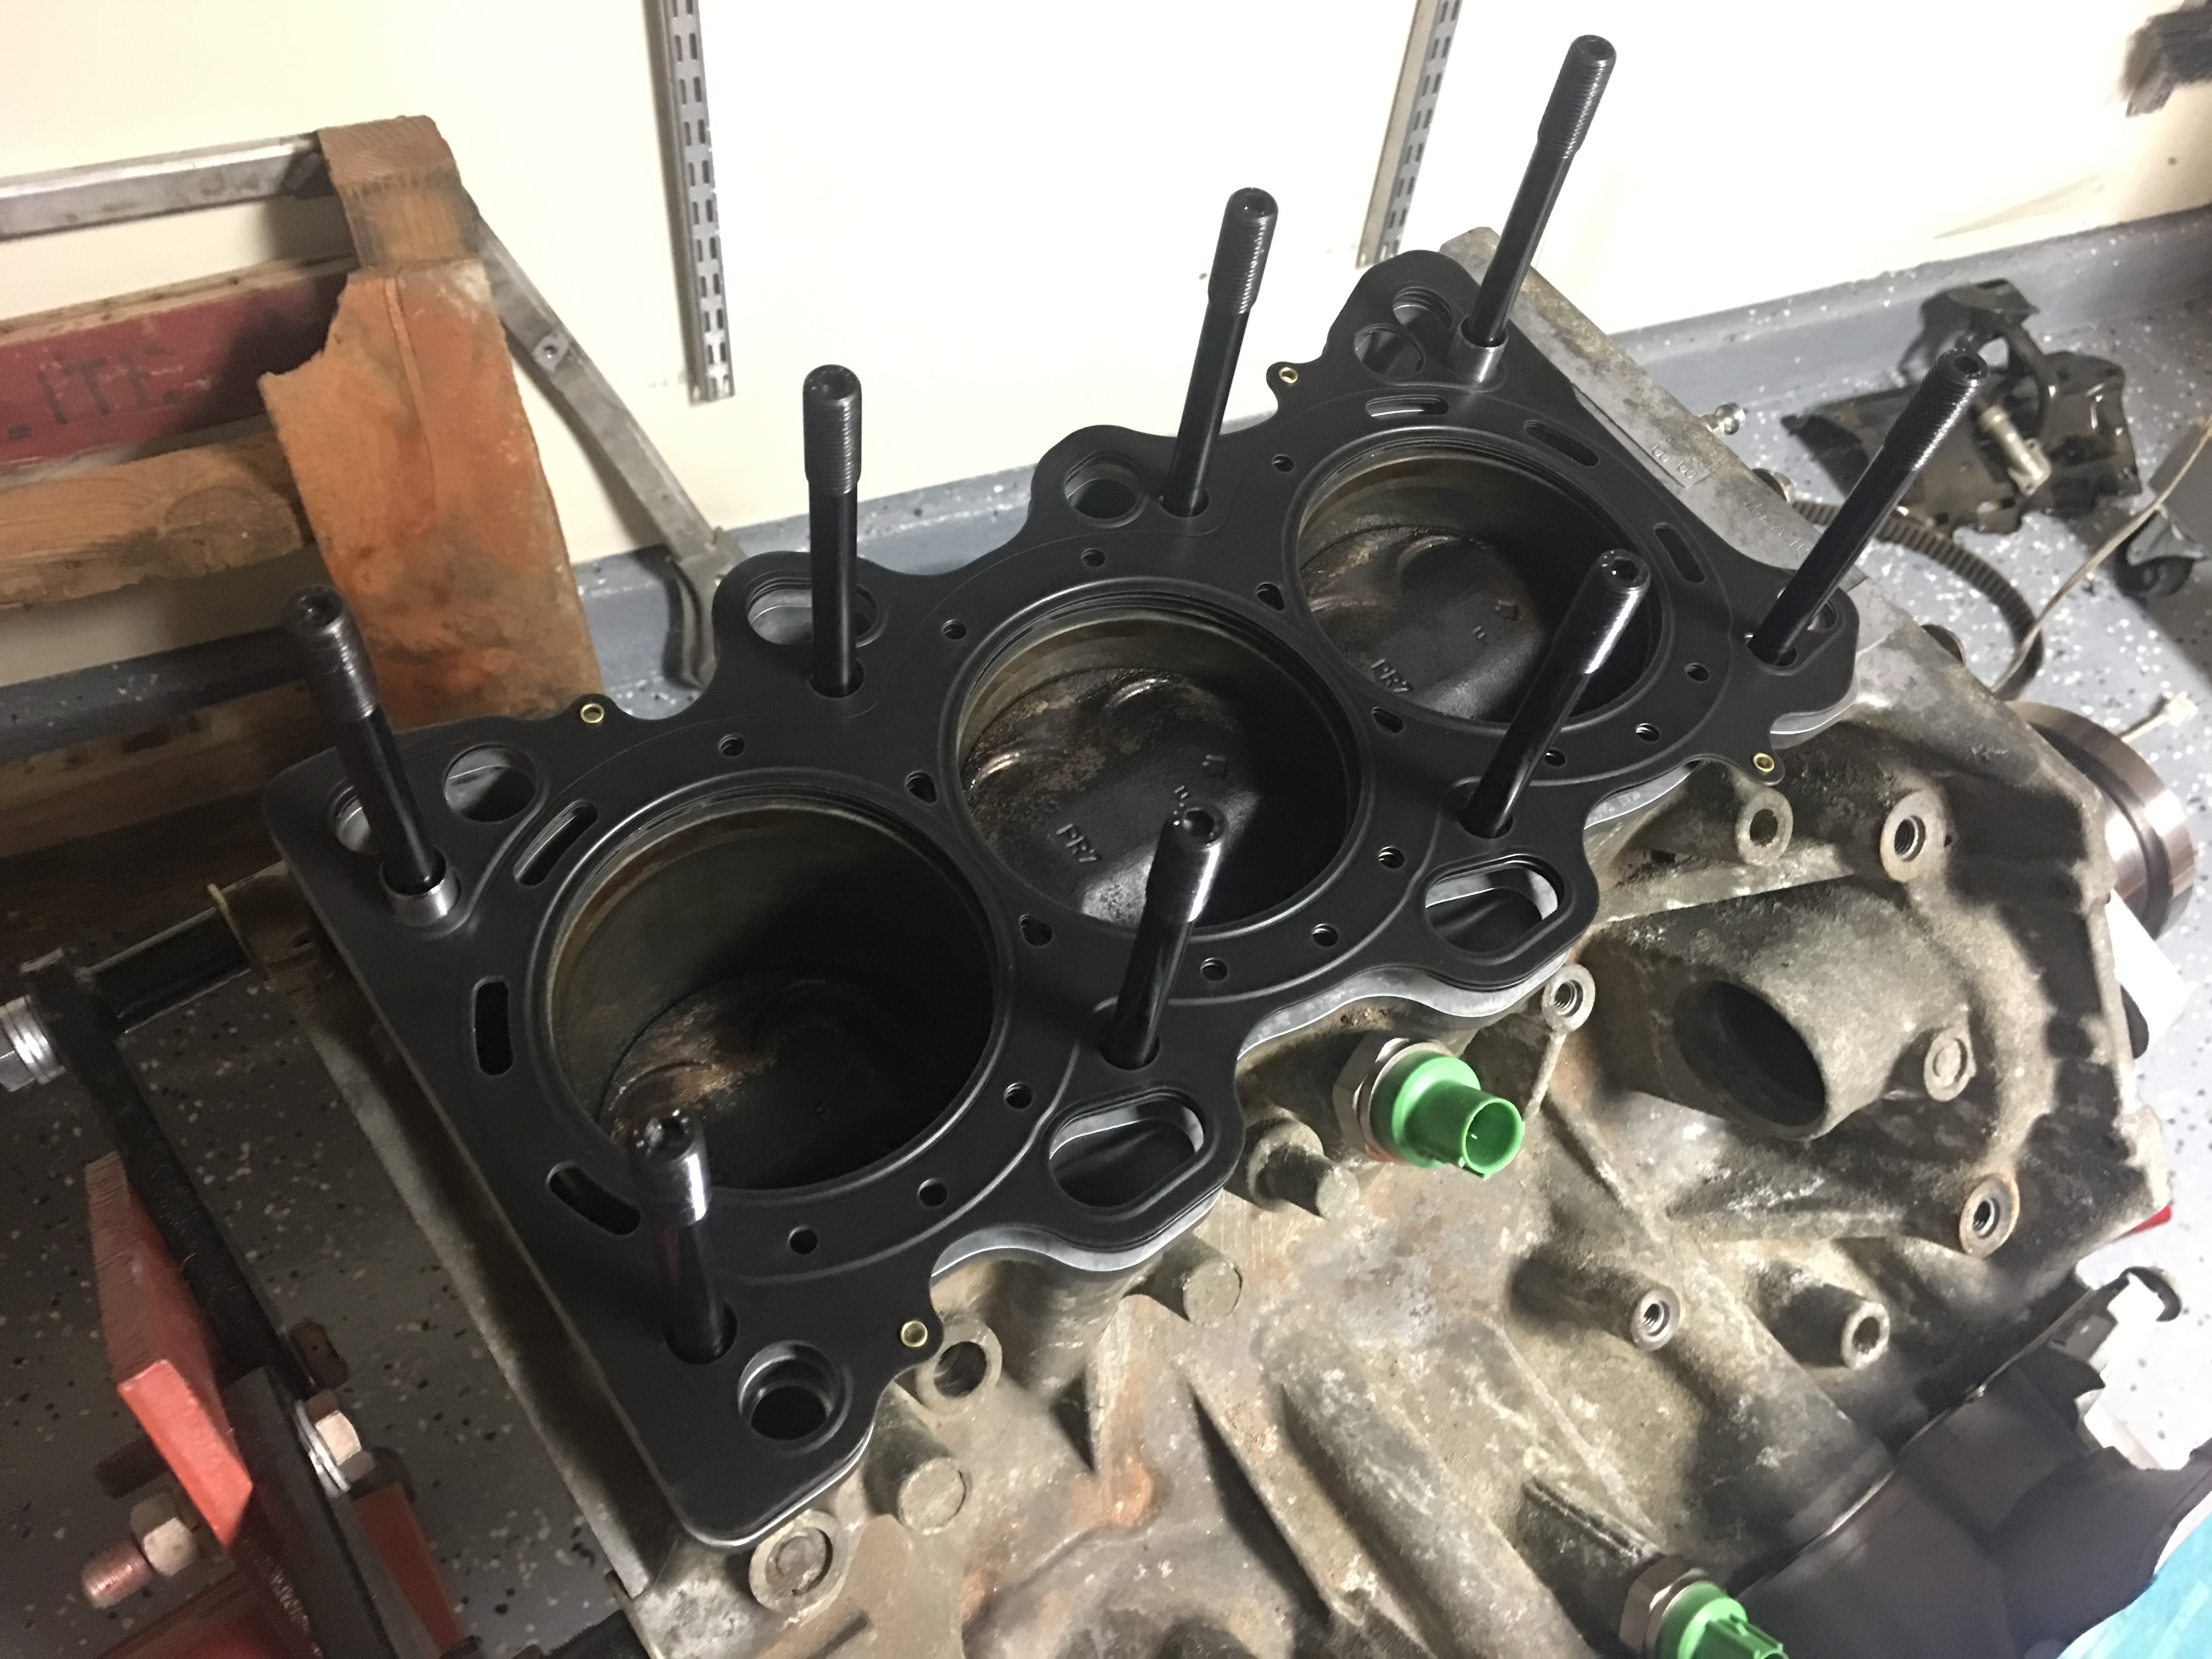
Studs, dowels, and head gasket installed. You want everything to go together as clean and dry as possible.
Cleaning the heads is essentially the same process, make sure to plug up the head bolt holes and oil pathways before starting, and it would also be good to stuff paper towels or something in the water passages too. I had a bit of something fall out of a water passage onto the block deck when installing a head, and luckily I saw it or it could have caused a leak.
I'd recommend you replace all 4 dowel pins since there's a decent chance one or more be stuck in the block and require fairly damaging procedures to remove, such as pliers and a slide hammer. If you don't plan on installing the heads soon, tape over the deck using masking tape to prevent anything from getting into your painstakingly cleaned engine block.
I bought my head stud kit from ScienceOfSpeed so I just followed their installation instructions and torqued to 80lbft in steps. Then went back and torqued again a few days later since MLS gaskets tend to compress a bit after initial torquing. Something I haven't seen mentioned anywhere else is that when you torque the outer head bolts during the first few steps, the inner bolts will no longer be at the full spec, so for each torque setting, go through the torque sequence twice to ensure that all bolts are at the same spec before moving to the next torque setting. I've seen other suggestions to torque the head gaskets over multiple days, and also suggestions to retorque them after the motor has run 1000 miles, but unfortunately this isn't really realistic on the NSX as the cams have to be completely removed from the car to access the head bolts so the best we can do is torque over a few days.
If you have any questions/comments/suggests feel free to comment below.
Like I said, you probably shouldn't do this and should just use OEM head gaskets and new bolts.
The general argument for doing this conversion is that the factory C30A head gaskets are graphite composite and prone to slow coolant leaks from old age and don't hold boost too well in forced induction applications.
The downside is that the block and head deck surfaces are a bit rougher than ideal for MLS gaskets. I haven't been able to find anyone who's actually had issues with Cometic MLS head gaskets on a C30A, and if anyone knows of any please let me know, but there's a few knowledgeable nay sayers who've never actually done it who will probably show up in this thread somewhere, and it's worth taking their points into consideration because frankly there just isn't much reason to do this conversion. It generally takes a very long time for issues to develop with factory gaskets, so just replacing the head gaskets with factory parts and new bolts is likely more than enough to get the motor through it's remaining useful life before a full teardown and rebuild.
The bottom line is that if you're boosting to the point that the stock head gaskets are a real concern, you shouldn't be boosting a stock engine that much. And if you're building an engine for boost, surface finish isn't a concern because both the heads and block will have been properly resurfaced and you should definitely use MLS gaskets and ARP studs, no question.
That said, for the remaining 3 people who still want to install MLS gaskets on their stock motor, here you go. Proceed at your own risk.
I bought a used engine for my car and found that the heads needed to come off, and since I had the head studs and MLS gaskets already for my never ending, ever expanding, money pit of a rebuild project, and buying OEM gaskets and bolts would cost about the same as buying the studs again, I figured I'd go for the MLS conversion since I don't feel like waiting for parts from the Acura dealer.
What you need:
1) All the tools to remove the motor from your car and then remove the heads. (technically it's possible with the motor in the car, but don't do that to yourself, just pull it out)
2) ARP head studs, because torquing bolts to higher than factory spec in a 25+ year old aluminum block is asking for trouble.
3) 2x Cometic MLS head gaskets (0.030" thickness is standard, but if your heads have been machined 0.008" or more you'll need to get a thicker gasket to compensate)
4) Plastic scraper or plastic razor blades
5) Brass bristle brush
6) Cardboard + thick grease to seal off the cylinders
7) Something to seal the oil passages in the block deck (paper towels work)
8) Shop vac
9) Permatex foaming gasket remover
10) Precision straight edge for checking flatness of the heads and decks.
11) A high quality torque wrench for torqing the head studs.
Notice that there are no roloc wheels, abrasives, or power tools on that list. That's because unless you're a dealership monkey you don't use such things to clean aluminum head gasket mating surfaces.
Start off by pulling the heads, it's documented in the service manual so I won't touch on that. You'll be met with the sad remains of a gasket stuck on the block deck, something like this.
You might also notice that there are cardboard circles in the cylinders, with thick grease all around the edges. This is to keep anything you scrape off the deck from getting into the rings and potentially scoring the cylinder walls. Before you do anything after pulling the heads, plug up the oil pathways and drain holes and cut out cardboard circles roughly the size of the cylinders, vacuum out the cylinders to get any debris that might have fallen in, insert the cardboard circles and smear grease all around to seal them. I use silglyde grease but really any thick grease should work just fine. I didn't bother to plug up the bolt holes since those will be cleaned out later, and the water jacket can also be cleaned fairly easily later but some people like to fill the water jacket with shaving cream to catch any debris that falls in so it can be easily vacuumed out.
Once the cylinders and other important holes are sealed off, start scraping using a plastic scraper or plastic razor blade. I used some plastic scraper thing I had in my toolbox but plastic razor blades would be better. You don't have to get everything off at this stage, just the big chunks of gasket material so it's relatively flat.
After you're done, the deck should look like this.
Now apply a good coating of Permatex foaming gasket remover and let it sit for 15-30 minutes. Warning: your garage will smell nasty after this. This stuff is very niche in it's usefulness, but I find that it's actually quite helpful on the graphite gasket crud.
After the gasket remover has sat for a bit, get out your brass bristle brush and go to town. MAKE SURE THAT IT IS BRASS. If you use something with steel bristles or some other harder metal you will wreck your block deck. Halfway through scrubbing it's already starting to look a lot better.
At this point, you basically repeat the process of scrubbing with a brass brush and applying gasket remover until the decks are clean. You'll be left with some stained and discolored metal on the deck in some places but that's normal. You might also find some dark spots around the fire ring, very carefully use a metal razor blade held vertically to the deck to gently scrape them away, you probably won't get perfectly clean looking but it needs to be nearly perfectly smooth.
You'll notice in this close-up photo that even after lots of scrubbing with the brass brush, the factory machining marks are still visible on the block deck, that's how little material is removed with this method. Yes it's time consuming, you'll spend a solid couple hours just cleaning the block, then another few hours on the heads, but you won't hurt the surfaces and it works very well.
Once you've finished cleaning the block decks, check the flatness of the deck with a precision straight edge according to the service manual procedure. You'll also want to check the heads in the same way.
Since everything is all sealed up, I also very lightly deburred the block deck edges with a small file and some 600 grit sandpaper to make sure there were no protrusions that could potentially cause issues with the MLS head gaskets.
This is a good time to clean out the bolt holes, they probably have nasty old oil or coolant in them as well as crud from the head gasket. I find that spraying brake cleaner in the holes then blasting them out with compressed air works really well. You want all the holes to be clean and dry before installing the studs.
This is after cleaning and removal of the plugs.
Studs, dowels, and head gasket installed. You want everything to go together as clean and dry as possible.
Cleaning the heads is essentially the same process, make sure to plug up the head bolt holes and oil pathways before starting, and it would also be good to stuff paper towels or something in the water passages too. I had a bit of something fall out of a water passage onto the block deck when installing a head, and luckily I saw it or it could have caused a leak.
I'd recommend you replace all 4 dowel pins since there's a decent chance one or more be stuck in the block and require fairly damaging procedures to remove, such as pliers and a slide hammer. If you don't plan on installing the heads soon, tape over the deck using masking tape to prevent anything from getting into your painstakingly cleaned engine block.
I bought my head stud kit from ScienceOfSpeed so I just followed their installation instructions and torqued to 80lbft in steps. Then went back and torqued again a few days later since MLS gaskets tend to compress a bit after initial torquing. Something I haven't seen mentioned anywhere else is that when you torque the outer head bolts during the first few steps, the inner bolts will no longer be at the full spec, so for each torque setting, go through the torque sequence twice to ensure that all bolts are at the same spec before moving to the next torque setting. I've seen other suggestions to torque the head gaskets over multiple days, and also suggestions to retorque them after the motor has run 1000 miles, but unfortunately this isn't really realistic on the NSX as the cams have to be completely removed from the car to access the head bolts so the best we can do is torque over a few days.
If you have any questions/comments/suggests feel free to comment below.
Like I said, you probably shouldn't do this and should just use OEM head gaskets and new bolts.