After much anticipation I got my Science of Speed subwoofer assembly and installed it today. For more information on this system see this thread.
Inspired by D’Ecosse’s and Malibu Rapper’s excellent stereo install write ups, and a promise to Chris of SOS that I’d do a comprehensive review, I decided to try a DIY/product review all-in-one.
Just a little background history, I had installed my system about two months prior, using D’Ecosse’s DIY install as my bible. It basically consisted of:
Alpine CDA-9833 Head Unit
Dali Carbonfiber dash
Rockford Fosgate P162S Punch Series 6.5" Component Speakers
Rockford Fosgate Punch P4004 Amplifier
Custom Amplifier Enclosure in the trunk where the tool kit (removed) used to sit.
As you can see I had no sub and while the stereo sounded great, it was way too high and needed some serious bass. I searched and searched and couldn’t find a box that I felt met my needs. Due to horror stories like this one that Malibu Rapper went through, I was very wary of what was out there. Enter Science of Speed with their new audio system. It fit the bill perfectly and having ordered from SOS in the past, I knew it had to be quality. I immediately called up Chris and within in a week the sub and box was in my hands.
I just need to mention what a class act the entire SOS crew is. They not only were informative, responsive, knowledgeable and friendly but they went out of their way to help me get my grubby little hands on this sub. They shifted work around to get the sub box completed in time and they even expedited it to me at no charge just so I could do the install this weekend! Thanks again guys!
Ok now to the write up. Below are a few pictures of the actual sub. You can get more details on the actual ratings of the sub from SOS. For what it’s worth, it felt very solid and well built.


Below is the picture of the box. The quality was excellent. No cracks or holes anywhere. The box felt very, very solid and well put together. What I really liked about it was it had some sort of black rubbery surface coating the entire sub. It felt good and it made it feel very well sealed. It also made it easy to screw into as well.


The guys at SOS thought of everything and the entire kit came with everything you need to do the install. Also included were instructions and a speaker grill with mounting tabs. They even thoughtfully provided fiberfill for the box, saving me a trip to the store.

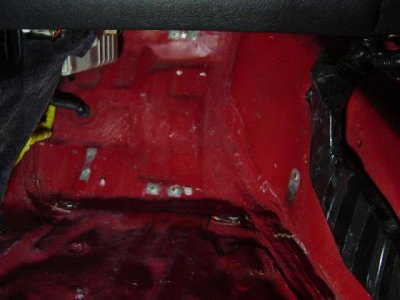
Ok, now to the install. I had already removed the existing subwoofer by following the service manual. It was pretty easy: just disconnect a few harnesses and remove three bolts. Below is a picture of the foot well with the OEM sub removed. The orange wire is the subwoofer speaker wire that I pulled through the car from the amp. *Tip: make sure you give yourself a lot of extra slack on this wire (at least 4-5 feet). You’ll thank yourself later.

To install the new SOS sub you need to remove/relocate a few parts. The first thing you need to do is detach the yellow wiring conduit from the blue channel. I found it was easier to detach the blue channel from the floor first, then remove the yellow conduit. The blue channel is held in by white tabs that either need to be squeezed to release or rotated. The tabs circled need to be rotated, the ones with the arrow need to be squeezed. One you get the blue channel out the yellow conduit is held in by more white tabs. I found the easiest way to remove them was with a flat blade screwdriver. Insert into the side and push the tab in a bit. Then twist the screwdriver and the tab should pop out.

Once released, you need to relocate the yellow conduit so that it runs along the top of the foot well and out of the way of the sub box instead of on the bottom. There is plenty of slack in the line to easily wire tie it to other things under the dash. You just need to get it out of the way so it doesn’t get pinched. Here you can see it tucked under the dash and out of the way. I tucked the left side out under the center console, but I left it out so you could see how to relocate it. Once the yellow conduit was of the way, you’ll need to remove the metal brackets that held the existing subwoofer. This was probably the most challenging part as they are attached by strong adhesive. SOS recommends using a chisel and mallet to remove them. I used a combination of a screwdriver, hammer, Dremmel and vice grips to remove them. Just muscle them out as you won’t need to them anymore. There are three you need to remove as indicated by the arrows. Once those are out, remove the black cross bracing along the foot well wall, by removing the three bolts holding it in. There are some more brackets under the cross-bracing that you can remove using the chisel-mallet technique, but I got lazy and left them in.

Next, I drilled a hole in the sub box to run the wire through using a .25” drill bit. There was no instructions on where to make the whole so I just picked some random spot.

Then I ran the speaker wire through the hole. I found that using some WD-40 or silicone spray first and some needle nose pliers made the job of running the wire through much easier. *Tip: Make sure to pull through enough wire so that you can wire the sub comfortably outside the box. I gave myself about a 1.5’ so that I could lay both the box and sub in the passenger seat without any problems.

As recommended by SOS, I used some hot glue to fill the hole. SOS said not to use a silicone based sealant since it would not stick to the wire coating. I ended up just globing hot glue on the inside and outside of the hole to make a nice airtight seal.

Then I wired up my sub. Since the sub has dual 2 ohm coilovers, you need to decide if you are going to wire it up in series (for a 4 ohm load) or parallel (for a 1 ohm load). I chose to wire my sub in series to keep my amp running cooler. Since the amp is in the trunk, which is known to get notoriously hot, and I live in Las Vegas, I decided to play it safe and keep my amp as cool as possible. Wiring the sub in series is easy. I just had to wire the negative of one terminal to the positive of the other terminal. With a small strip of wire I made the connection.

Next I put the fiberfill back in the box and wired the sub with the wire that I just penetrated through the box. This is where all the extra wire comes handy. Here you can see I had enough wire to rest the box on the passenger seat and the enough slack to wire the sub.

Then put the sub in the box and screw in place. I drilled small pilot holes first, rather than just tapping the screw in to avoid cracking the box. Then slide the box into place by tilting the top of the box towards the dash first and then sliding the rest of the box. Notice how well the box fits. I’m convinced it uses every usable inch of space back there. As you can see the foam padding was too long and needed trimming.

After using a utility knife the padding fit flush.

Next comes the speaker grill. The grill fits nice and flush and is attached by 4 aluminum brackets provided by SOS.

Next push back the carpet. Either I didn’t get the box in far enough or the box changed the dimensions of the foot well enough that the carpet didn’t fall back into place cleanly. There was still a lot of slack and buckling in the carpet. I think when I go back to clean up the install,a series of cuts into the carpet will easily fix the problem.

Finally the floor mats go back in.

Turn on the stereo and BOOOM! The sub and box sound excellent. It’s nice and boomy but relatively tight and clean. I wouldn’t say it is the tightest bass I’ve ever heard, but it was much boomier than I had expected. I even got it to read +/- 0.02 g's on my g-meter it shook my console that much! Perhaps its because the NSX has such a small cabin, but the bass was very loud and deep. It’s almost deceiving how much punch it can deliver from such a small enclosure. It was very impressive.
My only two gripes that I could think of was that the speaker grill was made of plastic and not metal as I had hoped. It’s still very strong and I’m not too worried about it but I can be paranoid at times and my biggest fear is that a passenger could accidentally kick through it, not knowing the sub is right at their feet. I might consider putting a metal mesh grill there in the future but I’ll see how the plastic holds up. ***UPDATE*** Upon futher review, I discovered that the subwoofer grill IS made of metal (thanks to Chris of SOS for correcting me). This is good in that it won't snap like a plastic grill will. However, does have some give so it may bend or dent if kicked hard enough. It's not flimsy like aluminum foil, but it's not rigid like a barbeque grill either. I'll keep an eye on it and snap some "later" pictures here after some time with foot traffic.
The other gripe I had was that while the bass sounded good, there was a very slight minor flapping sound when the bass hit at high volume. It’s not distortion because I’m very familiar with how distortion sounds. It was more like a flapping sound rather than the burping sound of distortion. It’s hard to describe, but it wasn’t really a big deal because you can barely hear it and once you have the carpet back up, you can’t really hear it at all. Also, I’m not fully convinced yet that it might even be a problem with the sub itself. Since it was a really fast install, it just needs some tweaking. ***UPDATE*** After some tweaking I really don't hear any flapping sounds. It was probably a result of my poor sealing/seating of the sub in the box.
But don’t let those two things take anything away from the overall performance. This sub/box combo is a real winner. SOS has put out an excellent product It sounds great. It fits great. The quality is top notch. And it comes from a grade A company. It was worth every penny spent and I highly recommend it to anyone looking to upgrade their subwoofer.
I’m giving it my first real test drive along the Vegas strip tonight. I’ll follow up with the results of my ride and let you know how it performs in action.
Inspired by D’Ecosse’s and Malibu Rapper’s excellent stereo install write ups, and a promise to Chris of SOS that I’d do a comprehensive review, I decided to try a DIY/product review all-in-one.
Just a little background history, I had installed my system about two months prior, using D’Ecosse’s DIY install as my bible. It basically consisted of:
Alpine CDA-9833 Head Unit
Dali Carbonfiber dash
Rockford Fosgate P162S Punch Series 6.5" Component Speakers
Rockford Fosgate Punch P4004 Amplifier
Custom Amplifier Enclosure in the trunk where the tool kit (removed) used to sit.
As you can see I had no sub and while the stereo sounded great, it was way too high and needed some serious bass. I searched and searched and couldn’t find a box that I felt met my needs. Due to horror stories like this one that Malibu Rapper went through, I was very wary of what was out there. Enter Science of Speed with their new audio system. It fit the bill perfectly and having ordered from SOS in the past, I knew it had to be quality. I immediately called up Chris and within in a week the sub and box was in my hands.
I just need to mention what a class act the entire SOS crew is. They not only were informative, responsive, knowledgeable and friendly but they went out of their way to help me get my grubby little hands on this sub. They shifted work around to get the sub box completed in time and they even expedited it to me at no charge just so I could do the install this weekend! Thanks again guys!
Ok now to the write up. Below are a few pictures of the actual sub. You can get more details on the actual ratings of the sub from SOS. For what it’s worth, it felt very solid and well built.
Below is the picture of the box. The quality was excellent. No cracks or holes anywhere. The box felt very, very solid and well put together. What I really liked about it was it had some sort of black rubbery surface coating the entire sub. It felt good and it made it feel very well sealed. It also made it easy to screw into as well.
The guys at SOS thought of everything and the entire kit came with everything you need to do the install. Also included were instructions and a speaker grill with mounting tabs. They even thoughtfully provided fiberfill for the box, saving me a trip to the store.
Ok, now to the install. I had already removed the existing subwoofer by following the service manual. It was pretty easy: just disconnect a few harnesses and remove three bolts. Below is a picture of the foot well with the OEM sub removed. The orange wire is the subwoofer speaker wire that I pulled through the car from the amp. *Tip: make sure you give yourself a lot of extra slack on this wire (at least 4-5 feet). You’ll thank yourself later.
To install the new SOS sub you need to remove/relocate a few parts. The first thing you need to do is detach the yellow wiring conduit from the blue channel. I found it was easier to detach the blue channel from the floor first, then remove the yellow conduit. The blue channel is held in by white tabs that either need to be squeezed to release or rotated. The tabs circled need to be rotated, the ones with the arrow need to be squeezed. One you get the blue channel out the yellow conduit is held in by more white tabs. I found the easiest way to remove them was with a flat blade screwdriver. Insert into the side and push the tab in a bit. Then twist the screwdriver and the tab should pop out.
Once released, you need to relocate the yellow conduit so that it runs along the top of the foot well and out of the way of the sub box instead of on the bottom. There is plenty of slack in the line to easily wire tie it to other things under the dash. You just need to get it out of the way so it doesn’t get pinched. Here you can see it tucked under the dash and out of the way. I tucked the left side out under the center console, but I left it out so you could see how to relocate it. Once the yellow conduit was of the way, you’ll need to remove the metal brackets that held the existing subwoofer. This was probably the most challenging part as they are attached by strong adhesive. SOS recommends using a chisel and mallet to remove them. I used a combination of a screwdriver, hammer, Dremmel and vice grips to remove them. Just muscle them out as you won’t need to them anymore. There are three you need to remove as indicated by the arrows. Once those are out, remove the black cross bracing along the foot well wall, by removing the three bolts holding it in. There are some more brackets under the cross-bracing that you can remove using the chisel-mallet technique, but I got lazy and left them in.
Next, I drilled a hole in the sub box to run the wire through using a .25” drill bit. There was no instructions on where to make the whole so I just picked some random spot.
Then I ran the speaker wire through the hole. I found that using some WD-40 or silicone spray first and some needle nose pliers made the job of running the wire through much easier. *Tip: Make sure to pull through enough wire so that you can wire the sub comfortably outside the box. I gave myself about a 1.5’ so that I could lay both the box and sub in the passenger seat without any problems.
As recommended by SOS, I used some hot glue to fill the hole. SOS said not to use a silicone based sealant since it would not stick to the wire coating. I ended up just globing hot glue on the inside and outside of the hole to make a nice airtight seal.
Then I wired up my sub. Since the sub has dual 2 ohm coilovers, you need to decide if you are going to wire it up in series (for a 4 ohm load) or parallel (for a 1 ohm load). I chose to wire my sub in series to keep my amp running cooler. Since the amp is in the trunk, which is known to get notoriously hot, and I live in Las Vegas, I decided to play it safe and keep my amp as cool as possible. Wiring the sub in series is easy. I just had to wire the negative of one terminal to the positive of the other terminal. With a small strip of wire I made the connection.
Next I put the fiberfill back in the box and wired the sub with the wire that I just penetrated through the box. This is where all the extra wire comes handy. Here you can see I had enough wire to rest the box on the passenger seat and the enough slack to wire the sub.
Then put the sub in the box and screw in place. I drilled small pilot holes first, rather than just tapping the screw in to avoid cracking the box. Then slide the box into place by tilting the top of the box towards the dash first and then sliding the rest of the box. Notice how well the box fits. I’m convinced it uses every usable inch of space back there. As you can see the foam padding was too long and needed trimming.
After using a utility knife the padding fit flush.
Next comes the speaker grill. The grill fits nice and flush and is attached by 4 aluminum brackets provided by SOS.
Next push back the carpet. Either I didn’t get the box in far enough or the box changed the dimensions of the foot well enough that the carpet didn’t fall back into place cleanly. There was still a lot of slack and buckling in the carpet. I think when I go back to clean up the install,a series of cuts into the carpet will easily fix the problem.
Finally the floor mats go back in.
Turn on the stereo and BOOOM! The sub and box sound excellent. It’s nice and boomy but relatively tight and clean. I wouldn’t say it is the tightest bass I’ve ever heard, but it was much boomier than I had expected. I even got it to read +/- 0.02 g's on my g-meter it shook my console that much!
Perhaps its because the NSX has such a small cabin, but the bass was very loud and deep. It’s almost deceiving how much punch it can deliver from such a small enclosure. It was very impressive.My only two gripes that I could think of was that the speaker grill was made of plastic and not metal as I had hoped. It’s still very strong and I’m not too worried about it but I can be paranoid at times and my biggest fear is that a passenger could accidentally kick through it, not knowing the sub is right at their feet. I might consider putting a metal mesh grill there in the future but I’ll see how the plastic holds up. ***UPDATE*** Upon futher review, I discovered that the subwoofer grill IS made of metal (thanks to Chris of SOS for correcting me). This is good in that it won't snap like a plastic grill will. However, does have some give so it may bend or dent if kicked hard enough. It's not flimsy like aluminum foil, but it's not rigid like a barbeque grill either. I'll keep an eye on it and snap some "later" pictures here after some time with foot traffic.
The other gripe I had was that while the bass sounded good, there was a very slight minor flapping sound when the bass hit at high volume. It’s not distortion because I’m very familiar with how distortion sounds. It was more like a flapping sound rather than the burping sound of distortion. It’s hard to describe, but it wasn’t really a big deal because you can barely hear it and once you have the carpet back up, you can’t really hear it at all. Also, I’m not fully convinced yet that it might even be a problem with the sub itself. Since it was a really fast install, it just needs some tweaking. ***UPDATE*** After some tweaking I really don't hear any flapping sounds. It was probably a result of my poor sealing/seating of the sub in the box.
But don’t let those two things take anything away from the overall performance. This sub/box combo is a real winner. SOS has put out an excellent product It sounds great. It fits great. The quality is top notch. And it comes from a grade A company. It was worth every penny spent and I highly recommend it to anyone looking to upgrade their subwoofer.
I’m giving it my first real test drive along the Vegas strip tonight. I’ll follow up with the results of my ride and let you know how it performs in action.
Last edited: