• Protip: Profile posts are public! Use Conversations to message other members privately. Everyone can see the content of a profile post.

Question: Rear Camber Kit Install. Thom Ayotte Kit.

Joined
19 December 2004
Messages
916
Location
Glastonbury, CT
FINAL UPDATE - If you ever need to install a Thom Ayotte Camber Kit. Here is how:

https://youtu.be/vLzffbYHuPQ


ORIGINAL POST BELOW

Summary (updated): Am I correct that the kit has simply changed some over time and these parts now have "collars" on them? I think I have now aligned this to replicate the instructions. My concern was the circled components had no collar by mine do. When I realized the total count was correct, it made me realize that's likely the case.

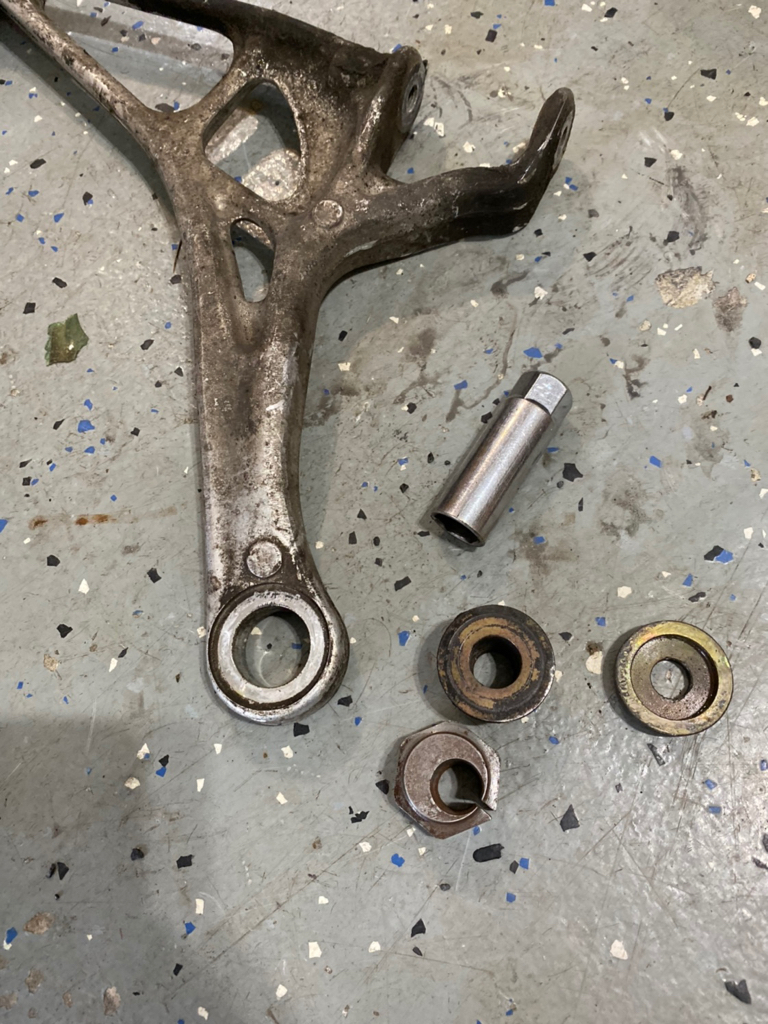
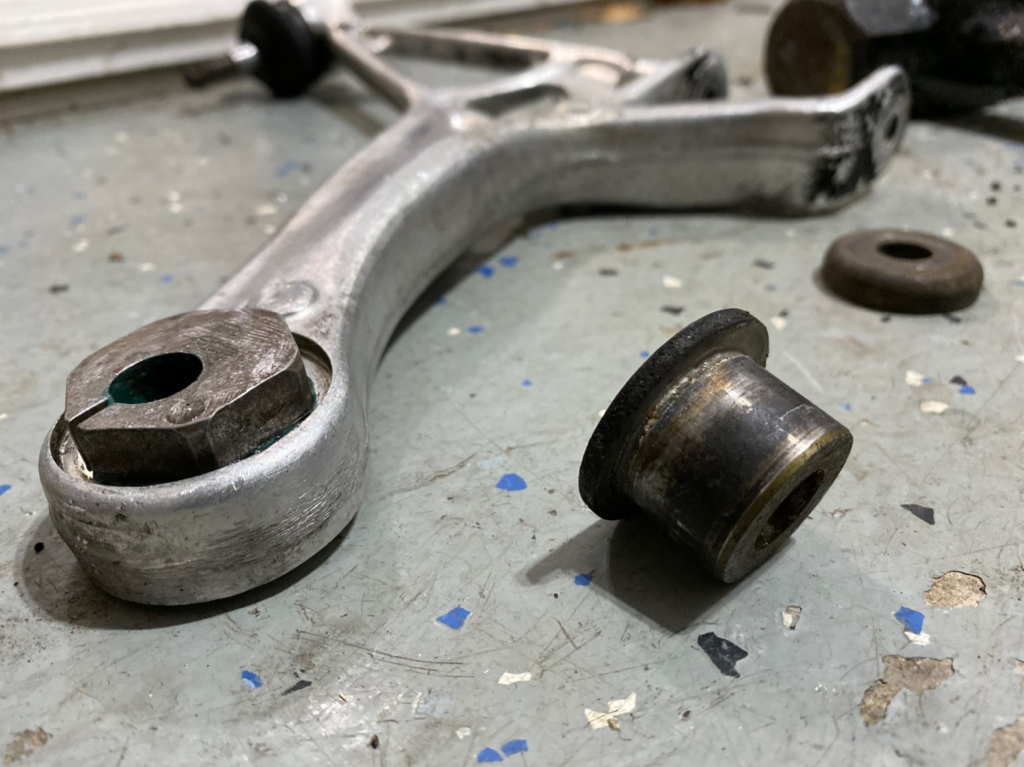
Pic 1: My kit. Tools on top. Example in middle. Other parts below.

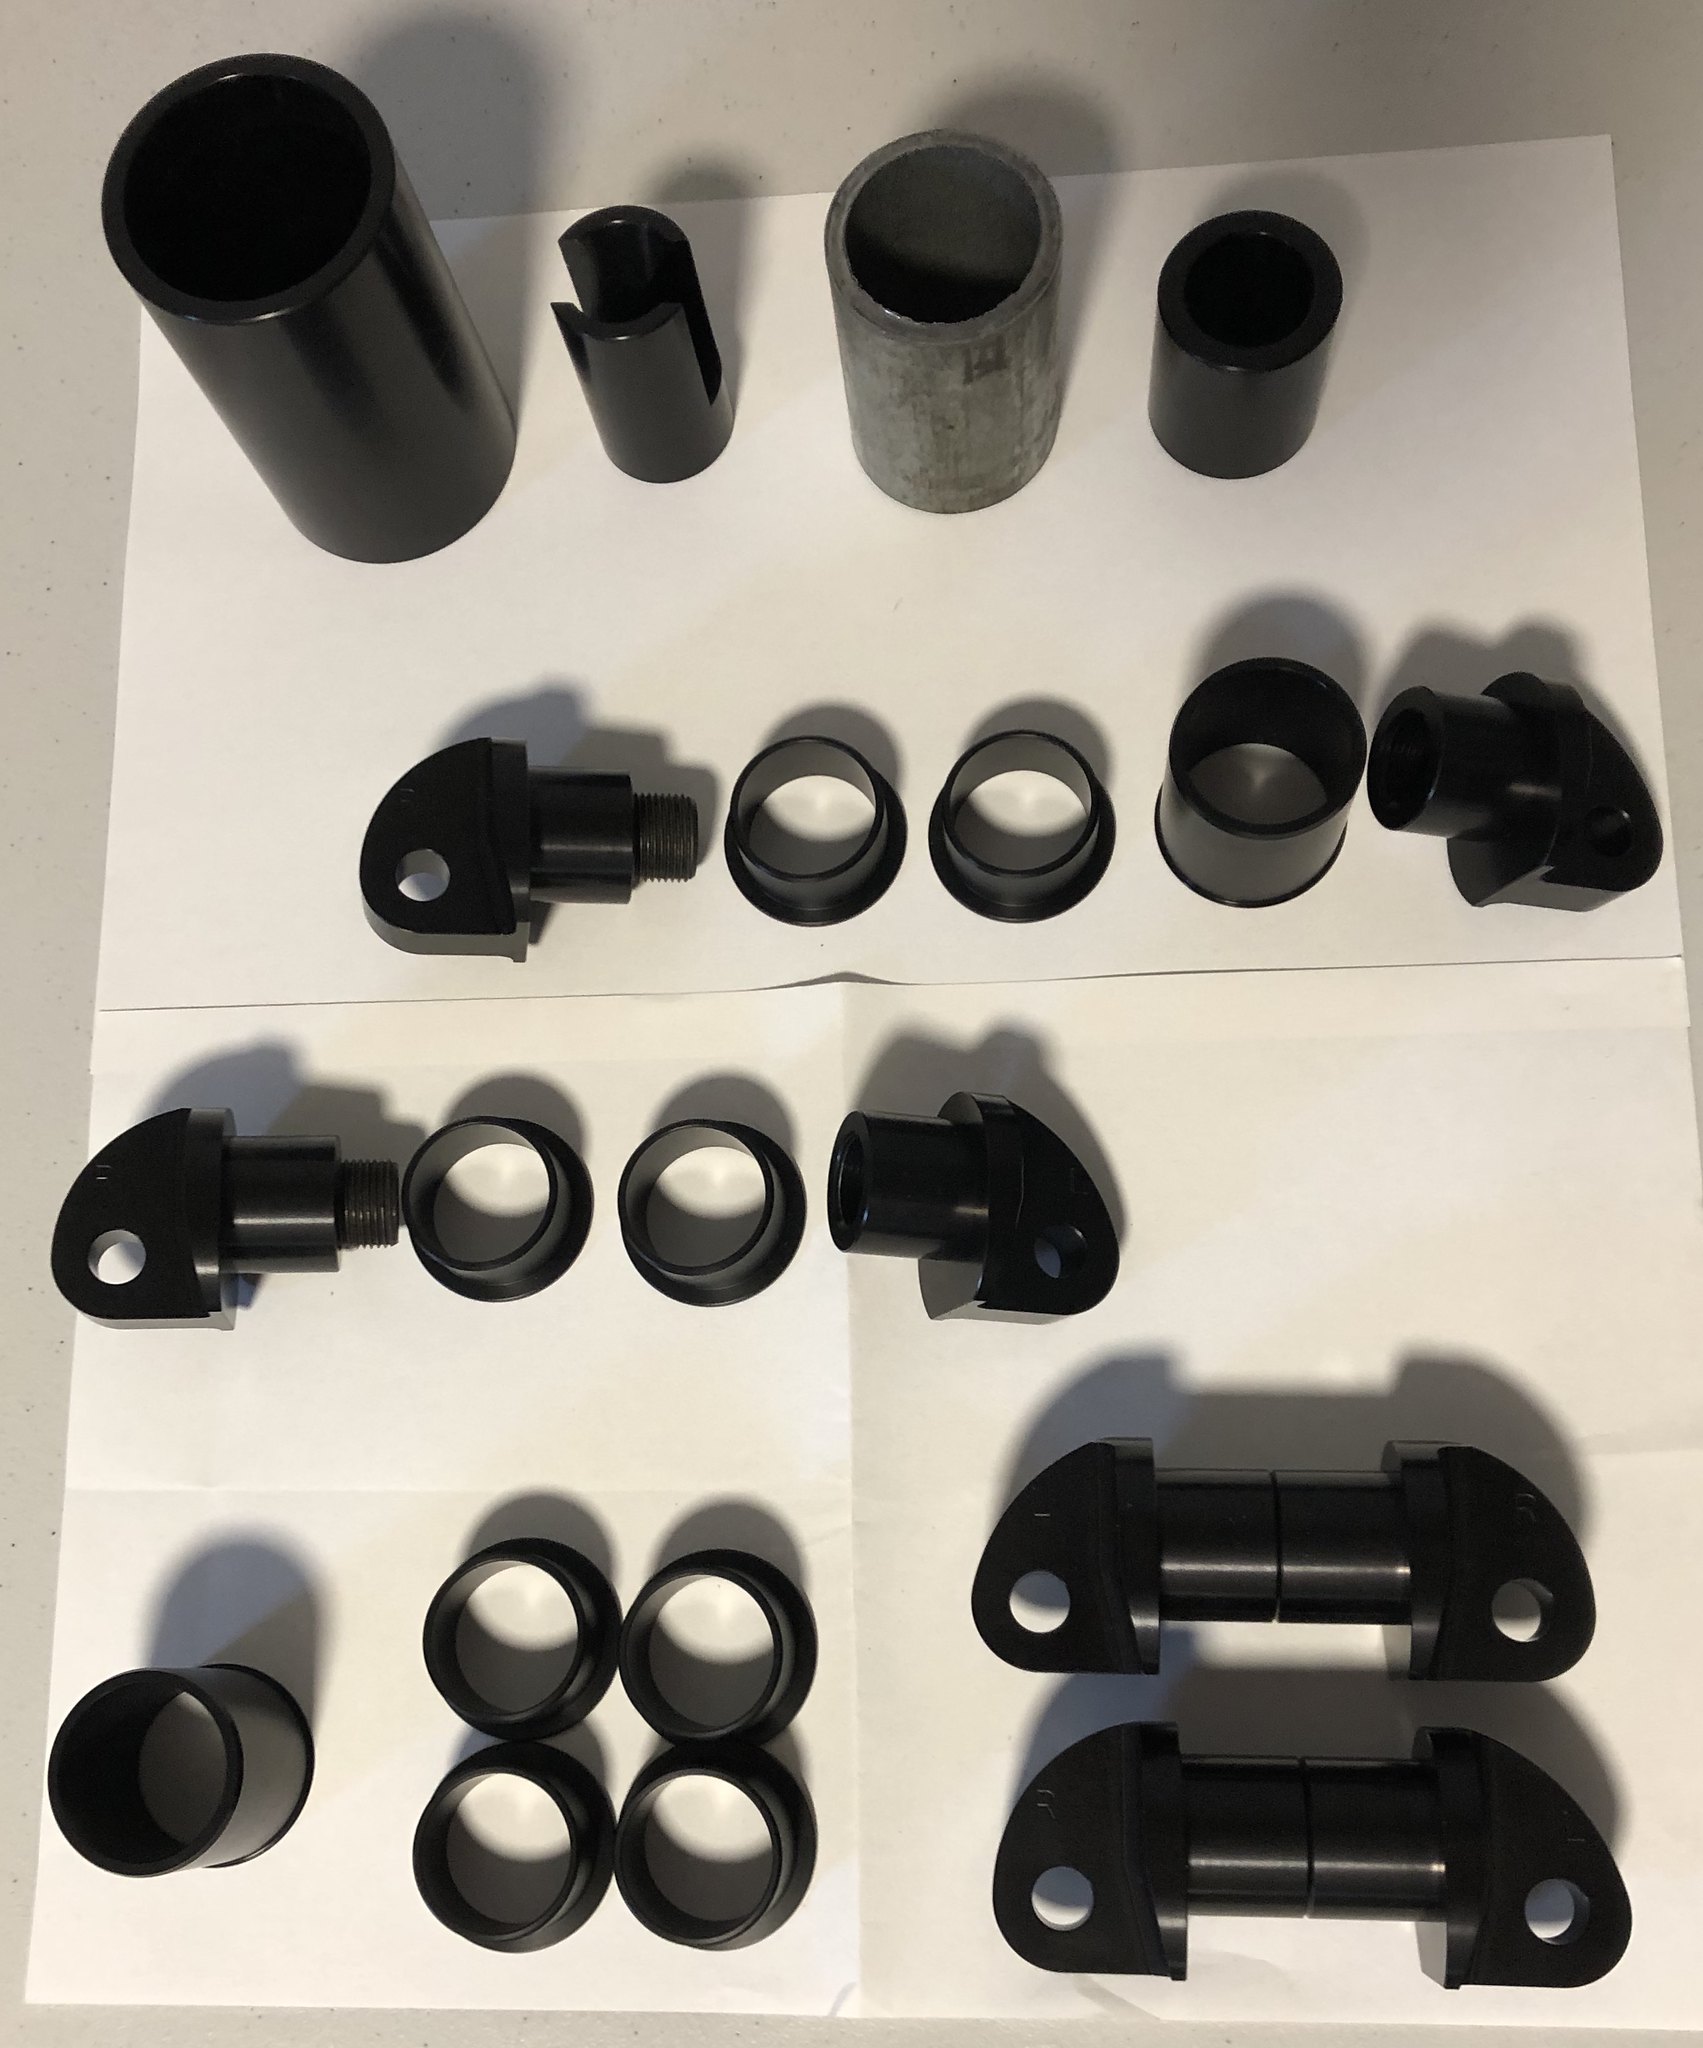
NSX-Camber-Thom-Ayotte-Kit-B by Michael Lohr, on Flickr

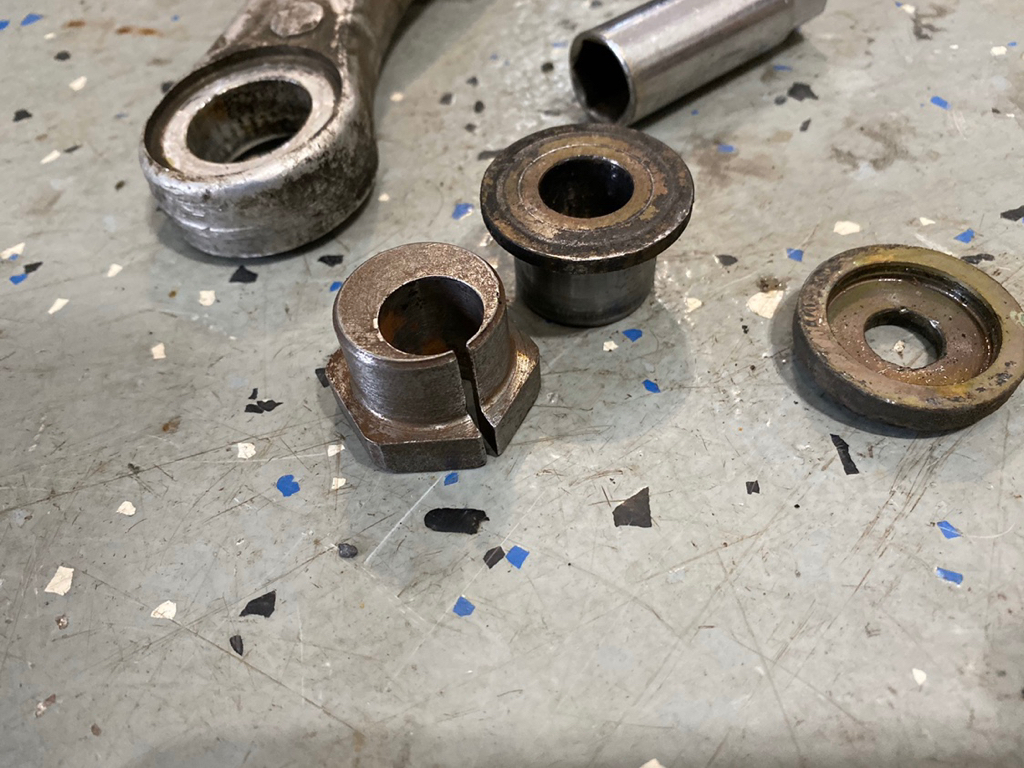
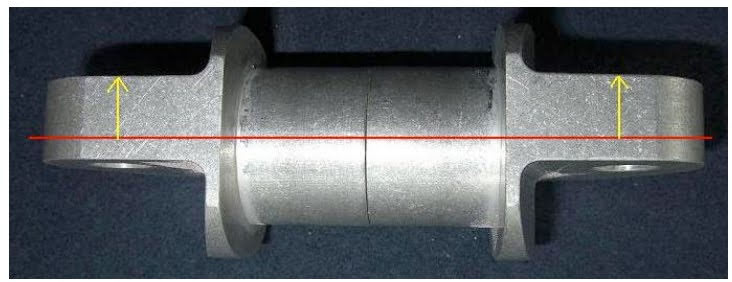
Pic 2: My area of question from instructions.

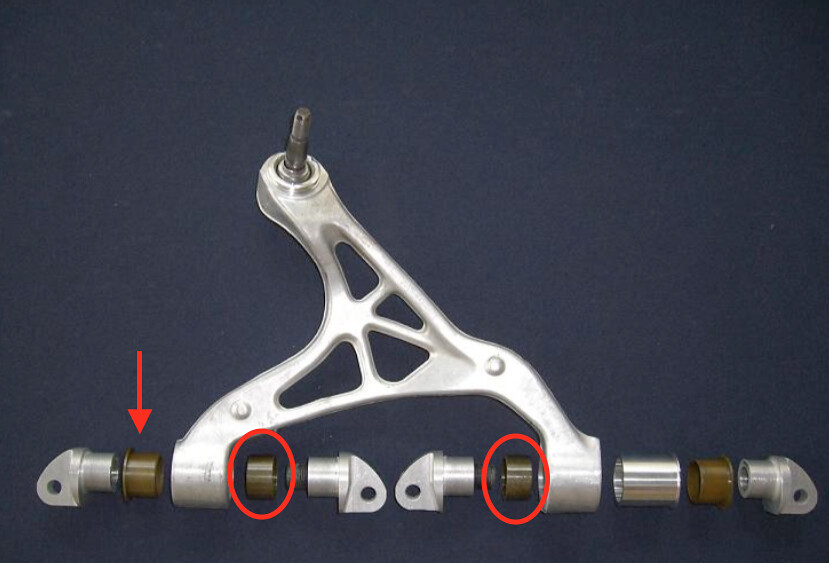
NSX-Camber-Thom-Ayotte-Kit-D by Michael Lohr, on Flickr

Details: I picked up a Thom Ayotte rear camber kit (it's unused looks perfect). I suspect it's the 6mm as opposed to the 12mm based on my quick measurements. I have Bilsteins on Tein's and really would like to get my rear alignment back to stock. I'm a bit nervous to dive into this project. I'm concerned about messing it up... Trying to first confirm that this kit is complete or correct (some change appears to have happened over time). I only question it based on the old Thom instructions which may suggest there are two pieces without collars. I'm not 100% following the instructions either at this point. On the positive side, I have to replace internal passenger boot anyway so I'll have the car apart. She's been down for quite some time due to voluntary repairs and I'm getting itchy to get her back on the road.

Thoughts?
 
Last edited:
The early kits had only one bearng with a flange. Later kits were updated to have flanges on both bearings to reduce noise and non-flanged bearing migration. Also keep in mind the larger bore has an additional sleeve. And always assemble the parts with a good bearing lube.

Rich Wong
 
Last edited:
The early kits had only one bearng with a flange. Later kits were updated to have flanges on both bearings to reduce noise and non-flanged bearing migration. Also keep in mind the larger bore has an additional sleeve. And always assemble the parts with a good bearing lube.

Rich Wong

Thank you. I think I bought these from you actually... (Should have checked my IM's). I originally thought I might be missing something and then realized I had more with flanges that shown originally. So the rubber "bearing" is not re-used then correct? What type of "bearing lubricant"? I suspect it's not roller bearing lubricant being these are what I guess I would call a polymer bearing or bushing.
 
When you say “rubber” are you talking about the OEM bushings? Then...yes, they are removed and replaced with the 5 pieces (6 for the larger bushing).

You can use the same kind of bearing grease that you would use for your sway bars.
 
Last edited:
When you say “rubber” are you talking about the OEM bushings? Then...yes, they are removed and replaced with the 5 pieces (6 for the larger bushing).

You can use the same kind of bearing grease that you would use for your sway bars.

Thank you. This is becoming more clear to me. I will document completely by way of video for the community. ….probably a little too late but I'll do anyway for my own edification....
 
A few more questions (Rich I PM'd you a few minutes ago, but I figured I would post).

1. What do you do if the ball joint bolt just spins? Note: One side I popped off brought out the whole "cone" and the bottom heavy custom washer dropped out. That one was fine. The second one I am having an issue with, the "cone" and customer washer did not come out. So All I have it a bolt and the rubber boot. Maybe that is an issue in an of it self. Thoughts? UPDATE (CAPS TO DISTINGUISH) I PURCHASED A NUT THINNER THAN THE CASTLE NUT. I WAS ABLE TO HAND THREAD IT DOWN TO BELOW THE CASTLE NUT HOLES. AT THAT POINT I PUT SOMETHING IN THE HOLES TO HOLD IT IN PLACE WHILE I TIGHTENED UP THE THIN NUT. ONCE TIGHTENED DOWN, THE BALL JOINT STAYED IN PLACE. BACKED THAT NUT OFF AND MOVED TO THE CASTLE NUT. WORKED FINE.

2. I was able to most of this installation without too many real issues (I documented the ones I did hit and will publish once this is all over). My current issue is that I had a really tough time aligning the bolts hole and treading in the upper control arm bolts. I was able to get the passenger side on with mild aggravation, but he passenger side.... no dice. It appears the whole are just a shy to far apart (like a few millimeters). Although extremely difficult, I was able to get one end on. The second side just wouldn't line up and I was approaching cross threading. The only think I could think to do was elongate the wholes (on one end or both) so it would have a little bit of play. The stock bushing have elongated holes one one side so that's where my head is at. Thoughts? UPDATE: I ENDED UP USING A DREMEL WITH A MILLING TOOL TO CUT INTO THE AYOTTE KIT BOLT WHOLES TO GIVE THEM SOME ROOM. THE OEM ONES HAVE SLOTS ON ONE SIDE (BARELY) SO I FIGURED THIS WOULD BE FINE. IT ALL WENT TOGETHER FINE. AGAIN, I DOCUMENTED ON VIDEO, WILL BE A WHILE BEFORE I GET THAT UP THOUGH. ALL THAT LEFT IS PUTTING THE BRAKES BACK ON AND SENDING HER TO ALIGNMENT. IT'S BEEN OFF THE ROAD TOO LONG....

I feel like this project was a bit more than I bargained for. I guess it will all depend out well it drives after the alignment with the new kit. I'm crossing my fingers. It an expensive road to get back to stock (about $1200 for new arms). Anyway, trying to stay positive.
 
Last edited:
Full DIY video added too the first post at the very top. It was a bit of an adventure...
 
Full DIY video added too the first post at the very top. It was a bit of an adventure...

Awesome vid !! it's great to see the process.

By any chance do you have any information on the front top camber adjustments? I pickup a kit but can't find any information or what tools are needed and want to prep before tearing in to this.

Thanks,
David
 
Awesome vid !! it's great to see the process.

By any chance do you have any information on the front top camber adjustments? I pickup a kit but can't find any information or what tools are needed and want to prep before tearing in to this.

Thanks,
David

Unfortunately no. In my research to date I have not found a good front kit option. If you find one let me know because I’ll be burning the the insides off the front tires until then...


Sent from my iPhone using Tapatalk
 
Oh, ok. I'm trying this bushing but for upper. I know they had it listed for upper also on their website but can't find it now.

Link
 
Oh, ok. I'm trying this bushing but for upper. I know they had it listed for upper also on their website but can't find it now.

Link

Those appear to be the OEM camber nuts unless I’m mistaken. Would be nice if it’s that easy (1 part) so let us know...


Sent from my iPhone using Tapatalk
 
Those appear to be the OEM camber nuts unless I’m mistaken. Would be nice if it’s that easy (1 part) so let us know...


Sent from my iPhone using Tapatalk

Yea it was easy to install, it replaces the top camber nut. It’s cut on a side so as the tapered inside is screed in the sides expends keeping it locked. It’s also adjustable once on the car too.

Here I few pics for reference.

6d2b4d9296994ff316b1029da0fceebb.jpg
fa7966b43f66ef54cdd79dc29adc9b5b.jpg
6398b1ea2aee1878367c6f5965709421.jpg
46648ac696b165084613531c22ed93ea.jpg
dc2bdf83fa721da1e1b6b028a8a95561.jpg
67ed569fdb3bab67db226b37c5b4b44a.jpg


Sent from my iPhone using Tapatalk Pro
 
To be clear, this is to bring a lowered car back to stock camber? If so, I have to have these. Very excited about it. Assuming this is all true it appears we have another video coming... Thanks.
 
To be clear, this is to bring a lowered car back to stock camber? If so, I have to have these. Very excited about it. Assuming this is all true it appears we have another video coming... Thanks.

Yes, correct it’s to returned lower car back to stock or at list as close as possible on front wheels.


Sent from my iPhone using Tapatalk Pro
 
Really Interested. More Info Please


Sent from my LM-V405 using Tapatalk

The bushings are made by "Rare Parts" machine shop. There is front upper and lower bushing that they offer. I only did front upper. Here is a link to machine shop that I think makes them Link Contact them if you need more info. As for the install it was one of the easier ones, but make sure you have good ball joint separator. The new bushing just slides in and I set it on max but it's adjustable after the install on the car too. I just need wheel alignment now.

Here is link to CT Engineering that made a kit also. This looks like top and bottom full kit for the front. Link
 
Last edited:
[MENTION=11589]N-Wing[/MENTION] [MENTION=9191]03 raw nsx[/MENTION]

21mins into the video, you're showing the offset between the front and rear orientation. I'm not a Suspension expert but I believe that adds a bit of anti-squat. I believe the OEM is not offset there, correct?

I know the other kits which replace that bushing are neutral there. Do the Ayote instructions specify that offset?
 
I had to re-watch the the video to orient myself...its been a while. So you referring to the "bolt to the car portion" and it being on center line vs the off-set I'm clarifying. I do the recall the stock being "centered". I don't know why they are offset. I follow you that it could effect the height (I think that's what you mean by squat inclusive of the camber) but I think only in relation to it's affect on the distance from bolts to ball joint (I think picturing it). It would effect the motion geometry which is above my pay grade to comment on. I do have the original instructions Thom created. Got them from Rich. Here is a screen shot of that depiction. I was very careful to follow the directions because I didn't completely understand why off-center was relevant but Thom appears to have understood. See below it's a copy paste from the PDF. Not sure I can post but will try.
BTW: Still no issues with this install and tires appear to be wearing well. Not sure how many miles I put on them. Probably at least 10k. I also had the fronts corrected through Mechanics Direct in Lowell MA (not sure what kit if any). Car was there due to an unfortunate transmission challenge (unfortunate for my car and my wallet).

STEP TEN: Install NSX Camber Correction Pivots
*DO NOT HAMMER ON ALUMINUM, IT WILL MUSHROOM!Using your hands and a back-and-forth twisting motion insert the large Pivot Halves as shown in the Exploded View.
*Notice: when looking at the NSX Camber Hardware pivot above, that you can see they are created with an offset mounting posistion. This photo shows the offset higher then center. Rotating the picture 180 degrees will therefore establish a higher offset from center. This is needed to ensure the surface of each of the Big and Small Ends of the control arm mount flush to the chassis. If this is not done correctly the upper control arm will be extreemely flexed. This could place the upper control arm under stress, and possible bearing failure.
*Make sure the mounting hardware offset is exactly like the picture above ON THE BIG END with the arrows pointing up toward the chassis. The big end is the part of the arm that retains the sleeve that will be pressed in.
**Make sure the mounting hardware offset is revervse of the picture, arrows pointing down, ON THE SMALL END. The small end is the pivot that mounts towards the rear of the car. Pleas email if you have more questions [email protected]


[MENTION=11589]N-Wing[/MENTION] [MENTION=9191]03 raw nsx[/MENTION]

21mins into the video, you're showing the offset between the front and rear orientation. I'm not a Suspension expert but I believe that adds a bit of anti-squat. I believe the OEM is not offset there, correct?

I know the other kits which replace that bushing are neutral there. Do the Ayote instructions specify that offset?
 
Yes, the OEM do not have any offset and I do not know what the 'offset' is from the Ayotte kit.

For me, the bottom line is:
I wanted my car to have a 'lowered stance'. This kit offers the correction I need to have OEM camber which gives me normal tire wear and handling that I want. I have had this kit on my car for 12+ years with no issues.

If you are worried or concerned...
Don't lower you car. You will not need this kit if your 100% OEM.

Modifications are OPTIONAL and to each NSX owners taste.

Rich Wong
 
@N-Wing @03 raw nsx [MENTION=25247]MexiRicer[/MENTION]

Hi Guys, So i'm pretty i'm thinking of this incorrectly in my head. I was looking at options to swap out those bushings so this is defintely on my radar. Something doesn't make sense to me though so i'm hoping one of you guys can just say "i'm crazy" haha. I know there are probably dozens of these out there so I probably am crazy!

this is the offset I'm referring to. I believe we're all on the same page here. (Lemme know if pic doesn't show up)
AM-JKLVCMgD19u1JFidRInCF6bsv1QdXpnjckCtVToY-fp1C5LGLPgs3O25IBOdhhswptb62E3GcIHRMSwB74SdsqamXBv0BQuzRQj7Ju7bHO7xsFl_17-LGC5BIqUB9FoipCpkVH_OJlUQPyb4nLLDgo9oUfA=w732-h282-no


This is the geometry of the my NSX. It was easy to place a straight edge there since I have everything torn apart. It's a perfectly flat plane mounting point(s).
AM-JKLXccEmiOFMDG3FGRHlTkXAxoWOiUELVQ7gXybPbjK0W3qGmq_-leGOflmNm5jFX7g4_I80aOsqCk8ms_w8sMrELqVkB4ee6FtDJYOI8e-6HemJRrzyzU6u8NUE9CA5vuCS8Uv6gaii7Y1uV1-O-JnLucw=w1232-h736-no


This is a screenshot from N-Wing's video. This roughly illustrates the offset that's confusing to me. If i'm right (i'm probably wrong) then the bushings should be binding. You see how the blue should be the common centerline pivot point but if the two mounts are offset the pivot points are not on the same pivot plane.
AM-JKLX8fPxmpOWDk2h3iLw7wZUydQqt3BetZZ9veuvN4g2X7S6yJIbPe6WQIFT0TM6JnyVJ-TaI10xqnS7mpfSmVbCvOThD42k-MPOzyYRAR_kpXWuO8z56QrVBEPwZqh1kOvQVo-1B_2L1NROR0CRl56uoNw=w987-h527-no


Can someone tell me i'm nuts or help me understand what's going on?
AF1QipP1IESwgGWseqTAY19TS4UQrAzHO0lgfiiavORW
 
You're not nuts. But I am not a engineer to that level. Thom is an engineer and has made that specific offset. It is also spelled out in the instructions to install with the offsets in mind. I can ask about the reason.

Rich Wong
 
You're not nuts. But I am not a engineer to that level. Thom is an engineer and has made that specific offset. It is also spelled out in the instructions to install with the offsets in mind. I can ask about the reason.

Rich Wong

Thanks for checking Rich! I'm not sure I like the Prothane I'm using so I'm looking at options like Thom's. Are these still available by chance?
 
Yes, I have a few sets left. I'm also planning to bring a few to NSXPO.

Rich Wong
 
Back
Top