• Protip: Profile posts are public! Use Conversations to message other members privately. Everyone can see the content of a profile post.

removing window regulators

Joined
21 July 2022
Messages
49
Wanting to send my window regulators off for repair/rebuild and have watched and read a few videos on the DIY. Yes I have seen Hugos post on YouTube.
So my question is how many bolts am I removing to get the window regulator out? From Hugos video it looks like two at the top inside the window , and two mid top of door. Then I seen another video where the guy states there is an additional 5 mid door. Not wanting to remove anything I don't need too. I have searched prime and can't find any pics of removal, did see OLDGUYs recommendation for re-installation. Pictures would be awesome with bolts circled and any additional removal tips would be great.
 
We used to have the NA1 manual on the site but since our change over it's missing although I think it's coming back at some point.

In the meantime I've uploaded a copy to my google drive so you can download/view it there.

I just followed the manual and had no problems at all.

 
Are you asking about just the regulator itself? If so, I can advise that there are no 'additional 5 mid door' bolts.

For the actual regulator track there are two bolts at the top and two bolts at the bottom which attach the track to the door skin and two bolts which attach the track mechanism to the base of the glass. In order to access the glass attachment bolts you have to lower the glass to get to them. There is a convenient hole in the inner door skin which makes it easy to access the bolts when it is lowered the correct amount. Have a second person around to hold the glass or have it well taped in place otherwise it will come crashing down. The regulator motor which is connected to the track by cables is held to the door skin by another 3 bolts. Complete removal of the regulator requires removal of 6 + 3 - 9 bolts. Fairly easy except for the two at the glass attachment point. Once unbolted, tape the glass in the full up position to allow regulator removal. Biggest hassle was trying to figure out how you rotate the track to get it out of the door cavity.

Be sure to lubricate the sliding plastic bobbin in the regulator that the glass attachment piece rides on.

Be very careful with prying up the inside trim piece along the base of the glass. Work along its length to gradually get it up. It is very soft metal and if you try to pry the whole thing up from the back end you risk putting a permanent kink into it.

On my 2000 the mastic used to attach the plastic moisture barrier remained wonderfully gooey after 17 years. Pull off the plastic barrier and there were strings of gooey stuff over everything. You will want some rags and mineral spirits for clean up. If you elect to completely remove the old mastic. 3M makes some butyl strip caulk (08578) which is much nicer to work with.

@Honcho may have some advice on alternate greases to use to lubricate the regulator track. Absent that, make sure you have the recommended Honda Urea grease on hand.

As @Superhatch says, the diagrams in the service manual are all you really need.
 
I'd also note that if you are at the point where you are thinking about getting your regulators rebuilt I suggest the SOS kit to also replace your bushings and retainer. Mine were all in rough shape after decades of use. I think that SOS provides a printed out walk through of replacement as well which is helpful.


Good point! If your car is a 1991 and has the original plastic (1991 - 1993) cable retainers they should be replaced. Doing the guides is also good. I forgot about those because I had the Hugo kit and I think his included replacement guides in the kit Since the regulator is being sent 'out' for repair the guides may or may not be part of that repair.
 
Today I just finished putting my passenger side back together, I installed the SOS guides. The only difficult/tricky part is unhooking the cables from the plastic retainer. You need 2 vice grips (a lot of patience) and if you have someone that can push one of the cable ends out you’ll save yourself some time and frustration. Still have the drivers window to do.

Maybe someone can shed some light on the minor issue I’m having on the window that I just finished, going down is perfect, going back up it’s not fast but not slow and the class moves from front to back going up? (Meaning it moves from the front of the car backwards)
 
Maybe someone can shed some light on the minor issue I’m having on the window that I just finished, going down is perfect, going back up it’s not fast but not slow and the class moves from front to back going up? (Meaning it moves from the front of the car backwards)

I'm having the same issue on my passenger side after rebuilding. I'm going to take it apart in a few days to see what might be causing the issue, if I find it I'll post here and @ you.
 
Today I just finished putting my passenger side back together, I installed the SOS guides. The only difficult/tricky part is unhooking the cables from the plastic retainer. You need 2 vice grips (a lot of patience) and if you have someone that can push one of the cable ends out you’ll save yourself some time and frustration. Still have the drivers window to do.

Maybe someone can shed some light on the minor issue I’m having on the window that I just finished, going down is perfect, going back up it’s not fast but not slow and the class moves from front to back going up? (Meaning it moves from the front of the car backwards)
The shape of the glass may give the perception that it is moving front to back as the glass rises; but, because of the front and rear guides and the rather solid attachment to the regulator, it is not possible for the glass to move horizontally unless the sliders that fit into the front and rear guides are broken. With the door open and the glass 1/2 to 3/4 of the way up, grab the glass and try to move it back and forth. Should be minimal movement (some play in the slider mounting which kind of floats a little bit. If you have a lot of movement and clunks then you may have severely worn or broken / missing sliders. You will want the service manual for their replacement. Parts #6 and #7


After I did my Hugo kit, I noticed that I did have a very slight rocking motion in the glass as it reached the upper end of its travel. Probably not what you want to hear; but, the guides at the front and back of the door that the glass moves in were incredible dirty and in need of lubrication. There was a differential drag between the front and back guide which caused the glass to rock as it was coming up. If you don't mind scratching your arm up a lot and can display some creativity you can pack new grease into the guide track; but, cleaning is really difficult. I ended up putting a bucket under the door and then repeatedly dumping mineral spirits down the front and rear guide tracks from the window opening in the top of the door (and using a squirt bottle inside the door). Cleaned out the door cavity to boot! A few mineral spirit flushes and the old grease had started to softened enough that I could remove it by reaching in with a rag and jamming it into the guide track and wiping. I repeated the flush and wipe process a couple of time until the rags were no longer obviously picking stuff up and then packed in grease as best I could. Removing the guides from the door is the best way to clean and lubricate them; however, that gets into playing with the glass adjustment which is a place you really don't want to go unless you absolutely have to.

Make sure that plastic bobbin that the window mounting rides on at its attachment point to the regulator is clean and lubricated (there is a TSB covering this). If it doesn't slide easily it can impede the smooth operation of the glass and also make a really loud bang as slams from side to side rather than moving smoothly.

With the guides cleaned up and lubed and with the Hugo kit installed, my windows are also slower going up than going down. I think that is probably normal. Do your window speed testing with the engine running. My alternator maintains a voltage of around 14.5 volts when running pretty much regardless of the load. Voltage without it running drops to slightly less than 12 volts when the window motors are engaged. That last 2.5 volts makes a huge difference to the amount of torque that the window motor can generate.

Edit - in the SM you will see that there are two adjustable stopper plates mounted on the door skin (toward front and back of the glass). These establish the upper limit of glass travel when the matching piece on the base of the glass hits the stopper. Don't be tempted to fiddle with the stopper adjustment to eliminate any rocking. The stopper plates establish the clearance gap with the roof. Unless that clearance gap is incorrect don't mess with the stoppers.
 
Last edited:
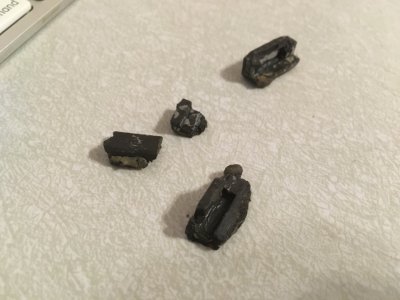
I've been working on my slow driver door window for a few weeks off and on, trying to thoroughly clean and re-grease the guides without removing them, which has gone pretty well. Today I noticed some small plastic bits in the bottom of the door that I believe are pieces of the guide bushings. If I take out just the regulator assembly and replace the broken parts, leaving the glass and window guides in place, will I need to go through the glass adjustment process which I've read horror stories about?
 
Last edited:
I've been working on my slow driver door window for a few weeks off and on, trying to thoroughly clean and re-grease the guides without removing them, which has gone pretty well. Today I noticed some small plastic bits in the bottom of the door that I believe are pieces of the guide bushings. If I take out just the regulator assembly and replace the broken parts, leaving the glass and and window guides in place, will I need to go through the glass adjustment process which I've read horror stories about?
If you remove the regulator without moving the glass, you MUST securely tape the glass to the sashes to prevent it from falling inside the door and shattering.

The regulator does affect window alignment. There is forward-back play in the window glass mounting bracket and play in the adjuster nuts. The main thing the regulator adjusts is the forward/back rocking motion of the window (a circular motion). You will need to ensure that the window glass is not cocked forward or backward too much, or it will rip the sash rubber. basically, when you reinstall the regulator and get the glass bolted up, pull the tape and rock the glass clockwise/counterclockwise until it lines up evenly in the front and rear sash. I would then do the water test and wind noise check before buttoning up the membrane and door panel. If it passes both, you are good. You can avoid a "full" adjustment process this way, as the taped window will preserve the regulator alignment mostly and you can tweak the last 10% before tightening the bolts.

The plastic pieces in the bottom of the door (if black) are almost certainly the OEM rubber guides. Almost every NSX has at least one down there at this point. Why Honda would use something so sticky is a mystery to me. I replaced with the SOS yellow guides and they work great.
 
Thanks for the quick reply @Honcho. Here's a picture of what I found, which even to my untrained eye, looks like the bushings. I'm going to order the new bushings and metal retainers from SOS. Hopefully addressing those old/weak parts on both sides now will prevent any bigger issues down the road. As for the speed, the cleaning and re-greasing I have done so far helped significantly. I ended up picking up some of that Super Lube Silicone grease that you recommended in your other post. Thanks again for the wisdom!IMG-2403.JPG
 
The nasty adjustments you want to avoid are the ones that move the guide tracks in-out horizontally with respect to the door. In the service manual these are noted with a lock nut and a recommendation to make a registration mark with a marker and count the turns. To completely clean the guides you really need to remove the guides which means fiddling with those adjustments. If you didn't remove the guide tracks then you don't need to deal with this.

There is an 'up' limit for the glass on the door which you should check if you remove the regulator. The service manual describes this and it is easy to do.

As Honcho says, definitely do a run of duct tape along the base of the glass attaching it to the outer door skin and the front and back sashes before you remove the regulator.
 
Getting ready to execute this folly in frustration next week. Already have the SOS kits. But not looking forward to removing the tracks to fully clean them. Or should I say REALLY not looking forward to putting them back in and doing the alignment process.
 
Back
Top