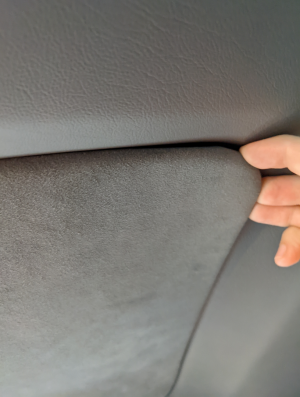
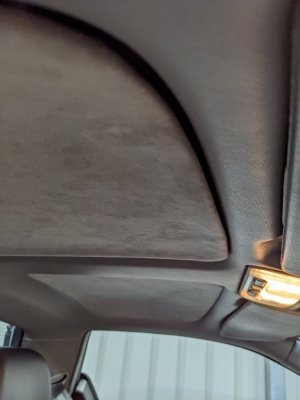
The suede square piece in the roof trim above my head is sagging down in the middle, it feels like it's glued to the roof but the glue is no longer sticky enough. It only drops by about an inch but it's enough to touch my hair and makes the interior feel a bit smaller than it is. I want to remove this piece and reglue it but I'm scared to break/bend it during removal, is this held on with clips or does anyone have some advice on how to remove it?
-
Protip: Profile posts are public! Use Conversations to message other members privately. Everyone can see the content of a profile post.
You are using an out of date browser. It may not display this or other websites correctly.
You should upgrade or use an alternative browser.
You should upgrade or use an alternative browser.
Roof trim sagging
- Thread starter Blipman
- Start date
Is this a hardtop or a NSX-T? I'm trying to visualize what you're describing, but my hardtop has no such piece. The headliner does release from the backing board and sag over time. Unfortunately the only real solution is to peel off the liner and re-glue it with something like 3M Super 77.
You must have a coupe because my targa does not have any suede pieces in the roof liner. Since Honcho says that his coupe doesn't have any suede maybe this is an 'improvement' added by a previous owner?
According to the service manual, on a coupe you have to remove the center section trim and the seats in order to get the roof liner out. I expect that is required to get the clearance to remove what is a fairly large piece of plastic (or whatever it is). This is in addition to the obvious stuff like the visors and interior light etc. The liner is held in place by a number of clips. Rather than try to describe all the locations of the clips it is best if you down load the free .pdf versions of the service manual (there are links on Prime) and in the Body section of the service manual on I think page 20-38 (in the 1997 version) there is about 1/2 page dedicated to removal of the panel including pictures showing the location of the trim clips. Its only 1/2 page long because it references separate parts of the manual for seat removal and center section removal.
This is not going to be a trivial project.
Last edited:
Sorry my bad, this is in a J-Spec coupe. Here is a pic of the roof, I want to know how the suede-like pieces are attached as ideally I'd like to remove the one that's sagged without removing the whole plastic roof piece, which does sound like quite a job. I can pull on the edge and it comes away, but if I start applying more force without knowing how it's attached I could damage that piece.
<img src=http://www.j-spec.com.au/customers/nsx_24.jpg>
<img src=http://www.j-spec.com.au/customers/nsx_24.jpg>
Sorry my bad, this is in a J-Spec coupe. Here is a pic of the roof, I want to know how the suede-like pieces are attached as ideally I'd like to remove the one that's sagged without removing the whole plastic roof piece, which does sound like quite a job. I can pull on the edge and it comes away, but if I start applying more force without knowing how it's attached I could damage that piece.
Those suede pieces are aftermarket. It looks to be a separate piece that is either glued/attached to the OEM headliner on the outside or they cut out the sections and put those pieces in and attached it to the backside or to the roof somehow.
The safest bet is going to be to remove the whole headliner to find out how it's attached.
here are some good pictures of the headliner backside so you can see where the clips are located:
http://www.nsxprime.com/forum/showt...-Pillars-and-Headliner-Near-Perfect-Condition
Last edited:
Hmm that's definitely standard on Japanese spec NSX's. Mine's a 1990 with these suede parts, here is a photo of a Japanese 1991 auto with the same parts:
Interesting, well if that's the case then I stand corrected. The 91-94 USDM cars are all a gray vinyl with no inserts. Hopefully someone with a JDM car has taken the headliner off and can provide an answer.
Last edited:
Amayama.com will have the parts diagrams for JDM NSXs. Check them out and it may give you a clue as to whether the insert is a separate piece or permanently fixed to the headliner.
Amayama.com will have the parts diagrams for JDM NSXs. Check them out and it may give you a clue as to whether the insert is a separate piece or permanently fixed to the headliner.
Did that last night. It's clearly a different part number from the US cars, but the diagram does not depict removable panels in the headliner recesses. It shows as a complete unit.
For the OP, it looks like these upholstered panels are glued to the main headliner. You might want to try heating the panel with a hair drier and then pulling a fishing line behind it to release the adhesive. Then, you can re-stick the fabric and glue it back to the headliner.
Sooooo
Now that you know that the JDM NSX has a different roof liner are you going to order one for your Type S project? Knowledge can be a burden.
Sooooo
Now that you know that the JDM NSX has a different roof liner are you going to order one for your Type S project? Knowledge can be a burden.
So interestingly enough the 97-99 Type-S and the Type-S Zero have the exact same headliner as the USDM NA2 Coupes. The '91-'94 USDM coupes have a headliner color called "Half Black" it's color code NH84L but the NA2 USDM Coupes/S/S-Zero have a color called "Seagull Gray" color code NH293L. I've seen the NA2 coupe in person and I couldn't tell the difference in color, I actually didn't know they were different until just now. The more you know haha.
I believe Sudesh has posts on his "refresh' on NSXCB.
http://www.nsxprime.com/forum/showthread.php/160600-NSX-Refresh-Work-Sudesh-NSXCB
I've owned both USDM and JDM versions...the JDM headliner is much cooler.
Removing the headliner is extremely difficult to do without damaging something. I estimate 8+ hours...you will likely need to fabricate some tools to pop out the pins without causing damage to the headliner. This is a job that will require a lot of room as a whole lot of the interior will have to be removed, long thin prybars that will require custom pivot points for each fastener.
I believe Sudesh has posts on his "refresh' on NSXCB.
http://www.nsxprime.com/forum/showthread.php/160600-NSX-Refresh-Work-Sudesh-NSXCB
I've owned both USDM and JDM versions...the JDM headliner is much cooler.
Removing the headliner is extremely difficult to do without damaging something. I estimate 8+ hours...you will likely need to fabricate some tools to pop out the pins without causing damage to the headliner. This is a job that will require a lot of room as a whole lot of the interior will have to be removed, long thin prybars that will require custom pivot points for each fastener.
Is Sudesh still around? I know he was dealing with a serious illness a few years ago and had moved to a Lamborghini. I haven't seen much posting from him over on the NSXCB forums...
Ok, for future J-Spec owners who want to know how to remove these, I hope this helps. The suede panel is held on to the ceiling trim piece with clips, some photos are attached. I gently pried on the edge and worked my way around. If you're gentle and take your time it's not too hard, the main concern is you don't want to bend the cardboard that the suede is attached to. It took about 5 minutes and wasn't too scary, the clips are somewhat flexible and don't grip too tight. I went slowly and it sounds like you're also pulling glue away as you remove this part from the roof, I'm not sure if it's really glued or was just very stuck on from being in close contact for 30 years.
Next I'm going to have to remove the staples that hold the suede to the cardboard on the back, pull the suede away from the cardboard, use a spray on adhesive to glue the suede and cardboard back together, then reapply staples.
<img src=http://www.j-spec.com.au/customers/nsx_26.jpg>
<img src=http://www.j-spec.com.au/customers/nsx_27.jpg>
<img src=http://www.j-spec.com.au/customers/nsx_28.jpg>
<img src=http://www.j-spec.com.au/customers/nsx_29.jpg>
<img src=http://www.j-spec.com.au/customers/nsx_30.jpg>
Thanks for sharing this! So cool!
Those metal tabs are similar in concept to the ones on the door panel cards.
Those metal tabs are similar in concept to the ones on the door panel cards.
- Joined
- 23 July 2018
- Messages
- 14
The JDM headliners with the alcantara inserts like that look so much better than what we got in the US. Not sure why they made them different but oh well.
I had mine redone in "anthracite" colored alcantara and I love it. I reupholstered the pillars to match too and the interior just feels so much more modern.
Edit: I've removed my headliner a whole bunch of times and it shouldn't take anywhere close to 8 hours. Breaking something is borderline inevitable since the pillar trims are so brittle and the clips grab so hard so have some ABS plastic solvent cement on hand.
>Remove the visors (screw at each corner, 2 screws holding the middle visor)
>Remove the dome light (screws underneath the lens, lens pops off)
>Remove the A pillar covers (they pull off, held on by clips, will probably crack and/or break tabs)
>Remove the rear upper trim piece along the bottom of the back window (top edge pulls out then lift up)
>Remove the rear center panels (pull straight out at each corner to release the "christmas tree" fasteners)
>Remove the rear side panels (screws)
>Remove B pillar trims (combination of screws along the bottom and clips, will probably crack and/or break tabs)
>Pull back the fuzzy trim strip where it contacts the edge of the headliner
>Undo the screws at each corner of the headliner
>Gently start pulling on the headliner to release the "christmas tree" plastic fasteners. You'll want to replace these as they won't hold well when you go to reinstall it. You can sort of feel where the clips are by the way the headliner flexes as you pull on it.
You can skip the part where you remove all the rear panels and just pop the top of the B pillar trims off and pull them back a bit to get at the headliner screws, but there's a much greater risk of cracking the B pillar trim doing it this way.
Last edited:
- Joined
- 23 July 2018
- Messages
- 14
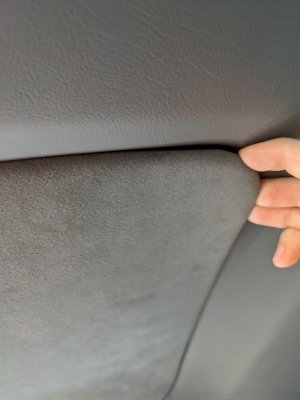
All done! Here are some photos for the next person who wants to fix this, it was an easy enough job to do myself.
Just pull down carefully on each edge of the panel, the metal clips will bend slightly to allow it to come out. Just make sure you don't bend the board too much.
Here's what it looks like with the panel removed:
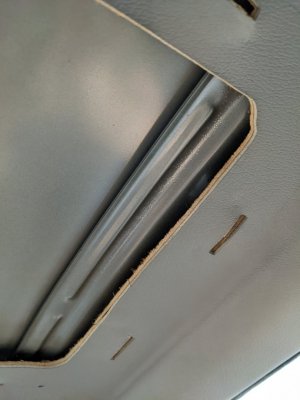
The metal clips just seem to go straight into slits in the headliner vinyl.
I unpicked the staples using a screwdriver on three sides. Left one side attached, made it a bit easier to keep it all aligned.
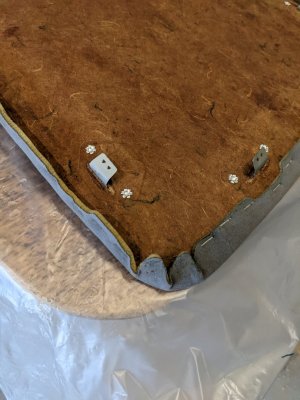
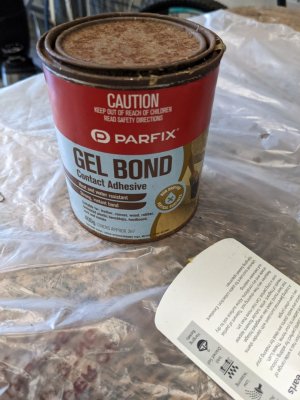
Then spread some of this stuff on both the board and the back of the suede. Waited for it to dry, then pushed the suede onto the board carefully - it bonds instantly.
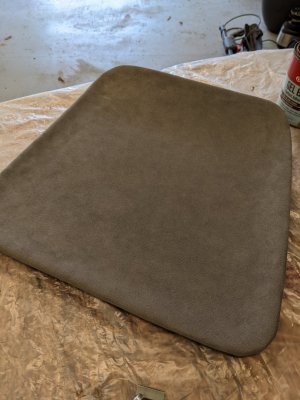
Looking good! No more sag, the suede is hugging the curve of the backing board nicely.
You'll need to use 4mm staples, which are quite shallow - anything bigger is too long and will poke through. It was hard to find these, and they didn't really fit properly in my staple gun, but it kind of worked.
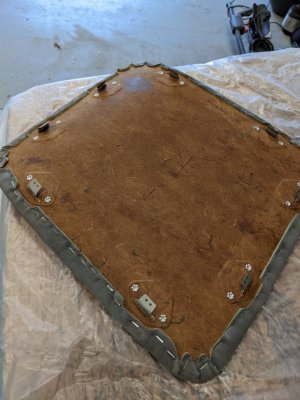
Notice the metal clips are still quite upright - that made it easier to put back into the slots in the car. But then it hangs really loose as you can see:
I don't know what the proper way to install these is, but all I needed was to make the metal clips lie a bit flatter. So I grabbed a spoon while wife wasn't looking and made this hi-tech tool (patent pending):
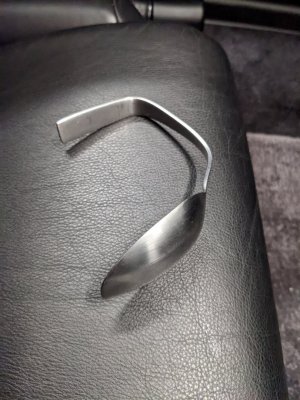
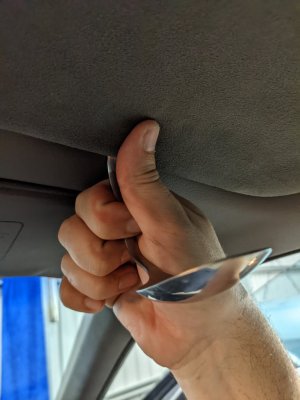
et voila!
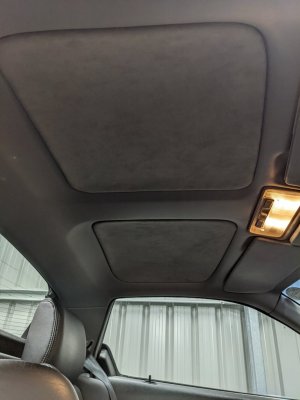
Just pull down carefully on each edge of the panel, the metal clips will bend slightly to allow it to come out. Just make sure you don't bend the board too much.

Here's what it looks like with the panel removed:

The metal clips just seem to go straight into slits in the headliner vinyl.
I unpicked the staples using a screwdriver on three sides. Left one side attached, made it a bit easier to keep it all aligned.

Then spread some of this stuff on both the board and the back of the suede. Waited for it to dry, then pushed the suede onto the board carefully - it bonds instantly.

Looking good! No more sag, the suede is hugging the curve of the backing board nicely.

You'll need to use 4mm staples, which are quite shallow - anything bigger is too long and will poke through. It was hard to find these, and they didn't really fit properly in my staple gun, but it kind of worked.

Notice the metal clips are still quite upright - that made it easier to put back into the slots in the car. But then it hangs really loose as you can see:

I don't know what the proper way to install these is, but all I needed was to make the metal clips lie a bit flatter. So I grabbed a spoon while wife wasn't looking and made this hi-tech tool (patent pending):


et voila!

Similar threads
- Replies
- 7
- Views
- 602
- Replies
- 4
- Views
- 622


