• Protip: Profile posts are public! Use Conversations to message other members privately. Everyone can see the content of a profile post.

Siezed (rear block) coolant drain bolt valve

Joined
11 January 2021
Messages
621
Location
Ontario, Canada
Search turned up empty.
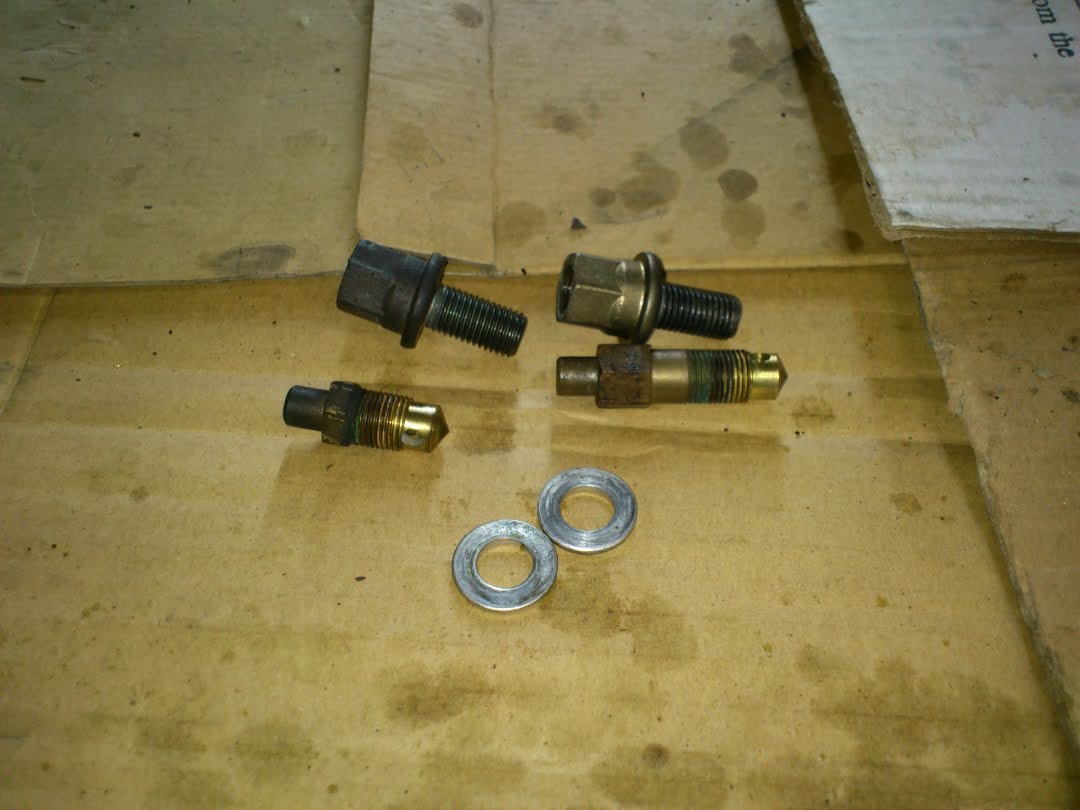
While changing my coolant, I attempted to open the rear engine block drain bolt valve. Unfortunately, the drain bolt (12 mm) was siezed into the (main?) bolt that it screws into (14 mm) to install it in the block so instead of opening the drain bolt, it unscrewed the both bolts from the block, en bloc. Once it was loose, I knew it had to come out to install another crush washer. (Successfully bled out the coolant...)

Even now that it's out, I can't separate the drain bolt from the main bolt, even with a bench vice. Galvanic corrosion or overenthusiastic tightening, I suspect.

Unfortunately, one of the parts is no longer available, so my only option seems to be to use the drain port & main bolt as a drain plug, with a new crush washer. Can't find the torque spec anywhere in the service manual.

(I'm afraid to have a go at the front block drain because it's much harder to access if the same thing happens - may have to invest in that vacuum thing for future coolant changes.) Good news is that coolant looked pristine after 5 years and 15k miles.

Wondering if I should be putting something on the threads to prevent the upper bleeders from seizing up in the future.

Any other suggestions?
 
Can't help you with the bolt problem; but, be aware that the vacuum tools are for refilling the system with coolant. It does not help with getting coolant out of the system.
 
What about #20-22 in https://www.oemacuraparts.com/v-200...6-speed-manual/engine--cylinder-block-oil-pan
Did you try in Japan?
Did you try heat on the bigger screw?

In the SM there are two no. for the torque, 10 Nm and 30 Nm, see 10-6 and 10-10 of the SM 1991. A fault? These are brass parts and don't like Gorilla torque. For a bleeding screw, I'd say 10 Nm is good enough but I'd choose 12 Nm, 30 Nm is too much. So maybe the bigger one is 30 Nm. Anyone can comment on that?
 
The plug (referred as 'main' in OP) and the two bleeders are still available in Japan and US.
Should be able to get them in Canada???

90029-PH7-004:
The plug or what you referenced as the 'main'.
The one directly plugs into the Eng block with the washer sandwiched.
Early eng was using -003 but now superseded to -004.
29Nm with crushable washer, 90481-463-000.
The latest batch is no longer in brass colour.

90030-PH7-000:
The bleeder, Rear one, shorter one
Easy to access even with the header.
9.8Nm
Brass colour

90040-PH7-000:
The bleeder, Front one, longer one
Bit tricky to access with header installed but swivel universal joint will help.
9.8Nm
Brass colour


ACtC-3dEsPp0zFgnOwKNjMvAcG1Rif3DE32yTjPtbOVDlIHxdIqDUlxf20-gCKpgeIaAbc8Y4P0X5_zv0d7QIHUY8i9P2SWkB044pOjX-t0mPSy_8vhaaWgbohdoybMFZyTSkmEQGDIYyrPwngVODh5PBwCEmA=w1080-h810-no

Unfortunately, there was a mistake in the English version of the workshop manual but still, overtightening happens even in Japan.
Experienced the same issue on several engines here in UK….

I know what you went through…..
Attaching the drain tube to the bleeder means nothing and you just get fair amount of coolant splashed as soon as the plug came off from the Eng block….

At the rear bank, the bleeder is located at the #3 cyl and you can find round plate 'cover' just above the plug/bleeder. The plate is installed with a thick o-ring.
With the age, you will notice tiny seepage from there.
Good practice to replace the o-ring after long interval and clean the 'pocket' behind there.
You may find paste like debris there, just like at the WP housing.

I normally apply tiny/thin coat of silicone compound at the seating surface (conical shape) of the bleeder.

If you know what you are doing, you 'may' apply it on the bleeder thread as well but as mentioned many times, be aware of the effect on the torque setting as it meant to be installed dry/fresh.
However, since it's cooling system, the thread is already exposed to coolant chemical that you have some allowance there.

Good practice to do the same on other bleeders at the front heater core pipe (very early model uses rubber cap), one on the thick pipe at the Eng firewall and the one at the thermostat cover.

Kaz
 
Good practice to do the same on other bleeders at the front heater core pipe (very early model uses rubber cap), one on the thick pipe at the Eng firewall and the one at the thermostat cover.

Kaz
I've had to replace some bleeder bolts due to slight rust after so many years.
 
Wow! Thanks for the rapid response & correcting my terminology, which should apparently be called breathing bolt and plug bolt. I called the dealer again to be sure - the plug bolt is not available in Canada. I was looking at the same part diagram with the dealer. Thanks for the suggestion of OEMacuraparts.com. Update: they seem to ship to Canada with a $50 ship charge.

I can see how people would get the torque specs confused and tighten the breathing bolt to the plug bolt torque spec, but my service manual also says 30 Nm for the breathing bolt, so I will correct it.

As Kaz noted, the front breather bolt is difficult to access. I applied about 30 Nm, and the breather did not open. If the breather and plug bolt come out as one like the back one did, I don't think I can get near enough to replace them without a lot of disassembly, probably including the header. Even if I remove the protective shroud under the header, the header will not allow straight access to the bleeder without a universal joint (I have later model headers.) This might be out of my league. Hmmm

Considering that the coolant looked pristine when it came out from the other drain points, I'm leaning towards leaving the front breather and only partially changing the fluid. I'll reinstall the rear breathing/plug bolt en bloc with a new washer. When I next do the coolant in 2 years, I'll install a new plug bolt & bleeder. If it ever needs work around the front header, I'll change the plug bolt & bleeder bolt at that time. (Timing belt & water pump in 2 years.) Any other suggestions welcome.

Edit: I can never do 1/2 a job & I could see how I could reinsert the plug bolt with a 1/4" driver so I pulled the front breather as well. As expected, the plug bolt came out with it. Unexpected was the fact that I got less than a cup of additional old coolant out. I should have left it.
 
Last edited:
I normally apply tiny/thin coat of silicone compound at the seating surface (conical shape) of the bleeder.

Kaz

Do you mean a silicone sealant to help seal the plug or a silicone grease to lubricate the threads / reduce corrosion?
 
Glad I found this thread again as there was a question to me.

I don't want using the 'subscribe' feature of the forum, no longer using tapatalk and just click on 'What's New' tab at the top these days.

So, inevitably, if there are many posts that I'm not interested in, not going to notice any questions to me.
'Mention' works but quite often, there are other things at much higher priority.


Anyway, I on purposely used the wording 'compound' to distinguish it from the 'grease'.
Not sure it's just me or specific to the chemical company I use.

I apply silicone compound at both the seating surface (conical shape) of the bleeder and the thread section.

Many people and even the English version of workshop manual seem to just mention the wording 'grease' to cover a lot of different type of 'grease like' products.

I'm not going into the discussion of the difference between the compound and the grease but I do spend a lot in all sorts of chemicals and treatments for servicing the NSX.

For example, I never use silicone 'grease' on the piston seal inside the brake caliper because some of them out on the market can react to brake fluid and may change the brake pedal feeling in longer term.
It's not the silicone but the materials/chemicals consisting the grease body.

For the clarification and to prevent the misunderstanding, I'm not saying that you can't use any silicone 'grease' there.
There are 'grease' designed for this type of application.

And the same goes to the use of 'silicone'.
You may heard not to use silicone grease/compound on the silicone o-ring because it can swell, etc.
The truth is, there are silicone grease/compound specifically manufactured for such application.


Bit off topic from the coolant chemical but for the brake caliper overhaul, I always use specific silicone 'compound' together with the OEM seal on the OEM piston so that it can provide the same pedal feeling everytime after overhaul and over longer term.

This is the reason why I'm not using the aftermarket brake caliper service kit that includes the seal, dust boot, etc.

Nothing wrong with it.
Just that there are several knowhows on the shape of the lip, material and chemical in use that would result in different brake touch.

Even the OEM chemicals with the same name are different depending on the local regulations.
Good example is the OEM Urea grease.

The OEM one in US is different from the one in Japan.

It's still Urea based but the chemicals consisting the grease are different.
Some say you can't use Urea grease on the rubber material, window regulator, guide rail, etc.

Not sure about the green-ish one in US but the dark grey one in Japan can be used on the guide rail, etc.
Again, it’s not the Urea base but the substances making the grease body.

There are Urea based chemical and grease that can be used on the rubber material.


Considering the Type-2 coolant, probably using silicone grease (and compound) would be safe at both the seating surface (conical shape) and the bleeder thread.


Not sure from where the idea of 'sealant' came from but if you have seepage/leakage from the bleeder area, there is a problem at the seating area or overtightened the bleeder.
Best replacing the parts.

Kaz
 
Did you try heat on the bigger screw?
Thanks. I had a go with heat and was able to separate the breather bolt from the rear plug bolt. :)

I'd like to apply a little grease to the threads so they aren't seized when I go to change the coolant again in a few years. What is special about silicone grease vs general purpose grease? I know there are several mentions of silicone grease in the SM but when I went to the acura dealer, they had no idea what I was talking about & couldn't get me anything without a part #.

How about either of these two? Or would general purpose grease work fine? I don't want the breather bolt to loosen over time.
https://www.canadiantire.ca/en/pdp/...eramic-brake-lubricant-28-g-0381412p.html#srp
https://www.canadiantire.ca/en/pdp/3-in-one-professional-silicone-lubricant-311-g-0381562p.html#srp
Also, since grease will allow the bolt to tighten more with the same torque, how much should I reduce the tightening torque when I've greased the threads?
 
Last edited:
Thanks. I had a go with heat and was able to separate the breather bolt from the plug bolt. :)
Bingo! :)
Brass parts don't rust. Or are they rusted? They are self-locking. No need (and no advice from me) to use greese unless you go with new parts which are said to be no-brass parts.
 
Bingo! :)
Brass parts don't rust. Or are they rusted? They are self-locking. No need (and no advice from me) to use greese unless you go with new parts which are said to be no-brass parts.
Not rusted, but definitely some corrosion. A little worse than Kaz's pics above. The breathers are brass, but I must have the "newer" steel plug bolts, since they're magnetic.

They "squeak" when I thread the breather into the plug bolt, and don't turn smoothly, but I can turn them by hand, which is not bad for 25 year-old bolts.
 
Last edited:
If you can't tighten the bleeder smoothly with your finger, it's either heavily corroded or the thread damaged.
Most likely, the bleeder body was over-stretched.
Ideally, you should just replace it.

It's the axial force when it comes to the bolt tightening.
Using the torque force is just the simplified method.
Applying something on the bolt thread changes the torque coefficient so in some applications, it's recommended.

Brass can corrode depending on the % of zinc in the alloy.

Also, when it exposed to several substances, it can lose zinc and result in corrosion.
This is typical if you live near the coastal area or if the authority uses salt to break the ice during the winter period, typical here in UK.

Some brass alloys contain other materials and not just copper/zinc so it 'can' stick to magnet.

As a side note, same material but different treatment would change the molecular level characteristic.
Good example is the SUS304 (304 stainless steel) that is widely used on the header.
If you take the magnet and attach it at the straight pipe section of the header, it won't stick.
However, if you attach it to the bent section such as the area on the rear bank header, you'll notice that it will stick to the curved section only.
The pipe bending process changed the material property.

Back to the original discussion….

If you can't replace the bleeder for some reason and as a temporary measure until you can replace the parts, just follow the simple one finger method.

Clean both threads as much as possible, finger tighten the bleeder and just use one finger on the wrench to tighten it to get snug fit.
Carry out vacuum leak check or if you see any coolant marking after the fireup, just apply tiny extra force to tighten the bleeder further.

Because the bleeder body is most likely already stretched, torque method can't be used.


For the silicone grease, if your local regulation allows you to get one, you can get OEM Shinetsu Silicone 08798-9013 from Honda/Acura dealers, on-line retailers including amazon, etc.

Only 100g tube so may feel bit pricey for what you get.
It's exactly the same low temperature application grease from Shinetsu Silicone G-30 series (outside of Japan, known as G-3W-0 series).


Many car owners are using it for refreshing the rubber weatherstrip, etc.
I prefer the 303 protectant on the surface where it has direct contact with the glass, etc where the grease/compound could leave eyesore markings/traces.


Considering the Type-2 coolant, you could use majority of the silicone products such as 3M Silicone Paste, etc.

Kaz
 
Thanks Kaz. I'd finished the job by the time I saw your post, but that's largely what I did. With a small touch of the silicone grease, the breathers turned very easily in the plug bolts. Unfortunately, I did tighten them to torque, but 9 Nm is not much more than finger tight anyway. I then installed the plug bolts with fresh crush washers and tightened them to spec of 30 Nm. No leaks. My plan is to keep an eye out for leaks and change the plug bolts and breathers when I next change the coolant so I've got lots of time; I'll add them to an order from amayama since there are none in Canada.

Update: Everything is reinstalled, coolant refilled, no leaks. With the SOS expansion tank, it's tougher to see the expansion tank coolant level, but I think I've got it right. I ran the engine up to temp with no problems. I just need to wait for spring weather to test drive it.

Thanks for all the help!
 
Back
Top