

Based upon a non statistically significant sample size of four cars (including mine) the average gap is 5.8 mm with my gaps straddling the average value. Not what I was expecting. Hmm.
-
Protip: Profile posts are public! Use Conversations to message other members privately. Everyone can see the content of a profile post.
You are using an out of date browser. It may not display this or other websites correctly.
You should upgrade or use an alternative browser.
You should upgrade or use an alternative browser.
T Roof window adjustment
- Thread starter Old Guy
- Start date
I am going to have to do the entire glass and gasket replacement alignment on my car after paint. After reading this, looks like I'll have to set aside a few days... @Kaz-kzukNA1 if you can, could you post your notes on the full install and alignment procedure here? As our NSX gets older, I think there are many owners who will need to replace the rails, sashes and door gaskets in the next few years. I will be doing this miserable job in a month or so and would appreciate any advice!
You being a coupe dude, have you seen the write up in the Wiki. It is pretty much a by the service manual approach; but, you may find his fabrication of spacers for doing the measurements instructive.
Received another couple of measurements by PM. The average now sits at a nudge over 6 mm; however, there are 2 measurements at 7 mm which is an anomaly in this rather small data set. Definitely not a statistical Normal distribution. In the absence of more data I am thinking that 7 mm may be a good starting point. I will also have to address the glass height issue on my driver door which likely contributed to the boot tearing problem on the rear sash.
Next spring project!
Next spring project!
Last edited:
Another owner supplied measurement, 7mm on both sides . This brings the average up to 6.2 mm. However, more important is the fact that there are 6 measurements (3 cars) that are all right around 7 mm. The other measurements are scattered between 4.5 mm and 6.7 mm with no consistent values. Re enforces the thought that 7 mm spacing is the starting point.

Mine is 7.0 mm on driver side and 6.4 mm on passenger side.
In math-speak, the infinite series appears to be converging on a limit at 7mm.
With some nice temperatures for working out in my un heated garage, I finally got around to fiddling with my window adjustments, at least on the driver's side. The first thing I did was to replace the replace the original rear sash which had a mangled boot. I installed it loosely so that I wouldn't tear the new boot when I raised the window for adjustment. My plan was to first try and set the height of the glass to achieve the 1-3 mm overlap along the roof line and A pillar that is specified in the service manual for the T roof glass adjustment. I applied some tape to the glass to make the edge markings easier to see and then closed the door and used a sharp pencil to make a line corresponding to the edge of the A pillar and roof. The numbers along the roof were quite high, in the order of 8 mm so I made slight adjustments in the position of both window stops, and then remeasured, readjusted .... This all ended when the back stop reached its maximum bottom position and the front stop was 'fine tuned' so that the glass would hit both stops at the same time - no rocking of the window as it first hits one stop and then the other. With window stops maxed out on their lowest position, these are the overlap measurements I ended up with.

The measurements are 1mm, 2.8 mm, 5 mm and 3.5 mm front to back. So, the roof line measurements are greater than 3 mm; but, it is not clear that I can do anything about that because the back stop is already at its lowest position. I thought that perhaps I could slide the glass forward slightly which would increase the overlap at the A pillar. The overlap just above the boot on the front sash is less than 1 mm so my plan was to accept an increase in the 2.8mm measurement to get to the minimum 1 mm overlap above the boot. That didn't work out so well because upon checking the mounting bolts where the glass attaches to the regulator and the regulator mounts to the door body, both the glass attachment to the regulator and the regulator mounting on the door are already at their full forward position. The service manual seems to imply that the glass can also be moved forwards and back by adjusting the tracks for the window; however, I am not seeing how that works. The top of the back track shares a common attachment bolt at the top with the back sash. Moving the back track forward would require that the sash also be moved forward and that is not going to happen because the back of the sash is already flush with the back edge of the door. The two adjusting bolts at the bottom of each window track look like they might have some room for for-aft movement (although there is no obvious oblong adjusting slot like there is with the regulator to door and glass to regulator mounting locations. However, with the top of the track fixed that would just change the for-aft angle of the track and I don't thin I want to mess with that.
Fiddling with the window stops has altered the apparent for-aft position of the glass, probably because of the taper in the window. Previously, when fully up the glass was hitting the back of the back sash boot and had created a fairly good tear in the rubber. With the glass fully up you can see now that I have a lot of clearance between the back edge of the glass and the boot.

Also, previously the gap between the back edge of my glass and the front edge of the B pillar was around 5 mm. My glass now sits between 8.6 mm (bottom) and 9.1 mm (top) away from the edge of the B pillar which more than the 7 mm B pillar gaps that were reported. It would be easy to reduce that gap to the 7 mm reported because there is lot of room to move the glass at the regulator attachment point; however, I think that would reduce my overlap at the bottom of the A pillar which is already less than the spec in the service manual.

Since the glass stops are now maxed out at the bottom position and the regulator and window to regulator mounting are maxed out in their forward position, I don't think I have any height or for-aft adjustment options left. I have not tried the highway test for noise or the water test yet. Kaz made the observation
"Also, at B-pillar section, you glass is not touching hard against the area where I placed the tool as well as marked in two blue lines."
If I still have a noise issue, I might try tweaking the lower track adjustment bolts just a bit to bring the glass into firmer contact with the weather strip. However, that is going to be a very small adjustment because with the door strike adjusted to have the back edge of the door flush with the body the door already requires a firm push to latch it.
The one up side to the fiddling with the glass is that my expensive new rear sash boots don't even come into contact with the glass on the back edge so they should last a long time. The front sash boots were stretched just a bit a bit when the glass was full up; but, now they have a little clearance also so should last longer.
The measurements are 1mm, 2.8 mm, 5 mm and 3.5 mm front to back. So, the roof line measurements are greater than 3 mm; but, it is not clear that I can do anything about that because the back stop is already at its lowest position. I thought that perhaps I could slide the glass forward slightly which would increase the overlap at the A pillar. The overlap just above the boot on the front sash is less than 1 mm so my plan was to accept an increase in the 2.8mm measurement to get to the minimum 1 mm overlap above the boot. That didn't work out so well because upon checking the mounting bolts where the glass attaches to the regulator and the regulator mounts to the door body, both the glass attachment to the regulator and the regulator mounting on the door are already at their full forward position. The service manual seems to imply that the glass can also be moved forwards and back by adjusting the tracks for the window; however, I am not seeing how that works. The top of the back track shares a common attachment bolt at the top with the back sash. Moving the back track forward would require that the sash also be moved forward and that is not going to happen because the back of the sash is already flush with the back edge of the door. The two adjusting bolts at the bottom of each window track look like they might have some room for for-aft movement (although there is no obvious oblong adjusting slot like there is with the regulator to door and glass to regulator mounting locations. However, with the top of the track fixed that would just change the for-aft angle of the track and I don't thin I want to mess with that.
Fiddling with the window stops has altered the apparent for-aft position of the glass, probably because of the taper in the window. Previously, when fully up the glass was hitting the back of the back sash boot and had created a fairly good tear in the rubber. With the glass fully up you can see now that I have a lot of clearance between the back edge of the glass and the boot.
Also, previously the gap between the back edge of my glass and the front edge of the B pillar was around 5 mm. My glass now sits between 8.6 mm (bottom) and 9.1 mm (top) away from the edge of the B pillar which more than the 7 mm B pillar gaps that were reported. It would be easy to reduce that gap to the 7 mm reported because there is lot of room to move the glass at the regulator attachment point; however, I think that would reduce my overlap at the bottom of the A pillar which is already less than the spec in the service manual.
Since the glass stops are now maxed out at the bottom position and the regulator and window to regulator mounting are maxed out in their forward position, I don't think I have any height or for-aft adjustment options left. I have not tried the highway test for noise or the water test yet. Kaz made the observation
"Also, at B-pillar section, you glass is not touching hard against the area where I placed the tool as well as marked in two blue lines."
If I still have a noise issue, I might try tweaking the lower track adjustment bolts just a bit to bring the glass into firmer contact with the weather strip. However, that is going to be a very small adjustment because with the door strike adjusted to have the back edge of the door flush with the body the door already requires a firm push to latch it.
The one up side to the fiddling with the glass is that my expensive new rear sash boots don't even come into contact with the glass on the back edge so they should last a long time. The front sash boots were stretched just a bit a bit when the glass was full up; but, now they have a little clearance also so should last longer.
Last edited:
I have been doing some driving around and I can definitively say - its not worse than before. I think the driver's side door has reduced wind noise; but, that may just be confirmation bias. Previously there was definitely wind noise originating from the gasket area along the A pillar. As Kaz described, you could run your finger between the glass and the gasket and you could hear the noise level change. You don't get that effect anymore; but, under the right circumstances noise still seems to originate from the area of the front sash. Moving your finger down between the sash and the A pillar gasket has no effect on this noise so I am wondering if the noise is originating outside the of the car, perhaps as air is flowing over the A pillar and past the outside of the front sash. Kaz also described that possibility. Adjusting the sash inwards might be a possible solution.
There is also noise still originating from the upper back corner area of the driver's side window. Doing the finger test in the contact area between the gasket and the glass no longer seems to affect the noise level so the noise may be originating from air flow over the B pillar outside of the car rather than the glass - gasket interface. If that is the case, then adjusting the window tracks so that the glass presses harder against the gasket may not be the answer if it results in a larger step between the glass and the B pillar.
Right now, only the driver's side door has been adjusted because of my little mis adventure with the broken plastic retainer on the latch release rod from the handle on the rear sash. I can get out of the car, I just can't get in unless I leave the window down or crawl in and release the latch from the passenger's side. I am not going to do the passenger side until I have a supply of the 04721 retainers on hand in case I snap the one on the passenger side. The order is on the way from Amayama so it will probably be a week or so before I get to experiment with the passenger's side door.
I Replaced the rear sash on the passenger side yesterday and attempted to adjust the glass. It did not go as well as the passenger side.
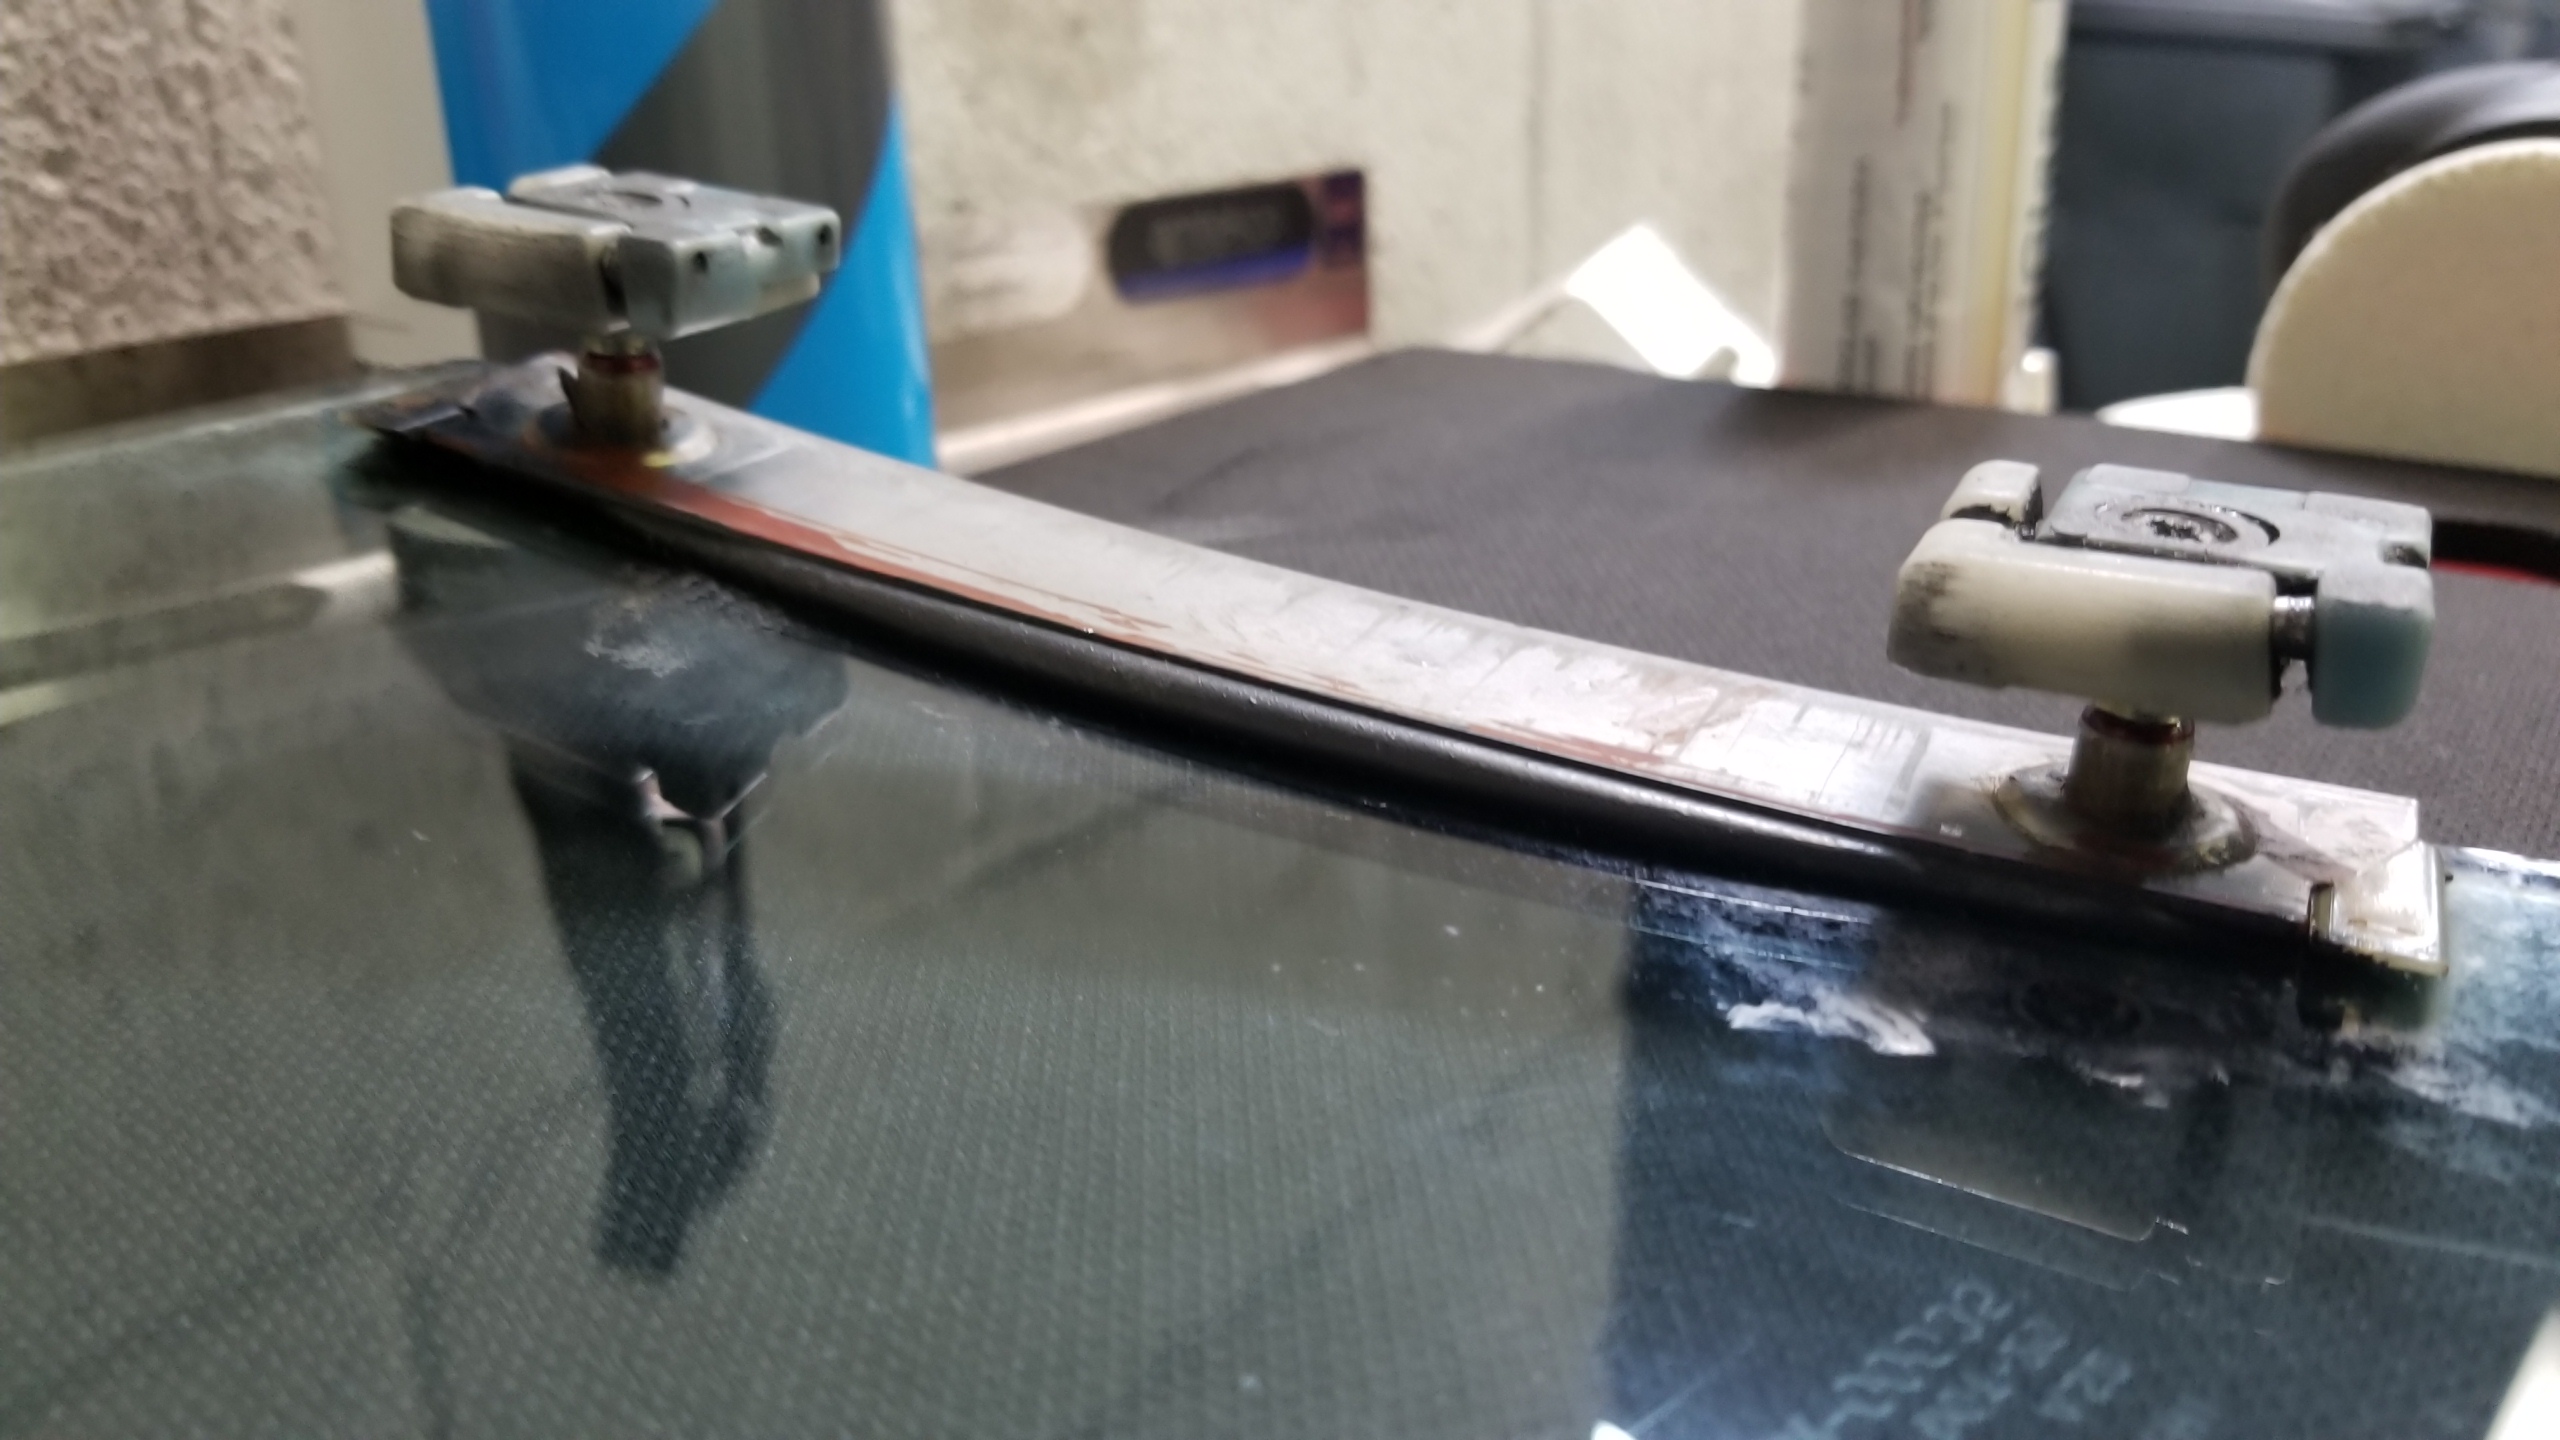
First off, the little clip on the lock rod released by popping off, in a slightly different manner than the driver' s side, so it was out with the rear window track and remove the latch to fix that. With the rear window track out and while cleaning it I noticed that the track seems to have a twist along its length in addition to the 'normal' curve along its length. I am thinking that this twist is not normal; but, I didn't really pay attention to the driver's side rear track and its back in the car so I couldn't do a side by side comparison. I do know that the track was much harder to lift up out of the door with the glass in place. The two big tabs on the track that receive the lower mounting / adjusting bolts hit the inside of the window opening at the top of the door and ended up scratching the paint on the inside of the opening as I pulled them up. That didn't happen on the driver side and I am wondering if it was caused by the twist in the track.
After cleaning, it was apparent that the anodizing on the bottom of the track had been worn off by the window glides; but, that was also present on the driver's side. However, the wear along the bottom of the track seems to be mush more significant. Also, after going back and again looking at the photo of the glides that Kaz posted, I am not sure that my glides still have those little raised pads that would contact the bottom of the track. Unfortunately, I checked the photo after everything was back together so I cannot confirm that the pads have been worn off. I put everything back together and tested the operation of the window. The glass goes down quickly; but, on raising the glass it slows down noticeably for about the last 5 " as the glass is entering the boot around the rear sash. I checked and the glass is not binding on the boot so it does not appear to be the sash boot that is causing the slow down. The other thing I noticed is that when I removed the rear track, both lower adjusting bolts were fully bottomed - no need to count the turns. On the driver's I think one adjusting bolt was close to bottomed; but the other adjusting bolt was adjusted out so that there was a differential in the spacing of the two bolts by either 2 or 3 turns (I would need to go and check my scribble notes in the shop manual margin to confirm). Is it possible that there is a differential in the height of the mounting surface on the door skin which requires that the bolts have a differential adjustment and that the absence of the differential in the bolt heights caused the twist in the track? I can't think of any other way the track could get twisted unless it is supposed to be twisted.
In retrospect, I should have detached the regulator from the glass, lowered it and then moved the glass up and down in the tracks to see if I could determine if there was something in the tracks or their alignment causing it to bind. However, it was getting late and I still hadn't started on the glass to weather strip adjustment which was the primary purpose of this exercise.
It is possible that I am looking at a new rear track and some replacement glides to go with it. If anybody can provide some guidance on whether the rear track should or should not have a twist in it that would help in confirming the need for a new track. Also, if they have recorded the lower bolt adjustments whether they are the same or there is a differential, that would be greatly appreciated. Given the cost of getting parts with Covid shipping restrictions any further work on the doors and windows is probably next year country. I still have a planned TB / water pump / coolant hose thing to do which is what was planned for this year and may now have to slide.
The actual glass adjustment did not go so well. The height adjustment on the glass at the roof was correct, all being in the 2-3 mm range; however, like the driver's door the glass is to far back which contributed to the tearing issue on my old sash boots. In looking at the glass mounting arrangement, the only mechanisms to adjust the glass for and aft are the oblong holes in the carrier where the glass mounts to the regulator and the top mounting holes in the door for the regulator which are very slightly oblong. The bottom track bolts have no intentional room for adjustment other than the normal hole clearance. In my case the glass was already fully forward where it attaches to the regulator. I was able to move the regulator mounting bolts in the door very slightly forward. This adjustment plus fiddling with the front sash mounting bolts a bit gave me enough clearance so that the sash boots were not distorting as a I raised the window into position. The back edge of the glass is now at 6.4 mm from the forward edge of the B pillar which is better that the 5.2 mm before I started the adjustment; but, significantly less than the driver's side. At the A pillar the overlap of the trim over the glass is below spec. At the top of the A pillar it is a nudge under 1 mm and as you drop down to just above the sash you can actually push your fingernail between the edge of the A trim and the edge of the glass, so no overlap at all just above the sash. Without elongating mounting holes with a file, I don't see any possible way to bring the glass any further forward. I am starting to wonder if the variability in the for - aft mounting of the door glass is caused by variability in the placement of the regulator attachment points when they are bonded to the glass during assembly.
Last edited:
I share your window adjustment frustrations and can offer up some discussion points from my experience this past month trying to adjust mine. My philosophy was to use the FSM as a reference but ignore all of the measurement specs, just get the window working and sealing the best I could.
-I tried to keep both lower track adjustment bolts at the same height since the FSM said to keep their adjustments the same. In certain situations (like yours), adjusting one bolt differently than the other might help reduce the twisting of the track. I'm not sure if they're meant to be somewhat twisted (doubt it) but I didn't notice it on my tracks. I think the key here would be to test the window movement with the track twisted in either direction and with no twist (3 positions) to find which point causes the least friction to the window guides which I would think is the ultimate goal, even if that means leaving the bolts adjusted differently to one another. No factory specs to share since I have no idea if mine were touched before I got to them.
Some Kaz pics here (http://www.nsxcb.co.uk/entry.php?1581-ABS-Upgrade-Door-Window-Refresh-etc-09&goto=next) if that helps you figure out if your track is out of whack, hit Prev/Next for more good posts. They definitely change shape over time, I was able to get satisfactory performance with my 30+ year old guides but a set of T3TEC guides for $800 plus shipping and a set of 8 new OEM guides would make things work a lot smoother, but over $1k USD for that extra bit of performance isn't worth it to me right now.
-I also wonder how the track fore-aft adjustment is meant to work when they're fixed at the top by the sash bolts which have much less adjustment fore-aft. There is a slot in the back of the rear sashes where the window guide slides on but the bolt hole in the door skin to that slot is just a circle, not enough to allow for real guide adjustment at the top.
-I found that if I moved a track outside of its "natural" settling point (that I found by leaving the track bolts loose and moving the window), the window would actually stick at the bottom of the door and wouldn't move. What I did to reduce friction was leaving the track bolts loose (the whole bolt, not the in-out adjuster) and bolting them down with the window fully up at the point of "least tension" on the guides. I would need to experiment more with this method to come to any useful conclusion, ultimately if I bolted down the tracks in a position they didn't seem to want to be in, the window tended to stick as the guides probably got jammed up.
-The left (driver's) window in your pic is adjusted way further forward (fore) than mine is, but mine is too far aft to begin with (almost hits the B-pillar) so there's a middle ground there. I think the gap in yours might be creating the wind noise you report due to the crevice between the window edge and B-pillar interrupting the smooth flow of air. If you manage to bring the window further aft, you might not need to bring it further inboard as well since the edge of the window will naturally press harder against the gasket.
Every window is different so the intricacies are hard to convey with text, it would be nice to have another experienced helper in-person. I really think that unless you're spending $2k+ on all new gaskets, guides, tracks, regulators, sashes, etc. and you devote several days to the project which almost no one has time for, the windows will never be quite perfect.
I share your window adjustment frustrations and can offer up some discussion points from my experience this past month trying to adjust mine. My philosophy was to use the FSM as a reference but ignore all of the measurement specs, just get the window working and sealing the best I could.
-I tried to keep both lower track adjustment bolts at the same height since the FSM said to keep their adjustments the same. In certain situations (like yours), adjusting one bolt differently than the other might help reduce the twisting of the track. I'm not sure if they're meant to be somewhat twisted (doubt it) but I didn't notice it on my tracks. I think the key here would be to test the window movement with the track twisted in either direction and with no twist (3 positions) to find which point causes the least friction to the window guides which I would think is the ultimate goal, even if that means leaving the bolts adjusted differently to one another. No factory specs to share since I have no idea if mine were touched before I got to them.
I will have to go back and carefully re read the FSM. I interpreted the 'keep the adjustments the same' as keep them at the same number of turns as when the tracks were removed from the car; but, that the two bolts could have different number of turns. Are you interpreting this as both the front and back adjusting bolt should have the same depth?
Some Kaz pics here (http://www.nsxcb.co.uk/entry.php?1581-ABS-Upgrade-Door-Window-Refresh-etc-09&goto=next) if that helps you figure out if your track is out of whack, hit Prev/Next for more good posts. They definitely change shape over time, I was able to get satisfactory performance with my 30+ year old guides but a set of T3TEC guides for $800 plus shipping and a set of 8 new OEM guides would make things work a lot smoother, but over $1k USD for that extra bit of performance isn't worth it to me right now.
Its hard to tell from the photos in Kaz's blog whether the back rails have a slight twist. The picture of the T3TEC rear window guide does look like it has a slight twist to it. I am going to have to search around some more to find out whether twist is good or twist is bad. Kaz did make the comment that the silver color that appears in the grease is due to wear of the track material and I definitely have that. On my rear track I noticed that at the bottom and top of the motion range of the glides there was a round impression in the bottom of the track rail. This was slight on my drivers side door; but, very noticeable on my passenger side. In retrospect, it almost looks like when the window starts or stops its movement at the top or bottom of the range that the regulator might be pulling the window sideways and causing the mounting screw for the glides to hit the track.
I checked Amayama and the rear track and new glides would be about $125 US so not unreasonable; however, they list a ? next to shipping for the track which I expect means over size which is going to send the price by Fed Ex way up, so definitely next year when other shipping options become available. In his blog, Kaz makes reference to adjusting the glides, shimming them and the glides being loose. I am curious about what is meant by shimming them since I see no provision in the parts manual for shims. I was not able to determine where he is shimming them. If you shim them under the mounting screw that would push the glide more into the bottom of the track which would increase the wear on the bottom of the track and I already have lots of that so I think I am missing something. I am also unsure about the looseness part. My glides appear to be free to gimble on the mount and I assumed that was part of the design. The glides also appeared to have in-out movement on the mount and I also assumed that was part of the design. The mounting screws were not loose and the glides did not seem to rattle on their mounts although the pads on the outside of my glides had disappeared which may lead to the mounting screw dragging on the bottom of the track. Were your glides rigid or did they also have the gimble and in - out movement?
-I also wonder how the track fore-aft adjustment is meant to work when they're fixed at the top by the sash bolts which have much less adjustment fore-aft. There is a slot in the back of the rear sashes where the window guide slides on but the bolt hole in the door skin to that slot is just a circle, not enough to allow for real guide adjustment at the top.
My take was that the slot was just to allow some small adjustment in the position of the rear sash to deal with the boot stretch problem / final alignment relative to the rest of the body. I don't think there is any real provision for-aft adjustment in the tracks.
-I found that if I moved a track outside of its "natural" settling point (that I found by leaving the track bolts loose and moving the window), the window would actually stick at the bottom of the door and wouldn't move. What I did to reduce friction was leaving the track bolts loose (the whole bolt, not the in-out adjuster) and bolting them down with the window fully up at the point of "least tension" on the guides. I would need to experiment more with this method to come to any useful conclusion, ultimately if I bolted down the tracks in a position they didn't seem to want to be in, the window tended to stick as the guides probably got jammed up.
Your natural settling point idea is interesting. I know that when I reinstalled the back track on the passenger door I installed the top bolt first and ran in in to slightly tight - no rattle; but, loose enough to allow movement. This resulted in the lower part of the track being located towards the center of the door with the tips of the adjusting bolts just barely projecting through the mounting holes. With the adjusting bolts at their bottomed position (the way they came out of the car) I had to exert a fair amount of force on the lower part of the track to screw on the nuts and tighten them. If the tracks are supposed to be close to their normal mounting point when you insert them my passenger side definitely wasn't. I don't recall this being a problem on the driver's side. I am wondering if the in-out adjustment on the rear sash might be part of the problem. Working on your natural positioning idea, I am thinking that a plan might be to detach the regulator from the glass and then slide the window up and down to see if there is a bind point. If the bind occurs when entering the front or rear sash then it might be a question of adjusting the sash in or out to address the bind rather than adjusting the tracks. Once the tracks and the sash play nicely with the window, then perhaps you can adjust the tracks and sash together to get the desired gasket fit.
One thing I noticed while messing with the passenger window is that the sliding spool where the glass holder attaches to the regulator did not seem to be moving in and out as the window went up and down. Its clean and well greased (I did a Hugo kit a couple of years ago). In retrospect, this leaves me wondering whether part of the glass movement binding problem may be caused by the regulator mounting forcing the glass into an abnormal position. If you can get the glass to operate smoothly while detached from the regulator, it might be interesting to see what happens to the movement of the glass after you attach the regulator. If the regulator is the problem, then perhaps it might be necessary to 'somehow' shim the regulator to position it better. It occurs to me that you might be able to check the position of the glass relative to the gaskets and trim without the regulator attached. This would be a bit of extra effort requiring a lot of tape to hold the glass in the up position; but, if you can adjust the tracks, sashes and the glass stops so that the glass moves smoothly and is positioned correctly that 'should' remove them as the source of the problem. I will note that at this point this is definitely not a fully thought out idea.
-The left (driver's) window in your pic is adjusted way further forward (fore) than mine is, but mine is too far aft to begin with (almost hits the B-pillar) so there's a middle ground there. I think the gap in yours might be creating the wind noise you report due to the crevice between the window edge and B-pillar interrupting the smooth flow of air. If you manage to bring the window further aft, you might not need to bring it further inboard as well since the edge of the window will naturally press harder against the gasket.
That is possible; but, I still seem to be getting a little wind noise from the area of the front sash (not where the glass touches the gasket). I ended up with the glass that far forward because I was attempting to get the A trim overlap on the glass in the area just above the sash into the FSM specified 1-3 mm range. For-aft adjustment of the glass was the only option since raising the window stops would increase the overlap along the roof line past 3 mm. What is interesting is that both the driver side and passenger side glass are full forward in their attachment points to the regulator and the regulator mounts are in their full forward position, yet the driver's side glass is clearly much farther forward the passenger's side. Unless there is variability in the location of the mounting points in the doors, I am thinking that variability has to be in the regulator mounting points on the glass when they get bonded to the glass at the factory.
Every window is different so the intricacies are hard to convey with text, it would be nice to have another experienced helper in-person. I really think that unless you're spending $2k+ on all new gaskets, guides, tracks, regulators, sashes, etc. and you devote several days to the project which almost no one has time for, the windows will never be quite perfect.
Thanks for the input. It has helped me formulate some potential avenues for further action.
I will have to go back and carefully re read the FSM. I interpreted the 'keep the adjustments the same' as keep them at the same number of turns as when the tracks were removed from the car; but, that the two bolts could have different number of turns. Are you interpreting this as both the front and back adjusting bolt should have the same depth?
Yes, I took it as keep the two at the same depth. In practice I think that can be customized based on your situation and degree of track warpage.
In his blog, Kaz makes reference to adjusting the glides, shimming them and the glides being loose. I am curious about what is meant by shimming them since I see no provision in the parts manual for shims. I was not able to determine where he is shimming them. If you shim them under the mounting screw that would push the glide more into the bottom of the track which would increase the wear on the bottom of the track and I already have lots of that so I think I am missing something. I am also unsure about the looseness part.
The shims are these two parts (https://www.amayama.com/en/part/honda/73304sl0000) and (https://www.amayama.com/en/part/honda/73305sl0000). They are teeny thin washers that should go under the screw. Unfortunately when I rebuilt my windows last year I didn't know about them, but I removed all the guides to clean them off and apply red threadlocker to the screws like I think Kaz does since they were loose, I probably ended up keeping the old spacers the same without knowing.
From the same Kaz blog link it looks like he used more shims to push the window further outboard since he ran out of adjustment on the bolts. I'm not sure if the factory had a standardized shim setup but I expect each car was probably a bit different. Maybe that would increase wear on the bottom of the tracks, or maybe it tightens up the guides a bit and has them rattle around less, not sure.
My glides appear to be free to gimble on the mount and I assumed that was part of the design. The glides also appeared to have in-out movement on the mount and I also assumed that was part of the design. The mounting screws were not loose and the glides did not seem to rattle on their mounts although the pads on the outside of my glides had disappeared which may lead to the mounting screw dragging on the bottom of the track. Were your glides rigid or did they also have the gimble and in - out movement?
I think the guides are meant to wiggle around a bit, they have internal springs that give them a bit of play along the edges and the screw lets them gimble a bit, I'm sure since the tracks are not just straight lines. One of my lower guides had so much play that it fell apart in my hands, so it's worth checking all of them and giving them a good shake to see if any need to be replaced. The windows are actually quite loose in the doors if you rattle them around because of the guide play. New tracks and guides probably reduce that play a bit to make the window operation more consistent.
Working on your natural positioning idea, I am thinking that a plan might be to detach the regulator from the glass and then slide the window up and down to see if there is a bind point. If the bind occurs when entering the front or rear sash then it might be a question of adjusting the sash in or out to address the bind rather than adjusting the tracks. Once the tracks and the sash play nicely with the window, then perhaps you can adjust the tracks and sash together to get the desired gasket fit.
I think that makes sense to try. In my case, I actually added a washer between a rear sash and the door skin to push the track a tad further out, and found that gave me better overall performance. I think if you want to get this right and don't mind spending money, new tracks would help a ton with the window speed and consistency. Working around old warped guides seems to require some custom work outside of the FSM scope.
One thing I noticed while messing with the passenger window is that the sliding spool where the glass holder attaches to the regulator did not seem to be moving in and out as the window went up and down. Its clean and well greased (I did a Hugo kit a couple of years ago). In retrospect, this leaves me wondering whether part of the glass movement binding problem may be caused by the regulator mounting forcing the glass into an abnormal position. If you can get the glass to operate smoothly while detached from the regulator, it might be interesting to see what happens to the movement of the glass after you attach the regulator. If the regulator is the problem, then perhaps it might be necessary to 'somehow' shim the regulator to position it better. It occurs to me that you might be able to check the position of the glass relative to the gaskets and trim without the regulator attached. This would be a bit of extra effort requiring a lot of tape to hold the glass in the up position; but, if you can adjust the tracks, sashes and the glass stops so that the glass moves smoothly and is positioned correctly that 'should' remove them as the source of the problem. I will note that at this point this is definitely not a fully thought out idea.
Another good idea to try. At one point I left the regulator loose in the door while I operated the window to study how it shifted around, and tested a couple of positions to find which turned out the best. I'm sure the regulator track warps and degrades over time and increases the friction of the window guides as you say. Part of the reason I think that Kaz says to tap the window down button when the car will be left sitting so that the guides aren't jammed up against the top of the rails and warps them since the regulator motor only seems to have auto overcurrent shutoff, no "fuzzy logic" in Kaz's words. Hopefully I'm not putting words in his mouth by referencing him so much.
That is possible; but, I still seem to be getting a little wind noise from the area of the front sash (not where the glass touches the gasket). I ended up with the glass that far forward because I was attempting to get the A trim overlap on the glass in the area just above the sash into the FSM specified 1-3 mm range. For-aft adjustment of the glass was the only option since raising the window stops would increase the overlap along the roof line past 3 mm. What is interesting is that both the driver side and passenger side glass are full forward in their attachment points to the regulator and the regulator mounts are in their full forward position, yet the driver's side glass is clearly much farther forward the passenger's side. Unless there is variability in the location of the mounting points in the doors, I am thinking that variability has to be in the regulator mounting points on the glass when they get bonded to the glass at the factory.
Could be that the regulator mounting tabs get glued in slightly different spots, not sure what the tolerances on that are but every mm seems to count for a lot. You might consider pulling out the "upper lip" of the door seal slightly along where you hear the wind noise to see if that gets a better seal, it will deform slightly from where it was before so might not be worth trying if you plan on putting it back in the correct way later on.
Are other car's windows this complicated? I feel like we're all alone in this struggle. Surely the frameless windows on a Skyline or other vintage car must be just as big of a PITA.
Last edited:
I washed the car last night and did the garden hose nozzle spray test on the glass. The windows did not leak so I am counting that as a win. They didn't leak before; but, right now I am putting any activity that doesn't make things worse into the win column. I did notice that one of the fallouts of reducing the overlap of the top trim along the top of the glass to factory spec is that its much easier for water to get in and collect above the top edge of the glass when you spray vigorously with a hose. Most of this water drains to the sides; but, if you open the door too quickly after spraying some of it will drip down onto the sill / threshold. When I had 7 mm of overlap at the top of the glass that didn't occur.
Thanks for the clarification on the spacer / shim. Is the spacer anything more than a washer with a part number and a high price? I can source metric washers from my local fastener supply house which would be convenient if I needed them. If the spacer fits under the mounting screw I am assuming that it places the guide farther away from the glass. In my current situation the guide appears to be grinding its surface on the base of the rear track so if anything, I would think that I might need to remove spacers. That is of course based on the current location of my rear track.
You make reference to internal springs in the guides. Are those springs that push the side edges of the glides out? I don't recall any springiness there. However, I cleaned the guides with the track out but the glass still in the door and the guides still attached to the glass. I cleaned off the external grease (more like paste). If the grease worked its way into the guide mechanism then the thickened grease could be impeding any spring action. Perhaps to really clean them I have to remove them and let them soak in mineral spirits. I had presumed that the were just a piece of nylon flexibly mounted on the screw.
I think before my next foray into the door I will have to go back and re read all the pages in @Kaz-kzukNA1 's blog on the window repair.
Last edited:
The spacers are just thin washers, I'm sure you could use whatever fits but they're very small. Found some pictures of mine, the lower one looks to have ~3 spacers. I didn't mess with these during my window adjustments but it would probably help in some situations, especially if the window is too far inboard and you run out of adjustment. The window, door, and tracks are curved so the guides probably need to be at different "depths" at a given window position for the least friction.
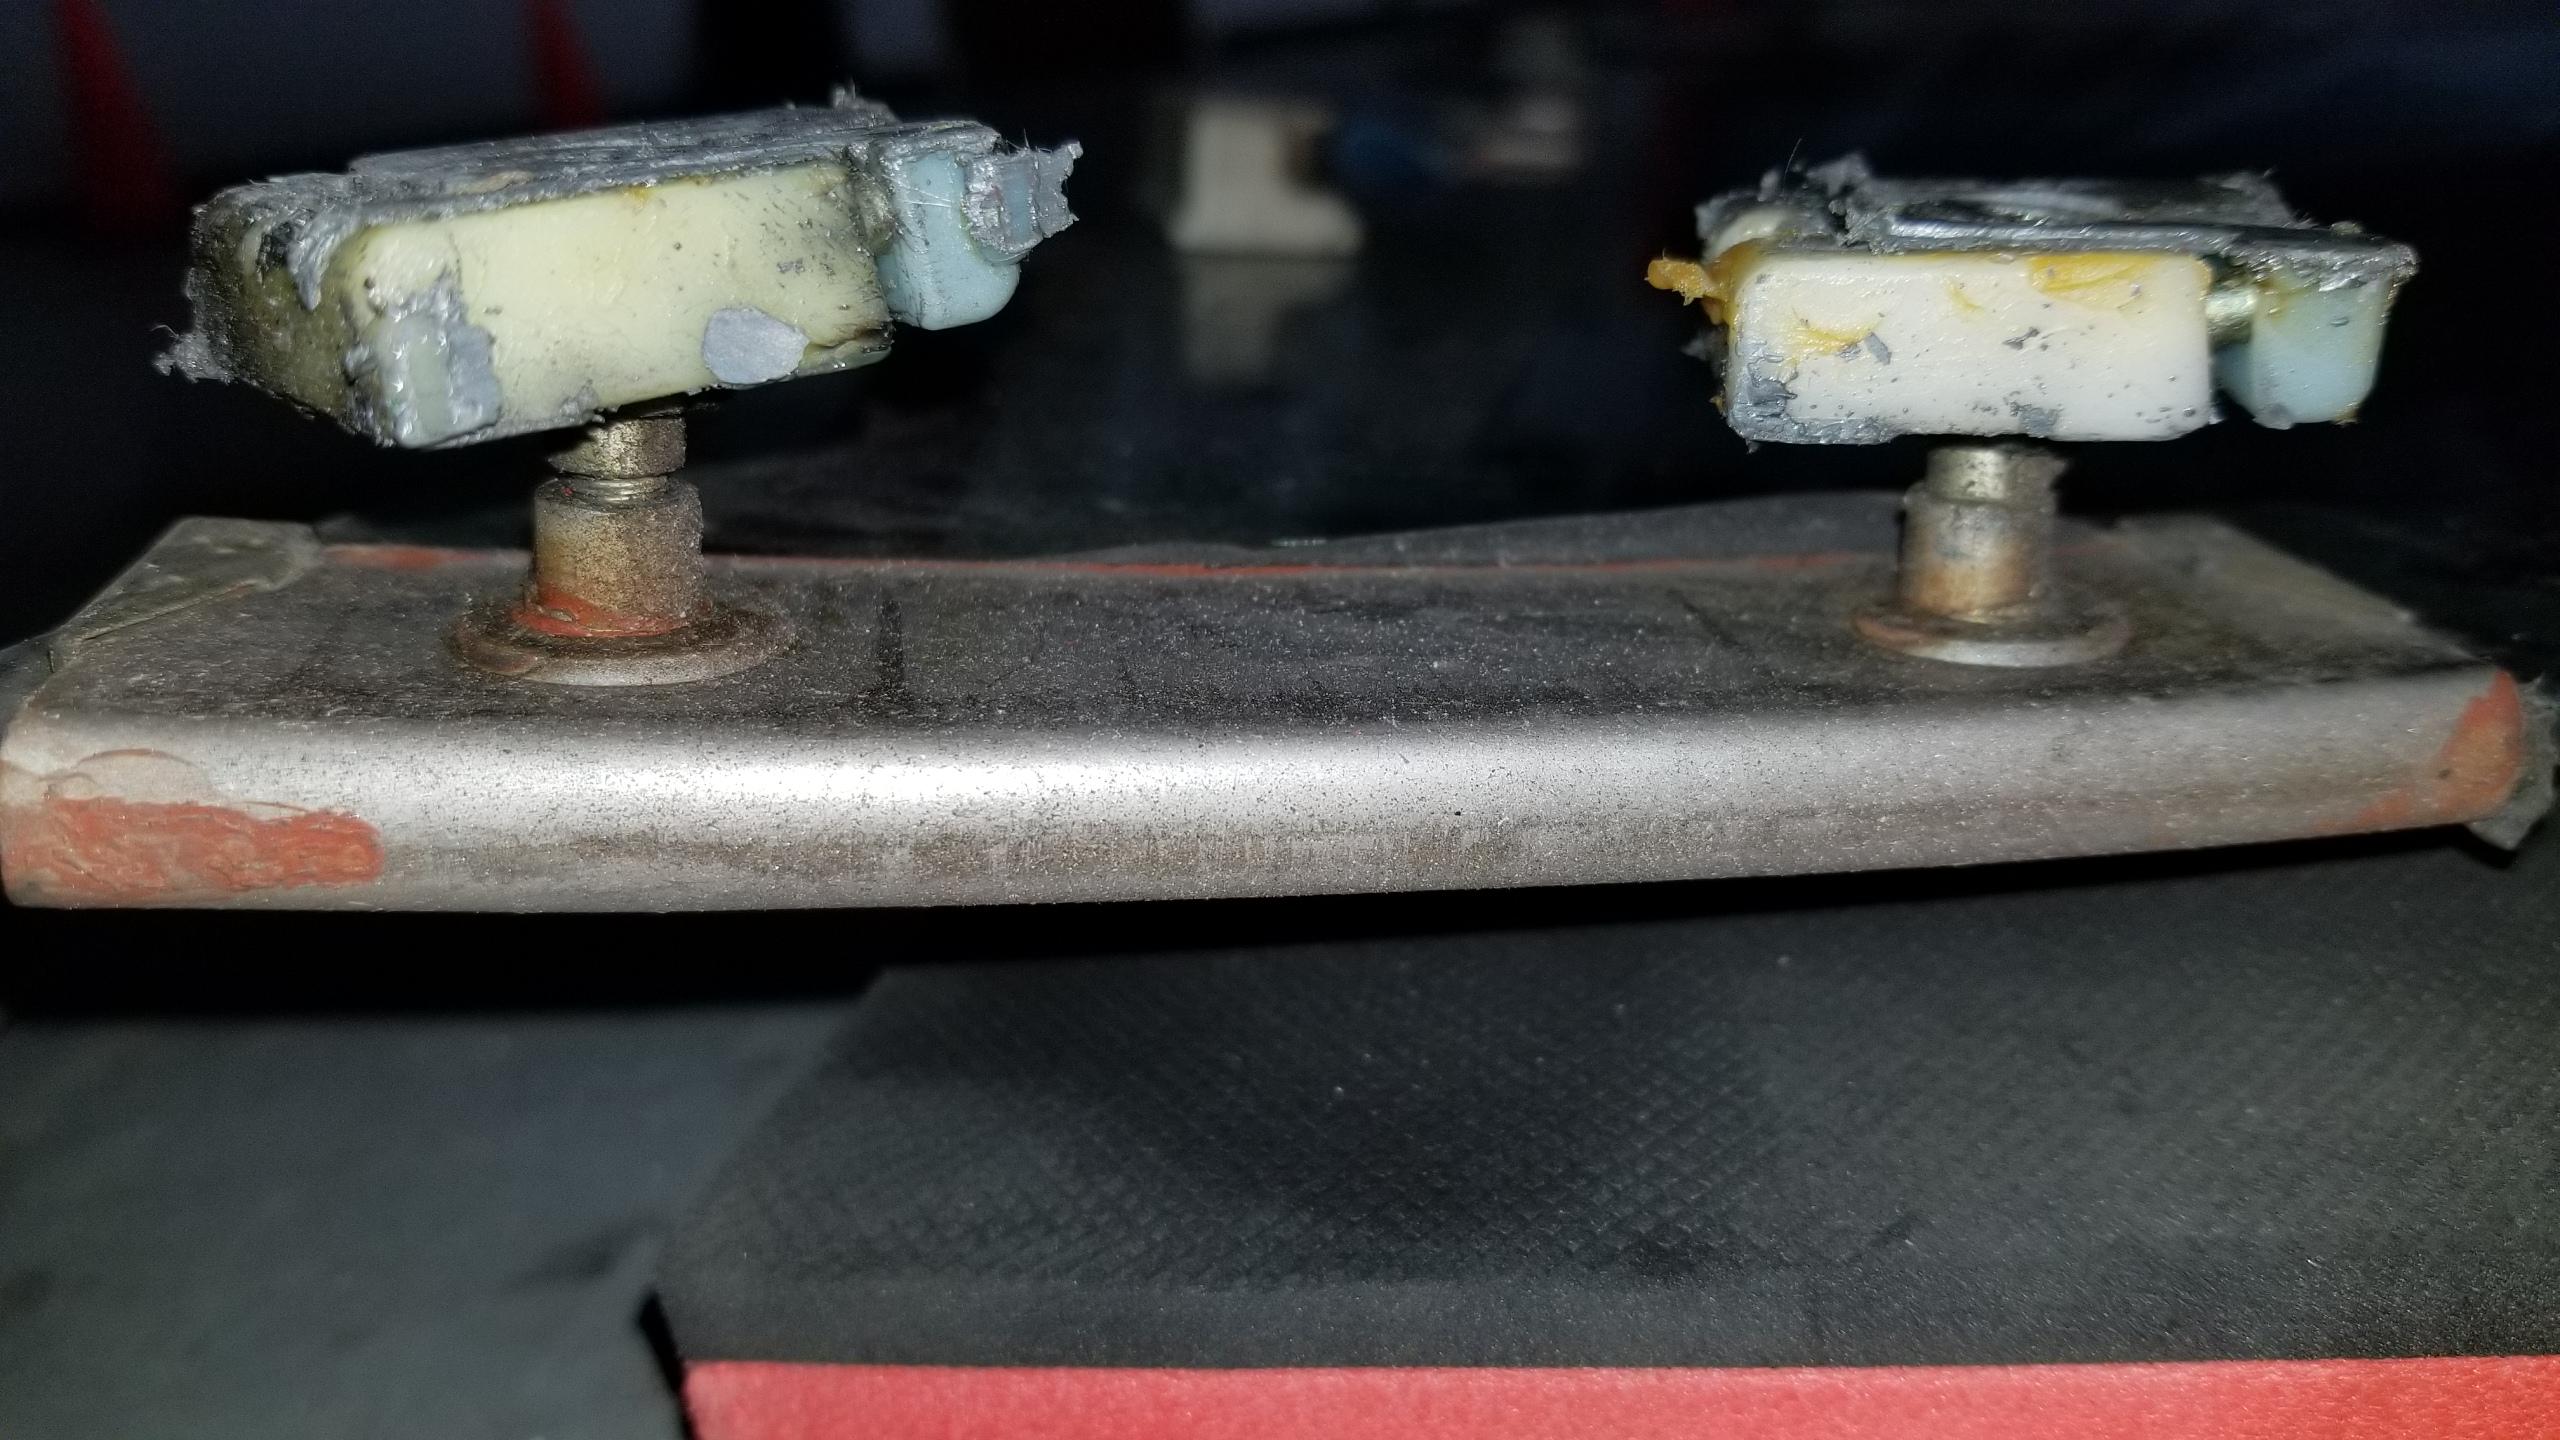
My broken guide. I think the hole on the top-right of the blue guide piece is where one of the springs went.
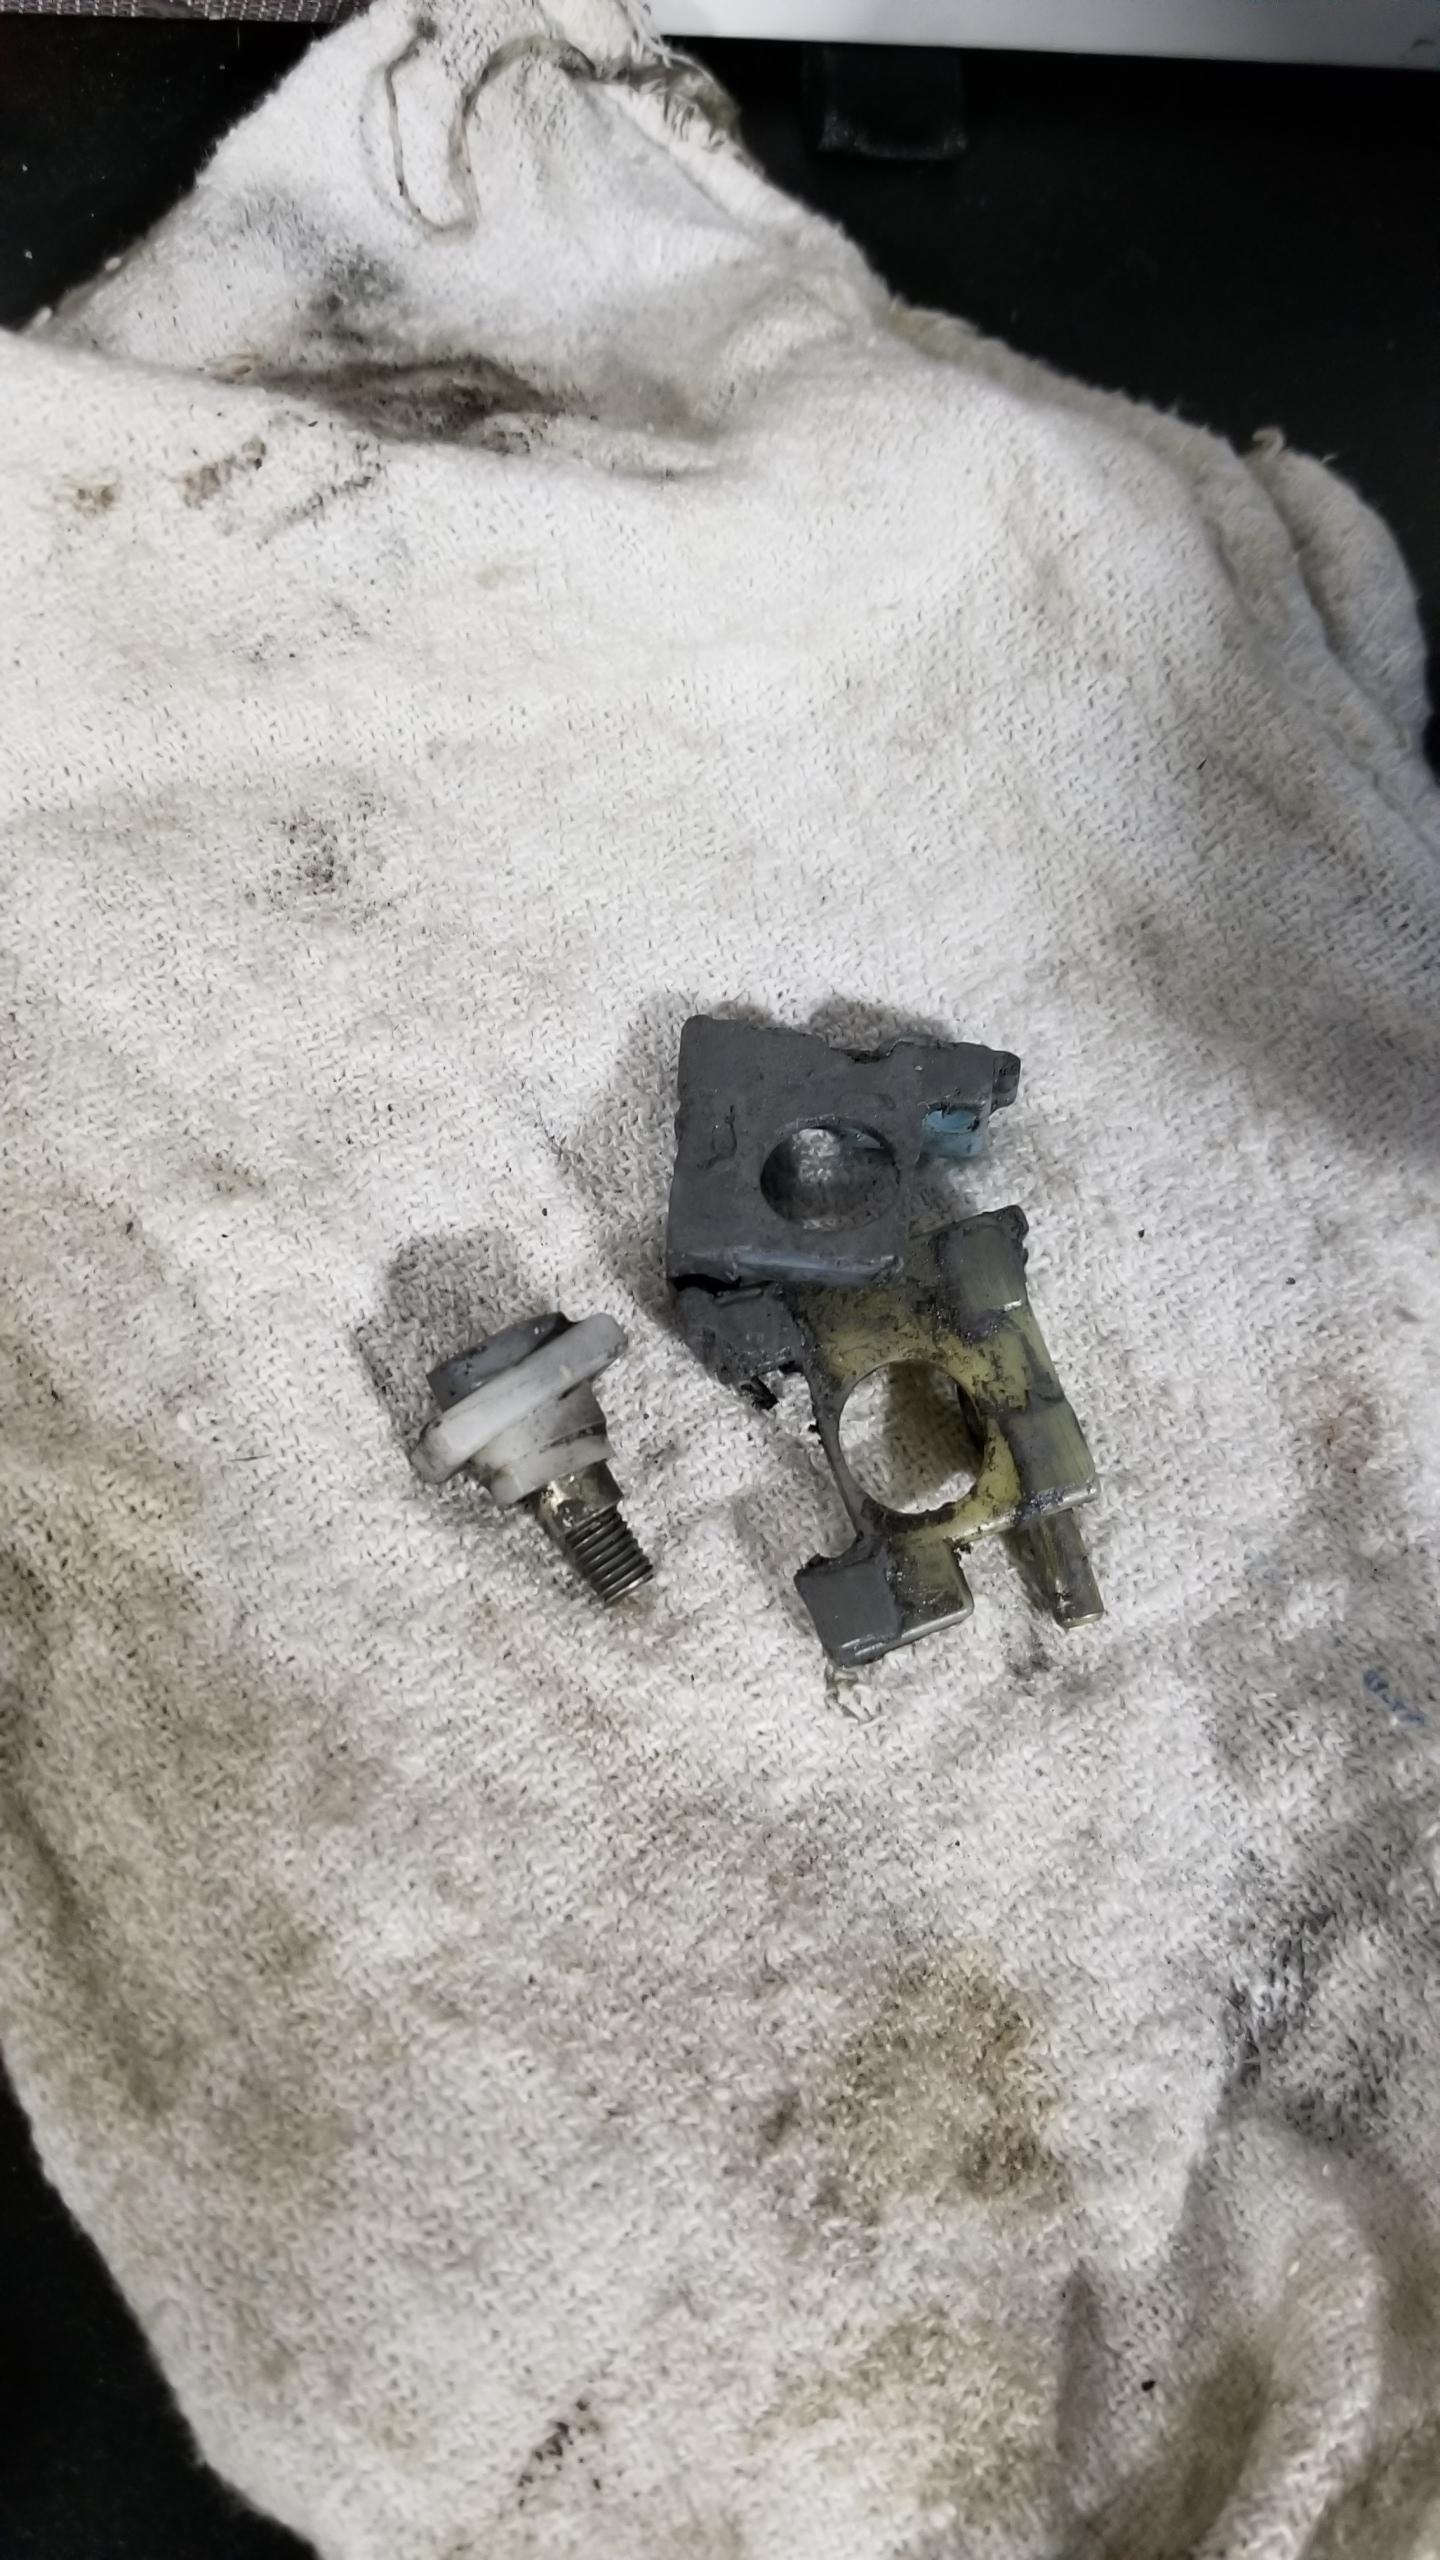
You can squeeze the white/blue parts together and the springs inside should push them back apart. They do gum up with old grease and crap so some do end up sticky and don't spring as well. Since they're pointed like this in the tracks the spring doesn't really work to push the guide against the inside of the tracks like you might think. The guide is not a tight fit inside so it probably gets cocked in the track sometimes and the spring action helps give some flex to the guide so it doesn't get jammed up and scrapes the tracks. My theory at least.
To fully clean the tracks I think removal of the windows is required. You can really inspect and clean the tracks with them also removed but I didn't want to initially, you can get them clean inside the doors but it takes a long time. The guides also should be cleaned off which you can only really do with the windows out and "filled" with new grease. Next time I would probably avoid Honda urea grease based on stuntman's recommendation and use the Nano Marine MT grease or Amsoil Dominator which has slightly better properties.
My broken guide. I think the hole on the top-right of the blue guide piece is where one of the springs went.
You can squeeze the white/blue parts together and the springs inside should push them back apart. They do gum up with old grease and crap so some do end up sticky and don't spring as well. Since they're pointed like this in the tracks the spring doesn't really work to push the guide against the inside of the tracks like you might think. The guide is not a tight fit inside so it probably gets cocked in the track sometimes and the spring action helps give some flex to the guide so it doesn't get jammed up and scrapes the tracks. My theory at least.
To fully clean the tracks I think removal of the windows is required. You can really inspect and clean the tracks with them also removed but I didn't want to initially, you can get them clean inside the doors but it takes a long time. The guides also should be cleaned off which you can only really do with the windows out and "filled" with new grease. Next time I would probably avoid Honda urea grease based on stuntman's recommendation and use the Nano Marine MT grease or Amsoil Dominator which has slightly better properties.
Similar threads
- Replies
- 19
- Views
- 778
- Replies
- 13
- Views
- 443