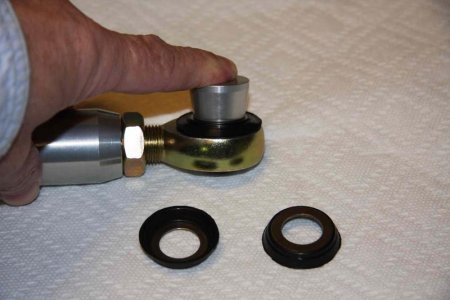
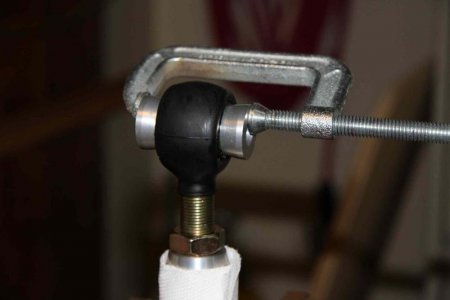
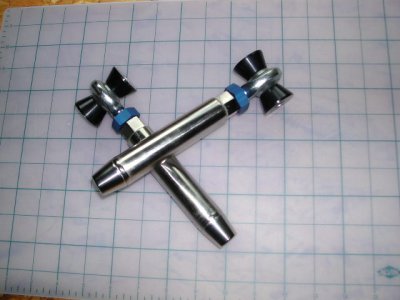
I can't believe this hasn't been covered, but my searches were futile. I just installed the SOS toe-links along with Titanium Dave's mono-ball rear beam bushings and have some advice on the installation. Toe-links first: excellent product, tolerances perfect, but these obviously have no protection against airborne dust and grit, and of course rain water. While thousands of race cars have used these and just shoot them with Break-Free or that crap WD40, sealing them up if possible only makes sense, and on a street car IMO is an absolute necessity. So I set out to design a seal and found that a company named Seals-it has been there and done that. They offer two types of seals: one that is a traditional cup type seal that is just clamped in between the heim joint and the reducer bushing, one of each side. I ordered some and they would work well in our toe links. I would recommend however that you carefully polish off the heim joint imprinted indentity markings as they will probably wear away the seal a bit. They sell for $1.95 each. As they are clamped into the "assembly", you will have to shave off the thickness of the seal from the outer surface of each reducer bushing by the thickness of the seals integral washer (looks like around .030"). But I wouldn't even go there as Seal-it has another boot product that is just plain outstanding. It is a very stretchy rubber boot that seals around the heim joint as well as both reducer bushings (it's magic!) A package of six is $28 and they work great. Just lather up the joints with wheel bearing grease and snap the boot on (which looks impossible at first). When tightening the heim joint nut on the bench, I suggest you line up the joint with the flat on the toe-link body so you can tell your alignment person to keep that flat vertical so the heim joint will be near vertical after alignment. I adjusted the toe link length on the bench to 1/4" longer than the stock length. Regarding the mono-balls, another awesome product: First, they don't come greased up, so I took them apart and greased them just a little, and don't grease the reducer bushings themselves. Make sure the bushings are turned to the outside (3 o'clock or 9 o'clock position). Take a prick punch and witness mark the edge of the bushing at the outside 3 position on one and the 9 position on the other in a manner where this mark will be visible after all is assembled. Tell your alignment tech that you have "offset bushings" in there and when he rotates the cam bolts to make sure that punch mark stays to the outside position. Vendors, feel free to use any of the above in product literature if desired. Find the seals at SEALSIT.COM or www.FASTAXLE.COM. Part # RERS3 for the boots. Pic's attached.
-
Protip: Profile posts are public! Use Conversations to message other members privately. Everyone can see the content of a profile post.
You are using an out of date browser. It may not display this or other websites correctly.
You should upgrade or use an alternative browser.
You should upgrade or use an alternative browser.
Toe-link seals/mono-balls installation
- Thread starter Tanto2
- Start date

I am thinking about doing the toe-links and Non-Compliance Rear Beam Bushings next. I haven't decided which bushing set should I get, Titanium Dave's or SOS. I will look in to the rubber boot for the toe-links.
I did not get a clear answer on just what the SOS setup was, so I assume it was a copy of the Comptech units, which will wear out too quick and need to be relubed often. Dave's setup is the only one that allows for the angle change that does occur. There are a couple of things in Daves design that would need to proved out, like is the bearing press fit tight enough? Is the clamping force enough to keep the reducers from rotating? While I was trying to verify this stuff myself (as Dave has probably done long ago-but I'm a show me guy), I saw the Shad was using them. Thats good enough for me. If you don't have the balls, you need bushings with some give, like perhaps urethane, but the monoballs are the way to go IMO, although they need a pretty good installer.
Tons of people have the Comptech units so I would defer to one of them to go into detail, but the short answer is yes. I believe they are metal to metal contact which is not unusual for a race car and I think SOS has some coating on theirs. From my VERY cursory study of this, it appears that there will be some minor binding in these "solid" setups (OEM was rubber) . Titanium Dave probably an old post on this he can send you. Or just search on "mono-balls" will get you started.So, what you're saying is that the non-compliance stuff needs servicing??
Henry.
I have had the Comptech rear tow links for around 4 years.
They are stainless steal. No issues.
The seals at SEALSIT.COM seen like a good idea.
They are stainless steal. No issues.
The seals at SEALSIT.COM seen like a good idea.
Found this by chance under a search of something unrelated. The rod ends we have use a self cleaning / self lubricating race material that sweeps debris and moisture away as the mono ball rotates before it enters the race. The rod end chosen exceeds its implementation and we've had rod ends from 5+ years ago tested by the manufacture finding them still in tolerance. Like any joint though, they should be investigated as part of routine maintenance on your car. The seal kits you found are a great idea and will add another level of protection - one that I will investigate today.
Regarding the beam bushings, they are not metal-on-metal. There are delrin (high density plastic with self lubricating properties) that are located between the aluminum barrel and bushings.
Cheers,
-- Chris
Regarding the beam bushings, they are not metal-on-metal. There are delrin (high density plastic with self lubricating properties) that are located between the aluminum barrel and bushings.
Cheers,
-- Chris
Last edited:
thats a delrin coating on the balls right? The problem is that the original bushing was rubber allowing for the angle change. Any "solid" setup like the comptech,or a coated ball WILL be on a slight bind all the time. Yes it probably takes several years to bind up, but from an engineering standpoint, it's a non-starter for me. While Daves setup is a bit of a pain to align, it does adjust for the angle changes. Self cleaning balls? No such thing. It's really a race car only design where the balls will be inspected and relubed occasionally. But frankly I wouldn't even want to do an endurance race with them. Concrete grit is brutal. I locked up arm at speed would be bad. I'm only a low mileage street guy, but I do get anal about aftermarket parts. FWI I do like SOS products, they did improve on Comptechs design, which one would have thought would be bullet proof. They are a race shop.Regarding the beam bushings, they are not metal-on-metal. There are delrin (high density plastic with self lubricating properties) that are located between the aluminum barrel and bushings.
Cheers,
-- Chris
Both the Toe link bearings and the Mono-balls do not require grease. The wear surfaces are Teflon. They will wear longer if they are dry, grease and aftermarket seals will hold dirt and draw it into the Teflon surface causing pre-mature wear. Occasional cleaning with WD 40 is a good call call, but I recommend no more than that.
Like Chris said, all these parts are designed with a large margin as far as load capacity. The failure mode for the bearing will be slop and play for all the parts I make, there is a chance the plastic bushings could seize as Tanto2 mentioned, but I have never heard of this in either race or street applications.
As far as the offset hole is concerned, they do not turn once installed while doing alignments. As a matter of fact, they are a real pain roll around once they are in the car if you want to change the range of adjustment.
It's my personal guess FWIW the Teflon is a gimmick that they came up with because they didn't have decent seals available. These extremely high quality boots will SEAL the dirt out, there won't be any dirt or water to hold. With that thinking we should take all the seals out of all of our auto's ball joints. Comptech told me a decade ago that they will seize if not lubed regularly, and it only makes sense. Again my guess is they wouldn't have volunteered that data if they had not had it happen. I doubt Shad would be using Mono-balls if the old standby could not be bettered. A sticky suspension link or A-arm on a race car is pretty common. Dave and I may disagree on the details, but he does make a hell of a product that is the ONLY way to ensure zero bind.Both the Toe link bearings and the Mono-balls do not require grease. The wear surfaces are Teflon. They will wear longer if they are dry, grease and aftermarket seals will hold dirt and draw it into the Teflon surface causing pre-mature wear. Occasional cleaning with WD 40 is a good call call, but I recommend no more than that.
Like Chris said, all these parts are designed with a large margin as far as load capacity. The failure mode for the bearing will be slop and play for all the parts I make, there is a chance the plastic bushings could seize as Tanto2 mentioned, but I have never heard of this in either race or street applications.
As far as the offset hole is concerned, they do not turn once installed while doing alignments. As a matter of fact, they are a real pain roll around once they are in the car if you want to change the range of adjustment.
The toe link goes between the rear knuckle and the rear suspension beam. It it the part which is adjusted to change the amount of toe the rear suspension has. Look under the back of the car, the toe link is the rear most lower suspension member.can someone explain to me where the toe-links go? I've been thinking about buying them but have no idea where they are used. Thanks
If you go with a rigid toe link, you NEED to go with a rigid beam bushing! The toe link and beam bushing work as a set, they need to be of similar durometer to have similar flex. If one can flex or move more than the other, the car will have dynamic toe change as cornering load builds. This is very dangerous and will increase the snap over-steer that stock alignments tends to give. Replace both as a set!
I can supply both the toe links and beam bushings, including exchange on the beam which I have in stock.
Here are some pics of my latest version, these are as strong as any on the market and drop 350 grams per set! Plus cool nickel plating!
Attachments

Similar threads
- Replies
- 0
- Views
- 78
- Replies
- 5
- Views
- 3K
- Replies
- 11
- Views
- 3K