• Protip: Profile posts are public! Use Conversations to message other members privately. Everyone can see the content of a profile post.

Urgent Timing Belt Alignment Question

Joined
8 February 2019
Messages
621
Location
Atlanta, GA
Hi all,

In the middle of my first TB job, aligned and realigned all 4 cams and crank perfectly before tensioning, or so I thought. The timing was off slightly when I went to remove the old belt, so I couldn't reference my own marks as the walkthrough says to. I've run the car for ~50 miles on this new belt before I took the timing covers off again to recheck the alignment.

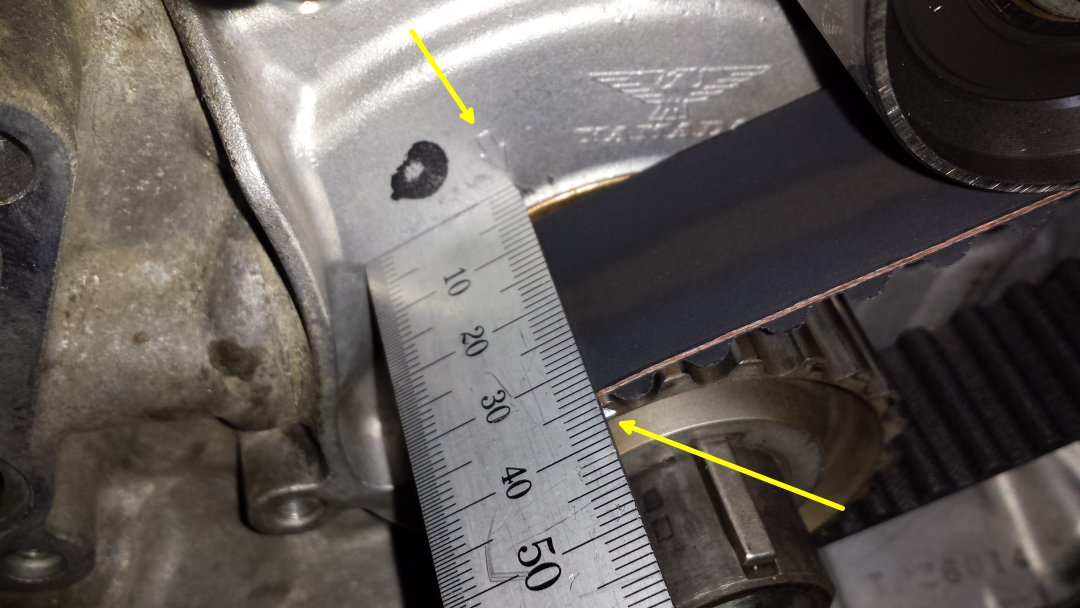
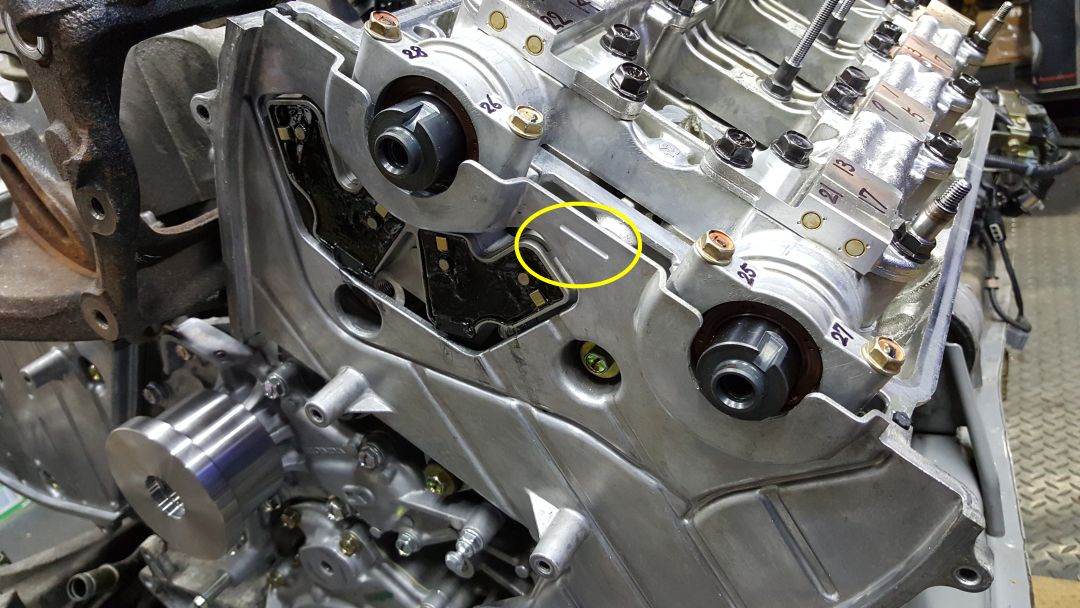
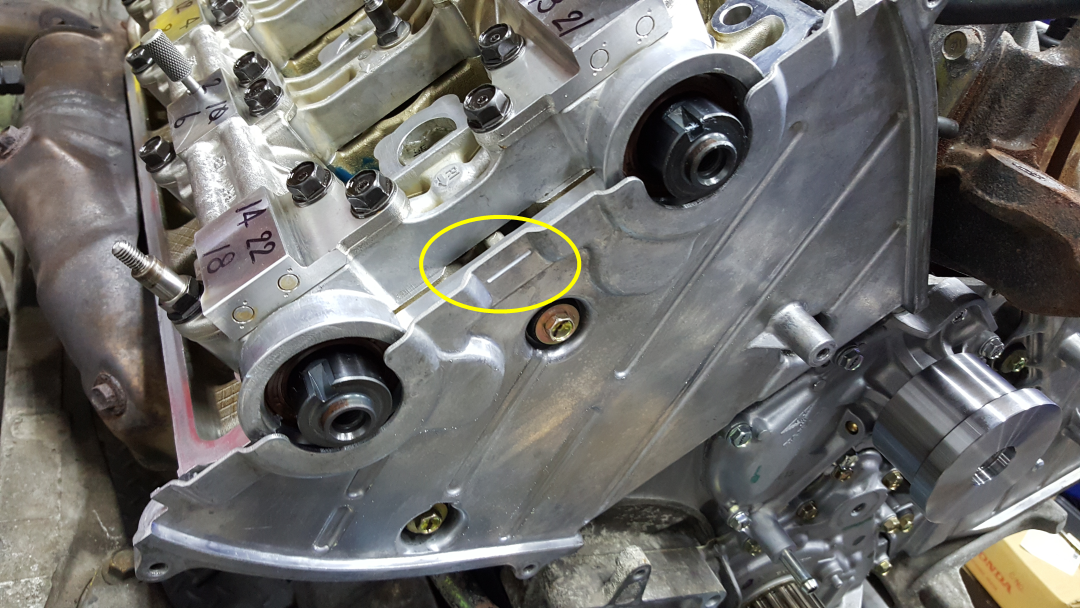
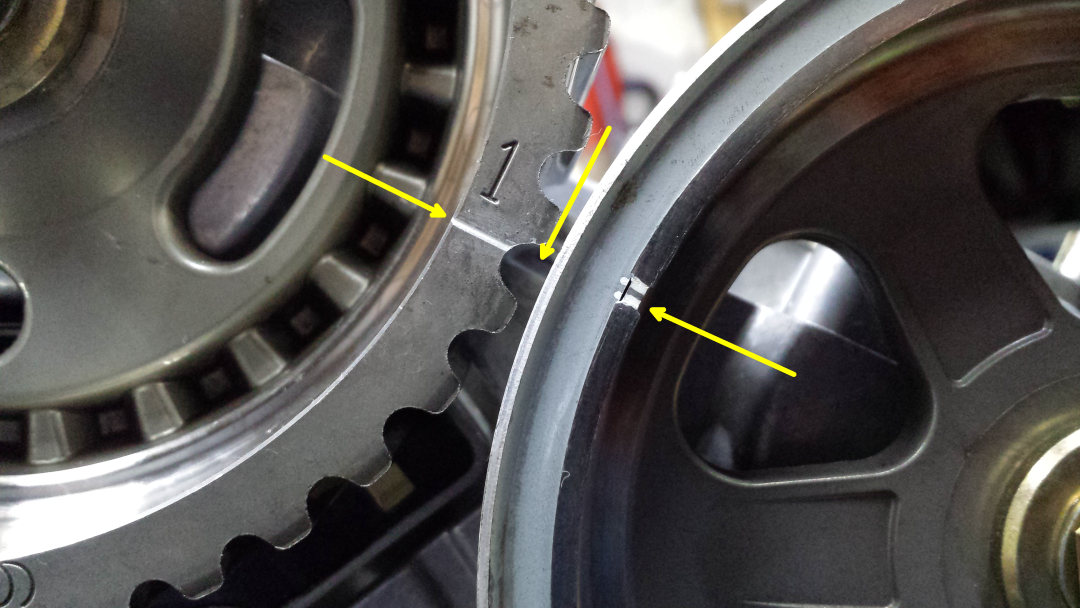
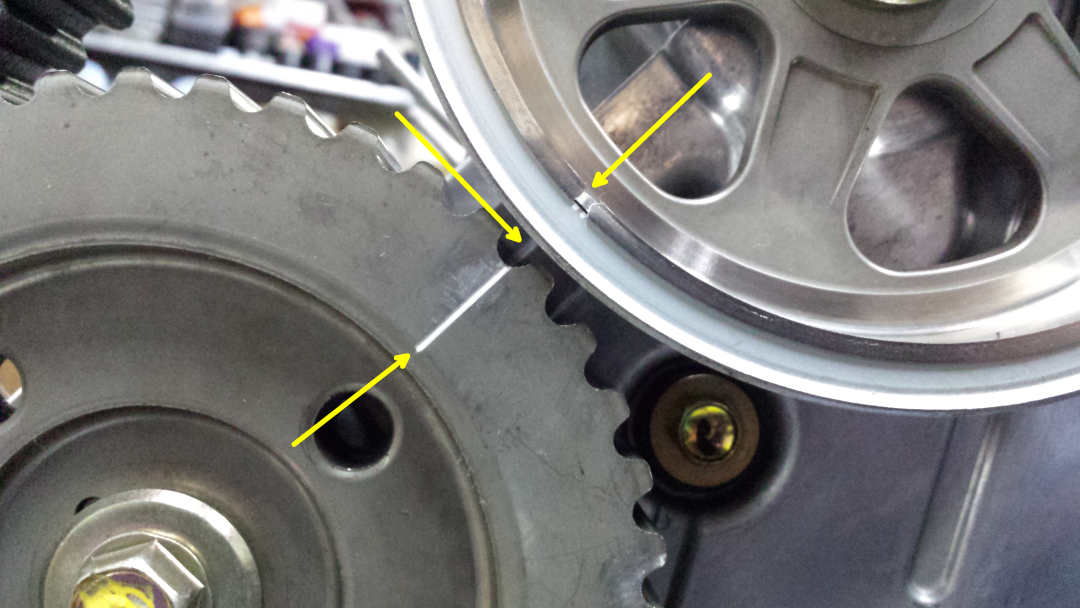
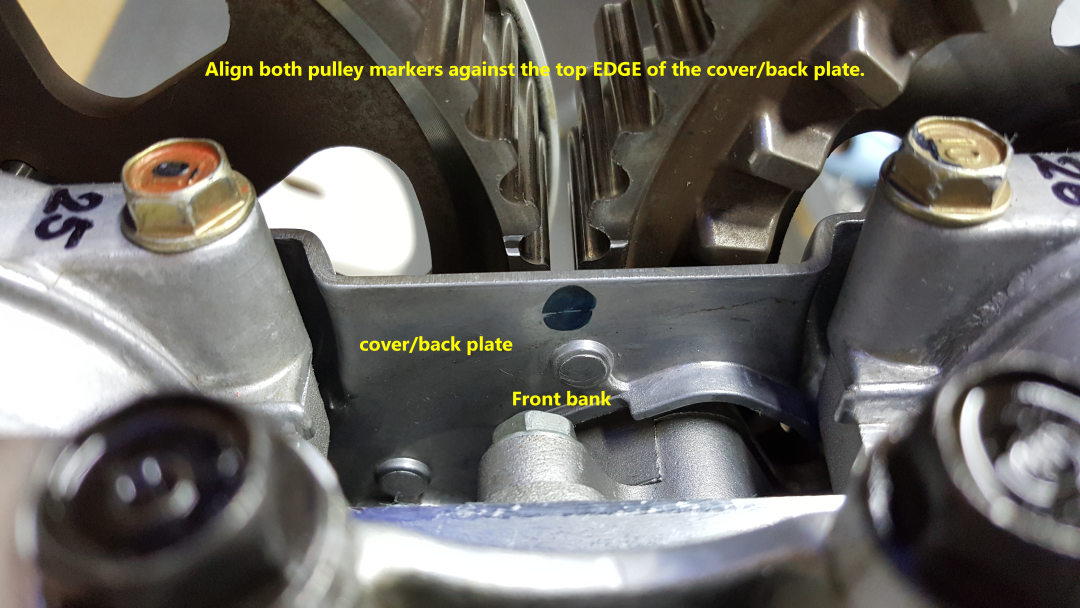
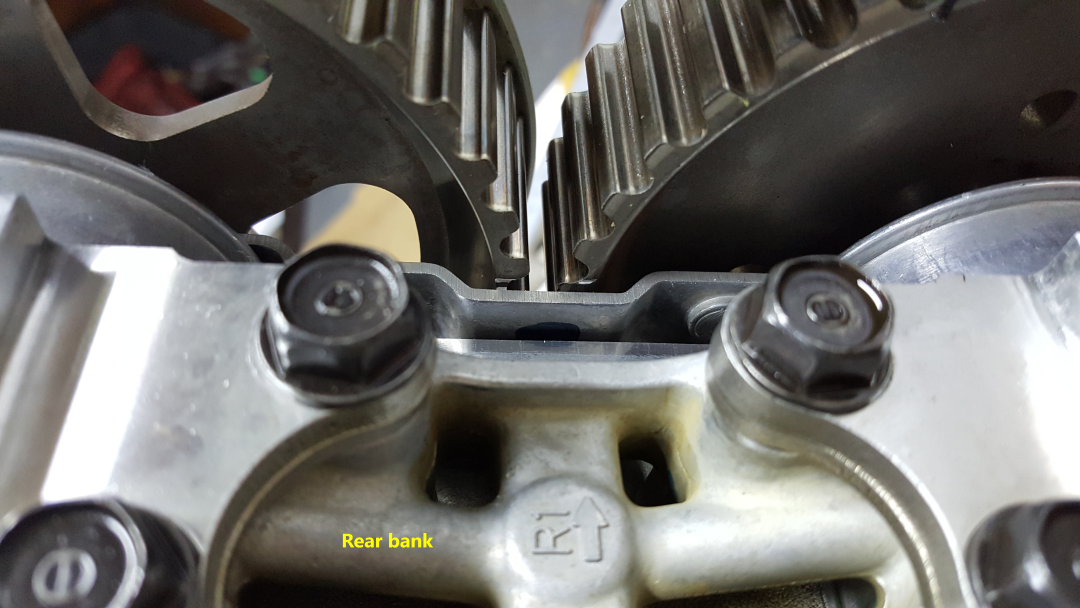
Right now I have the belt tensioned, my crank is at TDC (oil pump arrow aligns perfectly with cam gear arrow), front cams perfectly aligned with the divot just below the top of the timing cover, rear exhaust was advanced a half tooth and is now in line with the rear timing cover divot. However, my rear intake cam mark appears to be exactly 1/2 tooth retarded (counterclockwise) versus the rear exhaust cam and the timing cover mark.

With some contortions and a mirror, I can took at the rear cams about perpendicularly so I don't believe the viewing angle is the problem.

I don't want to mess with the belt anymore if this is normal, but it seems like if I advance the rear intake by a tooth, then I will just be 1/2 tooth above the timing mark instead. Maybe I need to do this anyways, then see if tensioning the belt brings the rear marks into alignment?

Thanks for any help.
 
Last edited:
pm Larry B.....and Honcho
 
20200314_125044.jpg
Here's the best pic I could get, looking towards the belt at the rear cams. You might be able to see the rear cam line and timing divot behind it, and the rear intake (bottom pulley in mirror) looks to be 1/2 off.

I don't think the little white-ish line on the timing cover one tooth to the right of the exhaust cam line is the timing mark, I think it's the darker divot one tooth above.

The difference is small enough that I can easily get them to align perfectly by turning the rear intake pulley ever so slightly with a wrench, but then I can turn the water pump pulley by hand which I've heard you're not supposed to be able to do.
 
Last edited:
I'm sure with all the C-19 shut-ins you will get some good responses soon...:eek:
 
Thanks for the references. In the meantime, I've tried advancing the rear intake a tooth, however as expected, after tensioning I ended up about 3/4 tooth above the timing mark/rear exhaust mark. Retarded by one tooth again, back in the same predicament.

After that, tried advancing the exhaust pulley one tooth (CW) after loosening the belt to rotate the rear intake 1/2 tooth to line up perfectly with the timing mark to see if, during tensioning (as in the factory service manual), the tensioner would pull CCW on the rear exhaust and bring it back into time with the intake. Not even close, just ended up a tooth off on the exhaust.

So back to square one, but after putting it back to the original position, the rear intake/exhaust were almost exactly aligned even though I was on the same teeth as before. However, after rotating the crank more after final tensioning at the blue mark, I ended up in the same place, intake 1/2 tooth off.

At this point, it seems very improbable that I'm off a tooth on any of the 5 gears, and this very slight intake misalignment might be because of slight tension differences between each gear or because I ran the car for ~50 miles with this new timing belt before I took the covers off again to recheck my marks, so maybe the belt expanded ever so slightly. I can't think of anything else to try.
 
Last edited:
From my years on prime it is common to have owners saying there car ran a little rough or showed cels after TB replacement and after a second look the gears were 1 tooth off...
 
Hmmm I think your belt tension is not right. You should not be able to move the water pump by hand after tensioning. The belt does stretch slightly over time, but that is over tens of thousands of miles, not 50. I know it sucks, but I would set the engine to #1 TDC, remove the belt and start over with the tensioning process. Your rear pulley is definitely off by half a tooth. This photo by Kaz shows the correct alignment of the rear pulley marks after tensioning.

http://www.nsxcb.co.uk/entry.php?2594-Eng-Refresh-Health-Check-etc-23

The good news is the tooth error is not enough to do valve damage, but your cam lobes will be slightly out of phase, reducing your engine power. It's really hard to do the tensioning process correctly with the engine in the car, especially if you have big hands. I don't know if you have the capability, but it may be worth it to you to remove the engine. When I install the belt, I try to leave no slack at all so that it is all "bunched up" at the tensioner, if that makes sense. This way, very little adjustment at the cam gears is necessary. Here is Kaz demonstrating what the tension should look like.

<iframe width="560" height="315" src="https://www.youtube.com/embed/AR-YZ1YqnoU" frameborder="0" allow="accelerometer; autoplay; encrypted-media; gyroscope; picture-in-picture" allowfullscreen></iframe>

Hope this helps.
 
At the moment I can't turn the WP by hand at all, still at TDC. Watching Kaz' vid it seems to me like the belt is as tight as that, similar levels of deflection from what I can see.

I do agree that the rear intake is not dead on, but I don't know how to fix the 1/2 tooth. 1 full tooth would be easy, but I've basically taken the belt off and redone the timing a few times today, and I haven't had to touch the front cams. Perhaps I can rotate the crank and front cams slightly CW to pull proper tension on the WP once I advance the rear intake CW to the proper position?

Removing the engine is unfortunately not feasible for me right now, I'd probably end up breaking something else.
When the belt is fully on, I go by the manual and wrench each pulley CCW as tight as I reasonably can, hold the pulley in place, then wrench the next one and so on. Finally holding rear exhaust, loosten adjust bolt, and simultaneously push the tension pulley towards the spring and tighten the bolt. The pulleys barely move at all during this, and the belt seems tight in all areas.
 
Are you advancing the rear exhaust pulley by 1/4 to 1/2 tooth when installing the belt? Your first photo is actually what the rear exhaust pulley should look like before you start tensioning (Edit- actually, it's a mirror image. The rear intake should be lined up with the cover mark and the rear exhaust should be advanced about a half tooth). Basically, by the time you get to the rear exhaust pulley in the tensioning sequence, there should be enough slack in the belt to get it to move that last ~1/2 tooth and line up with the rear intake pulley marks. You have to hold the rear exhaust pulley to keep the tension on the belt while you push and release the tensioner. This makes sure you take up all the slack and "lock" it in with the tensioner. The service manual is not clear about this. If you're letting go of the rear exhaust pulley before you set the tensioner, the slack is going back into the belt.
 
Last edited:
I'm working on moving the rear exhaust CW by 1/2 tooth like the pic in the service manual before the tensioning procedure to get all the tension to the adjuster, with the other 3 cams aligned as they should be. Hopefully works but I just ended up in the same place with too little tension. Probably just more fiddling...

It is a little fiddly, which the manual doesn't talk about, because if you line up all of your marks perfectly pre-tension, then they will all be off after you rotate each pulley. I set the front pulleys just ever so slightly off so they line up after tensioning, since they barely move. The rear intake I set just above the cover pointer (like a 1/16 of an inch) so it moves into alignment when I rotate the pulley to take up the slack. The rear exhaust I advance the most...about a 1/4 to 1/2 tooth depending on what allows the belt to slip on. I've done it 3 times and each time was slightly different. Depends somewhat on the particular belt and particular engine. Hopefully LarryB and/or Kaz will chime in too- I'm sure their tricks are better than mine. Also, if you are rotating the cams via the cam bolt, make sure to re-check torque after tensioning!
 
That makes sense to me. Tried 3 times to slightly offset the pulleys and keep ending up with the same result, lol. Last time I ended up with quite a lot of slack between the front exhaust and crank, which I eliminated with tensioning but ended up with the same result. Maybe I could do the same and transfer a belt tooth by one on the crank to eliminate some front slack? Still fiddling.

Edit: thought I had it, moved the crank slightly CW on the same tooth to pull tension on the front side, then went through and tensioned everything at TDC, everything lined up. Final tension at blue mark, then rotated back to TDC to check again, the rear intake moved back to the old spot by itself, like it self corrected. Maybe this is something that someone more experienced could fix in 5 minutes, but really considering just buttoning it up. I would think that as long as the belt overall has enough tension and is on the right teeth, the very small slack differences between the pulleys would be equalized once the crank pulls the belt along...
 
Last edited:
Just wondering
Have the heads ever seen any work on them like face grinding after a HG failure (grinding off too much material)? Or a thicker HG? Anything that changes the original height of the heads f*cks up the alignment and it will be most extreme on the rear head.
Still the OEM cams?
 
g28DxE60Pbp_20bu5WR2GR_HEwlkHrt_K5mfQ4EWg25XVTqmKWbzBV3WNYHmEL01_MAH6aXquAo9OrqG4R-Yx4Kzfobdxisw13h6df2iNQKW33GrbMi13hjvlglLxTkrJLtgVu3h-C7d5NVVAVwtBzfjhAJ328letFaL_wUVs6ZRhUr5QLUgWjDK5baPlJoBzfaXOwvWXoThoD848TKZcm5k_bDWeUocLXLmV0Yj5fe3M2dXUkqvd3WGgym3tqsRgSE2bS1i2qZ90wvKyTB57fxLBnwQraERx3B9WRBl2AQeTbt2sAFLTJYhEds6Og0TaD9ieey9sAaVVVofweOIynA1lWFHfF299grM_6P9_5obEcBbZJfktQJ6SpjPWsVuIFPUWtfUy3qgkCs2rLGBBwkErmzVXDtV-bl68KI48rvo482xGb44XHW7zKme6bSVUaiGinrbFh2Hm61B66y-YJoAUxCUvHmcmNMkCt9yAhdmD3esZRYpPmovhFzoQhD_6QC1LS7f5qQ2aCpD8ywGDkLWdli72CiapRuNNjQoEKvBiUczehTlVC38c9XJcKafhT0o9pyDVvIsqyIe7TJ1_kW5TvlXfwXgBnsKd9UY2dSwwoJ09irZ9GXQ0pyaz1JVlXF8puLI8pnLDL_YlWbsjRDCjoIt6_N6EhebMg79YJ3rKPAj8q96Cv5iezZeTmVSm_oLSV7ubRn3S3dJuP-dPjMtgKu15Hj_NX_3Wl2WfnGJMEt5iuU3dUw=w1080-h608-no


W9Ud7u_qR3Esm0PxYbPW3JaYQrqRuqFLzVO9jRue-7wHxoWcPH3GCQ2ZEp4uL_qlPmIZdLUlUAe32TAcWw5C6w70rl6GLl6uTcrhbCvotn8oen0nlsyhFpt5aEC4Ejx1tln_1hcXxcWIylUhO_ZHtXvyCLThm73tC86GOMpvX1KRNGKPmhG6qgPZkcLOycEthTcArDqu2VihhE67lvU1dbAzCVKzRG7oxIs19sADrzO1-wUHycDayzPdO_dUIt9tbY-8NMlw7aZd-n7cqOm4H7Xyz6o5d1YUHUynlpSIWxXXNvGBTKHlrEKgJjpptPYS1z6SRfmiNzfyWg2UhIyNWZZHrHEXNHJPa-eKl-vGY-vUIm1IbK0ZB90aw_lheWHznTnVgbFWWtEkggGtEIVwOIgff5SlwY7HjiaUgcufHM1R3LwUpKhLarjyZSLCtX1cnvuvam6fO9xNtzMt4CAQm6XWLlA988S4M7nW0gklgj3LqexT8dmROVCdQltCEVdf3RTBvDdccPWnwkOqjlvHFPydppcWjfhakt3UhO0stsb34RUCuomkOwy36U-vB4QzfLHb3Pp-3Jz0HGe2c656n6tBdt6SsUlmntkrFXjnopu_zvpGXDuGVSqlvk8Z-bWqHyGX2rnPMmuUbLQ0BeLmGrqHY4-423zhhHiWKz5TQaGttLJpbHBpZYu_ERAugbMlRrl0OFOsdq9qMqEJZlVWLsHXn3RjHLcP3RrJUC7qC9QoMTgUuHm-JKk=w1080-h608-no


0UpZ6yl84Ju7E1qctgFJyrg8jVx2XaeKU7HqpSouaHF2S0euqp9WV84WfqXTMuHvf3DXPjFy_ZSriOa95NUVZHnm3NLdB4liOI9tr2jUoSZ5Sfb_7oxhLJSjz32oncllEJFymPfS5cyeBa-jhHrQv-oEaJMwCMjXzyt7ao0ZF9KiFiEzBzfqotPY9RxeAsT3PdNwdiDeP3npaNBIGskqlnnzyBbKiwkgHXOYirOdOYzmDYB2P61KQFJ-JZXJnbDSDa4k8QiDxPkTnDoypTvrO5iIb9RixLoTyLCLMFIOGDht1LTgQmAj2yqv83A12VT8vZszRU-2MU1w_sXxqWheuQgDcATh-L32dIRMOQfef1gtJps8rnnE5bRgCCJjQ8J7e_bkEjS2jS4bnreqQFrrfQL1mCJiGYa91GBWXMnZ-Ej8jzhiTQFG4nyR97cSgS1tumMg7u-bE05YzdKr_F9vYDhRHLTEpVRu-Rw7LoyedSKHpurU1QAdoeKTZIL72cOchNdJsxBsKn1Ih9a03OCt5FU5VV8uHbMTlIOEPETSfwA2XPnHJ63cXy57UXFoj8Kww4fokCRy5DmefLSpKhQmKlhKN_QsEJfJ137HHPcuPOlSS5YPlyxSs2zsB5-GBJ6IOHswxaTIM_kKlO9UW6hAxiFP82G_E60bMYWrNZgTe8RE7ek5V42KToBO0X7MUGXBCi8u3RyNjj21PxgdZmuta4JunmhA2uvJ1UNAgSVI7GWywFsRkhmIdV0=w1080-h608-no


hCBw01Y9ItysiPeOqqcFRN0qIUaUYAUVJ79JBVcZ-G600mEocZcAmYKoF78KPDzpVKR5H6mLcU1tFfz9iCoaE0LeephsJx-13giQ9hRbvBu58AflbWs4rzqlnGD7Vcx7JaSfMTD-3gEYXi80VWG0DSnZDEhpRnVs8sHrni66cMK3Qf5Kv3atnOuXDzDaO2jWM5497xYgre4_O_mNup3a3ZYMEcDV55EQOXvdCOB8KyuyTE4jLRkTkNdBA6IbqEF1dcdssadK7OLEKRq4qFMIyco9LNyVKGZ-XpTlSjbeNU7OMV_1zHp4Pg9OkkuG0o3dPocFnC9DYQm6xwcukd7ye7VlbEBoYivemWGx5mibb8mc8JuHaDFSRknTeu7yeWzkzBzaM-Lo3SCCuTG3Sp93K13kWjPKnAZ6JVQt_2eQo24nvfBiuvcP5PVKpdzChGwL1qO8Z5SV791XiliQzvlVu6AK3dsgs49vHAPkN2KCSr_I09vJgnYx7MRtkSklTaP3OLv1AgwryqiNiDKUUcRemI83qFZ4TJwk37zbPprRct5kpMmmJern4Fiptlvxor_oGRXoOqnc9LOjjHdVquAkHtTVKVK7zsvPrJ3PBksIXKuPQ9UMaweFX2lue6LSUN9jRUaoZy_WYLGY-B-3yIugfLsb0K3OeFMQlEuTHZ_amGgP2_FZANCNywCJqLPcJBfCC_nM6e8TJ7rVrN6hM1W-FD8chZzAxAUNnbL5kBQ1ti60Gw9Ua6NwbdI=w1080-h608-no


Xa1ZE2V5eH2TyzAFktPfPzYc6okC8V__yrUBp4rp1_BKXpMmpHPTh1dJncDwtWeJ94N_IJmfAbEnNuuWVSF6DKyoED-7puipK7p5IsQHzaIP3Q7L9gadArtP2KF5Xj6AlDa6NCyJIrlwzS_t7aDUqRxjaLClXIfaW2weENGLcRNQndBpWW1_le13nJmyObMpKC7SMN1ZhpXs4hj_yE-6kIImkbPY93VomL1muAgzHJh9dpSSwBrLzdsEh1YI97z1ZQkBATh4zKqw8U_aHk2DamTWo3_LeEzG0yioAPsiVj4kQ-z6pg7KY5WWG50lL0I1-tNR5FMlfMOB5Rc0ncbjeBi_gnsZc3iPQ1RZjKUAMIedXyLN-F3MeBixa5gTZTbTxy1n2ZO6UrHEF3l6jqkWdUXP5dO4XH1bgNN49f7hN1d5uruKoJntL2plSMr56IySWcjP0wNXFI9J0xVfcxxBIoFIjY7lQLGTwYEuKJtDMdBm2_sok0ihHx4ylFGIQnejNOJkxWuxt15vN9AHbZJm7Go0lwIcuZ2JA3V8wjo4YIXZ9lrMvxWuCauNO1PdaGXZ6hTBM5dpSaUgvUpQrjE5X7XPejYCQPruZjiZxPeuPaUAUY4exZDNO0RMKlLmV97fR3_ZCprgZ_5B2dVEmjGDrSAh4oH1zRFXgIMHfk9mm-euP0pHPsy49xb8mj01WH6GfEnbQK7YsHOQ3EqI5_t-ALyc5SywlOkkSBC-RXA5JLSqRXSiSURd5Eg=w1080-h608-no


FcOcvYZa6EvRNbZCqysfmEO8L4qT8P1Pq63gBKqCvr0INcXIHkYa_pxljWG5hDG6vQOUNvU7hzRDgJTBfWvyin4f6601ibnDwSVXqchbfE9rMKfSkjtYx75XV3yzeLAwE0dSw-hTi8t5y9VHM17Ojgynjr7SKCtJL5-ckvEa5f4qJmFIcRxoDetOsM3CjcoU0HZhqnqtJxXK914Ynw9Uc02fOZL4EcfW3GKC_-tRHzbvMe5YPQTNYO9-udNf7CuFEiHFFa90rxvSXXZ1Re_pI-CweDzi41cyolzisHdh8xc_l0BVZCRfNYIkgT5V0eHVMBW2i3RYIfXAuCZA7WLU8wdwlzxAWcLDLr3rYDMx6rQ7ds8IkVpKTneqb_aMMo4sjrEpMSAqcoWW2QofVUjwKJIydvTI_dh1MUstu_T-Ajmw6CIvEQ9h61fKDlGPG6gFmMwbgnNZXYroKyNNtW7gbZOCEAHsSjlzR0MqeMZqW3Dl50ngh9fc8Ex6wvHa3dykwDXKVmLv943RnVSF_hLsCg2xUiWz4vsxhE_7ft0j4bj2saVpH0-rLw3j6khgEpcr8IC8o4dqUi7BOqiGD4z_rJw3NCDTXGkZt9ZELchPmI6F1Ar0kgEKoOlNL6a1yStSuHT9QbPZRHppWG8B0Bs86eJLCWwvBztpNkiLz1IWo-GcG7IrCuzu7S5Ub_ttS7vDCzNQblCOc2h91801rWRllqAad_2MSe5PS1cI-bCVuMMReKEszcUTyHI=w1080-h608-no


WonsDa-UHkZuykL2jaPtw8He3eHAxW2z5_RRvk6LvsVKnvUCjuqiU8XjffzAf6FBrT0nvOruhxIm6MIyMEFsbKukJ5U-6jKTkL6d5_3SPHBC45VCWpDnup9l7Y3sFpWTvFPBNUEnxLaMUrAtOzjCjnZxX1M1eeQNMtMh4VVfc8uP1J-HCZ1V2eq2n38ozFh5z4rgdB9ZQLUbXXeZ3PZxj75q1Ke6PdDFjapJqbPDroEoaQ4V0z_bmu0Im93_C4hMwkxnFnTJAm6i8N7Ltgl19rUERK5maTy0uL69ywwnedeLzClYxbiq_7CdWlWaczFp-4SRh6-FiExLWrjKhje9LhYdJgcJ6pg4faeK1JYchWrOqub3SlzgTeQcuD2SP8mQhjXjYoyLOrwbMyMmRG805h7ajhvhSIpo6kHjSpSkn4BTXqBnxubGRpvlMGfLEi5dHchX6dPHW3wHei8upHFdDSUOxssv5Wfl-5PFVqsCgQ1WRBZIqVDWsBGRNxHmGV9AhewANJqs1UF90pWng2tSZNn5jI9e4rxWVNji7ORqiSYk2NO5Q7cM1opSRMThI7uPEhvwFrvGmf6aN22poB_iGMbO8SpetmULV_2nNlsXLCV0tPtXsIJBChhZo-XHKP8WRL0VVyA8nk7h_UZq2kmIGLbMDgJ4e1bNHEhL-yk7dklEH9LRug6V9tPQErRyj6KknRGQ5ePUokQgTOnAnS4eQzP9Bfz4MvbRqBe-hl6bKGtNGQMFZS_o9gY=w1080-h608-no


Must finish several documents today so just quick advice.


You can't set the timing by mistake with 1/2 tooth offset.
It's always in the order of 1 tooth.
1/2 tooth offset is more like loose tension, etc.
Try checking the timing while keeping slight CW force applied to the crank.

Very unlikely to be the case but make sure all spark plugs are removed.

Quite obvious but advancing 1/2 tooth the Rear Exh cam is purely for assisting the TB installation and not for the timing purpose.

DO NOT rely on the 5mm pin punch method especially on the early model.
With early model Eng, the Front Exh cam won't line up against the hole on the cam holder plate.
One of the reason for making mistake.

If keeping the Eng inside the bay, use the marker on the inner face of the pulley.
Just align the two markers against the TOP EDGE of the cover plate.
Please refer to the last two photos.
At the rear bank, because the pulley sits so close to the cover plate, very little chance of making timing mistake even when using the mirror.
Please note that you can't use this method at the rear bank on one specific year model because Honda or parts manufacture made mistake on marking the Exh pulley.
It's like 180deg offset so fairly obvious.
Just use the marker on the outer face if that is the case.

When removing the slack from the TB, it doesn't have to be at #1 TDC.
But make sure to set cam pulley 9 teeth past #1 TDC (or align blue pointer) when adjusting the TB tension.


Kaz
 
It took me 3 evenings to do my TB. The first evening was disassembly, putting the new TB on, and aligning. I spent the 2nd evening double checking my alignment, and I found that I was 1/2 tooth off. I spent the 2nd evening focusing only on alignment. The 3rd evening, I cam in with a fresh set of eyes and it was still good, so I re-assembled, and all was good.

Moral of the story, it took me two tries to align. I've probably done 50 TB jobs in my life, so don't be surprised if this is the case, even if you are mechanically inclined.

Here's my version of your thread for reference...
http://www.nsxprime.com/forum/showt...er-timing-belt-question?highlight=timing+belt
 
Just wondering
Have the heads ever seen any work on them like face grinding after a HG failure (grinding off too much material)? Or a thicker HG? Anything that changes the original height of the heads f*cks up the alignment and it will be most extreme on the rear head.
Still the OEM cams?

Unfortunately I have no prior service info, though from the way the engine/bolts looked I don't believe those internals have been touched yet. A past TB/WP service was evident, but nothing much past that.

You can't set the timing by mistake with 1/2 tooth offset.
It's always in the order of 1 tooth.
1/2 tooth offset is more like loose tension, etc.
Try checking the timing while keeping slight CW force applied to the crank.

Very unlikely to be the case but make sure all spark plugs are removed.

Quite obvious but advancing 1/2 tooth the Rear Exh cam is purely for assisting the TB installation and not for the timing purpose.

DO NOT rely on the 5mm pin punch method especially on the early model.
With early model Eng, the Front Exh cam won't line up against the hole on the cam holder plate.
One of the reason for making mistake.
Kaz

Thank you very much for you reply Kaz, and also for your hundreds of others posts I've been reading through to help me work on this car :smile:. Know that even 30 years after my car was made, your posts still help me keep it on the road and are an invaluable resource. You and Larry/gold both :).

I do agree that the timing gears/belt can only be whole numbers and not half teeth, and I'm sure I had the correct teeth between each mark since I could align all the marks perfectly using the same teeth I was on when I had this problem, so I do believe it was a very slight tension difference between two or more pulleys.

I did have the spark plugs removed for the procedure. I mostly left the pins out for this because I read a few of your past posts that said they wouldn't align perfectly, though mine tended to fit in more situations because I ground down the end of the pins to change their length or the tip of the pin, so they wouldn't fit perfectly anyways.


Same here, I spent about 3 full days my first go around doing the whole shebang with coolant, TB, WP, thermostat, valve adjust, gaskets, etc. Was paranoid about my work the first time, so this was my second go focused just on the belt. Went much faster since I knew where everything went and the crank pulley bolt came off at the proper torque...everything on this car is way more complicated/involved than anything I've worked on before, so I'm learning as I go.

Anyways, I have everything put back together now, ended up tensioning a final time with all the marks aligned and then at the blue crank mark for the final tension. Everything looked good, and it seemed that even nudging the crank by 1-2mm moved the rear marks into alignment and the tolerance between the oil pump arrow/crank arrow and the front cam marks were basically indistinguishable. I did use a ruler as in Kaz's photos to verify and watched the belt videos as well. Was beating my head against the wall for the whole day.

Thanks everybody for the help. Have to wait until tomorrow to start it up so I can put in my new oil pan/gasket and figure out how I'm getting my rear O2 sensor out.
 
The timing was off slightly when I went to remove the old belt, so I couldn't reference my own marks as the walkthrough says to.
That's curious. It was even with the old belt.
Just to be sure: the WP has two pins which holds it in its exact position. I guess they are still there.
As/If you've done everything correctly as it seems something is wrong between the front and the read head. The distance between them is around 2-3 mm (or half a tooth on the TB) off as it seems.
 
Last edited:
That's curious. It was even with the old belt.
Just to be sure: the WP has two pins which holds it in its exact position. I guess they are still there.
As/If you've done everything correctly as it seems something is wrong between the front and the read head. The distance between them is around 2-3 mm (or half a tooth on the TB) off as it seems.

Now that you mention it, digging through my pics I have one of the two pumps, old on top. I didn't notice before I installed the new pump and already have everything together for the second time :)livid:), but it looks like one of the dowels stayed on the old pump. I think I remember the other one still being on the engine and slotted in with the new pump.
9CWkH62.jpg


I think I see what you're getting at. Looks like the other dowel is the smaller hole on the "southeast" side of the pumps, and perhaps since the upper left dowel was left on the old pump, that allowed the right side of the pump with the missing dowel (facing the TB side) to droop/shift ever so slightly with the tolerance on the WP bolt holes, which might move the WP pulley enough to make the 2-3mm difference on a cam pulley. I could believe it, though the new pump seemed to slot very snugly into place, and it's not off enough to cause any leaks so far. Either way, I don't have the will to take everything apart again so maybe during my future cam/LMA job :redface:
 
A missing dowel pin induce a problem. I'd have sleepless nights not knowing if both are in their place. But your choice. :)
 
Tyler, I think you may have found the answer. It would only take a very small change in alignment of the water pump pulley to affect belt tension.
 
That thought never crossed my mind, though it makes sense for why nothing else I tried made a difference. I suppose I'll have to make a note of it for the future when I'm forced to remove the belt again, whenever that will be. Mostly due to the fact that I don't know if I'll be sane enough to spend another 40 hours fixing something that might not matter that much. Just wish there was a reminder about the dowel pins in the SM/DIY guides to jog my memory :(.

I do believe that the belt will stay at its current tension (everything was tight when I finished) and doubt that the pump will shift at all now that it's torqued down properly. Obviously I'm inexperienced with this job, but I would think that as the engine rotates it would distribute any "over/under" tension between all the gears to reach a sort of equilibrium, the result of which I'm hoping will be imperceptible.
 
Yes, that might be a clever solution if one dowel pin is missing. It just takes 9 screws to unbolt 1 or 2 two turns at the WP. You'll see then if one pin is missing because you can't rotate at all if two pins are installed. Maybe worth a try. Good luck anyway!
Planning of fixing it a second time doesn't take it anywhere.
 
Back
Top