• Protip: Profile posts are public! Use Conversations to message other members privately. Everyone can see the content of a profile post.

Vented Dust Caps for LED Headlights

With respect to printing up-side down, note that the examples are sans vents. If you use the vented design, you'll still save about 20% of the print time, just not the 50% you'll save flipping the non-vented design. (Also save a LOT of support-removal time after printing.)
 
Last edited:
Assembled the headlights with new adjusters, LED bulbs, and the ventless dust caps…adjusted…and took for a drive. Wow! These LED bulbs make a huge difference, light up the road like a car built this decade instead of 30 years ago. And the headlights adjust like butter. Thanks again, [MENTION=4740]Russ[/MENTION], for the cap designs.
 
I just remixed Russ's awesome extended dust caps for 1991-2001 NSX.

There are 2 versions:
Vented: These are a remix of Russ's vented dust caps, modified to only need supports for the 3 small tabs. Also eliminated the stress concentrations at the corner of the inside of the cup and one of the corners of the flange. Print oriented like a cup & just order support for the three tabs. This cuts your print time (& plastic) by >50% - Prusa MK3s from 6:45 to under 3 hours.

Unvented: I made these for those who don't want vents in the caps. Boslla & Vleds state that venting the caps is unnecessary and can let dust get into the area behind the reflectors. Also optimised to not require supports except for the 3 small tabs.

NOTE: The measurements are different for these caps from Russ's original way of measuring as noted at thingiverse. Hold your connector on top of the bulb fins and measure from the gasket surface. If anyone needs a longer option, PM me and I'll add it to the thingiverse page.

https://www.thingiverse.com/thing:5270491
 
Last edited:
I just remixed Russ's awesome extended dust caps for 1991-2001 NSX.

There are 2 versions:
Vented: These are a remix of Russ's vented dust caps, modified to only need supports for the 3 small tabs. Also eliminated the stress concentrations at the corner of the inside of the cup and one of the corners of the flange. Print oriented like a cup & just order support for the three tabs. This cuts your print time (& plastic) by >50% - Prusa MK3s from 6:45 to under 3 hours.

Unvented: I made these for those who don't want vents in the caps. Boslla & Vleds state that venting the caps is unnecessary and can let dust get into the area behind the reflectors. Also optimised to not require supports except for the 3 small tabs.

NOTE: The measurements are different for these caps from Russ's original way of measuring as noted at thingiverse. Hold your connector on top of the bulb fins and measure from the gasket surface.

https://www.thingiverse.com/thing:5270491

Thank you Tim!!!

We are going to rely more and more on creative owners with 3D printers as our NSXs age...
 
NOTE: The measurements are different for these caps from Russ's original way of measuring as noted at thingiverse. Hold your connector on top of the bulb fins and measure from the gasket surface. If anyone needs a longer option, PM me and I'll add it to the thingiverse page.
Uuh, without measuring can you tell me if either of your ventless caps are the same depth as Russ's single/only ventless cap? I'm about to print some caps for a friend doing the same upgrade and figured I'd try/use your revised design. Want the same size.
 
Uuh, without measuring can you tell me if either of your ventless caps are the same depth as Russ's single/only ventless cap? I'm about to print some caps for a friend doing the same upgrade and figured I'd try/use your revised design. Want the same size.
Which of Russ's designs are you asking about?
Basically, because Russ's measurements are the whole thing including the lip and the top, but not the back vent. and mine are the interior dimensions, my dimensions are 12-14 mm less than Russ's. My 50 mm is the same as Russ's 64.
Let me know if that explanation is sufficient.

Another fairly easy way to check it is this. Load Russ's design that you want to use and mine into your slicer. After you slice them you can scroll through the layers to see. If it's too hard to see looking at the layers, use the cut feature feature to cut both of them in half so you see the cross section. You can then see them side by side or overlapped.

If you look on my thingiverse page, the last photo shows how to measure your bulb and connector. Measure from the gasket surface to the top of the connector over the bulb as shown.

Hope that helps, Tim
 
Last edited:
Is it possible for us to merge the other large LED thread using these caps? I feel like were covering a lot of ground twice between the two threads. I didn't even know this one existed until just now.
 
I just remixed Russ's awesome extended dust caps for 1991-2001 NSX...
Any chance your modifications to Russ's version includes making them thicker where the tabs that engage the headlight housing are? I'm thinking a 0.5cm (tall) x 1.5cm (wide) bump, with sloped edges so printing does not require supports, on the inside - just behind those three engagement tabs. Or the whole last 0.5-1cm of the ring could be thicker. This would reduce likelihood of the failure shown in my photo in post #21 of this thread? I ask because I'm about to print a batch for a friend who I'm helping install LED bulbs and new adjusters this weekend, and this might be a good improvement (make tougher, more-reliable).

Update: After printing one I realize they are too short for the VLEDS, so I’m just going back to printing Russ’s 80mm (67mm? equivalent) caps. If yours are to be more universal, you’ll need a bigger size option. As a side note, I think the time and material saved by printing less supports with your ventless caps is eaten up by printing the tapered gasket lip (the feature that reduces supports). I get about 4h10m print time for your cap and 4h30m for Russ’s slightly longer cap.
 
Last edited:
One more note. The nylon washers on the screws that hold the headlight covers on, they were brittle on the NSX I worked on today (broke some). Friend working on the car with me went out and found perfect replacements at Lowe’s which we used to replace all eight. E530364F-9396-4DB1-91F7-8940293E4012.jpg
9E0A7D6D-9199-4272-8A8E-8D0AD5941C48.jpg
 
Any chance your modifications to Russ's version includes making them thicker where the tabs that engage the headlight housing are? I'm thinking a 0.5cm (tall) x 1.5cm (wide) bump, with sloped edges so printing does not require supports, on the inside - just behind those three engagement tabs. Or the whole last 0.5-1cm of the ring could be thicker. This would reduce likelihood of the failure shown in my photo in post #21 of this thread? I ask because I'm about to print a batch for a friend who I'm helping install LED bulbs and new adjusters this weekend, and this might be a good improvement (make tougher, more-reliable).

Update: After printing one I realize they are too short for the VLEDS, so I’m just going back to printing Russ’s 80mm (67mm? equivalent) caps. If yours are to be more universal, you’ll need a bigger size option. As a side note, I think the time and material saved by printing less supports with your ventless caps is eaten up by printing the tapered gasket lip (the feature that reduces supports). I get about 4h10m print time for your cap and 4h30m for Russ’s slightly longer cap.
Sorry to be so long in replying and thanks for the feedback! Good find on the washers.

Mods: I don't think we can make those tabs without supports as they pretty much need to jut out perpendicularly based on my understanding of the headlight housing. I may not be understanding you though - want to pm me a drawing of what you mean? I don't think the ring can be much thicker internally for clearance of that little tab inside that holds the wiring with incandescent bulbs. I also don't think it would help with the failure in #21 . This looks like a layer-separation failure and a thicker ring would still have the same local stress with loading (and the same 90 degree stress concentration factor). I tested my cups by reefing on the tabs. One of my flat black plastics had poor interlayer adhesion and broke like in your picture. I switched to one of my Pet-G fibers with great interlayer adhesion for the inserted ring section. That was grey fiber, but the grey part was hidden inside the housing. You could probably print the entire thing in any colour since the retractor cover pretty much hides everything anyway.

Extended version: 67 mm version, no vents, uploaded. Not sure why your prints are so much longer than mine, or especially why Russ's would print more quickly, especially when it needs supports. Are you printing solid? 10% Gyroid infill is fine and with that, the cone to avoid the supports adds virtually no time, certainly compared to the supports. I did modify my support parameters slightly (2 => 1.2 mm spacing, no first layer expansion) in order to have the supports just start from the upper surface of the cap and not from the bed, which shaved about 1/2 hour or so. 0.3 mm layer height. I just resliced them using Prusa-Slicer: My extended 67 mm - 3h9m, Russ's extended "80" - 5h25 like a cup, ~8h cup face down.
Screen Shot 2022-05-15 at 3.03.07 PM.jpg
 
Last edited:
I don't think we can make those tabs without supports as they pretty much need to jut out perpendicularly based on my understanding of the headlight housing. I may not be understanding you though - want to pm me a drawing of what you mean? I don't think the ring can be much thicker internally for clearance of that little tab inside that holds the wiring with incandescent bulbs. I also don't think it would help with the failure in #21 . This looks like a layer-separation failure and a thicker ring would still have the same local stress with loading (and the same 90 degree stress concentration factor). I tested my cups by reefing on the tabs. One of my flat black plastics had poor interlayer adhesion and broke like in your picture. I switched to one of my Pet-G fibers with great interlayer adhesion for the inserted ring section. That was grey fiber, but the grey part was hidden inside the housing. You could probably print the entire thing in any colour since the retractor cover pretty much hides everything anyway.

Not sure where the "tabs without supports" comes from (I didn't suggest anything like that) so I'm not responding to that. I understand the tab failure is a layer adhesion failure, but if the layer had more surface area (because it was thicker there), it might be less likely to fail. Like I could pull apart a 0.5mm(w)x1cm(h)x1cm(d) printed part, but not a solid 1x1x1cm printed part. I could mock up at home to take a photo, but I'm thinking just add 1-2mm of material on the inside of the barrel in the area of the three tabs (oh, this extra material inside the barrel is where I was suggesting slopes to avoid supports, not outside the barrel where the tabs are).

I'm using ABS. Did not consider another material because (1) ABS is what I had when I started all this and (2) when I looked into other filaments none handled high temps like ABS and I figure it gets warm there in on hot+sunny days.

Extended version: 67 mm version, no vents, uploaded. Not sure why your prints are so much longer than mine, or especially why Russ's would print more quickly, especially when it needs supports. Are you printing solid? 10% Gyroid infill is fine and with that, the cone to avoid the supports adds virtually no time, certainly compared to the supports. I did modify my support parameters slightly (2 => 1.2 mm spacing, no first layer expansion) in order to have the supports just start from the upper surface of the cap and not from the bed, which shaved about 1/2 hour or so. 0.3 mm layer height. I just resliced them using Prusa-Slicer: My extended 67 mm - 3h9m, Russ's extended "80" - 5h25 like a cup, ~8h cup face down.

Our differences in print time seem likely to come from:
  • Different printers. I'm using Lulzbot Mini, you're using Prusa MK3s.
  • Different slicers. I see that your supports under the tabs stick out farther than the tabs. All of the supports I get from Cura Lulzbot Edition stick out no further than the feature they are supporting. This could make the supports when you are printing Russ's non-tapered o-ring lip use up twice as much material/time as the supports I print for same part. Conversely, when I print your version the supports for the tabs don't just go to the o-ring lip, they (illogically/unnecessarily) extend all the way down the side to base, so that adds some unnecessary time.
  • Different choices. I'm printing solid (and ABS, if that matters). Probably makes very little difference in print time with Russ's part (not thick really anywhere), but means more time/material for your tapered o-ring lip than if that was not solid. Except for your tapered o-ring area, I wouldn't want the slicer to try to make anything else not-solid, so forcing everything solid is easy way to ensure a nice durable part throughout. Per KISS principle I'm not doing much tweaking besides taking defaults for my printer+material, picking solid, and selecting checkbox for supports.

Below are screenshots from my slicer.
  1. Your 67mm cup, solid, with supports. Results in some unnecessary supports as noted above.
  2. Your 67mm cup, solid, without supports. Print time would theoretically be closer to this if I could eliminate the extra supports.
  3. Russ's 80mm (equivalent to your 67mm), solid, with supports - which is how I printed them.
  4. Your 67mm cup, 10% infill, with supports. This saves 81 minutes vs solid (first screenshot). Doing the same (10% instead of solid) only saves 4 minutes for Russ's cap...so maybe yours with 10% doesn't lose much strength in important areas (almost all the time/material savings is probably in the sloped o-ring lip).

7841874E-0B8D-4660-8615-0404AE1768F2.jpg
6F12E3B5-773F-48F6-98D2-66FAE072A3D7.jpg
C62CA93F-165C-40A1-A392-1A66ED7F40AF.jpg
806A1043-AA8A-44A4-A617-D9E6EBE5E38A.jpg

Shoot, I accidentally attached the wrong image and even if I delete it it shows up. [MENTION=18194]Honcho[/MENTION], can you remote this extra attachment (173318) that is not referenced by my post?
 

Attachments

  • D6E66E47-2C50-4F16-B50E-8706CE201188.jpg
    D6E66E47-2C50-4F16-B50E-8706CE201188.jpg
    58.7 KB · Views: 41
Last edited:
but I'm thinking just add 1-2mm of material on the inside of the barrel in the area of the three tabs (oh, this extra material inside the barrel is where I was suggesting slopes to avoid supports, not outside the barrel where the tabs are).

I'm using ABS. Did not consider another material because (1) ABS is what I had when I started all this and (2) when I looked into other filaments none handled high temps like ABS and I figure it gets warm there in on hot+sunny days.
I think you're right and I hope I didn't come across as confrontational. I'm trying to encourage everyone. I had suspected in my previous post that you might be printing it solid. Printing that cone area solid would use a LOT of plastic, so there would be no time/plastic savings. I don't know if your slicer allows you to pan through individual layers to visualize before printing, but with 10% infil, the only area not solid with PrusaSlicer is that cone section, as I would want. Stress wise, the cone section printed at 10% and 2 perimeters will still have a greater cross sectional area and thus lower stresses than the original, while avoiding the 90 degree stress concentration point. So this design at 10% infill will be stronger than cloning the OEM. I can't see a reason to print it solid myself, but it's your call and what you did seems to have worked as well.

With respect to a smaller internal diameter to increase the area and strength, I think I understand what you're asking: I've posted rough copies L1 & L3 (individual to the tabs, and continuous) to the thingiverse page, shrinking the diameter by 4 mm, which was just a guess. L3 would be much stronger. Have a look & see if I'm understanding you correctly. Check and see if either work for you and I'll finish them off, or change it to 2 mm diameter shrinkage if you wish.

I'm glad to spend 15 minutes optimising before printing to save > 15 minutes on the print, especially when I have to print 4 of them. But if your slicer isn't as easy to customise, it might well not be worth the effort. While ABS has a higher melt point, I'm OK with PetG since that's what the OEM ones are. Forgot to mention: THANKS for the great explanation on the headlight adjusters. I wouldn't have waded in without your thread info.
 
[MENTION=37580]tturkstra[/MENTION] I appreciate the dialog, didn't perceive any of it as confrontational (hope you did not either). Even though my lights are long-ago done (and my friend's lights are also done as of this past Saturday), as a part of the NSX community for 24 years I love to see the cars well cared for and improved in ways like this so it is an interesting/worthwhile topic to me that may benefit others. Your L1 is basically what I was picturing (L3 is overkill without making the stress points any stronger), although I wonder if some of the benefit could be forfeited by that portion now being thick enough that slicers will now make the tabs somewhat hollow (which I confirmed is the case in my slicer). LOL. Need a slicer (or slicer user) smart enough to allow the o-ring-lip section to have 10% infill but the last 15-30 layers with the tabs and "L1" backing to be solid. Interesting tradeoffs that reveal to me how 3D printing isn't as simple of a domain as it initially appears. With eight of these caps now printed and installed, and only one layer-adhesion failure of a tab, maybe my concern about this tab area is overdone...but it is definitely the weakest point of all designs (especially prior to your L1/L3 variants).

I'm going to have my headlights out again soon for a totally unrelated reason. I may print the last 50 layers (end with tabs) of the L1 variant to validate the extra inside material does not create any clearance issues as you mentioned being a concern.
 
Last edited:
@latzke Glad you're happy with L1. I printed all 3 and checked them on my headlights - no clearance issues. I also tested them to destruction breaking the tabs off with a bending moment. (It would take a lot more force to pull it off in pure tension.) Original design yielded 3-5 inlbs. L1 printed solid, in the area of the tabs, yielded at 6-7 inlbs, added 12 minutes to the print time. L3 printed at 10% infil added 9 minutes to the print time and yielded at 4-6 inlbs. So L1 is the winner! L3 with solid internals only around the tabs would be even stronger, but that's a bit complex for most folks to print. I agree it's overkill. For another test, I reefed on a complete one while installed in the NSX and was able to break it, but I doubt the part would ever get loaded like that except in a collision.

With respect to the slicer options, what you're describing takes <1 minute with PrusaSlicer, which I think is grown from Slic3r, so I'm guessing that Slic3r would do it as well? Can you use PrisaSlicer or Slic3r to make Gcode for your printer? (R click the object, choose add modifier box, size/move the box to surround the parts you want to be solid, click the settings icon for that box and select 100% infill.)

I've updated the unvented 53, 60, & 67 mm print files on Thingiverse.
 
Last edited:
Thought I'd add a link to this install thread in case people are looking at this in the future. It's a single document summary on LED install with these caps:
I wish there was a way to change the title of this thread, since it deals with unvented caps as much as the vented ones.
 
Thanks for the revised version as I'm also looking for the unvented caps. Just for a frame of reference, can you let me know the measurement of the OEM caps using your measurement specs?

I'd like to see the OEM size compared to the 53, 60, and 67mm designs.
 
I measured the OEM cap. It's ~35 mm deep measured from the gasket surface, but it is also bevelled, with about 1/2 of it angling down to ~19 mm. There is also a ~2 mm gasket, so it's a bit deeper when installed. (The gasket gets compressed ~0.5 mm during installation and then expands when it hits the "notch".)

Hope that helps & congrats on the new printer. Measure the gasket when you have it apart & I'll update this post.
 
Repost pic of David's NSX from other thread: With the caps, if you print layers 2-4 in a contrasting color, not only are they easier to insert, you see the alignment color if you look "back" into the headlight housings (only when the hood is up.)
1672362464022.png
 
Boslla is now making bulbs with an external driver which also has a connector between the bulb and the driver, in addition to the harness/bulb connector. As a result, if you go for one of these types, you will need a notably longer replacement dust cap (100 W, 110 W, 140 W - they rate bulbs by the pair so a single bulb is 1/2 that, also the B4 tri-color bulbs). I've uploaded a 75 mm deep cap that works, but I personally wouldn't go over 110W (55W/bulb) based on the OEM current draw. Based on some trial and error with cardboard, 70 mm would also probably work but I don't know for sure. The Bullet B1's fit in a 53 mm cap, but these B4's will need a 75 mm cap.B4 driver size.jpg
 
Wanted to take the car on a roadtrip and there would be night time driving involved, so was pushed to do this mod. Read all the information, thank you @Wild Turkey, @Russ, and all the other many contributors.

Wanted to do the Bolsa lights, but they don't seem to be available on Amazon any more? Wanted to get this done quickly for my drive, so tried to go with what @Honcho did with the Hikari's. His model was no longer available, (LED's seem to change fast these days), but found these, https://www.amazon.com/gp/product/B0CKQY8D1K/ref=ppx_od_dt_b_asin_title_s00?ie=UTF8&th=
And they were available for Prime shipping. The also had the removable collars, which my last set didn't that I ordered and had to return. As an added bonus, they have a little screw that once installed in the correct position, the locking ring sits on top of it for added security.

Hikari 2023 20000LM 9005/HB3 9006/HB4 LED Combo Kit, High Lumens LED, 6000k Cool White, IP68 Halogen Upgrade Replacement, Pack of 4

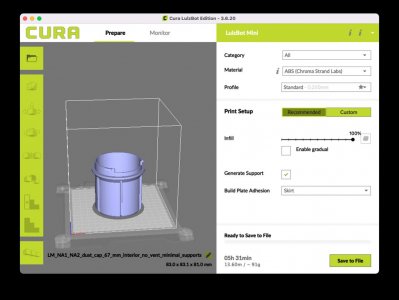
(Of course they dropped $19 a couple days after I ordered them, 50.99 for the set.) Fan variety, no external driver, and not very deep. Connector would still need to go behind the fan though, which I wanted to avoid, but oh well. Still can't decide if I want to go vented or un-vented, and not sure the inexpensive 3D printer I bought the grand kids a couple years ago will churn out the new required caps?

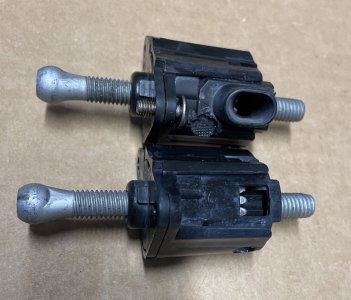
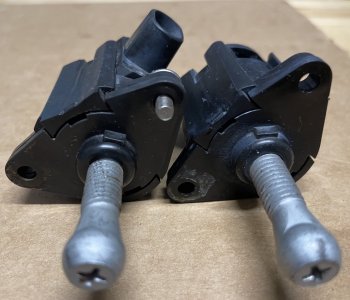
While dissembling mine I ran into the stuck adjuster problem. I freed up two, two still soaking in PB blaster. Probably will order all 4 if they have now upgraded the design? 33129SL0A01. Someone said they come two to a package?

My two adjusters at the bottom of the headlight assembly were also different than the ones at the top. (1991) Bottom ones look to have been "modified" for easier adjustment? Looks like a section was cut out and another section grafted on and plastic welded to make it easier to find the adjuster? Interesting.

Getting an order ready now for Amayama, and finding extra rubber stops and things that I might as well add. Also saw that the rubber gasket just below the lights on the bumper is still available $19 a side, Honda 71168-SL0-000 - SEAL, L. FR. RETRACTABLE, Honda 71163-SL0-000 - SEAL, R. FR. RETRACTABLE, mine are not in terrible shape but they are 33 years old. Rubber stoppers, Honda 90499-SB0-000 - STOPPER A, 1 per side, Honda 90500-SB0-000 - STOPPER B, 2 per side.

Now that the 3 hour job has turned into 3 weeks-months job? and the car needs tires, will probably have the wheels refinished as well. Since the wheels will be off, there are the side vents that I've always wanted to change to NSX R style. This cheap upgrade is looking a LOT more expensive than I thought.<g>. Thanks again to all the contributors.
 

Attachments

  • Adjuster comp.jpg
    Adjuster comp.jpg
    204.5 KB · Views: 5
  • Adjuster comp1.jpg
    Adjuster comp1.jpg
    191.1 KB · Views: 5
Don't know if the Boslla LED's were ever available on Amazon. Find them at www.boslla.com (2 L's)

Read my LED upgrade document for answers to a lot of your questions, like the "modified" adjusters (See post #40).
I don't believe they're "modified" - the outboard adjusters require an additional piece to allow you to access them thru the cover. My doc shows how to remove them and transfer them. Yes, the adjuster part is updated (black anti-oxidant finish) - I would definitely not install old ones even if you can free them up unless you live in a place as dry Arizona. (JK, even if you live in AZ, upgrade them for how cheap they are.)

https://docs.google.com/document/d/1SGdHGW-BikpDmP8dobDKRuM1Df2NplarGv8sehrdOac/edit?usp=sharing

Both Boslla & Vleds recommend unvented caps, & I do too. I ran a test for 60 minutes with the B1's and I could still handle them, but I have asbestos hands. Wish I'd measured them, but they're not that hot.

The caps are a pretty easy 3D print. You just need to be sure to use PET-G or ASA, (or stinky ABS if you have a range hood for your printer) NOT PLA. When looking for cap print files on Thingiverse, note that Russ and I used different conventions for the size. Russ's are keyed to the exterior dimension. Mine are labelled by the interior depth (& mine are optimised to print in about 1/2 the time by reducing support requirements by about 95%.)

Not a bad idea to change those stoppers. If they're missing, the lights will vibrate.
 
Last edited:
Yes, the adjusters come two to a pack and maybe include two of the funnel/extension things you show as being different between the upper and lower on your car...but you only install the funnel on one of them (to retain the difference you observed). No need to weld/melt that into place.

Like Honcho and Boslla and VLEDS, I recommend the UNvented caps so you're not inviting dust or moisture into the otherwise sealed projector lamps. These are the ones I used on both cars: https://www.thingiverse.com/thing:5146508
 
Last edited:
Parts ordered. @Wild Turkey Not sure how I missed pic 11 in your directions as I did DL them and use them??? Thanks for the work on that, very helpful. Your "funnels" look like they were made, mine look like a hacked add on, very different. Will take a shot at printing dust caps and see how it works out. Thanks for the recommendation on material.

@latzke Only ordered two packs so hope they come two to a pack. My "funnels" are melted in place, so hope a set comes with one funnel already. They don't look easy to transfer at all. Per your recommendation and others, I will go with closed dust caps.

Thanks for the advise!
 
Just a point of clarification: you can still get my LEDs. Hikari re-named them to "Vision Plus"

https://www.amazon.com/VisionPlus-9005-HB3-Equivalent-Replacement/dp/B0CMXHRL25?ref_=ast_sto_dp

They're not the most powerful bulbs in the current lineup, but I like these units because they use a single Cree LED with a bulb-shaped diffusor. It puts out a very even, HID-like beam. I had to use Tim's extended caps though. I chose the vented ones for fear of overheating the bulb drivers, but if I did it again I'd use the non-vented. The caps cracked on install and Tim warned me they would be more fragile due to the vents.

20231104_211308.jpg20231104_180046.jpg20231104_180056.jpg20231104_212137.jpg
 
Back
Top