• Protip: Profile posts are public! Use Conversations to message other members privately. Everyone can see the content of a profile post.

Warning - latch pull rod retainer clips

Joined
3 November 2011
Messages
3,381
Location
Saskatchewan, Canada
There have been a least a couple of threads discussing the hassle associated with removing the latch pull rod from the plastic retainer on the door latch.

http://www.nsxprime.com/forum/showt...-door-handle?p=1991101&viewfull=1#post1991101

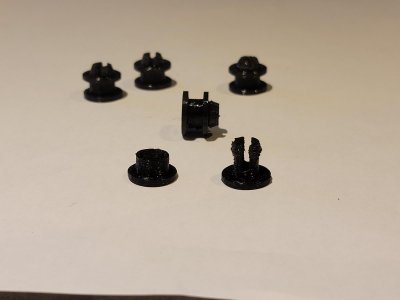
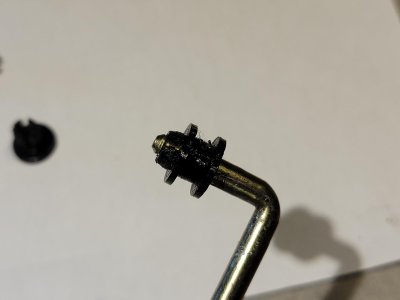
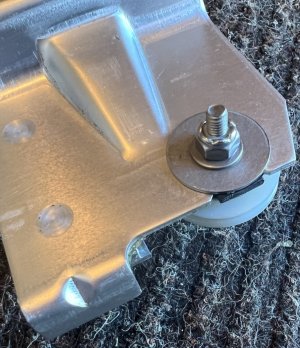
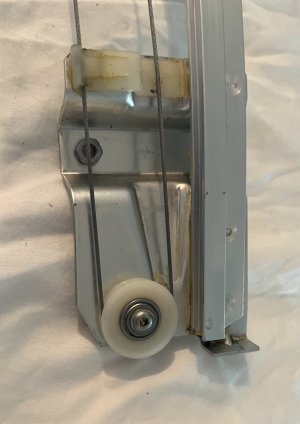
I am replacing my rear sash because of torn boots and attempting to adjust my T roof windows to avoid tearing the boots again and deal with wind noise. As has been noted, the pull rod is a bear to get out of the retainer. After spray lube and curved needle nose pliers did squat, I ended up using a large super heavy duty seal pick to hook the rod and yank it out. Thing is, the rod did not pull out of the plastic retainer. The retainer pulled out of the latch assembly while still on the rod. Clearly the rod is a very tight fit in the retainer. The retainer coming out of the latch is not a huge problem; however, the reason it popped out is one of the ears on the retainer fractured.

IMGP4083.JPG

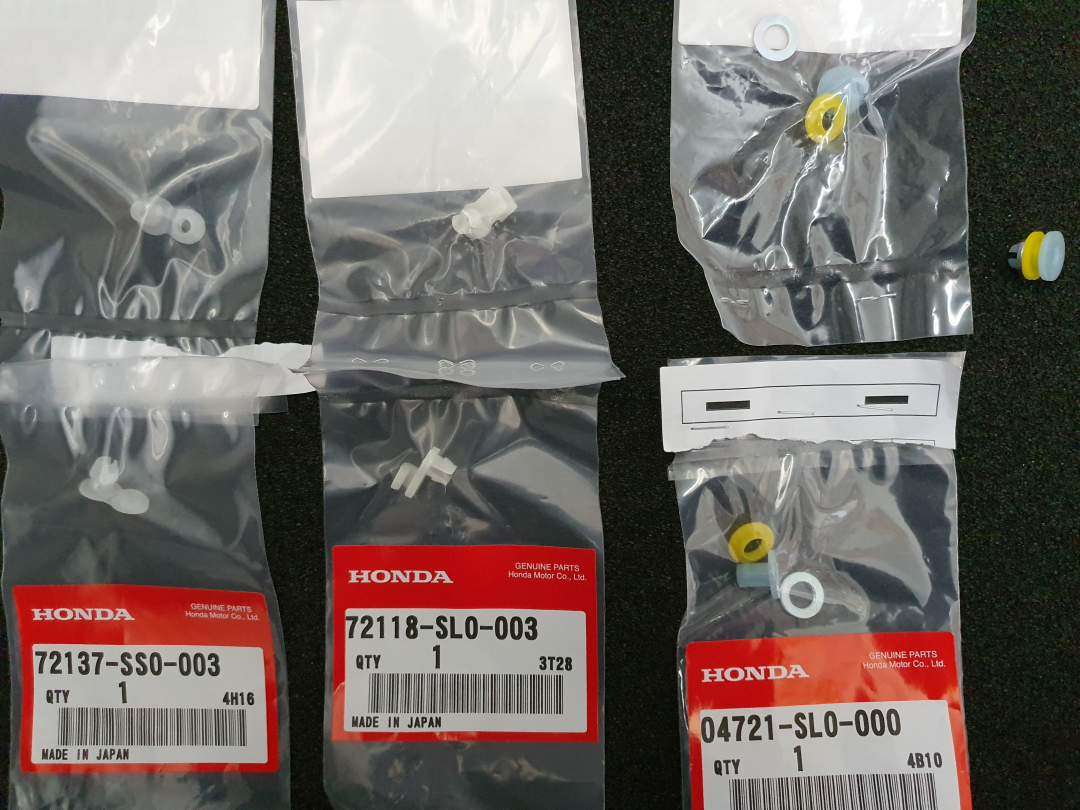
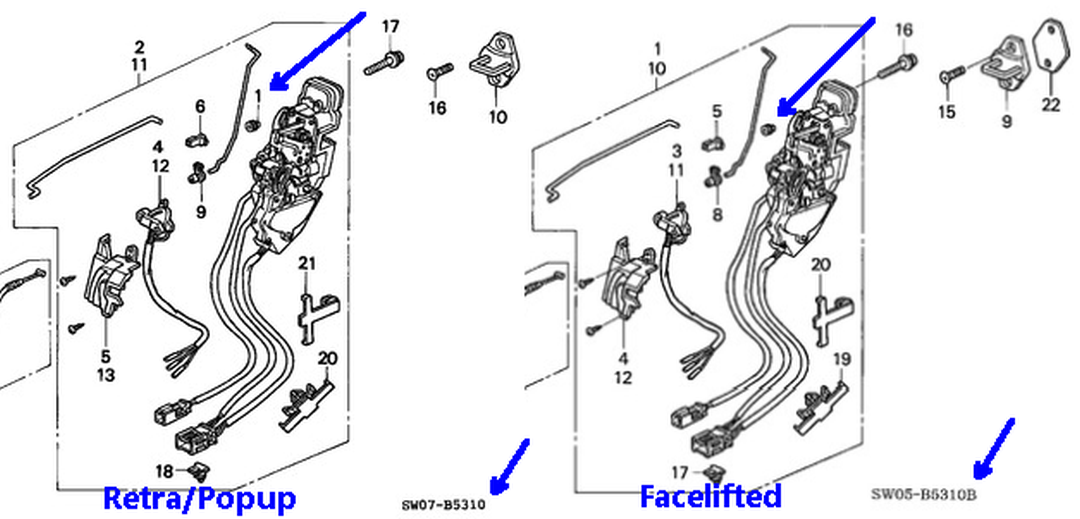
As far as I can determine, the retainer is part number 72118-SL0-003. The parts diagrams are low resolution at best and the part just looks like a blob so its a bit of a guess based upon the correct location on the diagram and the price.

1991-2005 Acura NSX Snap 72118-SL0-003 | Acura OEM Parts

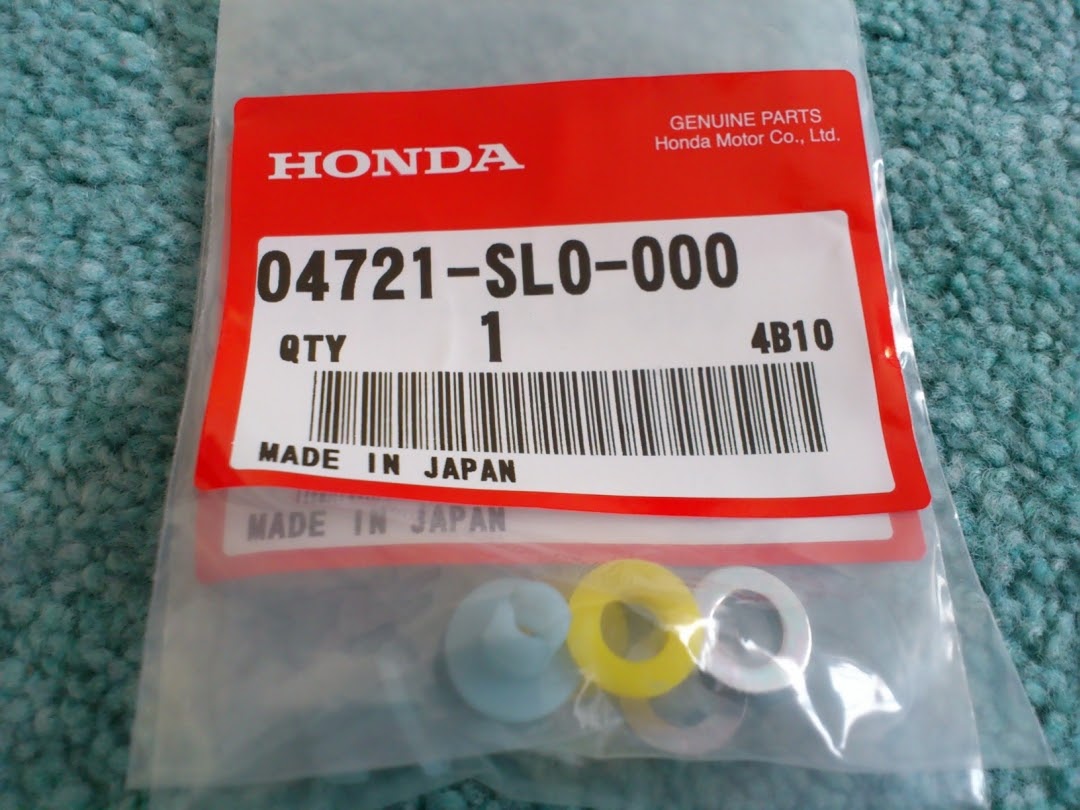
Unfortunately, this part is NSX specific, not shared with any other Honda. Net result my dealership doesn't have it and Honda Canada does not have it and expected delivery is July. So, its an Amayama order now which has turned a $1.24 part into a $40 part with the Fed Ex charges. However, I am going to order 6 of them which brings the cost down to around $7 each which is around the cost from the dealer here. I can rationalize just about anything. The extras allow for breakage during reassembly or accidentally dropping the retainer down into the door where I may never find it. It also provides for breakage on the retainer on the other door when I do it. There is another part on the diagram right in the same area 72137-SS0-003 which is also a blob on the diagram. I think its the locking clip for the pull rod for the lock knob. I have decided to order both these parts because they are both blobs on the diagram and I don't want to risk the Amayama package arriving with the incorrect blob.

The short story here is that if you are going to be doing any work that requires removal of the actuating rod from the latch you might want to have a replacement retainer on hand before you do the work in case you suffer the same fate as me. If you are in the US you may be lucky and Honda US may have it in stock, otherwise you are probably looking at a 2 week turn around from Amayama or Speedy Parts.
 
This is interesting and confusing. Note Kaz's comments in post #12

Also, on the later model or different country spec, the area around the lower slot will look completely different so please only refer the photo for the upper slot where the rear sash rod is connected.

His comments don't seem to apply to the top position for the rod that connects to the handle in the sash. However, there does appear to be a year or country difference according to the parts diagrams. If you go to the North American parts page for model year 2000 you will find that 04721-SL0-000 (part 1) is not listed as being applicable to the 2000 model year.

Front Door Locks for 2000 Acura NSX | Acura OEM Parts

The only parts that look like they could be the part I need are #9 - 72137 SS0 003 or #6 72118-SL0-003 according to the parts page for the 2000. What is additionally interesting is if you go to Amayama's parts page you will find two different diagrams. The top diagram is applicable to 1990 - 2001 and shows that 04721-SL0-000 is not listed as being applicable. The bottom diagram which is applicable to 1992 - 1997 does show 04721-SL0-000 (part #25 ) as being applicable.

Door lock for Honda NSX 1 generation 09.1990 - 11.2001 - Honda Car & Auto Spare Parts - Genuine Online Car Parts Catalogue - Amayama

I also checked the parts diagram for the 2002 - 2005 cars and it does not list 04721-SL0-000 as being used on those cars either.

Having said all that, the remains of my retainer sure does look like 04721-SL0-000 in the photo in Kaz's post. It doesn't look like 72137 SS0 003 or 72118-SL0-003. However, when I look at the three piece 04721-SL0-000 photo in Kaz's post, his comment
You may struggle placing the 04721- in the upper slot.
.
is particularly relevant. I am thinking 'as if'. I popped the broken retainer back in temporarily to hold the rod while I was adjusting my door glass and just getting it in from the front was a hassle. Perhaps Honda revised the rod retaining mechanism for the later cars recognizing the extreme difficulty of getting the that yellow piece and washer installed on the back of the retainer. In a production line setting the only practical way of doing that would be to clip the rod in place on the latch before the latch was bolted into the door. What is extra interesting is that some of the North American on-line vendors (not all of them) indicate that the part is out of production.

04721-SL0-000 Genuine Acura Bush Set, Front Door Lock (acurapartswarehouse.com)

So, the parts pages say that 04721-SL0-000 was not used on my 2000 and may not be available; but, 04721-SL0-000 sure looks like the remains of what was left on my pull rod. What to do! Since my order for Amayama is still pending perhaps I may add a couple of 04721-SL0-000 in just to be safe because they are still showing the part as available.

Perhaps @Kaz-kzukNA1 can provide some in-sight on the production changes / part changes and the correct part for later models.
 
Last edited:
8-JqON8Y0H4lZAcMvLGI1yQ75YKy2pSh5dFG1oIPUpYR_aX8GM8o2c0kV6mgXp20xtXKk6m9JvP8mekCcZzBZyP7CgtdxPNj_Siu88pDZU2N5XiCp920ZhvIsVHOpwtpHUMyy40UQOG0mkMjXHHW4PpkCfJLq1YlKEg6_Y1lhNyYyN-4Ujkyzzn6ZERFjErvpp1GvF6L2UEnJooYZe16ovIPP4wAwihWa_KB8TAfLy1FZB43p9U_ljsphvYgIdh3m2QWoYzGzRekpgPnCBCrWkAfom4iEOjfD4vETki_21zBW-ovW6nVkk3eJ-1F6yrzuoEu0IWeEswE8OhfDd5yfCY5IBM2VD8Evcgrd96NG20psGFnqacIzezTWmSqitXaX9TLw4dapE320WD2jjHXv7Z39yMAzwMnxhR_-EQDAD1IlzlDn0dIwx6jXphQWiMvJbhw1JRy1Uxg4lvDerWi40_2MayIz7Ca87pYHjqDmJ5pPfeV6szFu2OF4idIGHmfhA6sZPdF2iQ_vmiRWiEGSV_jTyDoXrAb6CkZ08Iu9Tfb18aymoubceXBNK_BzwUjpKg3sqdw9ZKfGiTnD9p71EU_PCj1m_wyaHhZaXO1HHEeL-Jlr2XD6GXt4Zkgi7uZ9hOFbRIRQvXQTuNCsHUsaUZuGi7XFdEuC8MRqeaK5KDxlJvobmPDrFbS-3cMwNeQQyBl9Jo1cwUD1-01gVKdIRh6=w1080-h810-no


soI1HxWaDpY-ndltjTEcKmJa3IsfSex00qYapzYVdhHVQXwwdZrXhbx7vHyrXGChh-F0IZwsFn2Lc5jK7_-wRjzS8IK-mUhcsnTVu-uNLA1zyxIMW7z_6VCNHtK5nOwtISQuvzYD60L1fA7FSU46rozYpsStoCaQzU1L8K337JGSNTDugXUN966JZokoKqr2iLLFbvYN8K-yk-022tBmA4am1bLDmHdHX_ctSvcqQUsPwDf9U_4Efn41aZEhMcGGZlt3AaFo7-DMj-7p6I3keRVEc58rFtJVQERv5rJoHXagy-I0IqAF8uosJ6WVwYse9W4MLNplUumy71iaWmJWX_cYuft-9RqCEm0d3wthko0kcDhAb1DlN5LsI8B9BXP2tbDCwM_ZFQ2IiNfnBNwIyg-FzcIyZe6vJPupHJxazjwUDmSNUWJqOC7MErREKJWZTZuwssbaoQmAe1DXnlCjFH1dRGR-QkpiEoBa4v-Jk5PSHoOXKuowu8uFtOhQCzPhyJbmDkKvqyuhiXwHbgNlWqU2OCFR3kRsnrvJ0Lnvu7W5Lolqm1tsj_trfE67iAAMguooEPx8pIEDNhXr2V5X8yypIeW2_H_FxIv7Pfu01sefqBX-avOwpxYRSwVJAusVsvaJM4LmlyolnYjG2e2t6hz0_UvddzmhjBSoEksTs8gtl4dAFfsaY07R-po74bKYYxrV3H2kQhTWZ6ySSljX98H0=w1080-h810-no


jWrIUYLC7fICF8K-B3CK1q6soOwYuBrvHNlpk4iYfDwFVRMarMdyVYh2ZYnYsbpgxGISSlEvAjx5UNGA2MLWZgwRuzYL9ON18LM2nTVha0E6CT_WPqm1hiOzAxCSk9SrWEfGZEax3SLDZ1xPDDiQL2FCm7mevah8TIoehAgOJOINSj9MYt88_YBKJjs0KWV_jrmmnmObR9n6Es290lYs8WTTwCFRoh8fimyh7B5zabzzA2dhGr-zw9ITQvwBP4zXZ0jbZC_wx2gjck70jdskBgq2-loaaAwOO1T-ZmAxP2kwk47KqcqAt8SWtRgRy0KUAqA1kN3hUgyuJqVNg7Zpxh1vtbZOIH6fMRBDTpWDb3GwUrtR6PV4RpoprthFNgFczZfm9ntnDHDtomgwJghVhCVjLuve1N-5MdQyFAITzwUDX-7R-ixtYeg9KeJOE-0Bw77LtX4gOVXwmflffFmtxs5No_ph_c1gJyIn9RugCD75eqxap-qedrkKHdQIxSmkrSX1FOa-_YYXuEWtW-cwRcJJIbsNANQwyCx2jINFqVFlAMIe7YrCTH4gOr6VLRUO1qeZoszch0KeHDjv6hwCyPaAsgSUjaI5-6HpeROwh3LEIfl7ahM59ClGrzJtVxmiS2y5LLgfx09lB82jSQt-443XiouPxw-LdbeQCal9YbF3Eyp-Ce6dMiBMfW1Vng3GKjuad_Ok6g9SqQoWJpREc0Ag=w1080-h810-no


Q6XE6EKE64qVIXnd1hl_8qefJCb-cVZA55EkjKj_MRSoH-1u96J9HS3FWwS_BcOPBDfzAA_YakN8RfMI5R8yUFnT7NUtD0uGQNBd5zmBumS3MfluNfyglrtVqia_SnxYWT7WzjqyIuZwSFlzZVAib2inedEZELgCERuVGPk4cF5w8fJoMQ2eMFZO5cbpJ9ZhtFjvj-HHMQduZZqgE15IJg7waoEhFgQmizHyVvltMoCZQlC2oWj7PmKCTlKu7VbsHwY-tKs_GmbyRaJ6DJQbS4MTs7D9veYvm8lsGEwwsHSf08kRWgGCqThqcx0GE2sxx-ZfB74_QDqeTSK4XpvRhE1UYxSZhqatoadB-KMceQXN4SF_0zbGKx4qyd7uGSC0LQaj3fqgQhr6orM3AKdPPlt8ietSqtszA0QlJaCnFTfpM785vILBvJm7WoZGM84qP8xPB4OWraWntTFpzattIIxfMVi6zaM_tWF51XeTKj36XkOdAyqRVouTR_WAIGJkCq1Uj3mB2uew1vIMkijiZkDHWUZvuPI4IVYUIGEICSoCfaEmDtuwzP8ecpMdrDJQnBhFPSAFIBX39CfePkjKo3eFyo2tasBpUacjqHWeyrLIzA-NvRDepKwQAZl3BjwAH2I1a5iGR_ih_jlXPHpGWNw-9UqIWJCD-gqcodFrAJ3xIhuzXKBjVvCvavJvJ6FkXrPu-DNpXnAqyKeZMPO6zT_i=w1080-h810-no

Probably helps others if I just post related photo here in case someone searches for the similar subjects in the future.


Welcome to the club 'parts list magic'.

From time to time, by mistake or on purposely, Honda updates the parts list with the certain parts suddenly disappeared from the list or even from the diagram and vice-versa.

In Japan, any modification that could change the registered model spec must be declared as new model type and that will require the revision of the parts list to update application table.

There are at least 15 main model types with further extra variants depending on whether it was equipped with a/c, eps, navigation, driver/passenger SRS, etc.
All must be covered in the application table for each parts.

Hence, sometimes, you will notice some strange things happening in the parts list.

For example, at one point, the pilot bearing disappeared from the list as well as from the diagram on the dual-mass flywheel single disc CL set.

Later, it was magically re-appeared on the revised parts list.


So, there are mistakes as well as on purposely done revisions.

For your case, please order 04721-SL0-000 for the cracked fastener.


iIEDYvlGJ3GfW9GwMMFz9Wu5I7q-j2kXbdLLutQo99UVLH_VaEp2-Me1YmwmI4ifwGBtn_60XzAFS7fhBfIOPumm67ysdxt4T4XUY7RC3ASz-mANDqA4BGMUXUmlrqq1xxtv7z9tMGVCTeHB7GNJjVFesrPZW2b36hDkHAREm-5J_obyFWhNXE7-u6sHPKBfJhkeNJdNkmPNtWjBHDuL8tvyoRodmNYL8HxBugzlwiYBEnYXrE4-vTyQDIYqLfOQw3BdyxN0yBug5gkDCNA4poXys-VC7Qee-DWkK8H1fVU7xFx3NjMaifYHPvHKIBrvDmdrmKvLYVWFj7-Lkl6sIRRdDbH-n6VvSrKtP2l40bnsEqk61xGm1-uCO8U4Z1W2a-siXjVJCIhjD3SsIv2jXQKkYa563nQ6nPtLSmB2HSfyUbJidnjvOjfiszKvO8TnFErAC6iOLjuv0KNEDkYAsD7rToPeOyyI6b-E0gxC4QShajPZxukwSpB_ik58GzhIEEQBj-IKqPmR-yJZd23P9RxVLBHyyPvIX5o-oCYSQyN4IY9Gwt7NjeTpBNzL-gQzxX6wN11av0AjkWWsLAx643m3li20fgTbtowbdqHDWXgrLDA23cF0ZyJiwFC3BcAEnf3Isy4jpxUKanlM0CUV1b4pHmU_VuZ96kLQsmkACjpIIAPrksqGhrMuFdh8T8_5IVHGGLOeRke6Fs5MR847Yfda=w1080-h519-no


Not sure when it happened for LHD model but for RHD one, this 04721- disappeared from the list when the facelifted model was released.

However, it was still displayed in the diagram but without the index #.

Don't know whether it was by mistake or on purpose but 04721- would replace your broken one.

As a side note, whenever working on the rear sash, just keep multiple spare of this 04721-.

Sometimes, the fastener just flies away somewhere and never to be seen again.....

I use two different angle long nose pliers to pop out the rod from the fastener.


Kaz
 
@Kaz-kzukNA1 , thanks for that timely clarification. It is interesting that I spotted the metal washer part of 04721 in the bottom of the door which seems to confirm that 04721 was used as the retainer. The yellow bush piece is nowhere to be found; but, there are a number of places in the bottom of the door cavity where I expect things remain invisible forever.

I was able to revise my Amayama order and add in 04721-SL0-000. I am ordering 5 of them because I also need to replace the passenger side sash and adjust the glass on that side. Between getting the rod out on the passenger side and getting the replacement retainer in on the drivers side I expect some of the retainers may disappear, so I want lots of extras on hand.

I am not looking forward to getting that yellow bush and metal washer on the back of the retainer with the latch installed in the door. I stuck the remains of my 04721 in the latch to hold the release rod in place while I finished off my window adjustments (holding so far) and that was not an easy operation. Getting the pieces on the back of the retainer in place seems like an impossibility with the latch installed. Is it pretty much a foregone conclusion that the latch has to come out to replace 04721 (save myself the futility in even trying to install those pieces with the latch installed )? Is there anything tricky to removing the latch from the door? The service manual implies that the latch can be removed without removing any of the other internal parts of the door as long as the glass is in the full up position.

Thanks @drew for that link to Kaz's post on the latch rod retainer. Without it, I would have been unaware of the parts page mix up and would have received a package of really expensive incorrect retainers from Amayama.
T
 
Last edited:
The only credit I can take is:
1) This is what peer review is all about
2) Kaz did all the work.
3) Everybody should read Kaz's Knowledgebase


Tangent: If you do remove the driver's lock assembly and your security (SCU) doesn't dis/arm, you may wish to replace the switch (left: 72154-SL0-A01,right:72114-SL0-A01). There is a TSB 93-007 on the SCU setting off the alarm or not arming. Unfortunately, per the TSB it appears that you need to remove the rear glass guide to R&R the door lock mechanism.

http://www.nsxprime.com/tsb-93-007/
 
Last edited:
Unfortunately, per the TSB it appears that you need to remove the rear glass guide to R&R the door lock mechanism.

http://www.nsxprime.com/tsb-93-007/

Well isn't that a treat. When I reviewed the service manual it did not list removal of the rear guide as a requirement for removal of the latch; but, when I looked at the door it sure looked like the rear guide was going to present a significant obstacle to removal. A downer after I got my sash installed and the outside trim pieces back in place - all for nothing now. I am wondering if I remove the latch mounting bolts there is enough room to move the latch around so I can access the back of the piece the retainer fits into through the opening that the strike enters the latch. That might allow me to install the yellow bush and retaining washer if I can fit my hand in there to hold the white plastic portion of 04721 in place while I push those pieces on. Not giving that a high probability of a positive outcome.

I like the note in the TSB about a flat rate time of 1.7 hours to disassemble the door, remove the sash and guide, remove the latch and do whatever you need to it and then have everything buttoned back up again. As if! I am hard pressed to see how an experienced tech could do it in 1.7 hours even if they had already done it a couple of times.
 
Done!

The clips and other misc bits arrived late last week. The weather has been cold and wet so I was not really motivated to go out and work on the car in my unheated garage. Temperatures improved slightly today so time to stop procrastinating. First observation is that Drew's comment and the TSB he referenced are correct. In order to get the latch out of the door the rear window track has to come out along with my newly installed rear sash. The second observation is that my idea that I might be able to unbolt the latch assembly and rotate it in the door to install the backing washer on the new retainer clip through the latch opening (eliminating the need to remove the rear window track) was pure fantasy. If you break that retainer the latch has to come out to install the 3 piece retainer correctly. Once the latch is out installing the retainer is effortless.

With the latch assembly out, I took the opportunity to clean the outside of the latch up and apply grease to the moving parts that were accessible from the outside. I originally wanted to bench the latch assembly for a more complete cleaning; but, I could not pop the cable from the inside handle out its retaining slot in the latch. It was almost like the slot had been squeezed closed with some pliers so I did a partial cleaning and greasing with the latch dangling from the cable attached to the door. With the rear track out I was able to do a complete cleaning of the track and with the window full up I was able to get at the guides to wipe off most of the old grease. In order to do a thorough job of cleaning the guides I think you would have to remove them from the window and I did not want to do that. I greased the tracks up with a synthetic grease that uses a PTFE thickener. It is a much lighter body grease than the urea grease so we will see what the long term durability is like. With clean tracks, the thinner bodied grease and the Hugo kit the window speed is 'almost' modern.

The TSB allocates 1.7 hr to R&R the latch which includes replacing the switch in the latch. I didn't replace the switch; but, I did clean and grease the latch and cleaned the guck out of the rear window track which took more time (and mineral spirits) than I expected. My time for all the work was probably closer to 4+ hours.

For anybody that has done the latch removal, were the three socket head screws that retain the latch to the door coated in what looks like Loctite red thread retainer? I am not talking just a little on the actual threaded area of the screw. It looks like the whole length of the screw was liberally dipped in thread retainer before it was shoved into the latch. The retainer liquid had bonded to the plastic unthreaded portion of the hole in the latch making removal of the screws interesting. In going through the service manual I did not see anything about using a thread retainer on the screws during reassembly so I did not use any during reassembly. If retainer is required I would need to purchase a die to chase the threads of the screws to remove the old dried rock hard retainer. Also, if retainer is required is the whole screw supposed to be soaked in retainer or just the short section on the end that engages the threads in the latch body?
 
Time for a repeat performance on the passenger door to replace the rear sash on that side. After doing a little more research, I attempted to replicate the recommended removal technique for the latch rod using two long needle nose pliers with bent tips to pry the rod out of the the retainer. The only up side to this was that unlike the driver side door where I messed around for about 20 minutes finding the appropriate tool to hook onto the rod and pull it out of the retainer it took me less than an minute to have the latch rod out of the retainer. However, the metal washer on the back of the retainer still popped off when I removed the rod so I still had to remove the latch.

Based upon my experience my original observation holds that if you need to remove the sash or the latch, have a replacement 04721 on hand.

I also think I answered my question about the thread retainer fluid on the the latch mounting bolts. The passenger side did not have any retaining fluid on the mounting bolts so it seems that at some point in previous ownership some work had been done involving the driver side latch. I am not sure why there was a need for retaining fluid since the receiving threads on the latch appeared to be just fine and the bolts torqued down just fine. Perhaps I will find out if there was a reason for the retaining fluid if the bolts start to loosen.
 
Done!

The clips and other misc bits arrived late last week. The weather has been cold and wet so I was not really motivated to go out and work on the car in my unheated garage. Temperatures improved slightly today so time to stop procrastinating. First observation is that Drew's comment and the TSB he referenced are correct. In order to get the latch out of the door the rear window track has to come out along with my newly installed rear sash. The second observation is that my idea that I might be able to unbolt the latch assembly and rotate it in the door to install the backing washer on the new retainer clip through the latch opening (eliminating the need to remove the rear window track) was pure fantasy. If you break that retainer the latch has to come out to install the 3 piece retainer correctly. Once the latch is out installing the retainer is effortless.

With the latch assembly out, I took the opportunity to clean the outside of the latch up and apply grease to the moving parts that were accessible from the outside. I originally wanted to bench the latch assembly for a more complete cleaning; but, I could not pop the cable from the inside handle out its retaining slot in the latch. It was almost like the slot had been squeezed closed with some pliers so I did a partial cleaning and greasing with the latch dangling from the cable attached to the door. With the rear track out I was able to do a complete cleaning of the track and with the window full up I was able to get at the guides to wipe off most of the old grease. In order to do a thorough job of cleaning the guides I think you would have to remove them from the window and I did not want to do that. I greased the tracks up with a synthetic grease that uses a PTFE thickener. It is a much lighter body grease than the urea grease so we will see what the long term durability is like. With clean tracks, the thinner bodied grease and the Hugo kit the window speed is 'almost' modern.

The TSB allocates 1.7 hr to R&R the latch which includes replacing the switch in the latch. I didn't replace the switch; but, I did clean and grease the latch and cleaned the guck out of the rear window track which took more time (and mineral spirits) than I expected. My time for all the work was probably closer to 4+ hours.

For anybody that has done the latch removal, were the three socket head screws that retain the latch to the door coated in what looks like Loctite red thread retainer? I am not talking just a little on the actual threaded area of the screw. It looks like the whole length of the screw was liberally dipped in thread retainer before it was shoved into the latch. The retainer liquid had bonded to the plastic unthreaded portion of the hole in the latch making removal of the screws interesting. In going through the service manual I did not see anything about using a thread retainer on the screws during reassembly so I did not use any during reassembly. If retainer is required I would need to purchase a die to chase the threads of the screws to remove the old dried rock hard retainer. Also, if retainer is required is the whole screw supposed to be soaked in retainer or just the short section on the end that engages the threads in the latch body?

Were you able to order this part from an Acura dealership? I tried Acura of Peoria and they said it's on backorder with no eta. wondering if there are other sources?
 
Back in early May, my local Acura parts department indicated the part was not available in Canada and that placing it on critical back order would result in a delivery date some time in July. If its back ordered from Acura USA then your only ordering option is Amayama.com, JP-CarParts.com, or Mita. From when my order was placed with Amayama until I received it was less than a week; but, you pay for that. If you need the clip order extras because if you break it during the install you don't want to have to re order. The cost of the part is irrelevant compared to the cost of shipping.
 
Wow, I totally missed this thread.

Mine broke as well and I couldn't find the part number (thanks Kaz!). So I just hopped on my computer, designed a new clip, and a few minutes later, printed out new clips. Gotta love 3D Printing!

20210526_094318.jpg
20210607_160114.jpg

I didn't know there was an insert as well; I guess I'll have to draw and print that next to ensure it's retained well, but the clip alone is holding it in place already.
 
Last edited:
As noted, there are three pieces to the retainer. The center part that looks like the part that you fabricated, a yellow bushing that fits over the shaft part of that insert and fills up the space between the diameter of the center and the width of the slot in the latch and a metal washer that presses on to the center and holds the bushing in place and probably helps keep the center part of the retainer in place.

I did use just the center piece by itself to operate the latch while I was waiting for new pieces to arrive from Japan. It stayed in place for about 10 days then popped out. Mine was damaged, missing part of the retaining ear so yours may or may not be a problem. If you are going to try print the bushing you will also need the retaining washer. If the yellow bushing is lost down in your door, let me know. I have extra retainer sets (in case of future door work) and can give you the measurements of the bushing and washer if you need them.
If you could get me the ID & OD of the bushing, and the thickness of the flange, that would be awesome. I've already printed a few bushings and am dialing in the dimensions.

A few people asked me for clips but unfortunately I didn't save the print settings for the clip and now have to re test different temperatures, speeds, cooling ,etc... to figure out what I did the first time around to make sure the clip has the properties of the set I made for myself.
 
Here are the dimensions for the yellow bushing and the metal retaining washer. I have marked the ID of the bushing as 6.1 mm; but, that is approximate. The yellow material is fairly flexible and it was quite easy to distort the bushing when applying the calipers for the measurement so the ID could just as easily be 6.2 mm.
 

Attachments

  • retainer20210610.jpg
    retainer20210610.jpg
    110.1 KB · Views: 120
Thanks!

I think I got them all dialed in. To get the mechanical properties I wanted (super strong and bends instead of snapping, I have to print at a hotter temp, so the finish quality isn't as high and I needed to use a drill to make the ID perfect. If I printed with a good quality and perfect dimensions, they are more brittle and snap easier (1-time use).

UPDATE: After more tweaking of the design and print settings, I minimized post-processing and now this is a STRONG and SECURE clip and it'll bend when prying it rather than snapping. I'm pretty happy with the result.

20210616_164110.jpg
20210616_164123.jpg
 

Attachments

  • 20210616_110707.jpg
    20210616_110707.jpg
    58.5 KB · Views: 87
  • 20210616_110721.jpg
    20210616_110721.jpg
    51.8 KB · Views: 88
Last edited:
It looks like those are the ticket!

Remember that the retainer assembly has to go into the latch first and then you push the lock rod into the retainer. The OEM yellow bushing is quite flexible and probably allows for stretch which combined with clearance allows the insert to flex so that you can get the lock rod into place. If the bushing material is quite stiff / strong you may have an interesting time getting the rod into place. You may need to insert the rod with the latch assembly unmounted so that you can support the actuating arm on the latch while you are pushing the rod in. Just speculating!
 
Thanks!

I think I got them all dialed in. To get the mechanical properties I wanted (super strong and bends instead of snapping, I have to print at a hotter temp, so the finish quality isn't as high and I needed to use a drill to make the ID perfect. If I printed with a good quality and perfect dimensions, they are more brittle and snap easier (1-time use).

UPDATE: After more tweaking of the design and print settings, I minimized post-processing and now this is a STRONG and SECURE clip and it'll bend when prying it rather than snapping. I'm pretty happy with the result.

View attachment 170026
View attachment 170027
Hi Stuntman, sorry to bump and old thread but I need these black clips after I broke my clip on the install, are they still available to purchase? thanks.
 
Hi, I'm new to nsxprime and glad to be finally active! I've had my Silverstone 2005 for 4 years now.
I have over 40 years of design experience, and have designed two great devices for our NSXs.

The RX is a frictionless pulley assembly that replaces the static nylon guide on the window regulator. Use it in conjunction with the Science of Speed yellow window guides. Both of my windows are like butter now.

The RSX is the Rear Sash eXtractor. My passenger side sash removal was a nightmare, so i created this small tool to help with the driver side. It makes the sash arm removal portion of the job a breeze! Attach the tool to the sash arm, turn the knob, the arm pops free. Contact me at [email protected] for more details. Steve
 
Welcome 2K5! Lots of designers & engineers on Prime. I'm wondering how your RX compares to Hugo's or Wayne's groove => pulley repairs. Hugo & Wayne only replace 1 of the 3 guides, the 180 degree one.

Any chance of some explanatory pictures? I wonder if the RX needs its own thread with pictures (& an OK from Lexus for your naming convention.) Now that Hugo's fixits are getting harder to find, great to have another supply.

I'd love to see the sash remover in action with pictures as well. Those things are bugger!
 
Last edited:
Back
Top