-
Protip: Profile posts are public! Use Conversations to message other members privately. Everyone can see the content of a profile post.
You are using an out of date browser. It may not display this or other websites correctly.
You should upgrade or use an alternative browser.
You should upgrade or use an alternative browser.
NSX-R Steering Wheel
- Thread starter mwagner10702
- Start date
Looks great, any difference from the steering wheel directly from MoMo?
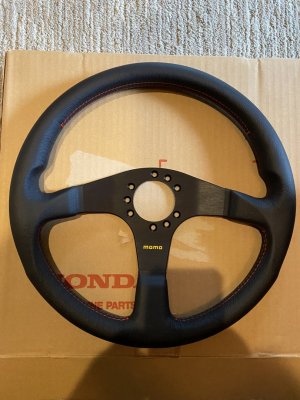
I assume you are referring to the Momo Tuner wheel which is the closest in looks to the OEM wheel. The OEM wheel (350mm) has additional holes in the hub area. The Tuner wheel has the word "TUNER" imprinted below the Momo imprint. The "Momo" imprint on the Tuner wheel is a slightly larger font than what is used on the OEM wheel and is printed lower on the spoke and offset to the left verses the OEM wheel.
The Momo Tuner wheel can be purchased with either red or black stitching just like the OEM wheel (red was used on the earlier NSX-R and black was used on the later 2002+ NSX-R).
I chose to go with the OEM wheel because I wanted originality (FWIW). I was able to purchase my wheel from Amayama for considerably less than what Mita Motorsports is selling the same wheel for. I did get the boss kit and horn button from Mita as their boss kit includes the necessary parts to prevent the SRS light from illuminating when you remove the air bag wheel.
The quality of the OEM NSX-R wheel I received is outstanding.
Hope this helps.
Last edited:
Wheel installed!
What an effort. I used the NSX-R hub boss from @MITA Motorsports. While the kit was complete and well executed, the instructions were in Japanese and the pictures were low resolution, low light and sometimes hard to interpret. Even using Google translate the instructions were janky at best. Fortunately Kaz has an excellent write-up which I referenced.
Basically with the Mita kit, the entire steering console trim has to come off as you need to remove the SRS reel assembly. This is an arduous task (at least for me) as you spend a lot of time on your back removing many fasteners and panels. The lower instrument panel assembly that fits around the ignition switch is secured with two very tight clips at the top (one on each side) and you need to tug on it with a good deal of force to pull it loose. Needless to say I was very worried about breaking the clips.
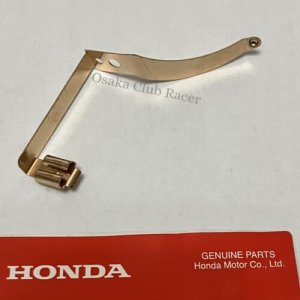
The Mita kit includes a nice adapter to connect the horn. The backside of the NSX-R hub must contact a spring located on this adapter that completes the electrical circuit.
Once you get the panels off and the SRS reel out you need to jumper the SRS circuit so the dash light doesn't come on. In addition you need to connect the wire for the horn. Mita includes several plastic taps to tie into the lower SRS harness, however I fashioned my own connectors as I didn't want to use these plastic taps for fear of compromising the wires. The wires are very thin and I am sure it would not take much to damage them. If I was to suggest an improvement to Mita it would be to attach male lugs on the ends of the wires to match the female connector in the SRS cable. Much like Kaz did in his wheel installation write-up.
Finally you re-assemble everything - again laying on your back. The smaller you are I suspect the easier it is to get under the dash.
Overall it was totally worth the effort. Probably took me 6 to 7 hours over two days. Everything went back together the way it was supposed to and the only extra fasteners I had left over were from the removed parts. Bonus!
BEFORE:
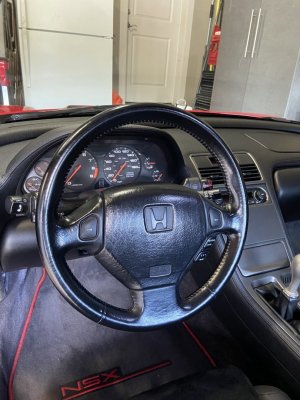
AFTER:

What an effort. I used the NSX-R hub boss from @MITA Motorsports. While the kit was complete and well executed, the instructions were in Japanese and the pictures were low resolution, low light and sometimes hard to interpret. Even using Google translate the instructions were janky at best. Fortunately Kaz has an excellent write-up which I referenced.
Basically with the Mita kit, the entire steering console trim has to come off as you need to remove the SRS reel assembly. This is an arduous task (at least for me) as you spend a lot of time on your back removing many fasteners and panels. The lower instrument panel assembly that fits around the ignition switch is secured with two very tight clips at the top (one on each side) and you need to tug on it with a good deal of force to pull it loose. Needless to say I was very worried about breaking the clips.
The Mita kit includes a nice adapter to connect the horn. The backside of the NSX-R hub must contact a spring located on this adapter that completes the electrical circuit.
Once you get the panels off and the SRS reel out you need to jumper the SRS circuit so the dash light doesn't come on. In addition you need to connect the wire for the horn. Mita includes several plastic taps to tie into the lower SRS harness, however I fashioned my own connectors as I didn't want to use these plastic taps for fear of compromising the wires. The wires are very thin and I am sure it would not take much to damage them. If I was to suggest an improvement to Mita it would be to attach male lugs on the ends of the wires to match the female connector in the SRS cable. Much like Kaz did in his wheel installation write-up.
Finally you re-assemble everything - again laying on your back. The smaller you are I suspect the easier it is to get under the dash.
Overall it was totally worth the effort. Probably took me 6 to 7 hours over two days. Everything went back together the way it was supposed to and the only extra fasteners I had left over were from the removed parts. Bonus!
BEFORE:

AFTER:

Last edited:
Nice job, Mark! Looks great. I also used the MITA kit and have the same comments as you.
- Joined
- 3 May 2020
- Messages
- 165
Wheel installed!
What an effort. I used the NSX-R hub boss from @MITA Motorsports. While the kit was complete and well executed, the instructions were in Japanese and the pictures were low resolution, low light and sometimes hard to interpret. Even using Google translate the instructions were janky at best. Fortunately Kaz has an excellent write-up which I referenced.
Good job, but you should have checked out my DIY video!
Honestly, the OEM momo hub is a pita....unless people want it just because it's OEM, I always recommend the Works Bell setup since you can keep the OEM SRS reel, making the install WAY simpler, easier and cleaner.
Thanks for the video link. When I did my search, I searched for "NSX-R steering wheel", so of course your Type S video didn't show up in my search results. It didn't occur to me to check the sticky section of the forum as I would have found it straight away.Good job, but you should have checked out my DIY video!
Honestly, the OEM momo hub is a pita....unless people want it just because it's OEM, I always recommend the Works Bell setup since you can keep the OEM SRS reel, making the install WAY simpler, easier and cleaner.
In any event - nice video, well made and great explanation of the process.
Looks great!
The Works Bell hub costs significantly more, is much bulkier, and isn't collapsible like the Momo hub. Whether or not the collapsible hub matters in an accident, I'm not sure, but Honda saw fit to do it on their cars not equipped with airbags so that's what I'll do too.
- Joined
- 3 May 2020
- Messages
- 165
If you compare a Mita's Momo hub kit ($300) against a WB short hub and QR, yes the WB combo is more expensive. But you should be comparing against WB's standard hub, which is $285 on Evasive Motorsport's site. The standard hub is made of cast aluminum (vs billet for the short hub) so it can break in an accident if needed.The Works Bell hub costs significantly more, is much bulkier, and isn't collapsible like the Momo hub. Whether or not the collapsible hub matters in an accident, I'm not sure, but Honda saw fit to do it on their cars not equipped with airbags so that's what I'll do too.

Works Bell Standard Hub - 290 (Acura NSX NA1 / NA2)
Check out the deal on Works Bell Standard Hub - 290 (Acura NSX NA1 / NA2) at Evasive Motorsports
I don't know how much the Mita kit costs, I just remember what I paid for my Momo hub which was about $100 which is right in line with current pricing on Japanese parts sites.
At the end of the day it just comes down to preference.
At the end of the day it just comes down to preference.
The OEM hub has a crash protection system built in- it will collapse and absorb some of the impact energy. This was the main reason I used it versus the aftermarket options, which are all some form of solid metal.If you compare a Mita's Momo hub kit ($300) against a WB short hub and QR, yes the WB combo is more expensive. But you should be comparing against WB's standard hub, which is $285 on Evasive Motorsport's site. The standard hub is made of cast aluminum (vs billet for the short hub) so it can break in an accident if needed.

Works Bell Standard Hub - 290 (Acura NSX NA1 / NA2)
Check out the deal on Works Bell Standard Hub - 290 (Acura NSX NA1 / NA2) at Evasive Motorsportswww.evasivemotorsports.com
My rationale for using OEM was - OEM of course. I never explored other options prior to purchasing my hub from Mita.
- Joined
- 3 May 2020
- Messages
- 165
The $300 price tag is what i pulled off of Mita's site today for their full kit that includes the SRS light defeat & horn hookup. I'm sure you can get the hub by itself cheaper, but you'd still need to figure out the SRS light & horn separately.I don't know how much the Mita kit costs, I just remember what I paid for my Momo hub which was about $100 which is right in line with current pricing on Japanese parts sites.
At the end of the day it just comes down to preference.
I agree on preference, I was just responding to the concerns you and anyone else had as far as thinking the OEM hub was the only one that took crash protection into account. Personally, I like the WB hub because it's just well engineered. While the OEM momo hub is, well, OEM, there doesn't seem to be a nice clean OEM style installation for horn retention and SRS light (Unless you purchase all the OEM components, which I assume are insanely expensive since that route doesn't seem to be too common).
No offense to Mita--their kit works just fine. But the up side to keeping the SRS reel is that that OEM electrical connection through the SRS reel is retained, meaning I don't need to use messy grease and the coiled spring that Mita provides to make an electrical connection for the horn. Nor do I have to tap into a SRS wire to cancel the light. Just like the OP, it took me hours to install the oem momo hub. The WB hub can be installed in 30 minutes and can revert back to OEM steering wheel in the same time...and you don't need to worry about breaking plastic trim components in the interior either which is definitely a positive.
The OEM hub has a crash protection system built in- it will collapse and absorb some of the impact energy. This was the main reason I used it versus the aftermarket options, which are all some form of solid metal.Something to think about...
Definitely a consideration, but like I said, the WB standard hub has the same protection as the MOMO hub
- Joined
- 3 May 2020
- Messages
- 165
Here's the info from Works Bell's site about their Standard hubs being designed to break properly:

 www.worksbell.co.jp


Tightening torque | en | Worksbell
Worksbell steering bosses and steering wheel bosses need to be tightened to the specified torque. Please note that the steering bosses may be damaged if they are tightened with a force exceeding the specified torque.

IMO Mita could get an immediate 100% improvement on their kit by sourcing the male end of the coupler that connects to the SRS harness under the dash and terminating the horn and SRS resistor onto the coupler. It then becomes a plug-and-play process. No more taps. Mita is making the resistor, horn / spring bracket anyway so sourcing the connector via JAE should be in their wheelhouse.
The spring and grease part of the installation didn't bother me.
The spring and grease part of the installation didn't bother me.
Last edited:
SRS connectors are not typically sold to anyone besides OEMs due to liability issues with messing around with the SRS system, I spent quite a bit of time searching a few years ago. A few of us have sourced the OEM connectors from 90s Civic clock springs, and there's a guy on Facebook who 3D prints a replica of the connector.
The spring and grease is OEM so yeah I didn't have an issue with it either.
The spring and grease is OEM so yeah I didn't have an issue with it either.
I went even further- I used a HONDA spring! Like @Old Guy says, OCD.SRS connectors are not typically sold to anyone besides OEMs due to liability issues with messing around with the SRS system, I spent quite a bit of time searching a few years ago. A few of us have sourced the OEM connectors from 90s Civic clock springs, and there's a guy on Facebook who 3D prints a replica of the connector.
The spring and grease is OEM so yeah I didn't have an issue with it either.
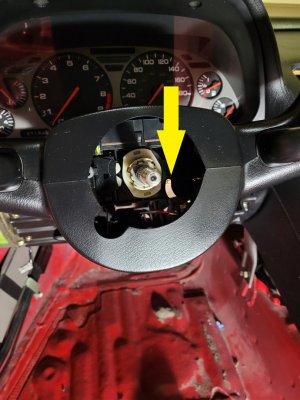
Yeah that looks like the Honda spring I used in my setup too. I don't remember the part number but if anyone else has it it would be good to post here for future reference.
Per Kaz, it wasn't sold separately for the NSX but was included with "another steering column/satellite sw/cover parts"Nice! OEM "shoe horn" from a CRX is the way to go. Very common to use this for integras. Was trying to figure out if the NSX-R or S used this, but couldn't find it in the catalogs. That mita spring is definitely not OEM...
View attachment 177463
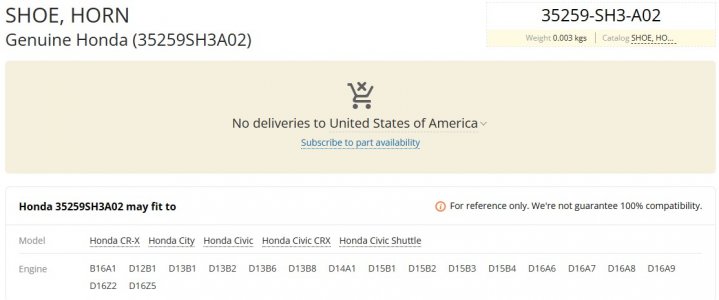
I used: 35259-SH3-A02
http://www.nsxcb.co.uk/showthread.p...ering-wheel-with-OEM-boss&p=122602#post122602
**EDIT** @Chris_Lum we posted at the same time!
you can get it on ebay: https://www.ebay.com/itm/3030429445...tyjujBQnU6pSIgrb6BHMwz54U=|tkp:Bk9SR-SUkZ7MYQ
Similar threads
- Replies
- 5
- Views
- 813
- Replies
- 0
- Views
- 194
- Replies
- 6
- Views
- 587
- Replies
- 0
- Views
- 122


