Tonight I installed the ScienceofSpeed HID-kit. In my case for a European NSX with the H1-kit which is a bit different from the US-model.
The kit comes with a five page manual with some B&W pictures included. After reading I wasn't too sure but decided to give it a try.
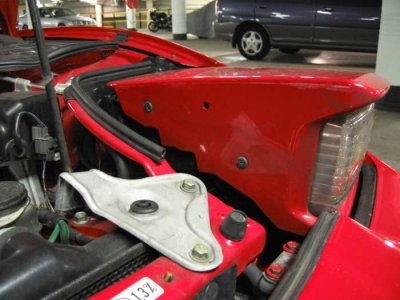
First step is putting the headlights up and disconnecting the battery.
Second is unscrewing the four Philips-screws holding the lamp-cover. On the outside of the cover, these screws are hidden under some plastic bolt-covers than you can flip off with a small screwdriver.
Underneath the cover are four 10mm bolts (two on each side) that have to be undone. Take care while doing this not to scratch your paint. I used a towel and my hands to not damage anything.
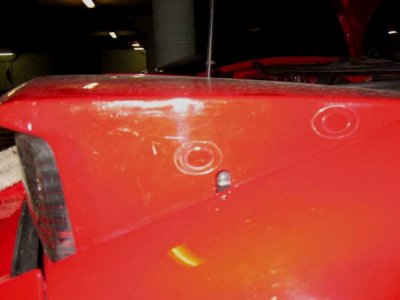
After that, reach down under the lamp-assembly and disconnect the connector you will find there. Then take out the lamp-assembly and put it on a bench (preferably). I put it on a plastic crate turned upside down.
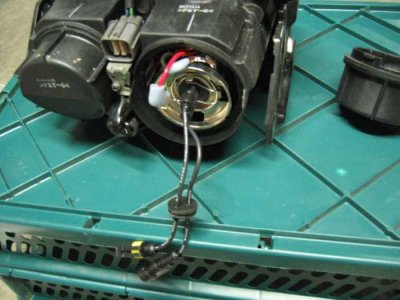
Next, remove the outside end-cap (low-beam), disconnect the cables and take out the bulb. Carefully insert the new HID-bulb and fix it with the retainer. The kit comes with two plastic gloves just for this purpose because you should NEVER touch the bulbs themselves. With the H1-bulbs, the bulbs fitted very tight and it took some effort to get them into their base. As can be seen from the pictures, the bulbs already have wires attached to them.
On the end-cap there is a gasket that you now move to the SoS-supplied bulb-covers. These bulb-covers have a hole in the side to lead the wires to. Lead both HID-bulb wires through this hole and then also lead the two original bulb-wires through it. There is a small slit made in the grommet. After this, fit the grommet in the bulb-cover hole so the assembly is sealed from the outside when the end-cap is fitted. Getting the grommet fixed actually took up quite some time for me.
The basic electrical schema is simple. In the HID-kit the original wires which would normally connect to the bulb are fed from the headlight-assembly through the end-cap to the ballast which bumps up the voltage. Then this is led through the ignitor and then back to the HID-bulbs.
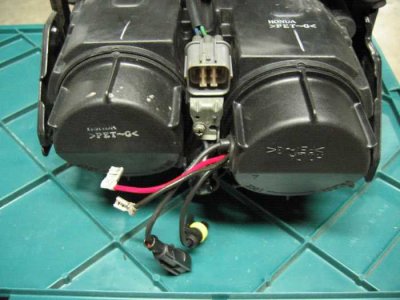
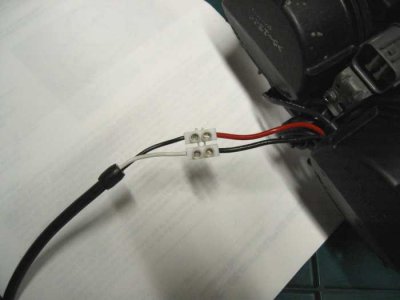
The SOS H1-kit came with a separate connector with which you are supposed to fit the original bulb-wires to the ballast-wires. However much I tried, I could not figure out how this was to be done, they simply didn't fit. So I finally cut off all the connectors and then used an ordinary electrician connector to connect the wires. Here, the main thing to remember is that the black wire from the car does NOT match up to the black wire of the HID-kit. Then, connect the ignitor-wires to the bulb-wires. This can only be done in one way. After this, the most difficult part is done.
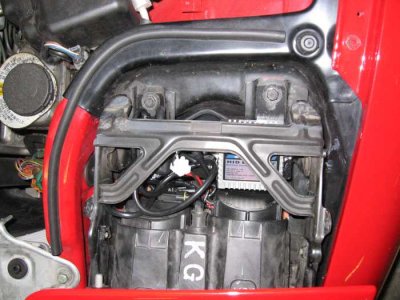
The kit comes with a bracket upon which you fit both the ballast and ignitor with the supplied Allen bolts. Look how to fit this bracket before attaching these parts, you can easily fix them on the wrong side (ask me how I know).
Then, take the whole assembly to the car, including the lamp-cover. Undo the two big bolts on top of the lamp-bracket, put the bracket with ballast etc. in the lamp-bracket, put in all the cables, and then attach the bolts again. The SoS-manual mentions four bolts, but I only used two and it seems to work fine.
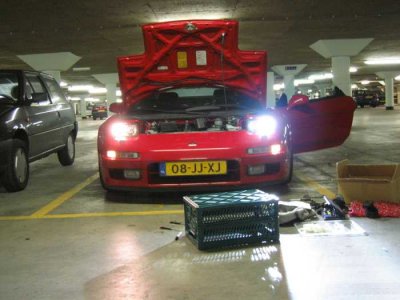
Now connect the lamp-assembly again with the car, loosely put the lamp-cover on, reconnect the battery and move the headlight up and down a few times. Make sure the cables are not getting pinned or wedged between anything. Of course, also test if the light works. If it does, take of the lamp-cover again, fix the cables with the supplied tie-raps and then put everything together again.
After one side is done, repeat the procedure for the other side.
The only tools I used were a socket-wrench, a 10-mm spanner, Allen-key, several screwdrivers, a pair of pliers and a wire-stripper. The left side took me almost two hours including the time to take pictures and figuring the connector-stuff out. The other side only half an hour.
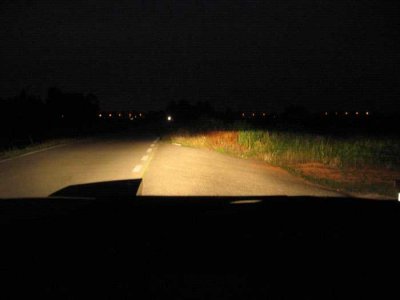
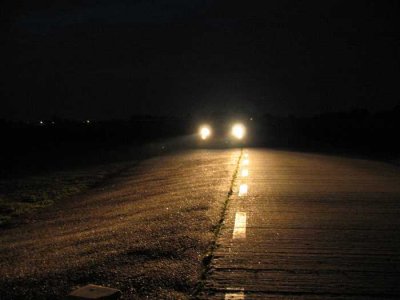
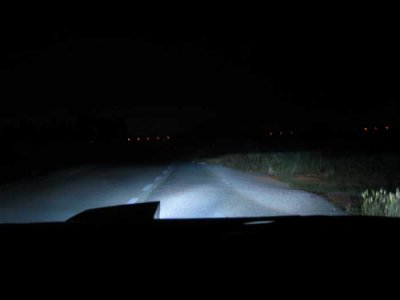
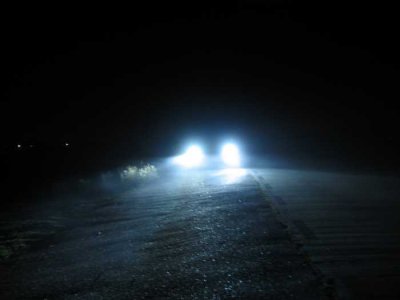
The first thing you notice is that the lights take a little time to 'warm up', about 10-20 seconds. Second, the light is much brighter and more white. However, the light-pattern is not any different so you don't necessarily see any further than before. One thing is that the light, at least in my car, is not as evenly spread as with the halogen-bulbs, it is brighter in the middle. I think this is because of the reflector design of the car.
One thing I especially like about the kit is that it is totally invisible even if the hood is up.
I have taken some pictures of the install which I have posted below.
The SoS HID-kit:
The kit comes with a five page manual with some B&W pictures included. After reading I wasn't too sure but decided to give it a try.
First step is putting the headlights up and disconnecting the battery.
Second is unscrewing the four Philips-screws holding the lamp-cover. On the outside of the cover, these screws are hidden under some plastic bolt-covers than you can flip off with a small screwdriver.
Underneath the cover are four 10mm bolts (two on each side) that have to be undone. Take care while doing this not to scratch your paint. I used a towel and my hands to not damage anything.
After that, reach down under the lamp-assembly and disconnect the connector you will find there. Then take out the lamp-assembly and put it on a bench (preferably). I put it on a plastic crate turned upside down.
Next, remove the outside end-cap (low-beam), disconnect the cables and take out the bulb. Carefully insert the new HID-bulb and fix it with the retainer. The kit comes with two plastic gloves just for this purpose because you should NEVER touch the bulbs themselves. With the H1-bulbs, the bulbs fitted very tight and it took some effort to get them into their base. As can be seen from the pictures, the bulbs already have wires attached to them.
On the end-cap there is a gasket that you now move to the SoS-supplied bulb-covers. These bulb-covers have a hole in the side to lead the wires to. Lead both HID-bulb wires through this hole and then also lead the two original bulb-wires through it. There is a small slit made in the grommet. After this, fit the grommet in the bulb-cover hole so the assembly is sealed from the outside when the end-cap is fitted. Getting the grommet fixed actually took up quite some time for me.
The basic electrical schema is simple. In the HID-kit the original wires which would normally connect to the bulb are fed from the headlight-assembly through the end-cap to the ballast which bumps up the voltage. Then this is led through the ignitor and then back to the HID-bulbs.
The SOS H1-kit came with a separate connector with which you are supposed to fit the original bulb-wires to the ballast-wires. However much I tried, I could not figure out how this was to be done, they simply didn't fit. So I finally cut off all the connectors and then used an ordinary electrician connector to connect the wires. Here, the main thing to remember is that the black wire from the car does NOT match up to the black wire of the HID-kit. Then, connect the ignitor-wires to the bulb-wires. This can only be done in one way. After this, the most difficult part is done.
The kit comes with a bracket upon which you fit both the ballast and ignitor with the supplied Allen bolts. Look how to fit this bracket before attaching these parts, you can easily fix them on the wrong side (ask me how I know).
Then, take the whole assembly to the car, including the lamp-cover. Undo the two big bolts on top of the lamp-bracket, put the bracket with ballast etc. in the lamp-bracket, put in all the cables, and then attach the bolts again. The SoS-manual mentions four bolts, but I only used two and it seems to work fine.
Now connect the lamp-assembly again with the car, loosely put the lamp-cover on, reconnect the battery and move the headlight up and down a few times. Make sure the cables are not getting pinned or wedged between anything. Of course, also test if the light works. If it does, take of the lamp-cover again, fix the cables with the supplied tie-raps and then put everything together again.
After one side is done, repeat the procedure for the other side.
The only tools I used were a socket-wrench, a 10-mm spanner, Allen-key, several screwdrivers, a pair of pliers and a wire-stripper. The left side took me almost two hours including the time to take pictures and figuring the connector-stuff out. The other side only half an hour.
The first thing you notice is that the lights take a little time to 'warm up', about 10-20 seconds. Second, the light is much brighter and more white. However, the light-pattern is not any different so you don't necessarily see any further than before. One thing is that the light, at least in my car, is not as evenly spread as with the halogen-bulbs, it is brighter in the middle. I think this is because of the reflector design of the car.
One thing I especially like about the kit is that it is totally invisible even if the hood is up.
I have taken some pictures of the install which I have posted below.
The SoS HID-kit:

")