• Protip: Profile posts are public! Use Conversations to message other members privately. Everyone can see the content of a profile post.

Interior Mirror Replacement

Joined
14 September 2007
Messages
234
Location
Chattanooga, TN
I'm trying to replace the mirror/shaft part only. How do you get the shaft of the mirror off the part that's glued to the windshield? My new part hs a round springy thing on it and I'm assuming that plays a part of the deal.

Thanks
-Robert
 
I'm not sure how far yours is dissassembled but if it isn't remember the screw that attaches it to the windscreen is backwards threads. Turn right to remove the screw. I found this out the hard way.

Cheers
nigel
 
Is there a way that the entire assembly comes off the part that is attached to the windshield? I see a spring-loaded round thing that you would think that once released, it disengages the unit from the windshield mount. What's the trick to releasing it? The screw just turns the round thing it seems.

Thanks,
-Robert
 
Thanks. Apologies for being dense here and still not getting it...
The diagram shows what I have in my hand and it seems to be O.K. The screwed together assembly is really tight as if it hasn't been messed with to get it off the previous car, so I'm assuming that it hasn't been messed with, so...
My question is, how does one get the assembly shown off the piece that is glued to the windshield? Does the springy thing release it from the windshield mounting and how do you get it released?

Thanks,
-Robert (Not smarter than a 5th grader apparently!)
 
Looking at the pic in the TSB there seems to be two ways to turn the center assembly, one way os obvious from the screw that is on top when it is disassembled. Looks like the SAME assembly can be turned from teh outside from the other end (lower pic shows a screwdriver inserted in the small hole underneath and can loosen the mount.

The internal screw turns counterclockwise to tighten, the external one turns coutnerclockwise to loosen. Basically it is the same bolt turned from either end. (look at step #4)

Hope that makes sense.

Regards,
LarryB
 
Let's start with the removal of the one that's the original, still attached to the windshield...It's on there reeeeaaaal tight, as if it has never been taken apart. But, let's assume that I can get it to turn, Will this release the shaft from the piece that's glued to the windshield? I'm also assuming that I can re-use, or attach to this glued on piece.

Thanks again,
-Robert ( Feeling like a drop-out at this point!)
 
Maybe these instructions will help more:

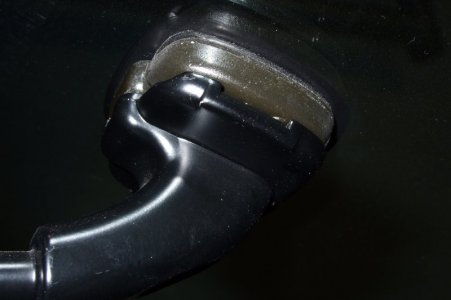
The cover that goes around the mirror stay just clips in place. Carefully pry it off.

Once that is removed, you can see a screw in the bottom of the mirror stay - the lock bolt. Turn that counterclockwise to loosen it. Even if it's really tight, you have to loosen it to get the mirror stay off the lug, which is the part glued to the windshield.

Once the lock bolt is loose enough, you can slide the mirror assembly towards the nose of the car, off the lug.

If everything goes as it should, the lug will still be glued to the windshield, ready to accept your new mirror.

When you slide your new mirror onto the lug and tighten the lock bolt, the springy stuff inside the new mirror stay should clamp onto the lug.

Good luck!
 

Attachments

  • Rearview Mirror replacement.pdf
    48 KB · Views: 52
  • Mirror stay and cover.jpg
    Mirror stay and cover.jpg
    46.2 KB · Views: 68
  • Mirror stay and lug without cover.jpg
    Mirror stay and lug without cover.jpg
    47.9 KB · Views: 56
  • Lock bolt underneath the cover.jpg
    Lock bolt underneath the cover.jpg
    46.9 KB · Views: 66
Thanks,
That what I needed to know. It just seems that the screw is so tight on my relacement mirror that it had to come off the lug via some other way. I'll give it a try tonight.
Thanks again,
-Robert
 
Hey ur lucky--I was driving down the road in hot Arizona and my mirror simply fell off the windshield taking a portion of the windshield with it. I guess I could use a glue and put it back in place as the WS has not cracked--lol
 
Back
Top