• Protip: Profile posts are public! Use Conversations to message other members privately. Everyone can see the content of a profile post.

power antenna

Ok, here's some pics. However some of them downright suck because it's a new camera that I haven't figured out yet, and quite frankly probably wouldn't be any better if I had it figured out. Not my forte I guess.

Anyways, any questions about what you see (or can't see) let me know. Thanks.

Phil.


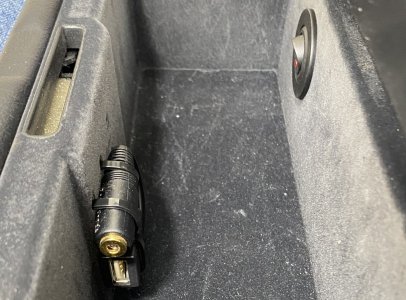
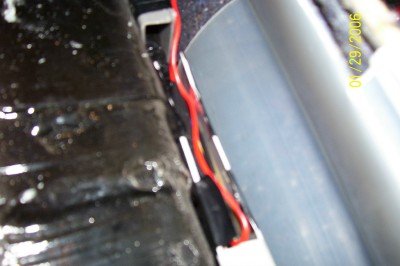
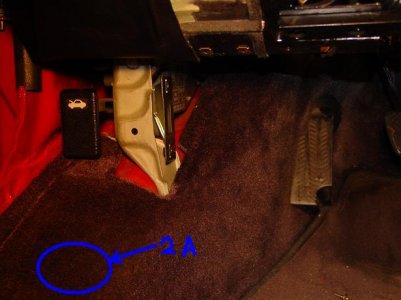
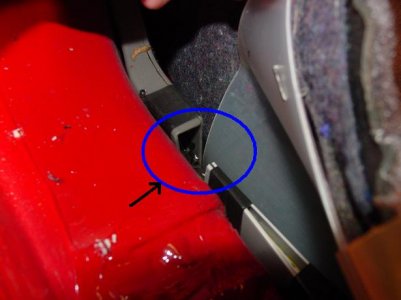
Where I tapped into the pink/white wire is located in the rocker panel right before the kick panel. There are two sections of rectangular conduit that have a gap between them at this spot. The wires are taped up but can be seperated easily but carefully. I ran from the switch to this point and back again and it worked like a charm. It's downstream of the amp relays and doesn't require much disassembly to get to, especially nice since you don't have to work around the seat.

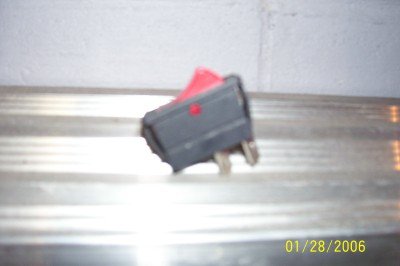
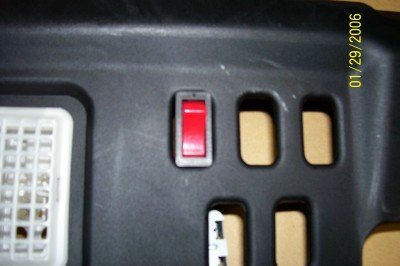
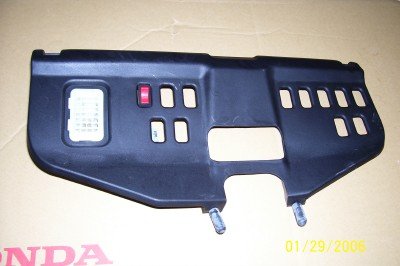
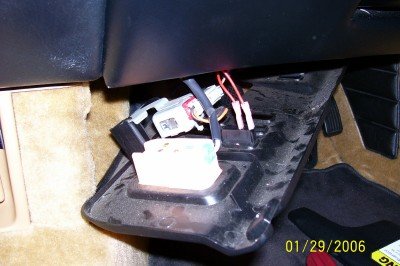
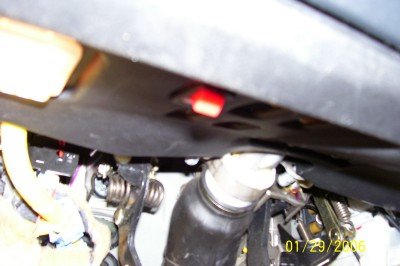
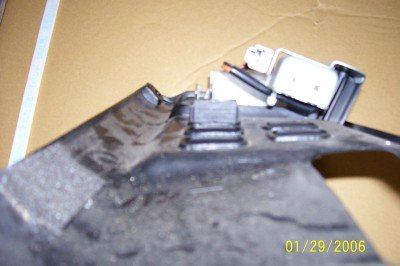
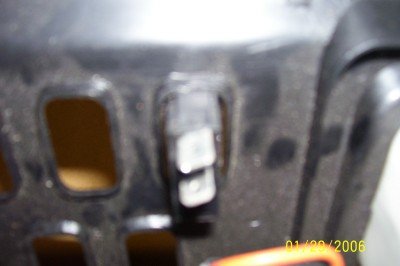
The switch fits nice and snug, but there is a little gap on each side. Of course, you'll never see it unless the panel is out and it's a small price to pay for not having to cut the panel at all.
 

Attachments

  • 100_0009.jpg
    100_0009.jpg
    66.7 KB · Views: 399
  • 100_0013.jpg
    100_0013.jpg
    34.7 KB · Views: 428
  • 100_0012.jpg
    100_0012.jpg
    77.1 KB · Views: 419
  • 100_0018.jpg
    100_0018.jpg
    84.2 KB · Views: 468
  • 100_0019.jpg
    100_0019.jpg
    74.5 KB · Views: 421
More pics...
 

Attachments

  • 100_0011.jpg
    100_0011.jpg
    79.3 KB · Views: 376
  • 100_0017.jpg
    100_0017.jpg
    37.2 KB · Views: 376
  • 100_0014.jpg
    100_0014.jpg
    32.2 KB · Views: 337
  • 100_0015.jpg
    100_0015.jpg
    77.3 KB · Views: 324
  • 100_0016.jpg
    100_0016.jpg
    70.1 KB · Views: 329
Great location for the switch & especially convenient for picking up the wire in the side harness. Relatively close at hand too especially when not something that needs to be accessed frequently. Major benefit of course is no OEM panels need to be physically modified & it's all very easily reversed.
I have mounted previously in the centre box which in itself is an easy mount, but of course requires a non-reversible hole(!) & a lot more needs to be removed to access the wire intercept (left rear interior quarter panel to access the side harness). All in all, not too bad though.

(clickable thumb for full size)

 
Thanks!

I thought about the center console but it seems like you have to have double-jointed elbows to get into the thing. And I've had several Preludes where I mounted the switch in a similar location and it worked out well. For as much as I'll use it, I really didn't want to cut anything.

The more I work on this car, the more I love it. Almost as much as driving it. :smile:
 
Kudos on the switch location! Thanks for the photos too. I completely missed where you were putting this switch until I viewed the pictures.
 
Thanks and you're welcome :smile: . And I understand about not getting something until you see it. Being Italian, I find it hard to explain anything without using my hands anyways :biggrin: .
 
Hi all, this is a great idea...

Ruined 2... great shots of how the switch went in... can you give some more detail as to where you spliced? I saw a couple of pink/ white wires under there in the front rocker area.

Thanks

Rob
 
I just removed all that and installed a shark attack II antenna..
 
orbusrex said:
Hi all, this is a great idea...

Ruined 2... great shots of how the switch went in... can you give some more detail as to where you spliced? I saw a couple of pink/ white wires under there in the front rocker area.

Thanks

Rob

Thanks! The best way I can describe it is that where the two rectangular pieces of conduit meet up (there's a gap between them), I opened up the conduit closest to the rear of the car by the gap. It freed up a little more room to work on that wire bundle. When I spread the bundle out, I only remember seeing one pink/white wire. But I also lucked out when I probed it and it turned out to be the right one. So I didn't have to look any further. It's not a heavy gauge wire, and Honda does get a little tricky with their wire colors. They sometimes have several different shades of a color or silver dots on them as well. This one is straight girly pink with white, no other markings. Pick a wire, probe or skin back a little insulation and check it with a volt meter with the radio on and off. If you get 12v when you should and 0v when you shouldn't, then as a final check, go ahead and snip the wire. Keep it away from metal and key the car. If you've got the right one the antenna shouldn't do anything.

I've got the car back together, but if you need me to I'll yank it back apart and take pictures. Better ones this time, I promise :smile: .
 
No need for pics... I'll give it a whirl!

BTW, a little off but the reason I didn't go with a shark attack antenna is because I keep it covered in the garage most of the time and don't want to alter the cover!!
 
It's in the bag... that wasn't that hard at all, just required patience in a confined space. I tapped into the wire in the conduit, using male and female connectors so I can remove the switch easily, and put a small switch in the rocker panel... I couldn't find one to fit exactly, but I only had to cut out the tiniest of space to get it to fit. Works like a charm! No need to alter the car cover either!

Thanks for all the advice,

Rob
 
Glad it worked out well and happy to help. :smile:
 
I saw that, but cost is a factor with me right now :smile: .
 
Here's some pictures Honda9000 took when he had his apart that are a lot better than the ones I had. It shows the location of the wire bundle that I had so much trouble trying to get across...
 

Attachments

  • xproject 3b.jpg
    xproject 3b.jpg
    40.7 KB · Views: 408
  • xproject 2a.jpg
    xproject 2a.jpg
    31.8 KB · Views: 444
I'm not sure of the exact size. It's the standard rocker switch that comes with KC HiLites, or damn near any other set of inexpensive fog lights for that matter. I can measure it and get back to you, or I can send you one if you'd like. I'm lousy with the little buggers.
 
Thanks for your help.
Standard size could be 19.5 x 13 mm or 30 x 11 mm. Does it fit perfectly or do you need some fix on the backside?
 
It snaps right in. It fits perfectly length wise and has a little gap on each side width-wise. But obviously you can't see it, and it stays put. No rear fix necessary.
 
Old thread but helped me out with my new 2005.

While I was installing a grom USB3 adapter on the rear bulkhead, I did this mod too. I found the wire in the side harness behind the driver's seat, but since I was installing USB and 1/8" audio inputs in the console, I put the antenna switch there, too.
.
 

Attachments

  • switch.jpg
    switch.jpg
    222.9 KB · Views: 71
  • grom connections.jpg
    grom connections.jpg
    253.1 KB · Views: 68
I'm impressed with your search abilities and bumping helpful old threads....hopefully you worked out your armrest modification...
 
I'm impressed with your search abilities and bumping helpful old threads....hopefully you worked out your armrest modification...

Holding off on swapping armrest for now. I did discover that the one-piece armrest is actually shorter than the dual-lid one, so adapting it shouldn't really be a big problem. I'll probably make it flip up to the rear, so it's out of your way when open- unlike the standard lid!
 
Back
Top