I was fortunate enough to experience one of the first installs of a Science Of Speed Proformance Audiophile kit (Stage 2) into Jonathan's beautiful Silver NSX.
Also more details & pricing at Science Of Speed
This install should quite easily accomplished as a DIY project by most with rudimentary skills. An excellent set of instructions comes with the kit and I wanted to give potential buyers an opportunity to see how it would go by way of this story-board. The thumbnails below are linked to larger images so please click on them for added detail.
No real knowledge of electronics is required and you basically just have to be able to handle a screw-driver. The kit comes with pretty much everything you need to do the job except your tools of course. You will need a variable speed drill ideally, with a 2” hole-saw attachment. The hole-saw is cheap enough at most hardware stores and you can rent or borrow the drill if you don’t have one. A Dremel tool is a great asset to have even beyond this project – treat yourself! Other than those more specialized tools, drill bits, screwdrivers, various metric wrenches/sockets, hot-melt glue gun, wire strippers & crimp tool should just about cover it.
As well as the major components, the head-unit adapter harness and amp power, RCA input & speaker cables are all included, as well as Dynamat for both doors.
There are minimal "invasions" to the car: essentially removing the OEM BOSE hardware, with the associated brackets for the footwell speaker; a minor relocation of the harness in the footwell area (plus the PS box if so equipped); a hole drilled in the trunk for the ground stud; screw holes in the trunk to mount the amp. And of course the holes in the door panels for the tweeters.
For additional information on removing panels etc, please consult the NSXPrime Online Service Manual
Before doing anything, DISCONNECT THE BATTERY, -ve first followed by the +ve.
Start by prepping the car for the install by removing the centre console & door panels and footwell speaker box.


Good information is available in another photo-record in this excellent review by Vega$ NSX on preparation & installation of the subwoofer.
I prepped the sub-box by installing the speaker wire, pre-drilling the mounting ring for screws for the speaker and covering the face with carpet. Follow the included directions and as shown in Vega$ NSX post on wiring the sub with the voice coils in series; ideally exit the speaker wire on the left side of the box and add some quick-disconnect spade terminals to make future removal/installation more convenient. By having the speaker connection on the left side of the box, the main speaker wire from the amplifier can run down the centre console & exit in the bottom right area below the head-unit to connect to the box terminals.
Be sure to seal the area around the speaker wire feed-through with hot-melt glue inside & out. When mounting the speaker be sure to clean off any surface burrs from your pre-drilling to ensure a good seal of the speaker. The Diamond Audio subwoofer comes with an excellent rubber gasket that should provide a good seal; this can be enhanced by a light smear of silicone grease if desired.
Here's the box ready to go in the car


Next on the agenda was to run the wiring. Start by splitting your supplied speaker wire into three equal lengths, one for each door component set & one for the subwoofer. ID the speaker wires with some different coloured electrical tapes so you don't have to guess which is which a the other end! You have choices regarding how you wire the speakers: you can take the speaker wire all the way to the doors, or terminate them at the head unit harness adapter & utilize the existing wiring already running through the OEM harness to the doors for the BOSE speakers. I used the latter & can honestly say there was no detectable loss of performance - & it certainly makes the job a whole lot easier! Either way run them down the centre & then out to the doors from there if desired.
Starting from the head unit end, run the RCA cable, the three speaker wires and the amp remote turn-on wire down the center console. The routing will go up over to the upper right corner of the front engine firewall (your left as you look at it from inside the car) behind the ECM - you will find a large rubber grommet there through which you can feed your cables. Leave a little extra at the head unit end - not so much as to make stuffing it in there a problem, but just so you can have some slack on the harness for ease of access for installation/removal. You will then run around the top right side of the engine compartment and you'll find another rubber grommet on the rear engine firewall (this is easier found from the trunk side so you know what you're aiming for). Tie off your cable harnesses neatly with zip-ties to convenient restraint points.


As an aside, during the process of wiring in this area, I decided to give Jonathan an added "bonus" of an antenna switch. This is really simple to accomplish at this stage by simply wiring a switch to interrupt the feed to the antenna - this is taken off the same connection on the harness adapter as for the remote-power. Just be sure to have the remote power be connected directly to the head-unit end of the connection, not after the switch!
I picked up a nice rocker switch from Radio Shack and mounted it in the compartment below the arm-rest - this works well as is unobtrusive yet readily accessible. Not a bad mod for < $3 investment! Now the antenna can be in the lowered position when the switch is off, while listening to CD's.

Next up is the amp power: the most convenient location is to take this directly off the engine fuse box. You can mount the fuse holder on the convenient vertical member in the engine bay.
Start by removing the airbox to get access underneath. It's not necessary to open up the box as in how you would change the filter - just loosen up the clamp to the output hose, remove the three bolts holding the complete asembly to the frame & unclip the various hoses. Then remove the complete box. (You can inspect your filter with the box removed and if necessary might be convenient time to replace it if necessary)
A minor modification is made to the box cover to allow it to sit flush down over the new power cable connection. Mark the locations of the holes to mount the fuse-holder and pre-drill for self-tapping screws. Leave the fuse out for now, until you are ready to power all up for test. Run the cable down along the existing wire harness which you can follow into the trunk. Again, it is easy to find this location from the trunk side, on the left. Finish by tying it off with zip-ties for a neat result. Re-install the airbox.


Over on the right fender well, inside the trunk, just below where your cables entered the trunk, you will make your power ground connection. Drill a hole and abrade the paint off the surface to give a good ground contact. Use a serrated washer to get good bite (good grounds make for low noise systems!) This stud is what you will attach your power ground from the amp to. (It doesn't show up so well on the silver body, but if you look at the hole below the orange connector you will see the paint around it has been sanded down to bare metal)

That leaves the trunk ready to receive and wire the amp. We'll leave that till last.
On to the doors:
I started by prepping the speaker mounting plates by priming and paint - this is just to create additional seal against weather. Jonathan is moving back to Portland so it's a little damp up there! Again, pre-drill for screws to mount the woofer and the cross-over. Although the cross-over appears quite large, it fits great in the available space on the convenient "tail" section of the mounting plate. All the necessary hardware comes to mount the plates to the doors.
There is an ample supply of Dynamat sound deadening material to cover both doors. This is really an intuitive process - just peel 'n' stick. Try to cover all the openings and be aware of things like the door actuator levers which still need to move when you're done! These woofers have a very nice large magnet which is a plus from a performance perspective and they barely fit through the OEM cutout in the actual door. I added electrical insulation tape around the door cut-out just as a precautionary measure against shorting the terminals. The speakers also have to be oriented at just the right angle to fit. It's not a problem, just worthy of note to be careful at this step. Follow the directions to align them at the correct orientation angle.
To wire up the speaker, find the brown plug that originally went to the BOSE assembly and cut the orange & white wires; attach a short section of speaker wire between this pair & the cross-over input. (The white is the +); Connect a short section of speaker wire between the appropriate cross-over output and the woofer and attach a section of speaker wire from the tweeter output t create a pigtail for connecting to the tweeter. Terminate this pigtail with quick-disconnect spade terminals. Since the tweeter is actually mounted on the door trim panel as opposed to the door, it's important to create a disconnect so you can install/remove the door panel as required.


Then on to what might be the most apprehensive task - cutting the hole in the door panel for the tweeter. It's really nothing to fret over, I've done a number of these now and it's really quite a painless exercise although it can appear intimidating at the outset.
Begin by removing the identified block on the inner side into which there is a mounting screw for the side window vent duct - the duct will still be held securely by the fittings at the top & bottom & the remaining screw - don't worry about losing this, it's not going anywhere. A dremel is the perfect tool for this operation with a cutting/sanding disc making short work of it. You may also have to trim some of the vinyl around that area - it varies from car to car how much is overlapped on the back side.

Now onto the actual hole cut for the tweeter: Find the centre and start to cut through from the back side until the centre pilot drill punches through the vinyl on the front side. Flip the panel over and we'll go at it from the front side from here, using the centre hole as our pilot guide. VERY IMPORTANT - REVERSE the drill rotation before starting your cut on the front side. If you inspect the hole-saw bit, you will see the teeth are designed for ripping - not a feature we particularly want to employ cutting our premium vinyl! By reversing the drill, and use a slow speed you can cut through the vinyl cleanly. Once you break through the vinyl, stop & withdraw the drill and peel off the vinyl disc which had been glued to the substrate (it should peel off easily). Reconfigure the drill to the correct cutting rotation direction and blast on through the substrate to complete the hole cutting process.

Insert your tweeter into the hole, aligning it in the appropriate orientation. The Diamond Audio Tweeters come with the most innovative clamp ring - simple yet brilliant! It is a sprung split-ring design that you merely have to press down on the threaded ring of the tweeter housing - it "springs" open as you press down, but then clamps frimly around the threads. Ingenious! The tweeters also have an angle adjustment to orient the axis so take this into consideration if you want a compound angle (rotation as well as axis).
Feed the leads under the duct and attach the mating quick-disconnect spade terminals to interface with your pigtail.


So doors are complete and if you're confident in your work, you can go ahead and re-install the panels and put your interior back together.
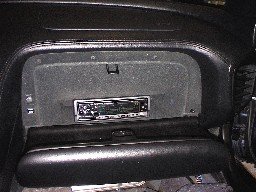
The last step is to install the amp in the trunk and complete the wiring to it. The amp fits nicely against the rear engine firewall at the front of the trunk. This location I believe is ideal - it affords the most room - still room for golf clubs! - and allows unimpeded access to the CD Changer in both the stowed & load positions. There is also relatively good accessibility to the controls on the right side of the amp.
The physical mounting entails simply attaching the two brackets to the "base" feet, marking their position on the trunk floor and pre-drilling for self-tapping screws. A single screw on the top left bracket holds it secure. Some small slits in the carpet to allow the brackets to protrude ensure a good cosmetic result. I've previously used a "platform" covered with carpet in this location and I honestly much prefer this cleaner look.
Another slit in the carpet to feed through the wires and connect them up.

That should complete the installation so finish up tidying any loose ends, re-insert the fuse, reconnect the battery and light it up!
The final result! Note Jonathan’s beautiful custom matched interior paint trim – looks fabulous!


Aesthetically I would hope you agree the install looks really good and is relatively unobtrusive. But the main feature of course is not how it looks but how it sounds! It clearly does not disappoint in this department either!
The Diamond Audio components all complement each other nicely as you would expect from a matched system - the mids are rich and full and the tweeters extremely bright and crystal clear. In the orientation in the NSX both Marc (01blacks4) and I agree it is probably advisable to set up the cross-overs with the tweeters at the -2db switch setting to get better balance with the woofers. I think the SOS guys liked the "flat" setting but I think they are overwhelmed by hearing features & elements of the music they hadn't experienced before! I'd go with the -2db but try it for yourself to determine against your own taste. And the sub rounds out the whole experience. There is plenty of power (300w) on tap from the Diamond Audio D6600.4 to drive the D310D2 sub - it may be considered Diamond's "entry-level" component in that segment but that by no means makes it an inferior product relative to competition - only to it's own "big brothers"! Combination of the box and speaker make for hard hitting yet still retaining excellent Sound Quality. Being honest, the limiting factor is the OEM head unit which is extremely limited in its capabilities with minimal tuning features. But start with this and you'll still be seriously impressed at how much better it sounds than the OEM Bose. I can forsee a follow-up with a better head unit in many of your futures after taking this primary step however.
Overall, I have to rate this system as an all-round winner for value, relative ease of installation and performance. SOS has put a lot of thought into all the fine details to ensure that you have pretty much everything needed to do this efficiently & effectively. But you can't ask for more than having that well-proven support of an organization like SOS behind the products, including the factory warranty of the Diamond components. Definitely a

Also more details & pricing at Science Of Speed
This install should quite easily accomplished as a DIY project by most with rudimentary skills. An excellent set of instructions comes with the kit and I wanted to give potential buyers an opportunity to see how it would go by way of this story-board. The thumbnails below are linked to larger images so please click on them for added detail.
No real knowledge of electronics is required and you basically just have to be able to handle a screw-driver. The kit comes with pretty much everything you need to do the job except your tools of course. You will need a variable speed drill ideally, with a 2” hole-saw attachment. The hole-saw is cheap enough at most hardware stores and you can rent or borrow the drill if you don’t have one. A Dremel tool is a great asset to have even beyond this project – treat yourself! Other than those more specialized tools, drill bits, screwdrivers, various metric wrenches/sockets, hot-melt glue gun, wire strippers & crimp tool should just about cover it.
As well as the major components, the head-unit adapter harness and amp power, RCA input & speaker cables are all included, as well as Dynamat for both doors.
There are minimal "invasions" to the car: essentially removing the OEM BOSE hardware, with the associated brackets for the footwell speaker; a minor relocation of the harness in the footwell area (plus the PS box if so equipped); a hole drilled in the trunk for the ground stud; screw holes in the trunk to mount the amp. And of course the holes in the door panels for the tweeters.
For additional information on removing panels etc, please consult the NSXPrime Online Service Manual
Before doing anything, DISCONNECT THE BATTERY, -ve first followed by the +ve.
Start by prepping the car for the install by removing the centre console & door panels and footwell speaker box.


Good information is available in another photo-record in this excellent review by Vega$ NSX on preparation & installation of the subwoofer.
I prepped the sub-box by installing the speaker wire, pre-drilling the mounting ring for screws for the speaker and covering the face with carpet. Follow the included directions and as shown in Vega$ NSX post on wiring the sub with the voice coils in series; ideally exit the speaker wire on the left side of the box and add some quick-disconnect spade terminals to make future removal/installation more convenient. By having the speaker connection on the left side of the box, the main speaker wire from the amplifier can run down the centre console & exit in the bottom right area below the head-unit to connect to the box terminals.
Be sure to seal the area around the speaker wire feed-through with hot-melt glue inside & out. When mounting the speaker be sure to clean off any surface burrs from your pre-drilling to ensure a good seal of the speaker. The Diamond Audio subwoofer comes with an excellent rubber gasket that should provide a good seal; this can be enhanced by a light smear of silicone grease if desired.
Here's the box ready to go in the car


Next on the agenda was to run the wiring. Start by splitting your supplied speaker wire into three equal lengths, one for each door component set & one for the subwoofer. ID the speaker wires with some different coloured electrical tapes so you don't have to guess which is which a the other end! You have choices regarding how you wire the speakers: you can take the speaker wire all the way to the doors, or terminate them at the head unit harness adapter & utilize the existing wiring already running through the OEM harness to the doors for the BOSE speakers. I used the latter & can honestly say there was no detectable loss of performance - & it certainly makes the job a whole lot easier! Either way run them down the centre & then out to the doors from there if desired.
Starting from the head unit end, run the RCA cable, the three speaker wires and the amp remote turn-on wire down the center console. The routing will go up over to the upper right corner of the front engine firewall (your left as you look at it from inside the car) behind the ECM - you will find a large rubber grommet there through which you can feed your cables. Leave a little extra at the head unit end - not so much as to make stuffing it in there a problem, but just so you can have some slack on the harness for ease of access for installation/removal. You will then run around the top right side of the engine compartment and you'll find another rubber grommet on the rear engine firewall (this is easier found from the trunk side so you know what you're aiming for). Tie off your cable harnesses neatly with zip-ties to convenient restraint points.


As an aside, during the process of wiring in this area, I decided to give Jonathan an added "bonus" of an antenna switch. This is really simple to accomplish at this stage by simply wiring a switch to interrupt the feed to the antenna - this is taken off the same connection on the harness adapter as for the remote-power. Just be sure to have the remote power be connected directly to the head-unit end of the connection, not after the switch!
I picked up a nice rocker switch from Radio Shack and mounted it in the compartment below the arm-rest - this works well as is unobtrusive yet readily accessible. Not a bad mod for < $3 investment! Now the antenna can be in the lowered position when the switch is off, while listening to CD's.

Next up is the amp power: the most convenient location is to take this directly off the engine fuse box. You can mount the fuse holder on the convenient vertical member in the engine bay.
Start by removing the airbox to get access underneath. It's not necessary to open up the box as in how you would change the filter - just loosen up the clamp to the output hose, remove the three bolts holding the complete asembly to the frame & unclip the various hoses. Then remove the complete box. (You can inspect your filter with the box removed and if necessary might be convenient time to replace it if necessary)
A minor modification is made to the box cover to allow it to sit flush down over the new power cable connection. Mark the locations of the holes to mount the fuse-holder and pre-drill for self-tapping screws. Leave the fuse out for now, until you are ready to power all up for test. Run the cable down along the existing wire harness which you can follow into the trunk. Again, it is easy to find this location from the trunk side, on the left. Finish by tying it off with zip-ties for a neat result. Re-install the airbox.


Over on the right fender well, inside the trunk, just below where your cables entered the trunk, you will make your power ground connection. Drill a hole and abrade the paint off the surface to give a good ground contact. Use a serrated washer to get good bite (good grounds make for low noise systems!) This stud is what you will attach your power ground from the amp to. (It doesn't show up so well on the silver body, but if you look at the hole below the orange connector you will see the paint around it has been sanded down to bare metal)

That leaves the trunk ready to receive and wire the amp. We'll leave that till last.
On to the doors:
I started by prepping the speaker mounting plates by priming and paint - this is just to create additional seal against weather. Jonathan is moving back to Portland so it's a little damp up there! Again, pre-drill for screws to mount the woofer and the cross-over. Although the cross-over appears quite large, it fits great in the available space on the convenient "tail" section of the mounting plate. All the necessary hardware comes to mount the plates to the doors.
There is an ample supply of Dynamat sound deadening material to cover both doors. This is really an intuitive process - just peel 'n' stick. Try to cover all the openings and be aware of things like the door actuator levers which still need to move when you're done! These woofers have a very nice large magnet which is a plus from a performance perspective and they barely fit through the OEM cutout in the actual door. I added electrical insulation tape around the door cut-out just as a precautionary measure against shorting the terminals. The speakers also have to be oriented at just the right angle to fit. It's not a problem, just worthy of note to be careful at this step. Follow the directions to align them at the correct orientation angle.
To wire up the speaker, find the brown plug that originally went to the BOSE assembly and cut the orange & white wires; attach a short section of speaker wire between this pair & the cross-over input. (The white is the +); Connect a short section of speaker wire between the appropriate cross-over output and the woofer and attach a section of speaker wire from the tweeter output t create a pigtail for connecting to the tweeter. Terminate this pigtail with quick-disconnect spade terminals. Since the tweeter is actually mounted on the door trim panel as opposed to the door, it's important to create a disconnect so you can install/remove the door panel as required.


Then on to what might be the most apprehensive task - cutting the hole in the door panel for the tweeter. It's really nothing to fret over, I've done a number of these now and it's really quite a painless exercise although it can appear intimidating at the outset.
Begin by removing the identified block on the inner side into which there is a mounting screw for the side window vent duct - the duct will still be held securely by the fittings at the top & bottom & the remaining screw - don't worry about losing this, it's not going anywhere. A dremel is the perfect tool for this operation with a cutting/sanding disc making short work of it. You may also have to trim some of the vinyl around that area - it varies from car to car how much is overlapped on the back side.

Now onto the actual hole cut for the tweeter: Find the centre and start to cut through from the back side until the centre pilot drill punches through the vinyl on the front side. Flip the panel over and we'll go at it from the front side from here, using the centre hole as our pilot guide. VERY IMPORTANT - REVERSE the drill rotation before starting your cut on the front side. If you inspect the hole-saw bit, you will see the teeth are designed for ripping - not a feature we particularly want to employ cutting our premium vinyl! By reversing the drill, and use a slow speed you can cut through the vinyl cleanly. Once you break through the vinyl, stop & withdraw the drill and peel off the vinyl disc which had been glued to the substrate (it should peel off easily). Reconfigure the drill to the correct cutting rotation direction and blast on through the substrate to complete the hole cutting process.

Insert your tweeter into the hole, aligning it in the appropriate orientation. The Diamond Audio Tweeters come with the most innovative clamp ring - simple yet brilliant! It is a sprung split-ring design that you merely have to press down on the threaded ring of the tweeter housing - it "springs" open as you press down, but then clamps frimly around the threads. Ingenious! The tweeters also have an angle adjustment to orient the axis so take this into consideration if you want a compound angle (rotation as well as axis).
Feed the leads under the duct and attach the mating quick-disconnect spade terminals to interface with your pigtail.


So doors are complete and if you're confident in your work, you can go ahead and re-install the panels and put your interior back together.
The last step is to install the amp in the trunk and complete the wiring to it. The amp fits nicely against the rear engine firewall at the front of the trunk. This location I believe is ideal - it affords the most room - still room for golf clubs! - and allows unimpeded access to the CD Changer in both the stowed & load positions. There is also relatively good accessibility to the controls on the right side of the amp.
The physical mounting entails simply attaching the two brackets to the "base" feet, marking their position on the trunk floor and pre-drilling for self-tapping screws. A single screw on the top left bracket holds it secure. Some small slits in the carpet to allow the brackets to protrude ensure a good cosmetic result. I've previously used a "platform" covered with carpet in this location and I honestly much prefer this cleaner look.
Another slit in the carpet to feed through the wires and connect them up.

That should complete the installation so finish up tidying any loose ends, re-insert the fuse, reconnect the battery and light it up!
The final result! Note Jonathan’s beautiful custom matched interior paint trim – looks fabulous!
Aesthetically I would hope you agree the install looks really good and is relatively unobtrusive. But the main feature of course is not how it looks but how it sounds! It clearly does not disappoint in this department either!
The Diamond Audio components all complement each other nicely as you would expect from a matched system - the mids are rich and full and the tweeters extremely bright and crystal clear. In the orientation in the NSX both Marc (01blacks4) and I agree it is probably advisable to set up the cross-overs with the tweeters at the -2db switch setting to get better balance with the woofers. I think the SOS guys liked the "flat" setting but I think they are overwhelmed by hearing features & elements of the music they hadn't experienced before! I'd go with the -2db but try it for yourself to determine against your own taste. And the sub rounds out the whole experience. There is plenty of power (300w) on tap from the Diamond Audio D6600.4 to drive the D310D2 sub - it may be considered Diamond's "entry-level" component in that segment but that by no means makes it an inferior product relative to competition - only to it's own "big brothers"! Combination of the box and speaker make for hard hitting yet still retaining excellent Sound Quality. Being honest, the limiting factor is the OEM head unit which is extremely limited in its capabilities with minimal tuning features. But start with this and you'll still be seriously impressed at how much better it sounds than the OEM Bose. I can forsee a follow-up with a better head unit in many of your futures after taking this primary step however.
Overall, I have to rate this system as an all-round winner for value, relative ease of installation and performance. SOS has put a lot of thought into all the fine details to ensure that you have pretty much everything needed to do this efficiently & effectively. But you can't ask for more than having that well-proven support of an organization like SOS behind the products, including the factory warranty of the Diamond components. Definitely a
Last edited:

")