• Protip: Profile posts are public! Use Conversations to message other members privately. Everyone can see the content of a profile post.

SOS ProFormance Audiophile System (Stage2) Install & Review

Ken, thank you so much for all your time and trouble to have posted such a thorough and comprehensive guide on this install.

I have recently purchased the kit from SOS and I do not wnt to give up any trunk space and want to mount my amp behind the drivers seat.

Do you have any tips or guidance for this kind of install.

thx in advance
 
Your screen-name - is that "Smile" Doc i.e. Dentist?
Or am I way off? Maybe you're a Psychiatrist!
biggrinroll.gif


Thanks for the comps & flattered to have you seek suggestions for your application.
Actually much easier install there from physical perspective, at least re cable runs; my concern is typically one of theft invitation, but that's not necessarily a major concern depending on personal circumstances ( and still reasonably unobtrusive behind the seat.)

You can hook up the power by the same method, but instead of going "South" through the rear engine firewall to trunk, you'll find another feed-through grommet (major harness!) coming through the front engine firewall into the driver's side bulkhead. You still need to remove the air-box to gain access to this feedthrough. One "complication" to get to that, is to remove the panels on the left (right as you look towards the rear) i.e. driver's side.
You need to remove the gas release lever & the rear hatch lever handles to enable the removal of the left-rear trim panel. The prior handle is easy, just lift & pry it forward - interference fit on the lever shaft.
The hatch lever handle is not so straight-forward if you haven't done it before (much easier in retrospect after achieving first time!) You need to pry the lever away from the panel with a flat screw-driver or similar, then use some needle-nose pliers to pull off a small retaining clip behind the lever. There's not much space to access the clip so you need to create the space with the leverage action between panel & lever.

Refer to this diagram (clickable link)


To feed through the power cable, it's easier to first "fish" through a smaller gauge solid copper wire (or coat-hanger) from the engine side, then attach the power cable & pull it through. It's a little more congested in that area & you are working a little "blind" on the interior side, but the "fish" will help immensely.

You should be able to find on that rear bulk-head a number of existing ground points (without any drilling required) to which to connect your power-ground wire.

For the RCA & speaker wires of course, you have much shorter run & no need to mess with pulling through the engine compartment! (or removing the right side panels at all). I would probably use a shorter RCA cable - the one supplied is awfully long for your requirement. 2m (~ 6.5') I would think adequate.

Now - that just leaves mounting the amp.
If you refer to Random Harmony's new tunes thread, you can see that I mounted his directly on the trim panel - this is just screwed straight through the panel with some speed clips - U nuts- on the rear-side to hold the screws secure. The panel then just snapped on as regular with the OE clips. One concern with this might be is if it was broken into, it would not take any effort to steal this. My general opinion on this is moot, as if it is more securely fastened, it just creates more damage in the process of ripping it out anyway! (If they want it they'll take it regardless)

The other perhaps more valid concern with the larger (heavier) Diamond amps is whether the weight can be supported by the plastic clips if the amp were only fastened to the panel? It might be adequate, just not sure how secure it would be - the plastic clips certainly snap pretty tight - I would be loath to out & out recommend without being able to test it out personally . But in RH's case it was really quite secure physically - I think it may still work quite adequately even with heavier Diamond amp.

One problem in that area is there's not much to screw into there.
As alternative thought, I might suggest making a dummy panel of 1/4" or 3/8"" MDF or plywood covered with vinyl (to use instead of the OEM trim panel - even 1/4" is going to be substantially more robust than the OEM hard-board piece); put some speed clip U-nuts over the original holes tat the plastic clips would engage & screw directly into those through (marginally) clearance holes through the MDF which mimic the locations of the original corresponding clip holes.
Then mount the amp by screwing directly through the vinyl into the wood with a wood screw.
Ideally you could access the screws securing the panel to the clips - to remove as one complete assembly (amp/panel) ideally if required - but it all depends on how these holes compare to the mounting holes of the amp as to whether directly accessible.

Hope this is somewhat helpful. :confused:

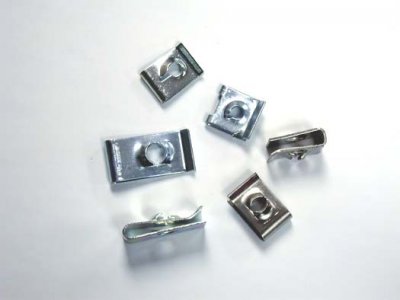
p.s.Here's pic of "U-nut"s - I know what they are when I look for them in the hardware store, but the nomenclature is not something readily obvious!
They work by slipping over an existing panel and tightening against it. They can also be used simply & practically on the back-side of the OEM trim panel without actually being held captive, as they would in "normal" application - like across the captive hole for the OEM clips on the bulkhead as described above, or in my trunk amp-mount application, across a bracket.

.
 

Attachments

  • lrg_u-nuts.jpg
    lrg_u-nuts.jpg
    12.5 KB · Views: 1,079
Last edited:
Ken, I think you and I have similar tastes in the way we set up our sound systems. I too generally elect to use the - dB settings on the passive x-overs if available. I also like silk or soft dome tweeters. What about you? Anyway, I really want to hear your impressions on the sub woofer system. I'll probably just pick up the sub box so I'd like to hear your comments on it. Thanks.
 
Hi Chris - oooh yeah, Baby - Silks all the way! (metals a little harsh for me)
We did a quick parking lot comparison the other week of my SEAS Lotus vs an NSX with a set of Focals and even the other owner acknowledged the easily distinguishable superiority of my tweets.
I'm not sure that all component sets are necessarily the same in requirement for a - ve offset on the tweet - really depends on the components themselves & the cross-over & of course their physical location.
The Diamonds in the NSX application definitely benefit from it, although also not necessarily true in other vehicle applications - or maybe a kick install. Although I have completely seperate channels to my mids & tweets, they are actually running relatively same gains to each & no attenuation on the C/O. I also have ability to bias to the mids or tweets using the fader control but it is set at flat also.

The sub is going to make the world of difference to you - you don't know how badly you're missing it till after you experience the difference.
While clearly not the most powerful (SPL) sub out there, the SQ qualities are good at this price point yet still has more than enough power (suitably driven) to make plenty of volume in this application.
What will you drive it with?
 
Ken,
I'm an orthodontist that is why the SMYLDOC
I assumed that in losing 3/4 inch of foot room w/ the new sub that I would put the amp behind the drivers seat. But having looked at a number of different threads the consensus seems to be for the passenger side. What would be your preference as I'm just about ready to do this.
thx in advance
 
If you can afford the room on the drivers side put it there - the passenger room has less to begin with & will bite into the space more unless you are tall & run the driver's seat in full rear psoition.
 
Re: SOS ProFormance Audiophile System (Stage1) Install & Review

I would like to say thank you very much to those who took their time to provide all the excellent tips that helped me in the install I recenlty completed of the SOS Stage 1 Stereo system in my 92 NSX. Special thanks to Ken "D'Ecosse", Malibu Rappper and Vega$, you guys were great.
Because of all the help I got, I would like to offer my help to anyone who might be thinking about doing the Stage 1 instead of the Stage 2 upgrade install.

First of all, my reason for doing Stage 1 vs Stage 2 was simply that I my NSX is an every day car and I'm an avid golfer and often carry two golf bags in the trunk and I did not want to give up any space in the trunk! I also wanted my install to be as inconspicuous as possible, so I opted for the Stage 1 that had a slightly smaller amp that I could mount horizontally at floor level behind my driver seat.

I fabricated a panel to replace the existing panel, behind the drivers seat, that would extend to floor level. I did this with 3/8" plywood and then countersunk the fasterners into the board, epoxied them into place and then covered this board with black upholstery material I bought from a local auto upholstery shop. I used the original 4 holes to mount this board but enlarged them to accomodate the larger fasteners. Photo below shows board in place.
6678NSX_Wheels_001-med.jpg
I used a nearby grommet to run the power cable to the engine fusebox and used a large bolt holding the rear glass release for my ground. Photos below show amp mounted to bottom of board.
6678NSX_Wheels_006-med.jpg
6678NSX_Wheels_005-med.jpg
I took the drivers seat out do do this install. But, before you bolt the amp to the board, reinstall the seat as you need to slide the seat all the way back to put the two front bolts back in, then slide the seat forward and but the 2 rear bolts in and then attach the amp to the board. As you can see from this next photo, with the seat installed it really is very inconspicuous.
6678NSX_Wheels_007-med.jpg
I lost some leg room, but I am 6 feet tall and I still have more than I need in terms of rear travel of the seat.

Kudos to Chris at SOS for coming up with such a great kit for this car. The fit of the subwoffer box is simply amazing. When I pushed it into place you can almost feel air rush out from under it due to it's perfect fit. Tip, cut your carpet to how you want it before you mount the speaker in the box, as the empty box is a lot lighter and easier to handle. I was not crazy about the plates that were used to hold the speaker grill in place so I installed the speaker a little differently. First of all, I used 1/2" wood srews to attach the speaker to the box. The shorter screws do not go all the way thru the face and therfore do not create a possible air leak. When I screwed the speaker in, I also used black latex caulk sealant I got at Home Depot to seal the speaker and I used the same caulk to attach the speaker cover. This is very solid, looks great and avoids those mounting plates. I then taped off the speaker and spray painted the front of the box with textured flat black/dark gray paint to make it look like it belonged inthe footwell with the rest of the carpet. When sealing the wire hole with the hot glue gun I also hot glued a piece of black nylon strapping to the top of the box, ran it around the back and let it stick out about an inch or so in bottom front. I then tucked it under the box when it is fully seated in the wheel well. The box is such a tight fit, that if I have to remove it, I fish out this piece and pull with a plier to easily remove the box. Photo shows sub box with nylon strapping slightly sticking out.
6678NSX_Wheels_004-med.jpg


Another issues I would like to address is how to wire the new speakers. Having read previous posts I did not even consider trying to run new wires thru the doors directly to the speakers in the existing sheaths. I made the mistake of taking Chris' advise and used the larger wires at the existing door speakers to make that connection. No offense Chris, but this was very difficult to do, very time consuming, and a real pain in my A__. I did the passenger side first, and not only do you have to splice into those wires but you have to cap off the other end because this is a hot 12 volt wire that was powering the amp at the old Bose door speaker. Getting to those wires after they come thru to front quarter panel and before they enter the plug was very difficult. this photos shows the passenger side with the butt connectors I used.
6678NSX_Wheels_003-med.jpg
Having done the passenger side I then proceeded to the drivers side and the task became a whole lot harder as this harness is behind the fuse box. I don't know how many hours I spent simply splicing into these wires but it was not worth it. I apologize for the poor photo but it is just a mess trying to get to those wires! No offense, but if you are left handed forget even trying! as this is a very tight area to work in.
6678NSX_Wheels_002-med.jpg
In talking to Ken D'Ecosee after the fact, he recommends using the smaller signal wires that you can very easily tap into behind the head unit in the center console, I wished I had known that prior to my install!. The rational from Chris at SOS is that you want to use the larger guage wire for better signal, and I am sure there is validity to that, but I can tell you that whatever signal is gained is not worth the effort. A small tip: use a 9 volt battery to periodically check your conductivity to the actual speakers as you do whatever wiring you choose to do. Positive wire to + battery terminal and negative wire to - terminal of this 9 volt battery and it will produce some "noise" thru the speaker to confirm conductivity.

In talking to "Coop" at Diamond corp who helped design this system for the NSX, he recommended to bridge channel 3 & 4 by attaching the positive wire from the sub to the positive terminal of channel 3 and the negative wire from the sub to the negative terminal of channel 4. This worked great for me.

I have not heard a Stage 2 install, but I can tell you how thrilled I am with this Stage 1 system. Sound is may not be quite as good as my Martin Logan's in the house, but it is terriffic!!!! Great adjustments on the amp in both hi and low gains to tune the system to you listening style. Chris thanks for making such a good kit available to us and again to all those who came before me that provided me some great help.

I will not be able to attend NSXPO in Phoenix but I live in uptown Dallas and would be glad to show and help any locals in any way I can. email or call my cell 214-334-0403. Thanks
 
Last edited:
Re: SOS ProFormance Audiophile System (Stage1) Install & Review

:confused: Man no love around this place.......sometime i feel invisable
 
Any chance someone has this thread (or PDF) with the photos still in tact?
 
The example in this thread is now my car. I can tell you that it sounds amazing. I am still trying to figure out how to adjust the bass/treble on the amp. I don't know what the buttons on the side of the amp do. I need to do a little investigating. The treble is still too high, even though Jonathan (previous owner) had the treble cranked down and the bass up.
I am also still trying to figure out why the amp is making whirring sounds during acceleration. I think the ground may be bad.
 
Has anyone installed the newest version of the autophile system? Im thinking of picking up the Stage 2. Is there a noticable difference in sound from the first and second versions?
 
hi Darryl --

I'm sure you'd like to hear from a customer, but I thought I'd share my experience since we are installing the stage 2 setup in our own NSX. Several months ago, we installed the final version of our new Proformance Audiophile Stage 2 setup in a customer's car. I was so impressed, we decided to install a set in our own car for demonstrations.

While I thought the prior setup sounded great, the Hertz and Audison components are truly special. I particularly like how small the Audison amplifier is, making installation much more versatile. We have mounting boards available now for either rear firewall or rear trunk installation which we will offer as an option to our customers.

http://www.scienceofspeed.com/produ...ts/NSX/ScienceofSpeed/ProFormance_Audiophile/

Please give me a call if you'd like to discuss more details.

Cheers,
-- Chris
 
Back
Top