• Protip: Profile posts are public! Use Conversations to message other members privately. Everyone can see the content of a profile post.

The endless tweaking of my silver 91

Joined
26 November 2019
Messages
35
Location
NJ
Seeing as this car has come a long way since I originally got it back in November 2019, I figured it’s about time I actually document the parts and work I have done over the years to get this car closer and closer to perfect for me. Surprisingly, I didn’t initially have any grand plans for what I wanted to do with it, but the car really grew on me the more and more I drove it and in some ways I may have gone off the deep end modding it…

When I first bought the car it was stock except for a K&N cone type intake that sat in the engine bay, the HRE wheels, Bilstein shocks with Tein lowering springs and some pretty jank installed head unit and door speakers.

IMG_3FEB926FA938-1.jpeg
“Pretty good looking car” was the first thing I thought when I laid eyes on it, and the opportunity to buy it kind of fell into my lap so I went for it. At first driving it was nothing special to me but the more and more I did drive it the more it grew on me, but that turned into a couple of things I wanted to address.

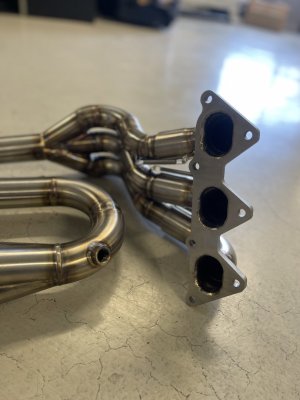
First thing I ended up doing was an exhaust(of course….). Got a used Ark cat back from a for sale thread on here, bought the cheapest headers and test pipes I found online and slapped it all on. Needless to say, being that the headers were bottom dollar they needed to be lightly “massaged” to get them to clear the oil pan 😂
61655170692__DB90DEFF-A809-46D0-AA41-37FDD08D2A30.jpeg
61655229242__81ADB93A-DCDD-439D-B0CA-CEF0E4BCBA03.jpeg
Anyway….with that problem out of the way, the car was back together and sounded great, after being on the stock exhaust for 8 months it was 1000x better sounding. After this the next main concern was getting the maintenance up to date, who knew when the last timing belt service was done, the original radiator looked like it had seen better years, and the engine had some valve cover gasket/oil pan gasket seepage. I had been dreading doing the job because the car did not look like it was fun to work on at all with the engine in the car, so one day I just sucked it up and brought the car into the shop on a weekend and dropped the motor out of it, since that seemed like the less painful solution.

Surprisingly dropping the motor out is relatively painless on these cars and it was out in less time than I was initially thinking it was gonna take.
IMG_5292.jpeg
64944088442__88E81873-E97F-455F-99D9-A9F38AF47FF4.jpeg
Taking the timing stuff apart is way way easier this way than to try and fight with it in the car 2 inches away from the frame rails.
IMG_5297.jpeg
New belt, tensioner, water pump, cam and crank seals, valve cover gaskets, and oil pan gasket, and did a Koyo rad to replace the stock one.
IMG_5291.jpeg
After all that it went right back in and the car was running same day. I had noticed when it was all apart that the cam/crank sensor had puked out all its epoxy guts down the side of the engine, but looking it up on here it seems like that’s common and doesn’t affect the sensor operation for the most part. But being how I am, once I saw something that could be an issue it bothered me, enough that I looked it up in the service manual and checking the sensor resistance, it being out of spec was enough justification for me to buy a new sensor and drop the motor out again to swap it. (I got problems…)
65430054508__A6DFAD10-7549-4A43-98BE-55D213EB52AB.jpeg
65430158249__C2FF3918-4D41-4931-A632-D8074DE4EA1C.jpeg
IMG_5537.jpeg
Thankfully, the first time is always the hardest and this time I had the motor out, sensor swapped, and motor back in running starting at about 4pm and driving home at about 11:30pm which wasn’t half bad. After I had the peace of mind of having this addressed the next concern was getting the radio catastrophe fixed and I wanted to swap over to an S2k dash because I always loved how it looks and it really doesn’t look out of place in this car in my opinion. Thankfully that process was easy because of the great plug and play kit that Sjoeberg sells.
IMG_5683.jpeg
IMG_5690.jpeg
Painless install, looks great, win win. The radio and door speakers on the other hand…..yikes. At this point I basically never turned the radio on because half the time if I hit a bump it would stop working, and it was just such an eyesore.
IMG_5589.png
The dash was just chopped up and the head unit plopped in, the door panels were also mangled because whoever did the install clearly had no idea how to take them off so they just broke them and used screws to hold it together with hopes and dreams.
IMG_6842.jpeg
IMG_6843.jpeg
IMG_6130.jpeg
Just all around A1 quality work here….Mita motorsports door kit, and SoS speaker install panels and Mita tweeter pods fixed this whole situation up with the doors.
IMG_6805.jpeg
IMG_6461.jpeg
67028406426__1022F059-B930-47F7-9067-B0DF4EBC6CC1.jpeg
IMG_5923.jpeg
Had to lightly modify these to fit my larger morel tweeters but the end result came out looking really good..
 
love sebring black roof cars..Nice choice of parts, all good vendors.
 
IMG_5922.jpeg
IMG_6852.jpeg
Ended up mounting the crossovers and amp in the trunk with the SoS kit for as clean a look as possible, ran all the wires through existing grommets and such to avoid drilling any holes at all, super hassle but it was worth the annoyance.
IMG_6846.jpeg
IMG_6850.jpeg
IMG_6853.jpeg
IMG_6804.jpeg
For the center console I bought a Euroboutique carbon double din replacement, really nice looking and fitting piece.
IMG_5706.jpeg
I scored a factory keyless entry unit and remote from a for sale thread here on the forums and made a harness to get it working, all the connectors and pins were easy to source from cycle terminal.
65939552469__BDE1DED9-A492-49AB-8F85-E1955323BD41.jpeg
IMG_5881.jpeg
IMG_5888.jpeg
65948627981__007E2933-75DD-4374-9B02-838B27B13BB4.jpeg
This was actually one of my favorite mods because it’s a working factory keyless. Moving on the next few things were some carbon brake ducts and fender scoop from Pride Carbon, really nice fit and finish on these.
IMG_6994.jpeg
IMG_6997.jpeg
IMG_6999.jpeg
And some time around this point was when I ordered an NSX-R gear set and final drive from SoS, but they told me it was pretty much and order it and wait deal so I had forgotten about it for awhile, ordered the other stuff I was going to need from the dealer, new oem clutch, release bearing, synchros, sleeves, bearings etc etc. I have a stack of receipts from Acura and at this point I stopped adding it up 😆.

Ended up having a carbon lip practically fall into my lap, the price was too right, so that was the next mod that went on the car.
IMG_7131.jpeg
Once I put the lip on the more glaring concern of my butter soft suspension became an issue that needed to be addressed. Also because of my rear tire size(295/30-19) my right rear shock perch was cutting into the inside of the tire, so I needed to go to a coil over.
IMG_7517.jpeg
IMG_7518.jpeg
I ended up putting on a new rear tire with a 3mm spacer as a patch fix, but it was a problem that needed to be fixed. Also, annoyingly, this thing was scraping on flat roads if there was even a slight dip on the road. The car became a bit annoying to get in and out of my driveway too, always lightly scraped. Thankfully the lip is pretty solid, and the fact that it’s held on by so many bolts meant that it wasn’t going anywhere.

I bit the bullet and ordered Sakebomb öhlins, I’ve always been a bit of an öhlins fanboy with my motorcycle suspension so it was the only real choice in my eyes. Went with the 12k/9k track spring rates since I’ve driven cars that have had dfv’s in them and they ride really nice with higher spring rates, and I’m not scared of a little bit of nvh if it comes with the performance I want when I’m pushing the car hard. Glad I went with the spring rates I did because this car drives so much better with these than with the Bilstein/tein combo even with triple the spring rate in the front and double in the rear.
IMG_7980.jpeg
IMG_7985.jpeg
 

Attachments

  • IMG_7980.jpeg
    IMG_7980.jpeg
    269.8 KB · Views: 1
I have the 10/8 ohlins and like them
 
Man I gotta say, I am a sucker for that öhlins gold…
IMG_7982.jpeg
IMG_7986.jpeg

Next mod I ended up doing was some Bride seats, again this was one of those the price was too damn right deals, and I just had to buy them.
IMG_8041.jpeg


IMG_8043.jpeg
IMG_8047.jpeg
The blue just really pops nicely on a silver car, I wasn’t sure how I was going to feel about it but once they were actually in the car I decided to keep them. Around this time the gear set finally came in and I had managed to get my hands on the other parts for the swap. Quickly amassing the pile of parts in my living room.
IMG_7898.jpeg
IMG_7932.jpeg
IMG_8137.jpeg
Amayama order for a few random things that were showing discontinued here, and a bunch of thrust shims in case I needed them.
IMG_8139.jpeg

With jobs like that it’s always better to be safe than sorry, I’d rather waste money on shims I will never use than need them while it’s all apart and be screwed. Around this time I decided to actually finish my stereo install and wire the power to the amp and address my battery terminals, and also installed an antigravity battery. When I initially fixed the door panels and center console I wired the stuff in the doors and ran all the speaker wires and the rca’s to the trunk but I didn’t actually wire the power to the amp so the whole time while my interior looked good I was always driving around with the windows down listening to the car and not actually having a working radio. It really never bothered me because the car is such a driver car that I was never bored just listening to the song of that lovely C30.
71536492394__A599FF9A-DB96-4512-9F26-DA6BBFA09970.jpeg
Went with 1/0 cable for the ground, never hurts to have more than you need.
IMG_0047.jpeg
IMG_0055.jpeg
Now around this time my buddy had been telling me I have to do a track day with it to see how the car is, I had always meant to do it eventually, but he was the push I needed to address the brakes on the car. I was still on the stock size small 91 brakes, with stock lines, my brake booster looked like it had seen better years, and the stock ALB unit didn’t even work, it had been wired to just shut the pump off by shorting the pressure switch.

So this is where I kind of went off the deep end again a bit, because I decided if I was going to touch the brakes I was going to do EVERYTHING at once. That “everything” turned into Sakebomb front and rear competition brake kits, SS lines, a new brake booster, and a complete abs system upgrade to the newer style modulator.
IMG_0373.jpeg
IMG_0368.jpeg
IMG_0541.jpeg
IMG_0565.jpeg
Since 2000+ NSX modulators are now ridiculously expensive, and the fact that I had unplugged my tcs module completely a long time ago, I went with an AP1 modulator I got on eBay for $100. I wasn’t going to be using traction control anyway so I didn’t really see the point in paying that much more for the NSX one, plus at this point I had spent a ton of money on all this stuff, but the end result was worth the money and the time installing and wiring the abs up.
IMG_0581.jpeg
IMG_0583.jpeg
IMG_0584.jpeg
IMG_0585.jpeg
 
IMG_0587.jpeg
IMG_0600.jpeg
IMG_0601.jpeg
IMG_0602.jpeg
There’s nothing like the fit and finish of the oem brake lines, made this swap way easier than it would have been if I had to bend them myself, and it wouldn’t have looked nearly as tidy.
IMG_0392.jpeg
IMG_0603.jpeg
Fronts only needed a 3mm spacer to clear which I can live with.
IMG_0604.jpeg
Making the wiring harness took me a few hours but since it isn’t that many wires to hook up it wasn’t too bad. I ended up spending about $120 or so for the connectors and pins and wires, I just didn’t want to spend $500 on a plug and play harness for something that I knew I could figure out.
72020662123__D9AEF98D-0944-430F-AA82-A602CABF37D4.jpeg
IMG_0616.jpeg
IMG_0622.jpeg
IMG_0623.jpeg
IMG_0624.jpeg
Only had 3 wires going into the car through the grommet I reused the stock solenoid plugs for the wheel speed sensor connections and the existing plugs for the pressure sensor and such to make it as minimal as possible and not have random plugs open in the front.
IMG_0628.jpeg
Ended up wiring in a solid state relay to get the light working properly too but I didn’t actually take a picture of that it seems.

After all this was said and done I went to my first track day with S2k takeover at NJMP lightning. Had a blast, the car performed perfectly all day, drove to the track and back, really didn’t have any issues which was the best I could hope for for its first time out. Even with my 18/19” wheel setup and pilot sport 4s tires I didn’t have enough pace to overpower the tires so for my skill level it worked out perfectly.

IMG_0779.jpeg
IMG_0782.jpeg
A29A933F-7F86-47C9-A7C7-74B72F63374D.jpeg
IMG_0814.jpeg
5C4DDF62-D983-47BC-BDF4-56EAF3ED6C5A.jpeg
B3E1ACED-9EFF-43BF-962F-1A066455C0E0.jpeg
Was able to have some pretty nice shots taken. My best lap of the day was a 1:23.6 which I was pretty happy with for first time out.


This was the recording of the lap with my phone mounted on the windshield with the track addict app. Definitely have a lot to improve but I plan on going to the track more this year to get my skills up.
 
Last edited:
At this point after everything went off without a hitch at the track and the car was driving good and everything I was obviously very happy with it, which meant only one thing…..something bad was around the corner 😅😅 That something bad happened to be a sidewalk being raised in one corner on a driveway I was pulling into…the literal next day after the track. 4 years having the car and never hitting anything and it had to be a damn sidewalk that got me, I was too focused on getting the right angle to clear the driveway I didn’t even notice the corner of the sidewalk slab was raised and while I didn’t notice, my front lip sure did. As soon as I felt the hit and heard the god awful cracking crunch it made, I felt it in my soul that property damage had just occurred.
IMG_0829.jpeg
IMG_0830.jpeg
IMG_0831.jpeg
IMG_0832.jpeg
Needless to say this completely took the wind out of my sails….the only silver lining was that it happened in November and not in June so putting the car away until it could get fixed up was not that bad. Seeing that the front valance had been repainted a few times, and the fact that it was cracked, I figured it would be easier for the guy at the body shop and my wallet to just buy a new one instead of wasting labor trying to save the one that was on the car. Thankfully by some stroke of pure fate my local Acura dealer was able to get one next day because it was in stock at the local Connecticut warehouse.
IMG_0854.jpeg
And seeing how I was going to get this painted anyway, I decided to take my mirrors off and apart to get the resprayed because the rock chips had done work on that paint over the years and it was one of the parts of the car that bothered me a lot.
IMG_0851.jpeg
IMG_0852.jpeg
They just looked terrible and now was as good a time as any to get it addressed. The lip I initially thought was garbage but when my coworker looked at it he said it wasn’t that bad and I should just sand it down and fix it. While he was technically correct in hindsight I probably should have just bought a new lip because good lord I had no idea the amount of labor I had just signed myself up for. Mind you I have never done any sort of composite work before, let alone body work so I had no idea the amount of annoyance and labor it would be sanding and repairing.
IMG_1112.jpeg
IMG_1111.jpeg
This spot was the only part that the carbon actually cracked through and broke off completely, so even finished now it doesn’t look perfect but after the amount of hours I put into this lip I can live with it, and if I ever damage this one again it’s going right in the trash.
IMG_1550.jpeg
IMG_1551.jpeg
After the first coat of epoxy there were some cracks that needed to be filled, then sanded entire lip again, another coat of epoxy, and then it was wet sanding it smooth again and polishing. I’m making it sound easy but the initial wet sanding with a block was quite terrible because the surface looked like Swiss cheese after the epoxy dried.
IMG_1553.jpeg
IMG_1711.jpeg
IMG_1765.jpeg
Got it up to 2000 grit before polish and afterwards it actually had a really nice shine to it, at the suggestion of the guy who polished it for me I decided to do a matte PPF instead of clear and it ended up giving it a dry carbon look when it was all said and done.
IMG_1779.jpeg
Left was the polished finish and right was with the PPF on. Had to do it in 2 pieces because he only had about 3 feet of material on a 60” roll so it was not enough to go lengthwise. I’m not complaining because it came out really good, my coworker came through big time for me and did it in about half an hour, he used to do vinyl wrapping so it was a lot faster to have him do it and I play helper than me attempt to try it with only enough material for 1 mistake.

Honorable mention now because I don’t remember exactly when in the timeline this was but I had at some point gotten a complete new oem air box to replace that cone filter intake thing that was just in the engine bay sucking up hot air, and I had gotten type r front and zanardi rear sway bars.
IMG_6008.jpeg
IMG_6009.jpeg
IMG_7984.jpeg
Now around this time I knew that getting the car ready for this year I had to stop putting off doing the transmission build because the weird gearing of the car stock had become very apparent on track, also I wanted to do at bare minimum a weld in baffle because the last thing I need is a spun bearing. I initially bought a cedar ridge weld in baffle and figured while the engine was out it wouldn’t be too bad to ask my coworker to weld it in for me. The more and more I started thinking about things I want to do “while I’m in there” the more and more the pile of parts ended up growing. This was probably when I went off the deep end a little(again…). I had bought a set of Foundry3 engine mounts awhile back that I was going to do while the engine was out, and one day I randomly messaged Chris about his alternator bracket that never seemed to be in stock and he had just so happened to have gotten a batch done when I messaged him, so of course I had to buy that.
IMG_1666.jpeg
And since the intake manifold has to come off to get the stock alternator bracket out, that turned into like $300 of gaskets to replace everything on the manifold, plus injector o rings etc. Then I figured hey since the front bumper has to come off anyway I might as well do the type r chassis braces, and I swear right when I thought that Mita had posted they just got a batch of them in from Honda so of course those were ordered. Then I figured while the motor was out I might as well do the lost motion spring upgrade to get rid of the idle ticking…..and you can see where this is going….
 

Attachments

  • IMG_1779.jpeg
    IMG_1779.jpeg
    129 KB · Views: 2
IMG_1667.jpeg
This quickly turned into seals, o rings, vtec screens, coolant hoses, etc etc. basically I bought anything I was anticipating I was going to touch or be near at some point. While a friend of mine was in Japan a few weeks ago he told me that the exchange rate was pretty good so I decided to look into a better oil pan, and ended up buying an RFY baffled high capacity pan.
IMG_1676.jpeg
Shout out to Mita for their new price match policy they even beat the shipping price which was great. If I was going to buy it anyway I would much rather buy it from them because all the parts I’ve gotten from them over the years have all been perfect fit and finish and their shipping is always fast and reasonably priced. Gotta support the guys who still support the platform. Around this time I decided to put my mirrors back on and the door panels back together so I can get the car to the shop. Ended up putting clear PPF on the mirror bases and for my first time ever using it they came out half decent. I plan on doing the mirror caps on the car but the bases were so small and awkward that wouldn’t happen on the car.
IMG_1735.jpeg
IMG_1737.jpeg
Once it was all settled and done about 2 weeks ago I had gotten everything together and figured this past weekend would be as good as any to just suck it up and get it all done. Boy did I slightly underestimate how much actual work this was going to be….like of course I had an idea what would be entailed but when you get into the meat of it, it ended up being late nights and early mornings in a crunch to get the car back together before the end of Sunday so I wouldn’t be interfering with the work flow of the shop on Monday. So I loaded up the daily with everything on Thursday, got a ride home and drove the car to work Friday.
IMG_1878.jpeg
Started working on the car at around 4pm Friday and at a not trying to kill myself on the first night pace I got the engine dropped out around 7pm, then got the transmission split off, the old clutch out and the engine on a stand. Getting the engine on a stand was actually quite awkward and definitely a 2 man job thankfully my coworker had stayed around until he knew I would be good by myself for the night and helped me get it on there.
IMG_1904.jpeg
IMG_1905.jpeg
Apparently I had an ACT clutch this whole time, never bothered to even look at it even though I’ve had the engine out twice because the clutch never really gave me any issues.
IMG_1906.jpeg
IMG_1907.jpeg

IMG_1910.jpeg
IMG_1912.jpeg
IMG_1913.jpeg
IMG_1915.jpeg
This bracket was actually way heavier than I was expecting it to be.
IMG_1919.jpeg
Cracked the manifold apart, not terrible for 33 years worth of use. I checked the screws on all the valves for the vvis and they were all tight and the staking on the backs were still perfectly intact. So a couple cans of brake cleaner and some compressed air blowing out all the egr ports, and every nook and cranny I could see I got it all back together with new gaskets on everything.
IMG_1921.jpeg
IMG_1922.jpeg
IMG_1925.jpeg
By the time I had finished swapping over new injector seals and cleaning and putting the manifold back together it was about 1030pm and I got real tired and went home for the night. Saturday morning I was back here bright and early at 8am to get cracking on the lost motion springs, valve adjustment, and the o ring and seal replacement on the engine, get it all back together and ready to drop in before getting to work on the transmission. This was the part I misjudged how long it would take because I wasn’t done with getting the engine tidied back up until about 4pm on Saturday.
IMG_1930.jpeg
IMG_1934.jpeg
IMG_1936.jpeg
I noticed while it was apart that I don’t have dual valve springs, which is a little weird I guess, but measuring the cam lobes they are definitely MT cams, and I’ve regularly taken this engine up to the limiter over the years and never had an issue, so I’m hoping these are aftermarket and not AT springs for some reason because that would probably make me lose sleep. The retainers definitely look stock but the intake springs have green paint on them and the exhaust have that pink paint. The hydraulic lifter lost motion assemblies were all sticky, which would explain the tick.

 
IMG_1937.jpeg
IMG_1938.jpeg
IMG_1939.jpeg
IMG_1942.jpeg
Oh at some point before I had done an ATI pulley as well that’s why that’s on there.
IMG_8111.jpeg
IMG_8112.jpeg
Seeing that it was already 4pm Saturday at this point I knew I had to get cracking on that transmission because the weekend was quickly evaporating.
IMG_1940.jpeg
IMG_1941.jpeg
IMG_1945.jpeg
IMG_1946.jpeg
IMG_1947.jpeg
IMG_1948.jpeg
Got the gear stacks pressed, the main shaft play checked, and the type r diff preload shim installed and the case bolted back together around 9pm. Cleaning the 30 years of gunk off the case and all the clutch dust off the bell housing took awhile, but the end result was very nice.
IMG_1952.jpeg
I wasn’t taking many pictures at this point because I was in full “I gotta get this done” mode. At this point I figured I may as well take the front bumper off and get the chassis braces on so that Sunday all I’d be doing was basically putting the car back together and not having to take anything else apart at that point. Plus I couldn’t get the engine off the stand by myself so I had to wait for my coworker to come in in the morning to help me with that.
IMG_1953.jpeg
IMG_1955.jpeg
By this time it was around 10pm on Saturday and I was really feeling it at this point so I went home for the night to get back to the adventure on Sunday.
 
Was back at it Easter Sunday around 8am but by this point in the weekend I was beyond tired, but it was the final stretch so I had to get it done. Thankfully my coworker came in since he had to do something here anyway and helped me out a ton, I probably wouldn’t have been able to finish the car without him showing up and sticking around after helping me get the engine back into the car.
IMG_1956.jpeg
New valance installed
IMG_1957.jpeg
Front air duct cut to fit around the chassis bar.
IMG_1958.jpeg
New oem clutch installed and there’s no better alignment tool than an input shaft, the transmission slid right on in.
IMG_1959.jpeg
IMG_1960.jpeg
IMG_1961.jpeg
IMG_1962.jpeg
While I was working on the stuff in the back of the car my coworker ended up installing the lip, changing my radiator hoses, changing the hoses under the middle of the car, and installing the lower part of the type r chassis brace set. Really came in clutch for me because by this point I was running on fumes.
IMG_1965.jpeg
IMG_1966.jpeg
IMG_1964.jpeg
IMG_2007.png
Got it running around 315pm, thankfully no leaks no weird noises, burped the coolant and the car was able to drive out of the shop around an hour later after I finished buttoning up the interior and everything.
IMG_1968.jpeg
At this point the sense of relief I felt took all the tension out of my body and the fatigue hit me like a ton of bricks. Had to clean up the shop and load up all the old parts into my truck before I headed home for the day, but I was happy nothing stupid happened.
IMG_1969.jpeg
So after all that was it worth it? Within about 35 seconds of driving the car down the block I would resoundingly say hell yes it was. I feel like the car really should have came with short gears like this from the get go because it drives way better now. I was trying not to be too rowdy on my way home because of the new clutch and stuff but I couldn’t help doing a 2-4 pull when I got on the highway and the way it just stays up in the revs after every shift is wonderful.

So basically that’s been the journey up to this point, there’s still a few more things I’d like to do to the car but for now it will be nice to drive it again and enjoy the nicer weather that should be right around the corner.
 
Got the car back on the lift this weekend to double check everything after driving it back and forth to my house, nothing of note other than a tiny coolant drip from one of the hoses underneath the middle of the car, but the hose was all the way on and the clamp was on too, all I did was shift the clamp a little and it seems to have taken care of that, even though I will be keeping an eye on that to make sure it isn’t anything that will become an issue.

Since the car was on the lift already I threw the scales under it just to see where it was at weight wise, since I hadn’t checked in a long time.
IMG_2041.jpeg
This was the weight without me in it and the next picture is with me sitting in the car.
IMG_2042.jpeg
Right around 3k with driver is not too bad considering I have things like an amp in the trunk and stuff. Got the car aligned on Saturday and everything came out perfect as usual when I take it to Ivan. He adjusts everything with me sitting in the car so I never end up with issues.
IMG_2048.jpeg
IMG_2047.jpeg

Today I finally got my hands on a set of Foundry3 headers, I’ve wanted these since I first saw them and and Chris got me in contact with a customer of his who had a brand new set that had been sitting unused, so that deal was as good as done.
IMG_2066.jpeg
IMG_2068.jpeg
IMG_2069.jpeg
IMG_2070.jpeg
These headers are so pretty I almost don’t even want to put them on my car right away…🤣 But they will most likely be going on this weekend if the weather is nice.
 

Attachments

  • IMG_2067.jpeg
    IMG_2067.jpeg
    105.4 KB · Views: 1
Back at it again today to install the headers, and everything went relatively about as smoothly as you could expect.
IMG_2149.jpeg
IMG_2152.jpeg
IMG_2153.jpeg
Flanges on these cheap ass headers were about what you could expect….they never sealed without hondabond because they weren’t even close to flat.
IMG_2162.jpeg
Front header had to also be massaged a tiny bit more to clear this pan, so I was pretty happy to finally be able to throw them in the scrap pile.
IMG_2160.jpeg
IMG_2161.jpeg
Not really much to say, the install went about as well as you could expect, and I only ran into one tiny hiccup but that was only because I have the RFY extendo sump pan and not an oem one.
IMG_2165.jpeg
Luckily my coworker was there to save my ass again, and he whipped out the hot glue gun and got me sorted with a second bung in about 15 minutes.
IMG_2172.jpeg
IMG_2173.jpeg
IMG_2174.jpeg
The headers came with an offset bracket with oem bolts for the rear to clear the runners on the back header
IMG_2170.jpeg
IMG_2171.jpeg
IMG_2176.jpeg
The fitment on these was absolutely spot on though, clears the pan with no funny business, not really much else to say I’m beyond happy with these things.
IMG_2167.jpeg
IMG_2168.jpeg
IMG_2178.jpeg
I’ll have to drive on them for a bit to see how the colors end up changing on them, but for now I’m really happy with where the car is at. Next thing to address will probably be a new clutch master and slave only because I have a feeling if I don’t change them after having done everything else I’ll run into an issue, so I’m going to do those just to be safe.
 
Back
Top