• Protip: Profile posts are public! Use Conversations to message other members privately. Everyone can see the content of a profile post.

The MovieTime! THEATER Construction Thread!

Joined
7 February 2001
Messages
1,617
Location
CORONA, CA USA
Building the MovieTime showroom

I've been chatting with a fellow Prime member over the last few days about the theater he designed and built recently and
about what we had done with ours. I was going to link to the photos I had posted on my website and then realized I never
uploaded all of them. So during the upload I figured why not put a thread together on the design and construction
process from start to finish. So for anyone that's interested, below is the Construction of my private screening room.


Below is our loft back when we moved in Sept of 2007. I think we looked at over 30 homes minimum, many of which
were very nice, but had to pass because it didn't have that perfect loft I was looking for. Finally
found a layout that would work. I wanted a high ceiling and a minimum of 18 feet in width to support
the wide 2:35:1 screen we wanted to demo. That also meant I needed at least 22 feet of depth for acceptable
seating distance, at least for the back row. Turns out the sloped ceiling was a godsend, giving me
incredible flexibility on what I could experiment with for the night sky I wanted to do.
The speakers and amps in the picture are not what was used in the theater, but part of a 2 channel
setup I used. Same with some of the chairs. We had just moved in and needed a place to put it all.

<img src="http://movietimepro.com/Construction/before1.jpg" border="0" alt="" /><br />
<img src="http://movietimepro.com/Construction/before2.jpg" border="0" alt="" /><br />
<br />


So first things first, we had to build a wall and create an enclosed space. As much as I liked the idea of
a multi-purpose hangout room, it just wasn't conducive to the high-end theater I needed to build for
show. The room had to be isolated and the windows removed. As it turned out, my next door neighbor
ended up being a general contractor. I contracted him to do all the construction, drywall, painting,
and woodwork with me. We designed the room and he built it to spec with us.

<img src="http://movietimepro.com/Construction/framing1.jpg" border="0" alt="" /><br />

If you're wondering what these 4 cutouts on the backside of the wall are, I thought it would be a good idea
to hang large photos of theaters we had done on the stairway. So instead of a huge blank wall, we could
have some lighting and photos as you ascend the stairs to the theater.
<br />
<img src="http://movietimepro.com/Construction/framing2.jpg" border="0" alt="" /><br />
<br />
<img src="http://movietimepro.com/Construction/framing3.jpg" border="0" alt="" /><br />
<br />
<img src="http://movietimepro.com/Construction/framing4.jpg" border="0" alt="" /><br />
<br />


At this point I have to apologize for the break in the flow of images. During the framing we were on a very
large project in Vegas that had me gone for entire weeks at a time. I missed taking photos of framing the
stage, the front sofit and the following drywall. The next images start with the room framed and drywalled and
beginning the rough woodwork.


So the platform is already built and much of the drywall complete. We used isolation blocks under
the platform to decouple it from the floor, but there wasn't much purpose as I chose not to isolate the room
from the rest of the house. Doing it with new construction is expensive enough, doing it on a retrofit is worse.
I decided it would be a more effective example to show a client the opposite; what it sounds like when you DON"T
do room isolation. That way the client can hear what the rest of their home will sound like if they don't spend
the extra funds to do so. So yes, when the room is cranked, you're watching the movie wherever you are, lol.
It's my house anyway. :D


The goal is to not see a single speaker or piece of equipment in the room, so the front screenwall needs to
be acoustically transparent. I am not a fan of perforated screens, so I designed the screen slightly higher
than normal to fit the center channel underneath. As much as I would love to put it right behind the screen,
the compromise in image just isn't acceptable to me. The larger arches are opening for the front speakers,
and the entire area below the screen will be transparent as well for subwoofers. If I had the choice, I would
add 12 inches of depth to the equipment area, but the 21 feet of room length bit me in the butt again. This will
serve as an issue later in the project when the subwoofers are so powerful they shake the screen and image due
to their proximity to the screen.


<img src="http://movietimepro.com/Construction/woodwork1.jpg" border="0" alt="" /><br />
<br />
<img src="http://movietimepro.com/Construction/woodwork2.jpg" border="0" alt="" /><br />
<br />
<img src="http://movietimepro.com/Construction/woodwork3.jpg" border="0" alt="" /><br />
<br />
<img src="http://movietimepro.com/Construction/woodwork4.jpg" border="0" alt="" /><br />
<br />
<img src="http://movietimepro.com/Construction/woodwork5.jpg" border="0" alt="" /><br />
<br />
<img src="http://movietimepro.com/Construction/woodwork6.jpg" border="0" alt="" /><br />
<br />
<img src="http://movietimepro.com/Construction/woodwork7.jpg" border="0" alt="" /><br />
<br />
<img src="http://movietimepro.com/Construction/woodwork8.jpg" border="0" alt="" /><br />
<br />
<img src="http://movietimepro.com/Construction/woodwork9.jpg" border="0" alt="" /><br />
<br />
<img src="http://movietimepro.com/Construction/woodwork10.jpg" border="0" alt="" /><br />
<br />
<img src="http://movietimepro.com/Construction/woodwork11.jpg" border="0" alt="" /><br />
<br />


We used tint on the inside of the windows so from outside, it just looks like the window is closed and
you can't see in. We hung a thick, black material over them and drywalled over that. The framed out square
you see in it's place is just an inset for a poster once the room is complete.

<img src="http://movietimepro.com/Construction/woodwork12.jpg" border="0" alt="" /><br />
<br />
<img src="http://movietimepro.com/Construction/woodwork13.jpg" border="0" alt="" /><br />
<br />


So what's up with the crazy LEDs lining the ceiling? That was the cool idea I came up with for a night
sky mural. I did some of the fiber optic ceilings and never really thought they had enough cool
factor for how very expensive they were. And simply painting something on the ceiling is a bit
Vegas. I wanted a crazy nebula. Now there is a 20K+ way to do it, and the 4K way I discovered.
I thought that if I stretched a print over the entire ceiling about 3 inches from the LEDs and used
a backlit material, I could make the entire image glow from behind. Did it work out? You be the judge further
in the writeup. Or cheat and skip ahead like I would. :D


<img src="http://movietimepro.com/Construction/LEDs.jpg" border="0" alt="" /><br />
<br />


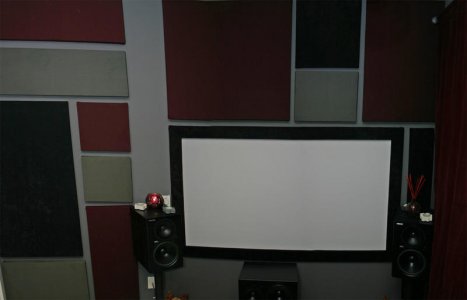
So now the panels arrive courtesy of my local paneling shop. We picked out the fabrics, created a design,
and decided on the various panel types around the room. They showed up wrapped and 90% ready. A couple days
of cutting and wrapping and the panels are up!We cut out openings in the panels for the side and rear speakers
that are already installed in the walls.

<img src="http://movietimepro.com/Construction/panels1.jpg" border="0" alt="" /><br />
<br />
<img src="http://movietimepro.com/Construction/panels2.jpg" border="0" alt="" /><br />
<br />
<img src="http://movietimepro.com/Construction/panels3.jpg" border="0" alt="" /><br />
<br />
<img src="http://movietimepro.com/Construction/panels4.jpg" border="0" alt="" /><br />
<br />
<img src="http://movietimepro.com/Construction/panels5.jpg" border="0" alt="" /><br />
<br />
<img src="http://movietimepro.com/Construction/panels6.jpg" border="0" alt="" /><br />
<br />
<img src="http://movietimepro.com/Construction/panels7.jpg" border="0" alt="" /><br />
<br />
<img src="http://movietimepro.com/Construction/panels8.jpg" border="0" alt="" /><br />
<br />
<img src="http://movietimepro.com/Construction/panels9.jpg" border="0" alt="" /><br />
<br />
<img src="http://movietimepro.com/Construction/panels10.jpg" border="0" alt="" /><br />
<br />
<img src="http://movietimepro.com/Construction/panels11.jpg" border="0" alt="" /><br />
<br />

With the paneling all finished, it's time to fire up the ceiling. So how did it turn out?

<img src="http://movietimepro.com/Construction/ceiling1.jpg" border="0" alt="" /><br />
<br />
<img src="http://movietimepro.com/Construction/ceiling2.jpg" border="0" alt="" /><br />
<br />
<img src="http://movietimepro.com/Construction/ceiling3.jpg" border="0" alt="" /><br />
<br />


I admit it. It's frickin SICK! Pics don't do it justice. As cool as the rest of the room turned
out, it's always the first thing you notice when you walk in. Jaws hit the floor. I used an actual
NASA photo at 10K X 8K + resolution. The print is a single
sheet with no seams and ran me a solid $2500, but it was so worth it. :D We still just lay in the room and
stare at it without watching anything, lol.


It's time for me to go out now, so I will have to save part 2 for when I get back. You haven't seen
anything yet. Want to know what kind of equipment goes into a theater like this? I won't give it
away, but I will say that the Audio alone will buy you a brand new NSX (if they still made them).

I know we've been looking at lots of Racks in the Off-Topic section as of late,
but this one will knock your socks off! :tongue:

SO STAY TUNED FOR PART 2 OF THE MOVIETIME THEATER CONSTRUCTION! :D
 
Last edited:
Niiice , What Projector are you using ? My Theatre has a Vidikron Vision One 9" CRT, This rivals commercial cinemas at least in my town .
I often see a lot of people spend a lot on asthetics and Audio , but miss out on the most crucial part , the Picture . I'm sure you have something sweet though , I betting either D-ILA ,SXRD or 3 chip DLP .
Will the art work on the cieling negatively distract from the picture ?
I only say this becase when your veiwing pics with on/off CR of 30000:1 , the smallest amout of distracting light or reflections are annoying when your into a movie . When a movie goes to a dark scene , you can't see your hand in front of your face , the way it should be .
 
Last edited:
As amazing as the room is turning out, I still like the first photo with the Magnepans and McIntosh monoblocks :cool:

We currently have 3 pairs of Maggies; MG1C's, MMG's and our main MG3A's.

Brian
 
What in-wall speakers are those?

The surround speakers are the JBL Synthesis S4AI speakers

http://www.jblsynthesis.com/product...?prod=S4AI&Language=ENG&Country=US&Region=USA

They are not traditional in-walls in the sense that they are a sealed enclosure. They were designed with only a 4" depth for placement inside a wall. They are actually quite heavy and require brackets that drill into the vertical studs.

<br />
<img src="http://movietimepro.com/Construction/S4AI.jpg" border="0" alt="" /><br />
<br />

The most unique feature they have is their configuration flexibility. They can be set into a bipole, dipole, or direct radiating mode depending on how they are being used. There is a contact closure on the back that I can control from an external control system that does the switching.


Niiice , What Projector are you using ? My Theatre has a Vidikron Vision One 9" CRT, This rivals commercial cinemas at least in my town .
I often see a lot of people spend a lot on asthetics and Audio , but miss out on the most crucial part , the Picture . I'm sure you have something sweet though , I betting either D-ILA ,SXRD or 3 chip DLP .
Will the art work on the cieling negatively distract from the picture ?
I only say this becase when your veiwing pics with on/off CR of 30000:1 , the smallest amout of distracting light or reflections are annoying when your into a movie . When a movie goes to a dark scene , you can't see your hand in front of your face , the way it should be .

The projector is a 3-chip DLP from Digital Projection International and it's definitely awesome. I will post some pics of it in Part 2 today. If necessary, it has enough power to project a plasma-bright image on my screen with all of the lights and ceiling at 100%. This is useful for sports and get togethers when you want to hang out and watch something and not sit in a dark room. That kind of lumens output does come with a price tag.

For watching movies, the darker the room the better, just like you said. The ceiling is dimmable and controllable just like the other lights, so I can just shut it all off when watching a movie. What I like to do actually is to dim it real low so its not distracting, but still there like a night sky in the background. That's kind of cool when watching something Sc-Fi or space related. (like Battlestar Galactica) :biggrin:


As amazing as the room is turning out, I still like the first photo with the Magnepans and McIntosh monoblocks :cool:

We currently have 3 pairs of Maggies; MG1C's, MMG's and our main MG3A's.

Brian

Yes, the Magnepans are awesome for music. I spent a lot of nights sitting and just listening to music in my chair with them. We do a lot of automation and cinema rooms, but not 2-channel systems which is a totally different market, so I couldn't justify hanging onto them. They wouldn't stand up to the system we did in the room for Movies, but for music listening they are still my favorite. They create an ethereal stereo image you just can't do with drivers. I did love those speakers and they needed a lot of juice to sound that way, so the Mac501s were perfect. :D
 
Last edited:
That is simply incredible. Great design and execution! :cool: And yes the ceiling is priceless. Enjoy it!

Larry
 
PART 2 OF THE MOVIETIME! THEATER BUILD


I wanted to do something unique for the rest of the ceiling sections and other trim areas besides just painting it black. The last
2 projects we did, both clients had this crazy looking golden rock wallpaper they used in certain rooms of their home.
It's like a golden flake and has a cool texture. In person it looks like a wall made of gold pebbles, it's pretty neat.
So I figured what better place to have something like that than a theater. So
I found a source for it and decided to use that instead. Still have rolls left in the garage.
I also used it around the poster insets and around the entry to the room. It's a heavy wallpaper and we had to use
a very strong glue to keep it secure. The first round of glue started to give after a month or so and sections started to sag,
so we had to redo it with a stronger glue and more of it. No problems since.


<img src="http://movietimepro.com/Construction/wallpaper1.jpg" border="0" alt="" /><br />
<br />
<img src="http://movietimepro.com/Construction/wallpaper2.jpg" border="0" alt="" /><br />
<br />
<img src="http://movietimepro.com/Construction/wallpaper3.jpg" border="0" alt="" /><br />
<br />
<img src="http://movietimepro.com/Construction/wallpaper4.jpg" border="0" alt="" /><br />
<br />
<img src="http://movietimepro.com/Construction/wallpaper5.jpg" border="0" alt="" /><br />
<br />


The Rack is slowly coming together. Most of the electronics are already installed.The
rear access door to all the equipment allows for easy access to the back of the rack
and equipment.

A quick hint for anyone building a room and using a rack. You don't need to spend a fortune on
a complete frame. Simply create a fixed rack with rear access and it will never need to be pulled
out or moved. It's easier to work on and you never need to wheel it, move it, or set up tracks to
slide it outward. All you need is 1 single pair of rack rails for a whopping cost of $40-$50.
Frame out the opening exactly 19 1/4" wide and drill the rails right into the studs. Now just
add the shelves for your gear. That should have saved you a few hundred bucks minimum on a
full cage, and you don't need any doors, hatches, or tracks for it.

So if you notice in the first image below, you can see the wood frame around the equipment. All of
that equipment is literally just sitting inside custom shelves which are screwed into this $40 pair
of rack rails into the frame.

<br />
<img src="http://movietimepro.com/Construction/rack1.jpg" border="0" alt="" /><br />
<br />

In this second image, the backside of the rack with full access to all of the wiring and connections.
It will never need to be removed from its position.

<br />
<img src="http://movietimepro.com/Construction/rack2.jpg" border="0" alt="" /><br />
<br />

Some early images of the rack and entry before all of the equipment was finalized.

<br />
<img src="http://movietimepro.com/Construction/doorandrack.jpg" border="0" alt="" /><br />
<br />
<br />
<img src="http://movietimepro.com/Construction/doorandrack2.jpg" border="0" alt="" /><br />
<br />

A shot of the rack in its final state minus the 400 Disc Sony DVD that was removed.

<br />
<img src="http://movietimepro.com/Construction/rack3.jpg" border="0" alt="" /><br />
<br />

From top to bottom, the electronics in the rack:

1. DirecTV DVRPRO
<br />
<img src="http://movietimepro.com/Construction/EquipmentDVR.jpg" border="0" alt="" /><br />
<br />

2. DVDO VP50 Scaler (Use this for the vertical stretch when doing 2:35)

<br />
<img src="http://movietimepro.com/Construction/EquipmentDVDO.jpg" border="0" alt="" /><br />
<br />


3. UltraPower Surge Protector (Note: I personally don't much believe in expensive power conditioners and
voltage regulators. It's 10% functional and 90% snakeoil, similar to overpriced cables. I needed the
outlets, it was a solid unit, and it matched the rack). All Amplifiers are plugged directly into wall outlet.


4. XBOX360 w/ Black faceplate
5. PS3
6. Toshiba HD-DVD XA2 (Use this for watching standard DVDs. It does a better job of upconversion than the PS3)

7. Synthesis SDP40HD / Lexicon MC-12HD: For anyone not familiar with Synthesis, it uses Lexicon electronics for the processing.
This processor is BAAAAAD!!! :D

<br />
<img src="http://movietimepro.com/Construction/equipmentsdp40hd" border="0" alt="" /><br />
<br />

8. Synthesis SDEC3000 / BSS Audio Blu-16 : This is what makes a Synth system what it is. A 112 band parametric EQ.
It's calibrated by a JBL sound engineer once the room is complete.

<br />
<img src="http://movietimepro.com/Construction/equipmentSDEC3000" border="0" alt="" /><br />
<br />

9. Synthesis S7150 Amplifier

<br />
<img src="http://movietimepro.com/Construction/equipmentS7150" border="0" alt="" /><br />
<br />

10. Escient MX-111 Music Server: Use this mainly for the distributed audio around the house

GIANT SPACE: Used to be a Sony 400 Disc Changer that I phased out. It's an open slot now for future use.


11. Crestron CP2E processor: Controls the theater and also touchpanels around the house

12. Crestron PAD8A: Audio switcher for the distributed audio

13. Speakercraft BB1265: Multichannel amp for the various speakers around the house and outside. Not related to theater.

14. Not in the rack, but behind the screenwall sits a Monster PC I built myself.
I wanted all games to run at 1920X1080 resolution without a hickup.
It's a Quad Core 3Ghz processor with 2 GForce 280GTX Cards in SLI.
10K RPM Velociraptor drive and a MASSIVE Corsair power supply to run
it all. The case needed massive cooling so it couldn't possibly go in the
rack. It sits behind the screenwall with the rest of the gear.

<br />
<img src="http://movietimepro.com/Construction/monsterpc" border="0" alt="" /><br />

Yes, it runs Crysis nice and smooth at 1920X1080 w/ all settings maxed. LOL :eek:


To control the theater I used a Crestron TPMC-8X Wifi Panel

<br />
<img src="http://movietimepro.com/Construction/equipmenttpmc8x" border="0" alt="" /><br />
<br />


Some shots of the wiring. I would call it functional and an organized mess for now. Once all the
changes are complete I can make it nicer.

<br />
<img src="http://movietimepro.com/Construction/wiringcan.jpg" border="0" alt="" /><br />
<br />
<img src="http://movietimepro.com/Construction/wiring1.jpg" border="0" alt="" /><br />
<br />
<img src="http://movietimepro.com/Construction/wiring2.jpg" border="0" alt="" /><br />
<br />
<img src="http://movietimepro.com/Construction/wiring3.jpg" border="0" alt="" /><br />
<br />


The sconces in the room took a long time to find. I eventually found these awesome ones custom
made of Mica that glow red/orange when lit.
<br />
<img src="http://movietimepro.com/Construction/sconces4.jpg" border="0" alt="" /><br />
<br />

The front speakers are Project Array 1400s and the Array 880 Center. They are all hidden behind the
front screenwall. It's too bad as they have a beautiful zebrawood finish, but it just didn't
fit my design to place them in the room.

That is a 14" driver in the cabinet. No shortage of bass and mid-bass in these puppies.
<br />
<img src="http://movietimepro.com/Construction/1400array1.jpg" border="0" alt="" /><br />

A closeup of the horn driver and supertweeter. All comparisons to the horns on other speakers
pretty much ends as soon as you try to lift this sucker. It was HEAVY. It had to be shipped
separately and then attached to the cabinet afterward.
<br />
<img src="http://movietimepro.com/Construction/1400array2.jpg" border="0" alt="" /><br />
<br />

The cabinet is quite deep and heavy. One person can not lift this speaker.

<img src="http://movietimepro.com/Construction/1400array3.jpg" border="0" alt="" /><br />
<br />
<img src="http://movietimepro.com/Construction/1400array4.jpg" border="0" alt="" /><br />
<br />

And for something many of you are probably quite familiar with. The SVS Sub! :D
I've been a huge fan of SVS for years and have owned a number of them.
This is the newer Ultra13 model. Why not use the JBL Synth Subs you ask?
Well, I wanted power, massive power and my space behind the screenwall was limited due to
room depth. The 18" Synth subs are HUGE! The SVS Cylinders are perfect as they are tall, but
narrow and allowed me to fit them behind the screenwall.

JBL Sub. Almost 2 feet in depth.
<br />
<img src="http://movietimepro.com/Construction/equipmentS1SEX.jpg" border="0" alt="" /><br />
<br />

SVS sub. Tall and slender.
<br />
<img src="http://movietimepro.com/Construction/svs.jpg" border="0" alt="" /><br />
<br />


Finally the projection. I used a Stewart 2:35 Motorized Vertical Masking Screen. Projection is courtesy of DPI's 3-chip DLP Mercury HD Projector.
The Mercury only came in 2 varieties, the single lamp 1600 Lumen unit
and the dual lamp 4500 Lumen unit.

<br />
<img src="http://movietimepro.com/Construction/screen1.jpg" border="0" alt="" /><br />
<br />

They have since released it's replacement, the TITAN. They are very similar
in performance and image, but the new TITAN allowed them to consolidate
the chassy and produce a multitude of diffrent models for various applications.
It also has improved cooling capability allowing for a range of output from1600-10,000 Lumens in output!

Attached to the front of the projector is an ISCOIII 1:33 Lens on
a motorized sled for the 2:35 horizontal stretch. A single press of
a button on the Crestron remote expands the masking screen, adjusts
the scaling, and moves the lens into the projection path for 2:35 viewing.

This projector is a bad boy and not small by any means. It takes 2 people to
lift and mount in its place (thus it comes with handles :D). The plan is to
build a nice box for it, but to date it has not been done.

<br />
<img src="http://movietimepro.com/Construction/projector.jpg" border="0" alt="" /><br />

These pics give a nice closeup of the pattern on the fabrics I used for the
acoustic paneling.
<br />
<img src="http://movietimepro.com/Construction/projector2.jpg" border="0" alt="" />

It throws a nice image. :D

<br />
<img src="http://movietimepro.com/Construction/screenimage.jpg" border="0" alt="" /><br />


COMING UP IN PART 3:

Everything comes together.
The carpet goes in.
The chairs are installed.
Projector and equipment are fired up.
Final Finished images.
 
Last edited:
What is the photo on the ceiling printed on? Some kind of transparent plastic? It looks badass. I love your wall panels too. They look similar in color to the ones I built for my little movie room, only way fancier of course :eek:.
I'm hoping to find a house with the space to do something nice like your setup sometime in the not to distant future.

I only have the panels on my screen wall, it makes a huge difference in the sound in that room. I can only imagine if the entire thing was done like yours.

Your setup makes my Onkyo 805 and 720p dlp projector look like wal-mart toys :biggrin:

Here's a panarama pic of my screenwall, which looks funny since it is 3 pics stitched together. The screen is a measly 71" 16:9 and the empty spaces on the wall have since been filled in with more panels.

I would love to design fancy theaters for people with more money than me. :biggrin:
 

Attachments

  • screenwall panorama.jpg
    screenwall panorama.jpg
    26.1 KB · Views: 414
What is the photo on the ceiling printed on?

It's a photo quality backlit vinyl printed as one piece. To do it right, you
would pay a printer approx. $14-18 sq. ft for it, so it's a bit pricey. I paid
less since it's part of the business, but even my cost was around $2200-$2500. Anyone on PRIME that does this for a living and wants to offer me
better pricing on the printing, I can bring you some work. :tongue:

I would love to design fancy theaters for people with more money than me. :biggrin:

It was my dream for a long time and I'm thrilled to be doing it now. I had a massive project in Vegas just over a year ago that helped pay for this. I'm doing my best to keep overhead as low as possible with what's happened to the economy. Now the rich people are losing millions in the market and it's started to affect my business to a degree as well.

We all share a passion for this kind of thing and it's awesome when people find creative ways to express it, regardless of how
modest it may be. It's great you put something together for yourself in a temp situation. I bet you enjoy it regularly and are always
thinking of what else you can do with it. Not much different than what we do with our cars honestly. Just a couple years ago I
was also renting a couple of rooms in a home and wanted to create a nice theater space for myself. Since it wasn't my home, I
was very limited to what I could do. It had to be something I can have back to new in a day once I moved out.
Your post made me go back and dig up some old pics of what I did with the room. It brought back some nice memories
just looking at it again and remembering the fun I had in coming up with a way to do it and not damage the room.
I couldn't justify spending too much since it was only temporary and I managed to do it all for less than $1000 in materials for
everything (and that includes the price of the little mini-fridge). Now instead of watching in a big, white ugly room, I had a nice environment to listen to my music and watch film.
You can make something very nice for very little. It just takes some imagination. Maybe you'll get an idea or two from it for
yourself.

All I used was curtains, curtain rods, fabric from Michaels, and some cheap Wal-Mart carpeting. :D
Extreme Makeover on a Budget eat your heart out. lol

BEFORE: Me in my Pimp hat chillin' in an empty white room. lol I kinda like this pic... could almost make a good avatar. hmmm

<br />
<img src="http://movietimepro.com/tmp/oldroompimp.jpg" border="0" alt="" /><br />
<br />


AFTER:

<br />
<img src="http://movietimepro.com/tmp/oldroom1.jpg" border="0" alt="" /><br />
<br />
<br />
<img src="http://movietimepro.com/tmp/oldroom2.jpg" border="0" alt="" /><br />
<br />
<br />
<img src="http://movietimepro.com/tmp/oldroom3.jpg" border="0" alt="" /><br />
<br />
<br />
<img src="http://movietimepro.com/tmp/oldroom4.jpg" border="0" alt="" /><br />
<br />
<br />
<img src="http://movietimepro.com/tmp/oldroom5.jpg" border="0" alt="" /><br />
<br />
<br />
<img src="http://movietimepro.com/tmp/oldroom6.jpg" border="0" alt="" /><br />
<br />
<br />
<img src="http://movietimepro.com/tmp/oldroom7.jpg" border="0" alt="" /><br />
<br />
<br />
<img src="http://movietimepro.com/tmp/oldroom8.jpg" border="0" alt="" /><br />
<br />

And for sentimetal value... something did transfer over from this old room to my new one. It's the posters! :D
 
Last edited:
Love the SVS. My snobby audiophile friends scoff at my two PB12/2 Ultras.

That is until they sit down and have the wind knocked out of them during Blackhawk Down. :smile:
One of my co-workers, ex Army Blackhawk pilot, turned to me and said "OMG, I think that is just as loud as the real thing."


You own a couple of the baddest subs that can be bought at any price. They are just awesome. I can't give them up either. Outside of the massive 18" JBLs, the Wilson and Krell subs, all over $4K, you can't touch these SVSs. I wouldn't give them up either. And in the new room all of their internal electronics are bypassed and calibrated through the Synthesis parametric EQ. Imagine the SVS sound, which you know well since you have them, dialed-in to perfection with a $13K EQ. Ok, I have to go upstairs and play in the room now. Thanks a lot. :rolleyes:
 
Last edited:
PART 3: FINAL

So here are the final images. Nothing left to say except hope you like the final result and
the thread was interesting and educational.


Step ropelights haven't been secured yet in this pic.

<br />
<img src="http://movietimepro.com/Construction/entry.jpg" border="0" alt="" /><br />
<br />
<img src="http://movietimepro.com/Construction/complete2.jpg" border="0" alt="" /><br />
<br />
<img src="http://movietimepro.com/Construction/rearlandscape.jpg" border="0" alt="" /><br />
<br />
<img src="http://movietimepro.com/Construction/rearerticalstars.jpg" border="0" alt="" /><br />
<br />
<img src="http://movietimepro.com/Construction/frontkongstandard.jpg" border="0" alt="" /><br />
<br />
<img src="http://movietimepro.com/Construction/frontkongnobacklights.jpg" border="0" alt="" /><br />
<br />


To show off what is behind the screen a little, I installed small halogen lights behind the speakers.
When they light you can see the front speakers behind the front panels. I programmed the remote to
have demo startup mode. When you turn the system on, all the lights dim down and the system
sets itself to reference volume. The front speakers slowly start to reveal themselves as the
classic THX trailer plays. At the height of the THX trailer, the speakers reach their full reveal
and the entire room shakes. As it ends, the speakers dim back down and disappear, on comes the projector,
and the show can begin. Let me tell you how many times I did that Over and Over again after I programmed
it just right. :D It still hasn't gotten old.


<img src="http://movietimepro.com/Construction/frontkongbacklightsandceiling.jpg" border="0" alt="" /><br />
<br />
It's one thing to see them lit up in the pic. It's another thing indeed to watch them light up while they are blasting you and the
room is shaking violently. :D


Girlfriend took a pic of me while watching Phantom of the Opera.
<img src="http://movietimepro.com/Construction/WATCHING.jpg" border="0" alt="" /><br />
<br />


I have some more images of the finished room and will add them as I come across them. Hope you like it!
 
Last edited:
very nice! what upholstry choice do most of your high end clients choose for seating? we chose microsuede because leather is too sticky/tacky.Also is it possible to have too much sound absorption in a small room? i.e. too many panels/drapes.Lastly this 2.35 or whatever conversion , is this different than the options I have: which is a choice of anamorphic/cfill/widescreen/thwide?With these choices I can always use the entire screen.Thanks for considering my queries:smile:
 
WOW. Thanks for posting this. It is simply amazing what you did with that room. I love it.
 
very nice! what upholstry choice do most of your high end clients choose for seating? we chose microsuede because leather is too sticky/tacky.Also is it possible to have too much sound absorption in a small room? i.e. too many panels/drapes.Lastly this 2.35 or whatever conversion , is this different than the options I have: which is a choice of anamorphic/cfill/widescreen/thwide?With these choices I can always use the entire screen.Thanks for considering my queries:smile:

Although the majority go with leather, I'd say about 25% use a suede or fabric. The rooms are always climate controlled so it's not often an issue of it being hot and sticking to the chairs. Of course, if someone is just a sweaty dude I can see why they wouldn't want leather. jk :wink:

When they do go with a fabric, unless they are trying to save some money, they usually choose a synthetic suede. It's actually just as expensive as the leather, but it has an extremely high wear rating and cleans well too.
Using standard fabric is definitely the most cost effective, but it wears the fastest AND it doesn't clean too easily either.
Microfiber isn't a bad option for both performance and price(and it's acoustically superior in some ways to leather or so they say), but it does wear more over time and is more work to clean. If you have a cat, then you may want to stay away from leather. :D

Yes, you can have too much sound absorption in a room. You wouldn't want a room to sound dead. Properly done acoustic panels are of a certain thickness and have various patterns and materials. Some of my panels have a form of wood or partially wood for that reason. Others have different patterns cut into them behind the fabric. My particular room has quite a bit of woodwork so that adds to its reflective properties. Generally 1" thick paneling has little effect as it doesn't have the density to effect anything but the upper range of the audio spectrum. 2" is the standard and then use of bass traps to help correct the low frequencies.

Usually when designing a room, we always have to strike a balance between appearance and function. When we do a Synth audio system, we get to cheat because that EQ is ridiculously powerful. You can't take a terrible room and it make it sound wonderful with just an EQ, but you can take a terrible room and use paneling to make it good, then use the EQ to make it great.

What aspect ratio screen do you have? Is it a standard 16:9 HDTV format? Or are you using a projector with a 2:35 screen?
All of the aspect ratio formats that come with displays are meant to fill your screen, but it's not possible to view a 2:35 movie on a 16:9 screen and fill it completely unless it is zooming the image and cutting the sides off.
So if you are watching a widescreen movie on a 16:9 display and it has no top/bottom bars, it is cutting part of your image off.
Most new projectors now have the built-in scaling to stretch the image vertically for this application. Then you use a 1:33 lens to stretch the image horizontally, thus restoring the proper aspect and making it 2:35.
A 2:35 image is basically the same as your 16:9 HDTV in height, but 33% wider. Commercial cinema has been using various anamorphic lenses forever. But you can only do that if you have a 2:35 aspect screen to view it on in the first place.
 
Last edited:
Thankyou for those helpful responses!Yes I have a standard 16:9 such that when I go cfill I do lose some data from top to bottom.:redface: I have no extra sound absorption other than carpet and the furniture:redface: To my niave ears The sound is great in the room as is.Our room is small though at 23 deep but only 14 wide.The only thing that puzzles me is that our installer sold me on a 7.2 system and for the life of me I can never seem to hear anything coming from the rear speakers:frown:.since most of our rental movies are 5.2.
 
The only thing that puzzles me is that our installer sold me on a 7.2 system and for the life of me I can never seem to hear anything coming from the rear speakers:frown:.since most of our rental movies are 5.2.

Most movies are not using those rear channels yet, but your receiver should be taking that signal and sending it to your back speakers too. Even if the movie isn't 7.1 (the .2 just means you have 2 subs), it adds some immersion
when it integrates those back speakers. The only reason I can think of that they wouldn't play is a) the setup in the receiver is wrong somehow, b) they are just miscalibrated and playing so low you can't hear them, or c) your BluRay/DVD player is not hooked up digitally (HDMI or optical cable) but with analog multichannel connections. Only the Lexicon and very select few other processors can apply processing to analog multichannel.
The only reason to do C anymore at all is if your receiver is a bit older and can't accept a PCM signal over HDMI. In other words, those speakers should work and you should see if they can fix it. If you want you can PM me the make and model of the receiver and bluray/dvd you are using and I can tell you exactly whether those back speakers should be playing. Unless you are hooked up multichannel, the answer is probably yes they should.
 
Thanks again!I have an hdmi setup.I also mistyped:redface: I have 7.1 only one sub.I'll have to put my ear to those rears to see if the volume is just low.I'll also PM you should I have anymore ?'s since I don't want to pull a Steveny move:wink: and turn the thread into my own personal theater issues:tongue: This is about your profession and your beautiful setup.:smile:
 
I meant to post up a few screengrabs of the control panel in the room. I used the same image I printed on the ceiling as the background to match the theme.

<img src="http://movietimepro.com/Construction/touchpanel1.jpg" border="0" alt="" /><br /><br />
<br />
<img src="http://movietimepro.com/Construction/touchpanel2.jpg" border="0" alt="" /><br /><br />
<br />
<img src="http://movietimepro.com/Construction/touchpanel3.jpg" border="0" alt="" /><br /><br />
<br />
<img src="http://movietimepro.com/Construction/touchpanel4.jpg" border="0" alt="" /><br /><br />
<br />


Lately I've been thinking it would be really cool to make one NSX and racing themed. Maybe use the speedometer as the volume ramp and a shifter for source selection. That would be neat. :smile:
 
Last edited:
WHAT I WOULD DO DIFFERENTLY IF I DID IT AGAIN

1. I would have liked to have more room depth. At only
21 feet in depth, I had less than a foot and a half of space
behind the screenwall. To get to the center channel and far left speaker I have to move the subwoofer out of the way.

2. Instead of building a box for the projector (which I
haven't done yet), I would have rather installed it into
the wall behind the room. Below is a pic of one of the rooms we did this way. The lack of room length bit me in the butt again to do it.

You can see the opening for the projector on the back wall.
<br />
<img src="http://movietimepro.com/tmp/projectoropeninginside.jpg" border="0" alt="" /><br />

3. I would have liked to move the entry door forward into the room by a few feet, but that would have encroached into another bedroom. It's a hard point of first reflection for the right front speaker. It's such a nice door I can't bring myself to cover it with an acoustic panel.

4. With a few more feet of depth I could have added a couple feet in depth to the platform. That would allow the back chairs to recline AND people could still walk through without having to raise back up. As it is now, the reclined seat is just a few inches from the front chairs.

5. The chairs are somewhat mixed and matched so I could show various models and fabrics. If it were strictly for me, I would have prefered a single, long couch in the back row from wall to wall with chases on the corners. It would look more uniform and seat more people.
 
Amazing ilya!
It was great speaking with you regarding home theater, and I will plan to call you later this week, or feel free to call me after Wed (I have a midterm I need to study for).
Your build is inspiring me to finish up the very last of my theater and update my thread. I will hopefully have time next week to get the last tidbits done.

Incredible equipment and extraordinary construction. Did you use Linacoustic and GOM for the walls?

Take care,
J.
 
Absolutely amazing. I can't imagine what it would cost someone to replicate but it looks fantastic to me.

That's a room you could play Gran Turismo in for days without moving, I think. :D
 
Did you use Linacoustic and GOM for the walls?
J.

Yeah we can definitely chat later this week. Good luck on the mid-terms.

Yes, all the panels are linacoustic fiberglass and GOM fabrics. The red fabric is not acoustically transparent enough for speakers, so that is what those black diagonal lines are for. It's part of the design, but that is where the speakers are. The black fabric is perfect for transparency, although any fabric has some effect.

A fabric isn't technically transparent or not, it has a rating. All fabrics block certain ferquencies, and different fabrics and patterns can effect the same speaker in different ways. In most cases its best not to cover a speaker with it if you don't have to. That is what we usually recommend unless they are doing a Synth system because it has the EQ. The expensive Mics can detect every dip in frequency so when we calibrate the room we adjust that small part of the spectrum back into a flat response. For example: If the fabric caused a 2db drop in the 20.5-21khz range and a second 1db drop between 18-18.5khz, both frequencies can be manually boosted by the EQ for that specific speaker. The software has the data for the entire frequency response of the speaker, so any deviation due to fabric, room acoustics, etc can be adjusted. I have seen some nasty dips due to a combiunation of acoustics and some GOM fabric you would think was pretty good, as big as -3db. That's huge!
 
Last edited:
That's a room you could play Gran Turismo in for days without moving, I think. :D

Oh I have... trust me I have. :tongue:

<br />
<img src="http://movietimepro.com/vrc1.jpg" border="0" alt="" /><br /><br />
<br />

If you look closely at the bottom of this second pic, you can make out the indent in the carpet from it. lmao

<br />
<img src="http://movietimepro.com/Construction/rearerticalstars.jpg" border="0" alt="" /><br /><br />
<br />
 
Last edited:
Back
Top