Just an FYI, if your ordering from Amayama, order 4 adjusters, they only came 1 per package for the part number I ordered. YMMV. Placing a second order.

I did get the "horn" things with both adjusters. Didn't ask Amayama, as I'm just happy to still get parts that are so well packaged. Did you order the same Part number?Did you get a "horn thing" with both of your adjusters? Interestingly, looking at the parts diagram, it does look like the part only includes 1 adjuster. Interesting that the price doesn't seem to have changed with the switch to 1 instead of 2. I wonder if it's worth asking amayama about it. They usually respond pretty quickly to questions.
 www.amayama.com

 www.amayama.com
www.amayama.com
www.amayama.com
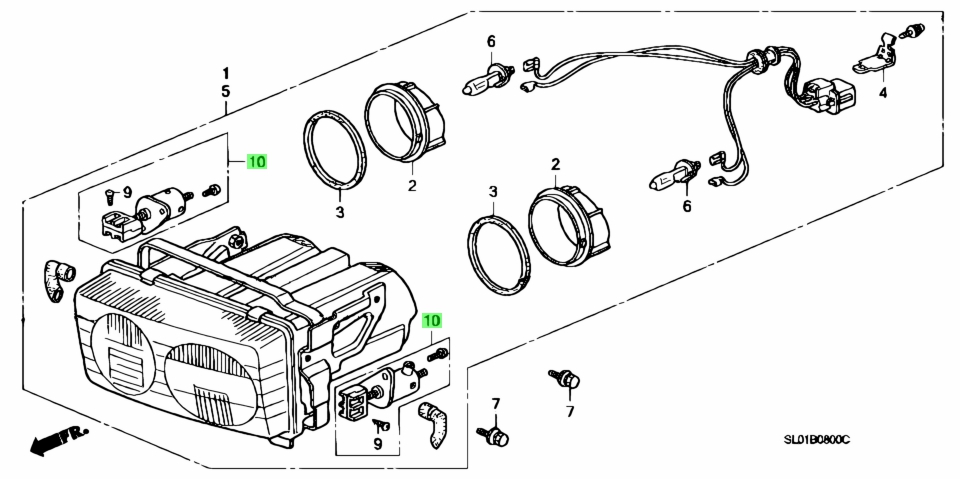
It's a artifact of the JDM parts catalog. It's kind of a blessing and a curse. The blessing is that they keep the original parts number for each applicable year in the catalog (and often stock these original parts as new old stock). The curse is that they don't always tell you whether the part has been updated or superseded entirely. I always try to check manually in a newer year catalog.This diagram is quite confusing. A01 is for 1993-1997 regular NSX's, N11 is for 1993-1997 NSX-R & NSX-T??? Why would they be different? and why no listing for 1991-1992 & 1998-2001?
Both look like the updated part with the black anti-oxidant coating. (The original was grey & highly prone to rusting.) Can anyone explain? Hello @Honcho ?
If you've already invested in the CNC machines, no reason not to use them, but my perception is that the cost could be notably higher to make them than 3D printing. If you could make and sell these things for ~$25 a pop, you'd probably have a bunch of buyers, including me. But these cars are a labour of love, not economics, so I look forward to seeing your results. The key question is whether to anodize them black or match to your paint color? Make mine black with a milled out H and @Honcho will probably take a set in orange.
Cracking is not really an issue with the unvented caps, and heating isn't really an issue for most. In my testing, the bulbs were not too hot to touch after 60 minutes of continuous use in the unvented cap. Bulbs that put out too much heat are probably being rather assish to oncoming traffic - a couple of threads on folks going back to the B1's. The Boslla B1's use 1/2 the current of the incandescents and are 2-3 times as bright, more than adequate in my opinion - very pleased with the nighttime illumination. Even the vented caps are plenty strong with ABS or ASA construction.
See pic in post #44 of this thread. You can only see them when the front hood is open, but it looks gorgeous with the black & red "H's".Can you even see them when they're installed? I'll whip some up and then give it a look. Mostly just using what I have available.
Would anyone be interested in some of these? I could do another logo if people preferred. Probably 250 for a set if I can sell 10+ sets.See pic in post #44 of this thread. You can only see them when the front hood is open, but it looks gorgeous with the black & red "H's".


Quick turnaround! Nicely done.Would anyone be interested in some of these? I could do another logo if people preferred. Probably 250 for a set if I can sell 10+ sets.
 www.thingiverse.com
Yeah I mean it’s hard to compete with a 3d printer in terms of total cost, but I really despise using 3d printers for functional prints. Personal preference.Quick turnaround! Nicely done.
These aluminum caps seem like an attractive option because they'd eliminate any question of durability (as noted earlier, I broke some earlier prints maybe by being too rough with them...but since installing mine have held up nicely).
However, that price seems steep...huge percent increase in price of this project using them over plastic.
I wouldn't care about logo...don't care how this looks...just want to keep dust out of my projectors.
How similar are they dimensionally (and otherwise) to this?
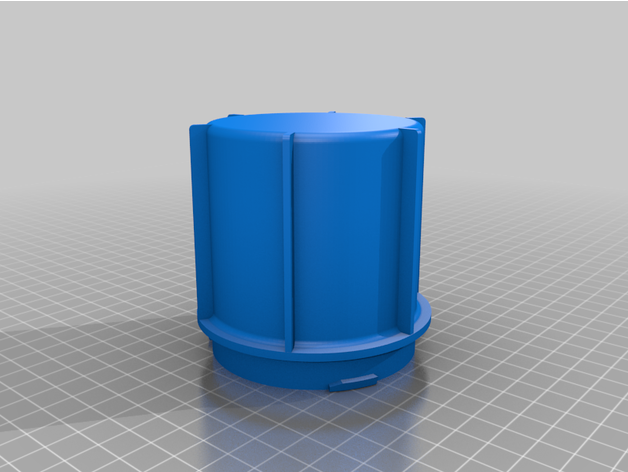
I need that much interior depth for the LEDs I selected.NSX Headlight Cap - Extended by PatPend
Extended dust cap for the headlights of the 1991-2001 Acura/Honda NSX.
 www.thingiverse.com
While my car is a 1991 I explicitly selected a later year (1997+) when looking up the part in an online catalog, to be sure I got the updated part (black not silver). It is highly ironic that I ordered four to get four parts, but received eight...and then Honcho (probably based on that info) ordered two to get four parts but got two and had to order more (life is funny like that, sorry @HonchoGood catch @NSXF1 ! You received a different part than I suggested in my document and that @latzke recommended in post #24 of this thread. I got 33129-SL0-N11, which included 2 adjusters, but only one "horn thing". It's also available in the US, but stated for only 1997-2001? It worked perfectly on my 1995.
Honda 33129-SL0-N11 (33129SL0N11) ADJUSTER, HEADLIGHT
Honda 33129-SL0-N11 (33129SL0N11) ADJUSTER, HEADLIGHT. New & genuine Japanese car parts. Fast shipping. Low prices. Request a quote from Amayama Trading Co. online.
Your picture is of 33129-SL0-A01, same price, which seems to include only 1 adjuster and a horn thing, which is discontinued in the USA. What did you order? N11 seems like better value?
Honda 33129-SL0-A01 (33129SL0A01) ADJUSTER, HEADLIGHT
Honda 33129-SL0-A01 (33129SL0A01) ADJUSTER, HEADLIGHT. New & genuine Japanese car parts. Fast shipping. Low prices. Request a quote from Amayama Trading Co. online.
At amayama, they both have the same picture and relate back to the same part diagram:
This diagram is quite confusing. A01 is for 1993-1997 regular NSX's, N11 is for 1993-1997 NSX-R & NSX-T??? N11 would be the update of the A01 part. But why would NSX-R & T be different? and why no listing for 1991-1992 & 1998-2001?Head light for Honda NSX 1 generation 09.1990 - 11.2001 - Honda Car and Auto Spare Parts - Genuine Online Car Parts Catalogue - Amayama
Head light for Honda NSX 1 generation 09.1990 - 11.2001. Buy OEM spare parts online. Low prices, proven reliability, fast shipping from Japan
Both look like the updated part with the black anti-oxidant coating. (The original was grey & highly prone to rusting.) Can anyone explain? Hello @Honcho ?
 ).
).

