-
Protip: Profile posts are public! Use Conversations to message other members privately. Everyone can see the content of a profile post.
You are using an out of date browser. It may not display this or other websites correctly.
You should upgrade or use an alternative browser.
You should upgrade or use an alternative browser.
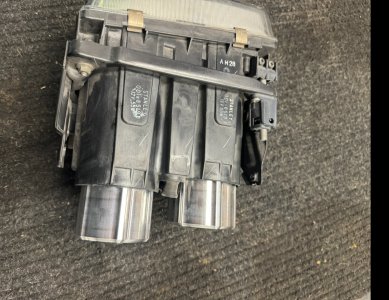
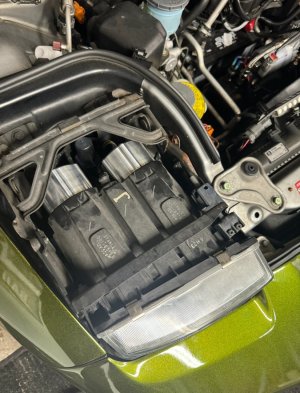
Vented Dust Caps for LED Headlights
- Thread starter Russ
- Start date
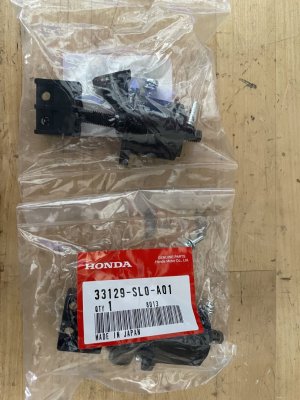
That's a definite change with the adjusters to 1/package, and the part # is different. When I ordered them, I also got 2 adjusters to a package, like @latzke . My packaging looked different, with 1 bag including 2 adjusters and 1 plastic horn thing that goes on the outboard adjuster. Unfortunately, I don't have any pics of what I got originally. @latzke seems to take more pics, maybe he has a shot of the old ones, but it probably doesn't matter - if that's what they're selling, I guess that's it. I wonder what American Acura is selling. Did you get a "horn thing" with both of your adjusters? Interestingly, looking at the parts diagram, it does look like the part only includes 1 adjuster. Interesting that the price doesn't seem to have changed with the switch to 1 instead of 2. I wonder if it's worth asking amayama about it. They usually respond pretty quickly to questions.
I've updated my instruction document to reflect the changed packaging and different part #.
I've updated my instruction document to reflect the changed packaging and different part #.
Last edited:
I just bought and replaced these ones. It fits perfectly. It might not need an extended cap if you pack them carefully (please let us know if you could). Since I have the extended caps from Wild Turkey ( thank you for making them for me), I did not try to use the OEM ones.
Last edited:
I did get the "horn" things with both adjusters. Didn't ask Amayama, as I'm just happy to still get parts that are so well packaged. Did you order the same Part number?Did you get a "horn thing" with both of your adjusters? Interestingly, looking at the parts diagram, it does look like the part only includes 1 adjuster. Interesting that the price doesn't seem to have changed with the switch to 1 instead of 2. I wonder if it's worth asking amayama about it. They usually respond pretty quickly to questions.
Good catch @NSXF1 ! You received a different part than I suggested in my document and that @latzke recommended in post #24 of this thread. I got 33129-SL0-N11, which included 2 adjusters, but only one "horn thing". It's also available in the US, but stated for only 1997-2001? It worked perfectly on my 1995.

 www.amayama.com
Your picture is of 33129-SL0-A01, same price, which seems to include only 1 adjuster and a horn thing, which is discontinued in the USA. What did you order? N11 seems like better value?

 www.amayama.com
At amayama, they both have the same picture and relate back to the same part diagram:
 www.amayama.com
This diagram is quite confusing. A01 is for 1993-1997 regular NSX's, N11 is for 1993-1997 NSX-R & NSX-T??? N11 would be the update of the A01 part. But why would NSX-R & T be different? and why no listing for 1991-1992 & 1998-2001?
Both look like the updated part with the black anti-oxidant coating. (The original was grey & highly prone to rusting.) Can anyone explain? Hello @Honcho ?

Honda 33129-SL0-N11 (33129SL0N11) ADJUSTER, HEADLIGHT
Honda 33129-SL0-N11 (33129SL0N11) ADJUSTER, HEADLIGHT. New & genuine Japanese car parts. Fast shipping. Low prices. Request a quote from Amayama Trading Co. online.
Your picture is of 33129-SL0-A01, same price, which seems to include only 1 adjuster and a horn thing, which is discontinued in the USA. What did you order? N11 seems like better value?

Honda 33129-SL0-A01 (33129SL0A01) ADJUSTER, HEADLIGHT
Honda 33129-SL0-A01 (33129SL0A01) ADJUSTER, HEADLIGHT. New & genuine Japanese car parts. Fast shipping. Low prices. Request a quote from Amayama Trading Co. online.
At amayama, they both have the same picture and relate back to the same part diagram:
Head light for Honda NSX 1 generation 09.1990 - 11.2001 - Honda Car and Auto Spare Parts - Genuine Online Car Parts Catalogue - Amayama
Head light for Honda NSX 1 generation 09.1990 - 11.2001. Buy OEM spare parts online. Low prices, proven reliability, fast shipping from Japan
Both look like the updated part with the black anti-oxidant coating. (The original was grey & highly prone to rusting.) Can anyone explain? Hello @Honcho ?
Last edited:
It's a artifact of the JDM parts catalog. It's kind of a blessing and a curse. The blessing is that they keep the original parts number for each applicable year in the catalog (and often stock these original parts as new old stock). The curse is that they don't always tell you whether the part has been updated or superseded entirely. I always try to check manually in a newer year catalog.This diagram is quite confusing. A01 is for 1993-1997 regular NSX's, N11 is for 1993-1997 NSX-R & NSX-T??? Why would they be different? and why no listing for 1991-1992 & 1998-2001?
Both look like the updated part with the black anti-oxidant coating. (The original was grey & highly prone to rusting.) Can anyone explain? Hello @Honcho ?
In the case of the adjusters, the A01 part was the original part. It was updated in 1993 due to corrosion issues and became the N11. The N11 fits all years 1990-2001. I also got mixed up and didn't realize each bag has two adjusters, so I ended up with eight (and used four on the Zero) LOL.
@Wild Turkey I ordered the later part numbers. (Not reading/following your directions again!)
@Honcho That all makes sense, and thanks for the explanation. Would you like to sell two adjusters?
@Honcho That all makes sense, and thanks for the explanation. Would you like to sell two adjusters?
Anyone have a compelling reason not to make these dust caps out of aluminum? I don't have a 3d printer, but I do have a 1/2 million dollars worth of CNC machines in my home garage. I could bang out a set of four in an hour and wouldn't have to deal with any cracking... Will transfer heat a bit better too.
If you've already invested in the CNC machines, no reason not to use them, but my perception is that the cost could be notably higher to make them than 3D printing. If you could make and sell these things for ~$25 a pop, you'd probably have a bunch of buyers, including me. But these cars are a labour of love, not economics, so I look forward to seeing your results. The key question is whether to anodize them black or match to your paint color? Make mine black with a milled out H and @Honcho will probably take a set in orange.
Cracking is not really an issue with the unvented caps, and heating isn't really an issue for most. In my testing, the bulbs were not too hot to touch after 60 minutes of continuous use in the unvented cap. Bulbs that put out too much heat are probably being rather assish to oncoming traffic - a couple of threads on folks going back to the B1's. The Boslla B1's use 1/2 the current of the incandescents and are 2-3 times as bright, more than adequate in my opinion - very pleased with the nighttime illumination. Even the vented caps are plenty strong with ABS or ASA construction.
Cracking is not really an issue with the unvented caps, and heating isn't really an issue for most. In my testing, the bulbs were not too hot to touch after 60 minutes of continuous use in the unvented cap. Bulbs that put out too much heat are probably being rather assish to oncoming traffic - a couple of threads on folks going back to the B1's. The Boslla B1's use 1/2 the current of the incandescents and are 2-3 times as bright, more than adequate in my opinion - very pleased with the nighttime illumination. Even the vented caps are plenty strong with ABS or ASA construction.
If you've already invested in the CNC machines, no reason not to use them, but my perception is that the cost could be notably higher to make them than 3D printing. If you could make and sell these things for ~$25 a pop, you'd probably have a bunch of buyers, including me. But these cars are a labour of love, not economics, so I look forward to seeing your results. The key question is whether to anodize them black or match to your paint color? Make mine black with a milled out H and @Honcho will probably take a set in orange.
Cracking is not really an issue with the unvented caps, and heating isn't really an issue for most. In my testing, the bulbs were not too hot to touch after 60 minutes of continuous use in the unvented cap. Bulbs that put out too much heat are probably being rather assish to oncoming traffic - a couple of threads on folks going back to the B1's. The Boslla B1's use 1/2 the current of the incandescents and are 2-3 times as bright, more than adequate in my opinion - very pleased with the nighttime illumination. Even the vented caps are plenty strong with ABS or ASA construction.
I guess I wasn't so much planning on selling them, I agree and don't think that would be terribly cost effective. Can you even see them when they're installed? I'll whip some up and then give it a look. Mostly just using what I have available.
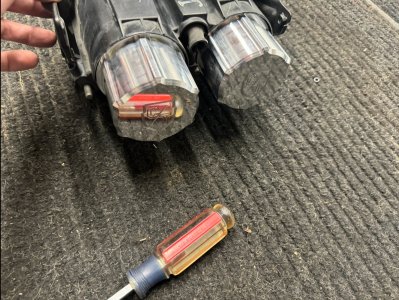
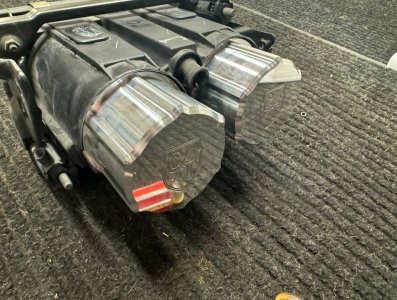
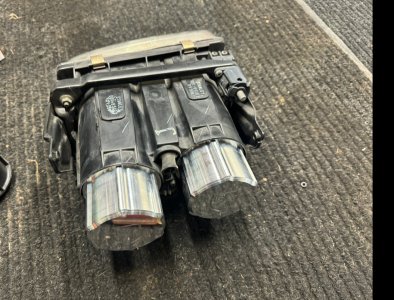
See pic in post #44 of this thread. You can only see them when the front hood is open, but it looks gorgeous with the black & red "H's".Can you even see them when they're installed? I'll whip some up and then give it a look. Mostly just using what I have available.
Last edited:
Quick turnaround! Nicely done.Would anyone be interested in some of these? I could do another logo if people preferred. Probably 250 for a set if I can sell 10+ sets.
These aluminum caps seem like an attractive option because they'd eliminate any question of durability (as noted earlier, I broke some earlier prints maybe by being too rough with them...but since installing mine have held up nicely).
However, that price seems steep...huge percent increase in price of this project using them over plastic.
I wouldn't care about logo...don't care how this looks...just want to keep dust out of my projectors.
How similar are they dimensionally (and otherwise) to this?

NSX Headlight Cap - Extended by PatPend
Extended dust cap for the headlights of the 1991-2001 Acura/Honda NSX.
Yeah I mean it’s hard to compete with a 3d printer in terms of total cost, but I really despise using 3d printers for functional prints. Personal preference.Quick turnaround! Nicely done.
These aluminum caps seem like an attractive option because they'd eliminate any question of durability (as noted earlier, I broke some earlier prints maybe by being too rough with them...but since installing mine have held up nicely).
However, that price seems steep...huge percent increase in price of this project using them over plastic.
I wouldn't care about logo...don't care how this looks...just want to keep dust out of my projectors.
How similar are they dimensionally (and otherwise) to this?
I need that much interior depth for the LEDs I selected.
NSX Headlight Cap - Extended by PatPend
Extended dust cap for the headlights of the 1991-2001 Acura/Honda NSX.www.thingiverse.com
They’re the same depth as these:
Dust caps for NSX LED bulbs NA1 NA2 - optimised to minimise supports by Pi-design
These are remixes of Russ's awesome extended dust caps for 1991-2001. There are 2 versions: Vented: These are a remix of Russ's vented dust caps, modified to only need supports for the 3 small tabs. Also eliminated the stress concentrations at the corner of the inside of the cup and one of the...
While my car is a 1991 I explicitly selected a later year (1997+) when looking up the part in an online catalog, to be sure I got the updated part (black not silver). It is highly ironic that I ordered four to get four parts, but received eight...and then Honcho (probably based on that info) ordered two to get four parts but got two and had to order more (life is funny like that, sorry @HonchoGood catch @NSXF1 ! You received a different part than I suggested in my document and that @latzke recommended in post #24 of this thread. I got 33129-SL0-N11, which included 2 adjusters, but only one "horn thing". It's also available in the US, but stated for only 1997-2001? It worked perfectly on my 1995.

Honda 33129-SL0-N11 (33129SL0N11) ADJUSTER, HEADLIGHT
Honda 33129-SL0-N11 (33129SL0N11) ADJUSTER, HEADLIGHT. New & genuine Japanese car parts. Fast shipping. Low prices. Request a quote from Amayama Trading Co. online.www.amayama.com
Your picture is of 33129-SL0-A01, same price, which seems to include only 1 adjuster and a horn thing, which is discontinued in the USA. What did you order? N11 seems like better value?

Honda 33129-SL0-A01 (33129SL0A01) ADJUSTER, HEADLIGHT
Honda 33129-SL0-A01 (33129SL0A01) ADJUSTER, HEADLIGHT. New & genuine Japanese car parts. Fast shipping. Low prices. Request a quote from Amayama Trading Co. online.www.amayama.com
At amayama, they both have the same picture and relate back to the same part diagram:
This diagram is quite confusing. A01 is for 1993-1997 regular NSX's, N11 is for 1993-1997 NSX-R & NSX-T??? N11 would be the update of the A01 part. But why would NSX-R & T be different? and why no listing for 1991-1992 & 1998-2001?Head light for Honda NSX 1 generation 09.1990 - 11.2001 - Honda Car and Auto Spare Parts - Genuine Online Car Parts Catalogue - Amayama
Head light for Honda NSX 1 generation 09.1990 - 11.2001. Buy OEM spare parts online. Low prices, proven reliability, fast shipping from Japanwww.amayama.com
Both look like the updated part with the black anti-oxidant coating. (The original was grey & highly prone to rusting.) Can anyone explain? Hello @Honcho ?
Very impressive to make those so quickly and they look beautiful. I'm jealous of your workshop.
/Rant on/
Your distain for 3D printed parts is your call, but 3D printing has has advanced dramatically and I'd encourage you to reconsider. For instance, since printing the dust caps in ASA/ABS, the strength is probably increased by a factor of 10, stronger than the original PET-G parts; I'd challenge anyone to break one.
I will acknowledge one problem with 3D printed parts - some folks without structural analysis skills can make parts with simple online tools, and sometimes don't take into account the non-homogenous properties of 3D printed objects (original dust caps). I've fixed several of the problems, but I should have started from scratch. 3D printed objects can also have different properties based on the orientation they are printed in, which is not always appreciated by the person printing.
I'll use whatever material (3D printed, cast, forged, milled, etc.) provides the best ballance of utility, strength, appearance (if applicable), and cost. We put 3D printed parts into humans where I work, protecting brains. My 3D printed cup holders don't spill like the OEM, and my battery bar doesn't short out the battery like the OEM can, and is a pound lighter. My 3D printed tabs for the door panels are at least 10 times as strong as the OEM, and almost certainly stronger than the vaunted MITA replacements, in tension, torsion, shear, and bending moment. If anyone wants to send me something to compare, I'd be glad to test them to destruction.
/Rant off/
Last edited:
Very impressive to make those so quickly and they look beautiful. I'm jealous of your workshop.
/Rant on/
Your distain for 3D printed parts is your call, but 3D printing has has advanced dramatically and I'd encourage you to reconsider. For instance, since printing the dust caps in ASA/ABS, the strength is probably increased by a factor of 10, stronger than the original PET-G parts; I'd challenge anyone to break them on purpose.
I will acknowledge one problem with 3D printed parts - some folks without structural analysis skills can make parts with simple online tools, and sometimes don't take into account the non-homogenous properties of 3D printed objects (original dust caps). I've fixed several of the problems, but I should have started from scratch. 3D printed objects can also have different properties based on the orientation they are printed in, which is not always appreciated by the person printing.
I'll use whatever material (3D printed, cast, forged, milled, etc.) provides the best ballance of utility, strength, appearance (if applicable), and cost. We put 3D printed parts into humans where I work, protecting brains. My 3D printed cup holders don't spill like the OEM, and my battery bar doesn't short out the battery like the OEM can, and is a pound lighter. My 3D printed tabs for the door panels are at least 10 times as strong as the OEM, and almost certainly stronger than the vaunted MITA replacements, in tension, torsion, shear, and bending moment. If anyone wants to send me something to compare, I'd be glad to test them to destruction.
/Rant off/
I'll concede that certain things, when designed properly, can be passable. Also, these days it's sort of an inside joke with myself when I rag on 3d printers (and people typically don't agree with me, which is fine)
I'm mainly speaking of FDM printers, when I rant about this stuff. We have some decent 3d printers at work, and we occasionally outsource stuff for larger prints, but most consumer grade 3d printers, even if they can produce functional parts, just gives me the willies. Maybe the build layers activate some latent trypophobia? Also the parts typically just don't LOOK very good without a healthy dose of post processing, and that's quite labor intensive. They also tend to be bulkier in design just to make up for the shortcomings in material properties, and I come from a world where sleekness, design and surface finish are paramount. I like intricate details and FDM printers often fall short, there. Lastly, while there are absolutely shapes that 3d printing excels at, I'd posit that I could design and machine parts faster than most 3d printer shops could design/make them. Just curious, what's the cycle time for a set of 4 caps on the printer? (i know it's a set-it and forget-it). From the time I sat down at the cad workstation to the time I had 4 parts in hand was about 2.5 hours. This includes measuring the caps I took off the car, drawing the part in cad, designing a fixture, programming it, cutting the fixture and then running the part. (I grabbed the cap depth off one of the models in this thread). I based my design around tools I knew I had in the machine, so that made it go pretty quickly.
That said, I've had great experience with 3d print to wax, then investment casting off the wax patterns. I designed and built the heads for this engine a few years back before I had CNC capabilities using that method.
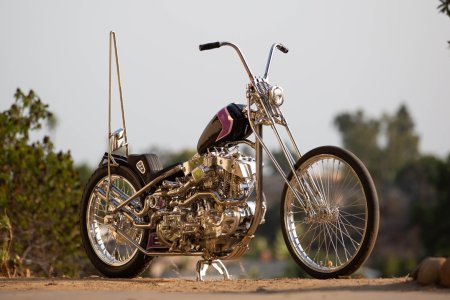
The same process was used to create the finned exhaust section on this bike:
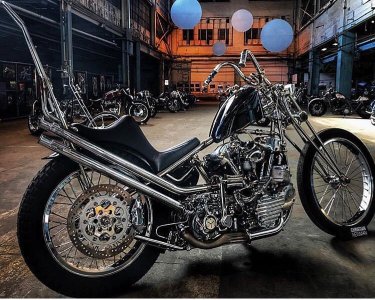
Anyhow, it's just personal preference, don't take me too seriously.
If anyone is interested there was decent response on the facebook group, so I decided to run 10 sets. The cost barely covers my time and the cost of material, but I tend to try to "give back" to communities I'm part of. If this link isn't allowed, please let me know.

NSX EXTENDED DEPTH HEADLIGHT DUST CAPS
NOTE (02/08/24): These will be machined as soon as I receive the material (generally takes around 3 weeks). 10 sets will be available. I know I'm new to the NSX scene, but I'm sure MexiRicer will vouch for me, and I've been making high end chopper parts for years. My instagram is @ctnewman if...
ctnewmanengineering.com
To each their own, and that is impressive form. Yup, your mill is way faster than my ancient printer that prints a set of caps overnight. (You sound like my son, who also hates 3D printing and makes everything out of metal.) There's a huge variation in printers/quality, just like machine shops - all the best with yours and your impressive productions. I wish the shop that made my aluminum radiator brackets took dimensional accuracy as seriously as you probably do so that I didn't have to fix them.
Trypophobia - nice! I have a corresponding aversion to chrome and polished aluminum, one of the factors that drew me to the NSX originally. Room for all kinds at Prime though.
As you say, personal preference/form vs. function. Looks like there are folks after $350 dust caps and it's good you're there for them; others may prefer a lighter option that's hidden anyway for a fraction of the cost. I posted the design because there are more folks with their own printer than their own CNC mill, but I'll stick to my day job & leave the milling to you.
Last edited:
Don't tell Chromatose:Trypophobia - nice! I have a corresponding aversion to chrome and polished aluminum
https://web.archive.org/web/20040221210804/http://www.northwest.nsxca.org/mikesc.html
https://web.archive.org/web/20040508200354/http://www.northwest.nsxca.org/mikebr.html
https://web.archive.org/web/20040508200426/http://www.northwest.nsxca.org/mikeps.html
Similar threads
- Replies
- 9
- Views
- 2K
- Replies
- 18
- Views
- 2K
- Replies
- 0
- Views
- 1K
- Replies
- 2
- Views
- 2K


