- Joined
- 13 May 2004
- Messages
- 492
I thought I share some information with you fellow members regarding a product I just used to restore my seats. I am sure there are you NSX owners out there who would like the seats to look better but not wanting to spend $700-$1000 replacing new leather. If you do what I have done, you will save a lot of $$$$$.
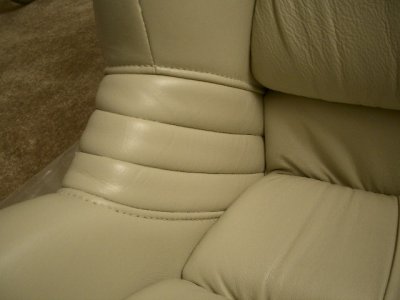
I have a 92 NSX red with ivory interior. The seats have ivory color leather. It's been 13 years, therefore, you would expect some wear and fading of the color of the leather.
My car has only 50k miles on it and the previous owners really took care of the car. My seats are in excellent condition, but it's just looked a bit old due to the color fading.
I was browsing the forums one day on Prime, and came across this company called Color-Plus (colorplus.com). I read the product information on their site and sent Joanne an email requesting broucher and additional information. She was very helpful with getting me the information that I had requested.
After review, I decided to buy their package deal, kit #3B, $112, and the Flex-fill crack eliminator, $14.95. I cut and small piece of leather from the back of my passenger seat and sent it to Colorplus for color-match. When I received my items from Colorplus(BTW, the color was right on! They are really the color experts) I went to Home Depot to purchase a lacquer thinner $4.95 and sand paper (320) and started my restoration process. And let me tell you gentlemen, I was so amazed with the result. I dont really work on cars, and I am not very good with working with my hands. The only thing I am good at is patience(since I want to save $).
I removed both seats and carried them into my living room(it's cold in Seattle now). I took the following steps to complete my restoration:
1. Wiped the seats down with the lacqure thinner with a terry cloth. You can see that a lot of dirt comes off. I didnt see any paint dissolve or been "thinned". I was not going to take out the old color, I was only re-coloring my seats.
2. After about 20 minutes, I went ahead and applied the Colorplus leather conditioner on the seats and waited 24 hours to make sure the seats are dried.
3. Then, I wiped down the seats with warm water in attempt to remove all the oil residuals. I waited another 12 hours (since I was in-door) so the seats are dried.
4. I started to apply the Fill-in Crack Eliminator on some of the cracks on the seats. This is an excellent product where I was able to cover up all the small cracks on the bolsters. I then waited another 12 hours(since I was in-door) for the fill-in crack eliminator to dried out.
5. Then, I used the lacquer thinner again to remove some of the crack eliminator that got on the seats and whatever the oil residuals might still be on the seats. (make sure the Crack Eliminator are in the cracks and not on the seats) I waited another 20 minutes before the last step
6. Applied the Colorplus Surflex on the seats. I used both the terry cloth and a very good brush. Make sure you ork on a small area one at the time and applied 2-3 coats. If you see brush marks on your first coat, dont' worry, by the time you are finished with your 3rd coat, the brush marks will be gone.
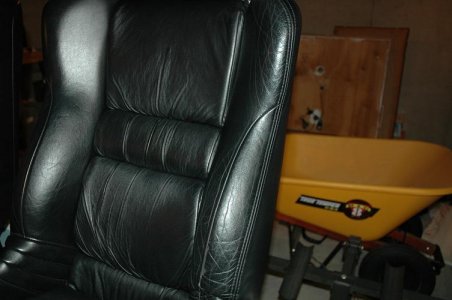
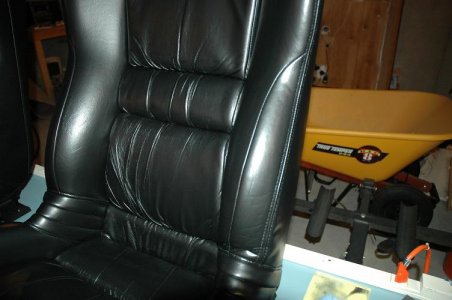
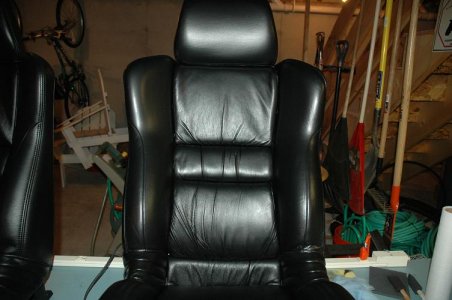
And that's all. The seats looked like new. I am very very happy with the results. My friend recently changed the leather in his NSX and paid $1200 at a local shop. It cost me total of about $125 and a few days, but it's all good.
Hope my experience can help some of you guys out.
I have a 92 NSX red with ivory interior. The seats have ivory color leather. It's been 13 years, therefore, you would expect some wear and fading of the color of the leather.
My car has only 50k miles on it and the previous owners really took care of the car. My seats are in excellent condition, but it's just looked a bit old due to the color fading.
I was browsing the forums one day on Prime, and came across this company called Color-Plus (colorplus.com). I read the product information on their site and sent Joanne an email requesting broucher and additional information. She was very helpful with getting me the information that I had requested.
After review, I decided to buy their package deal, kit #3B, $112, and the Flex-fill crack eliminator, $14.95. I cut and small piece of leather from the back of my passenger seat and sent it to Colorplus for color-match. When I received my items from Colorplus(BTW, the color was right on! They are really the color experts) I went to Home Depot to purchase a lacquer thinner $4.95 and sand paper (320) and started my restoration process. And let me tell you gentlemen, I was so amazed with the result. I dont really work on cars, and I am not very good with working with my hands. The only thing I am good at is patience(since I want to save $).
I removed both seats and carried them into my living room(it's cold in Seattle now). I took the following steps to complete my restoration:
1. Wiped the seats down with the lacqure thinner with a terry cloth. You can see that a lot of dirt comes off. I didnt see any paint dissolve or been "thinned". I was not going to take out the old color, I was only re-coloring my seats.
2. After about 20 minutes, I went ahead and applied the Colorplus leather conditioner on the seats and waited 24 hours to make sure the seats are dried.
3. Then, I wiped down the seats with warm water in attempt to remove all the oil residuals. I waited another 12 hours (since I was in-door) so the seats are dried.
4. I started to apply the Fill-in Crack Eliminator on some of the cracks on the seats. This is an excellent product where I was able to cover up all the small cracks on the bolsters. I then waited another 12 hours(since I was in-door) for the fill-in crack eliminator to dried out.
5. Then, I used the lacquer thinner again to remove some of the crack eliminator that got on the seats and whatever the oil residuals might still be on the seats. (make sure the Crack Eliminator are in the cracks and not on the seats) I waited another 20 minutes before the last step
6. Applied the Colorplus Surflex on the seats. I used both the terry cloth and a very good brush. Make sure you ork on a small area one at the time and applied 2-3 coats. If you see brush marks on your first coat, dont' worry, by the time you are finished with your 3rd coat, the brush marks will be gone.
And that's all. The seats looked like new. I am very very happy with the results. My friend recently changed the leather in his NSX and paid $1200 at a local shop. It cost me total of about $125 and a few days, but it's all good.
Hope my experience can help some of you guys out.
Last edited: