

Dry sump systems pull a significant vacuum inside the crank case due to the scavenge pumps (even when turbocharged). Therefore all vents in the camshaft covers are plugged up.My question about the catch can was related to the venting required out of the camshaft covers.
Going turbo no longer allows a vacuum to be created to pull in the fumes coming out of the engine.
Beyond that there was a flaw in the design of the rear camshaft cover in the C30 engines allowing oil to stagnate in front of the rear venting outlet.
This was documented by DAL motorsports.
https://web.archive.org/web/20110310192308/http://www.dalmotorsports.com/cars.asp#Sway
As for the oil cooler, it will be interesting to know how many holes you will use in the sandwich plate to balance the flow to the oil cooler without dropping the oil pressure too much.
-
Protip: Profile posts are public! Use Conversations to message other members privately. Everyone can see the content of a profile post.
You are using an out of date browser. It may not display this or other websites correctly.
You should upgrade or use an alternative browser.
You should upgrade or use an alternative browser.
Billy Johnson and Moto IQ's: Project NSX
- Thread starter FXMDBilly
- Start date
The next installment of MotoIQ.com's Project NSX is now live:
Part 8 – 2002 Facelift and Widebody
Our 1992 NSX gets a make-over with a 2002 facelift conversion and subtle flared fenders from Downforce USA. This will help us fit wider tires in anticipation of more than doubling the car’s power from our soon to be assembled, turbocharged engine.

https://motoiq.com/project-nsx-part-8-2002-facelift-and-widebody/
In the article
-2002 Conversion
-02 Headlight upgrade and NSX-R style painting by Euroboutique
-Downforce widebody (flared fenders front AND rear) - creation of
-Downforce DFR side scoop
-Pole 2 Flag carbon fiber front crash bumper beam
-Paint by Diamond Hills Collision Center
-18x8.5 +39 & 19x10 +29 ADVAN wheels
-235/40-18 & 275/35-19 Nitto NT05 Tires
-Size comparison to C8 Corvette
And much more...
Enjoy!
Part 8 – 2002 Facelift and Widebody
Our 1992 NSX gets a make-over with a 2002 facelift conversion and subtle flared fenders from Downforce USA. This will help us fit wider tires in anticipation of more than doubling the car’s power from our soon to be assembled, turbocharged engine.
https://motoiq.com/project-nsx-part-8-2002-facelift-and-widebody/
In the article
-2002 Conversion
-02 Headlight upgrade and NSX-R style painting by Euroboutique
-Downforce widebody (flared fenders front AND rear) - creation of
-Downforce DFR side scoop
-Pole 2 Flag carbon fiber front crash bumper beam
-Paint by Diamond Hills Collision Center
-18x8.5 +39 & 19x10 +29 ADVAN wheels
-235/40-18 & 275/35-19 Nitto NT05 Tires
-Size comparison to C8 Corvette
And much more...
Enjoy!

It's looking very good and I'm eager to see the next stages of the project.
In particular the anti-roll bars from Pole2Flag (@liftnot) and what you think about them?
I went through most of your improvements including KW V3 clubsport suspension with 22 mm front swaybar, NA2 type R look, DF front wide fenders, LoveFab turbo and Brembo/ AP racing brakes.
Lots of fun for sure during track days but the ultimate tunable swaybars would be nice to have!
BTW running these 18" front wheels forces you to drop the car further to keep the same riding height as with the 17/18 combo.
This in turn creates more roll up front.
Have you figured out by how much?
Last edited:
[MENTION=16531]stuntman[/MENTION]
Just want to say this project is looking great! I also am not a fan of widebody kits, but these DF fenders are so tasteful you don't really notice unless the car is parked next to a stock NSX. Really nice job!
Just want to say this project is looking great! I also am not a fan of widebody kits, but these DF fenders are so tasteful you don't really notice unless the car is parked next to a stock NSX. Really nice job!
Thank you, and it’s great to hear your NSX is being driven!Great job Billy and those involved with the project! I have close to 300k miles on my CTSC E85’d 91, but I think I’ll keep her and consider an update instead of saving up for the NC1.
Question; living in CA, why turbo vs. s/c?
It’s pretty difficult to get air intake temps under control on supercharged NSXs during continuous use on road courses, plus that’s a lot of weight at nearly the highest part of the car -hurting the car’s center of gravity and handling. They are easy to install and improve the car’s torque and are GREAT on the street, but for this project, a turbo is a better route:
I’ve always been a turbo guy and the first NSX i’ve ever driven was turbocharged and made 500whp. Turbos are far more complex to install but there is so much more you can do with them. Many are done poorly with sub-par turbo sizing, engineering, components, and tuning. But when done right, they are incredible. I’m taking what was learned on the record-setting FXMD NSX Time Attack car, and pulling from world-class motorsports engineering to make the most advanced turbocharged NSX ever made. Stay tuned!
The Pole2Flag bladed bars look really nice. It's a bit unfortunate that they are the same diameter and thickness as the NSX-R bar, which means that the stiffest the P2F bar can be is the same as an NSX-R front bar. Most lowered track-focused NSXs, especially those with 235 width front tires, need a front bar stiffer than the NSX-R front bar. Just as you mentioned -as you lower the NSX, the front roll center drops FAST (requiring more roll stiffness from a bigger swaybar).It's looking very good and I'm eager to see the next stages of the project.
In particular the anti-roll bars from Pole2Flag (@liftnot) and what you think about them?
I went through most of your improvements including KW V3 clubsport suspension with 22 mm front swaybar, NA2 type R look, DF front wide fenders, LoveFab turbo and Brembo/ AP racing brakes.
Lots of fun for sure during track days but the ultimate tunable swaybars would be nice to have!
BTW running these 18" front wheels forces you to drop the car further to keep the same riding height as with the 17/18 combo.
This in turn creates more roll up front.
Have you figured out by how much?
For my project, it may not be stiff enough and I might have to install my 1.125" Dali bar unless I decide to design a set of aluminum drop-spindles for ~$4K, then the P2F bar might be ideal.
Thanks! That's what I was going for.[MENTION=16531]stuntman[/MENTION]
Just want to say this project is looking great! I also am not a fan of widebody kits, but these DF fenders are so tasteful you don't really notice unless the car is parked next to a stock NSX. Really nice job!
Would people prefer and be more engaged if I posted all of the photos and words from the article in the thread itself, rather than just a recap and link to each section?
I am good either way. I have really enjoyed this project!

Would people prefer and be more engaged if I posted all of the photos and words from the article in the thread itself, rather than just a recap and link to each section?
Yes, please! I like pictures :biggrin:

Yes, we don't need to drive traffic to that siteWould people prefer and be more engaged if I posted all of the photos and words from the article in the thread itself, rather than just a recap and link to each section?
")
Why not? It a platform that hosts all of my in-depth technical articles and project cars, including Project NSX -to a much wider audience and sharing the love, build, and specialness of the NSX to a far greater community than this forum....Yes, we don't need to drive traffic to that site
Because you said you felt underappreciated over thereWhy not? It a platform that hosts all of my in-depth technical articles and project cars, including Project NSX -to a much wider audience and sharing the love, build, and specialness of the NSX to a far greater community than this forum....
That was between us, but it's still one of the best and last great places for technical informstion, testing, engineering, and development of different projects and automotive technologies. As well as a target market of readers interested in that stuff.Because you said you felt underappreciated over there
Their appreciation of my efforts or assistance of my builds are not really relevant.
I was trying to help you with the previous comment but then you called me out. Happy to delete my comments on this thread if you'd like.That was between us, but it's still one of the best and last great places for technical informstion, testing, engineering, and development of different projects and automotive technologies. As well as a target market of readers interested in that stuff.
Their appreciation of my efforts or assistance of my builds are not really relevant.
p.s. your inbox is full
Would people prefer and be more engaged if I posted all of the photos and words from the article in the thread itself, rather than just a recap and link to each section?
Just my perspective, but I think it would be helpful for NSX owners who come here to see everything. Personally, I have no issue clicking and reading the article on MotoIQ, but I'm sure it would generate more discussion/engagement if you posted here. Maybe keep the general description and link in this thread and post the detailed discussion in the topic-related subforum? JMO
agree with the big Honcho.....
Head Honcho sounds much better
That's the dilemma. MotoIQ has a nice 'home page' for the Project where you can easily see and quickly reference every article. On Prime, you have to sift though multiple pages to see my posts when a new article goes live, but if I post all of the pictures here, it will get cluttered up quickly, but it keeps everything condensed into a single thread (like Regan's). If I post links here to different threads with all of the pictures in them, they will be scattered among a ton of different threads.Just my perspective, but I think it would be helpful for NSX owners who come here to see everything. Personally, I have no issue clicking and reading the article on MotoIQ, but I'm sure it would generate more discussion/engagement if you posted here. Maybe keep the general description and link in this thread and post the detailed discussion in the topic-related subforum? JMO
I was hoping to have this be the main hub for and to discuss the progress of my build but maybe that format wasn't too exciting (or maybe the build hasn't been too exciting thus far?) I'll try posting the entire next article (photos and words) here to see if people like that more. Thanks for the feedback.
I get it and there probably is not a "right" answer here. But, for articles like your tire sizing guide, I would make them a sticky thread in the wheel/tire forum. That way, members don't have to sift through the forums to find it.
The next installment of MotoIQ.com's Project NSX is now live:
Part 9 – Designing, Fitting and Testing a 3D Printed Door Card Frame
Our 1992 NSX gets a make-over with a 2002 facelift conversion and subtle flared fenders from Downforce USA. This will help us fit wider tires in anticipation of more than doubling the car’s power from our soon to be assembled, turbocharged engine.
https://motoiq.com/project-nsx-part-9-designing-fitting-testing-3d-printed-door-card-frame/
We designed and 3D printed a stronger NSX Center Door Frame out of necessity, and solving a much-needed problem.
In the tech article Make Your Own Parts with Shareware CAD & 3D Printing! we told the story of how I had the passenger center NSX Door Frame laser scanned and then taught myself how to use CAD and 3D printing to design and print the missing driver’s side center door frame since only the passenger side was available from Japan.* With the design freedom of CAD, I then made the door tabs stronger and refined the design after numerous destructive tests.
This is important because NSXs are now between 15-30 years old and the plastic door frames that hold the leather-covered door card to the aluminum door are notorious for breaking over time, even if they have never been removed to repair or replace the window regulators or door speakers.* Both of which are also common issues in the NSX and will need to be addressed sooner or later.* It’s becoming pretty rare to find an NSX with the original door frame mounting tabs intact and replacements need to be special-ordered.* Unfortunately, the poor OEM design will only last so long before breaking again.* Until now.
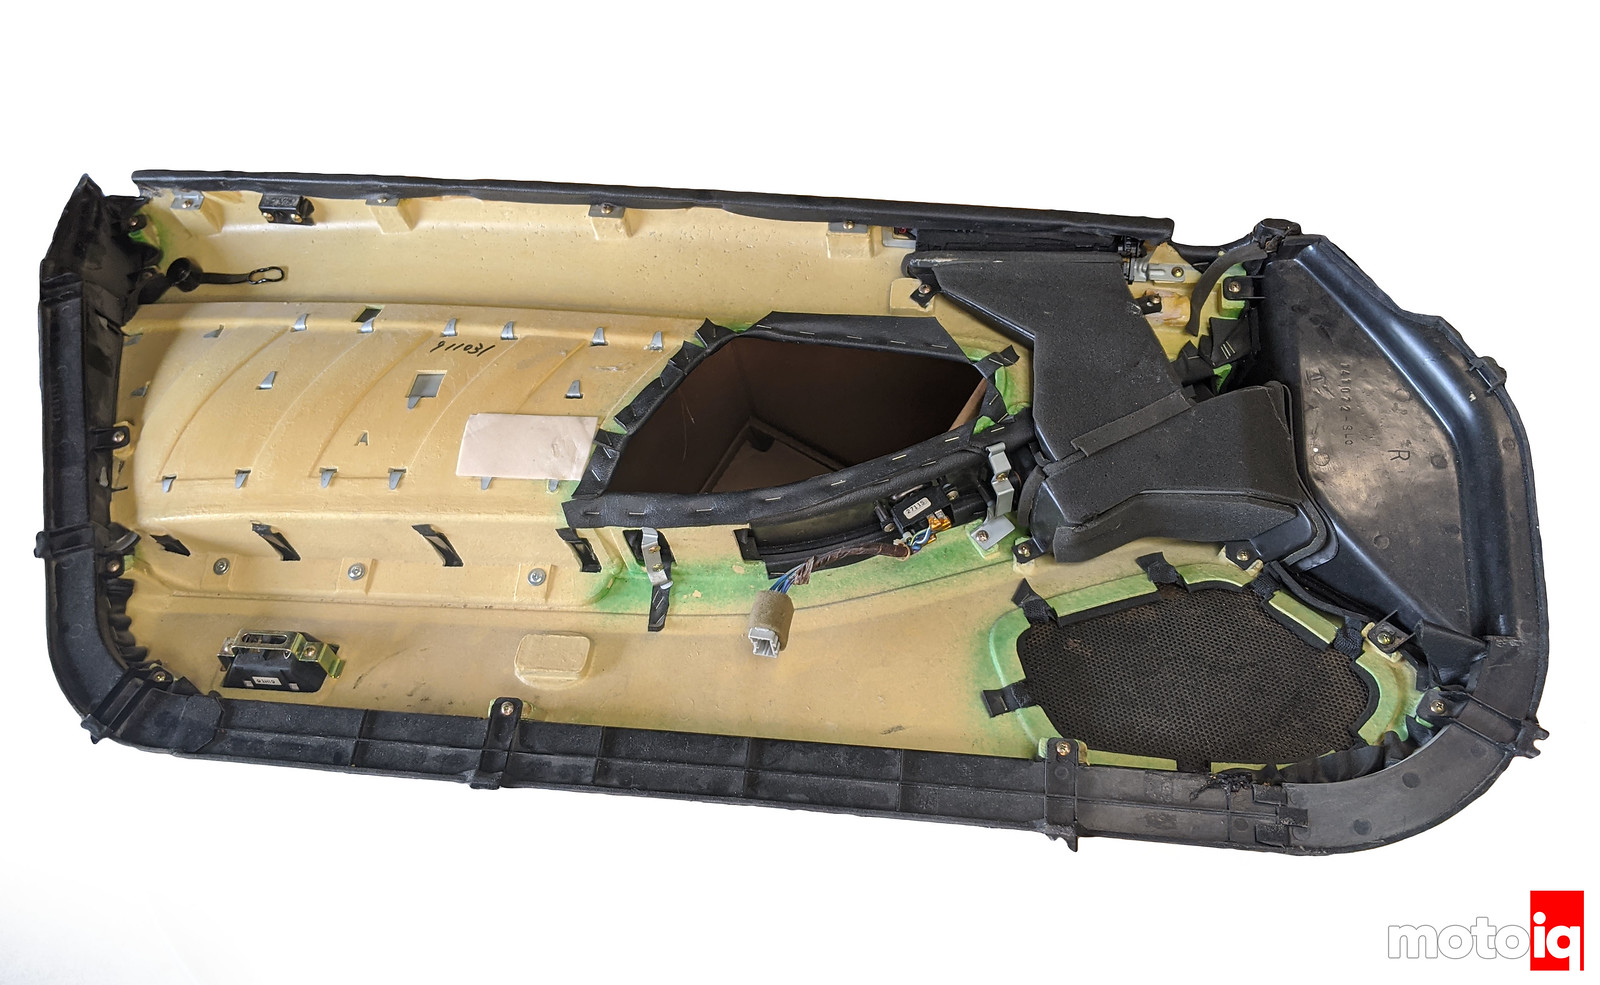
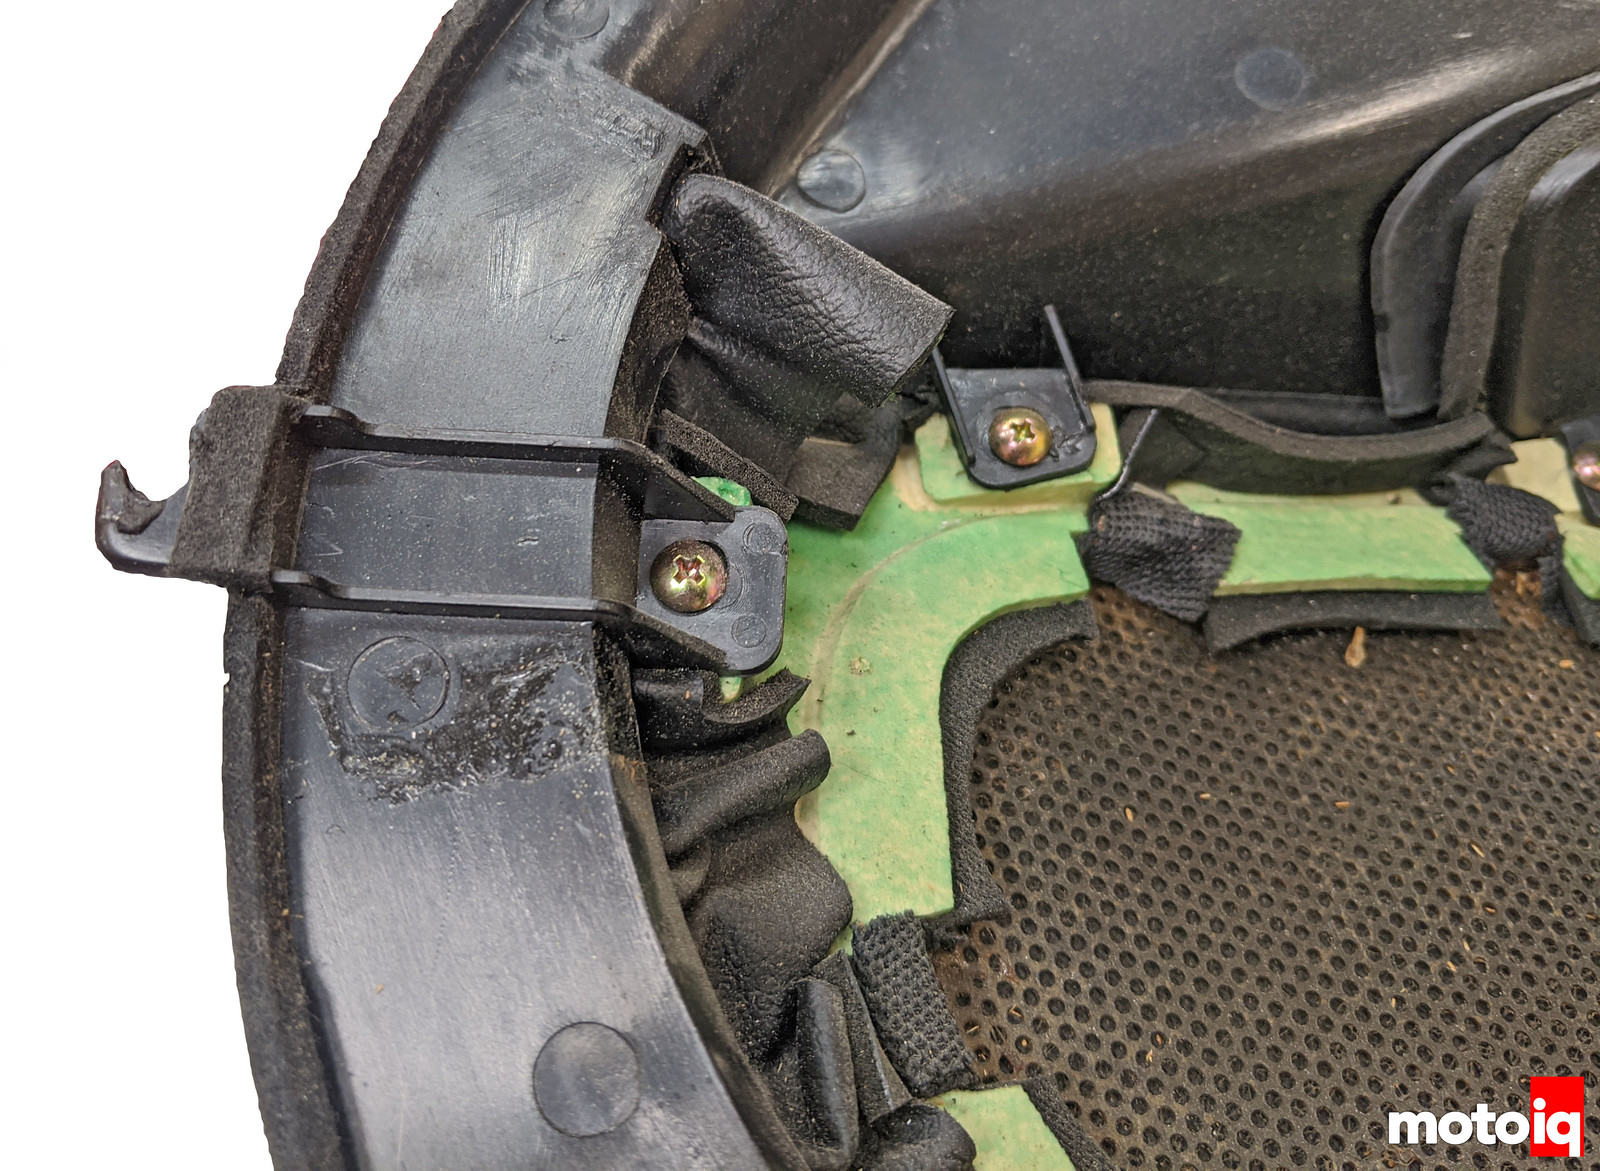
The NSX’s fiberboard door card is attached to the aluminum door via a three-piece plastic door frame: Rear, Center/Lower, and a large Front section that houses the door-mounted A/C vents and side window defroster.
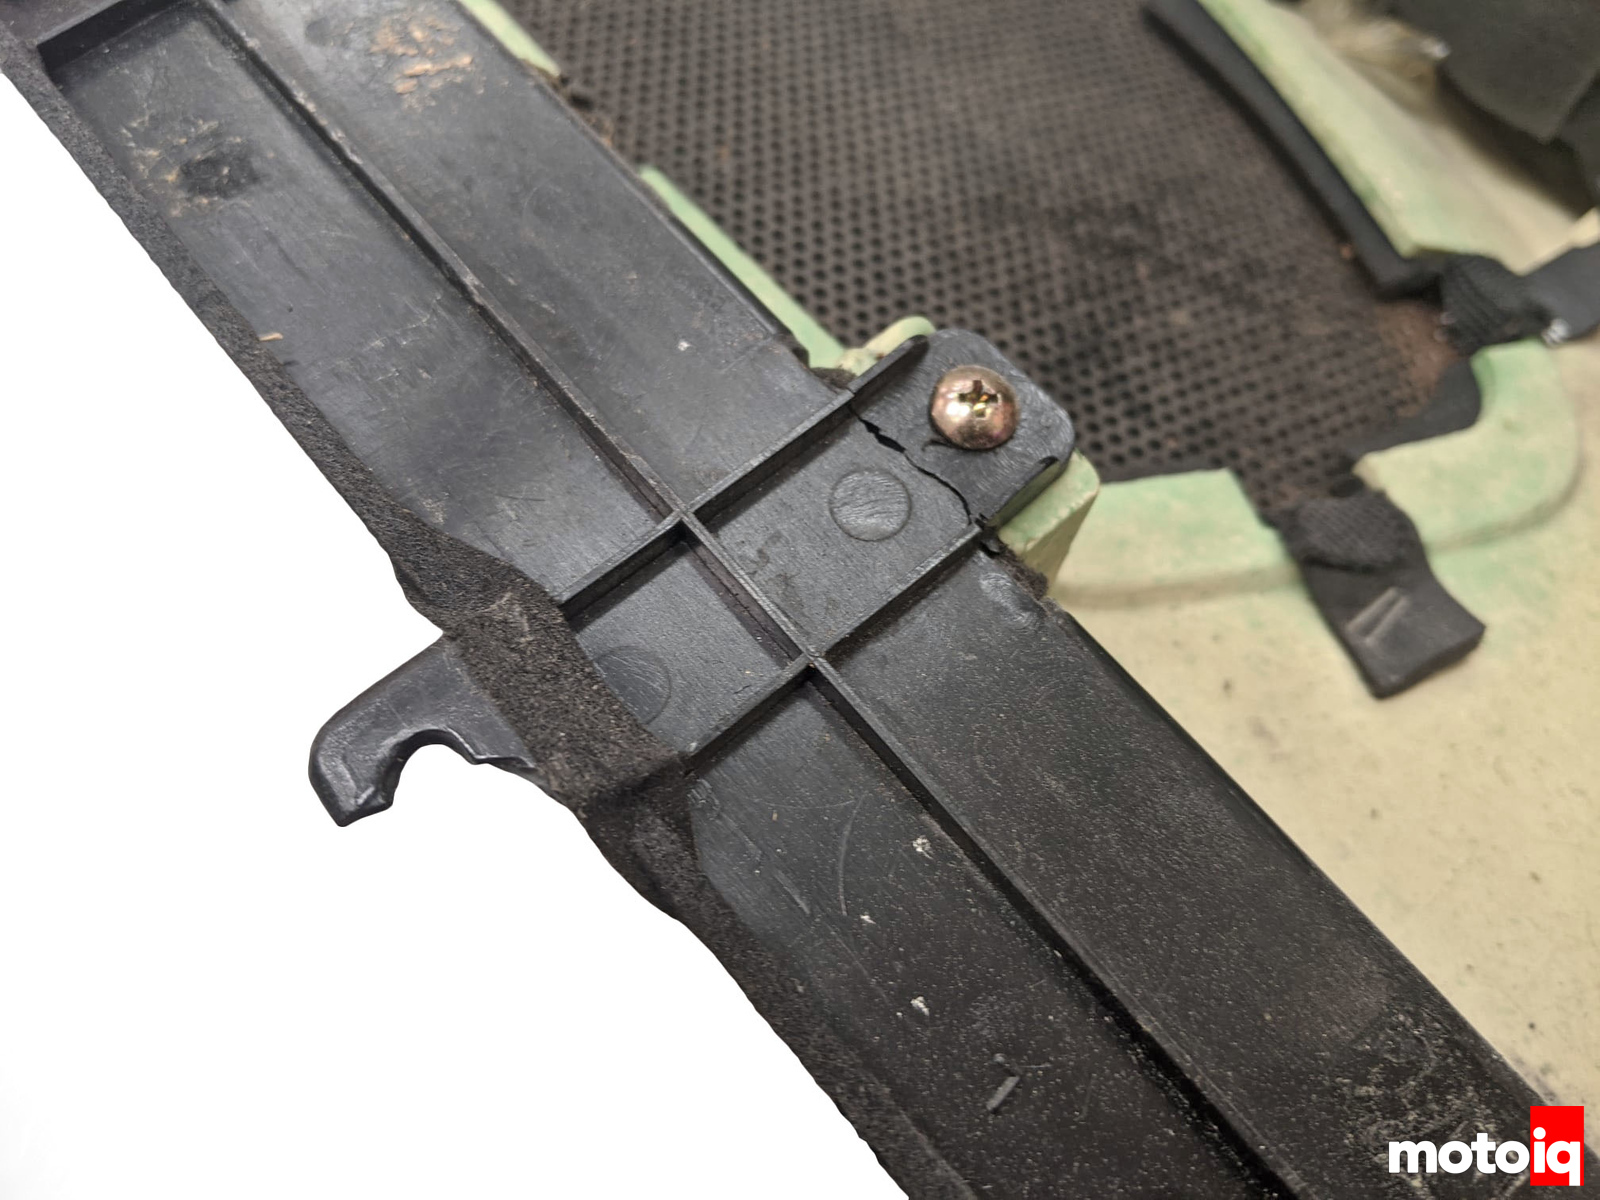
The plastic tabs often break at the mounting hole itself or at the base of the tab due to the tight radius, crack-propagating edges.
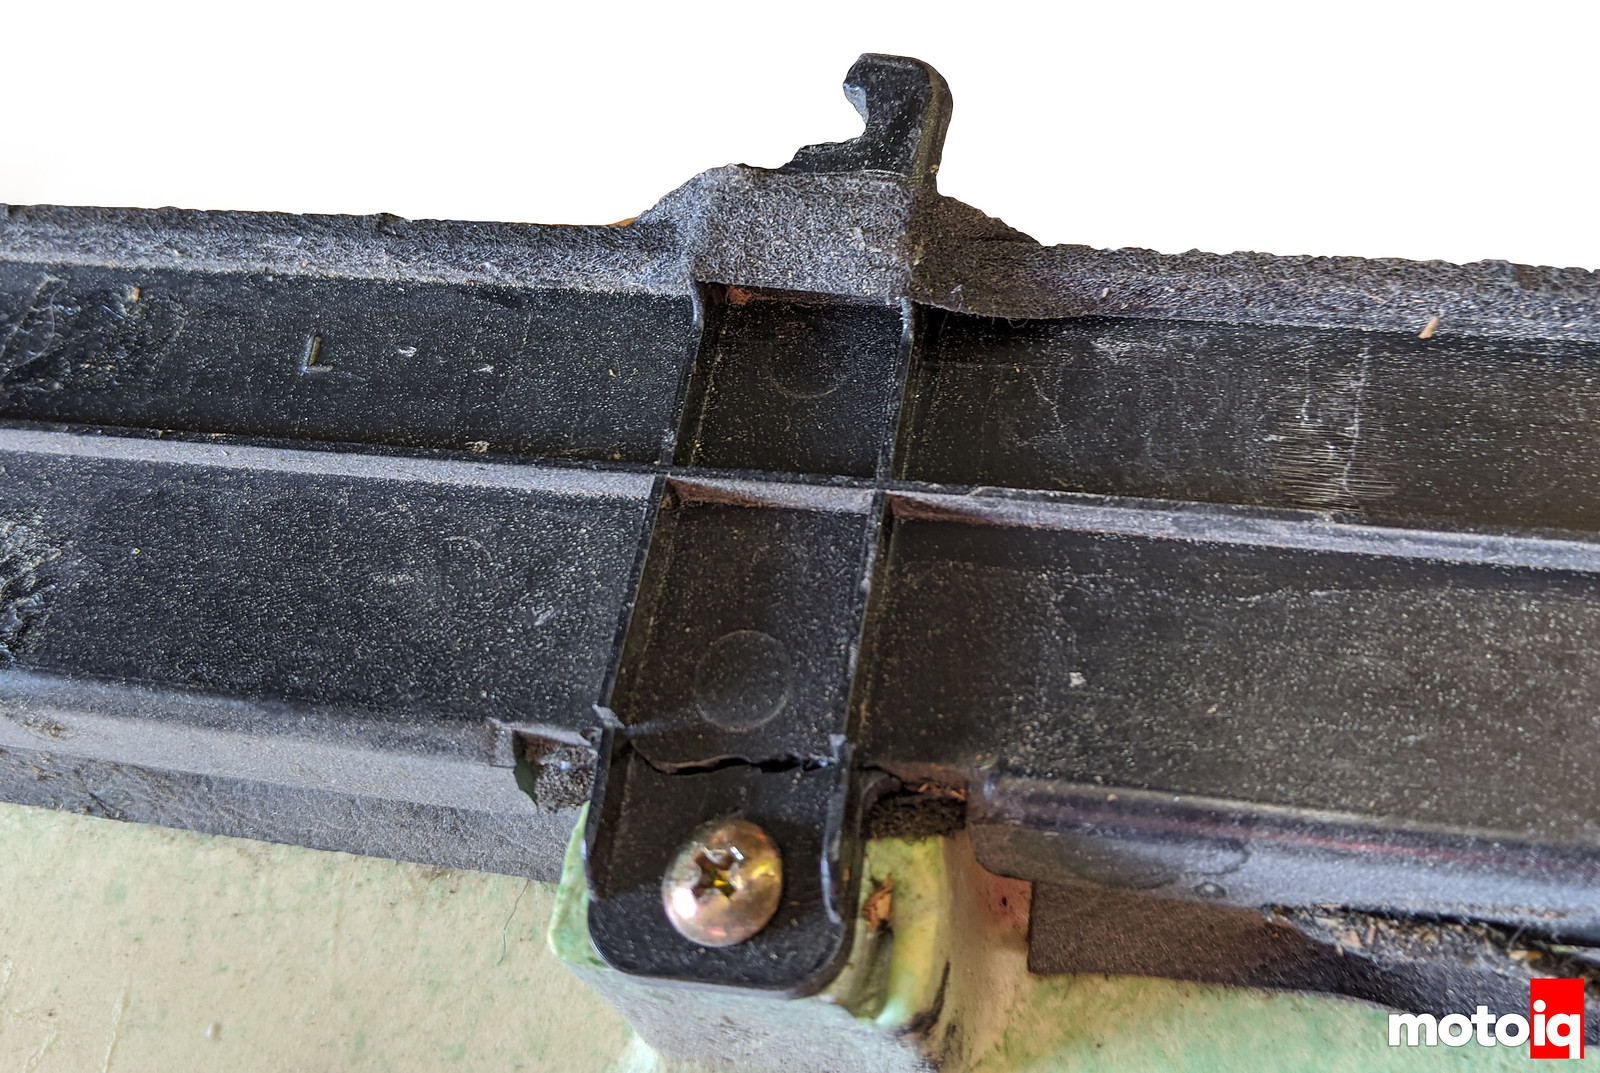
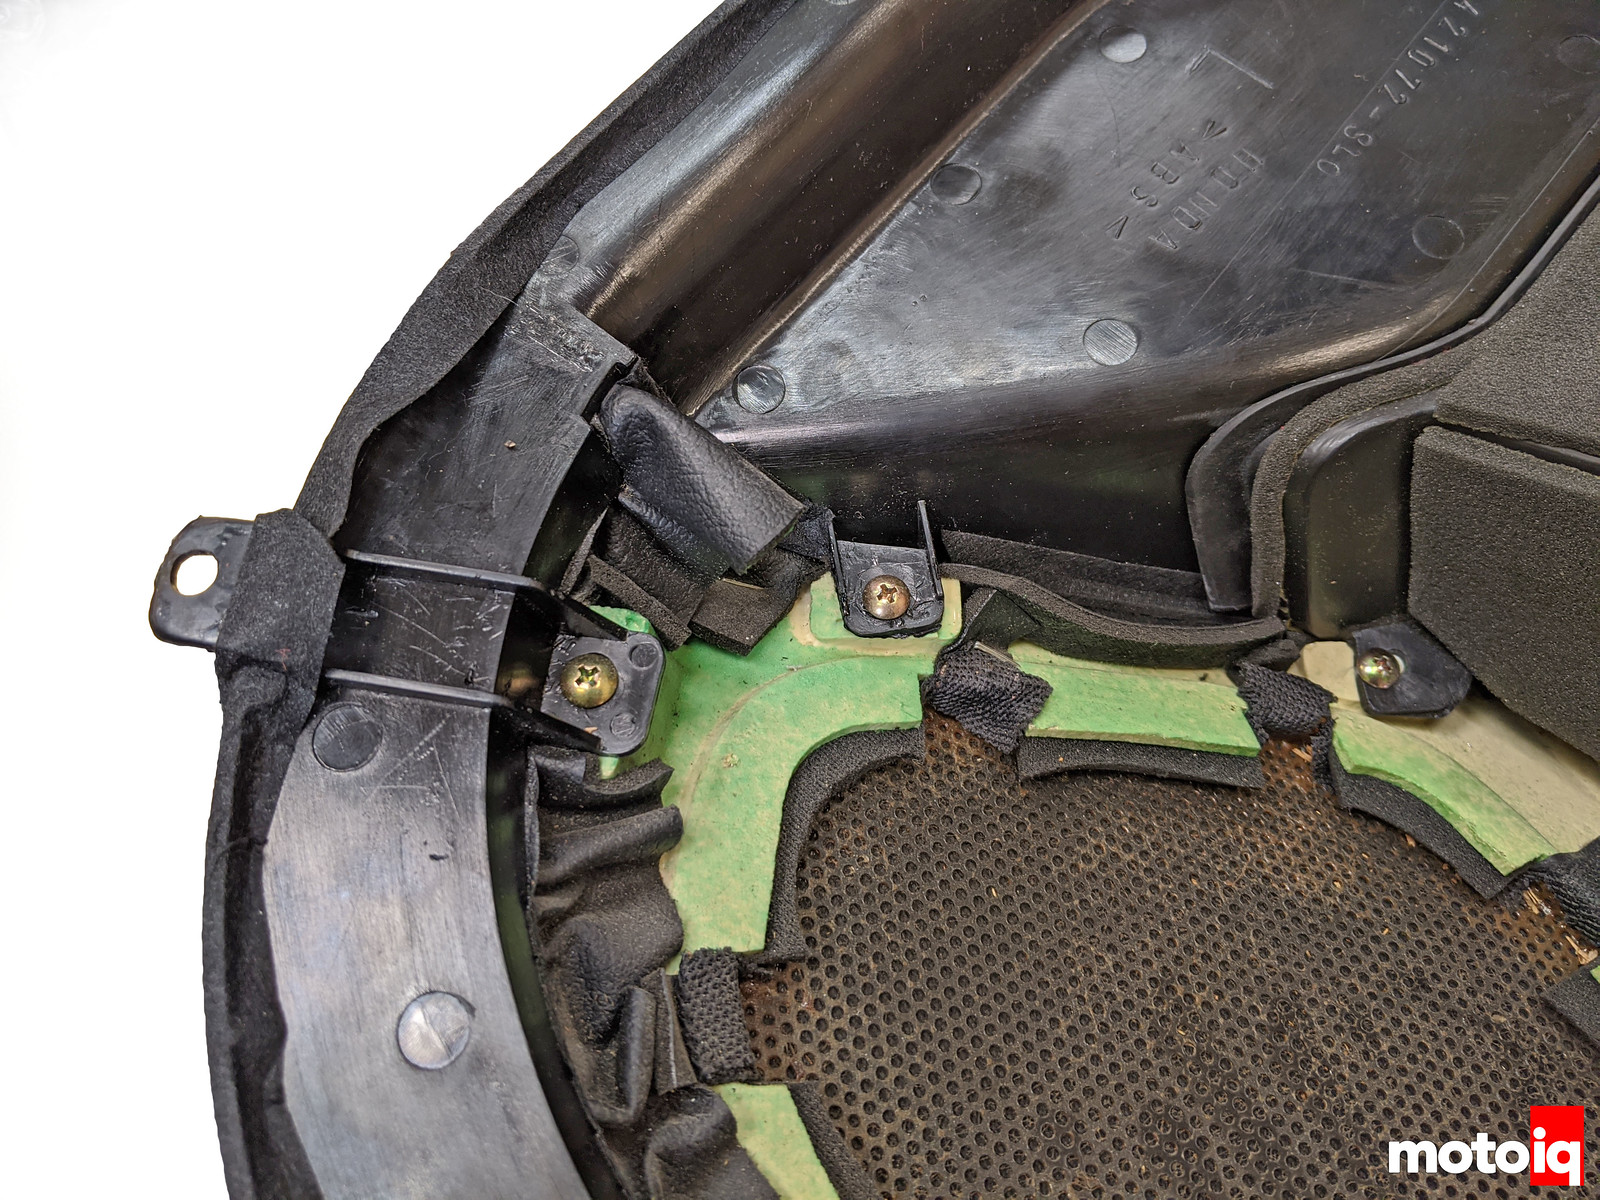
The rear door frame section sees a lot of abuse.* The two inboard tabs were broken off on the passenger side.
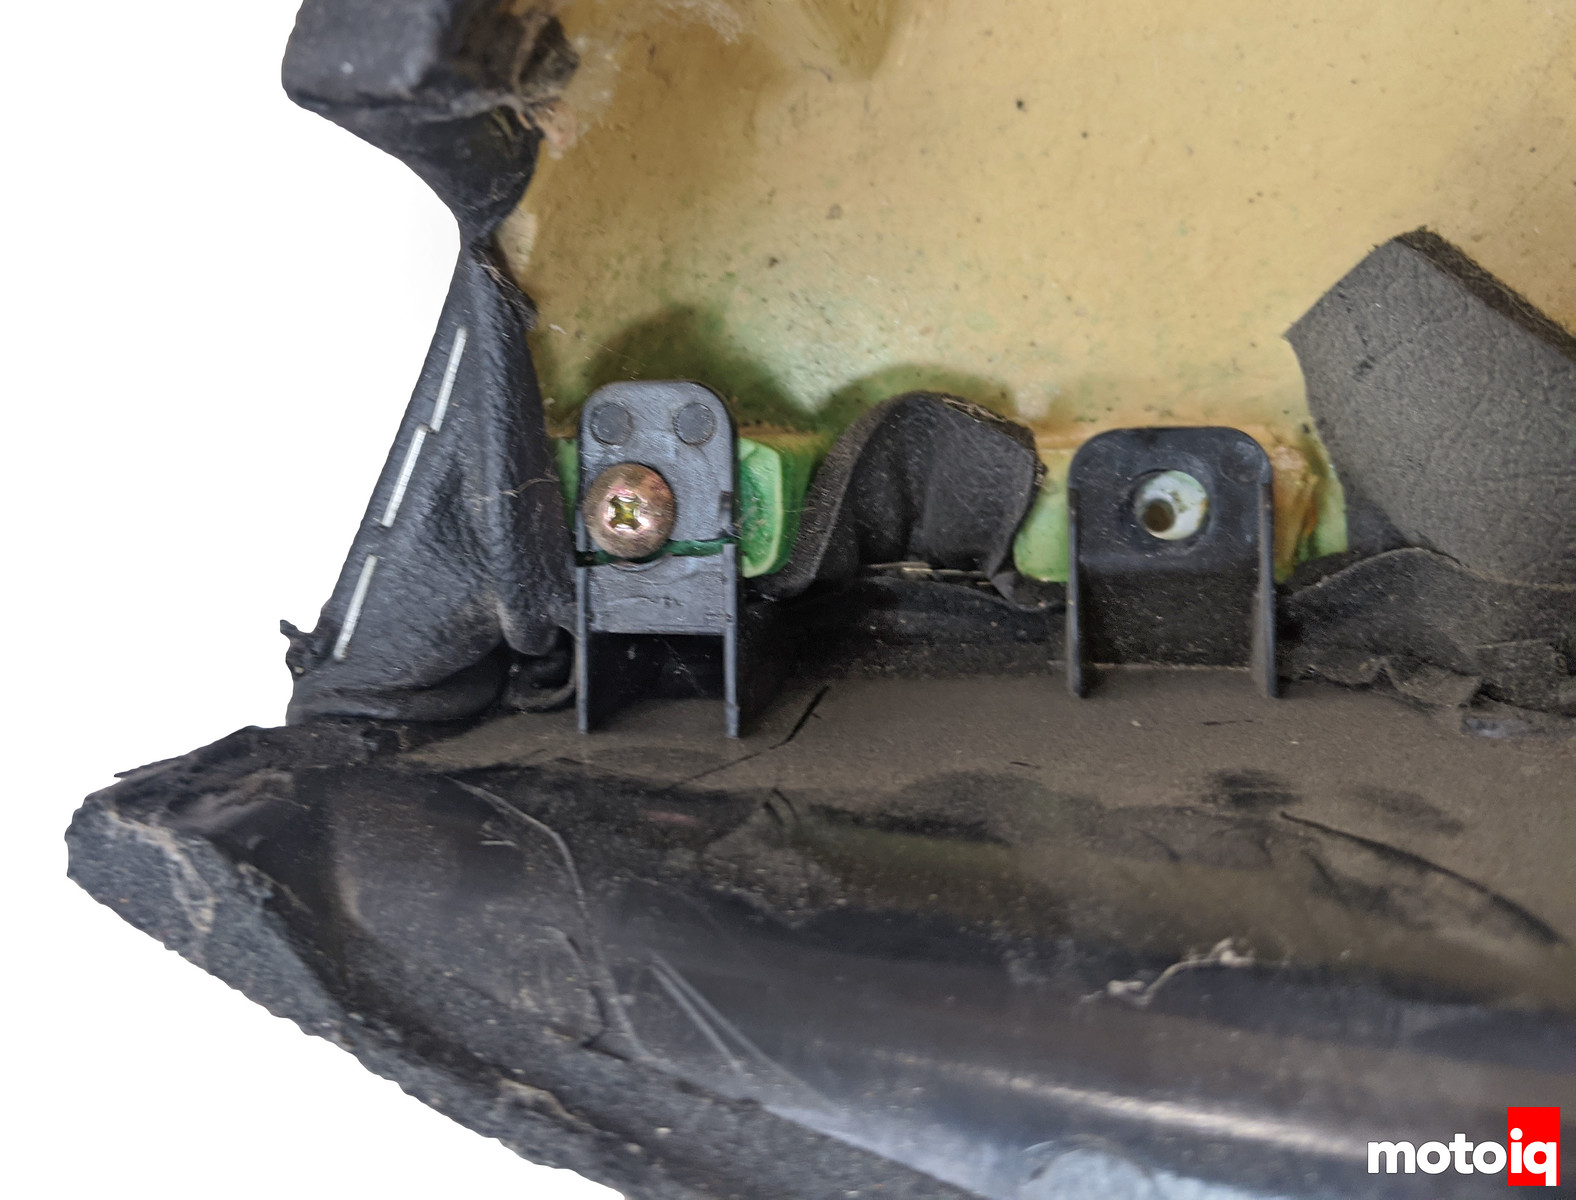
Only one of the top mounting tabs was holding the entire rear frame on the passenger door.
There are fewer outboard tabs that mount the entire assembly to the metal door than there are inboard tabs that mount the frame to the door card.* Needless to say, when all of the tabs at the rear corner are missing like this, the security of the door is not very good and the car does not feel that ‘solid’.
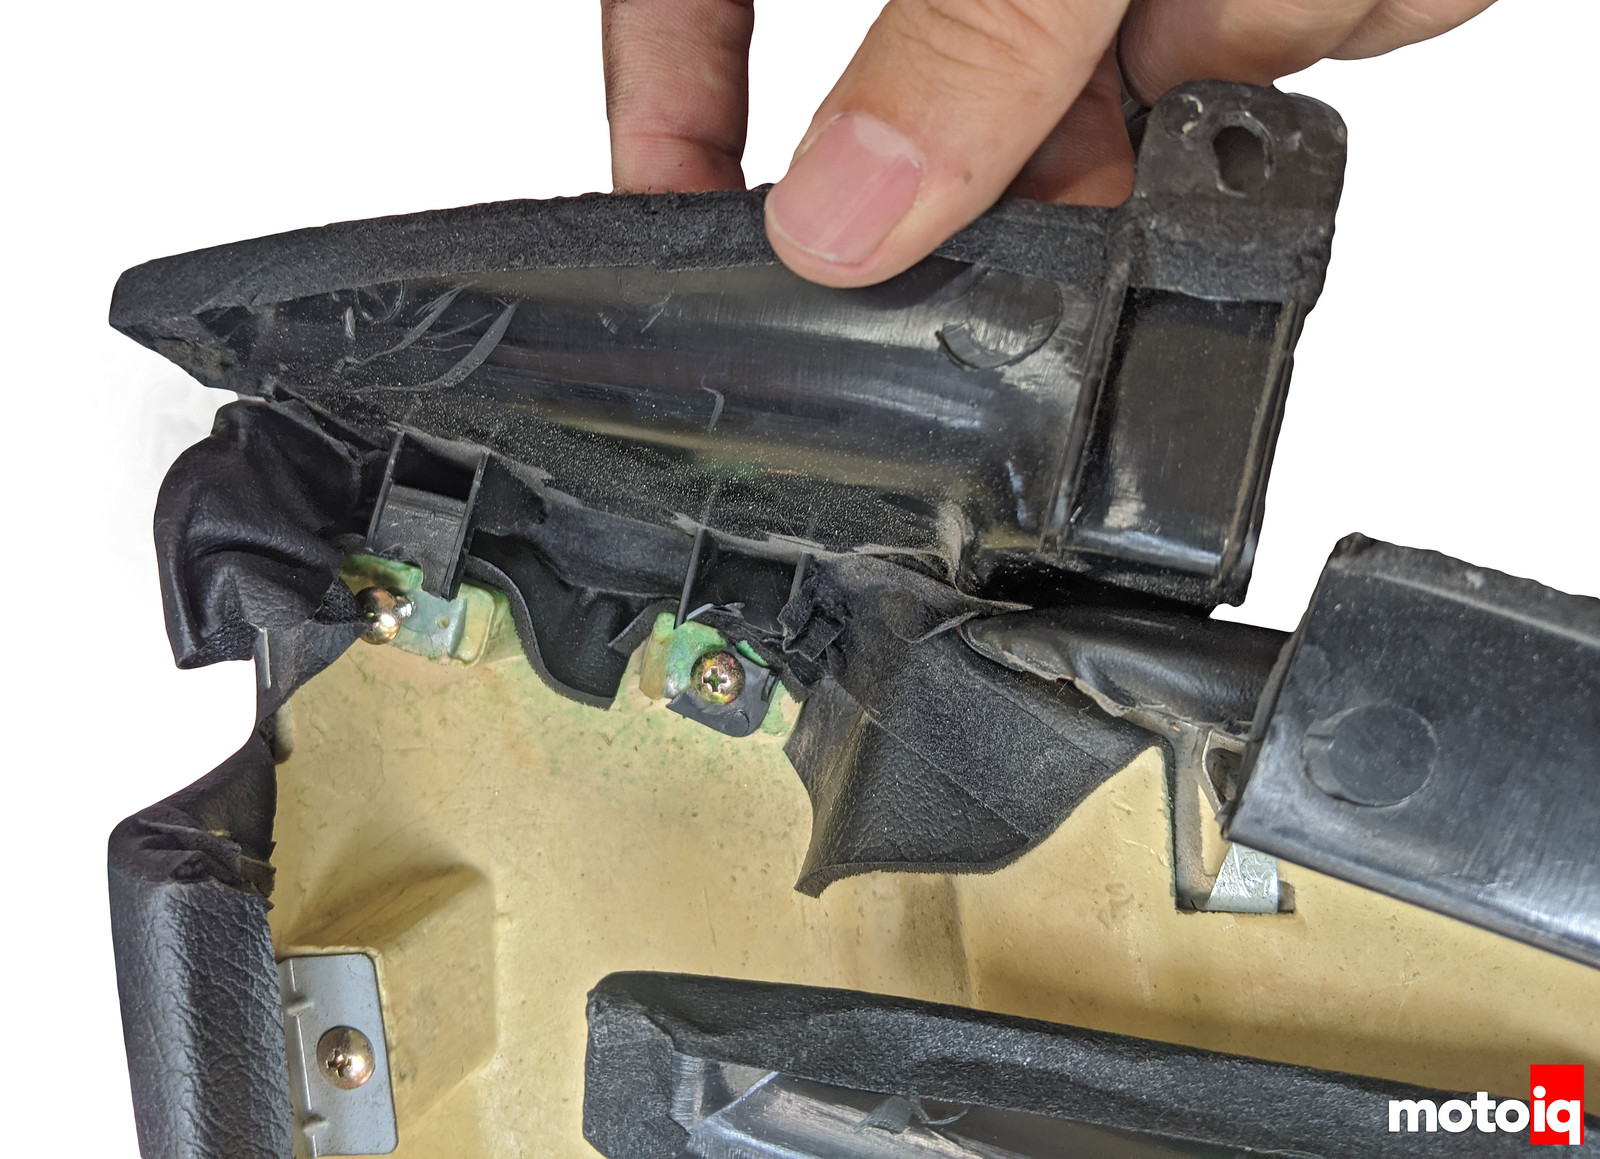
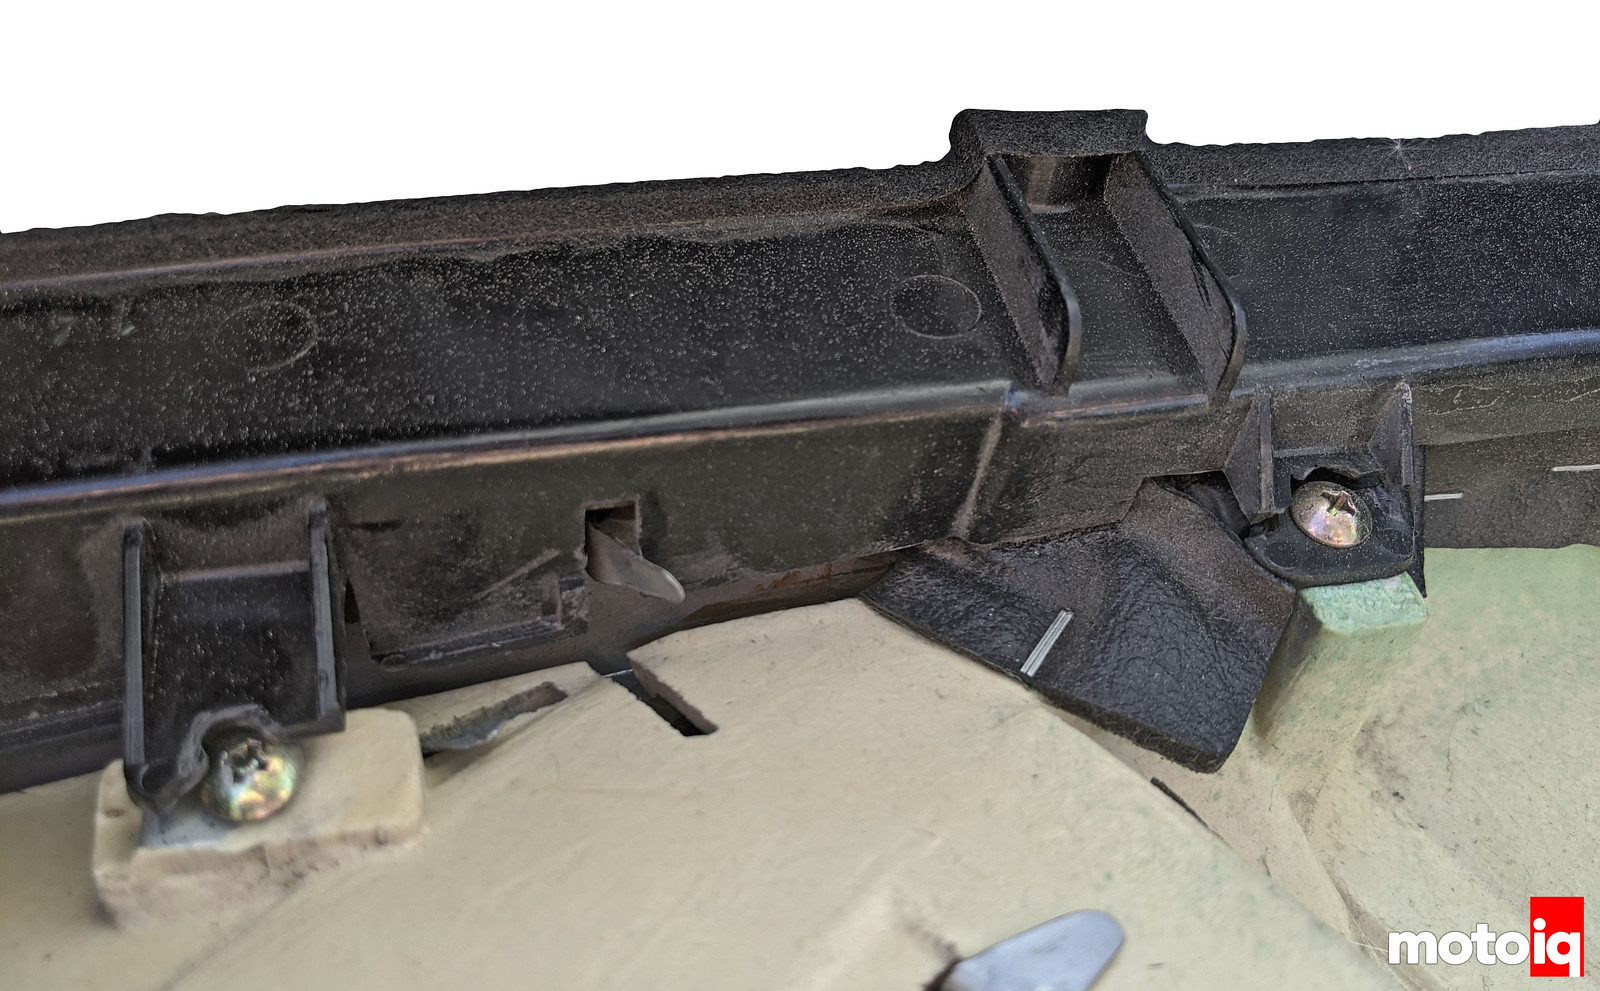
The driver’s side was even worse.* Not only were the two top tabs broken off, but the entire rear frame was split in two!
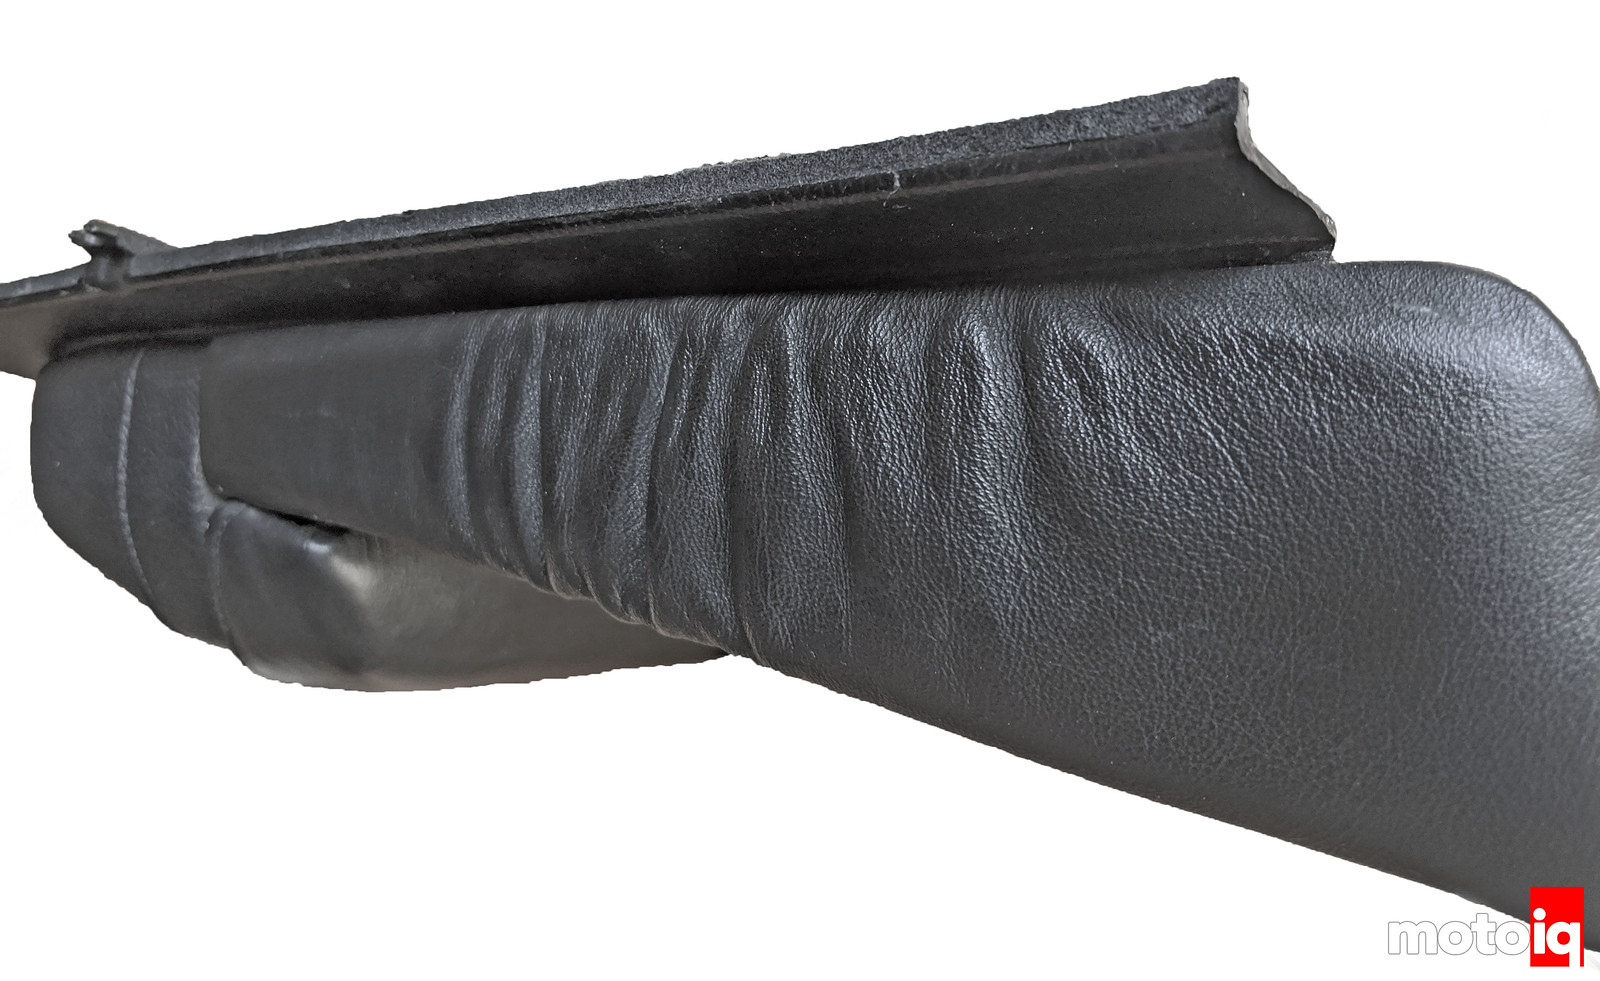
When these tabs are broken, the door card starts to ‘bow’ and warp away from the metal door.* This is something to keep an eye out for.
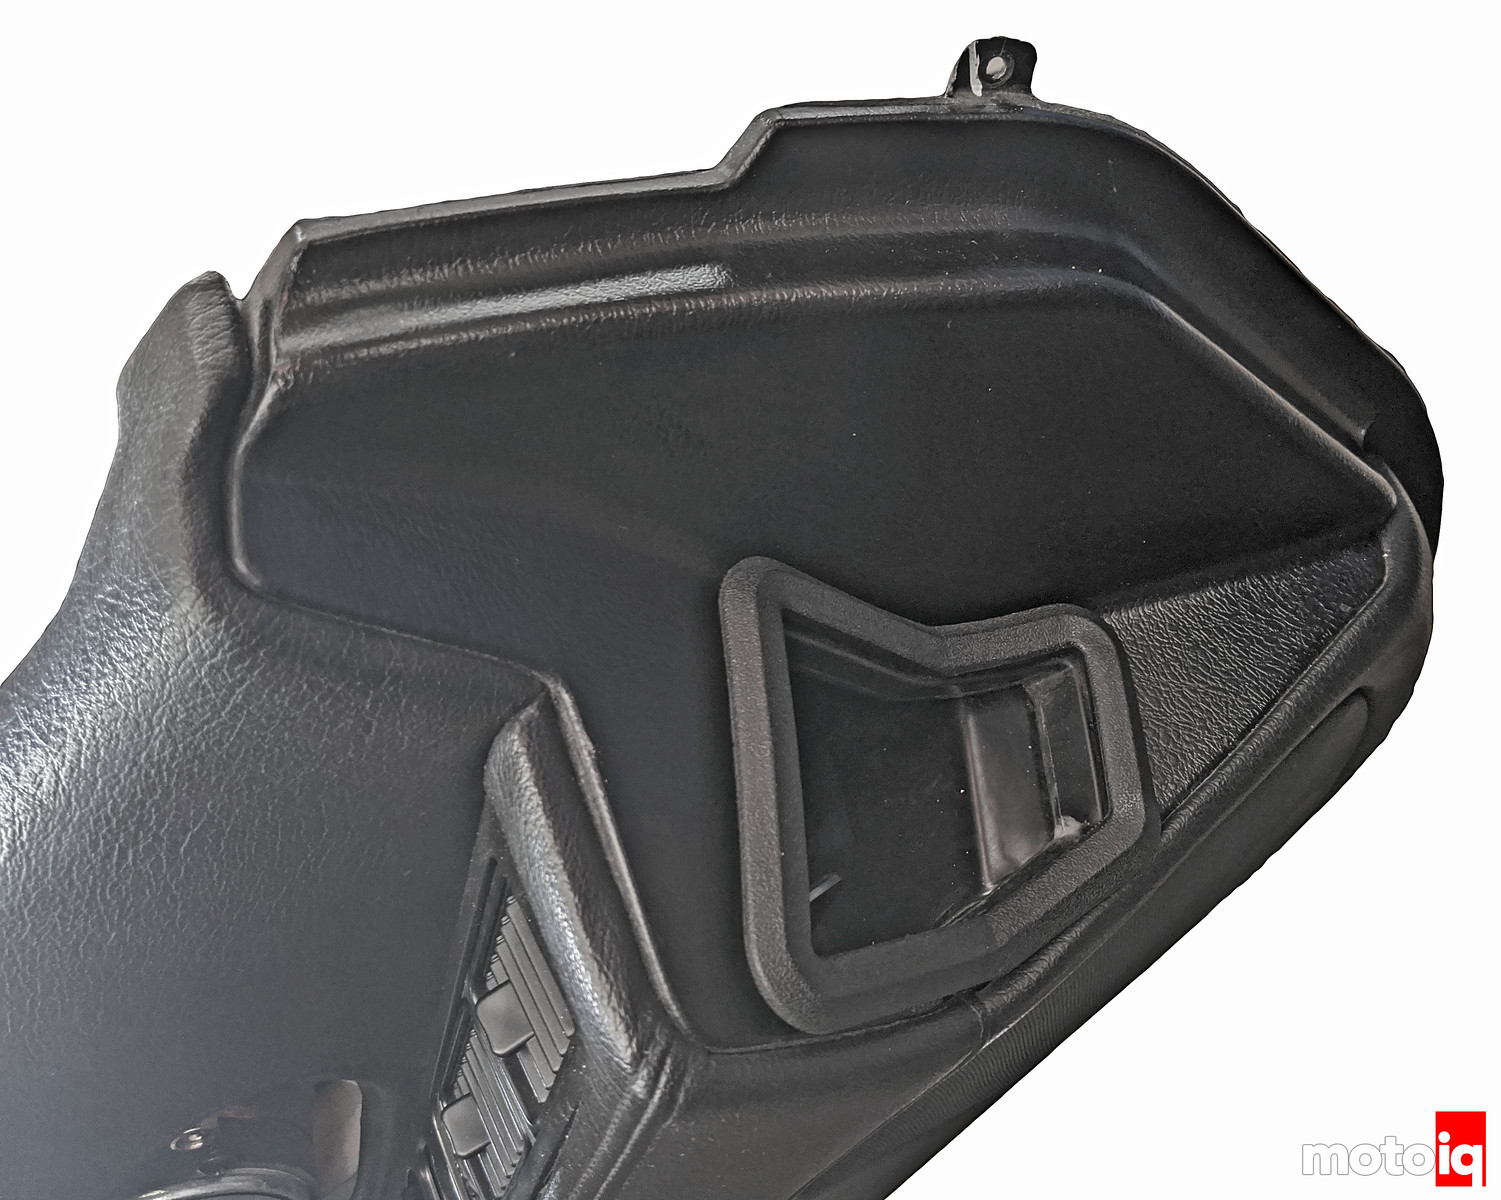
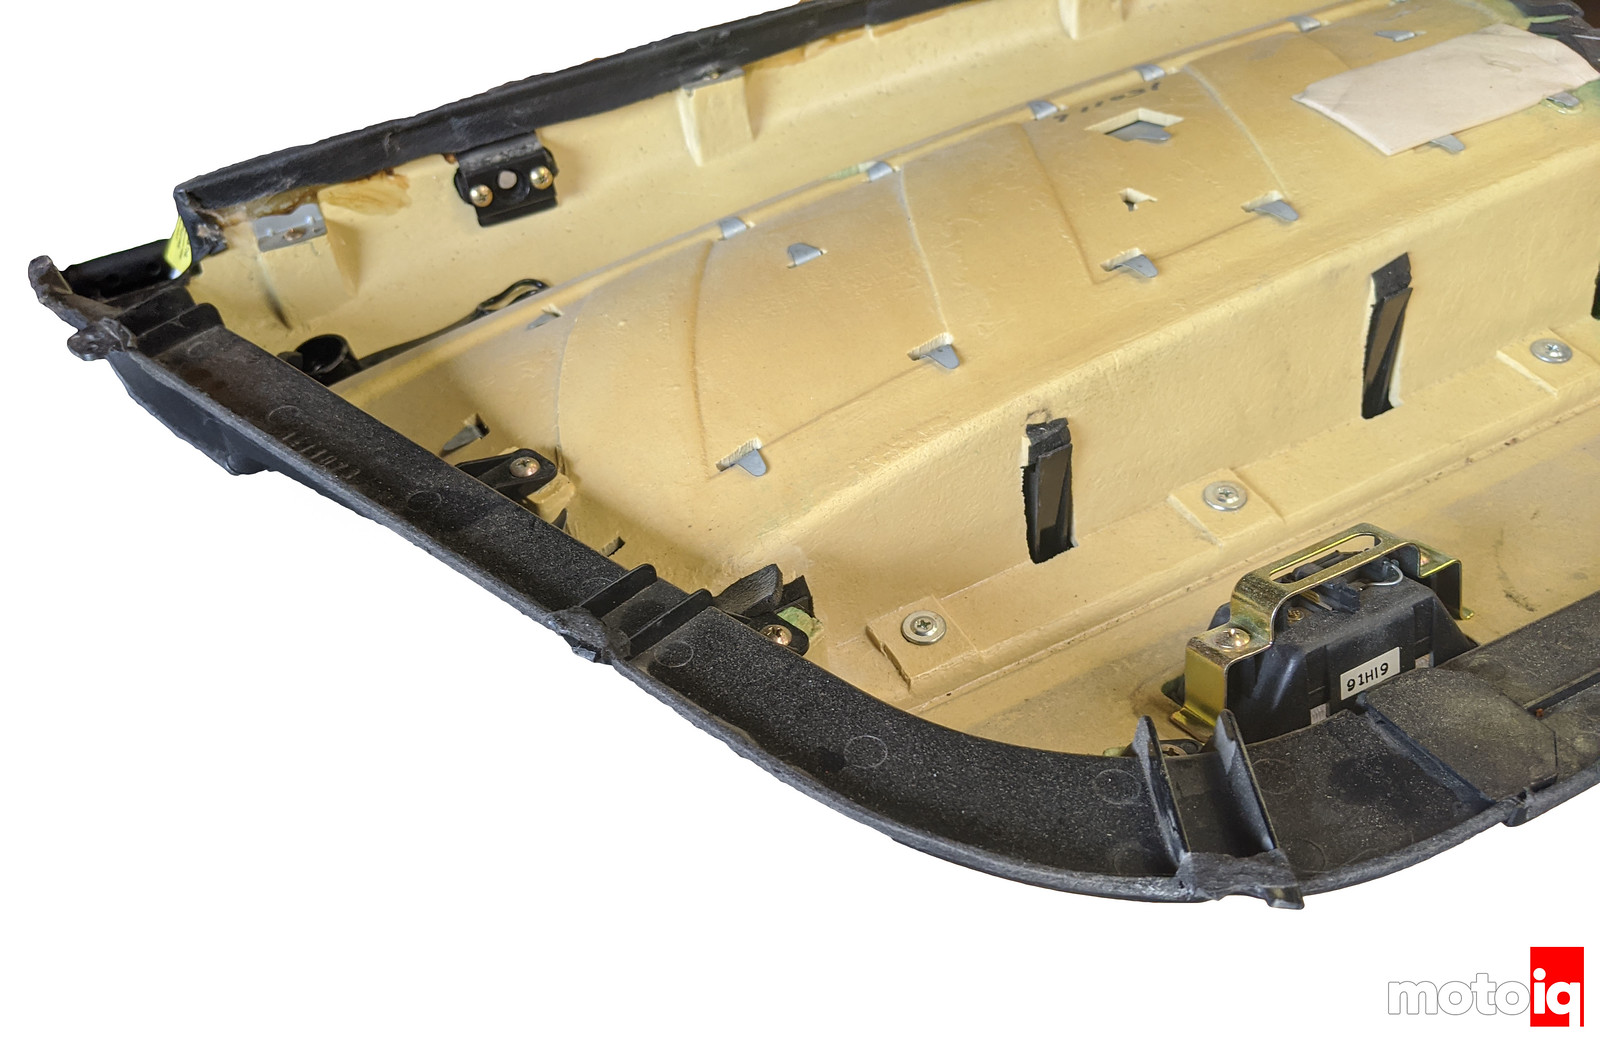
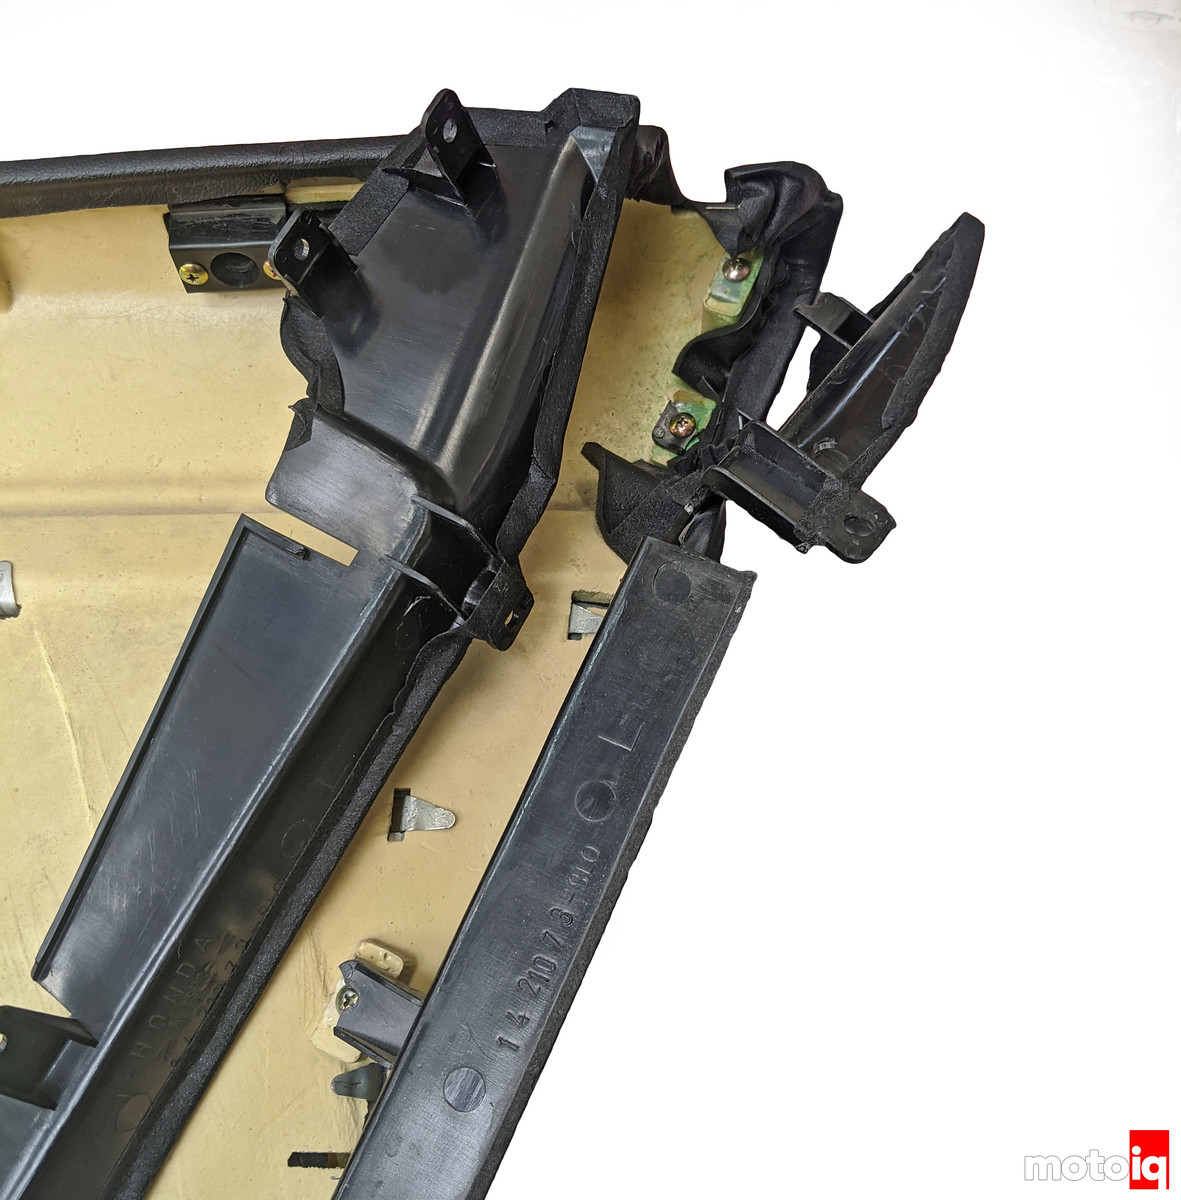
The front door frame is the most visible, albeit only when the door is open.
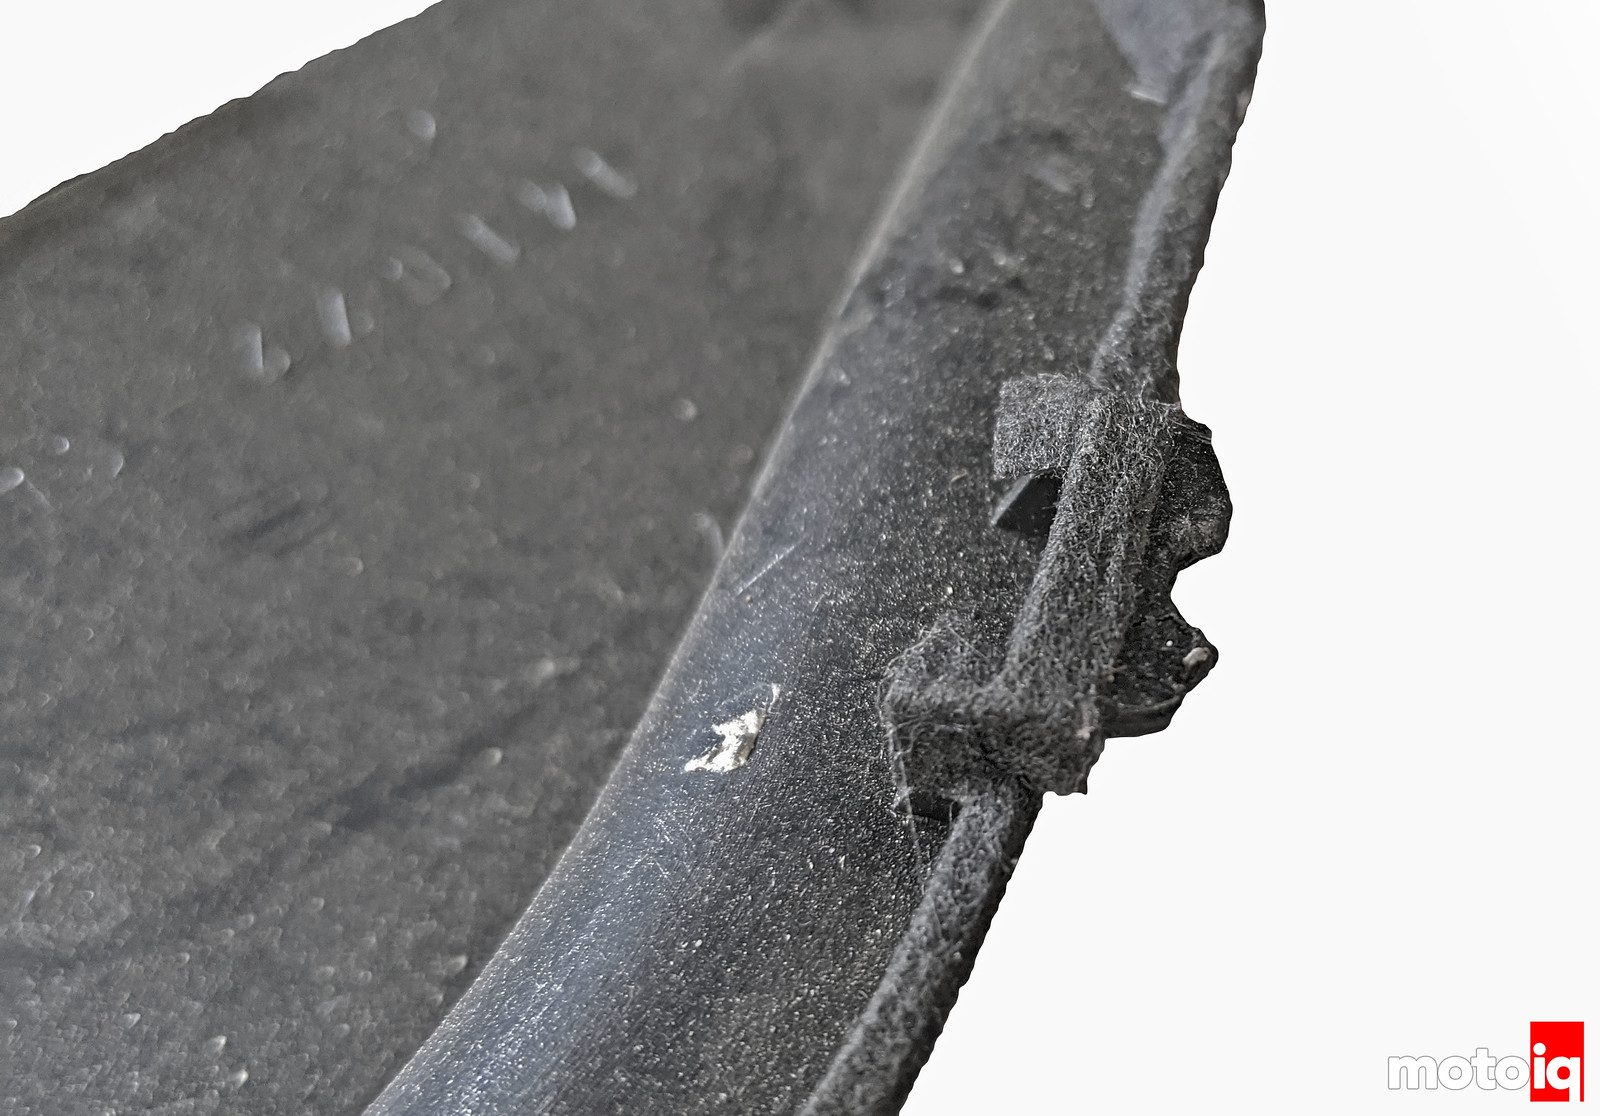
The front door frame tabs didn’t go unscathed, as most were also broken.
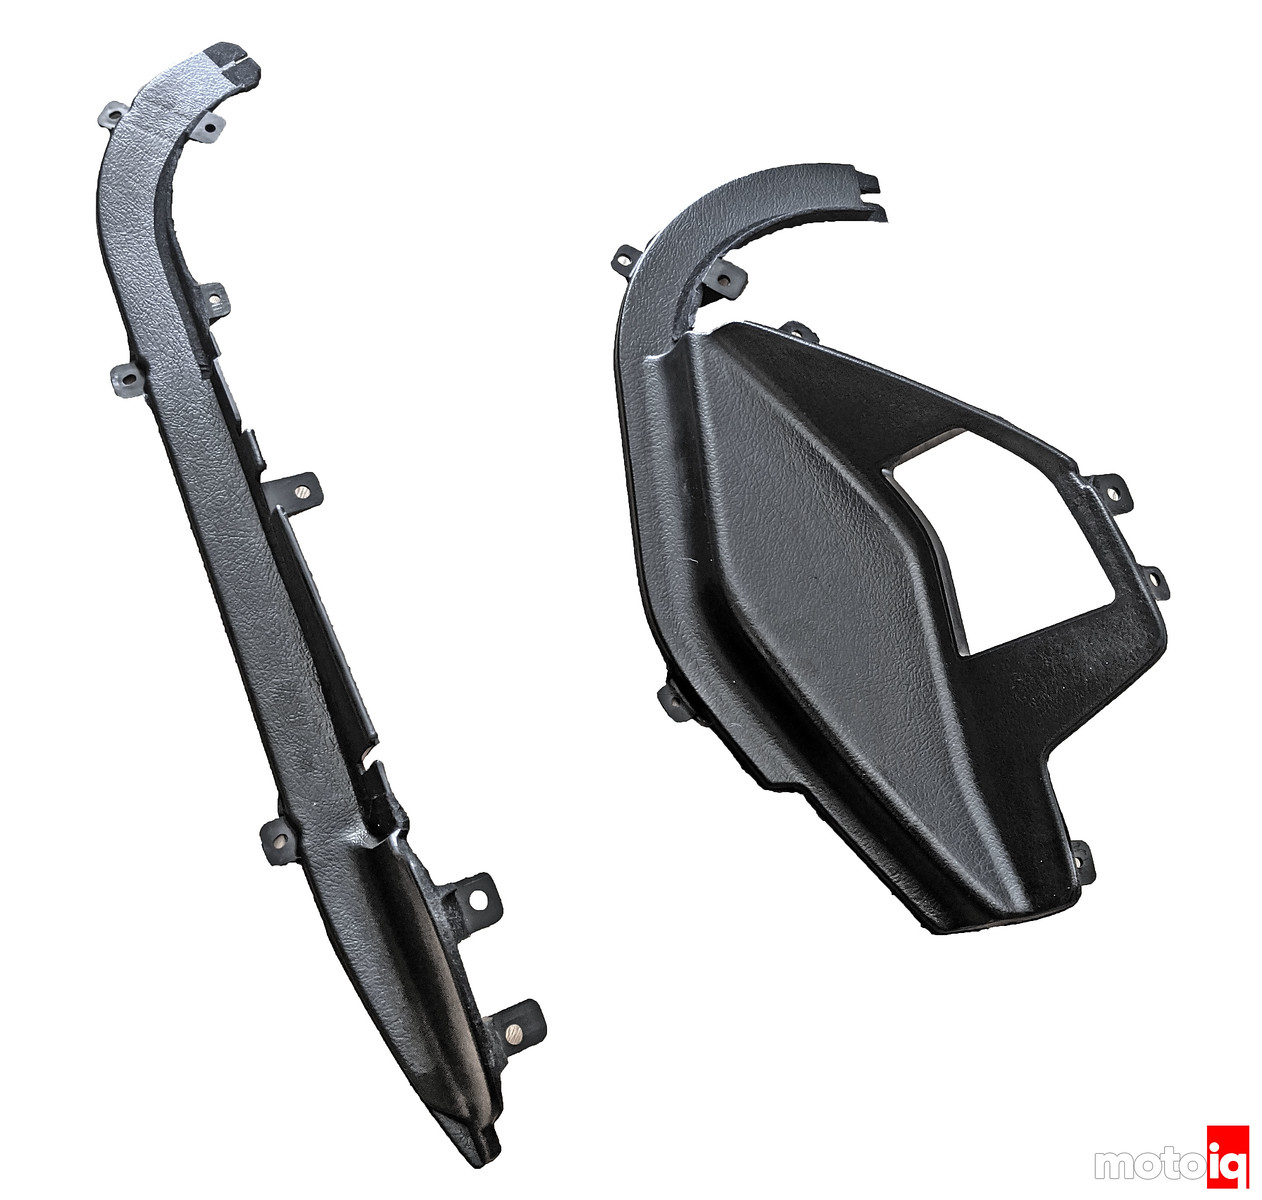
To fix all of these issues, new front and rear door frames were needed.
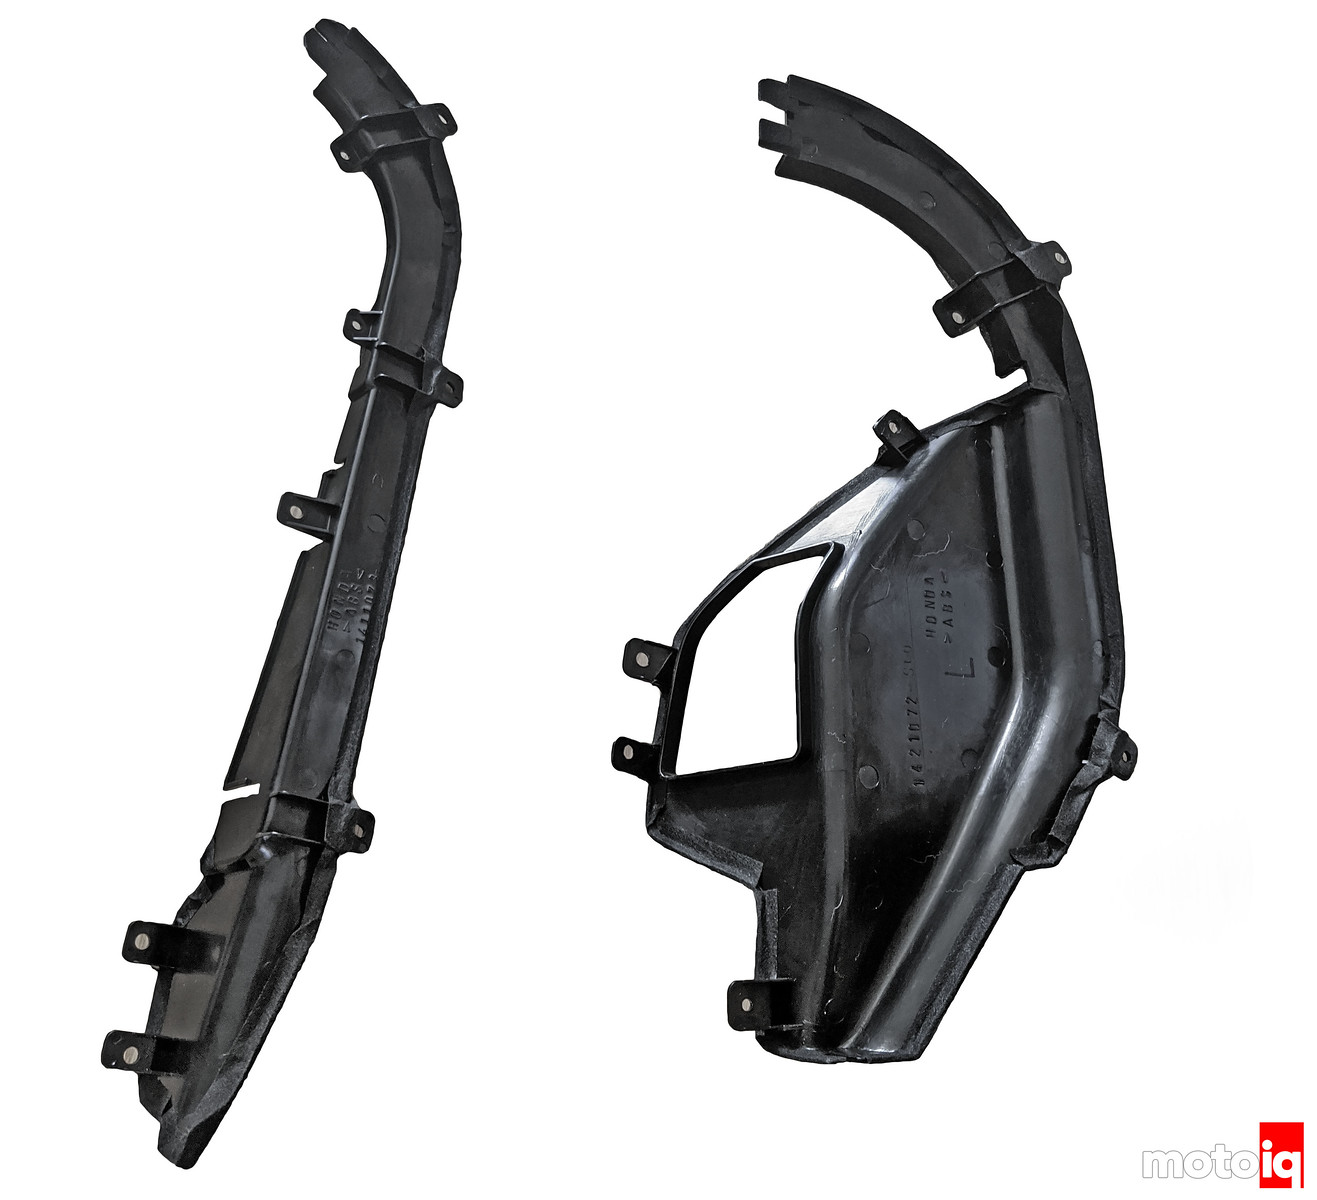
The outward face of the door frames are textured, while the inner are smooth injection-molded ABS plastic.* The texture is crucial for the large front door frame that’s really the only one that’s noticeably visible when the door is open.
We were looking forward to restoring Project NSX piece by piece, replacing all of the broken door frames.
With the new front door frame installed, a sense of pride started to develop as each piece was installed.
The rear door frames desperately needed replacing.
https://photos.smugmug.com/MotoIQ/Project-Cars/Project-NSX/i-hXzZmVf/0/2df76b68/X3/14%20New%20Rear%20NSX%20Door%20Frame%20Installed-X3.jpg[img]
Now that the new rear frames were installed, we could turn our attention to designing the center section.
[B]SCANNING, DESIGNING, and PRINTING NSX CENTER DOOR FRAME[/B]
Since the driver’s side center door frame was not available in the US or in stock in Japan at the time, my best option was to design and 3D print it.* This required laser scanning the brand-new passenger side center door frame, processing the scan, drawing the new part, mirroring it to create the missing driver’s side, and then 3D printing it it.
[img]https://photos.smugmug.com/MotoIQ/Project-Cars/Project-NSX/i-j95P6CD/0/1236cf8f/X3/15%20Mountune%20FaroArm%20Prizm%20Laser-X3.jpg
Our friends at Mountune used their FaroArm’s Prizm Laser to scan the part.* I didn’t get a picture of them scanning the door frame, but they used the same equipment when they scanned the NSX’s C30 block for the development of a new dry sump oiling system that we are working on and will cover in a future article.
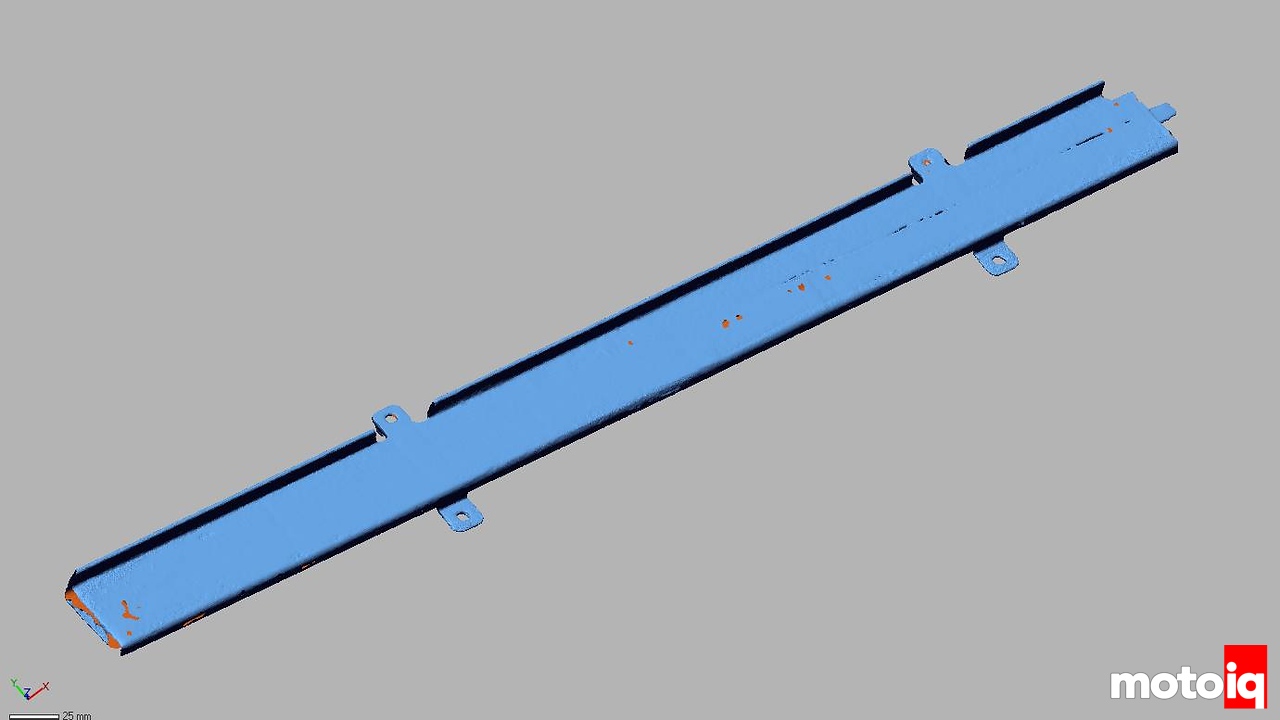
The 3D scan creates what is known as a ‘point cloud’, consisting of millions of little dots in space.
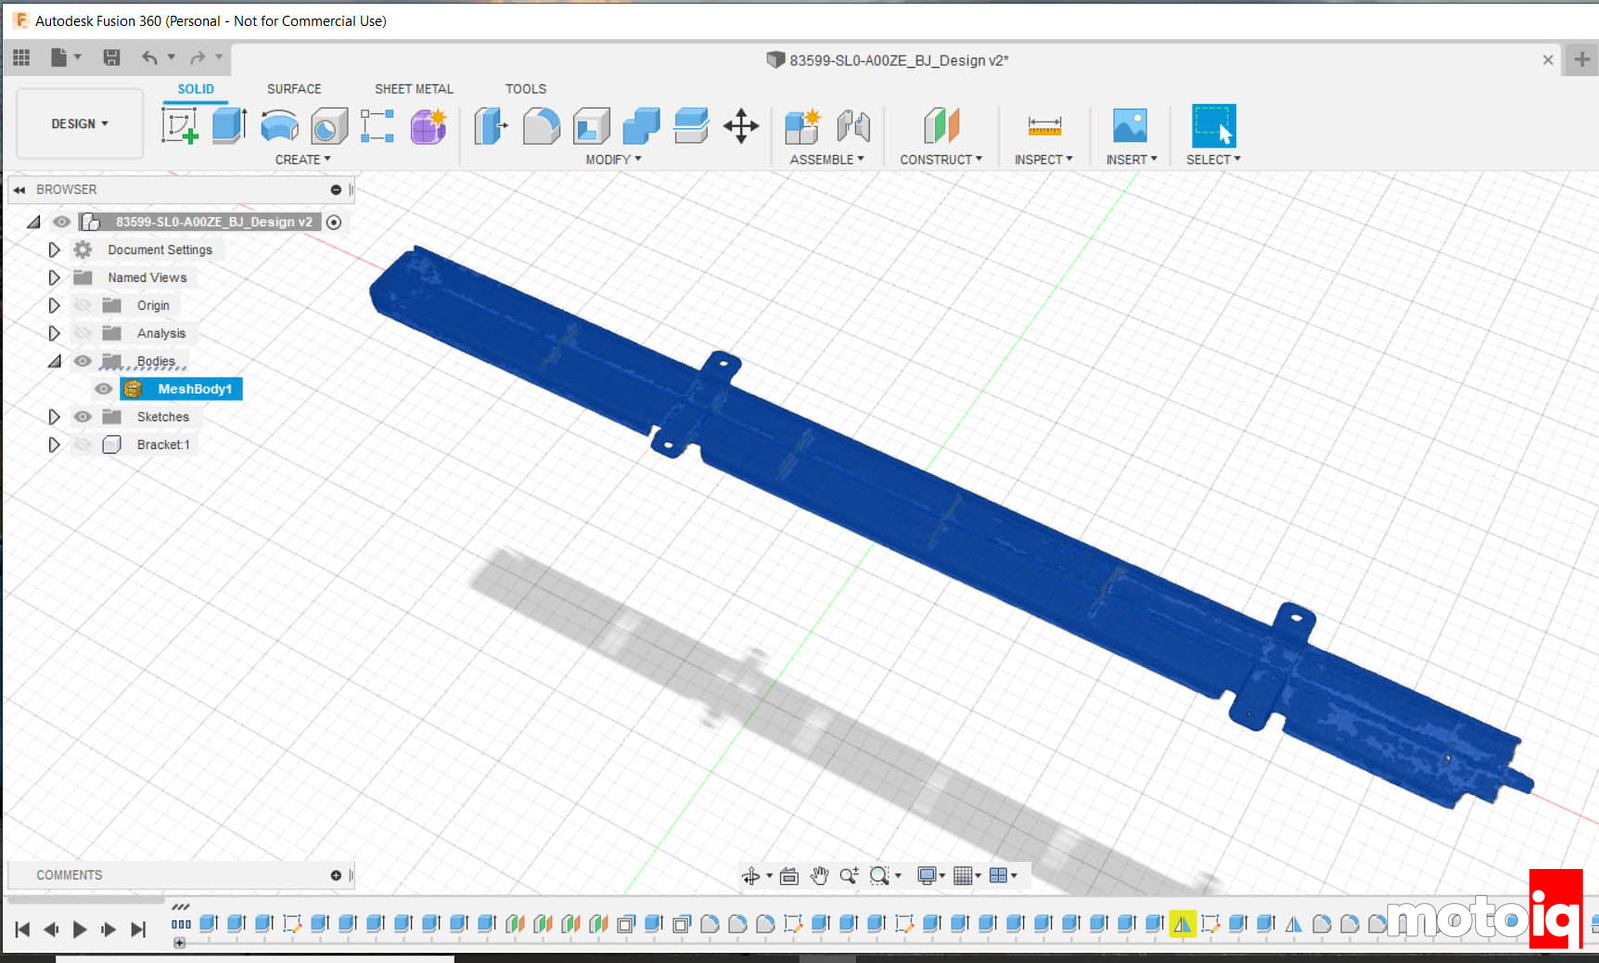
The next step is to turn the raw point cloud into a ‘mesh body’, consisting of millions of little triangles.
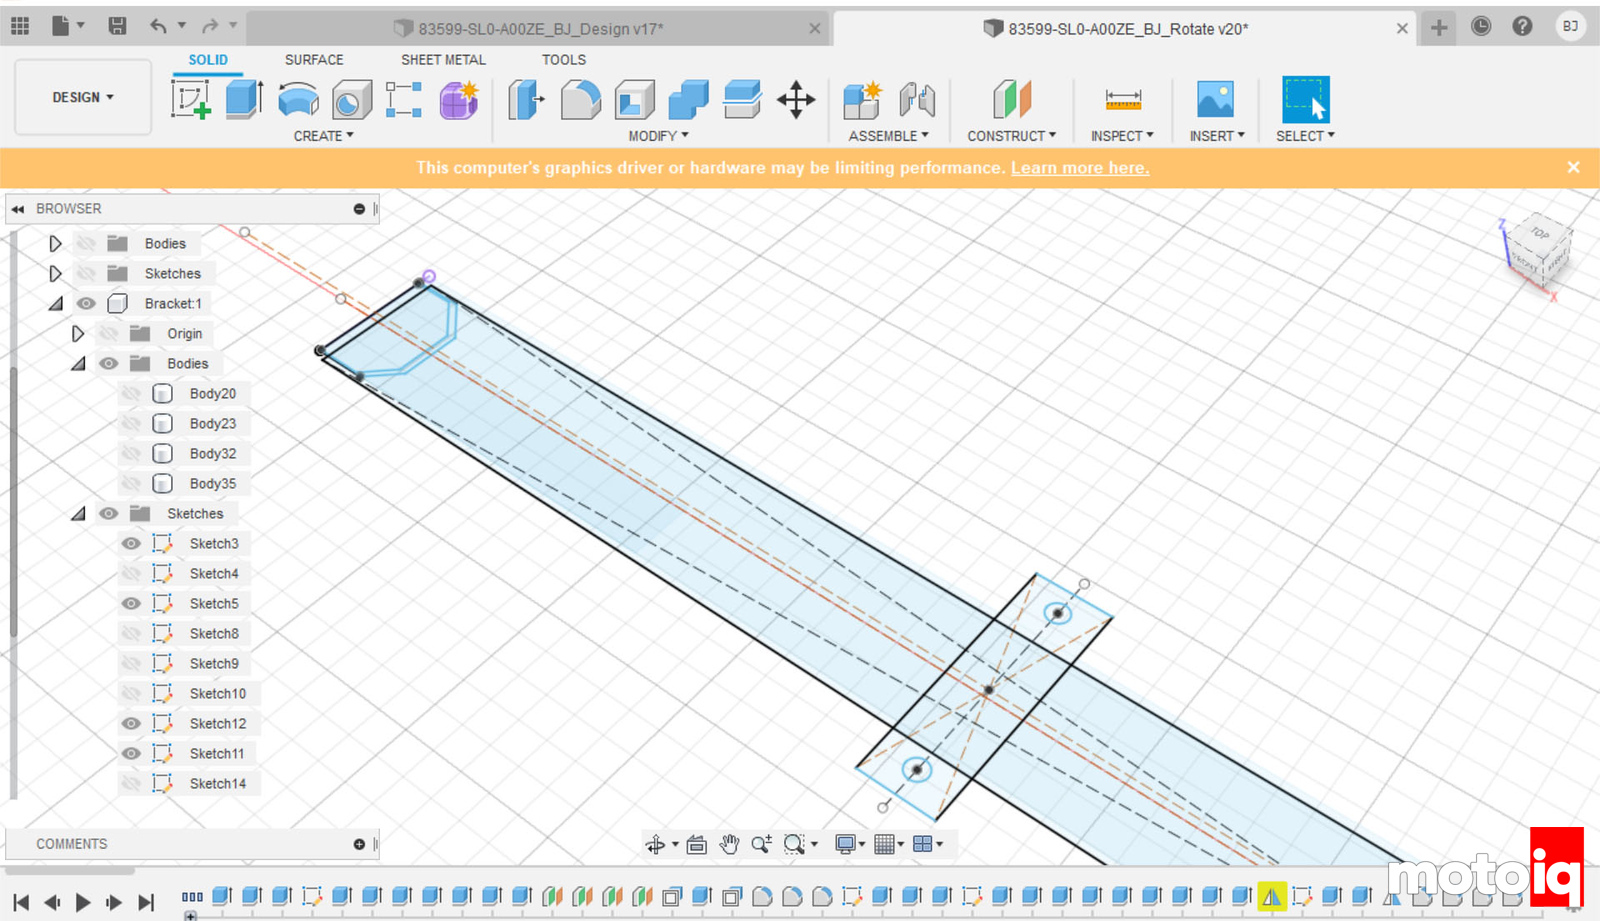
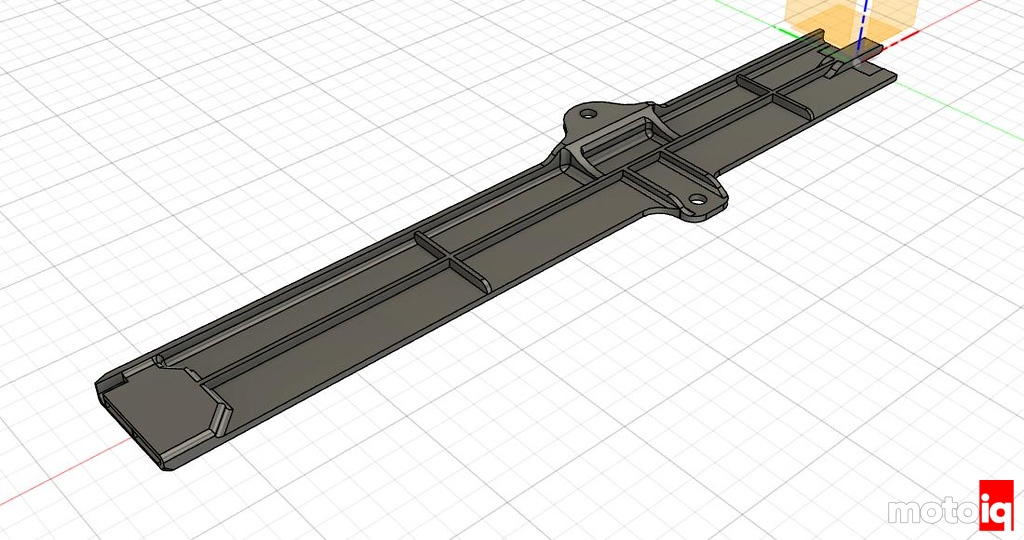
I used the mesh body as a template to draw the door frame from scratch.* Simple sketches of the shape and size and location of the mounting holes are the foundation of making the part.
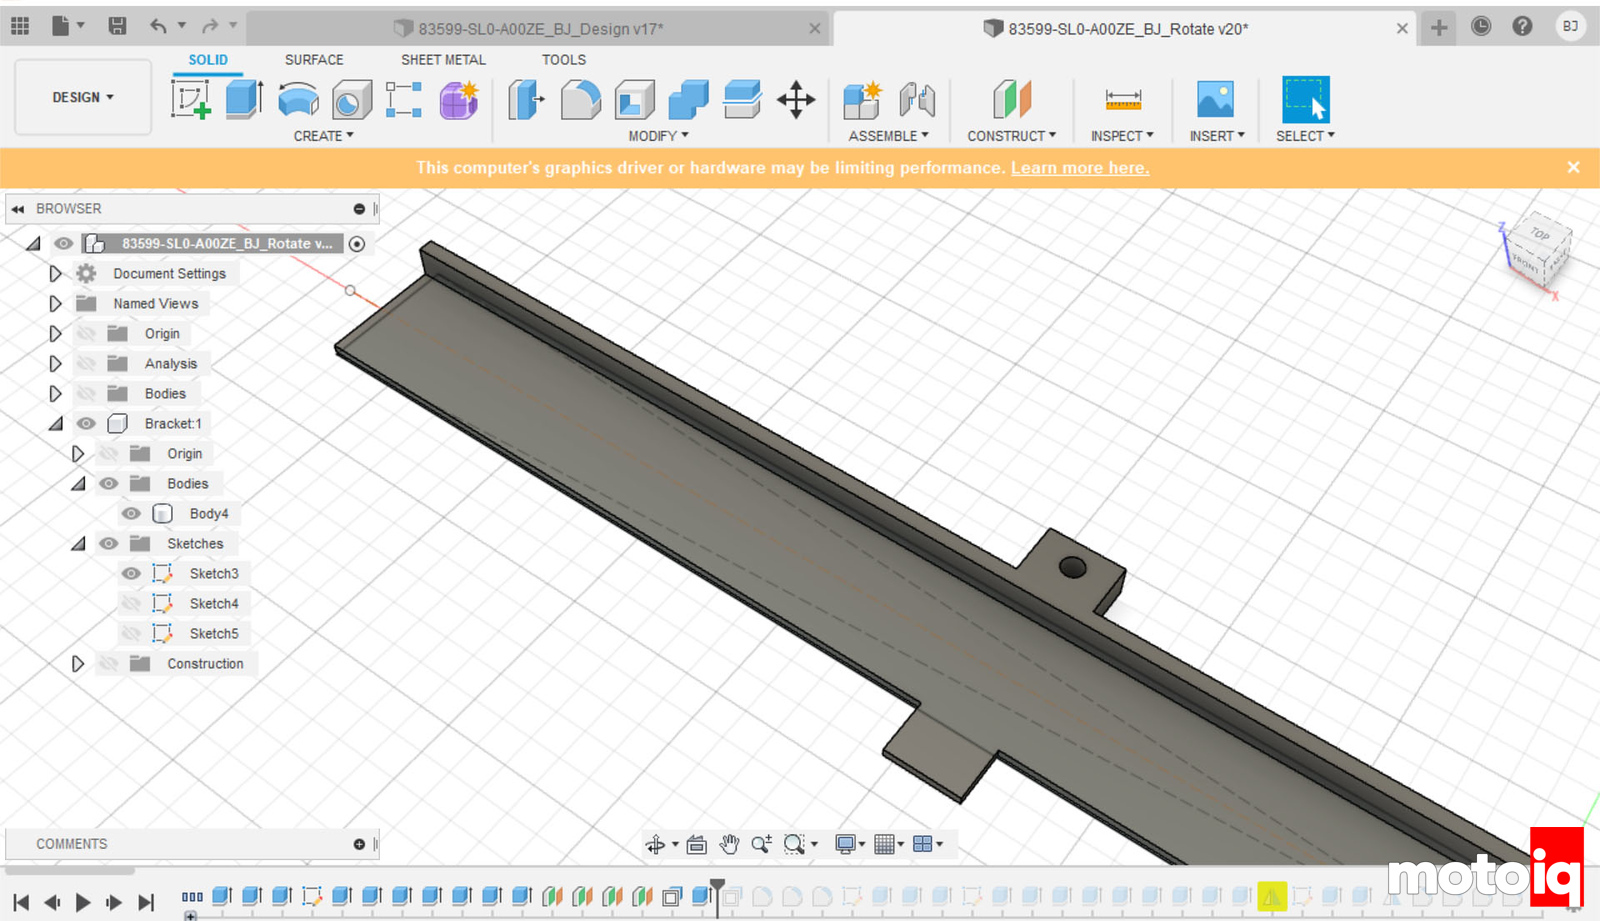
Each shape is extruded to the desired thickness of the part.
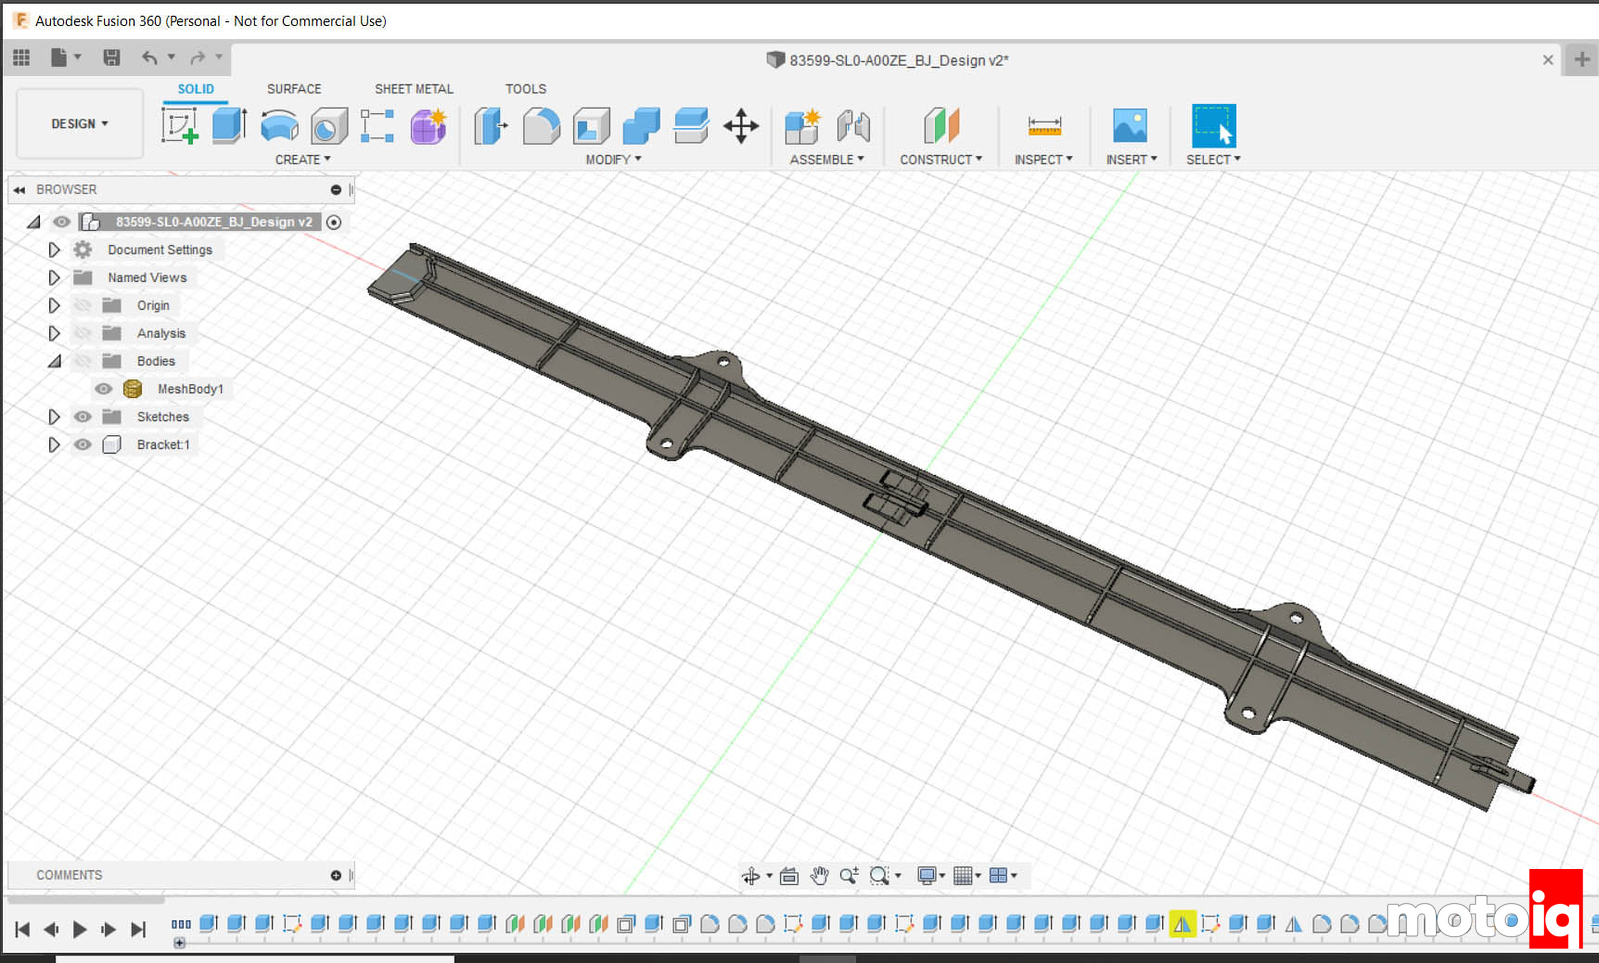
After a bunch of sketches for each supporting rib and brace, the completed design was ready.* The only major difference is that I made it in 2-pieces in order to fit on my Creality CR-10 Printer’s 300x300 build plate.* I radiused the edges and copied the OEM locking interface to connect the two pieces together.
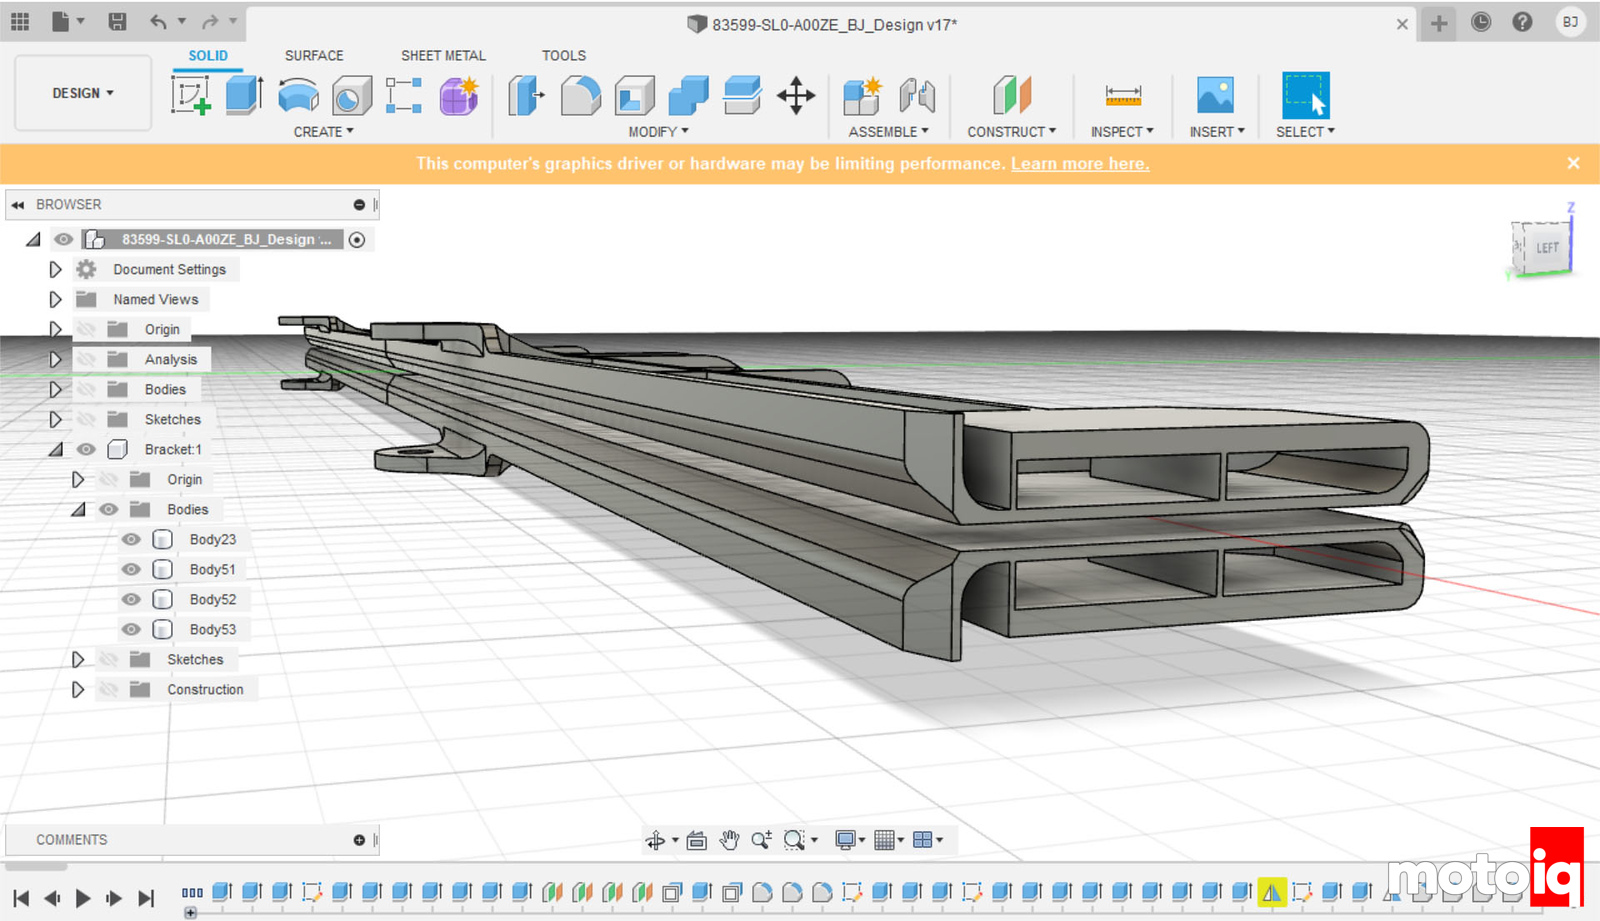
The key to creating the missing piece is a simple “mirror” function.* A few clicks of the mouse turns hours of work drawing the scanned part into the missing one.
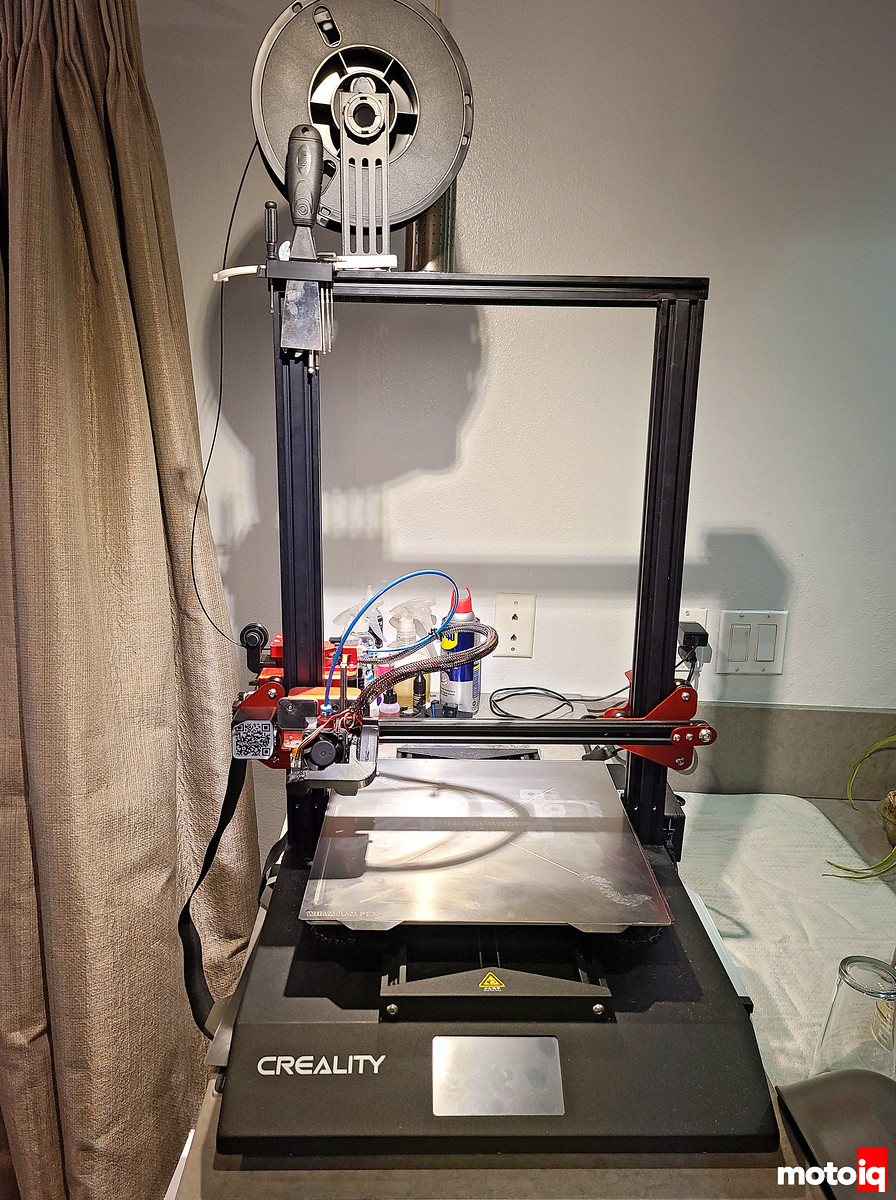
Once the design was finished, it was ready to be printed on my modified Creality CR-10S Pro V2.* Like many hobbies, 3D printing is nearly impossible to leave thing stock, especially when you can take a $3-500 printer like the CR-10 and modify it to perform like a $3-5K printer.
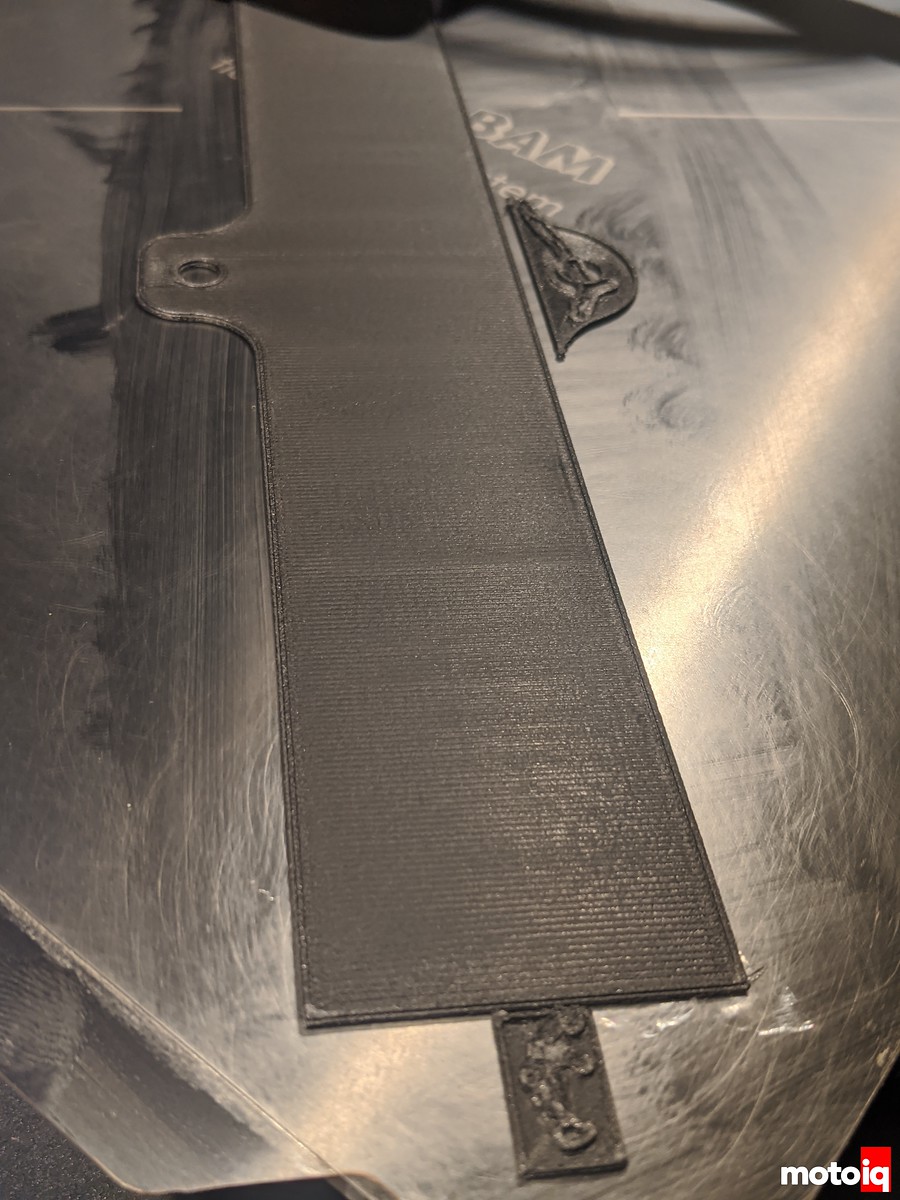
After a few layers have been put down, the printing process is easier to understand.
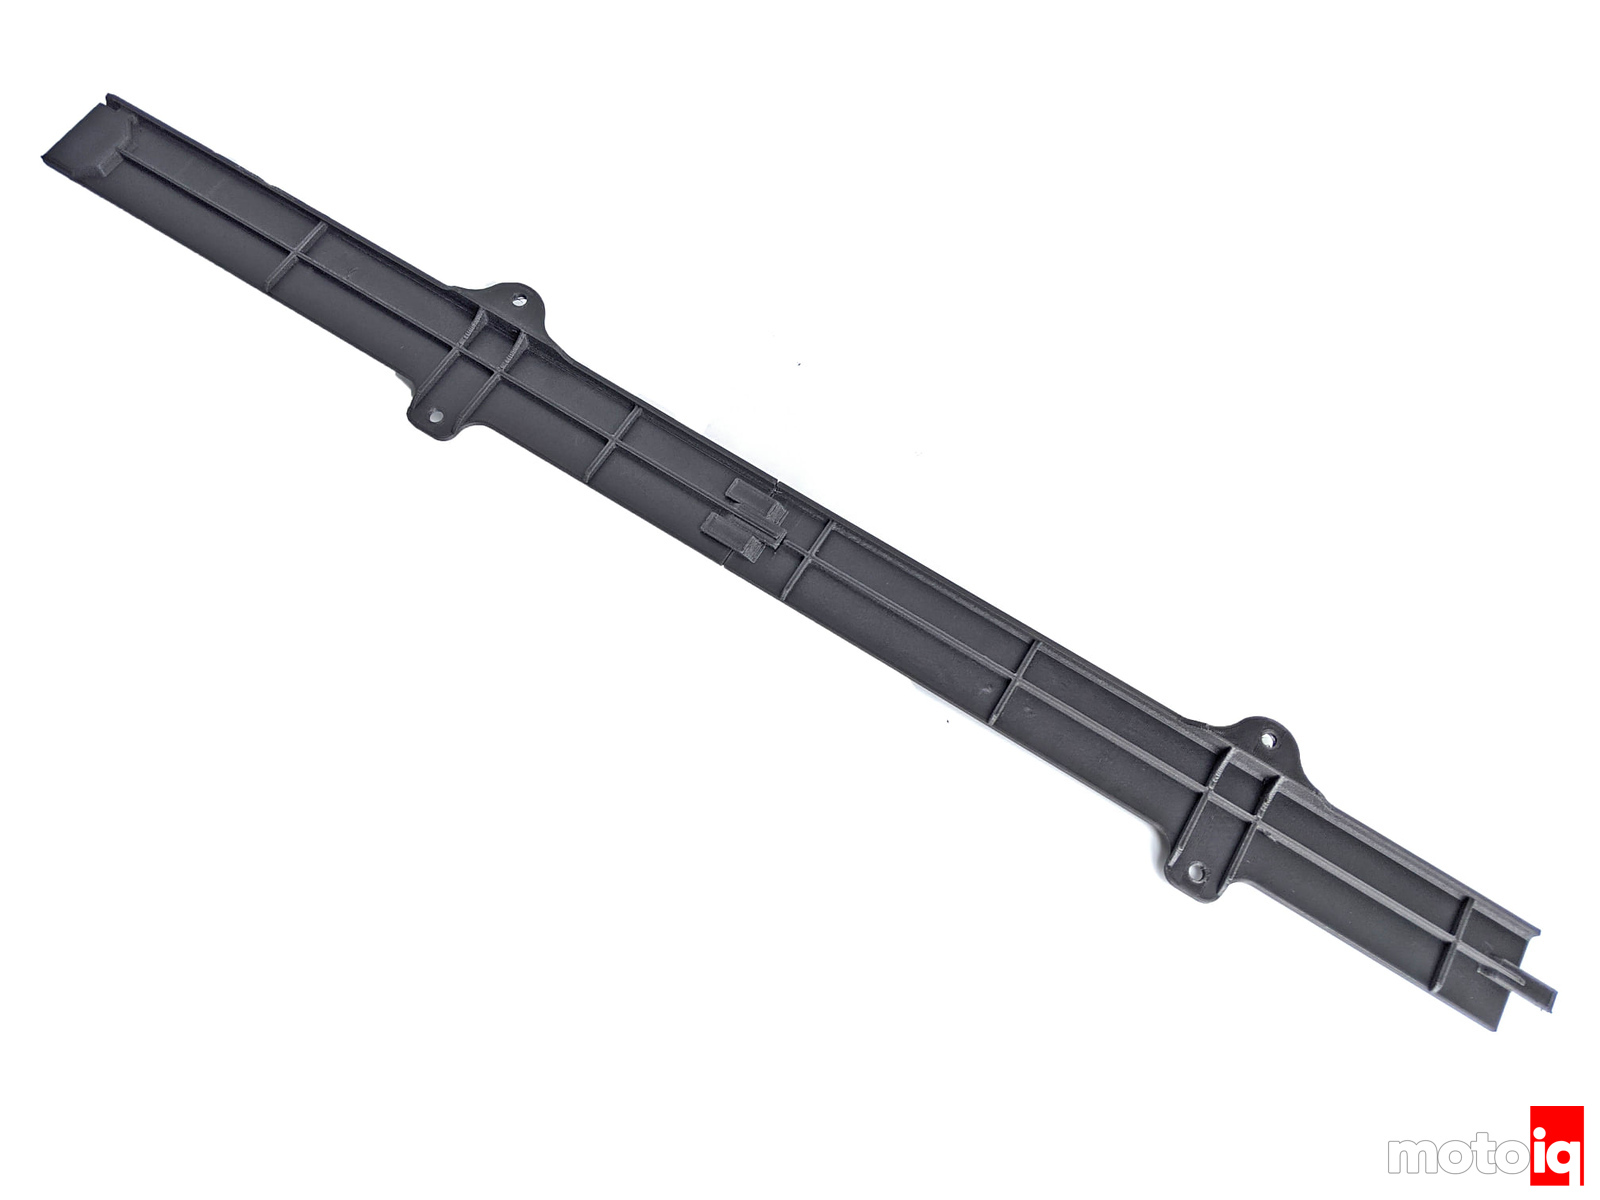
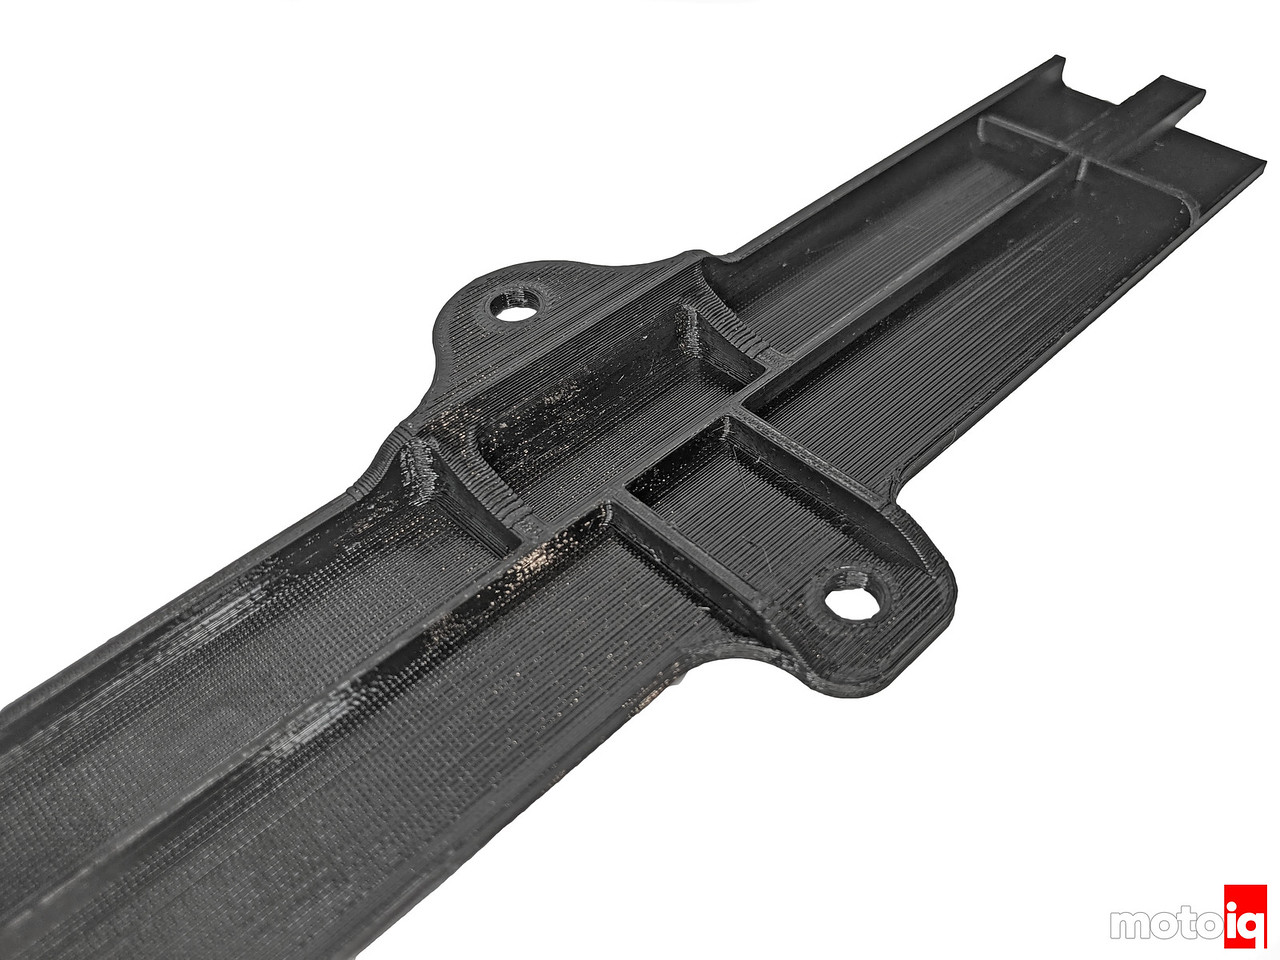
With the print complete, missing driver’s side center door frame is now made!
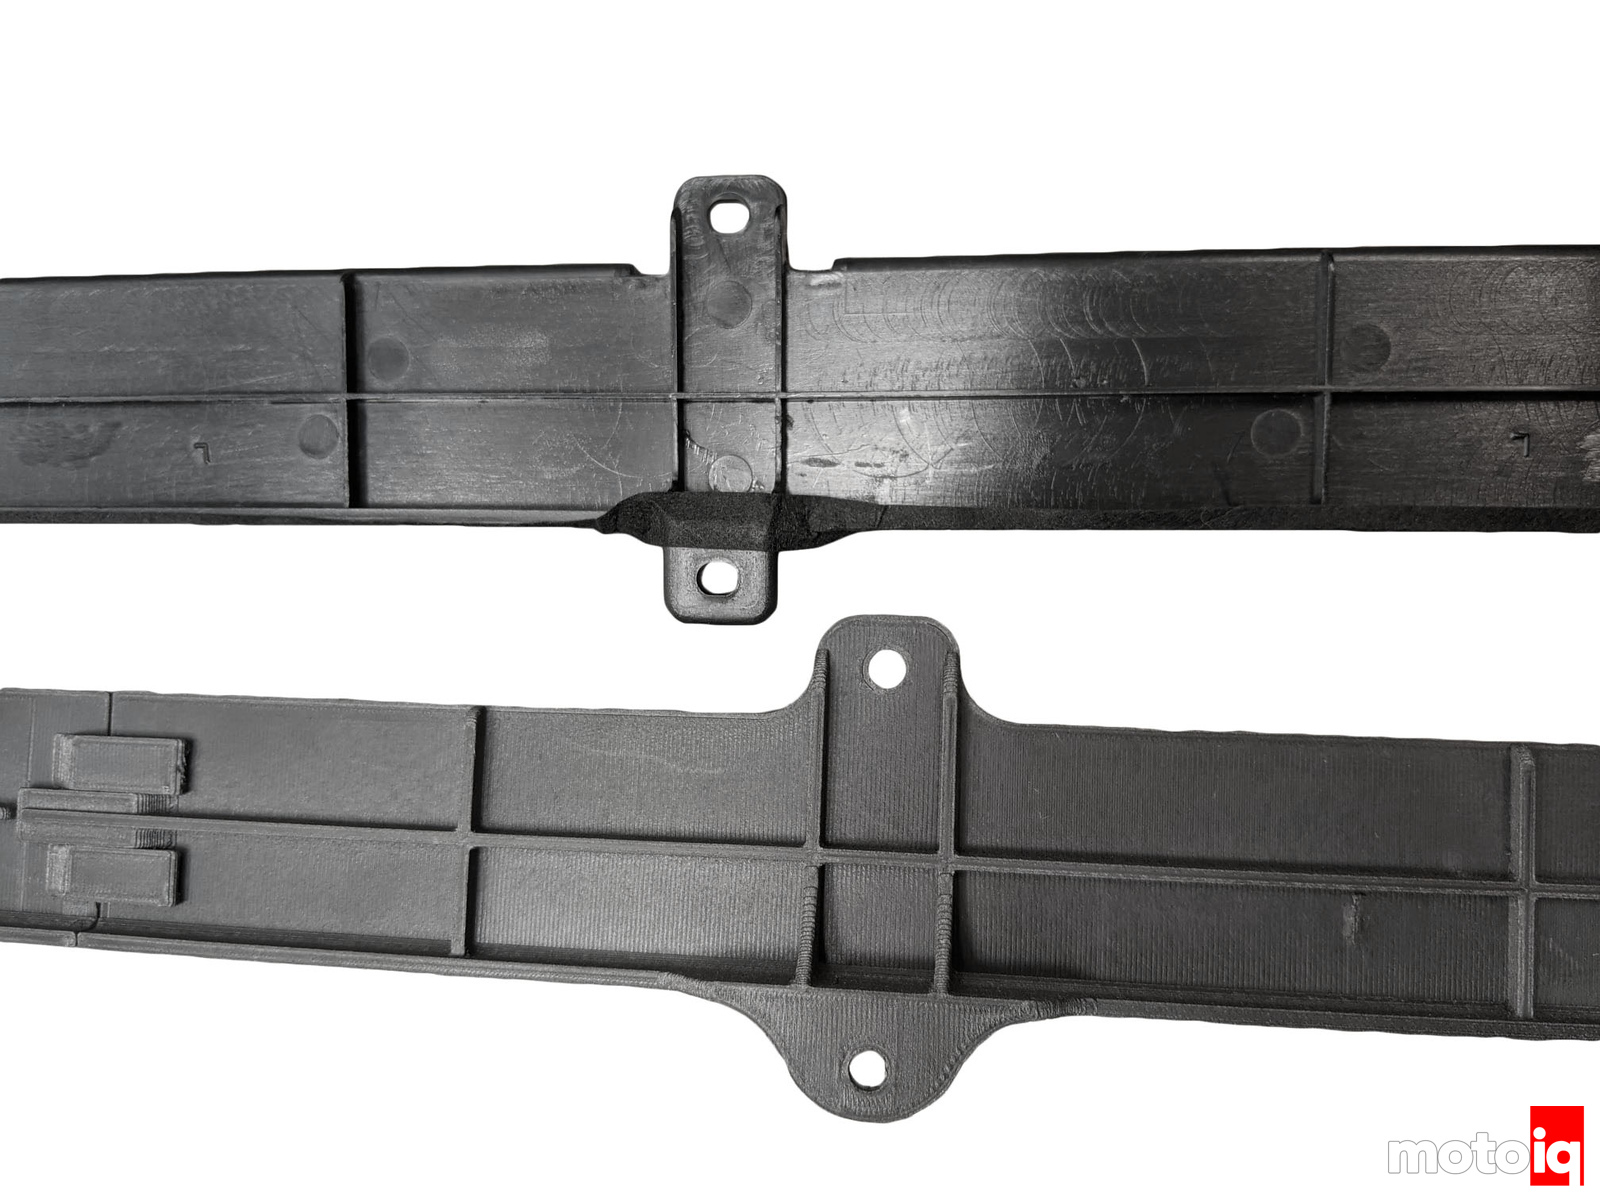
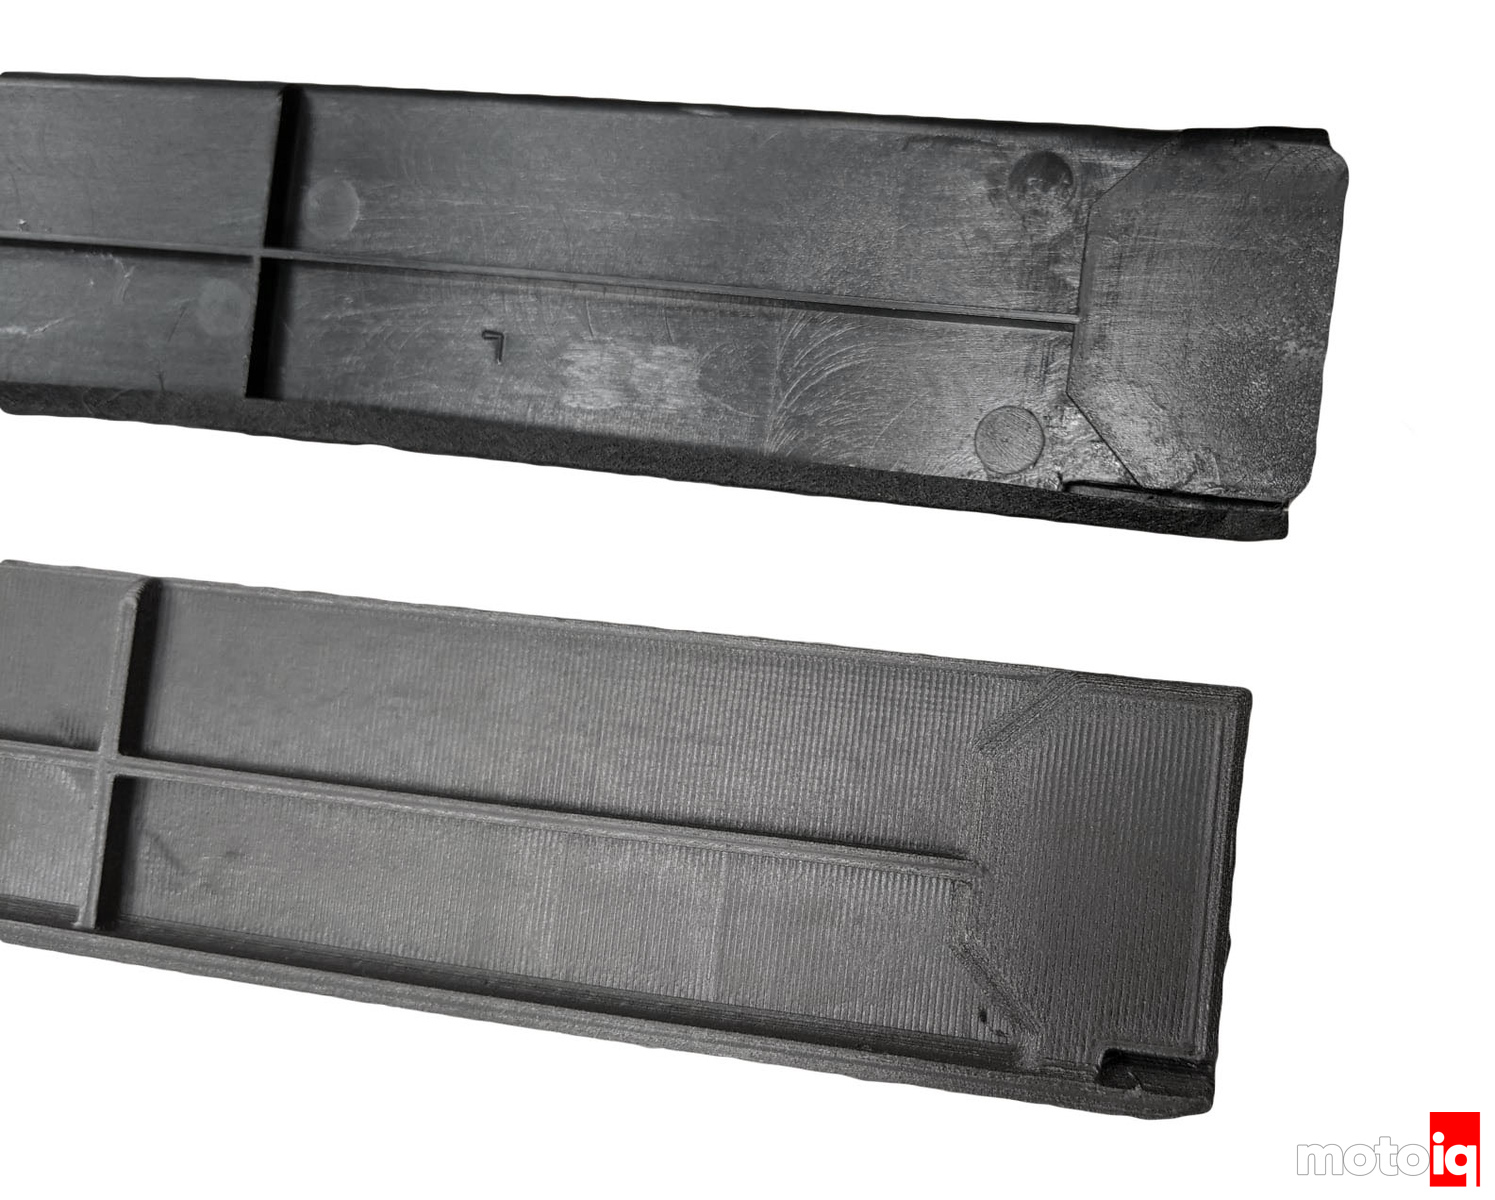
Compared to stock (above), the new 3D printed design (below) has thicker tabs with large-radius corners that reduce stress risers and crack propagation.
This is really important when the OEM tabs break at the sharp edges of the tabs.
The interface where the center door frame locks into the front door frame is matched identically.
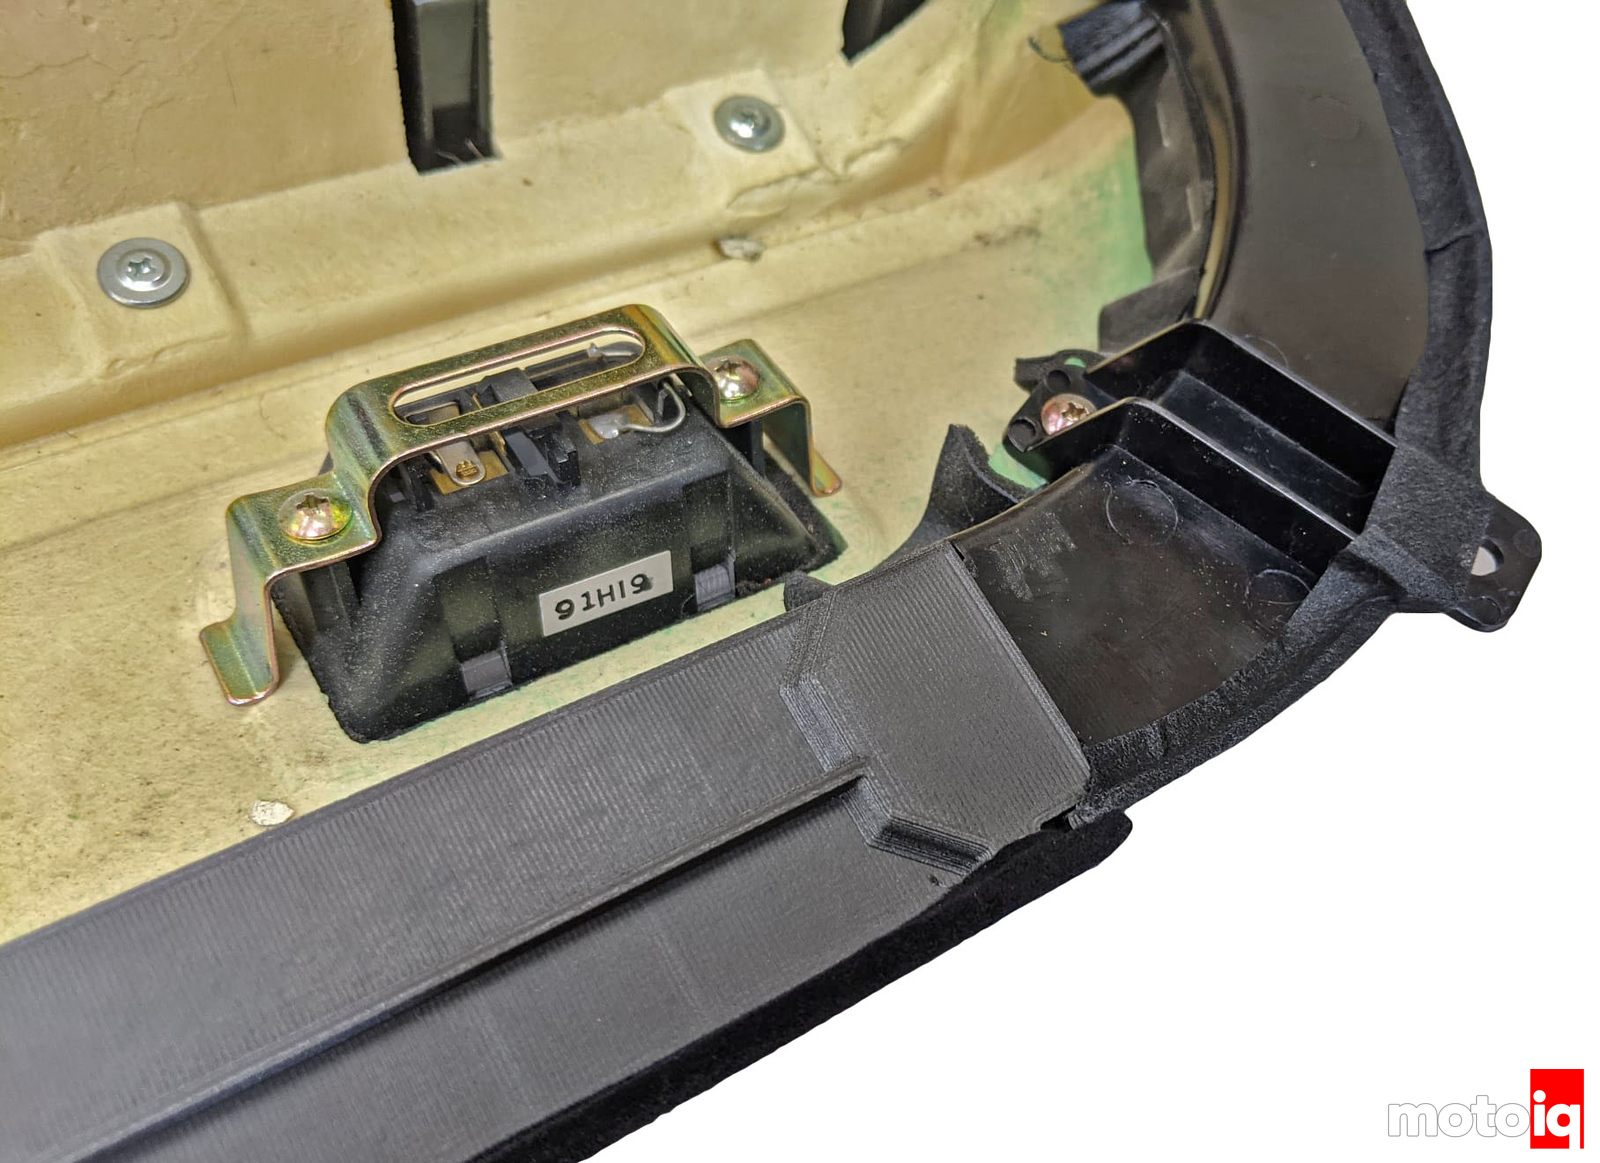
The 3d Printed piece fits perfectly.
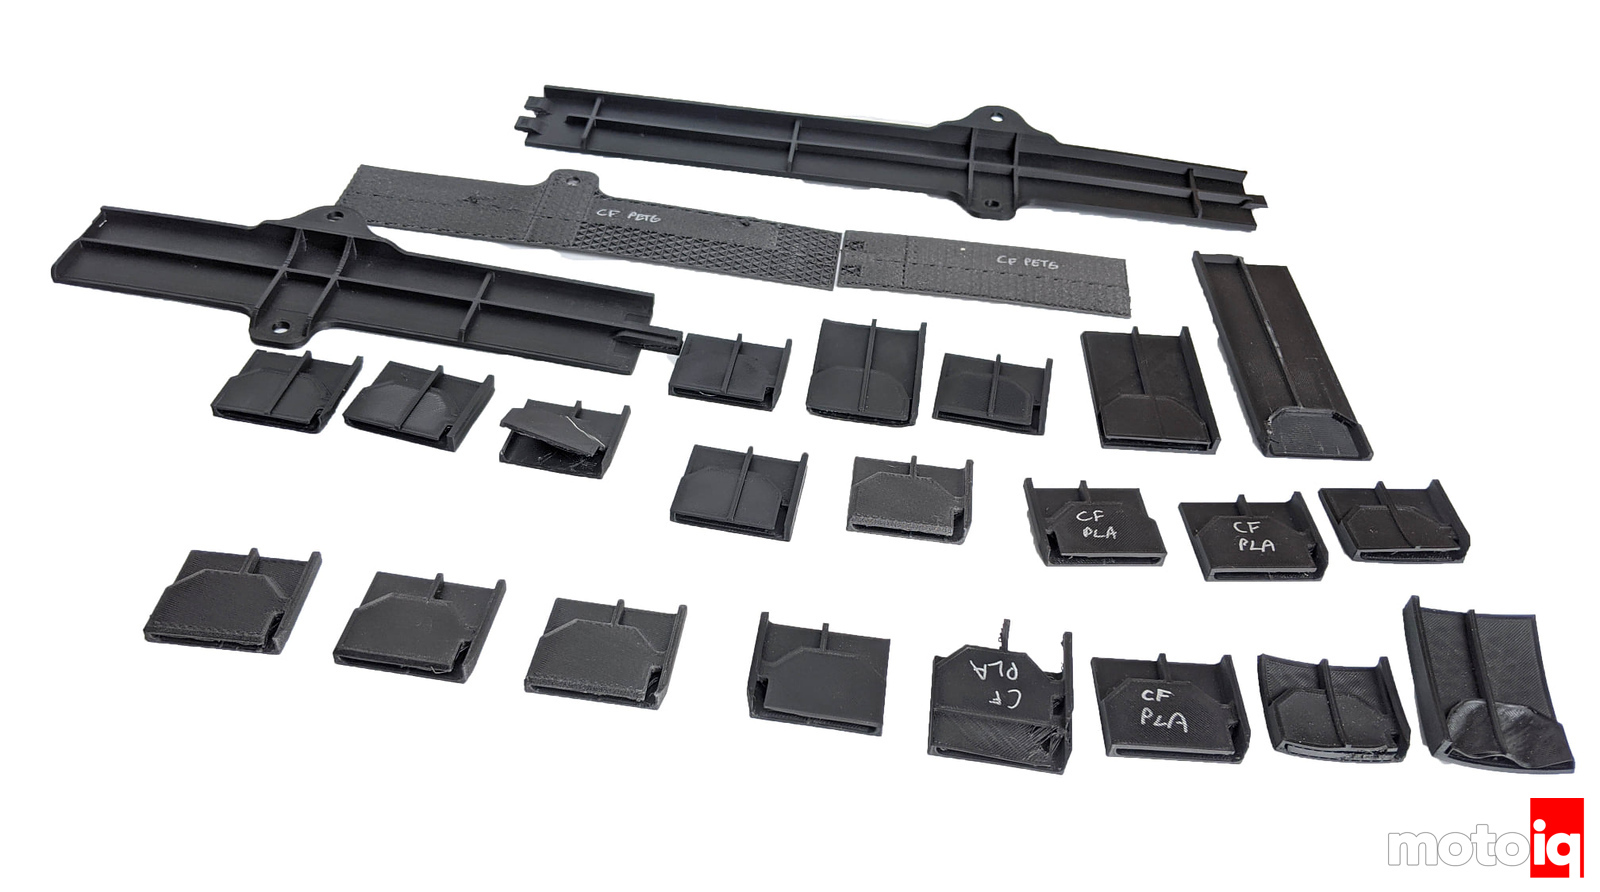
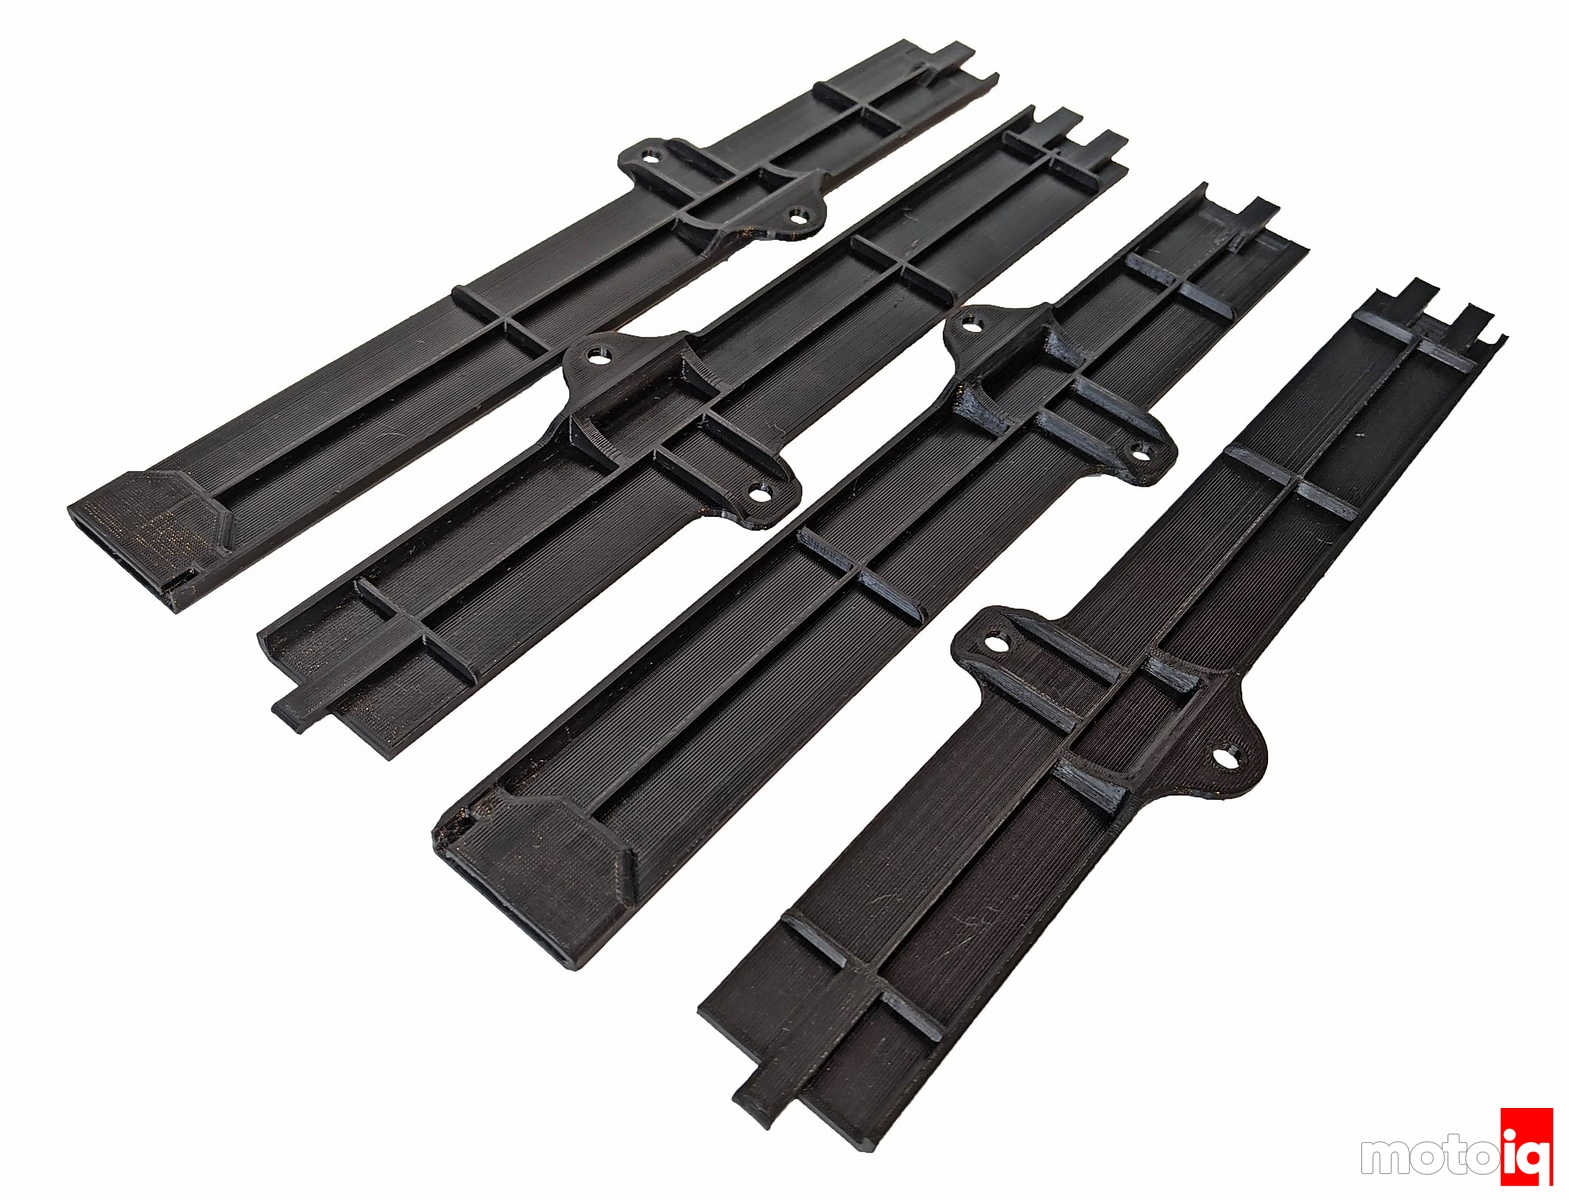
After verifying that the design fits, extensive testing was done on multiple different materials.* PLA is the most common thermoplastic used in 3D printing, but it warps from UV rays and softens in temps that can be found inside a car on a summer day.* Carbon-fiber reinforced PLA and a few other materials held up to the heat and UV rays.
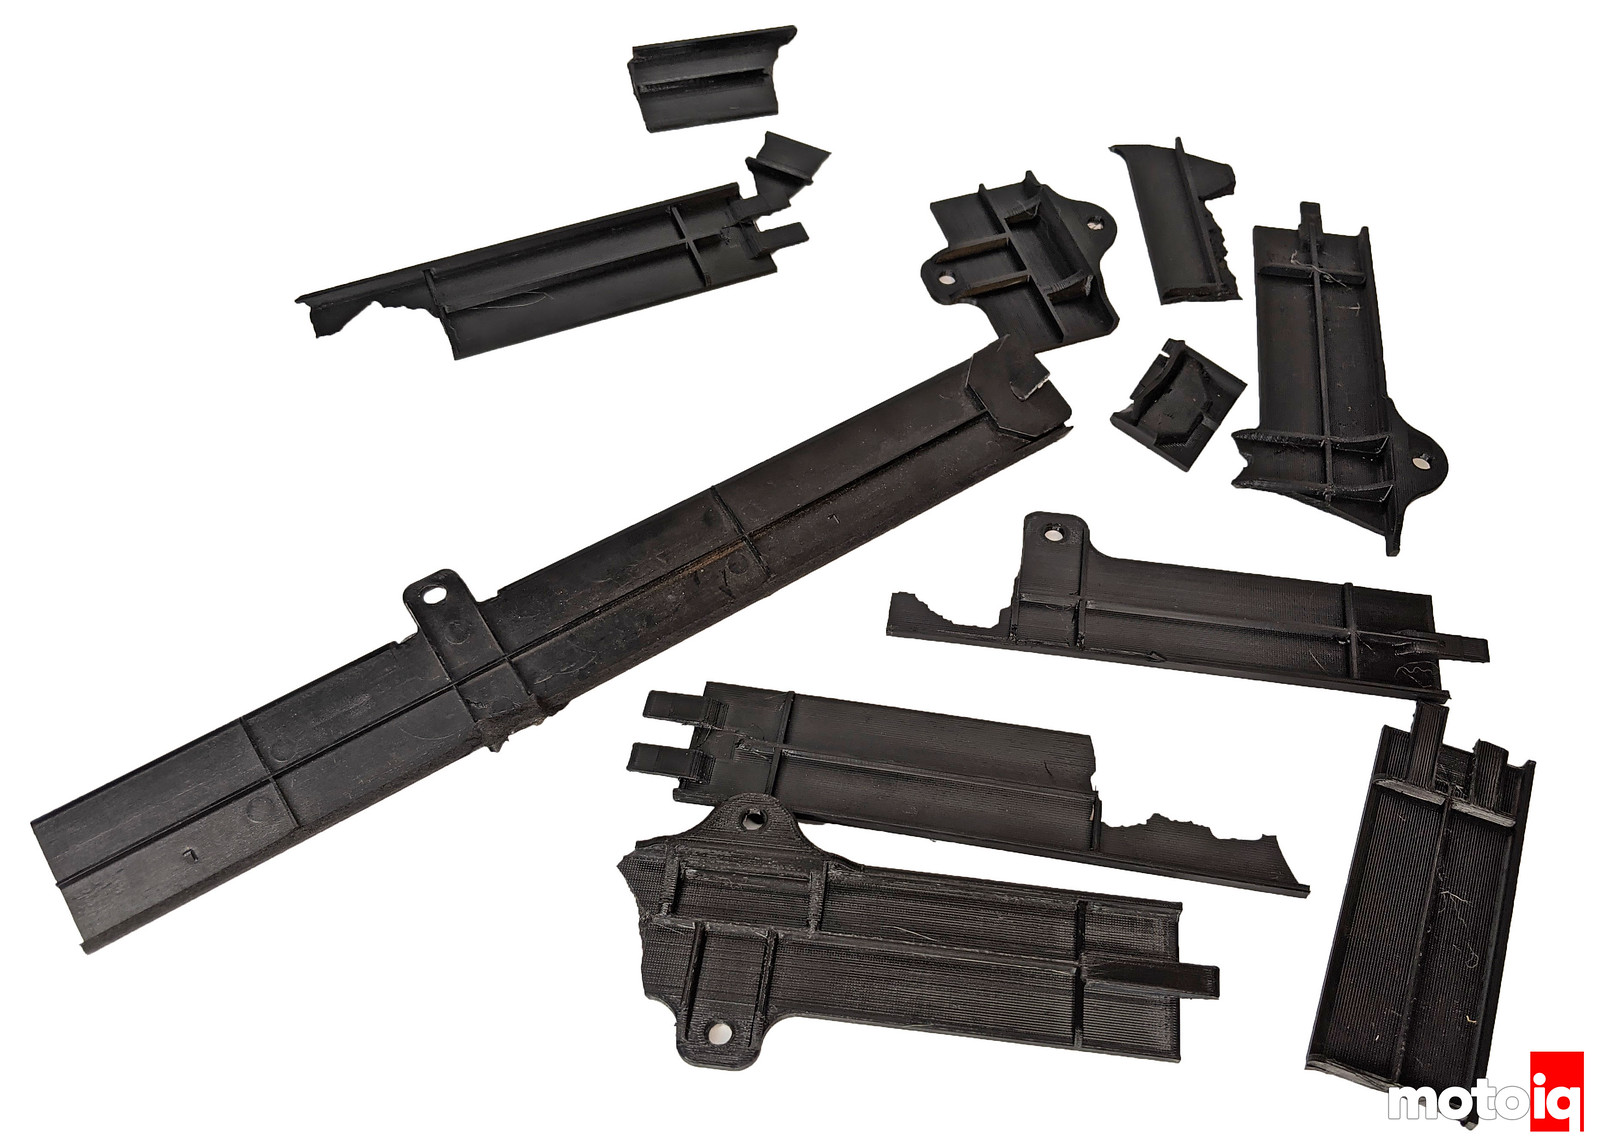
Countless destructive tests were performed on entire spools (the plastic printing filament is wound on 0.8-1KG spools) of different materials, brands, and print settings.* Their performance was benchmarked against the strength of the OEM ABS plastic.* Yes, OEM pieces were destroyed to ensure the new printed parts were actually stronger.
When 3D printing parts, there are tons of different settings from build plate temperature, extruder temperature, print speed, feed rate, cooling, layer height, retraction distance and rate, etc… that all effect the finish product’s texture, dimensional accuracy, strength, and stiffness.* This photo is less than 1/10th of the spools and spools worth of destroyed parts that filled up a rather large trash can in order to have the confidence that the 3D printed part is stronger than OEM.
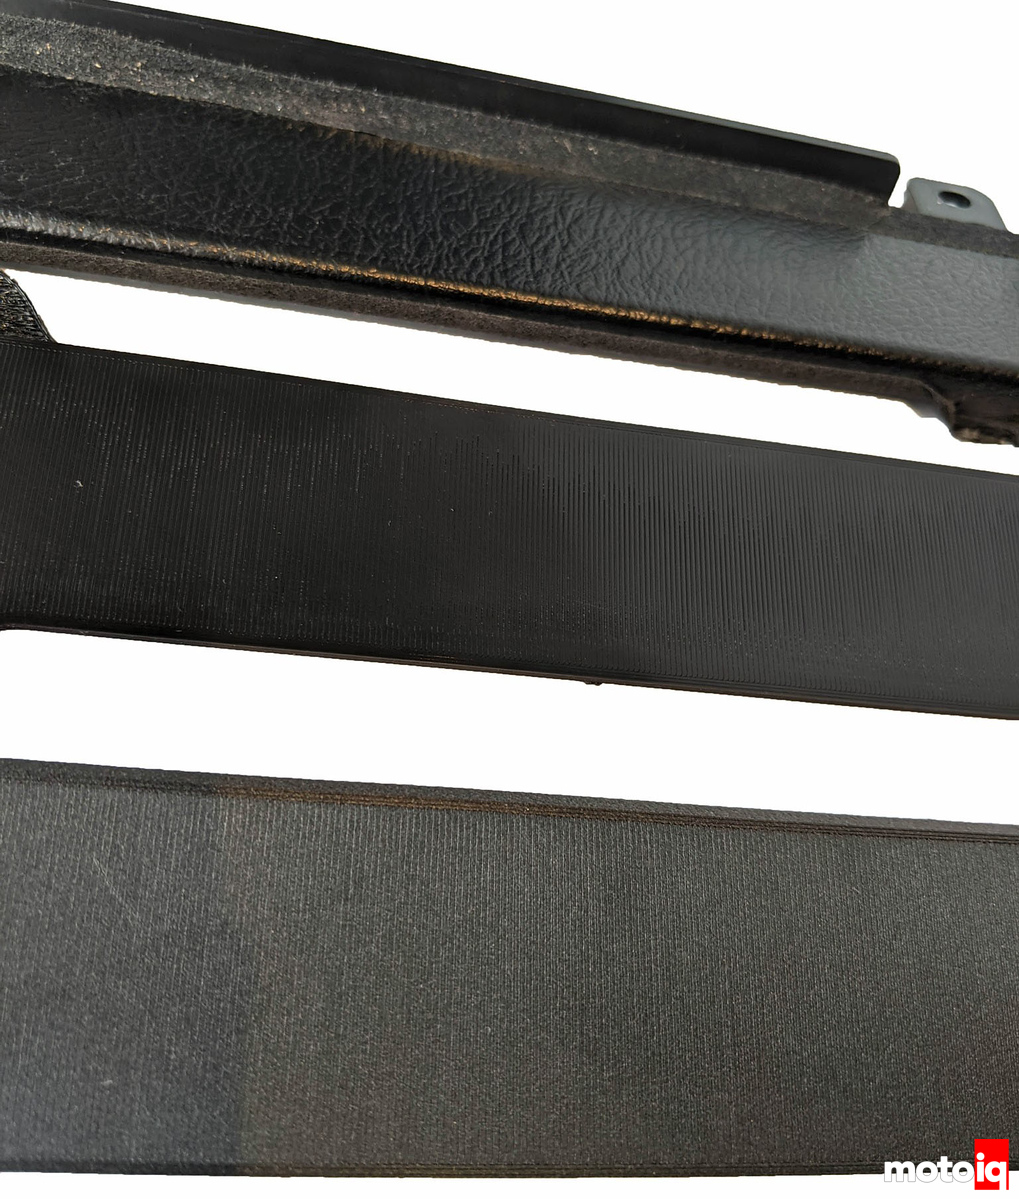
Different materials have different shades of ‘black’ and different textures.* Carbon Fiber-reinforced materials tend to be more of a metallic grey than a true ‘black’.
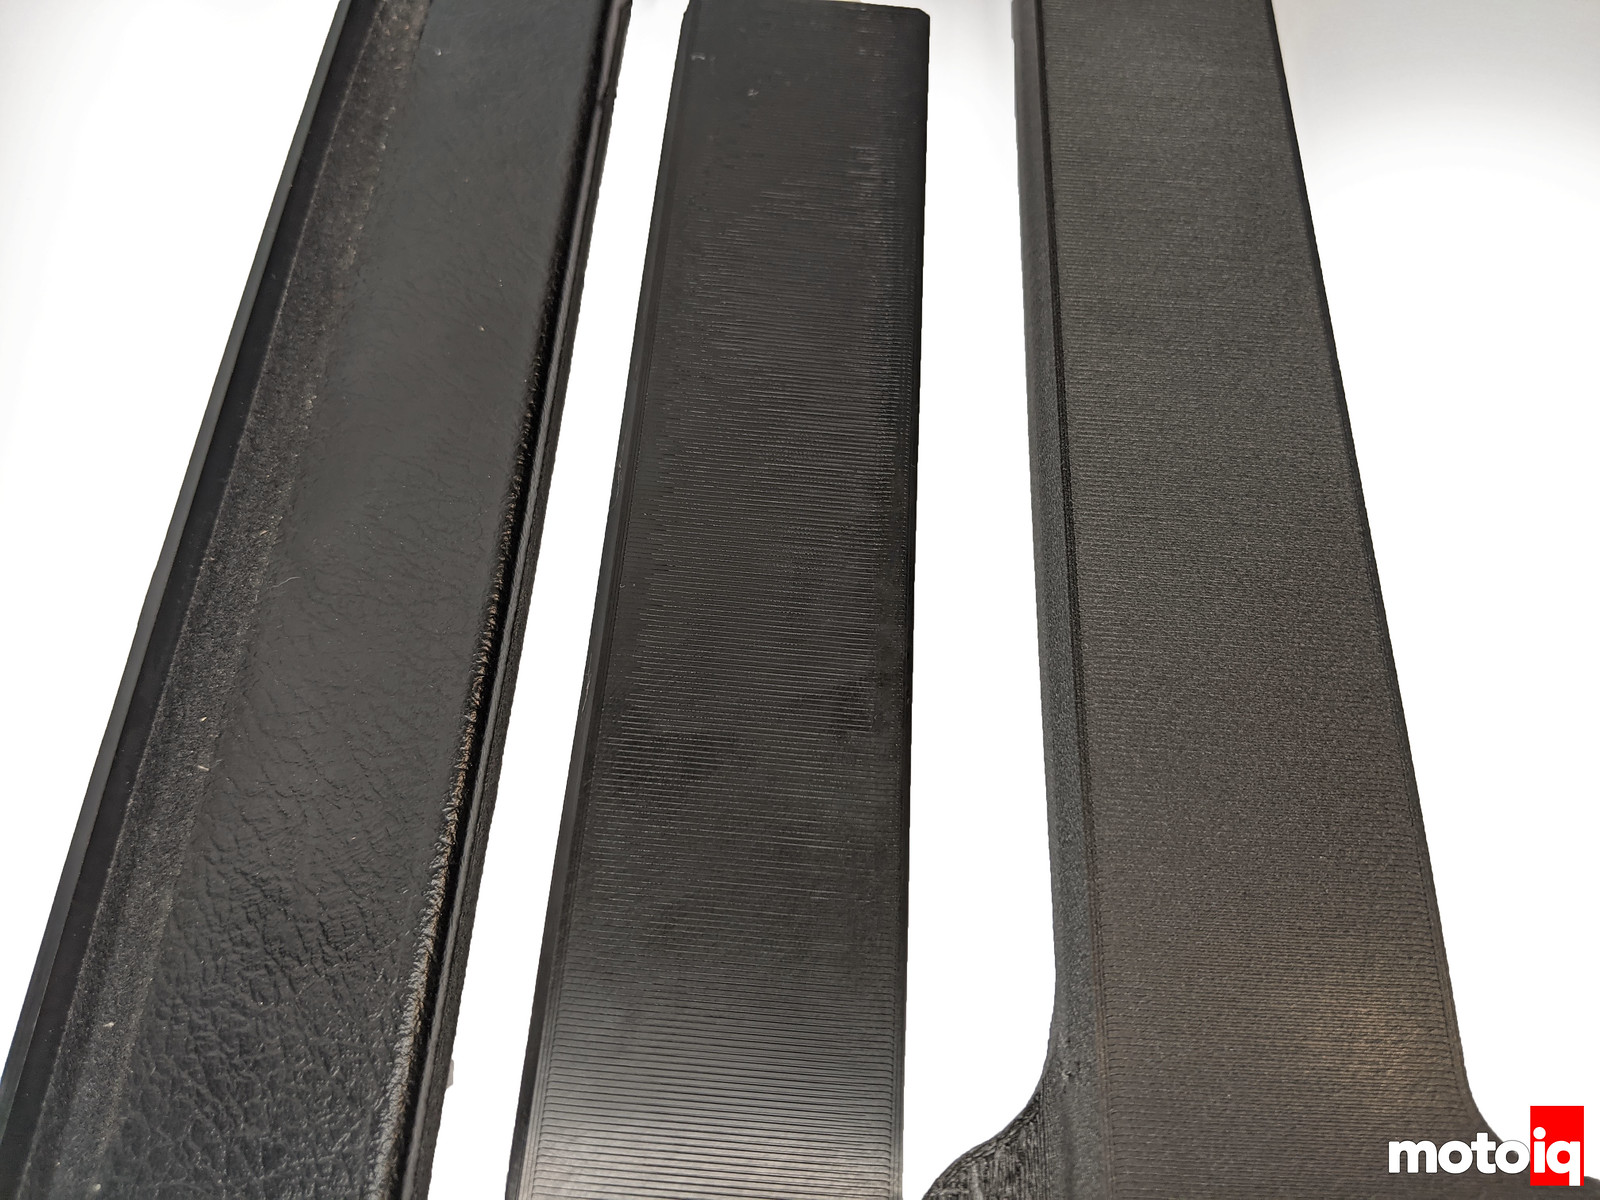
Finding the best material from a color, texture, strength, and stiffness standpoint was a long process.* We found a material that met our performance targets that was a purer ‘black’ with a better finish.
This testing led to slight changes in the design in order to greatly surpass the strength and stiffness of the OEM part. The tab area was made thicker with thicker bracing, and the radiused edges were changed along with the shape of the interlocking ‘tabs’.

The redesigned tabs are now virtually impossible to break by hand, and yield by bending rather than snapping like the OEM tabs.
With the final design extensively tested and refined, I am now confident that this new 3D printed Door Frame is significantly stronger than OEM in every aspect and features:
-Thicker mounting tab interface
-Thicker and relocated mounting tab “rib”
-Radiused mounting tab braces
-Revised and strengthened OEM interlocking tabs
-Radiused rear tab “pocket”
-Relocated longitudinal “ribs”.
CONCLUSION
Overall, I am extremely happy with the end result of this extremely durable Door Frame.* It was a long journey and a steep learning curve to develop this solution to cracking NSX Lower Door Frames, but it was a lot of fun to learn a new skill set that will continue to benefit the build of Project NSX.
Stay tuned for the exciting things we have coming up.
Part 9 – Designing, Fitting and Testing a 3D Printed Door Card Frame
Our 1992 NSX gets a make-over with a 2002 facelift conversion and subtle flared fenders from Downforce USA. This will help us fit wider tires in anticipation of more than doubling the car’s power from our soon to be assembled, turbocharged engine.
https://motoiq.com/project-nsx-part-9-designing-fitting-testing-3d-printed-door-card-frame/
We designed and 3D printed a stronger NSX Center Door Frame out of necessity, and solving a much-needed problem.
In the tech article Make Your Own Parts with Shareware CAD & 3D Printing! we told the story of how I had the passenger center NSX Door Frame laser scanned and then taught myself how to use CAD and 3D printing to design and print the missing driver’s side center door frame since only the passenger side was available from Japan.* With the design freedom of CAD, I then made the door tabs stronger and refined the design after numerous destructive tests.
This is important because NSXs are now between 15-30 years old and the plastic door frames that hold the leather-covered door card to the aluminum door are notorious for breaking over time, even if they have never been removed to repair or replace the window regulators or door speakers.* Both of which are also common issues in the NSX and will need to be addressed sooner or later.* It’s becoming pretty rare to find an NSX with the original door frame mounting tabs intact and replacements need to be special-ordered.* Unfortunately, the poor OEM design will only last so long before breaking again.* Until now.
The NSX’s fiberboard door card is attached to the aluminum door via a three-piece plastic door frame: Rear, Center/Lower, and a large Front section that houses the door-mounted A/C vents and side window defroster.
The plastic tabs often break at the mounting hole itself or at the base of the tab due to the tight radius, crack-propagating edges.
The rear door frame section sees a lot of abuse.* The two inboard tabs were broken off on the passenger side.
Only one of the top mounting tabs was holding the entire rear frame on the passenger door.
There are fewer outboard tabs that mount the entire assembly to the metal door than there are inboard tabs that mount the frame to the door card.* Needless to say, when all of the tabs at the rear corner are missing like this, the security of the door is not very good and the car does not feel that ‘solid’.
The driver’s side was even worse.* Not only were the two top tabs broken off, but the entire rear frame was split in two!
When these tabs are broken, the door card starts to ‘bow’ and warp away from the metal door.* This is something to keep an eye out for.
The front door frame is the most visible, albeit only when the door is open.
The front door frame tabs didn’t go unscathed, as most were also broken.
To fix all of these issues, new front and rear door frames were needed.
The outward face of the door frames are textured, while the inner are smooth injection-molded ABS plastic.* The texture is crucial for the large front door frame that’s really the only one that’s noticeably visible when the door is open.
We were looking forward to restoring Project NSX piece by piece, replacing all of the broken door frames.
With the new front door frame installed, a sense of pride started to develop as each piece was installed.
The rear door frames desperately needed replacing.
https://photos.smugmug.com/MotoIQ/Project-Cars/Project-NSX/i-hXzZmVf/0/2df76b68/X3/14%20New%20Rear%20NSX%20Door%20Frame%20Installed-X3.jpg[img]
Now that the new rear frames were installed, we could turn our attention to designing the center section.
[B]SCANNING, DESIGNING, and PRINTING NSX CENTER DOOR FRAME[/B]
Since the driver’s side center door frame was not available in the US or in stock in Japan at the time, my best option was to design and 3D print it.* This required laser scanning the brand-new passenger side center door frame, processing the scan, drawing the new part, mirroring it to create the missing driver’s side, and then 3D printing it it.
[img]https://photos.smugmug.com/MotoIQ/Project-Cars/Project-NSX/i-j95P6CD/0/1236cf8f/X3/15%20Mountune%20FaroArm%20Prizm%20Laser-X3.jpg
Our friends at Mountune used their FaroArm’s Prizm Laser to scan the part.* I didn’t get a picture of them scanning the door frame, but they used the same equipment when they scanned the NSX’s C30 block for the development of a new dry sump oiling system that we are working on and will cover in a future article.
The 3D scan creates what is known as a ‘point cloud’, consisting of millions of little dots in space.
The next step is to turn the raw point cloud into a ‘mesh body’, consisting of millions of little triangles.
I used the mesh body as a template to draw the door frame from scratch.* Simple sketches of the shape and size and location of the mounting holes are the foundation of making the part.
Each shape is extruded to the desired thickness of the part.
After a bunch of sketches for each supporting rib and brace, the completed design was ready.* The only major difference is that I made it in 2-pieces in order to fit on my Creality CR-10 Printer’s 300x300 build plate.* I radiused the edges and copied the OEM locking interface to connect the two pieces together.
The key to creating the missing piece is a simple “mirror” function.* A few clicks of the mouse turns hours of work drawing the scanned part into the missing one.
Once the design was finished, it was ready to be printed on my modified Creality CR-10S Pro V2.* Like many hobbies, 3D printing is nearly impossible to leave thing stock, especially when you can take a $3-500 printer like the CR-10 and modify it to perform like a $3-5K printer.
After a few layers have been put down, the printing process is easier to understand.
With the print complete, missing driver’s side center door frame is now made!
Compared to stock (above), the new 3D printed design (below) has thicker tabs with large-radius corners that reduce stress risers and crack propagation.
This is really important when the OEM tabs break at the sharp edges of the tabs.
The interface where the center door frame locks into the front door frame is matched identically.
The 3d Printed piece fits perfectly.
After verifying that the design fits, extensive testing was done on multiple different materials.* PLA is the most common thermoplastic used in 3D printing, but it warps from UV rays and softens in temps that can be found inside a car on a summer day.* Carbon-fiber reinforced PLA and a few other materials held up to the heat and UV rays.
Countless destructive tests were performed on entire spools (the plastic printing filament is wound on 0.8-1KG spools) of different materials, brands, and print settings.* Their performance was benchmarked against the strength of the OEM ABS plastic.* Yes, OEM pieces were destroyed to ensure the new printed parts were actually stronger.
When 3D printing parts, there are tons of different settings from build plate temperature, extruder temperature, print speed, feed rate, cooling, layer height, retraction distance and rate, etc… that all effect the finish product’s texture, dimensional accuracy, strength, and stiffness.* This photo is less than 1/10th of the spools and spools worth of destroyed parts that filled up a rather large trash can in order to have the confidence that the 3D printed part is stronger than OEM.
Different materials have different shades of ‘black’ and different textures.* Carbon Fiber-reinforced materials tend to be more of a metallic grey than a true ‘black’.
Finding the best material from a color, texture, strength, and stiffness standpoint was a long process.* We found a material that met our performance targets that was a purer ‘black’ with a better finish.
This testing led to slight changes in the design in order to greatly surpass the strength and stiffness of the OEM part. The tab area was made thicker with thicker bracing, and the radiused edges were changed along with the shape of the interlocking ‘tabs’.
The redesigned tabs are now virtually impossible to break by hand, and yield by bending rather than snapping like the OEM tabs.
With the final design extensively tested and refined, I am now confident that this new 3D printed Door Frame is significantly stronger than OEM in every aspect and features:
-Thicker mounting tab interface
-Thicker and relocated mounting tab “rib”
-Radiused mounting tab braces
-Revised and strengthened OEM interlocking tabs
-Radiused rear tab “pocket”
-Relocated longitudinal “ribs”.
CONCLUSION
Overall, I am extremely happy with the end result of this extremely durable Door Frame.* It was a long journey and a steep learning curve to develop this solution to cracking NSX Lower Door Frames, but it was a lot of fun to learn a new skill set that will continue to benefit the build of Project NSX.
Stay tuned for the exciting things we have coming up.
I'm not surprised anymore when NSX owners turn to laser scanning and 3D printing upgraded parts for something like a door card, haha. So you printed the final pieces in carbon-fiber reinforced PLA? How did you link together the separate smaller prints for the full door frame? Any recommended reading for someone who would want to get and mod a CR-10 ?
edit: forget that last part, just saw your thread here http://www.nsxprime.com/forum/showt...-Make-your-own-NSX-3D-Printed-Parts!-Tutorial...
?edit: forget that last part, just saw your thread here http://www.nsxprime.com/forum/showt...-Make-your-own-NSX-3D-Printed-Parts!-Tutorial...
Last edited:
For a little while. Eventually the base of the tab will fracture due to the old, brittle plastic and poor design that likes to propagate cracks at the base of the tab - hence my redesign and use of better materials that are not brittle.I put black washers on the stock pieces to distribute the load. Seems to work fine?
:encouragement:I'm not surprised anymore when NSX owners turn to laser scanning and 3D printing upgraded parts for something like a door card, haha. So you printed the final pieces in carbon-fiber reinforced PLA? How did you link together the separate smaller prints for the full door frame? Any recommended reading for someone who would want to get and mod a CR-10
edit: forget that last part, just saw your thread here http://www.nsxprime.com/forum/showt...-Make-your-own-NSX-3D-Printed-Parts!-Tutorial...
The next installment of MotoIQ.com's Project NSX is now live:
Part 10 – AeroWerkZ Paint Correction and Stek PPF Install
To protect our freshly painted NSX, we visited the experts at AeroWerkZ for a full paint correction and wrapped the entire car in Stek’s “DYNOshield” Paint Protection Film (PPF).
https://youtu.be/X7j4YNedmHw
https://motoiq.com/project-nsx-part-10-aerowerkz-paint-correction-and-stek-ppf-install/
Enjoy!
The next installment of MotoIQ.com's Project NSX is now live:
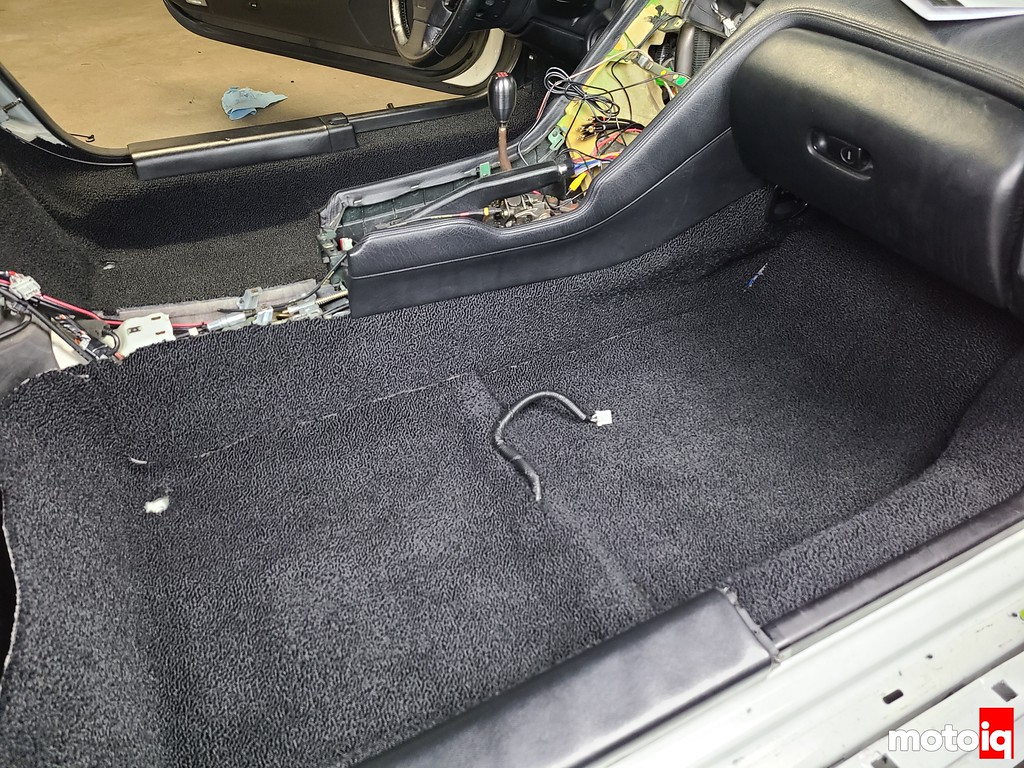
Part 11 – Installing NSX-R Style Loop Carpet From NSXcarpet.com
We refreshed the interior of our NSX with NSX-R style looped carpet from NSXcarpets.com
https://motoiq.com/project-nsx-part-11-installing-nsx-r-style-loop-carpet-from-nsxcarpet-com/
In the article
-Old Carpet Removal
-NSXCarpets.com loop carpet
-New Carpet Install and trimming
-Custom side center tunnel scuff plate
-New Trunk Carpet
Enjoy!
Similar threads
- Replies
- 50
- Views
- 5K
- Replies
- 34
- Views
- 2K
- Replies
- 6
- Views
- 992
- Replies
- 59
- Views
- 8K
- Replies
- 28
- Views
- 3K