• Protip: Profile posts are public! Use Conversations to message other members privately. Everyone can see the content of a profile post.

Honcho's Long Road to Imola Type-S Zero

Engine Refresh 65

Alternator Bracket, Compressor Bracket

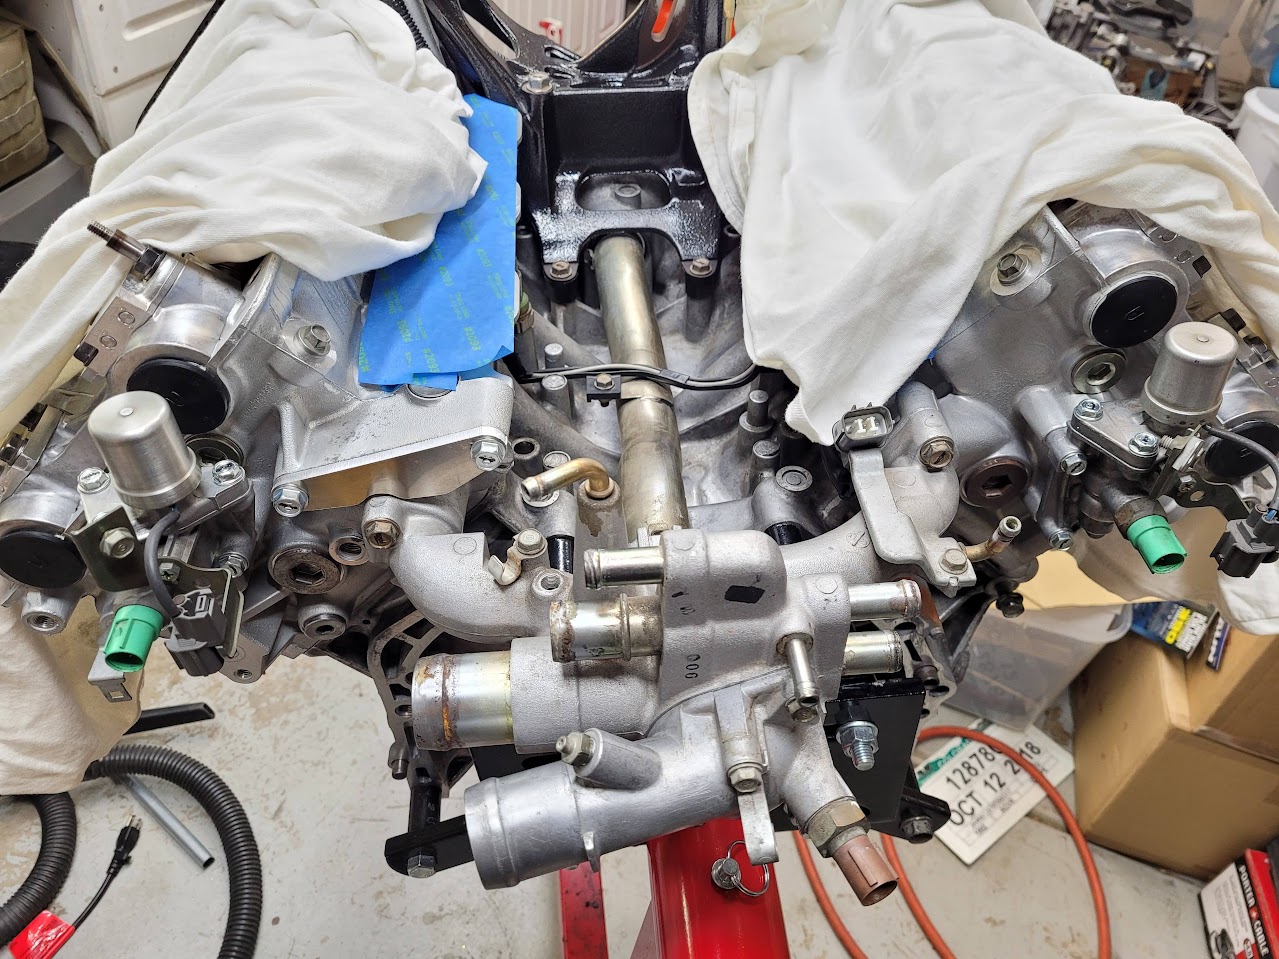
Installed the alternator bracket, which has a fresh coat of nice black enamel. I'm really impressed with this Rustoleum product. A note on this bracket- it is solid steel for a reason. The weight of the entire drivetrain rests on this bracket via the right side engine mount. I will leave this piece for my NSX- even though it is heavy, it serves an important structural purpose.

AM-JKLXQg9rOzvSEDa4e829FqNCT_mUUvhWj9elDtb78aY9FpqrHSlkY_uF1f1J7N01aq0cOEtHXYoAAnHnmxfx3aOIJ1EyUxq1VxVD6r5PZftyTgWbE3GtWCxjHO5a_-xOPVkEfTk2F4bZ47C_bW2s6fA9e=w945-h1260-no


AM-JKLV5InH2HjWBz7EtWzhlorsG7uiJ700yZc4xT7U5RHrG4L-KL7UJHjMul5sfiWvQAoL5I2xC7fBL17QTF77c-TY9ZmDiDfJgPx63KKgG5jcyltI_2G5JKy-aqn_yyXBCFRzji1n2exWxC20jmbnCIwHh=w945-h1260-no


The cleaned hanger. I'll have to remove it again to put the engine back in the car, but it is needed for the hoist process beforehand.

AM-JKLXIc8_U7_VmUYshtHV0sFTTN54NyYNzCrdYnoLxbHMbwTBY4AWR3MRcG83yzDyS3mjYox6BcC_bj3QONy5KeQUagNIsvdL_oQFyvGszwGZqBXp2SUqkM4PZjxvuanQibKBjne6sG5hkKmixzaHxELpj=w945-h1260-no


It has been discussed in other posts, but because I am using the 97+ A/C compressor and pulley, I need to use the 97+ compressor bracket, which moves the pulley further away from the front header bank.

AM-JKLW0mciyr1O3YiZpkWwD5WubKJcUG7TnPDD1uKzBfULs1FbYAxanjFr4U9JxVUE1-k2yEECYLHTP7cMFxoYhw4S8j6TP_LE7Hy0BdRiJ5kmZBA5bGhLHYFpr9oUUtr9bYfzwKN_lBTApW7yO8suOlobN=w1280-h960-no


AM-JKLVlagD_NI7bSAgx0PH5Y8pCbFyj7qOXcZp2jHzfuDPa5rBbJxEQ8zzN8l65P601AqsBJhED49nKb21pVxgcxehJmZvVYrJjurGaJsKo0C0clvWJr2LJW48UsuqiLNfK65QABDTY9AEyfox6VFWByuq2=w1280-h960-no


AM-JKLUNCJ9ywvC3NN8oL_6wxIgjspBjQipGZnrVPFCi0PcyyQXESJDS7bnq9Tb00A9lKTSE6RAx43rplpcX3lBkAGIyh154kFOuxSAqbuWS_XGylsogfmieSNPHJBY7oSQL_noahnV2Y1sn7t13_SSz0hB5=w1280-h960-no


AM-JKLXnlkjJUFrePaMco3zPBa8N9QzQo6jhF6WZzRAACJhPpx0Hvb-UVSN8Q3zkZpG5ZmiCYfPbPstOVJPFNR6UQg8HkkKCIpimR-9bxHCTcflFF4YpruVd3yJeHnWGdMxPVVHb4QOm9IJiJlKhtw7Dig_w=w945-h1260-no


AM-JKLXNCV49sqfPjRc49OFGHOveyss6tht7AcOH7lvq6uGXsAK049Ftkt1OrqcWIxgjLp6gdYcNaOnFObjEQoR5GNcZ71PAqp9yRH7gsHcrMti21jUH5KRX1vKu9LemgAOz2h--k7hIi9X_rKGUzvWNSIUD=w945-h1260-no
 
Great progress, clean job and fantastic pictures. Keep them coming.

Do you have an ETA in mind for the engine in? What's the next big thing to tackle for this project?
 
Great progress, clean job and fantastic pictures. Keep them coming.

Do you have an ETA in mind for the engine in? What's the next big thing to tackle for this project?

Three "big" tasks remain:

1. Perform the transmission refresh
2. Cast new motor mount rubbers
3. Replace the suspension bushings with the poly bushings

All three of these tasks must be done before I can put the drivetrain back in the car. I'm most worried about number 3, since I have never done this job before. There are a lot of different bushings and it's all aluminum. I have the correct tool, but still... I'll be honest- I've been avoiding this task because I'm scared to do it. :frown:

I hope to have the engine completed and closed up by the end of next week and the transmission by the end of September. In between, I will continue with the smaller projects like rebuilding the alternator and starter and painting the interior console pieces. I also need to finish up the wiring tasks on the car for the AT-MT conversion and ABS. If all goes smoothly (as in there are no delays for the mainshaft shims, if needed), I'm hoping to get the drivetrain back in the car by mid-October with final and full assembly of the car complete by mid-November. I hope for first startup and tuning after Thanksgiving.

There are additional logistical issues with Spencer's car currently taking up the space needed for the final assembly. And, Mrs. Honcho is getting fed up with having to park her very nice and expensive car outside because 2 NSXs are taking up her 3-car garage. :) In order for the gas tank, subframes and drivetrain to go in, the car must be on jack stands. Right now, it's still resting on the paint dolly. Lots of moving parts in this plan LOL.
 
Engine Refresh 66

Dipstick, A/C Pulley

Cleaned the dipstick tube and placed a new O-ring. Then installed.

AM-JKLWisF5jYCl_NmwNSzZ5Ev2Xw5_plNo5zVA-msE7nahedJYVOVCgfLNUm4fm0TSfObOL_3sz1zjz3IKzHryLL8ZZbxqnz_3tcsMSHVGohX385KM4XJ1FbrzaMKPu_b0Y5ro-cozJMOQ25WdpsGpLol5R=w938-h1250-no


AM-JKLU8RePgoAyBqXvU_KxJ0TSsjZyCG1meofqQmOzj3wSI7LvwI3CJxfFt7Reey0of9t70inA0vr17TV-Nxd2VzB9weNCjr3bljKqzPnTr0XAeM24ZuIHrR5WnyI6XfPUdJBtEHxVolI5Dj1zTbqP_VFpe=w938-h1250-no


Even though I bought a new bearing, it seems I ordered a completely new A/C pulley assembly 3 years ago. Lucky day for me!

AM-JKLWgDLWd_f9rn4-CH_11_caTUDvgNVrs3gXJDJqSXyyYBzGvee6GpG0FtIjuEPCLI7IQvkaAeyNFZGH075FXLQrNxrWcnZQo66TiNnPVFK8gZhCXm9YiVmUsMPzbEqDlzUyyCWTxoFOKXBh4vuuLIfkf=w1279-h960-no


Installed with the soda-blasted bracket.

AM-JKLXYa2T_JzQFX3wcaR14vxjj0BajA2NwFYmUBTdOyrpOrtr-H8NYJX6b4p9UUR46NkGKpKozGXAOraUFdCnRmjQu0gI4UHFdL3jDhz0vjVtk79Jh9REeEQp-CxR3ZFqGzGRt7D_io4O0LdCKa-fZWy2T=w938-h1250-no
 
Engine Refresh 67

Spool Valves, Block Coolant Passage

New gaskets for the spool valves after cleaning them and applying fresh Mobil 1 to the piston assemblies.

AM-JKLX20Gd_kilgZujnGKiNlDVGgxJ-Yyv6XWkyHCvkKzWgWLrEdoPGY7ElBadA40nPnJWbAxN9M5OuS8I6kXOHeFcZo4G9hnvkWQwTOf621ORzXIfx-3rSK3hneMMzgtJPjAlWWNJXumMxB8zi8y5AnhWF=w938-h1250-no


AM-JKLUsFkNRZ1kckAIQAlwMAN25QySBkewRlaNRp4Dq7kSUD9ajiaDeW1ld01FC9suj1qAWS-iTgojZo1zu-E-RatebI_q4pehS9D4AZrHJW9dR3j6H7XMlM5S0VJtRS6kZp8jpOnybaFGPpBq2LuJ3HhiE=w938-h1250-no


AM-JKLW7PrYRxrXNRZSf--dSwJkM5sMvgy1G4g9QuvYZrP6dNM5Hsg4B0CPr2VpsNkkT-7romBHn89HqRs-xyW7wXf6MS0MAnCYxryirE-B4JkY1MHLeBW6iDs8T0y6WRU-T9aYwejsTGurbnVI2Vh-HQyUJ=w938-h1250-no


And mounted. I always use new bolts, since I snapped an old one on my 91.

AM-JKLUYd1BHKwwdYhCK5zVtqxFqRhJN1ZUmHHeVXxQWflynpnOK0VlN1cdcMIKpCQVR9lFCDUsVS21tvGoscOiidd69B81YNVnD6tut-ReX-Y7nt78Gx4cA5R44ODcelH3dhz_MyBApbd_G4wy7BUJ5I1OW=w938-h1250-no


AM-JKLX2eKckL7PE4QL_7nxS44BIUFnf0RRijqovCJDjnLEjZkV1F3XIHk5LxfkJTeu50R8mLXGVu-Z_Qqj3fM7J8P1LNy9c9TN_tsOjJArrs-7HISiEl80vw3IzcwUC9-RR0SdD_T4hiHk08OZ1ro82qcXp=w938-h1250-no


One of the artifacts from the AT-MT conversion process is the block coolant passage for the oil cooler. On the AT cars, there is a port to feed coolant from the transmission fluid cooler, where it merges with hot coolant coming out of the water jackets inside the cylinder heads. On the MT, this port is blocked.

AM-JKLWrFffeKKQgJG97vI0oAu1RJ7I9sra2-iYINc9a3AePesfuN_yCPYLFf0RxxcZ0Vglis8DUXLFBFfbADA8oCFM_SKuvw8fZR9_QyvB3yoPol3Z8tqWasDO8_6JE0ULrRml0fK76UpxhjRx07RGwBgG1=w938-h1250-no


AM-JKLVaAyzF7_WdicNSclse-zdNNzY_0lkBF_qVgJRn2YTJvn-zczhcWrxoHwtItEYpM_tB6OD6u5s8uBYiwg9rtidz1_UCiOF3ZSKqv6bKatiTnHl1MC4erUt0uM8VpjIZARjvsksMXnPxBlGNe0ft0mpV=w938-h1250-no


AM-JKLWesRdR5bBCLjnFEMfik0JUFElVK7Z71lkog_uCnqlK8ti0uLqEtMzpwR3xwETlsurIIx_Vxo3oj7YeDOCFjM1bOpm4tUv2OiZwAGA-ynBMfN1zj2AEKy_ERCe3n3VA_WpRKgf1rhzqnLOhEm_B3by0=w938-h1250-no


AM-JKLXhci_cK3SNeve6Qsk4Dz_GAPup7DXp52YLxVe7QHmbDqw2FHLKnWHXmrIMuquSA5JN4omZ0NrOgdmWjFWIbV9R6LqeoLK1qX6KikqJMN2Y1foYRcoHbvBHOBlwOkFAQM_padwfUaekScjVBB31Qk1D=w938-h1250-no
 
Engine Refresh 68

Water Jacket, Thermostat, etc.

Upon closer inspection, the corrosion on the water jacket pipes was worse than I thought. I had to break out the sandpaper to remove it, but was only comfortable going this far. Too much and it will cause leaks or compromise the structure of the metal. I hope using the silicone grease will help with the future corrosion. I think the long term solution is to replace this piece with the correct MT part during the car's next coolant change. It's quite expensive, though.

AM-JKLUP9fxZSxmHZZfXwzyG9YaCWUNvsuwvfGwKev8dPNZr_7_TMsOGPBV2nOGQOCWkrINV-paMqFFC71NcRljXLM6YT3_GuX67N21IJpuwPykPPP_ThVcStimmVWiCpHDiWBn2ZkSbn5H1j8mgebSBWcNE=w938-h1250-no


AM-JKLUq9AclrVbDdW9CLUdITVm9jbeXEmqo6zkHKFuNuSitlNE086CmvAy9KBCrG3DXKwmDXH7NvvgGFuqgLa61s5cviCpelXJTbig7ZKArlxr9K1hnumbTwZJsT8GZFhyrwZzIh7lxthykq54nL3m9SKpi=w938-h1250-no


AM-JKLXadVbijpogDV0g0o18fmX0iozYCTEEoM_OGTqFWeOxw6j_0--PGU16VwAuB7K0RhIQ1dg5mGEzjQsXCt1a1N5YRMmdziJyR7ELD-spnbxg7Gx23zst1Vv3UJuDat7s8blpsibyUxuaH_wBl4rPRMx-=w938-h1250-no


Using the steel wool to polish the sealing surfaces at the cylinder head connection points. And, placing the new O-rings. The old ones were hard and cracked. My method is to use a very light coat of silicone grease for all rubber parts that come into contact with engine coolant. Not necessary, but it has worked well.

AM-JKLWCMnxwUxAAAiHXHnUNYPF0ht4YkuUlyPZtzpnf-h6_9mIY3l26b9PXon6S8n38yZWYemjMb9EVkbFGEcRJgCgh5wkdOSDfn_lPSL5PLTFNA97UFVcrxxXHL84XNDaKGN37YNXXepbKnoCyJa8mjGxs=w938-h1250-no


AM-JKLUZbHsNgDSw_IbKCimVNgBzMIsS2ZdRhh5rqVYaAk5hINKVkKfcoXW8f2QDTD6b-w7oyCTibPSfgyE2SblCoTXgHusGE9vt_otuFwMwaL6jo0q1uVaBoTkOf5Ya9Ple_90mP2rLJgsZ4jbkIrIE0f8W=w938-h1250-no


AM-JKLVww_KSWNxtAaL1oTjDCXNbCAdP4DyE4Wd7G80zqLhMWe96z2BDQ-3IMYG57X-a2VBk14LgI_zgPRrV1SSAPR_mqUY7ZGba28VL8NIjr8RYjGYsNx9sgL3sSSwc-S6R_fNYHtVy_Z0E0LB4jPuKrIws=w1279-h960-no


Installed on the engine, including the new O-ring at the water pipe.
AM-JKLX1qMS2g8sYdsJ7NmT2ptgi2j_3oC-_LHVD5tkwYF4c9kHm9fu8uPpYzi1VssrldLrdqM9quCmlEu9MyjTygHyZTjc0CirjT_nS3E7TWyUpRMMeDdQf1qmsLakegrTiCSVgRoyaUYvhiYE-VTpHAjY0=w1279-h960-no


The thermostat is one area where I do not use OEM parts. Both me and our recently departed Prime alum fthuy agreed that the OEM part is over-engineered. It uses a rubber plunger seal that eventually splits and mushrooms, causing the thermostat to be "stuck" open. You can see Frank's thoughts here. An all-metal thermostat is a bit more crude, but effective and it cannot fail in the same way. Thus, I prefer Stant thermostats for the NSX. Changing this part with the engine in the car is a miserable job, so I like to do as much as possible to reduce the chance of a failure.

AM-JKLU3jWsXklRDm8z85iDegD7cnTU6-PNm0qpizLN6Vw2qwYtIKc_xrO-XFHUIH7yNOtbpuXcPlKuzheW8D1Elzpx1BZpvOArMPo8M-UTCT0r2mPzszyxMhpxzpqByjMLo1PY52DQVuDsoOAfmwaa7xXtN=w938-h1250-no


Prepared the housing with the steel wool and acetone.

AM-JKLUkKQhI5-IxUlQR7k3qwZwi_pv92utRXc6UkWQw2bvikAKRcyHg16WHFajz9wOPh93-Gm8Wukc2ID3sZppmycvNj-7splX8EGTqNVechqNOyN3HhfyURgnSD4HcUUitY2_mxS5KL_N5w_OTx6MEQQ3v=w1279-h960-no


Thermostat installed. You can see the all-metal plunger piece.

AM-JKLWvYIA9DeRe84kUXEGgP1r6hTecTPfdhwHjKDcvvTukkJRdioYgdlW8_VUJ-gq6mNIqZN0tOByw2eQ73kBW-gHHP0CViAoX9qeZTiKu60EeaU5uHGzoGIorZai_fMwUSTye91osFOeDrzlftDq4kAB6=w938-h1250-no


The thermo bleeder was badly caked with dried coolant deposits. It was also completely clogged. I used the brass wire wheel and brake cleaner to get it back to this level. I will check the bleeder on the water pipes in the engine bay as a result of this. The engine block bleeders were also totally clogged. I re-installed it with a light coating of silicone grease to help prevent future corrosion.

AM-JKLW4HnACPLzMwQlQUbExDAqhD-YAhqf94Bx20rBE8Tmdt90w8QyCOerHui0Mz0agjMra_7yjUVp_4DO8GT9VVuxtcpRN8Dh5srSrI9xtf-comD-EfueMVxzuo716ctEHwAkxhnBbo8Bj-J4qX3oHQhfR=w938-h1250-no


Thermo cover on and torqued. I made a mistake and went to 10Nm. Tried to go from 10 to 12, but didn't like the feel, so I loosened fully and re-torqued to 12 Nm. Late at night after the kids are in bed, so my focus is not the best.

AM-JKLX8QBCZRcMEA87UmI6cWGg_0BOLwV3y7c5lXPhSDjTGcPNt2mizl-6EBAj2qR2JBwgMFKjILmyzU9iunugE_WwKignnuSu2-HLcdvxUENPhb3rO25pxYfw6jWyDldms3KK7uPnRmg8dXIaQPJvB_J-j=w1279-h960-no


Capped off the transmission cooler port with this nice silicone cap from HPS. Now I just need to pry a clamp off of the AT to use here...

AM-JKLVotleeZNaP7mZAnZknkqyujXxCrXySDZ5F26qmEJN3jjx9kSOddV19hwMhh9vLOduehFh0iA-ocmv_kk2QIVxeZUo4KaIB8n4hHs4aEAHe_35HGuQeHfZzJ4FTFVmB1m2qqdc95rcUWAfoDsZnhlIf=w938-h1250-no
 
Last edited:
Dc -4

In aviation any good tech uses an o-ring lube called Dow Corning 4, “DC-4”. A very little bit goes a long way. A tube will last forever. It’ s great for holding the o-ring in place and ensures they don’t cut or chafe during installation and ensures a seal to protect from leaks and their drying out.
Just a thought.

Cheers
nigel
 
Last edited:
In aviation any good tech uses an o-ring lube called Dow Corning 4, “DC-4”. A very little bit goes a long way. A tube will last forever. It’ s great for holding the o-ring in place and ensures they don’t cut or chafe during installation and ensures a seal to protect from leaks and their drying out.
Just a thought.

Cheers
nigel

You deduced my secret! :D

AM-JKLWHwDlqwgCYX0rbn5YnFbuEzsA1PtUdHQmbAEOLiZindDoQngJ1nWWYZTRGhjX1xRNPzlPtJsi3Bg8H4EXxdjFu01kZzaHBVZln_Zd8GDY3Yjol6Q2OAX0A7naI7pU37E4wTt1zwWlvZrUWrm6yIM6X=w1279-h960-no


My method is like you said: just use a small amount of grease to make the rubber look wet, not globby. Though, any high-quality silicone grease will work in this application. Shin-Etsu or LarryB's favorite- "Spa & Pool Lube". I also find the DC-4 is a fantastic all-purpose assembly grease for the brake calipers and it works great on the ignition coil cover gaskets and coil rubber.
 
Engine Refresh 69

Coolant Gauge Sensor

During my clean of the water jacket, the old coolant gauge sender looked pretty tired. I decided to replace it. I used an aftermarket part from Standard Motor. I like that it came with its own sealant applied, just like the Honda special bolts for the water pump and oil cooler.

AM-JKLVxXb0_tW5iyJZf1rxErs5oe2ovk_hZY3aiQ4-mgSgqEBwY9xr0gzVas090lYSi794_2wNQn3p9WAsTa_HLu6zlzkRKHM-UnjCvkmORjm1JGu2AUf7XQT-DU3G54hhdqw6gnYaL1jv6B-x01CvjqP2M=w938-h1250-no


Installed in the water jacket.

AM-JKLVpbspe1vOmiV6hcpKvoxmBvnmN2t_3Qf8HWeablggML0dpTPP3nB0VZ3LvQg8Zijh4ouHYpNquic6D8YHkr_lx4hckBFq9uR76KRaAAFPTcl1JnB7OgcCQolJVxZzxEIoxAqDAWTN4TQcXdiNQKUuo=w938-h1250-no
 
Engine Refresh 70

Valve Adjustment

Completed the valve adjustment on the front head. Not many pictures due to the focus. I complete two passes, which is 24 total adjustments. Then, I torque all of the locking nuts with the Tohnichi high-precision wrench and re-check all 12 valves, since the torque setting can move the adjusting screw. It's a very focused effort, as the clearance setting is really an art form. It's "feel".

The method I learned from my father is to find the "lower" and "upper" clearance gauges. Then, carefully set the lower clearance so that there is a drag on the feeler gauge when you move it back and forth. Check with the "upper" gauge- it should feel like it is about to go in, but it should not go in. If it does, this means you are already above the maximum clearance and the valve clearance will be too loose. The "art" of the process is to make the drag feeling the same across all the valves. There is a fairly wide range of adjustment on the screw that will permit the "lower" gauge to move. I close my eyes and just drag the feeler back and forth while turning the adjustment screw until it feels "right". "Right" means just about tight enough, but with a tiny bit of loose to account for the torque down. Then, I try to tighten the lock nut with the same amount of force each time using the adjusting wrench. Then check clearance again. This is made even more difficult with the assembly lube on everything.

Ideally, you want the same amount of movement on each lock nut when using the torque wrench. If you do all of this correctly, you should feel the same drag on the feeler gauge across all 12 valves after the final torque is applied. If you get it right, you will be rewarded with an engine that just sings and exhibits very consistent compression across cylinders. I did well- only one intake valve on #5 ended up slightly too tight after the torque setting. In that case, you start over on that valve, but this time you have the valve next door as a guide for the feel.

I prefer to do the entire engine in one effort, but I ran out of time. Thankfully, the temperature and humidity will be the same tonight as it was last night. So, hopefully, I can get a similar result on the rear bank. After that, it will be time to close up the engine and proceed with the transmission refresh process.

Intake Valves: "lower" = .006 "upper" = .007
Exhaust Valves: ""lower" = .007 "upper" = .008
Locknut Torque: 20Nm

AM-JKLW-yowSsb6thGAthf6rsx1tNdldpc0_ACDNt1Vt7d9l4AEv91WPh-9avJkk8Dd4W0B4IC7CnT8T69d2f1Z7I5gCmcU68QJrQzzeiecGFM8sDBiAyTbuyA29tfoE-MLERQ7GRpldgV85JPvtrRbjfvWy=w938-h1250-no
 
Last edited:
Coolant Gauge Sensor

During my clean of the water jacket, the old coolant gauge sender looked pretty tired. I decided to replace it. I used an aftermarket part from Standard Motor. I like that it came with its own sealant applied, just like the Honda special bolts for the water pump and oil cooler.

If you have an ohm meter, do a quick comparison between the original sender (or the SM spec) and your replacement sender. Aftermarket vendors sometimes have issues. The check only take a minute. If its out of spec its easy to remedy now. Not so easy later.
 
If you have an ohm meter, do a quick comparison between the original sender (or the SM spec) and your replacement sender. Aftermarket vendors sometimes have issues. The check only take a minute. If its out of spec its easy to remedy now. Not so easy later.

I do have an ohm meter, so I'll do the the test.
 
Engine Refresh 71

Valve Adjustment

Completed the rear bank valve adjustment. Also managed to get the mid-covers installed with new gaskets. Note that I hacked up the cover surface in a foolish attempt to use channel lock pliers to squish the two halves together. They slipped on the plastic and gouged it. It's just cosmetic, though, so no problem. A bit embarrassing though.

Now, I just have to close up the engine. Valve covers, oil filter/cooler, intake manifold, etc. It's pretty much done- just need to add the engine harness.

AM-JKLVQpa4LgLaBWAx-bRAe25ah9YgdSyeNbORDVbLU_DE-4-i92vZjcT7L0Dwn_sFprjjfPkk6uRORodfjmlD787FRO7vIkY82UXC8Y7NbQpxZ3Mqww1pGw4aNCI5yqDFXNPd2CgxhKJ1k4bAYI7qmHt2P=w1278-h959-no
 
Our engines still amaze me at the size of the heads in relation to the block..so different than most American V8's..
 
Engine Refresh 72

Oil Cooler, Oil Filter, etc.

A couple of years ago, I got lucky and scored a super-cheap new oil cooler off of Amazon. Every once in a while parts distributors will clear out old inventory like this. My existing cooler is in great shape, but in the interest of an engine refresh, I will replace it.

Replacement oil pedestal special bolts.

AM-JKLWNdvQTTr9ad-yKw1hEoBg1Yxdtb5tRyrSQ_0ye9JJq70iXCtVH9mmcqEsNFUBJSccvTsdKPlIIiD6-2MJW3DH5ntKiWDN-eLyOxGwVxoT4lmJO5qJwUXMFAPj5W0iVyGVxK2Vn_L1SNXUZ7FRX_0Xl=w878-h1170-no


New "figure 8" O-ring applied with clean engine oil. Also cleaned the upper bolt holes one more time to ensure accurate torque setting.

AM-JKLUe6G_cWm2VuYJRLhoRgevsJ9g2S9gA_EPvUfig-oqiVSV3srAVdhxCbL2Nglha7Oi0zJ3zzO5KhfigW-nW1mUdXdJukJxmqJsSTukzq197sZyDt-EIuWf1rUBl2A9thiWcbqyxCGYwRa7_WwRFvTlp=w878-h1170-no


Oil pedestal mounted. The long lower bolt was badly corroded on the shoulder, so I cleaned it up with the brass wire brush and applied a thin coat of silicone grease to help prevent future deterioration. I should have just replaced it.

AM-JKLXQMDuwXw0Wc0V3xbZgxdOyXK5kNhJ0YCBzeLlDuAoXeWbsy1SSpGelaT5LAE0x2cBHslEgcw0AbrqOchX1KJZSP_l8n9AR4uOS9HjLDDEVZr3LT1a7LgzTbOPsrMNBdhs1muRgTGWBK-biyPSubhTN=w878-h1170-no


New oil cooler and fixing bolt/relief valve with new O-rings. Again, coated the O-rings in clean engine oil.

AM-JKLU0u9f1TyFylNlvyAvtmJDLEAgh4nM2XOgNTPQRVZCMAbEPhmfUfDrfRf_b8BP96_JRfQ-2eUF36V2pkiKHTUjQQr3eh74P-_LdUjp_4sEDDKoTMW5sir6OVcsZ70thaScRx2MmR_0Gzxm2rlnBqfWJ=w878-h1170-no


Oil cooler mounted. Torque on the fixing bolt (17mm) is 50Nm. This was more difficult than it appears. Two factors complicated the process. First, the big O-ring falls out of the groove on the cooler when you tip it over. Thus, you have to use a light and check to make sure it is not pinched between the cooler and the base. It's fiddly. Second is the coolant hose. If you install the oil cooler without adding the hose, you will never be able to get it on later. Therefore, you must install the hose on the oil cooler first, and then slide it onto the engine block passage. But, once it's connected to the engine block, you have less adjustment when you're trying to make sure the big O-ring is seated in the groove under the oil cooler. It took about 20 minutes of jiggling, sliding and checking with the light before I was satisfied. Hopefully it won't spray oil everywhere when I start it up!

AM-JKLXYpYwIqHZa1Wnwc_PA7a192Xq0jDOkvuw51M7rhfkL8bOPw93j1vNTK0FFadhNs2JVjPsqTXlNImkF7kTxQKOouEGfuFFbO8U0GcTurlymBieIHQnzuunVL4tQBWlof6uDGIUHkAJQDx-QYslXoUVr=w878-h1170-no


AM-JKLU7B3ulRqfdTVbKB-k86IDyecSZPgzAAjfAOmXg7K8SqRUNHHLpyneKn0gHEtLYty-h7HfSVUGkbuLLgqp45w880jwkGHg0aLrFUwqBid73IQ9SyNv-u9MQsYP95p_vkoZ3QnEyqfF7soL6z2xW-Sm-=w878-h1170-no


Cooling hose clamps set to the running position and marked.

AM-JKLXQch7QFwAeIorbxh7S2m61skh5oTtIvy-jwkSY0qniTwb3PouPGuzMJCgmC1_38HPX6p7Zz0svdnbqkwtre_TZum4hl7pLdyuCF4nMoBU6AQGMhMe_5dFvi8sWlAFqJ_LYlEpsmWl6vHkzCLRP2RGS=w878-h1170-no


OEM short filter installed. Kaz typically fills it with fresh engine oil, but considering the amount of juggling I am going to do with getting the engine back on the transmission and into the rear subframe, I'll leave it dry. Years ago, there was a huge debate over the viability of these short filters versus the tall ones that were original to the car. My view is most of us do not drive our NSX enough miles between oil changes for this to matter. I change the oil once per year, which will work out to about 3,000 miles (if I'm lucky) on this NSX. That's well within the filtering capacity of the paper element in this oil filter.

AM-JKLUO35EtpeSFnWWuoH4GDBRvRi5Fb29XVGLdFvJbk8SdKci7Q1dvrQD0ViGkrD7nXARp5nqaIpLM7yIMce_LZzSXZT20_GoKpNlSRL3_A23VWzUbxRFrBuXxfMQZ3_-Mm5WEJf4MB2KUajdfHDuEqg0_=w878-h1170-no
 
Last edited:
Engine Refresh 73

Alternator Bracket, ECT

The oil cooler took longer than anticipated, so I only had a little time left to continue buttoning up the engine. I managed to clean and install the alternator bracket along with a new grommet. The timing belt is now totally sealed except for the valve covers.

AM-JKLWc4NfAlIDkMs06Yc5x7nJiVZ_WYSz2DDEn9pmntHZXJQVpZSjvcNJcaqY6G_vzuarbAOpyLTGAOgO3HpaZNm8Q5KworT7_PpIv8H_BzOQwp3a71WLxZAw8dmxfRncZlU3_d9n1mkY3pvpWD2BBZkow=w878-h1170-no


As I will be tuning the factory ECU, it's important to have accurate ECT data. So many of the tables in the .bin depend on coolant temp. So, I installed a new ECT sensor. This is a NTK sensor. Unfortunately, the black plastic cover is not available even in Japan.

AM-JKLXI8V5Z7t_3efKGCYYRPDNhBs7Fw_2SBkPXpjdTVSUAicK66BbiW09J3GTfdEeyiUcOFX2B0XBOhuzD6LsXMoH5xIZxxrgmWg5vJ8xU8wvRyafCuIVHKcrxqbJXXMT5F2hsPTNrgBMnTJeFfXdjNUfs=w878-h1170-no


Just keep installing the final engine parts...
 
I may have missed this earlier in your thread but did you ever get an ultrasonic cleaner? How do you get your parts so clean? I'm not talking about the new parts obviously.

No- it's all done by hand. Depending on the part I use these methods (sometimes a combo):

  • Hot Water + Simple Green and a nylon detail brush
  • Acetone and Microfiber Rag
  • Dry Red Scotchbrite
  • Solid Brass Wire Wheel on drill (works great on bolts)
  • Brake cleaner (usually as a finishing spray)

My dad once said restoring an old car is mostly cleaning. Through this journey I've gotten good at cleaning different types of dirt and grease LOL.
 
man... it's looking amazingly clean. I must have at least 50lbs of dirt, dust, and grime on my car. That should be motivation to clean, but so far it's hasn't been. I have paving stone on the driveway and I'd have no way to flush out all of the dirt at home.

Thanks! I probably lost a year or two of life with all the volatiles (brake cleaner, acetone, etc.) I've touched/inhaled during this project...

There’s always the detailer! My car was the same, very dirty underneath, and now is a lot cleaner with 0 effort from me

If I ever have to do this again, I'm going to get the dry ice blasting service. It shrinks 2 years of work into a single day and looks better than I can do. Though, if I have done my job right, hopefully there will not be too much grime leaking from the drivetrain!
 
...If I ever have to do this again, I'm going to get the dry ice blasting service. It shrinks 2 years of work into a single day and looks better than I can do. Though, if I have done my job right, hopefully there will not be too much grime leaking from the drivetrain!

You know you have to get a lift so you clean the bottom of the car after every drive. It's easier to maintain if you do it every time and not let shit accumulate. :D

Good luck.
 
Both of you guys got the car bug from dad! ^^^^^^
 
Back
Top