


you guys are THE BEST
-
Protip: Profile posts are public! Use Conversations to message other members privately. Everyone can see the content of a profile post.
You are using an out of date browser. It may not display this or other websites correctly.
You should upgrade or use an alternative browser.
You should upgrade or use an alternative browser.
Honcho's Long Road to Imola Type-S Zero
- Thread starter Honcho
- Start date
General
Got my wheels ceramic coated today. Lifetime warranty. I'm basically scared of the Carbotech brake dust at the track.


Got my wheels ceramic coated today. Lifetime warranty. I'm basically scared of the Carbotech brake dust at the track.
Engine Refresh 82
RDX Fuel Injectors, Top Hats
Managed to get the RDX fuel injectors and fuel rails installed.

Test fitting the top hats using fresh Mobil 1. I could not figure out how to use the metal clips- these may be intended for the B-series.

My test fit revealed the integrated filter that is pressed into the top hat interferes with the filter inside the fuel injector. I cannot seat fully this way. I had to punch out the filters in each top hat.

Fitment was perfect after that. I also chose to use the OEM phenolic fuel rail spacers, since the aluminum ones in Brad's kit will conduct heat into the fuel rails. They are about 1/32" shorter than the OEM, but I was able to get a snug fitment on these particular top hats using the OEM. Obviously, I will pressurize the fuel system prior to operation and check for leaks. Another thing to note is that you want the center line of the plug to match the alignment mark on the fuel rails. This will ensure the spray pattern hits the back of the valves properly. Photos for [MENTION=20915]RYU[/MENTION]:


RDX Fuel Injectors, Top Hats
Managed to get the RDX fuel injectors and fuel rails installed.
Test fitting the top hats using fresh Mobil 1. I could not figure out how to use the metal clips- these may be intended for the B-series.
My test fit revealed the integrated filter that is pressed into the top hat interferes with the filter inside the fuel injector. I cannot seat fully this way. I had to punch out the filters in each top hat.
Fitment was perfect after that. I also chose to use the OEM phenolic fuel rail spacers, since the aluminum ones in Brad's kit will conduct heat into the fuel rails. They are about 1/32" shorter than the OEM, but I was able to get a snug fitment on these particular top hats using the OEM. Obviously, I will pressurize the fuel system prior to operation and check for leaks. Another thing to note is that you want the center line of the plug to match the alignment mark on the fuel rails. This will ensure the spray pattern hits the back of the valves properly. Photos for [MENTION=20915]RYU[/MENTION]:
I just got black wheels ceramic'd with the xpel product and it is not a miracle cure unfortunately..
He used SystemX Max, which is supposedly the bees knees. I know nothing about ceramic though, so who knows. We'll find out next spring...
Re-Assembly 41
Jack Stands
After a year on the paint dolly, the S Zero is back on jack stands ready for final assembly. No pictures, but we once again levitated a NSX into thin air. 5 terrifying minutes, but it ended well. Thanks to some local Primates ( [MENTION=34522]NSX_n00b[/MENTION], [MENTION=34348]mskrotski[/MENTION]) and my great neighbor, the process was safe and smooth. The car is now resting comfortably awaiting its powertrain and front subframe. I will DRIVE it out of the garage from this position.

The turn signals are missing because we had to remove the bumper (again) and install two upper fender bolts I forgot to do the last time. We were also able to re-align the bumper better with the fenders thanks to some minor fitting work on the bolt holes using a dremel.

Jack Stands
After a year on the paint dolly, the S Zero is back on jack stands ready for final assembly. No pictures, but we once again levitated a NSX into thin air. 5 terrifying minutes, but it ended well. Thanks to some local Primates ( [MENTION=34522]NSX_n00b[/MENTION], [MENTION=34348]mskrotski[/MENTION]) and my great neighbor, the process was safe and smooth. The car is now resting comfortably awaiting its powertrain and front subframe. I will DRIVE it out of the garage from this position.
The turn signals are missing because we had to remove the bumper (again) and install two upper fender bolts I forgot to do the last time. We were also able to re-align the bumper better with the fenders thanks to some minor fitting work on the bolt holes using a dremel.
Last edited:
Engine Refresh 83
Fuel Lines, Pressure Regulator
Mounted the upgraded fuel line and new pressure regulator.


Fuel Lines, Pressure Regulator
Mounted the upgraded fuel line and new pressure regulator.

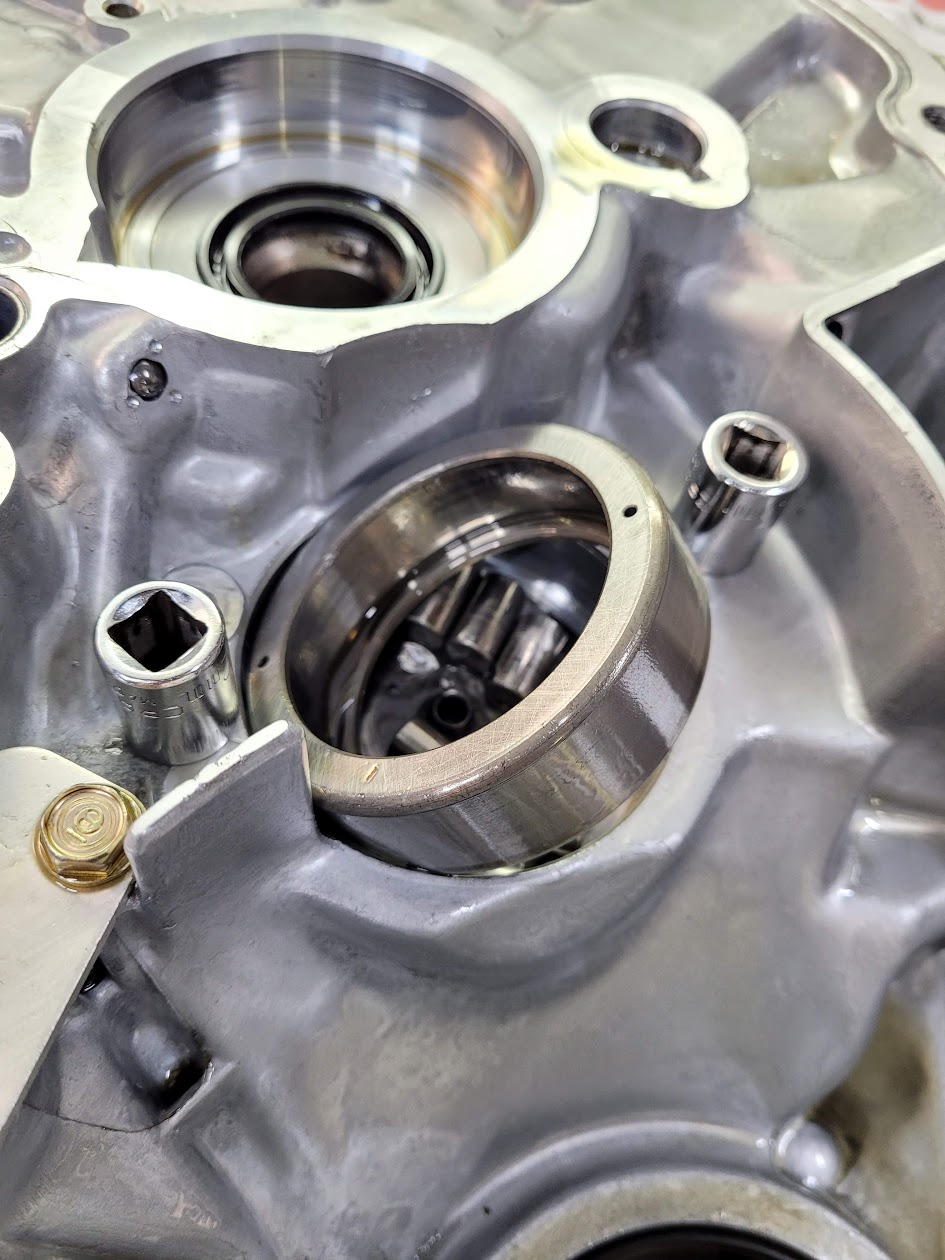
Transmission Refresh 6
Countershaft Bearing
Began the cleaning work on the clutch case. First is to inspect the countershaft bearing. Honestly, it looks fine- just some light wear marks on the rollers. However, I will replace it since I am using a new NSX-R countershaft and I prefer to have the rotating metal mating parts both new, since who knows how the old shaft wore in this bearing. Also, this way I will be able to give the oil guide plate and recess a good cleaning. I need to make a diff removal tool...
General
Over the weekend, I was printing out parts diagrams to use in the transmission build when my son asked me to print a few extras. He took them and disappeared. This morning, he came downstairs with this! He's 6.

Over the weekend, I was printing out parts diagrams to use in the transmission build when my son asked me to print a few extras. He took them and disappeared. This morning, he came downstairs with this! He's 6.
I think this is a sign you should let him assemble the transmission
I almost forgot how great your paint looked...
I know! I still go into the garage and just stare at it sometimes. All those years of seeing them in Best Motoring, Gran Turismo and in the Japan blogs. Now there's one in my garage. It's wild.
Color matched jack stands, ha! Am I the only one crazy enough to keep thinking about those tiles under them splitting?
No worries about the pavers (I wanted a bit more height to help with center tunnel access and eventual rear subframe install), but I hadn't noticed the jack stands until you pointed it out! It was not intentional LOL.
I think this is a sign you should let him assemble the transmission
That kid would grab a ratchet and just go for it. He'd probably get it pretty close too- he's a smart cookie.
THIS is clearly the greatest part about your build!
Over the weekend, I was printing out parts diagrams to use in the transmission build when my son asked me to print a few extras. He took them and disappeared. This morning, he came downstairs with this! He's 6.
Give the kid a torque wrench and a tube of Hondabond and he'll have it back together in a few hours.
Over the weekend, I was printing out parts diagrams to use in the transmission build when my son asked me to print a few extras. He took them and disappeared. This morning, he came downstairs with this! He's 6.
Paul, this is freakin' amazing. He'll have his first NSX built by the time he's a teenager.
Sounds like you should keep the lil guy around for a second skilled set of eyes on the build!
Love the progress
Love the progress
THIS is clearly the greatest part about your build!
Give the kid a torque wrench and a tube of Hondabond and he'll have it back together in a few hours.
Paul, this is freakin' amazing. He'll have his first NSX built by the time he's a teenager.
Sounds like you should keep the lil guy around for a second skilled set of eyes on the build!
Love the progress
Thanks guys. He frequently visits the garage to "check that you're making the NSX right and doing a good job"
We just got back from a week in Hawaii so the build resumes tomorrow. I haven't slept in 24 hours...
Transmission Refresh 7
Countershaft Bearing, Differential
I will post more detail in the transmission thread, but managed to safely remove the countershaft bearing using a $10 China tool. It pulled out very easily. Now I can clean the clutch case and remove the old seals.
Also got the differential out. The markings do not appear to be from the factory, which tells me this diff has been serviced before. My first thought was that perhaps I had lucked into a NSX-R final drive. I counted the teeth and, sadly, it's a standard 4.06 (65 teeth). Perhaps it has the NSX-R spring plate? Why else open the diff?
Transmission Refresh 8
Bearing guide, Oil pump, Diff Race, etc.
Continuing the preparation of the clutch case, I removed the old throw out bearing guide, which was badly corroded. Under the rust, lots of wear was indicated, suggesting improper grease application.


Also removed the oil pump components for cleaning. The residual trans fluid looked very clean.

Punched out the old mainshaft seal after removing the guide plate.

Moved over to the old transmission case and punched out the differential bearing race and spacer. I will re-use these since they are already seated to the bearings on the diff.

Bearing guide, Oil pump, Diff Race, etc.
Continuing the preparation of the clutch case, I removed the old throw out bearing guide, which was badly corroded. Under the rust, lots of wear was indicated, suggesting improper grease application.
Also removed the oil pump components for cleaning. The residual trans fluid looked very clean.
Punched out the old mainshaft seal after removing the guide plate.
Moved over to the old transmission case and punched out the differential bearing race and spacer. I will re-use these since they are already seated to the bearings on the diff.
Transmission Refresh 9
5th Shift Fork
Cleaned and re-lubricated the shift fork components. Installed the revised 5th gear shift fork.
Old fork on bottom, revised, beefier fork on top. You can see where they added metal- this is where the old forks were breaking off. They share the same part number (unusual for Honda), but if you order this number, you get the bigger fork.

Guide shafts cleaned and lubricated.

Partially re-assembled. Two things to remember: first, the steel ball inside the 5th fork; second, align the notch in the right shaft with the access hole on the sliding cap. This is where one of the steel balls goes after you assemble the cases.

The shift bracket fixing bolt installed and torqued to the spec with a new spring washer. There is a notch in the shaft so that you can't mess it up.

Final assembly. Ready to go back on the gear shafts.

5th Shift Fork
Cleaned and re-lubricated the shift fork components. Installed the revised 5th gear shift fork.
Old fork on bottom, revised, beefier fork on top. You can see where they added metal- this is where the old forks were breaking off. They share the same part number (unusual for Honda), but if you order this number, you get the bigger fork.
Guide shafts cleaned and lubricated.
Partially re-assembled. Two things to remember: first, the steel ball inside the 5th fork; second, align the notch in the right shaft with the access hole on the sliding cap. This is where one of the steel balls goes after you assemble the cases.
The shift bracket fixing bolt installed and torqued to the spec with a new spring washer. There is a notch in the shaft so that you can't mess it up.
Final assembly. Ready to go back on the gear shafts.
Transmission Refresh 10
Clutch Case
With the clutch case fully taken down (except for the diff race, which I did not want to disturb), time for the wash up. Not many pictures due to the mess, but here was my method:
Clutch Side
Not perfect, but vastly better. Besides, this will all get coated with new clutch dust in the first 500 miles. No sense in scrubbing out each nook.

Transmission Side
I also scraped off all the old Hondabond. There are a few areas that have some residue, so I will hit them with the steel wool acetone. But still, it worked very well.


I was paranoid about corrosion on the bare steel of the diff race, so I hit it with air until no more water came out and then blasted it with WD-40, since its primary purpose is water displacement! Avoided the corrosion. I will wipe the WD-40 with acetone during install and lubricate with fresh trans fluid.

Now to let it air-dry for a few days and we can re-assemble!
Clutch Case
With the clutch case fully taken down (except for the diff race, which I did not want to disturb), time for the wash up. Not many pictures due to the mess, but here was my method:
Clutch Side
- Spray Simple Green HD all over and let soak for 15 minutes
- Agitate all areas with a detail brush
- Blast with a pressure washer
- Blow dry with compressed air
Not perfect, but vastly better. Besides, this will all get coated with new clutch dust in the first 500 miles. No sense in scrubbing out each nook.
Transmission Side
- No simple green here- just soak up residual fluid with shop towels
- Wipe out with microfiber
- Blast with pressure washer
- Blow dry with compressed air and blow out oil passages
I also scraped off all the old Hondabond. There are a few areas that have some residue, so I will hit them with the steel wool acetone. But still, it worked very well.
I was paranoid about corrosion on the bare steel of the diff race, so I hit it with air until no more water came out and then blasted it with WD-40, since its primary purpose is water displacement! Avoided the corrosion. I will wipe the WD-40 with acetone during install and lubricate with fresh trans fluid.
Now to let it air-dry for a few days and we can re-assemble!
Transmission Refresh 11
JDM Gear Stack, Mainshaft
Now preparing for the mainshaft assembly for setting the thrust clearance.
Ancient new-old stock from SOS (2007!). The packing oil had coagulated on the gears and I had to clean them with acetone upon removal. The mainshaft was better, but I wiped it down with a microfiber and oiled with fresh trans fluid. Arranged in order of assembly.


3rd gear and synchro installed with first needle bearing.


JDM Gear Stack, Mainshaft
Now preparing for the mainshaft assembly for setting the thrust clearance.
Ancient new-old stock from SOS (2007!). The packing oil had coagulated on the gears and I had to clean them with acetone upon removal. The mainshaft was better, but I wiped it down with a microfiber and oiled with fresh trans fluid. Arranged in order of assembly.
3rd gear and synchro installed with first needle bearing.
Transmission Refresh 12
JDM Gear Stack, Mainshaft
Completed assembly of the mainshaft. I would mention that you should take care to make sure the synchro rings are aligned properly in the hub (via the slots and tabs) and that you have the hubs oriented properly top-to-bottom. Overall a smooth process. Just take your time and check everything twice. The small 12-ton shop press from helped immensely.

Pressing the 3/4 hub.

Pressing the 5th hub.

Clutch side bearing pressed on.


JDM Gear Stack, Mainshaft
Completed assembly of the mainshaft. I would mention that you should take care to make sure the synchro rings are aligned properly in the hub (via the slots and tabs) and that you have the hubs oriented properly top-to-bottom. Overall a smooth process. Just take your time and check everything twice. The small 12-ton shop press from helped immensely.
Pressing the 3/4 hub.
Pressing the 5th hub.
Clutch side bearing pressed on.
Transmission Refresh 13
Differential, NSX-R Final, etc.
After putting on my thinking cap, I came up with a good way to hold the differential without the factory tool. My dad bought me this Black & Decker Workmate bench as a gift when I bought my house 11 years ago. Much like the one we used when I was a kid, it has been so versatile. I have lost count of the different home projects where it has come in handy. It also has helped with a bunch of NSX stuff too. Great tool. There was plenty of grip to overcome the fixing bolt torque on the diff cover.

Fixing bolts.

The clutch pack exposed. I have not measured yet, but the discs look almost new.

Thickness marking on the 112mm thrust shim. Looks like "F" or 2.2mm.

Differential housing and ring gear. Note that the transmission fluid does not appear to be or smell like Honda MTF. Instead, it looks like an amber gear-oil type. Perhaps Redline MTL?

To remove the ring gear, use two diff bolts in the extra holes. Tighten back and forth with a ratchet and it presses right off.


The NSX-R 4.23 ring gear.

The carrier assembly, central gear and clutch pack.

Differential, NSX-R Final, etc.
After putting on my thinking cap, I came up with a good way to hold the differential without the factory tool. My dad bought me this Black & Decker Workmate bench as a gift when I bought my house 11 years ago. Much like the one we used when I was a kid, it has been so versatile. I have lost count of the different home projects where it has come in handy. It also has helped with a bunch of NSX stuff too. Great tool. There was plenty of grip to overcome the fixing bolt torque on the diff cover.
Fixing bolts.
The clutch pack exposed. I have not measured yet, but the discs look almost new.
Thickness marking on the 112mm thrust shim. Looks like "F" or 2.2mm.
Differential housing and ring gear. Note that the transmission fluid does not appear to be or smell like Honda MTF. Instead, it looks like an amber gear-oil type. Perhaps Redline MTL?
To remove the ring gear, use two diff bolts in the extra holes. Tighten back and forth with a ratchet and it presses right off.
The NSX-R 4.23 ring gear.
The carrier assembly, central gear and clutch pack.
Similar threads
- Replies
- 4
- Views
- 514
- Locked
- Replies
- 2
- Views
- 445