Sticky sushi rice with seasoning is where it's at. Lol. This reminds me of my suspension guidance thread where it went into who had the best salsas and tacos.:biggrin: But I agree, I never understand how you guys who run so low drive these cars? Maybe I just eat too many tacos?I love all kinds of rice!
Looks good with the seven spoke wheels.
And they did make the 16/17-inch seven spoke NA1 Type R wheels :wink::biggrin:
-
Protip: Profile posts are public! Use Conversations to message other members privately. Everyone can see the content of a profile post.
You are using an out of date browser. It may not display this or other websites correctly.
You should upgrade or use an alternative browser.
You should upgrade or use an alternative browser.
MexiRicer's 97 MCB
- Thread starter MexiRicer
- Start date

Sticky sushi rice with seasoning is where it's at. Lol. This reminds me of my suspension guidance thread where it went into who had the best salsas and tacos.:biggrin: But I agree, I never understand how you guys who run so low drive these cars? Maybe I just eat too many tacos?
LMAO. As @Dhalsim would say, tacos for everyone! You caravanning down with the Nor Cal group for NSX West Fest?? I can show you how the so cal low riders drive on these horrible roads :tongue:
I wish. I will be in Indiana that week for the boxer dog national. Nsx meets are always at the worst time for me. But maybe next year? I definitely would like to meet some So-Cal folks.LMAO. As @Dhalsim would say, tacos for everyone! You caravanning down with the Nor Cal group for NSX West Fest?? I can show you how the so cal low riders drive on these horrible roads :tongue:
Not bad :tongue:
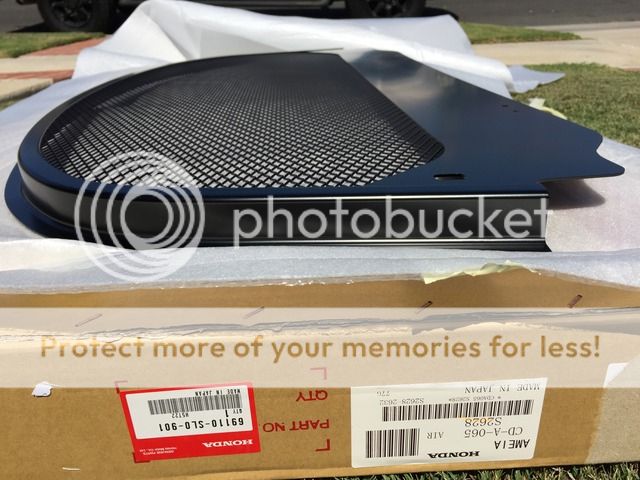
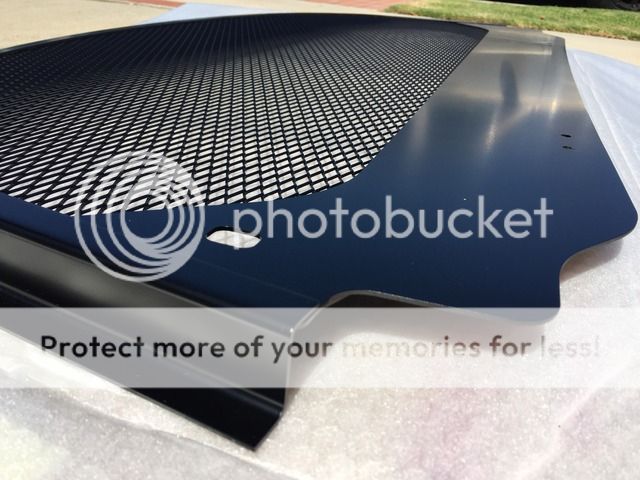
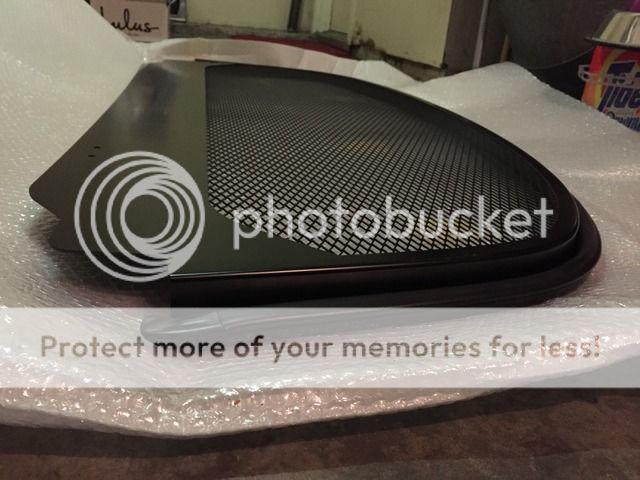
Genuine NSX-R lid install on targa!
First, I will preface by saying there are various options out there for parts, as well as several methods and techniques that will get the job done. If you're a targa owner like me, you know how difficult it is to find straight-forward information and the correct pieces needed to install the lid in the cleanest way possible (genuine r lid on targa will not install perfectly). This is how I did it and I think it came out fantastic.
Here are all the parts you will need:
69110-SL0-901; qty. 1 ------------ NSX-R lid
74442-SL0-003; qty 1 ------------- Weather stripping *
69210-SL0-900; qty. 2 ------------ Hinges
93404-0602007; qty. 4 ------------ M6x1.0 hex bolts w/ washer; mount hinges to chassis **
90151-SR2-000; qty. 4 ------------ M6x1.0 allen bolts; mount lid to hinges
74845-SL0-900; qty. 1 ------------ Prop rod
69112-SL0-900; qty. 1 ------------ Bracket; mount prop rod
91604-SD2-013; qty. 1 ----------- Grommet; prop rod bracket
90006-PT2-003; qty. 2 ------------ M6x1.0 hex bolts; mount prop rod bracket
32756-PBY-N51; qty. 1 ------------ Bracket; mount prop rod retainer clip
91503-SS0-003; qty. 1 ------------ Prop rod retainer clip
72142-SL0-000; qty. 2 ------------ Rubber stopper; engine lid rest (thanks to [MENTION=4017]BB[/MENTION] for the info)
*: only necessary if current needs replacement
**: coupe only
A few things to note- your current targa or coupe engine lid weather stripping can be reused but if it needs replacing now would be a great time to do it. Also, this install is basically entirely bolt-on for coupe owners, so be sure to order those nice OEM bolts w/washers to mount your hinges to the chassis. For us targa owners, we will be using spacers here instead, which is why you dont need to buy those specific bolts (they will be too short).
I ended up staying up super late one night brainstorming ideas on how I would make my lid fit without making any irreversible modification. Unfortunately, drilling is required to mount the OEM prop rod bracket on both targa and coupe; check out [MENTION=16180]comtec[/MENTION]’s solution if drilling two small holes scares you. I was fortunate enough to have a few local friends that had spacers lying around (thank you Jimmy [MENTION=25869]flexthatdx[/MENTION], Tony [MENTION=22270]S2k-Nsx[/MENTION] and Chaddy) so I thought I was set to install the lid. Jimmy gave me a pair of Comptech billet spacers, provided in conjunction for installation of their CTSC targa bag and Tony gave me a pair of SOS spacers, used in between where the lid mounts onto the hinges. After a bit of research, I found out that Tom [MENTION=9515]socalx[/MENTION] was using two CT spacers in between each of the mounting point where the hinges meet the chassis. He is one of the most secretive people I know, so I looked up an old Honda Tuning article on his NSX and low and behold there was a nice engine bay shot that captured his spacer set up within the frame. Because I only had 2 Comptech spacers, I searched high and low for another pair but to no avail. The SOS spacer route forces you to use aftermarket bolts (can no longer use OEM allen head bolts), cutting of the stock weather stripping underneath the lid where it hits and also, the complete kit does not utilize the OEM NSX-R hinges. Tom said he had no clearance issues with usage of 2 CT billet spacers at each mounting location whereas Nemo [MENTION=21934]nsxnemo[/MENTION] showed me his SOS NSX-R lid installation kit mounted, and was forced to cut the weather stripping where the lid hits it on the underside upon closing. I measured the spacers and what I found was that the SOS spacer kit adds a total of 17mm of height on each side whereas the CT spacers added 24mm of height. I believe this difference of 7mm is why Tom had no issues closing his lid whereas Nemo was forced to cut. I had to figure out an alternative. I remembered back in my ricey civic days, owners would use hood spacers to create that menacing look in hopes that potential victims on the road would stay away from their scary d16y7 (promise I held myself back from doing this ). Turns out, the mounting points on a civic hood are equidistant to the engine cover mounting points on our NSXs, meaning I could order 22mm hood spacers off ebay and use it to install my genuine r lid. Sounds like sacrilege to have a near $2k part come in contact with such an inexpensive item off ebay, but there was no other option. Much to my surprise, this ended up being a very viable solution. The spacer I ordered even came with extended M6x1.0 hex bolts. Please be aware that adding spacers will require you to use a bit more force when shutting your hatch glass. The edges of the lid sit closer to the hatch glass, but as long as your weather stripping is intact, you will be fine and won’t cause damage to any components.
Another thing I did different on my install was utilizing the OEM NSX-R resistor bracket that also serves as the mounting point for the prop rod retainer clip. I had searched high and low on the forums for the damn part number, to see if anyone had used it, but was left in the dark. Many resort to a custom solution, which is fine and functions 100% but I really wanted to use that OEM bracket. I was determined the find the correct part number. I cross referenced Japanese part inventory with U.S. Acura part inventory. It was difficult to pin point which numbers refer to which components, as the diagrams and numbers are often very smudgy. Alas, I found the part number that looked most like the bracket I needed and this particular number was not in the U.S. Acura parts database. I figured if its not in the U.S. Acura parts database, this means higher chances of this part being the item I'm looking for since there is no such thing as a U.S. NSX-R. Many thanks go out to Marc [MENTION=33290]SpeedyPartsJapan[/MENTION] for helping me throw the dice at this mystery bracket that I had not actually seen before. After a week or so of waiting for the part to arrive, I was beyond ecstatic when Marc sent me photos. It was in fact the correct bracket, with cut out for the prop rod retainer clip . Marc is a fellow NSX owner originally from Canada but currently living in Tokyo. He speaks fluent Japanese and English so it is super easy to go through him for special order JDM OEM and aftermarket parts; it’s a shame we didn't get to meet up during my trip to Japan for NSX Fiesta 2016.
The install itself is very straight forward once you have all necessary parts in front of you. Huge thank you to Nemo [MENTION=21934]nsxnemo[/MENTION] for sourcing the lid for me, Louis [MENTION=15357]AdvansCPAP[/MENTION] for ordering me all the nuts and bolts and last but not least, Marc [MENTION=33290]SpeedyPartsJapan[/MENTION] for helping me order the mystery bracket.
First order of business, transfer that weather stripping!
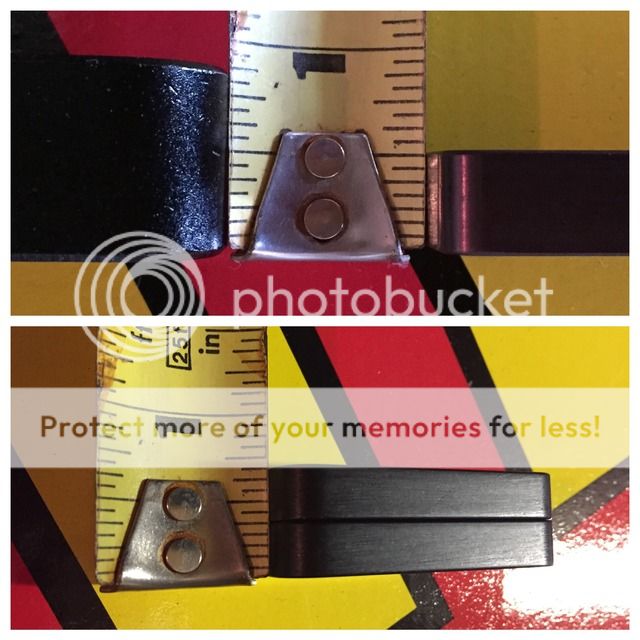
Ebay spacer 22mm; qty. 1 (top left)
Comptech 24mm; qty. 2 (top right, only one pictured)
SOS spacer 17mm; qty. 2 (bottom)
One comptech spacer is way too short.
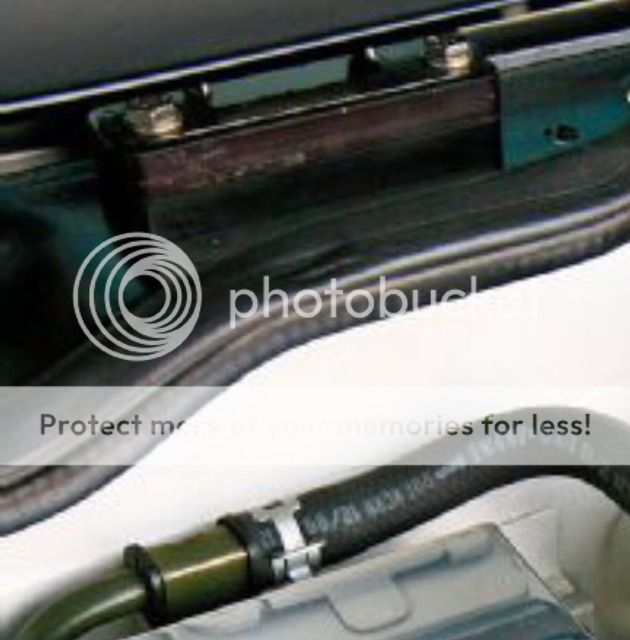
Here is Tom’s set up on his previous NSX. 2 Comptech billet spacers required.
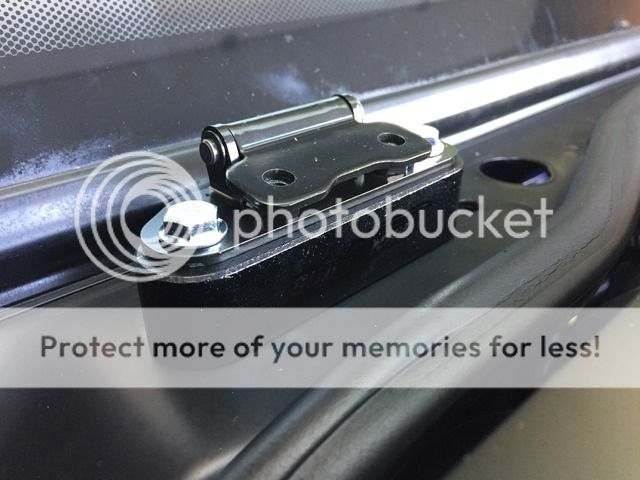
Ebay spacer mounted, need to paint it black asap. Brand is "God Snow"
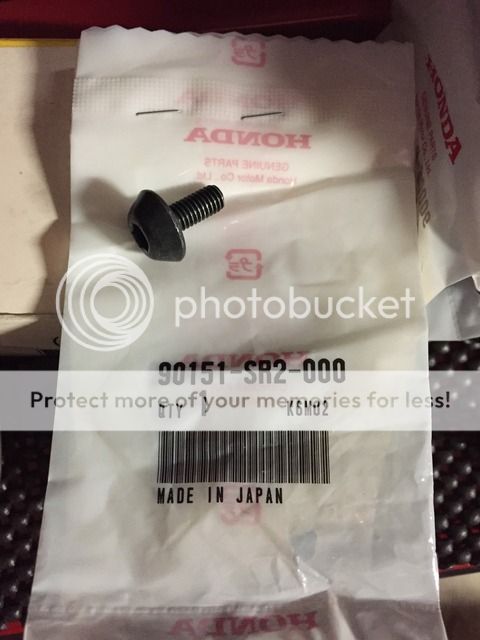
Beautiful OEM allen head bolts.
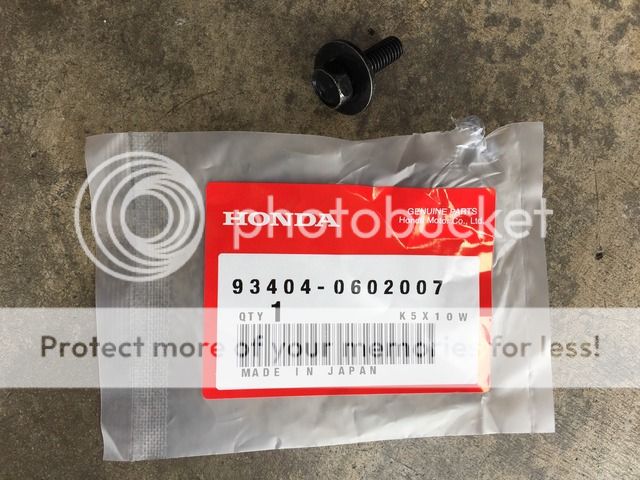
Coupe owners will want to use these to mount hinges to chassis.
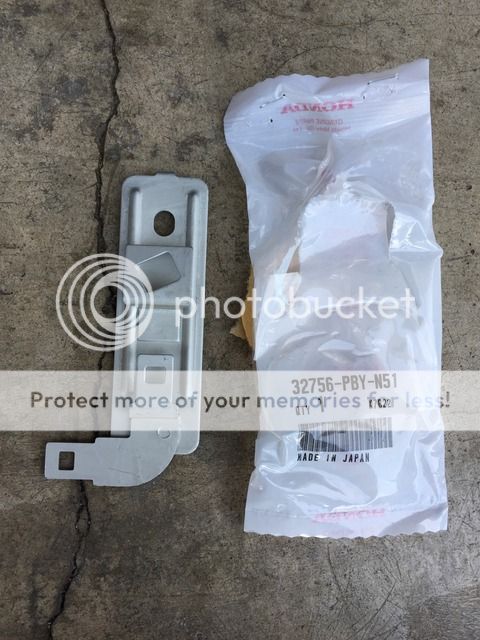
Mystery bracket in the flesh.
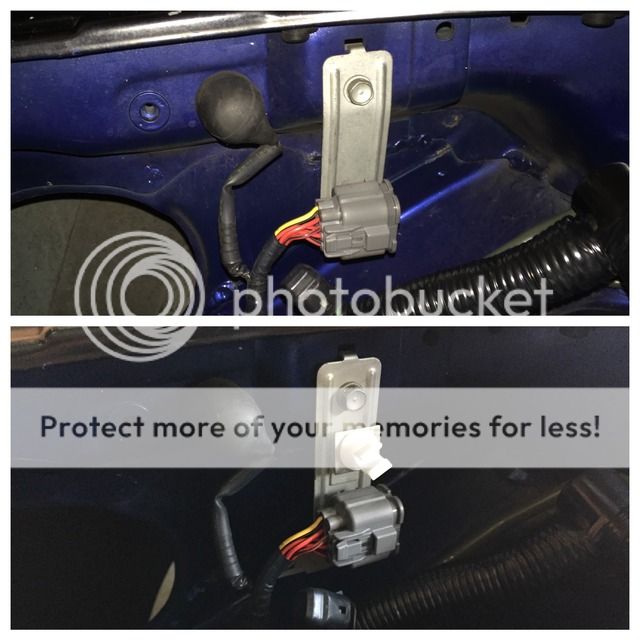
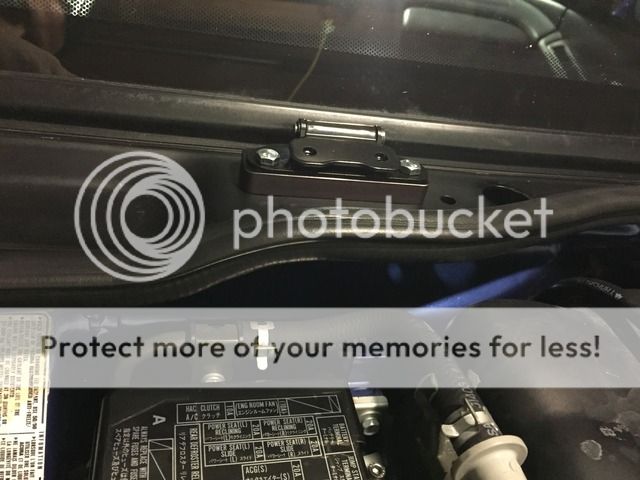
Installed this first to ensure perfect positioning for drilling points into chassis.
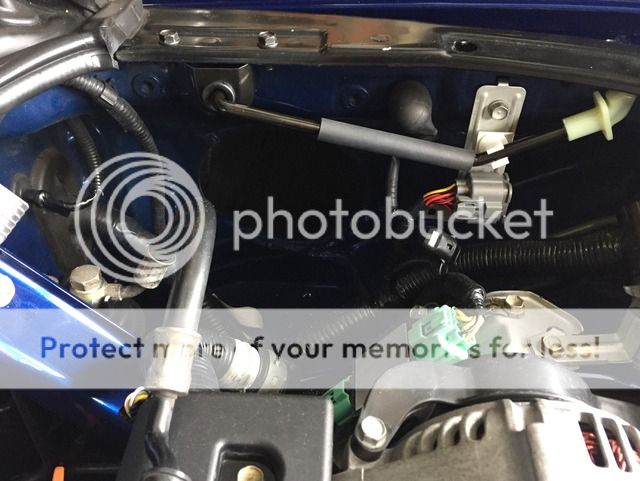
Drilled and prop rod bracket mounted.
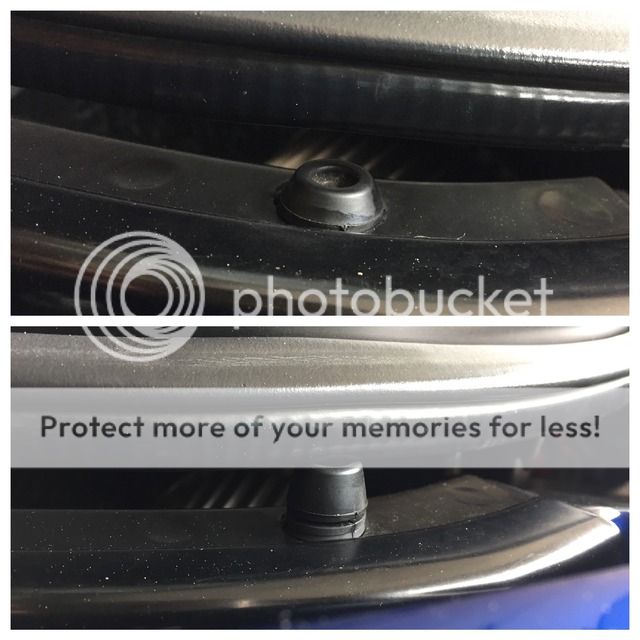
Before and after installing the correct size stopper.

Lid closed after install, weather stripping is begging for mercy.
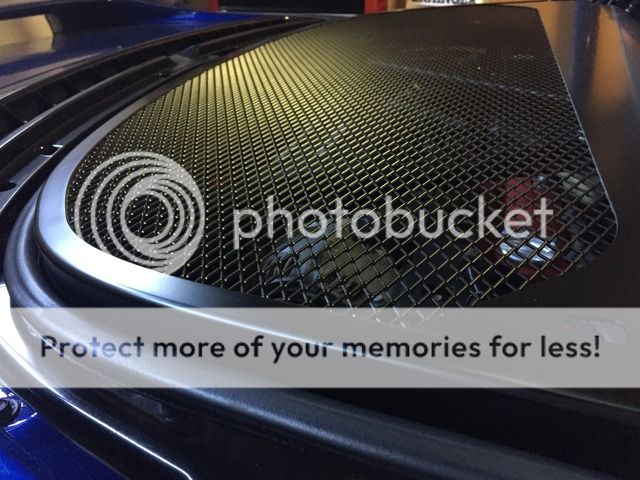

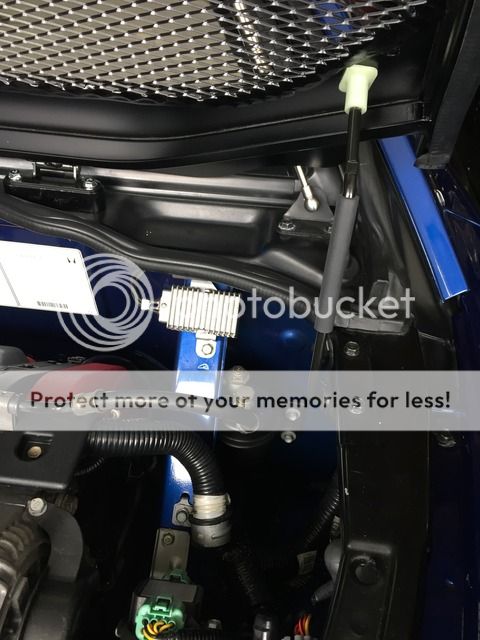
All done and installed.
Here are some honorable mentions, helped me tons with my research:
http://www.nsxprime.com/forum/showthread.php/195573-Genuine-NSX-R-engine-covers-are-available-again
http://www.nsxprime.com/forum/showthread.php/166956-NSX-R-Engine-Cover-Prop-Bar-Hole-Size
http://www.nsxcb.co.uk/showthread.php?4742-Type-R-Type-S-Owners-Help-Please!
First, I will preface by saying there are various options out there for parts, as well as several methods and techniques that will get the job done. If you're a targa owner like me, you know how difficult it is to find straight-forward information and the correct pieces needed to install the lid in the cleanest way possible (genuine r lid on targa will not install perfectly). This is how I did it and I think it came out fantastic.
Here are all the parts you will need:
69110-SL0-901; qty. 1 ------------ NSX-R lid
74442-SL0-003; qty 1 ------------- Weather stripping *
69210-SL0-900; qty. 2 ------------ Hinges
93404-0602007; qty. 4 ------------ M6x1.0 hex bolts w/ washer; mount hinges to chassis **
90151-SR2-000; qty. 4 ------------ M6x1.0 allen bolts; mount lid to hinges
74845-SL0-900; qty. 1 ------------ Prop rod
69112-SL0-900; qty. 1 ------------ Bracket; mount prop rod
91604-SD2-013; qty. 1 ----------- Grommet; prop rod bracket
90006-PT2-003; qty. 2 ------------ M6x1.0 hex bolts; mount prop rod bracket
32756-PBY-N51; qty. 1 ------------ Bracket; mount prop rod retainer clip
91503-SS0-003; qty. 1 ------------ Prop rod retainer clip
72142-SL0-000; qty. 2 ------------ Rubber stopper; engine lid rest (thanks to [MENTION=4017]BB[/MENTION] for the info)
*: only necessary if current needs replacement
**: coupe only
A few things to note- your current targa or coupe engine lid weather stripping can be reused but if it needs replacing now would be a great time to do it. Also, this install is basically entirely bolt-on for coupe owners, so be sure to order those nice OEM bolts w/washers to mount your hinges to the chassis. For us targa owners, we will be using spacers here instead, which is why you dont need to buy those specific bolts (they will be too short).
I ended up staying up super late one night brainstorming ideas on how I would make my lid fit without making any irreversible modification. Unfortunately, drilling is required to mount the OEM prop rod bracket on both targa and coupe; check out [MENTION=16180]comtec[/MENTION]’s solution if drilling two small holes scares you. I was fortunate enough to have a few local friends that had spacers lying around (thank you Jimmy [MENTION=25869]flexthatdx[/MENTION], Tony [MENTION=22270]S2k-Nsx[/MENTION] and Chaddy) so I thought I was set to install the lid. Jimmy gave me a pair of Comptech billet spacers, provided in conjunction for installation of their CTSC targa bag and Tony gave me a pair of SOS spacers, used in between where the lid mounts onto the hinges. After a bit of research, I found out that Tom [MENTION=9515]socalx[/MENTION] was using two CT spacers in between each of the mounting point where the hinges meet the chassis. He is one of the most secretive people I know, so I looked up an old Honda Tuning article on his NSX and low and behold there was a nice engine bay shot that captured his spacer set up within the frame. Because I only had 2 Comptech spacers, I searched high and low for another pair but to no avail. The SOS spacer route forces you to use aftermarket bolts (can no longer use OEM allen head bolts), cutting of the stock weather stripping underneath the lid where it hits and also, the complete kit does not utilize the OEM NSX-R hinges. Tom said he had no clearance issues with usage of 2 CT billet spacers at each mounting location whereas Nemo [MENTION=21934]nsxnemo[/MENTION] showed me his SOS NSX-R lid installation kit mounted, and was forced to cut the weather stripping where the lid hits it on the underside upon closing. I measured the spacers and what I found was that the SOS spacer kit adds a total of 17mm of height on each side whereas the CT spacers added 24mm of height. I believe this difference of 7mm is why Tom had no issues closing his lid whereas Nemo was forced to cut. I had to figure out an alternative. I remembered back in my ricey civic days, owners would use hood spacers to create that menacing look in hopes that potential victims on the road would stay away from their scary d16y7 (promise I held myself back from doing this ). Turns out, the mounting points on a civic hood are equidistant to the engine cover mounting points on our NSXs, meaning I could order 22mm hood spacers off ebay and use it to install my genuine r lid. Sounds like sacrilege to have a near $2k part come in contact with such an inexpensive item off ebay, but there was no other option. Much to my surprise, this ended up being a very viable solution. The spacer I ordered even came with extended M6x1.0 hex bolts. Please be aware that adding spacers will require you to use a bit more force when shutting your hatch glass. The edges of the lid sit closer to the hatch glass, but as long as your weather stripping is intact, you will be fine and won’t cause damage to any components.
Another thing I did different on my install was utilizing the OEM NSX-R resistor bracket that also serves as the mounting point for the prop rod retainer clip. I had searched high and low on the forums for the damn part number, to see if anyone had used it, but was left in the dark. Many resort to a custom solution, which is fine and functions 100% but I really wanted to use that OEM bracket. I was determined the find the correct part number. I cross referenced Japanese part inventory with U.S. Acura part inventory. It was difficult to pin point which numbers refer to which components, as the diagrams and numbers are often very smudgy. Alas, I found the part number that looked most like the bracket I needed and this particular number was not in the U.S. Acura parts database. I figured if its not in the U.S. Acura parts database, this means higher chances of this part being the item I'm looking for since there is no such thing as a U.S. NSX-R. Many thanks go out to Marc [MENTION=33290]SpeedyPartsJapan[/MENTION] for helping me throw the dice at this mystery bracket that I had not actually seen before. After a week or so of waiting for the part to arrive, I was beyond ecstatic when Marc sent me photos. It was in fact the correct bracket, with cut out for the prop rod retainer clip . Marc is a fellow NSX owner originally from Canada but currently living in Tokyo. He speaks fluent Japanese and English so it is super easy to go through him for special order JDM OEM and aftermarket parts; it’s a shame we didn't get to meet up during my trip to Japan for NSX Fiesta 2016.
The install itself is very straight forward once you have all necessary parts in front of you. Huge thank you to Nemo [MENTION=21934]nsxnemo[/MENTION] for sourcing the lid for me, Louis [MENTION=15357]AdvansCPAP[/MENTION] for ordering me all the nuts and bolts and last but not least, Marc [MENTION=33290]SpeedyPartsJapan[/MENTION] for helping me order the mystery bracket.
First order of business, transfer that weather stripping!
Ebay spacer 22mm; qty. 1 (top left)
Comptech 24mm; qty. 2 (top right, only one pictured)
SOS spacer 17mm; qty. 2 (bottom)
One comptech spacer is way too short.
Here is Tom’s set up on his previous NSX. 2 Comptech billet spacers required.
Ebay spacer mounted, need to paint it black asap. Brand is "God Snow"
Beautiful OEM allen head bolts.
Coupe owners will want to use these to mount hinges to chassis.
Mystery bracket in the flesh.
Installed this first to ensure perfect positioning for drilling points into chassis.
Drilled and prop rod bracket mounted.
Before and after installing the correct size stopper.
Lid closed after install, weather stripping is begging for mercy.
All done and installed.
Here are some honorable mentions, helped me tons with my research:
http://www.nsxprime.com/forum/showthread.php/195573-Genuine-NSX-R-engine-covers-are-available-again
http://www.nsxprime.com/forum/showthread.php/166956-NSX-R-Engine-Cover-Prop-Bar-Hole-Size
http://www.nsxcb.co.uk/showthread.php?4742-Type-R-Type-S-Owners-Help-Please!
^ I agree. That's Wiki material right there. Great job Robert!
--Conrad
--Conrad
Good info.
Only thing missing is the template to drill the holes for the prop mount.
Only thing missing is the template to drill the holes for the prop mount.
Almost makes me want to get an NSX-T just so I can do this
Great write up MexiRicer!
Modifying my cover was a LOT more work") Should have the no drill prop mounts back from the powder coat shop any day now.
Should have the no drill prop mounts back from the powder coat shop any day now.
Mike
Modifying my cover was a LOT more work
Should have the no drill prop mounts back from the powder coat shop any day now.Mike
Honestly, this post deserves its own thread.
Thanks Dennis! Maybe after I add in a few more pictures and tweak a few things I will post it in the DIY section.
^ I agree. That's Wiki material right there. Great job Robert!
--Conrad
Thank you my MCB brother!! :biggrin:
Good info.
Only thing missing is the template to drill the holes for the prop mount.
Not a bad idea! Although once prop rod is fastened in the retainer clip, it's fairly easy to figure out where to drill.
Almost makes me want to get an NSX-T just so I can do this
Nooooo way... its all bolt on for you buddy, I am jealous lol.
Great write up MexiRicer!
Modifying my cover was a LOT more work
Mike
A lot more work and a lot more ballsy
Props for successfully cutting your cover. Those no drill prop rod mounts are nifty indeed Thanks for the feedback Mike!
A lot more work and a lot more ballsy
Thanks for the feedback Mike!
Thanks buddy
The rod gets very close to the frame behind the mount when moved in certain directions. Make sure it doesn't scratch the paint behind. I have a rubber cap on the end of mine for protection.
Sent you a FR on facebook
Mike
Not a bad idea! Although once prop rod is fastened in the retainer clip, it's fairly easy to figure out where to drill.
Agreed, but you could say that for a lot of things, IMHO it would make your great write up complete.
I personally thought that the most scary part of this install was drilling the bodywork - I drilled before I had the bracket so wasn't exactly sure how it clipped together.
There is nothing on the car to show where to drill. You have to do it the way MexiRicer did.
Mount the hold down clip. There is a small slot cut on the rod where it goes in to the clip so snap the rod on to the clip. With the rod attached to the clip put the mount on the end of the rod and raise it to the frame to get the correct location.
Mike
Mount the hold down clip. There is a small slot cut on the rod where it goes in to the clip so snap the rod on to the clip. With the rod attached to the clip put the mount on the end of the rod and raise it to the frame to get the correct location.
Mike


Impressive due diligence Robert! Great work. Thanks for sharing with us your knowledge.
Very nice rice
I dig it Robert!!!
I haven't gone back through my SOS NSX-R engine cover install with the proper hardware (I have the correct stoppers but haven't installed them yet since I haven't gotten around to installing the hinges sans SOS spacer).
But I do have something to add for the fact that a lot of people are hesitant to drill the two holes for the prop rod mount on the right side of the car.
I too am hesitant to drill, so for the time being I uninstalled my original coupe prop rod from the original engine cover and simply use that to prop up the SOS NSX-R engine cover. I place the white part of the prop rod in the normal location next to the glass hatch latch and I then rest the engine cover on the other end of the rod (finding a sturdy spot in the mesh that sits well on the rod).
I dig it Robert!!!
I haven't gone back through my SOS NSX-R engine cover install with the proper hardware (I have the correct stoppers but haven't installed them yet since I haven't gotten around to installing the hinges sans SOS spacer).
But I do have something to add for the fact that a lot of people are hesitant to drill the two holes for the prop rod mount on the right side of the car.
I too am hesitant to drill, so for the time being I uninstalled my original coupe prop rod from the original engine cover and simply use that to prop up the SOS NSX-R engine cover. I place the white part of the prop rod in the normal location next to the glass hatch latch and I then rest the engine cover on the other end of the rod (finding a sturdy spot in the mesh that sits well on the rod).
That's why I made the no drill mounts
Mike
That's why I made the no drill mounts
Mike
Can you explain this solution or do you have some pictures?
lol @compscomps thats why you're the king around here!!
Can you explain this solution or do you have some pictures?
I only have pictures of the prototype and they look a little different. I will post some pictures when I get them back from the paint shop, hopefully very soon.
Mike
Last edited:
Thanks buddy
The rod gets very close to the frame behind the mount when moved in certain directions. Make sure it doesn't scratch the paint behind. I have a rubber cap on the end of mine for protection.
Sent you a FR on facebook
Mike
Hey Mike! Had no idea that was you on FB. Love your work and DIY solutions. I was especially digging that custom stealthy gauge you put in place where the clock is supposed to go. Very OEM and no one would ever notice its there. Awesome.
Awesome job. I did this 10 years ago and I learned a couple new things from your post
I need a mystery bracket
I am secretive
Hahaha glad you can appreciate it Tom, even though you figured it all out years ago
Agreed, but you could say that for a lot of things, IMHO it would make your great write up complete.
I personally thought that the most scary part of this install was drilling the bodywork - I drilled before I had the bracket so wasn't exactly sure how it clipped together.
YIKES! Why would you drill without having a reference point. You stunt devil!! Lol... Since a few others have also brought up the drilling dilemma I will definitely take some measurements and report back. Thanks again for the suggestion!
I can't say for sure but for coupes there should be dimples/indents where you are supposed to drill.
Hmmm, possibly but I know for sure on targa those "dimples" are no where close to where drilling occurs. I'll be helping a local friend of mine install his on his coupe sometime soon so will report back. Thanks Dennis!
There is nothing on the car to show where to drill. You have to do it the way MexiRicer did.
Mount the hold down clip. There is a small slot cut on the rod where it goes in to the clip so snap the rod on to the clip. With the rod attached to the clip put the mount on the end of the rod and raise it to the frame to get the correct location.
Mike
Yessir! Once all parts are on hand, the install is quite simple including the drilling since you have a nice reference point. Your solution works better though, IMO. Too bad I already drilled!
Impressive due diligence Robert! Great work. Thanks for sharing with us your knowledge.
Thanks Regan! I knew I wasn't the only one in this boat so I figured I'd share my findings.
Very nice rice
Nice rice or no rice. Lol thx!
I dig it Robert!!!
I haven't gone back through my SOS NSX-R engine cover install with the proper hardware (I have the correct stoppers but haven't installed them yet since I haven't gotten around to installing the hinges sans SOS spacer).
But I do have something to add for the fact that a lot of people are hesitant to drill the two holes for the prop rod mount on the right side of the car.
I too am hesitant to drill, so for the time being I uninstalled my original coupe prop rod from the original engine cover and simply use that to prop up the SOS NSX-R engine cover. I place the white part of the prop rod in the normal location next to the glass hatch latch and I then rest the engine cover on the other end of the rod (finding a sturdy spot in the mesh that sits well on the rod).
Thanks Jason!! Yes I have seen that done also and know exactly what you're talking about. That is actually probably one of the better prop rod solutions since I know overtime the SOS cover has been known to sag. If you need help installing or need help finding parts don't hesitate to reach out! Hope your car is on all 4's by now!!! See you soon bro.
comps thats why you're the king around here!!
Jajajajaja, thats all you comps.
lol @comps
I only have pictures of the prototype and they look a little different. I will post some pictures when I get them back from the paint shop, hopefully very soon.
Mike
Hehehehe, a lil Mexi lingo to spice up the thread...
Cant wait to see finished product Mike!
Similar threads
- Replies
- 8
- Views
- 515
- Replies
- 3
- Views
- 370
- Replies
- 25
- Views
- 2K