• Protip: Profile posts are public! Use Conversations to message other members privately. Everyone can see the content of a profile post.

Replacement of an HVAC Blower Motor Resistor

Joined
7 June 2014
Messages
10
Location
Auburn
Does anybody have any info on how to replace this resistor? I sent my AC unit to this guy on ebay (modulerepair), who has over 6,300 positive reviews. I got the part back, put my car back together and the unit was still only blowing on high. I contacted him and his response was, "oh, we'll I replaced all capacitors and fixed the damaged circuits. Seems like you'll need a blower resistor as well."

so, obviously the guy didn't bench test the thing before he sent it back to me but now I have looked up this part which is another $169 on top of the $100 to this joker to "repair" my AC unit. Can anyone tell me if they have replaced this part and how hard it is to replace. I can't seem to find a thread on this topic. Any help would be appreciated. Thanks all!
 
there are 3 things that causes this CCU, resistor and High Relay fuse.

you need to remove the blower to get to one of the bolts to get to the resistor.

high relay fuse is in the front fuse box the one against the firewall, it the farthest right upper. swap with your horn relay to test so you know if it worked.
 
Contact member BrianK. You will have a much better service experience. He fixed my CCU years ago and it is running strong.
 
My recollection is that there is no resistor. The blower motor uses a power transistor to modulate the 12 volt supply to the motor to reduce the speed on any setting other than high. On the high setting, the power transistor is by-passed by the high relay which applies 12 v directly to the motor. If the blower motor only works on high, it is possible that the power transistor is defective, although they are pretty robust devices. My vague recollection is that the power transistor module is located in the blower assembly.

Do a search on Prime using blower motor power transistor as the search term and I think you will find a number of discussions about your specific problem. I recall that there are other things than a dead power transistor that can cause the problem you describe
 
I knew I had a copy of the blower motor wiring diagram someplace! You can see that if the blower motor only operates when high speed is selected (which causes the blower hi relay contact to close and by-pass the power transistor, it pretty much means that the transistor is dead, has a bad connection or the CCU is faulty.
 
I knew I had a copy of the blower motor wiring diagram someplace! You can see that if the blower motor only operates when high speed is selected (which causes the blower hi relay contact to close and by-pass the power transistor, it pretty much means that the transistor is dead, has a bad connection or the CCU is faulty.

In my case: blower fan runs on high (and high only) even if the head unit is disconnected/removed.
When plugged in, off button only turns display off. Speed know has NO effect.

What might be causing that behavior?
 
Head unit is disconnected? Do you mean that the CCU module is physically disconnected from the wiring harness? If you have disconnected the CCU module and the blower continues to run on high that pretty much points a finger at the Blower Hi Relay contacts being permanently stuck in the closed position. The Blower Hi Relay (separate from the Blower Relay) is in the A relay box under the front hood on 1991 and early cars. If you have a later car you may have to check the service manual because Honda moved the relays around during the production run. When the relay is pulled out of its socket, check for melting on the plastic socket base. Sometimes with a bad connection and extended operation the sockets can get hot enough to melt resulting in a short although that is pretty rare.
 
Head unit is disconnected? Do you mean that the CCU module is physically disconnected from the wiring harness? If you have disconnected the CCU module and the blower continues to run on high that pretty much points a finger at the Blower Hi Relay contacts being permanently stuck in the closed position. The Blower Hi Relay (separate from the Blower Relay) is in the A relay box under the front hood on 1991 and early cars. If you have a later car you may have to check the service manual because Honda moved the relays around during the production run. When the relay is pulled out of its socket, check for melting on the plastic socket base. Sometimes with a bad connection and extended operation the sockets can get hot enough to melt resulting in a short although that is pretty rare.

Yes, CCU removed, blows full tilt.

https://www.dropbox.com/s/zzux6hlru5f4vnk/IMG_20181017_150027.jpg?dl=0


Thanks for reply. Will be out in a bit and get that relay out (was about to tackel glove box/blower, assuming that HI relay was integrated/close to the blower.
 
My psychic powers are a little off right now. It would be useful if you provided the year of your car because the relay assignments in the A and B boxes moved around during the production runs. 1997 - 2000 is a lot different than the early year cars so you definitely should not be referring to 1997-2000 diagrams if you have an early year car. Even 2000 has some minor differences relative to 1997- 1999. There may have been changes between 1991 and 1997. I am not familiar with the details of the early year cars.

If the photo in post #11 is your car, I am going to guess that it is an early production car because the 1997 and later boxes don't have a relay where your arrow points. The relay that your arrow points to would be the Blower Relay on an early car. If you look at the schematic diagram in post #5 , you will see that removing the blower will completely kill power to blower motor so that is why it is stopping. On an early car, the Blower High Relay is the relay just to the right of the Blower Relay.

If you look at that schematic, you will see that if you have removed the CCU and unplugged the Blower High Relay and the blower continues to run on high, you either have a short circuit to the chassis in the black / blue wire on the Blower High Relay (or a damaged socket) or the power transistor has shorted out. Power transistors typically fail open circuit; but, who knows. The power transistor is in the blower housing. With the Blower High Relay and the Blower Relay installed in their sockets and the ignition off, disconnect the power transistor plug. Turn the ignition back on, if the blower no longer runs it looks like you have a fried power transistor. Plug the transistor back in to confirm that the blower starts up and if it does you have pretty much double confirmed that the transistor is cooked. If the blower still runs on high with the power transistor removed, then you have a short in the wiring some place.

If you do some searching on Prime, you will find a post in the last 1-2 years where somebody has linked a .pdf of the early service manual and I think a later service manual. Try to find the post and download it. You are going to need it if you have to track down a short in the wiring harness.

Sorry for omitting the year, I thought I had already posted it: 1991

"On an early car, the Blower High Relay is the relay just to the right of the Blower Relay.": Thank you. I thought removing that relay would also 'kill' the fan motor (with CCU removed), even if main blower relay is still in. According to the wiring diagram

https://www.dropbox.com/s/197ffuw1bh7x16g/Blower%20fan%20wiring%20diagram.JPG?dl=0

the blower motor should then only get ground through the power transistor? Blower hi relay and CCU removed with fan running would mean Power Transistor shorted, or?


As noted, the power transistor is in the blower housing. This photo (post #3 ) shows the transistor on the inside of the housing and gives you a general idea of its location with respect to the blower motor.

http://www.nsxprime.com/forum/showt...ution-check?highlight=blower+power+transistor

If you use the search function, you may be able to find a post showing the connections on the outside. The power transistor is accessible from the front hood area. It is installed on the same side of the blower housing as the blower motor which is the driver's side of the car on LHD cars. If you look at the blower housing on the firewall, you should see the large round retaining cover on the side of the housing with 3 screws for the blower motor. Above that and towards the firewall you will see a smaller 'thing' retained by two screws in the housing. That is the power transistor.

You do not need to remove the power transistor to carry out the test. There are three plugs mounted vertically on the front of the blower housing. If I remember correctly, the middle one is the plug for the transistor. Trace the wire to confirm that. All you need to do is separate that plug to carry out the test to find out whether you have a shorted transistor - which would be really rare.
 
Last edited:
As noted, the power transistor is in the blower housing. This photo (post #3 ) shows the transistor on the inside of the housing and gives you a general idea of its location with respect to the blower motor.

http://www.nsxprime.com/forum/showt...ution-check?highlight=blower+power+transistor

If you use the search function, you may be able to find a post showing the connections on the outside. The power transistor is accessible from the front hood area. It is installed on the same side of the blower housing as the blower motor which is the driver's side of the car on LHD cars. If you look at the blower housing on the firewall, you should see the large round retaining cover on the side of the housing with 3 screws for the blower motor. Above that and towards the firewall you will see a smaller 'thing' retained by two screws in the housing. That is the power transistor.

You do not need to remove the power transistor to carry out the test. There are three plugs mounted vertically on the front of the blower housing. If I remember correctly, the middle one is the plug for the transistor. Trace the wire to confirm that. All you need to do is separate that plug to carry out the test to find out whether you have a shorted transistor - which would be really rare.

Thanks! I will try to take the old transistor out (previous owner cut wire/connectors off, left old transistor in the fan housing, zip tied new transistor in bay). With CCU disconnected or connected, only unplugging the transistor shut off the fan. It appears the (newer) power transistor is fried. Wish there were a simple test of the transistor I could perform before spending $250 for a new transistor.
 
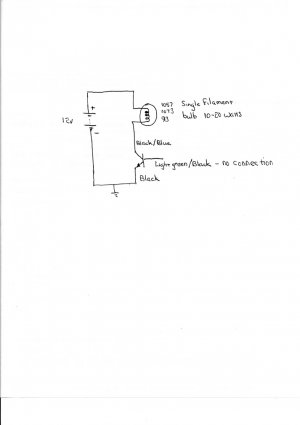
OK - this is a simple test that will confirm that the transistor is shorted out.

Besides the transistor, you need a single filament bulb such as 1057, 1073 , 93 taillight bulb, anything that is about 10 - 20 watts. Do not use a LED style bulb for this test. You need a 12 v supply. You could use the car battery; but, I recommend against that because if there is a short you could do a lot of damage. A smaller 12 volt lantern battery would be good. Actually a little 9 volt transistor radio battery might suffice.

Wire up the test as shown in the attached picture.


Transistor short test.jpg


If the light bulb lights up / glows during the test, the transistor is shorted out / spam in a can. If the light bulb does not light up, that does not mean the transistor works. It just means that the transistor is not shorted out. As noted before, the more common failure is for the transistor to fail permanently open. You can set up a test to actually check the transistor operation; but, that is more complicated. Since your problem appears to be a shorted transistor, then I would limit it to this simple test.

There is a an alternative to complete replacement of the transistor module. If you are a keener, you can remove the transistor and replace it. The specific transistor in the module is out of production; but, if you have the time and patience you can search Prime and there is a thread discussing replacement of the transistor and alternative part numbers for acceptable transistor substitutions. I expect that you should be able to find a suitable substitution for less than $10. I also recall something about an internal fuse / polyfuse in the transistor module and that the whole thing is potted, so repair is a bit messy. Anyway, if you can find that thread you can get the details and the part numbers.
 
Last edited:
OK - this is a simple test that will confirm that the transistor is shorted out.

Wire up the test as shown in the attached picture.

If the light bulb lights up / glows during the test, the transistor is shorted out / spam in a can. If the light bulb does not light up, that does not mean the transistor works. It just means that the transistor is not shorted out.

Thanks. Will run the test later this morning.

Also, when I dig out the old transistor (still mounted in fan housing), I may try to remove the transistor; I already found suitable replacement transistors and saw posts here that describe (I remember reading the transistor is 'pottet') the procedure IIRC. The transistor used for the aftermarket harness on the car is MJ11032G https://assets.alliedelec.com/f_auto,c_scale,w_200,d_no_image.png/70099987.jpg.
 
MJ11032 will certainly work. It does seem a bit of over-kill (it has a 50 A current rating) and is a bit pricey. MJ11016 is about 1/2 the price and has a 30 amp collector current rating which matches the original Toshiba power transistor.

If you do the repair, watch out for the internal fuse in the module. If you damage the fuse then it will forever be an open circuit.
 
New transistor came in. I got the fan to run on low (if making the correct selections on the CCU).
The existing (new at some point) transistor was ALSO working. But noticed that zip tying it into the bay is dangerous. It appears if the cooling fins on back touch ground, it shortens. Existing unit got very hot (likely touching).

The fun part was getting the old (wire cut by previous owner, left installed) transistor out of the blower box. The first philips screw is easy. But the rear is a real killer. After trying for an hour, i decided to remove the heater hose; but that did not want to come off the rear flange. So kept messing with various length and diameter of philips tools. Finally got the screw out. Now the unit did not want to COME out. Removed the 2 easily accessible 10mm socket screws of the blower housing. That allowed a BIT more room, and I finally got it out.

Everything running now as it should; now need to assemble everything under the hood, and the dash. Still need to figure out what to do with the broken (by previous owner) bezel around the top vent/clock. haven't found a source for the bezel itself yet (dealer only sells complete vent).
 
If you are a keener, you can remove the transistor and replace it. The specific transistor in the module is out of production; but, if you have the time and patience you can search Prime and there is a thread discussing replacement of the transistor and alternative part numbers for acceptable transistor substitutions.

Search came up empty so far. Can someone maybe link me to the transistor replacement thread? Would like to take the old one apart and try to put the transistor (on order) in. Maybe use it on the other NSX?
 
Everything running now as it should; now need to assemble everything under the hood, and the dash. Still need to figure out what to do with the broken (by previous owner) bezel around the top vent/clock. haven't found a source for the bezel itself yet (dealer only sells complete vent).

If the bezel is just cracked (no missing chunks) and if the bezel is ABS, try cementing in back together with some ABS cement. Don't use the yellow stuff. Home Depot or Lowes sells a PVC / ABS cement that is grey. I replaced some broken trim pieces on my interior door panels and used this to repair the broken retaining tabs on the pieces (Never throw away old trim pieces. 15 years from now somebody may be happy just to be able to get any trim piece). The cement is a solvent cement which means that the plastic at the repair site gets soft and will likely deform slightly. You will probably have to finish sand the repair and then spray with a plastic adhesion paint to finish it off.

If there is a smallish chunk missing in the bezel, you can use Q Bond to fill in the missing piece and glue the bezel together. This won't work if you have a big chunk missing. To do a 'fill in' you will likely have to do a couple of applications of the Q Bond to build it up. You then need to file and sand down the repair area to match the surrounding area. I always find that the repair area has a slightly grainy / pitted finish to it so you need to get some of that super fine auto body filler (or a really high build primer) to get a smooth finish. Then paint to match. There are ABS filler rods and I have heard of people making an ABS slurry / putty to fill in missing chunks of ABS. I have never tried the filler rods. I tried the ABS slurry / putty - it didn't work for me; but, perhaps I was not using the correct solvent to make it.

In my experience the Q Bond repair is not as tough as the solvent welded repair so take extra care when re installing the vent if you used the Q Bond.
 
New transistor came in. I got the fan to run on low (if making the correct selections on the CCU).
The existing (new at some point) transistor was ALSO working. But noticed that zip tying it into the bay is dangerous. It appears if the cooling fins on back touch ground, it shortens. Existing unit got very hot (likely touching).

The metal case of the transistor does double duty as the transistor's collector connection (black/blue wire). If the transistor's metal case came into contact with metal body parts, this would complete the circuit for the blower motor to ground and cause the blower to run on max speed for as long as the transistor was in contact with the chassis ground. However, this should not hurt the transistor since the transistor is not operating.

The power transistor that Honda used for the blower control is a darlington pair bi polar transistor (two transistors in one!). Its '80s technology. Its down-side is that it is not a really good switch. At high current loads the voltage across the transistor is quite high which means that the transistor gets quite hot when operating. That is why Honda by-passes the transistor completely on the highest setting and why they put the heat sink inside the blower housing where it gets lots of good forced air cooling. I suspect what killed your transistor was having it sitting in free air (no forced cooling). It might have survived on the lowest blower speeds; but, if the blower was operated at speeds just below high the transistor probably got good and hot and poof! The more current technology is to use large power MOSFETs for this kind of duty because their switched on resistance is very low making them better switches that don't generate anywhere near the same amount of heat. At the time the NSX was designed, power MOSFETS were uncommon / really pricey so the Darlington pair was the appropriate technology.

Probably more information than you need to know!
 
Last edited:
Probably more information than you need to know!

Certainly NOT! Au contraire: refreshing to get the 'why' of a failure, and good info for someone to potentially avoid the downfall (same mistake) in the future. This is what dedicated forums are all about (and the reason for my growing disgust with the Facebook crowd).
 
Back
Top