• Protip: Profile posts are public! Use Conversations to message other members privately. Everyone can see the content of a profile post.

Adding MP3 player and satellite radio.

Joined
10 November 2002
Messages
1,124
Adding XM and iPod input.

After really enjoying XM in my gf's Accord on a recent trip to the North Carolina Outer Banks, I decided to finally upgrade my car stereo system. My goal is to add an MP3 player input and satellite radio in a manner that is simple yet very functional. I intend to keep the stock stereo system but ditch the CD player in the trunk. I'm not willing to cut up the center console and don't need NAV. I want a clean, hidden installation without a lot of wires running all over the place. In keeping with these goals, a few decisions need to be made.

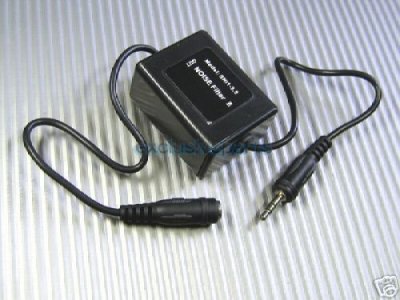
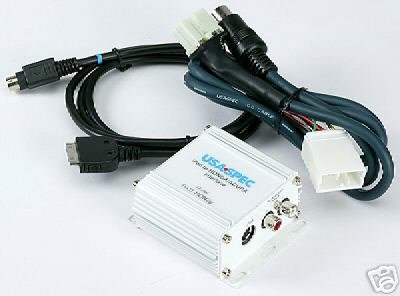
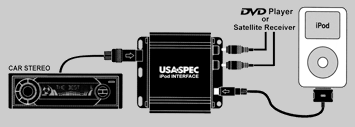
First, how to connect to the oem head unit? After considering several options, I concluded that the USA-Spec PA11-HON Honda/Acura Interface Unit is the best way to go for my purposes. This unit replaces the CD-changer with two inputs - the first is a dedicated ipod input that charges the ipod while allowing the CD-Changer function of the oem head unit to control the ipod. (Newer units allow both CD-changer control as well as direct control from the ipod itself. If this is important to you, be sure to purchase a newer unit.) The second input is an RCA-type auxilary input which will allows the user to direct-connect a satellite radio receiver without relying on an FM transmitter. (Since the second input is RCA, you could connect just about anything with the right adapter cable.) This unit can be purchased for $120 or less delivered. Search Ebay or Google to find one.

http://www.usaspec.com/ipod_product_sheets/pa11-hon.pdf

XM or Sirius? There are several good articles available online which discuss this, so I won't go into it in depth. Search Google using the phrase "Sirius vs XM" to get some good information. After reading these carefully, it pretty much boils down to a Mac vs PC argument. For my purposes, I based my decision entirely on the hardware as opposed to the programming. I chose XM based on the fact that XM has a slight edge in hardware over Sirius. As a bonus, XM hardware is typically less expensive than Sirius, while maintaining a slight technology advantage.

Okay, so which XM hardware? After looking at many different receivers, both from XM and Sirius, I concluded that the best choice would be an offering from Delphi. Delphi was an early player in satellite radio and their hardware seems to have a slight edge in being ahead of the competition.

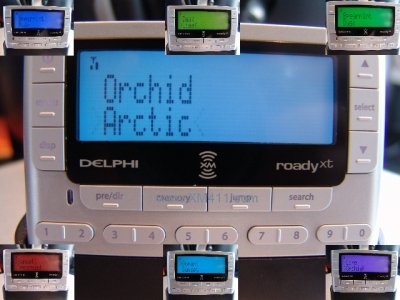
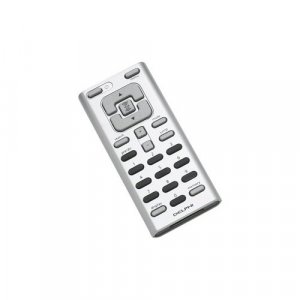
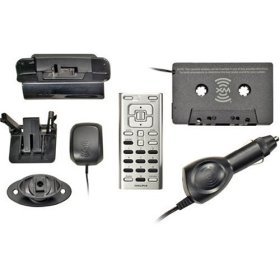
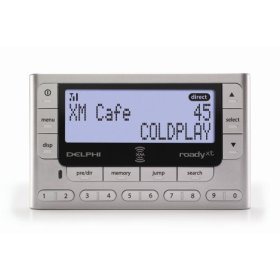
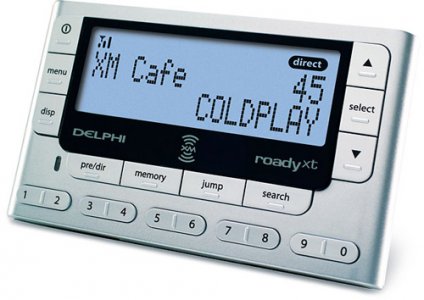
Fine, so exactly which Delphi receiver? After looking at their offerings, I decided that the best choice was the Delphi XM Roady XT. Critical factors were reliability, ease of use, size, and appearance, but the deciding factor was that the Roady XT offers a choice of different backlighting colors. The Roady XT is compact (approximately the size of a deck of cards, smaller than the Skyfi units), gets favorable reviews, and has a modern, simple, yet elegant look that is appealing. Specifically, I selected the Delphi XM Roady XT with car kit and Boombox. I chose a package that includes the boombox in the event that I am really digging the XM and want to play with it outside the car, either at home or possibly for very infrequent portable use. This particular Delphi package also has a CD player, and can be purchased for about $80 plus shipping.

http://www.myradiostore.com/bundles/boombox/sa10175-sa10205.html

Right now, most XM receivers come with a $20 or more rebate if you sign up for at least six months service with XM by October 9, 2007. (I'm sure they will continue offering rebates past that date as an incentive to sign up.)

http://xmradio.com/pdf/existing/shop/0214_Q307_LTR_F.pdf

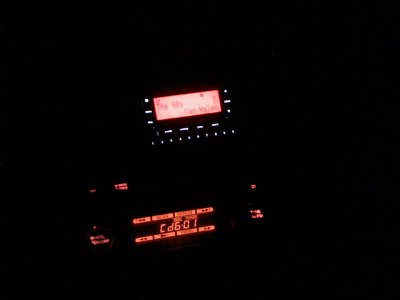
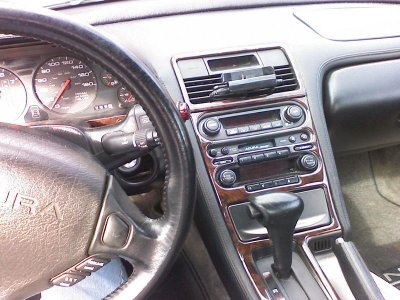
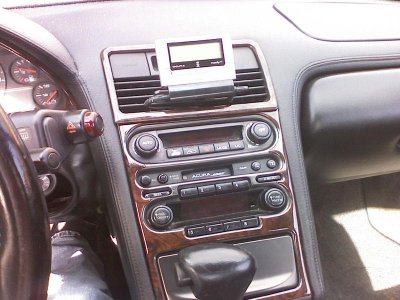
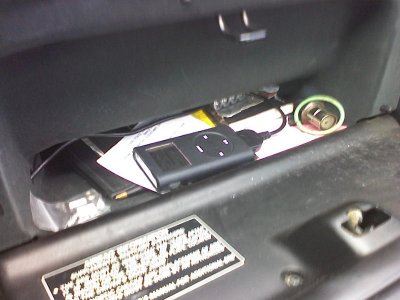
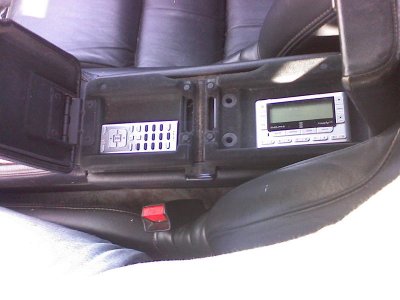
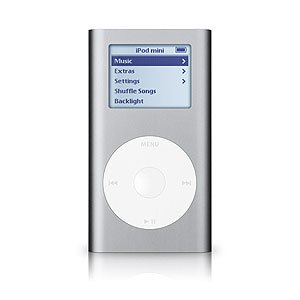
I intend to remove the oem trunk-mounted CD player entirely, as it will be rendered useless and obsolete when the USA-Spec adapter is added. I will be mounting the XM receiver on the AC vent using the AC vent mount included in the car kit. The Ipod will be placed in the glovebox, connected to the dedicated ipod cable of the USA-Spec PA11-HON adapter.

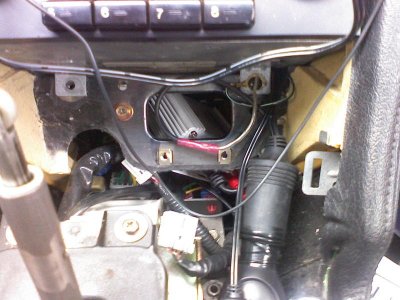
Here is a link to how to remove the center console cover. Note that the link specifies Climate Control Unit removal, but you need to take the same path to remove the radio. It really isn't that big of a job. Remove the center console cover, remove (unplug) the climate control unit, take out the radio, unplug the CD-player, replace that cable with the USA-Spec cable, then figure out where to position the various components and how to snake the cables to the desired locations. Pick up a switched power lead from the fusebox under the driver's dash. Be sure to use the correct voltage power supply to power the XM receiver. Thanks to Briank for the removal instructions.

http://nsxe-repair.com/CCUremoval.html

I will post a full review when everything is done, including pics of the installation.

The Delphi Roady XT with car kit minus the boombox, can be purchased for as little as $30 with a $20 rebate for a net cost of only $10. You could add both satellite radio and an mp3 player input to your car using high-quality hardware for as little as $150. No wonder XM has 2 million more subscribers than Sirius. Give the hardware away and make your money on the subscription fees. And as for the XM vs Sirius argument, I think that the SEC will ultimately allow these two companies to merge, and may announce their decision this year, so ultimately the issue could become moot.

As a side note, a music service still in it's infancy but which has future potential is called Slacker. Check them out at...


http://www.slacker.com/
 

Attachments

  • Usa-Spec pa11-hon.JPG
    Usa-Spec pa11-hon.JPG
    18.2 KB · Views: 119
  • usa-spec installation.gif
    usa-spec installation.gif
    14.8 KB · Views: 150
  • SA101075.jpg
    SA101075.jpg
    78.9 KB · Views: 105
  • SA10205+SA10276.jpg
    SA10205+SA10276.jpg
    30 KB · Views: 98
Last edited:
Hi - finally found someone who thinks like me - this is exctly what I want to do to my 1995 (blk/blk auto) nsx.

Please keep me posted on your progress with pics if possible - would love to know the outcome. Will you be able to control both the mp3 and the sat radio with the stock radio?

Thanks!

ptcapps

Hi.

At NSXPO, Motegi, Larry B., Brian K., and I installed the USA Spec unit that just has the two RCA inputs (not the proprietary iPod one). There is no way to control a SAT radio with the stock head unit at this point. Someone may come up with something (IMO, unlikely), but at this point, there's no way to do this. Even if you could, it wouldn't tell you the name of station or song, so I question how value-added it really is. I'm going to mount my XM to a panavise bracket so I can see what station, title, artist, etc. The sound quality is loads better than a FM modulator or using a cassette adapter.

The only hard part of the install is the console removal, the rest is a super easy. Motegi has great instructions on how to do the whole install. I'd recommend that you check your local circuity city because they are closing out the USA Spec adapter that I have for the quite modest price of $25.
 
Last edited:
Update

I just wanted to take a moment to discuss the difference between the USA-Spec adapter I chose (PA11-HON) and the USA-Spec adapter (DF-HON), which is the adapter that is referred to in post #4 of this thread) that others have chosen.

The difference between these is that although the PA11-HON will not control the Roady XT (nothing else will either, only the receiver itself or it's remote) the PA11-HON will allow control of the iPod from the oem NSX head unit and charge the Ipod, whereas the DF-HON does neither. The DF-HON is a simpler adapter that basically just provides switching capability between two different RCA inputs. I chose the PA11-HON so that I could connect the iPod to the dedicated Ipod cable in the glovebox, then close the glovebox and forget about it. Since the oem head unit controls and charges the Ipod, you just connect it and forget it, you don't have to even touch the Ipod for days, weeks, or even months. By contrast, when using the DF-HON, you have to control the Ipod from the Ipod itself, and have to frequently remove the Ipod to recharge it.

When using the PA-11 HON, you could just purchase an inexpensive Ipod mini (4GB of music storage) for car use only. Connect it, lock the glovebox and forget about it, maybe take it out once in awhile and update your music. Keep your nicer Ipod (Ipod Video, Ipod Touch) for personal use.

Note that I am not criticizing their choice, I am just pointing out the difference. There is nothing "wrong" with using the DF-HON. The PA-11 HON just offers more functionality (control Ipod from head unit) and convenience (Ipod stays charged).


The XM Roady XT model SA10276 does not come with a remote and although the boombox does come with a remote, it seems to be designed specifically for the boombox. I will be purchasing another remote separately for car use.

It looks like I will be installing the Roady XT in the NSX using the AC vent clip, as the Roady XT won't fit in the front portion of the split center console when attached to the required mount, which has a proprietary connector, making it an essential part of the installation. (The mount also allows easy disconnect of the XM receiver to switch between car and home use. The receiver just plugs right into the car mount, or into the boombox like a cartridge. Easy on, easy off.) I don't really see a practical way to mod the mount to make it work out in the console, plus the center console is a little too far aft to conveniently read the display when driving anyway. The ipod will be going in the glove box also, which isn't a problem since the head unit will control the ipod.

The XM micro-antenna has a very small footprint (approx. 1 3/4" x 1 3/8" x 1/2"), and will be installed on top of the dash in the center, forward of the padded ridge, almost against the windshield.

I have set the Roady XT backlighting to "Sunset", which is a dusky red-orange. This color is a little darker, richer, and redder (but still orange) than in the pic below when viewed at night. It is very appealing when paired with the orange interior lighting of the NSX.

I activated the XM online today and am using the boombox to listen. I was successful using promo code "XMSCION03" which is for three months free XM and free activation. The confirmation page showed the promo code and indicated it would be applied when billed. When I checked my checking account, I was able to confirm that the discount WAS credited. I will also be submitting the rebate form (available on the XM website) for a $20 rebate.

Once the installation is done I will provide an update and pics.
 

Attachments

  • RoadyXTcolors.JPG
    RoadyXTcolors.JPG
    77.8 KB · Views: 141
Last edited:
Halfway There

This has turned into a 3-part project. I am installing XM and iPod inputs, adding a wood-grain kit to the interior, and having the climate control unit repaired.

The stereo portion is half done. Half done because I need to send the climate control unit out for repair. The XM is installed and working, but only playing out of the right side, so I still have some troubleshooting to do. In the meantime, the center console, center-console cover, climate control unit, and clock are not in the car right now, so I am driving it with the dash all opened up, until I get the climate control unit back and have everything put back together. In the meantime, I am familiarizing myself with the settings and controls.

A few comments...

The USA-Spec adapter is buried in the dash below the head unit. It has been wired into a switched terminal on the underdash fusebox, so it provides a power feed only when the car is turned on, and doesn't drain the battery when the car is turned off. The Roady XT receiver operates on 5v (some XM receivers operate on 6v), so in order to have a permanent power feed I connected a female cigarette-lighter-style adapter to a switched fusebox terminal, then plugged the XM car adapter into that to step down the voltage to the correct 5v. There is enough room down in the console to bury the connector, so it will be hidden when the dash is closed up. I have attached a pic of the USA-Spec adapter and power feed below. The USA-Spec adapter is the white box which looks like a small amplifier buried back in there. The power feed is the round black connector in the right foreground.

A better way to install a permanent power feed would be to purchase one of these power supplies. Be sure to select the correct voltage power supply for your particular unit.

http://store.xmfanstore.com/myfihrdpwr.html

The XM micro-antenna is currently placed in the front center of the dash. The only thing metallic in that spot is the climate control sensor, so the antenna is riding on top of the sensor. It stays put there and doesn't move around since it is magnetic, but I will have to evaluate this location, as it may interfere with the sensor and cause the climate control to act up. If it causes problems I will have to relocate it, but in the meantime it fits perfectly, and actually blends well with its surroundings. XM satellite reception has been great in this location, so I am reluctant to move it unless it becomes necessary because of the climate control.

Tonight was the first night I have driven the car after dark with the XM installed. The Roady XT looks okay in the car during the day (it would blend better with my black interior if it were black), but it looks absolutely stunning at night. The reddish-orange backlighting combined with with bright white button illumination is aesthetically very pleasing. For those few who "have the blues", the "Dusk" (medium-blue) color selection on the Roady XT would look fantastic.

Although the XM receiver is not in its final location, here is a night photo. I took this photo with my cell phone camera, so the resolution isn't that great. But in person it is really gorgeous at night. In the photo, the XM receiver looks dimmer than the head unit illumination, but in reality the XM receiver color has a somewhat deeper and redder tint than the orange of the head unit.
 

Attachments

  • RoadyXTinNSX.jpg
    RoadyXTinNSX.jpg
    14.3 KB · Views: 178
  • USA-Spec adapter and power feed.jpg
    USA-Spec adapter and power feed.jpg
    80.7 KB · Views: 161
Last edited:
Here is the remote (Delphi SA10183, sold separately) that goes with the Roady XT. These are inexpensive - I purchased one of these through Ebay; still awaiting delivery.
 

Attachments

  • Delphi SA10183 Remote.jpg
    Delphi SA10183 Remote.jpg
    17.9 KB · Views: 106
Last edited:
Update - I have the electronic side of the installation pretty well sorted out now, although I am still awaiting the return of the climate control unit to be able to close up the dash opening. The XM/Ipod are now playing in stereo - seems the problem was as simple as a loose connection in back of the head unit. I will monitor it for a few days, and if it loosens up again I will pull the head unit and find a way to more securely connect it, if that becomes necessary.

The sound output from both the XM and iPod are both great. The NSX subwoofer gets a lot of criticism but it really fills out the bass compared to listening to the ipod through the headphones. Having a little kick to your favorite music is very satisfying when driving. Having the Ipod stashed in the glove box works out fine, since the head unit controls it really well, plus the Ipod is hidden. You just plug it into the cable, close the glovebox door, and forget about it, since the USA-Spec adapter charges the Ipod.

The oem head unit controls the Ipod well. The "next track" and "previous track" buttons on the head unit advance to the next or previous song with ease. The "scan" and "repeat" buttons on the head unit scan and repeat the iPod. If you switch to AM/FM/XM, then back to the ipod, the ipod resumes playing in the same spot (same song or same spot between songs) where you left it. If you turn off the car, the Ipod resumes playing in the same spot when you restart the car. I currently have the USA-Spec adapter set to "direct mode" to control the iPod. A limiting factor is that the head unit only counts to 99 songs, then starts over at 1 for each succeeding 100 songs, so to change from, say, song number 105 to song number 310 takes a lot of button pressing. I will have to experiment with playlist mode; it should be more efficient at moving between songs.

Selecting disk 6 in CD mode on the head unit selects the XM. The head unit doesn't control the XM receiver, but the Roady XT is very easy to operate with the remote, and easy to operate from the receiver itself. One complaint I have is that the Roady XT displays only two lines of data instead of three lines of data like some of the other XM receivers. So on the Roady XT you can't set the display to show channel, artist, and song, which is the preferred mode for most people, including me. A second complaint is that the font on the Roady XT is very thin and can't be adjusted, so even when you set the receiver to the maximum contrast setting it is a little hard to read with the thin font. A Roady XT feature I like is being able to input stock symbols and get streaming stock quotes.
 
Last edited:
Update

The Roady XT receiver easily disconnects from the AC vent mount and stores in the rear compartment of the split center console lid, adding a measure of theft protection. For even better theft protection, disconnect the receiver and take it with you.

The Roady XT remote showed up today; it fits perfectly in the small front compartment of the split center console lid. It is a lot more convenient to use than leaning forward each time to change channels. I still need to set the programmable memory channels.

I received notification that the CCU is done (thanks Briank). When it gets back I look forward to completing the project.
 
Last edited:
Update

The climate control unit has returned, in fine working condition, and looking handsomer since Briank was able to replace my grungy knobs with some which are much better. (Thanks again.)

I routed the three XM cables (power, antenna, and output) so as to come up behind the A/C vent, then through and out the front of the A/C vent so as to be somewhat less obtrusive when attaching to the mount. I then reinstalled the climate control unit.

After a few days of listening to the XM, I noticed that the stereo was picking up "alternator whine" from the car's electrical system, so I ordered a "ground loop isolator " (also known as a "noise filter", see attached pic) from Hong Kong through Ebay. It eliminates the "alternator whine" problem common to many XM installations. The specific ground loop isolator you should get is sold by seller "exclusivepart" on Ebay. It has the correct 3.5mm (1/8") cable connectors.
 

Attachments

  • GroundLoopIsolator3.5mm.JPG
    GroundLoopIsolator3.5mm.JPG
    35.3 KB · Views: 111
Last edited:
After using the Ipod in direct mode for awhile, it was just too cumbersome to navigate around what was essentially one huge playlist of all songs on the Ipod. I have placed the iPod in the glovebox, so it isn't practical to control the Ipod directly from the iPod itself. So it was time to try playlist mode. I created five playlists (CD selections 1 thru 5, CD 6 is reserved for XM) on the Ipod using itunes. You must name the playlists in a specific format:

Playlist 1 = HONDA1
Playlist 2 = HONDA2
Playlist 3 = HONDA3
Playlist 4 = HONDA4
Playlist 5 = HONDA5

You must use the word HONDA in all caps followed by the number 1 through 5. You may, however, append a descriptor to the end of the playlist name. Example: HONDA1 - Rock.
You may use any descriptor you choose.

When the CD player is selected on the head unit, you have five playlists to choose from on CD selectors 1 thru 5, plus XM satellite radio on CD 6. After a couple of days of trying it out, playlist mode is definitely the way to go.

The ground loop isolator (noise filter) finally arrived from Hong Kong. I now have everything I need to complete the installation. I should have it buttoned up soon. Will provide pics and summary of project when done.
 
Last edited:
Can you control the iPod via it's own interface, or do you have to use the car's head unit? I like the charging idea but don't want to use the < and > or even playlists to manage nearly 6000 songs.
 
Can you control the iPod via it's own interface, or do you have to use the car's head unit? I like the charging idea but don't want to use the < and > or even playlists to manage nearly 6000 songs.

The following response is derived from the USA-Spec PA11-HON owner's manual. I can personally confirm that the unit works as described below.

Set the USA-Spec PA11-HON to "direct mode" to search and select music directly from the iPod just as you would in portable use - all control functions on the iPod are available to use. You may still use the track up, down, fast forward, and reverse buttons on your radio to control music playback. The music will play back through your car stereo.

The newer USA-Spec PA11-HONs have a "hybrid mode" that combined the best features of direct mode and playlist mode.
 
Last edited:
Done!

The installation is finally done! The sound just absolutely rocks. I placed the ground loop isolator (noise filter) on top of the climate control unit and routed the wire through the AC vent and connected it to the sound output jack of the XM receiver. I was then able to close up the center console and complete the installation. I elected to go with the AC vent mount over another type of mount, as the AC vent mount centers nicely above the console components (stereo and climate control unit). By routing the wires through the back of the AC vent, the mount is somewhat less obtrusive on the dash. The clock is blocked when the XM receiver is installed, but when it is removed (disconnects easily from the mount and stores in the center console lid) the clock is visible again. Everything works well together and I can now remove the CD changer from the trunk entirely. I am using an Ipod mini (4GB of music storage) with a black rubber cover but you can use any iPod that has the same connector. The Ipod holds all the music I could possibly want to carry and when I get bored with that, XM has nearly 200 channels of programming. The sound from the iPod is just outstanding and the XM sounds great also.*

*For anyone contemplating a similar installation, make sure to get a ground loop isolator (noise filter) in addition to the other components. It is a must-have component for this installation.
 

Attachments

  • 1122071040.jpg
    1122071040.jpg
    94.4 KB · Views: 182
  • 1122071042.jpg
    1122071042.jpg
    80.4 KB · Views: 215
  • 1122071040a.jpg
    1122071040a.jpg
    56.9 KB · Views: 189
  • 1122071038.jpg
    1122071038.jpg
    53 KB · Views: 200
Last edited:
Parts List

Here is a list (with links) of every component you need to do the car installation as outlined above. (Home kits and boomboxes are also available for the Roady XT.) Removal of the center console is easy if you familiarize yourself with the steps first and don't attempt to just "figure out" where the screws are. If I can do it, anyone can do it.

USA-Spec PA11-HON
Ipod Mini (or any Ipod with the same dock connector as the connector on third generation Ipods.)
Delphi Roady XT car kit
Delphi Roady XT XM Receiver
Ground Loop Isolator
 

Attachments

  • USA-Spec PA11-HON.jpg
    USA-Spec PA11-HON.jpg
    8.7 KB · Views: 72
  • RoadyXTcarkit.jpg
    RoadyXTcarkit.jpg
    12.2 KB · Views: 82
  • groundloopisolator.JPG
    groundloopisolator.JPG
    51.7 KB · Views: 71
  • DelphiRoadyXT.jpg
    DelphiRoadyXT.jpg
    10.1 KB · Views: 73
  • IPodMiniSilver.jpg
    IPodMiniSilver.jpg
    7.5 KB · Views: 63
Last edited:
Observation

The above installation is really quite versatile. The XM radio in this installation could easily be replaced by just about any sound device. You could connect a cell phone that plays music, for example. Use a cell-phone vent mount to hold your cell phone then, using the headphone jack for output, plug in the 3.5mm (1/8") connector using an adapter similar to the one in the attached pic. That is really all there is to it - just connect your device and you are all set to listen to it through your car stereo by selecting CD 6 on the oem head unit.
 

Attachments

  • cellphoneto3.5mmadapter.JPG
    cellphoneto3.5mmadapter.JPG
    10.1 KB · Views: 88
Installation looks good!

I feel though that for those with huge music collections there are no control methods as elegant as the iPod's built in interface. Even the Harman Kardon Drive+Play w/ LCD screen pales in comparison to the newer iPods w/ coverflow browsing.

For those who don't need or want the playlist controllability of the PA11 and just want to control your iPod directly then get the USA*Spec DF-HON ($30 or less) with an external charging cable ($10-$30). It will sound the same, still have 2 inputs, and won't limit you to iPod only in the future should you, for example, switch to a Zune.

Also if you think the iPod itself will look too obtrusive then you can get a black one.
 
Would I need the ground loop isolator if I was just doing the IPod part of the installation?

Also, I was just going to put the USA Spec adapter and the IPod in the trunk (where the CD Changer currently lives). Any problem with that setup? I'll use the head unit to control the IPod - I don't need direct IPod control.
 
Installation looks good!

Thanks

I feel though that for those with huge music collections there are no control methods as elegant as the iPod's built in interface. Even the Harman Kardon Drive+Play w/ LCD screen pales in comparison to the newer iPods w/ coverflow browsing.

iPods do have good controls - that is part of their allure. This particular installation, however, is for those who want to use their iPod to replace their CD-changer with a tiny device (iPod) which can be made to emulate a HUGE CD-changer.

For those who don't need or want the playlist controllability of the PA11 and just want to control your iPod directly then get the USA*Spec DF-HON ($30 or less) with an external charging cable ($10-$30). It will sound the same, still have 2 inputs, and won't limit you to iPod only in the future should you, for example, switch to a Zune.

The DF-HON is a good unit - it is just a little lacking featurewise compared to the PA11-HON. Being able to place the iPod in the glovebox and controlling it from the head unit is very convenient. The PA11-HON is only for Apple iPod users though - if you are going to use a different brand of music player, or cell phone as a music player (or both) you should get the DF-HON.

Also if you think the iPod itself will look too obtrusive then you can get a black one.

With this installation, it doesn't matter what the iPod looks like, as you place it in the glovebox and forget about it. It is like having a tiny CD-changer in your glovebox that can hold hundreds or thousands of songs.

Would I need the ground loop isolator if I was just doing the IPod part of the installation?

No, the ground loop isolator/noise filter is only necessary for the XM side of the installation.

Also, I was just going to put the USA Spec adapter and the IPod in the trunk (where the CD Changer currently lives). Any problem with that setup? I'll use the head unit to control the IPod - I don't need direct IPod control.

Functionally it will work fine in the trunk, just make sure that you don't have leaking taillight gaskets that allow water in the trunk. But since you will have an additional input available on the PA11-HON, I recommend you locate the iPod in the glovebox and the PA11-HON inside the car (you could mount it underneath the glovebox for easy future access). It won't really be that much more difficult to mount it inside the car than to permanently affix it in the trunk. Then you could connect your cell phone or another device to it instead of satellite radio. It would be fun to play with the second input so make the little bit of extra effort (you have the skills to do this) to allow yourself the possibility. The only thing extra you will have to do is remove the center console piece to gain access to the back of the head unit. This isn't hard to do if you follow the directions. But again, functionally it will work fine in the trunk.
 
Last edited:
Would I need the ground loop isolator if I was just doing the IPod part of the installation?

No, the ground loop isolator/noise filter is only necessary for the XM side of the installation.
Thanks!

The reason I'm opting for a trunk mount is that I am uncomfortable removing the console. And my trunk doesn't leak at all (plus the car is rarely driven in the rain).

Maybe long term I'll mount it in the glove box or change tray (I like the look of that). I'm getting my first IPod in about 2 weeks - buying a used 40GB model from a friend. My car is Black/Black and her IPod is white - so I don't mind stashing it in the trunk.

Thanks again for the responses. :smile:

p.s. BTW - Where ARE the instructions for removing the center console?
 
Use these instructions to remove the center console. They say climate control removal instructions but it is precisely the same path to remove the head unit, as you can readily see in the pictures. After you get the climate control out, remove the four screws holding the oem stereo (it is easy to see these four screws once you get this far), and you're done!

That change tray installation is sharp and clever, but personally, I prefer the glovebox location to the change tray location (to each his own). Storage is at such a premium in the NSX (I drive mine every day now) that I don't want to give up an inch of space on the console surface. I keep my cell phone and other misc junk in there while I am driving.

I have had such fun installing these components that I am already eyeballing one of those cool AM/FM/XM/CD/DVD/NAV/iPod/Bluetooth double-din units. I am trying to figure out how to handle the center console issue - try to find a used oem unit (one set of problems), go with the Science of Speed unit (a different set of problems), or somehow get my hands on one of those carbon fiber units (near impossible to get).
 
Last edited:
That change tray installation is sharp and clever, but personally, I prefer the glovebox location to the change tray location (to each his own). Storage is at such a premium in the NSX (I drive mine every day now) that I don't want to give up an inch of space on the console surface. I keep my cell phone and other misc junk in there while I am driving.
Well, on my '91, there isn't really a "change holder". I was thinking more about the space where the factory car phone (remember those?) controls were. I don't want to give up any "arm rest/console" room either. I can see where some people might like to control the Ipod directly, though.
 
Well, on my '91, there isn't really a "change holder". I was thinking more about the space where the factory car phone (remember those?) controls were. I don't want to give up any "arm rest/console" room either.

Do you still have the cell-phone buttons in that location? I presume the cellular phone itself is long gone. You know you can remove those controls and buy a replacement "change tray" to go in that spot? There is actually a ton of room underneath the console cover in that spot - it would make a great built-in cupholder spot if you were willing to do some modification to the center console cover. To replace the change tray or access the area to create a large cupholder, you need to remove the center console piece.

Then while you are in there, you might as well install the PA11-HON underneath the oem stereo and, since you are already this far, locate the iPod in the glovebox, and....just kidding!

I can see where some people might like to control the Ipod directly, though.

I agree.
 
Thanks for the response. :smile:
Do you still have the cell-phone buttons in that location? I presume the cellular phone itself is long gone. You know you can remove those controls and buy a replacement "change tray" to go in that spot?
The phone is gone but the controls are still there. Long before I heard of the "smartenna" I had a stereo shop whire the center button as an up/down toggle for the antenna. I listen to the radio very rarely in the NSX, so I usually keep the antenna down.

There is actually a ton of room underneath the console cover in that spot - it would make a great built-in cupholder spot if you were willing to do some modification to the center console cover.
Well, I never drink anything in the cabin of the car while i'm driving, so a cupholder isin't necessary for me.

I just wish I had the guts/skill/money to install a whole new console - mines a little beat up.
 
Back
Top