I had been thinking about making my own mesh engine-cover for some time now. Even had bought a second one but just never seemed to get around to it. After seeing a very nice DIY-NXS Type R in the picture-forum last week, I finally decided it was my turn.
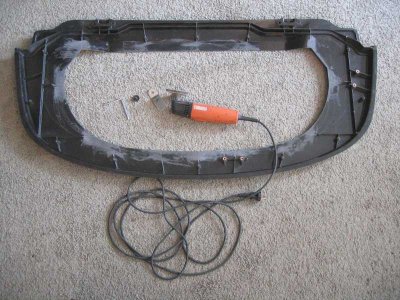
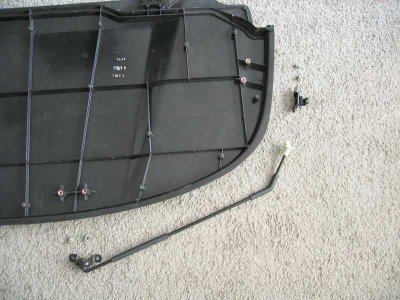
Take the spare cover that I had, the first step was the removal of the strut and its keeper and the sound-proofing of the cover and the rubber molding along the edge. The inner liner is fixed with clamped on metal studs that are easily removed with a flat screwdriver. That took about five minutes.
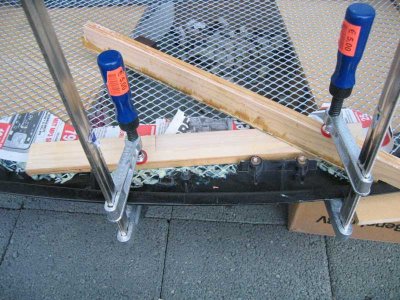
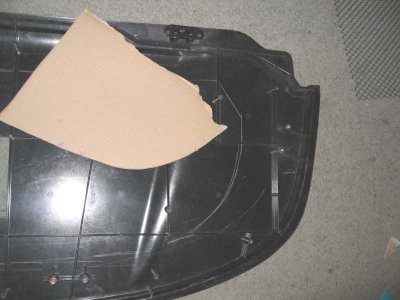
Second step was drawing the size of the window. For this you can use a piece of wood of a length of your choosing. With a sharp nail hammered through, you can scratch a line at a constant distance from the edge. Also, I cut out a piece of carton to make the final arcs and drew the nail along it's edge for the final part. This took me about 1.5 hour.
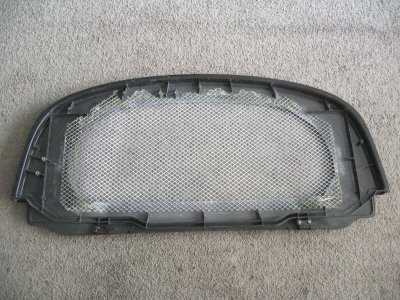
The hole was cut with one of those vibrating saws after which I used the sanding bit to sand all the curves of the hole. By moving the sanding-bit along the edge in a constant motion the curves became nice and smooth. I also cleared an area around the hole of the supporting ribs and then sanded everything flat. This will take you two to three hours easily. Wearing long sleeves might be nice as the plastic can be very irritating to your skin. A dust mask might also be a healthy thing to wear.
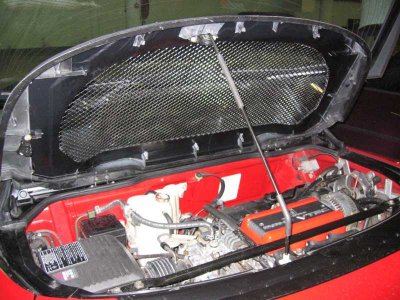
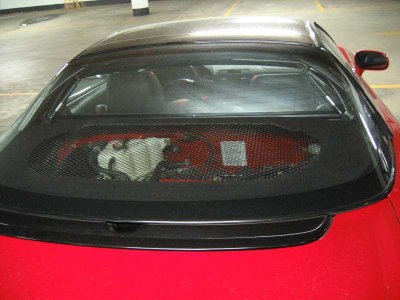
I had already cut the mesh roughly in size with a pair of pliers before and now I cut it to its final dimension. In my case, the mesh was just 40 inches wide which limited the size of the hole. Since the engine-cover is raised in the middle, you have to bend the mesh in order to make it fit. Take your time for this because a good fit is important if you want the result to look right. I used a piece of wood to make the curves but you can use anything with a rounded edge for this.
I chose to glue the mesh to the cover with one of those modern superglues only to find out I didn't have enough clamps. So I ended up with doing first the straigh edges and then the corners. Had some trouble with those bent part of the mesh because it was kind of springy so the glue had to hold it against the tension (that's why you have to bend it carefully or the glue won't hold). Finally however, everything was where I wanted it. To prevent rust I made sure to put a decent primer on the mesh before finally painting it black. After that I had a nice engine-cover with a very ugly looking underside (just look at the picture).
I tried to use the original sound-proofing (as in the FAQ) for the underside but the cuts I made were not very nice to look at. Also, because a lot of the supporting ribs were now gone, there was a gap between the liner and the upper-deck that didn't look right. I bought some adhesive black tape and then covered all the mesh and glue. Spray-painting the cover was the finishing touch. I tested the spray paint on the felt of the cover and found it didn't make it feel different so I painted to whole top and a part of the underside before I run out of paint.
Everything took me a good three days including the waiting for glue or paint to dry but I think the end-result is worth it.
The new engine-cover weighs just 7.9 lbs as opposed to the 13.9 lbs for the original so a weight-saving of 6.0lbs (2.7kg) was achieved.
I noticed several things with the new cover in place.
While driving, the sound-level of the engine not much different.
I also noticed that the hatch will fall in its lock very easy so you will have to be more careful with that now.
The new cover is much more flimsy than the old one so don't be to hard on it. Also, the mesh gets very hot while driving so I would suggest using the rightt glue and paint.
Do do this yourself you don't need much tools. A wrench, a set of screwdrivers, sharp pliers, some kind of saw, sanding paper, glue and clamps and a can of paint and primer.
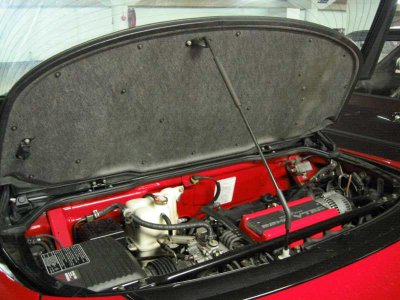
Below I have listed some picture that I took during my little project. I don't know yet if I will keep the mesh cover. I had thought about a lexan window also but decided I can always put that in if I change my mind. For now, I like the new cover.
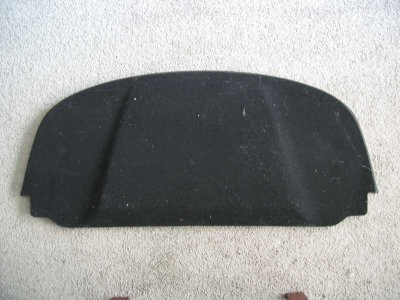
The original cover:
Take the spare cover that I had, the first step was the removal of the strut and its keeper and the sound-proofing of the cover and the rubber molding along the edge. The inner liner is fixed with clamped on metal studs that are easily removed with a flat screwdriver. That took about five minutes.
Second step was drawing the size of the window. For this you can use a piece of wood of a length of your choosing. With a sharp nail hammered through, you can scratch a line at a constant distance from the edge. Also, I cut out a piece of carton to make the final arcs and drew the nail along it's edge for the final part. This took me about 1.5 hour.
The hole was cut with one of those vibrating saws after which I used the sanding bit to sand all the curves of the hole. By moving the sanding-bit along the edge in a constant motion the curves became nice and smooth. I also cleared an area around the hole of the supporting ribs and then sanded everything flat. This will take you two to three hours easily. Wearing long sleeves might be nice as the plastic can be very irritating to your skin. A dust mask might also be a healthy thing to wear.
I had already cut the mesh roughly in size with a pair of pliers before and now I cut it to its final dimension. In my case, the mesh was just 40 inches wide which limited the size of the hole. Since the engine-cover is raised in the middle, you have to bend the mesh in order to make it fit. Take your time for this because a good fit is important if you want the result to look right. I used a piece of wood to make the curves but you can use anything with a rounded edge for this.
I chose to glue the mesh to the cover with one of those modern superglues only to find out I didn't have enough clamps. So I ended up with doing first the straigh edges and then the corners. Had some trouble with those bent part of the mesh because it was kind of springy so the glue had to hold it against the tension (that's why you have to bend it carefully or the glue won't hold). Finally however, everything was where I wanted it. To prevent rust I made sure to put a decent primer on the mesh before finally painting it black. After that I had a nice engine-cover with a very ugly looking underside (just look at the picture).
I tried to use the original sound-proofing (as in the FAQ) for the underside but the cuts I made were not very nice to look at. Also, because a lot of the supporting ribs were now gone, there was a gap between the liner and the upper-deck that didn't look right. I bought some adhesive black tape and then covered all the mesh and glue. Spray-painting the cover was the finishing touch. I tested the spray paint on the felt of the cover and found it didn't make it feel different so I painted to whole top and a part of the underside before I run out of paint.
Everything took me a good three days including the waiting for glue or paint to dry but I think the end-result is worth it.
The new engine-cover weighs just 7.9 lbs as opposed to the 13.9 lbs for the original so a weight-saving of 6.0lbs (2.7kg) was achieved.
I noticed several things with the new cover in place.
While driving, the sound-level of the engine not much different.
I also noticed that the hatch will fall in its lock very easy so you will have to be more careful with that now.
The new cover is much more flimsy than the old one so don't be to hard on it. Also, the mesh gets very hot while driving so I would suggest using the rightt glue and paint.
Do do this yourself you don't need much tools. A wrench, a set of screwdrivers, sharp pliers, some kind of saw, sanding paper, glue and clamps and a can of paint and primer.
Below I have listed some picture that I took during my little project. I don't know yet if I will keep the mesh cover. I had thought about a lexan window also but decided I can always put that in if I change my mind. For now, I like the new cover.
The original cover:
") )
)