

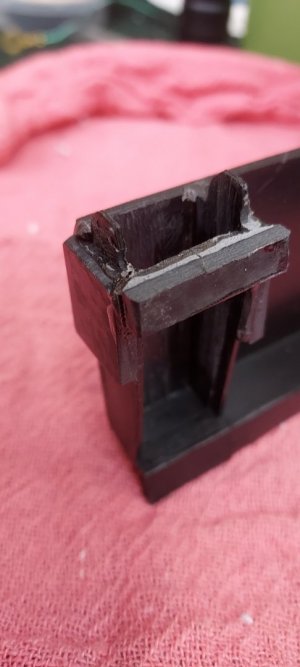
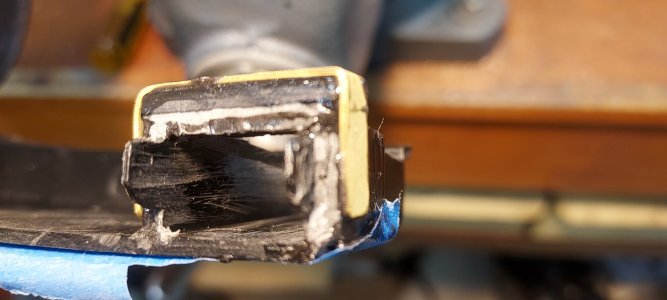
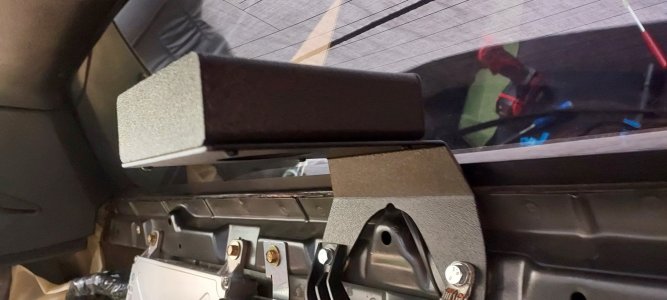
Did some testing to find the best adhesive to use on our broken mostly interior parts. Honda used a very common and easily repaired ABS plastic on the interior parts including elec connectors. Fender liners and the front radiator shield for example are “semi-flexible” plastics and are NOT addressed here. I made up 1/8” thick “tabs”of ABS sheet plastic, glued them with a bunch of glues and pulled them apart in a vise to see which held the best. I tried IPS #16, OATEY ABS pipe cement, J B PLASTIC BONDER(EPOXY), LOCTITE PLASTIC EPOXY, SUPER GLUE, PLASTRUCT PLASTIC WELD 5 minute standard epoxy and ACRA-GLASS. As expected the plastic epoxies held best by far. The common ABS Oatey plastic pipe glue is a decent super fast dry product that will work, but requires very tight joints which makes it second tier. The JB WELD PLASTIC BONDER did best. It’s available in clear(which is grey) or black. I’m thinking any brand epoxy formulated for plastic will be comparable as it will have plastisizers for thermal expansion which is desirable. Run of the mill overnight or 5 minute epoxy will hold the parts just as well for small areas where thermal is not an issue, but now that dedicated plastic epoxies are available everywhere I would not use anything else. In the distant past I would have called the 3M tech line for a recommendation as they are the adhesive experts, but they are zeroed in on products for semi-flexible bumper repair materials as there is little call for an interior ABS repair product, so I did not include them. Plastic epoxy makes stick products are available that theoretically canbe used to create even an entire part, but it does not penetrate into the nooks and crannies so I relogate to special applications only. In general the repair technique itself is to add “back-up” pieces, on both sides if possible. I purchased ABS sheets 1/8”, 3/16”and ¼” thick by 18” square one side smooth, one side textured from TAP plastics in Stockton CA in. I prefer the textured side. Use a very course saw blade in any tool at very slow speed(no wood burners)to cut the back up pieces minimum ¼” larger than the repair area. Trim with a file, 60-80 grit paper or a belt sander. Rough up both surfaces a lot. I use a very small dremal cutter of any type to deeply “v” groove both surfaces which increases contact area and the locking effect. I bead blast the parts only because I have a cabinet in my shop, I do not think it necessary- but a smooth shiny surface will not accept the glue well. Clean with alcohol or acetone. Clamp parts VERY lightly. You can trim excess epoxy about an hour after application. Let dry overnight. A few examples- the front windshield strip –Glue a largish say 3” long strip along the bottom. Let it dry overnight and then V out the top crack as narrow as possible and apply glue to the top surface. You cannot come back and sand this so tape off the area and smooth out the epoxy as best you can using a putty knife wetted with Alcohol. If it looks too bad, you can spot spray can the area with flat model paint. For the 4 center area screws I cut small 1x1” pieces of very thin sticky backed felt from Hobby Lobby, sticking it under a largish washer under the screw heads and between the strip and the body mount. I then only snug the screws to allow for thermal movement. IMO this is key as Honda overtightened the plastic parts. Door panels – Glue a 1/8” “backer piece on the cockpit side, then add small patch pieces to the broken out areas of the original tabs. In addition I purchased ABS washers from McMaster Carr I 1” diameter by 1/8” thick and purchased 1/8” longer screws. I didn’t glue them on, I just used them as additional washers under the screw head. A few of the washers have to be trimmed a little. Regarding stripped screws, I like the method of pushing epoxy down into the hole, then wrapping just one wrap of tefon tape on the screw and screwing it down just short of all the way. I have used a “release” agent such as Acra-Glass release just because I have it handy, but the Teflon alone appears to work well. Attached pic’s show a reinforced lower steer column cover and another showing an added thin brass strip and my most ambitious plastic job filling in the radio hole in the console. I mention this as our center console and door switch panels are chrome plated under the paint and have to be stripped first. While I was able to strip my wifes door handles myself( I hate chrome), after weeks of trying I was not able strip these NSX parts. In the old days I could have had this done locally. I was now only able to find one shop ART BRASS PLATING that would strip them . I did consider buying the carbon aftermarket parts and painting them. While this info is likely old hat to many, perhaps it will instill enough confidence to keep a frustrated newbie from going over to the darkside(P-cars). Happy plastic-smithing!
-
Protip: Profile posts are public! Use Conversations to message other members privately. Everyone can see the content of a profile post.
You are using an out of date browser. It may not display this or other websites correctly.
You should upgrade or use an alternative browser.
You should upgrade or use an alternative browser.
PLASTIC REPAIR
- Thread starter TANTO
- Start date


+1 on the JB plastic weld, which I have now used to repair 40-50 broken tabs. It works really well if you've got the broken pieces to epoxy back together and reinforce. The plastic gets brittle with age and I agree it's easy to overtighten the screws. The challenge I sometimes find is doing a lot of tabs and having the epoxy harden too much so you have to mix up another batch. There's a short window from "just enough viscosity" to "too hard" to mould. Make small batches. I've also taken to reinforcing all of my non-broken tabs (in a way that doesn't interfere with fitment) with the epoxy plastic repair.
If you've got almost nothing left, I've had great success epoxy putty. It's extremely strong after setting and you can paint, sand, and drill it. It also has a much longer window for working and shaping. As mentioned, it's critical to clean and roughen up the surfaces well. Here's a pic of my repaired speaker, which only had 1 complete tab when I took it off I think. Two tabs were broken off on my dash panel that repaired beautifully - don't want to think what replacing that part would have cost.

For the door trim tabs, I'm just in the process of making some 3D printed tabs that drop into recesses in the trim and replace the tabs with much stronger ones. Stay tuned.
If you've got almost nothing left, I've had great success epoxy putty. It's extremely strong after setting and you can paint, sand, and drill it. It also has a much longer window for working and shaping. As mentioned, it's critical to clean and roughen up the surfaces well. Here's a pic of my repaired speaker, which only had 1 complete tab when I took it off I think. Two tabs were broken off on my dash panel that repaired beautifully - don't want to think what replacing that part would have cost.
For the door trim tabs, I'm just in the process of making some 3D printed tabs that drop into recesses in the trim and replace the tabs with much stronger ones. Stay tuned.
Last edited:
Correction here, i purchased hard rubber washers 5/8" OD 3/16" ID by 1/8" McMaster Carr item number 90131A101.In addition I purchased ABS washers from McMaster Carr I 1” diameter by 1/8” thick and purchased 1/8” longer screws. I didn’t glue them on, I just used them as additional washers under the screw head. A few of the washers have to be trimmed a little.
I have a vintage camp that is primarily ABS, and the repair method is straight MEK and raw ABS mixed together into a “slurry” that can bond and even fabricate broken / missing pieces. I’ve seen pictures where broken / missing sections are repaired to almost new.
Lego blocks are made from ABS, and if cut up and mixed can be used to make just about any color.
Another tool I’ve seen is a 3D Pen with abs filament. I haven’t tried to fix a broken panel, but can vouch for it’s utility to create lots of different shapes.
Lego blocks are made from ABS, and if cut up and mixed can be used to make just about any color.
Another tool I’ve seen is a 3D Pen with abs filament. I haven’t tried to fix a broken panel, but can vouch for it’s utility to create lots of different shapes.

For ABS, I also like the solvent weld approach with using some scrap pieces of ABS dissolved in MEK or your preferred solvent for use as filler or external reenforcement if required. As a note, Plastruct Plastic Weld is a solvent cement; but, would not be on the list of my choice of solvents. It is Methyl Chloride and MEK and is meant for architectural & hobby modelers and is extremely thin bodied. It will probably work as a solvent; but, will be a super expensive way to go. A tin of MEK, acetone or toluene ....
I think the reference to JB Weld Plastic Bonder as an epoxy is an error. JB Weld describes it as a two part urethane adhesive. Urethanes are useful adhesives; but, I personally have not had good luck with them on ABS. ABS is a high surface energy plastic and theoretically should bond well with an adhesive (which is different than a solvent cement). I used urethane adhesives for repairs on a number of ABS interior panels on another car. The initial repair went well; but, all the bonds failed systematically after about 18 - 24 months. In all cases it was a nice clean detachment of the urethane from the ABS (which made subsequent repair by the solvent method easier) so I am personally dis inclined to use urethanes on ABS.
By Super Glue I am assuming you mean cyano acrylate (CA) adhesives. I don't know where the Super Glue brand is on the spectrum of CA adhesives; but, CAs require a tight joint for an effective repair. If the joint has missing pieces and needs filler CA is a bad choice. CA also has to be picked for the material. Most over the shelf CAs will not work at all on plastics that require surface activation (PE PP). You can purchase CAs meant explicitly for these plastics, some which come with or require a separate activator to be applied before joining. I have used Loctite 406 which is excellent for repairing torn rubber bits and works well on a lot of nasty plastics; but, it is expensive and has a short shelf life. Again, if the break needs filler / reenforcement CA is definitely not the way to go.
This is very helpful. I've worked with ABS in 3D printing and used a mix of acetone and scrap ABS to form a slurry for joining parts, but had never even thought of using that idea for auto interior parts like this. I need to take one of my door panels off for a Bose amp repair soon and will refer back to this thread if I find myself needing to fix any broken tabs.
The 3 trim separate trim pieces around each door liner are definitely ABS. A ham fisted previous owner had managed to snap at least one tab on four of the trim pieces on my doors. I ordered new pieces; but, rather than chuck the old pieces I did a test repair using solvent cement + ABS slurry filler + an ABS reenforcement piece for the tab. I didn't install the repaired pieces; but, I did give them the tab flex test and it seemed like a durable repair. The repaired pieces are now wrapped up in a box in the garage - waiting for something.
The only thing you may want to experiment with is the cement. I have used acetone and MEK. I find the acetone to be less aggressive / slower than the MEK which can be good and bad. I think there must be different grades of ABS because some ABS is very slow to soften with acetone although acetone worked well on the NSX trim pieces. Some people have used Oatey black ABS plumbing cement and claim good results because it has some gap filling capability. I don't think the Oatey would work well to make an ABS slurry for filling.
The only thing you may want to experiment with is the cement. I have used acetone and MEK. I find the acetone to be less aggressive / slower than the MEK which can be good and bad. I think there must be different grades of ABS because some ABS is very slow to soften with acetone although acetone worked well on the NSX trim pieces. Some people have used Oatey black ABS plumbing cement and claim good results because it has some gap filling capability. I don't think the Oatey would work well to make an ABS slurry for filling.
It looks like @Old Guy has exposed problems with my terminology. This is the "plastic welder epoxy" that I was referring to - "Permatex Black Plastic Welder Epoxy":
 www.canadiantire.ca
I don't know what it's made of or if it is actually epoxy, but it binds to ABS really well and can be built up somewhat if you're missing small chips. The package claims you can then drill and even thread the stuff although I will say that it is so tough that even filing it is difficult. It is notably less brittle than ABS. I've used this on lots of NSX parts and it's seemed to hold well, but I now realize most of it has only been 1-2 years, and @Old Guy 's post has me wondering if it might fail at some point. I have used it on quite a few Jeep parts and I can say I've never seen a failure in least 10 years, although some of those parts were also reinforced with dyneema thread sewn inside the epoxy to provide additional tensile strength. (Order: drill tiny holes for the sewing, epoxy on the joint surfaces to hold parts together, sew reinforcing fibres in tension, add overlying layer of epoxy.) I've never had one of those repairs fail - scads stronger than the original parts.
www.canadiantire.ca
I don't know what it's made of or if it is actually epoxy, but it binds to ABS really well and can be built up somewhat if you're missing small chips. The package claims you can then drill and even thread the stuff although I will say that it is so tough that even filing it is difficult. It is notably less brittle than ABS. I've used this on lots of NSX parts and it's seemed to hold well, but I now realize most of it has only been 1-2 years, and @Old Guy 's post has me wondering if it might fail at some point. I have used it on quite a few Jeep parts and I can say I've never seen a failure in least 10 years, although some of those parts were also reinforced with dyneema thread sewn inside the epoxy to provide additional tensile strength. (Order: drill tiny holes for the sewing, epoxy on the joint surfaces to hold parts together, sew reinforcing fibres in tension, add overlying layer of epoxy.) I've never had one of those repairs fail - scads stronger than the original parts.
BUT, that's only when you can find the remnants of the broken tabs in the bottom of whatever panel you're working on, to put back together again. If you've got nothing but a vague idea of where the tab used to be, this epoxy putty has worked well for me, as shown in the speaker picture above. It seems much easier than mixing up a "slurry". You just mold it into whatever you want like a tab, and let it set. It binds well, and sure seems stronger than the original ABS. After the putty epoxy hardens, it's easy to drill, but filing it down can be a lengthy process because it is so strong. "JB Weld Plastic Weld Repair Epoxy Putty Stick"
www.canadiantire.ca
General PDP Template
www.canadiantire.ca
BUT, that's only when you can find the remnants of the broken tabs in the bottom of whatever panel you're working on, to put back together again. If you've got nothing but a vague idea of where the tab used to be, this epoxy putty has worked well for me, as shown in the speaker picture above. It seems much easier than mixing up a "slurry". You just mold it into whatever you want like a tab, and let it set. It binds well, and sure seems stronger than the original ABS. After the putty epoxy hardens, it's easy to drill, but filing it down can be a lengthy process because it is so strong. "JB Weld Plastic Weld Repair Epoxy Putty Stick"
General PDP Template
www.canadiantire.ca
Last edited:
An injection molded new part is always a great solution. But may not be cost effective for some problems.We literally made reinforced versions that are made much better than whatever 3D printed thing you can make.
Injection molded plastic outweighs 3D printed.
We manufacture and work with plastic molds on a regular basis. Trying to fix and plastic welding is a temporary fix that will still break later on.
Injection molding a brand new piece and changing the structure to use a more durable plastic is the only solution.
20+ years ago I broke the “A” pillar trim on my Legend. I used Super Glue and as the break was so clean and tight, the super glue bonded the 2 pieces so well that I was able to reinstall the trim and couldn’t even see the crack.
This thread is about plastic repair, not new products. While I think your product is excellent, this post does not belong here. I'm moving it to the vendor forums.We literally made reinforced versions that are made much better than whatever 3D printed thing you can make.
Injection molded plastic outweighs 3D printed.
We manufacture and work with plastic molds on a regular basis. Trying to fix and plastic welding is a temporary fix that will still break later on.
Injection molding a brand new piece and changing the structure to use a more durable plastic is the only solution.
Ty. Deleted the thread instead. Not neededThis thread is about plastic repair, not new products. While I think your product is excellent, this post does not belong here. I'm moving it to the vendor forums.
As the OP on this i hear Old Guys bad experience with Epoxies and have sent queries to 3M, Permabond and TAP plastics and will report on their thoughts. I also bought a gallon of MEK to mess with(state of ohio just banned anything with oil in it which includes MEK of course-we can’t even get mineral spirits-argh!). Back in the 90’s I made a dozen or so V1 radar detector rear bulkhead mounts for our forum folks using some ABS sheet and some solvent I can’t remember now(see pic). A solvent WELD would seem to a much better bond than an “adhesive”, thus the Pipe cement may well be the best for close-ish joints as stated. I have had such fantastic history with epoxies(mostly Acra-Glass which is flat amazing) on competition firearms(mostly on unknown plastics or Zytels) that I thought the flexibility of the plastic epoxies would likely be an advantage. But if it delaminates, it’s junk. I did have a case of another non nsx JB fixed car tab that I later removed again and noticed that the JB was soft! Did they have too much plastisizer in their batch? Did they not know what they were doing back then? Or did I not get enough hardener in it? JB is NOT 3M, but I’m not panicking about my extensive use of JB, but I am re-thinking my “recommendation” of it. As an aside, in my earlier post I did not cover what to do if you cannot glue a “backup side piece” to one or both sides. Just did this and took a couple of pics. While I did not use the latest plastic repair “staple” guns on U-tube that look very cool, I did an old school repair that may be of interest specifically for a plastic “tab”. Glue or solvent weld the OE broken tab or a new piece of ABS. After a day of drying(epoxy takes an overnight dry while a solvent weld is good in an hour) cut several deep grooves almost all the way thru across the joint on one side. Cut small pieces of any metal material(or you can buy carbon fiber rods now that i use for prop rods), fill the groove with XXX, drop the tiny bits in the grooves and cover with more XXX. In my case I purchased .047 steel piano wire from the local hardware. I have seen folks on U-tube using bits of stranded wire which doesn’t thrill me but will likely work.
Attachments

- Joined
- 3 May 2020
- Messages
- 148
I just repaired a couple door card inserts utilizing a common plastic welder from Amazon and it worked amazingly well. The part was broken into 2 pcs and after the repair they felt like new with just a few staples. It works quickly too. Had these done within 5 minutes. the kit includes extra plastic to melt...so i could have smoothened out the top of these and even added more plastic but i felt confident enough in the repair to leave it like this.


At this point the interior of my car is held together by hopes, dreams, and solvent cement. It's worked really really well though, especially on the speaker boxes where I used a dremel to fully remove the old tabs that were cracking and replaced them with new ones I made out of 1/8 ABS plastic solvent cemented to the speaker boxes. Same for the door trim tabs, made new tabs out of 1/8" ABS and solvent-cemented them on and they've held up for the past 5 years or so. I need to buy the Mita kit for when they eventually disintegrate though.
For the little door pads that go behind the handle, when I reupholstered them in alcantara, I cut off the "ears" at the back that make it difficult to install and remove. They still stay securely. but are far easier to pop in/out.
For the little door pads that go behind the handle, when I reupholstered them in alcantara, I cut off the "ears" at the back that make it difficult to install and remove. They still stay securely. but are far easier to pop in/out.
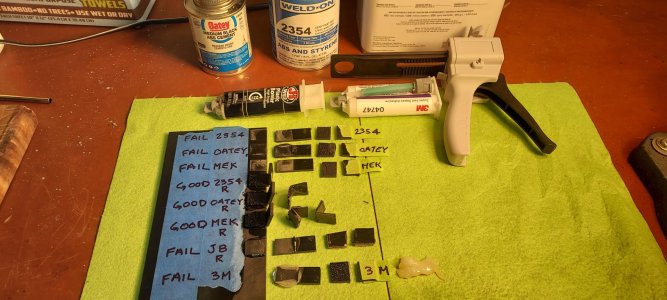
Old Guy reported he has had failures from these urethane based products which had me re-think my epoxy recommendation and thus my bench test #2. While the makers do stand behind these urethane based do-all plastic epoxies they are not ABS specific. Before we had these epoxies the standard was to use a solvent weld product. The standard for decades and the only products that are SPECIFICALLY ABS formulated and proven are IPS WELD-ON 2354(which i used to make my radar boxes) and Oatey ABS pipe cement. Weld-On is a very thin product available thru TAP plastics. If you work super fast you can apply it with a flux brush, but the standard is to use a hypo like needle applicator. OATEY pipe cement from the local big box store is considerably thicker to fill gaps of say 1/32” and it handles dirty joints. Next is the Old Guy recommended MEK which is also thin like the 2354. I did both a “tab” and “butt” test. Since it is said that these solvent weld products do not need surface roughing as they “melt” the parts together that was not my finding as all of them broke very easily when not roughed up. The “melt” thickness is only about 8 thousands or so, not what I would consider a “weld”. Roughing the joint to 60-80 grit is imperative. Oatey did “melt” a bit deeper than the thinner products. All need a back-up to have much strength as nothing did well in the butt tests. Bottom line all three of these products made an EQUALLY good joint and thus are now my revised recommendation for “close-ish” joints. Now what about the possible need for a build-up or filler product? My first thoughts are to make sure you cannot simply use ABS stock and make all the contact surfaces very close and stay with the solvent weld. But if that is not possible I mixed an MEK “slurry” using ABS shavings, JB and the 3m 04747(one minute dry/04748 five minute dry) urethane “tab repair”(their words) product. Both the JB and the 3m failed the tab tests. My impression is that JB is extremely tough and the 3m product was extremely tough and flexible(I beat the hell out of piece of it in the vise and couldn’t break it), but if they don’t’ stick to ABS well they are off the table for this thread. I “cast” the MEK slurry and the Oatey into a couple of tabs and while they took a couple of days to evaporate all those solvents in them, my samples held up to around a 75 degree bend before breaking which is likely pretty good. The Oatey did a little bit better but required many coats to get it built up as no filler material was added. That said I do see a few cases where an epoxy may still be considered, standard or “plastic” version. I recently had my steering column covers off and noticed a couple of the OE molded bosses were slightly stripped and one had split the boss. Since a solvent weld would be too thin for this repair and since only a few drops of material was needed, instead of mixing an MEK slurry I used a drop of JB. In this particular case a delamination would likely not cause a failure. Summary – JB off the table for most repairs. Use a solvent weld product but don’t expect too much as ABS is not a tough plastic to start with. To repeat from my earlier post as an “ex- ham-fisted mechanic” IMO it’s imperative to not torque down on plastic and if a part has broken, after repair consider placing rubber/felt washers from the local hardware under the part and under the screw. Just my opinions. Sorry for the false recommendation and thanks for your comments and experiences to further my education.
Attachments
I'd still recommend you try the epoxy putty I referenced before, pic in post #2. It's easy to mold in 3D like play doh, and gives you much more time to work with, unlike epoxy or a slurry. It binds well to ABS and is very tough.
www.canadiantire.ca
Only -ve is the tan color, and that filing off a little excess later is MUCH harder than regular epoxy, or ABS.
General PDP Template
www.canadiantire.ca
Only -ve is the tan color, and that filing off a little excess later is MUCH harder than regular epoxy, or ABS.
Last edited:
Following up - had to take my door panels off my 1995 to check the stereo tweeter wiring. Both Bose speaker boxes that each had 1 tab remaining out of 5 before, and had new tabs completely molded from the epoxy putty, were still excellent after 3 years. Of the tabs on the interior trim that were repaired with the JB plastic-weld, 1 broken tab out of 14.
Last edited:
Similar threads
- Replies
- 1
- Views
- 436