
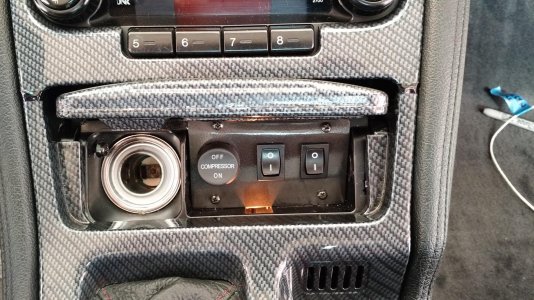
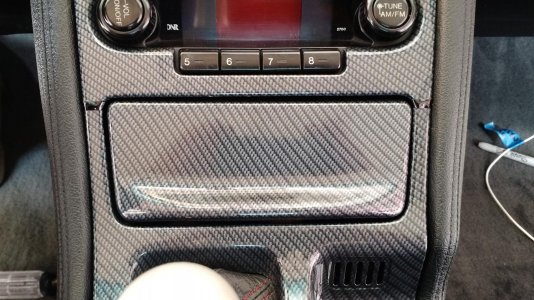
Owners, including me, have asked where to install switches for things like DRL's, OEM Antenna Control, Lift Systems, etc. The options are limited to installing the oem switch plate in the center console coin tray, deleting the ashtray and replacing it with a flat panel or drilling holes in the console, which in my mind is a big no no. I just installed all the above systems which required 3 switches. I had debated installing the oem switch plate, but my problem was that I didn't want to lose the coin tray since it serves as a perfect resting spot for the Willman's radio remote. After a lot of brainstorming while trying to go to sleep I came up with the idea of using the ashtray area for the switches. The lighter still functions, but the ashtray guts in my car had already been removed to store the USB cable for the radio. So here is a DYI switch plate that can hold 3-4 mini rocker switches that are invisible with the ashtray door shut.
Materials & Tools:
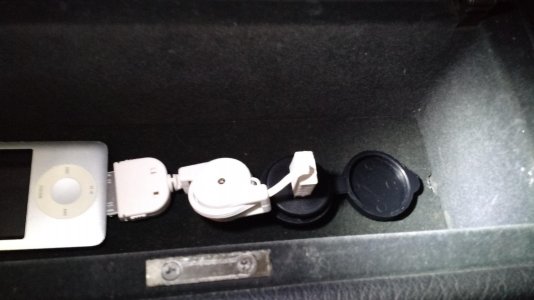
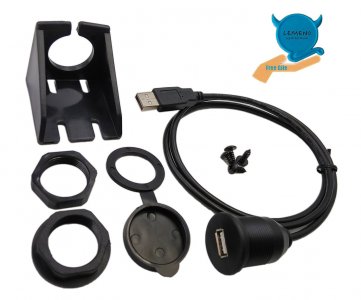
If you have a Willman's radio you might have the USB cable located in the ash tray so you'll need to relocate it. I relocated mine to the center console glove box using a flush mount USB connector & cable from Amazon.


Materials & Tools:
- Styrene Plastic Sheet - Available at most hobby shops and Amazon. An alternative is the black flat plastic mud flaps available at most auto parts stores, although it's not as stiff as the sheet.
- 1/2"x1/2" 16g Aluminum Angle - HD or Lowe's
- #4 x 1/2 SS Sheet Metal Screws - HD or Lowe's
- 16g Wire - Multiple Colors - Auto Parts, HS, Lowe's
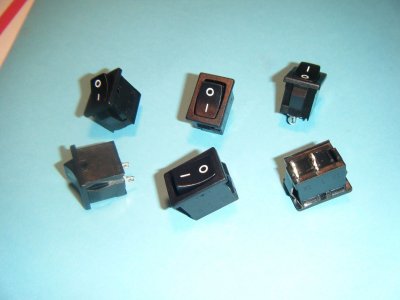
- Mini Rocker Switches (3/4"x1/2" holes) - Ebay or Amazon - I purchased 6 for $6 on ebay. I also purchased a Compressor On/Off switch from Amazon
-
- Machinist's 6" Ruler
- Dremel with Multi-Purpose Cutting Bit & Steel Carving Bit
- Soldering Pencil & Rosen Core Electrical Solder
- Razor Knife
- Heat Gun
- 1000 grit sandpaper
- Drill and bits for pilot holes and sheet metal screws.
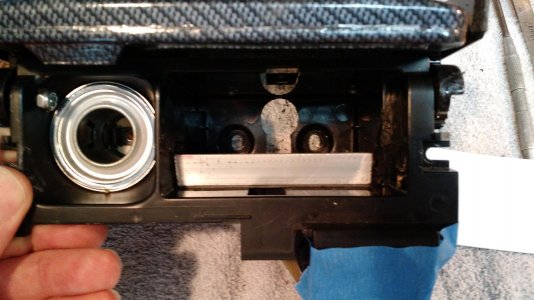
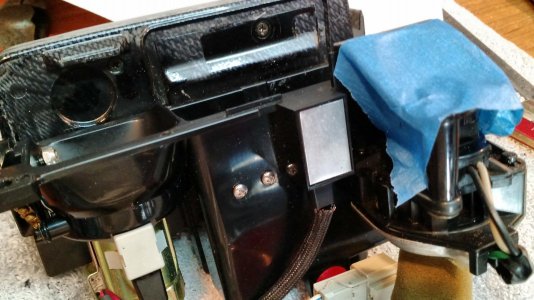
- Follow the service manual to remove the center console and ashtray/cigarette lighter housing, and remove the ashtray from the housing.
- Cut a hole in the back of the ashtray housing to allow passage of the wires. You can use a large drill bit or the Dremel with the Multi-Purpose Cutting bit. The hole in mine was pre-cut to allow passing through the USB plug & cable.
- With the Dremel and the Steel Carving Bit remove the ridges on the inside walls of the housing that were used to slide the tray in an out on. File them down so the wall is smooth. You don't need to remove them 100% but you do need to go back far enough so the switch plate can be installed at an angle to clear the ashtray light, make room for the aluminum support, and to make room for the switches.
- Measure from side to side the inside of the tray's housing and then cut a piece of angle aluminum to match.
- Install the aluminum in the base of the the trays interior just in back of the ashtray light opening. The light will provide illumination for the switch plate. Fasten with two sheet metal screws from the bottom. I used double sided automotive tape to hold in in place while marking the holes. Remove the tape before fastening. The photo shows tray with the hole, excess ridges filed down, the aluminum installed with the two screws.
-
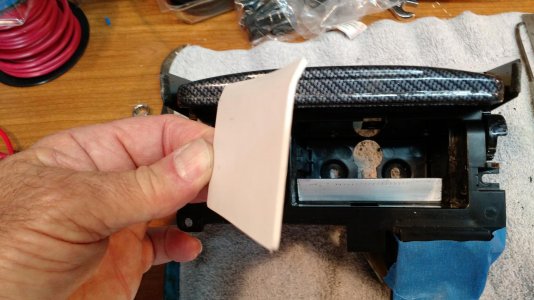
- Now measure the rectangular inside opening width, then measure from the base of the aluminum to top of the opening and include flat section that runs across the top. Your switch plate is going to mount to that aluminum and and to the top edge so it will be sitting at vertical angle compared to sloped angle the ashtray sits at.
- Mark the dimensions on the plastic sheet. Use a square to make sure your lines are square.
- Cut the sheet using the razor knife with a fresh blade. Several passes will be enough to cut through it or score it so it can be snapped.
- Sand smooth any rough edges.
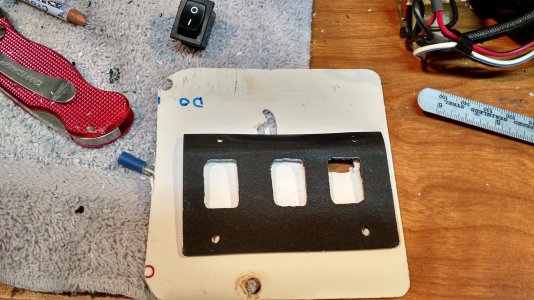
- This next step requires careful measuring for switch placement. The Aluminum is 1/2" so your switches need to clear it. What I did was mark a line at 1/2" from the bottom of the plate, then I measured the flat area at the top of the tray where the top of the plate is going to mount to and marked a line at the top of the plate. I then divided the section in the middle where the switches will go and drew a third line. This third line will be the center line for the switches. Next approximate how you want your switches spaced and then draw the 3/4" high by 1/2" wide openings for each switch.
- This step is for bending the plastic so the top of the plate mates properly with the top flat section of the tray. Place the top section of the plate into a vice so that the line that you previously marked is parallel to the vices jaw. With a heat gun warm the plastic so it's pliable and bend the the plate to and approximate angle that matches the angle needed. Do a test fit and re-bend if necessary. See the next photo.
- Now cut open the switch holes using either the razor knife or the Dremel with the Multi-Purpose Bit. The bit will want to drift so be careful and take your time. I found it easier to install the bit into a drill press and the guided the plastic sheet by hand.
- Once you have the holes cut do a test fit with the switches. It will probably requires some trimming to get the fit right.
- Place the plate into the tray opening and do any final trimming or bending that may be needed. Then drill four holes (one at each corner) for the mounting screws. Make sure you do not drill oversized holes into the aluminum or plastic!
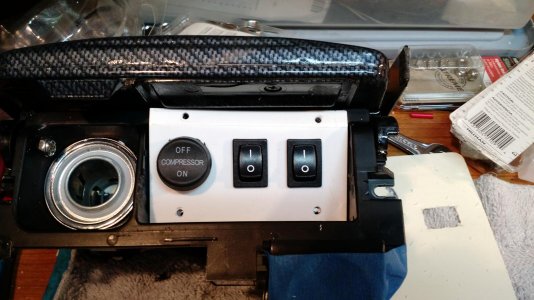
- Remove the switches and paint the plate. I used a grey/black Rustoleum Hammered spray paint.
- The switches are too small for spade terminals so a 4"-5" length of wire will have to be soldered to each leg. At the end of each leg you can install insulated spade terminals or you can make one connection by purchasing a mult-plug electrical connector for a really clean install.
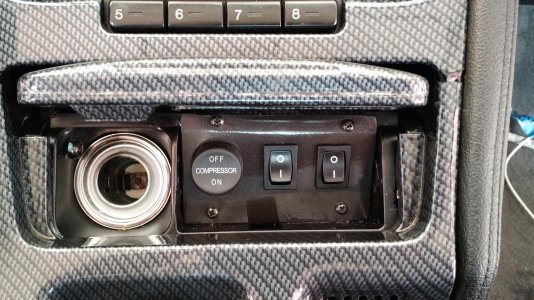
- Install the switches in the plate.
- Re-install the ashtray housing.
- Make your wire connections to the wires from the whatever it is you're controlling and that you brought up into the center console.
- Install the switch plate and center console.
-
If you have a Willman's radio you might have the USB cable located in the ash tray so you'll need to relocate it. I relocated mine to the center console glove box using a flush mount USB connector & cable from Amazon.
Attachments
-
 IMG_20160905_171532298.jpg151.9 KB · Views: 334
 -
 IMG_20160905_171540542.jpg163.2 KB · Views: 313
 -
 IMG_20160905_183918958.jpg171.8 KB · Views: 314
 -
 IMG_20160905_190530499_HDR.jpg230.9 KB · Views: 315
 -
 IMG_20160910_173318044.jpg280.1 KB · Views: 318
 -
 IMG_20160910_173341837.jpg242.2 KB · Views: 315
 -
 IMG_20160910_173326822.jpg249.1 KB · Views: 318
 -
 IMG_20160910_175015941.jpg103 KB · Views: 316
 -
 s-l1600.jpg150 KB · Views: 339
 -
 81dqr+VW7FL._SL1500_.jpg140.8 KB · Views: 313
 -
 IMG_20160905_173255509.jpg168.3 KB · Views: 300
Last edited: