-
Protip: Profile posts are public! Use Conversations to message other members privately. Everyone can see the content of a profile post.
You are using an out of date browser. It may not display this or other websites correctly.
You should upgrade or use an alternative browser.
You should upgrade or use an alternative browser.
Down Under Trackday NSX
- Thread starter f1racr
- Start date

Yeah, I saw that video.............. my hands and toes aren't fast enough so for competition I'll be using a friends qualified hands and toes !! 
Last edited:
Well once again it's been a long time between updates............. stuff has been happening, but nothing that was really worthy of any update.
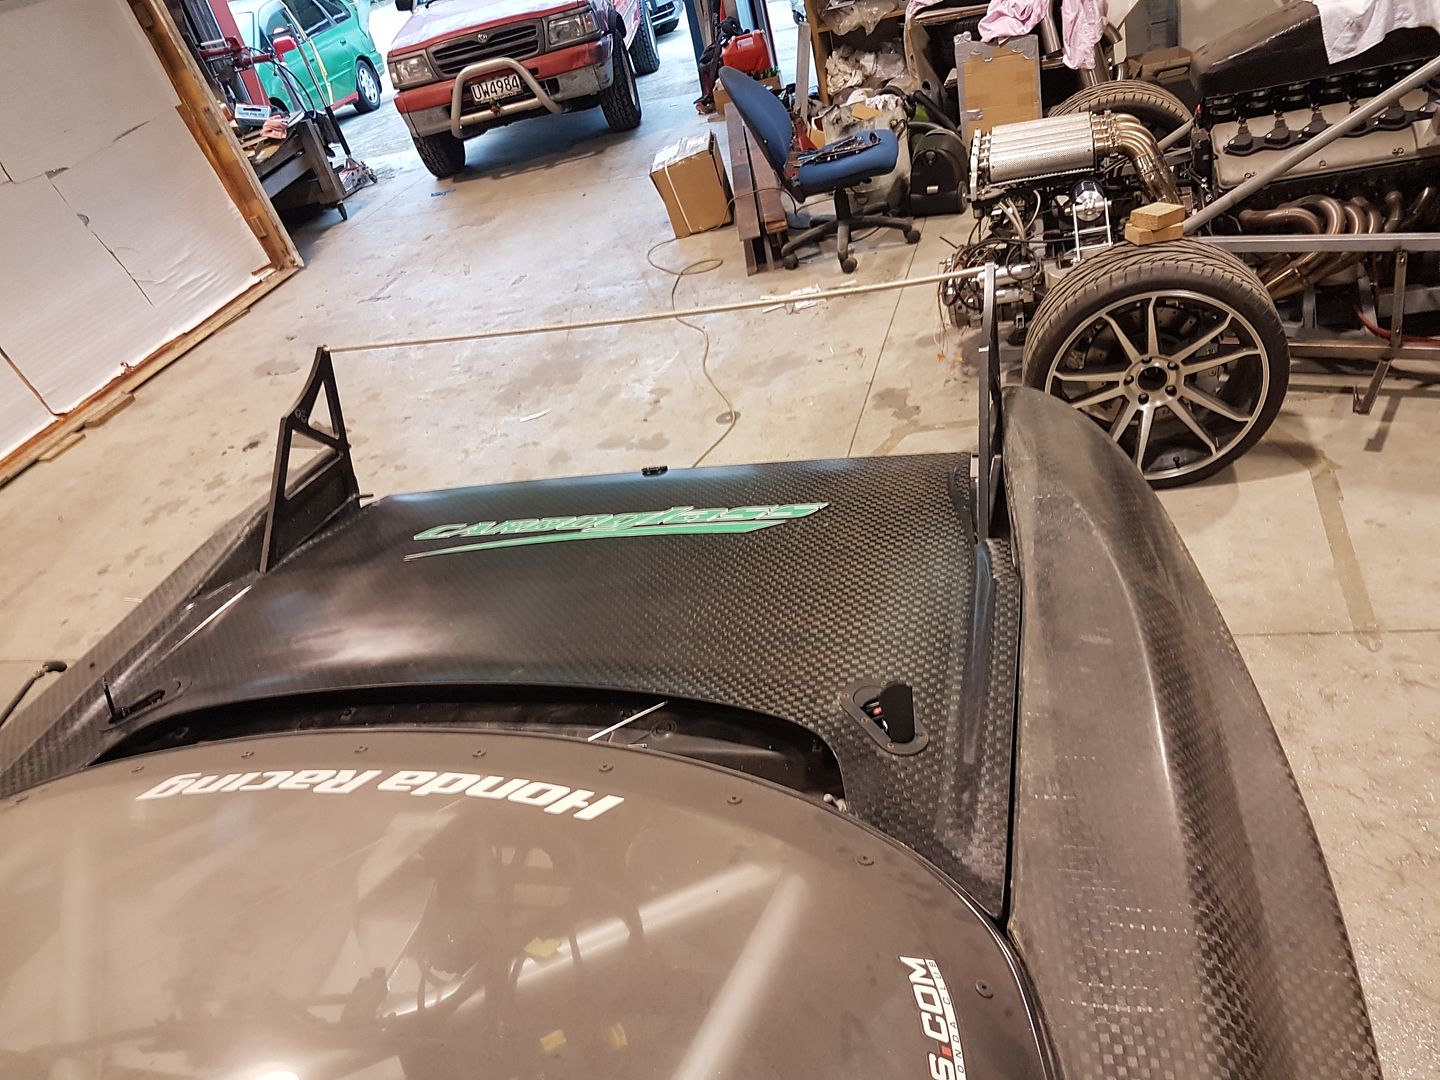
The long term plan is coming together and I have taken delivery of the new engines that will replace the current C30 in the car..... ! So that's awesome and yesterday was the last day out for the car in a while since winter is upon us. The plan is to make new molds for the front guards and bonnet and get the last of the carbon body parts made. We may even start on carbon doors which we need to do but not sure if we have time over this winter.
The big change will be the fitting of the new engine, turbo's and associated stuff like intercoolers etc. and I suspect that will take all of our time considering we're pushing along with our FZ12 Supercar project too and I want to put as much focus on that as I can so that will take away from the Racecar unfortunately, but we'll do our best.
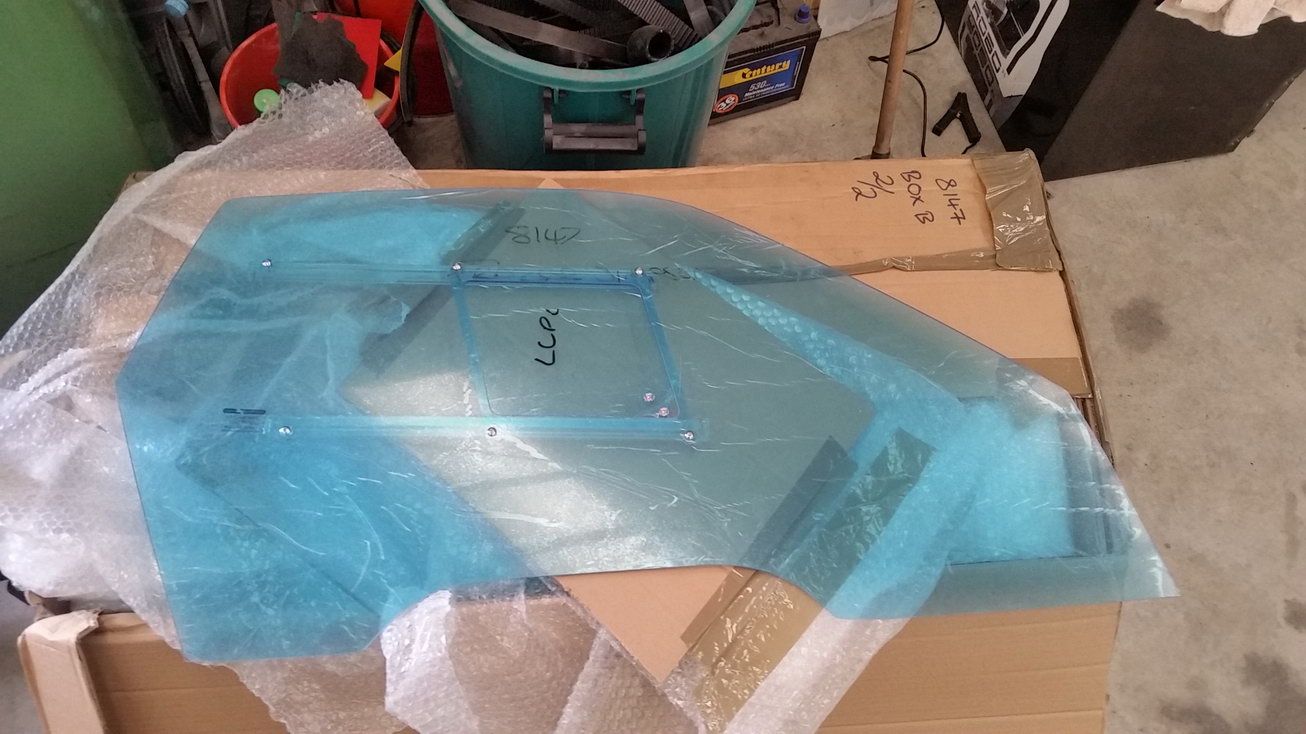
Some new parts arrived a few days ago with are from the UK (Plastics 4 Performance) which are formed polycarbonate windows and rear hatches which would be great on the weight saving front. I made my own rear hatch initially, but had to use thicker polycarbonate than was ideal since it wasn't heat formed so now we can get away with thinner / lighter material which is always nice !
We've also got two types of windows, one with hatches and ones without so we'll see which suits our needs best.


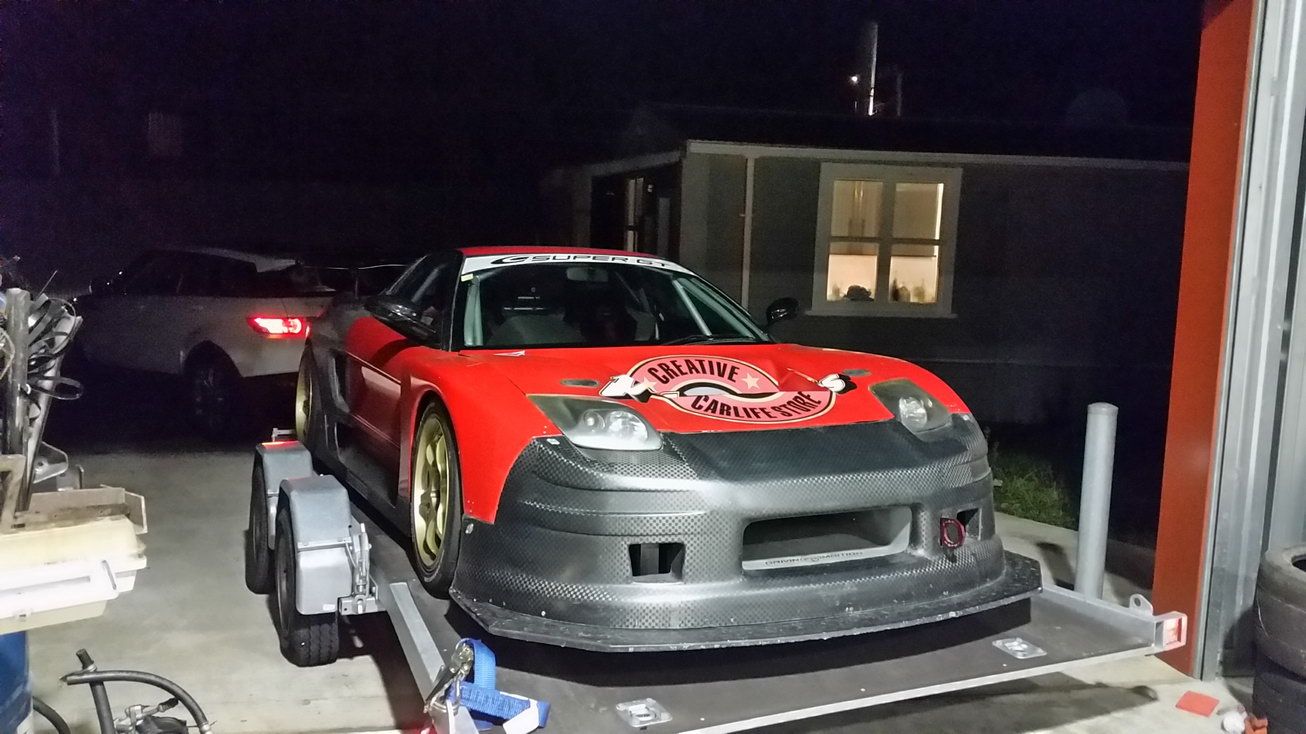
So took the car out for it's last run of the year and the day was awesome......... considering the time of year I expected to run into rain, but was welcomed with this......

Had a great day and improved my personal best time and went faster than my pro driver friend again (based on weight.......... he's 50KG lighter than me)..... so I was happy....... it put me in a good space to feel happy about putting the old girl into hibernation for the winter !!
Next time you see her, she should be considerably lighter and faster as the new engines are 30KG+ lighter than the current ones and we are obviously going to lose weight with the new carbon parts etc. ............ WOOHOO
The long term plan is coming together and I have taken delivery of the new engines that will replace the current C30 in the car..... ! So that's awesome and yesterday was the last day out for the car in a while since winter is upon us. The plan is to make new molds for the front guards and bonnet and get the last of the carbon body parts made. We may even start on carbon doors which we need to do but not sure if we have time over this winter.
The big change will be the fitting of the new engine, turbo's and associated stuff like intercoolers etc. and I suspect that will take all of our time considering we're pushing along with our FZ12 Supercar project too and I want to put as much focus on that as I can so that will take away from the Racecar unfortunately, but we'll do our best.
Some new parts arrived a few days ago with are from the UK (Plastics 4 Performance) which are formed polycarbonate windows and rear hatches which would be great on the weight saving front. I made my own rear hatch initially, but had to use thicker polycarbonate than was ideal since it wasn't heat formed so now we can get away with thinner / lighter material which is always nice !
We've also got two types of windows, one with hatches and ones without so we'll see which suits our needs best.


So took the car out for it's last run of the year and the day was awesome......... considering the time of year I expected to run into rain, but was welcomed with this......

Had a great day and improved my personal best time and went faster than my pro driver friend again (based on weight.......... he's 50KG lighter than me)..... so I was happy....... it put me in a good space to feel happy about putting the old girl into hibernation for the winter !!

Next time you see her, she should be considerably lighter and faster as the new engines are 30KG+ lighter than the current ones and we are obviously going to lose weight with the new carbon parts etc. ............ WOOHOO
And I foolishly thought I could catch up.... mate cant wait to see the new build progress until we meet on track again that is...
The hatch does look good
The hatch does look good
Any new updates? One of my favorite projects on Prime.
OMG....... I can't believe it's been 3 years since I last posted here !!
Unfortunately I've had a couple of deaths in my family and so that really makes you reset what is important in life and up until fairly recently I haven't even been near my workshop.
When I did get down to the workshop I was focusing on our scratch built road car project (FZ12) https://www.drivelife.co.nz/2017/02/project-fz12-frasers-zacs-hand-built-supercar-part-1-the-plan/
But Zac and I have really started to miss getting out there and so decided to put some real effort into getting all of the carbon bodywork finished so the whole car is done and then re-painted so we can get out and do some more events.........
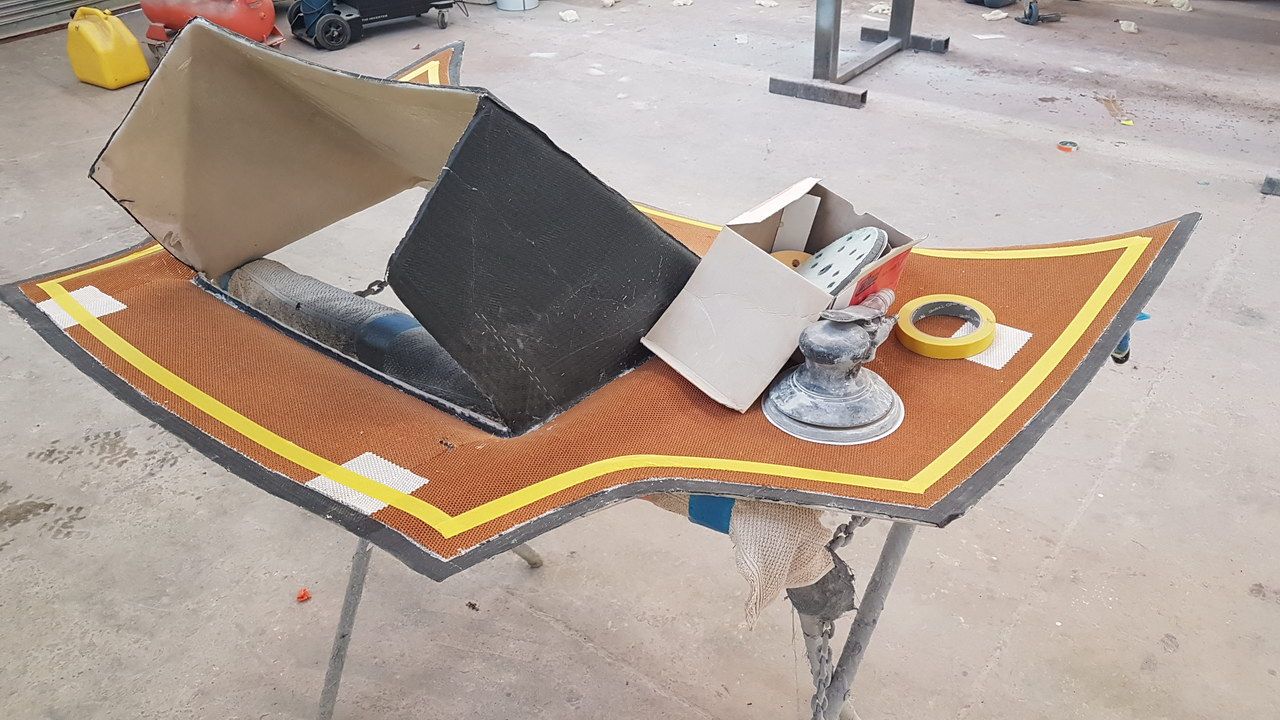
I've taken a fair few photos, cos everyone likes pics, of the whole process to give people an idea of what's involved to get the final product........ if you've got any questions, just ask ! New front guards are next, then doors.
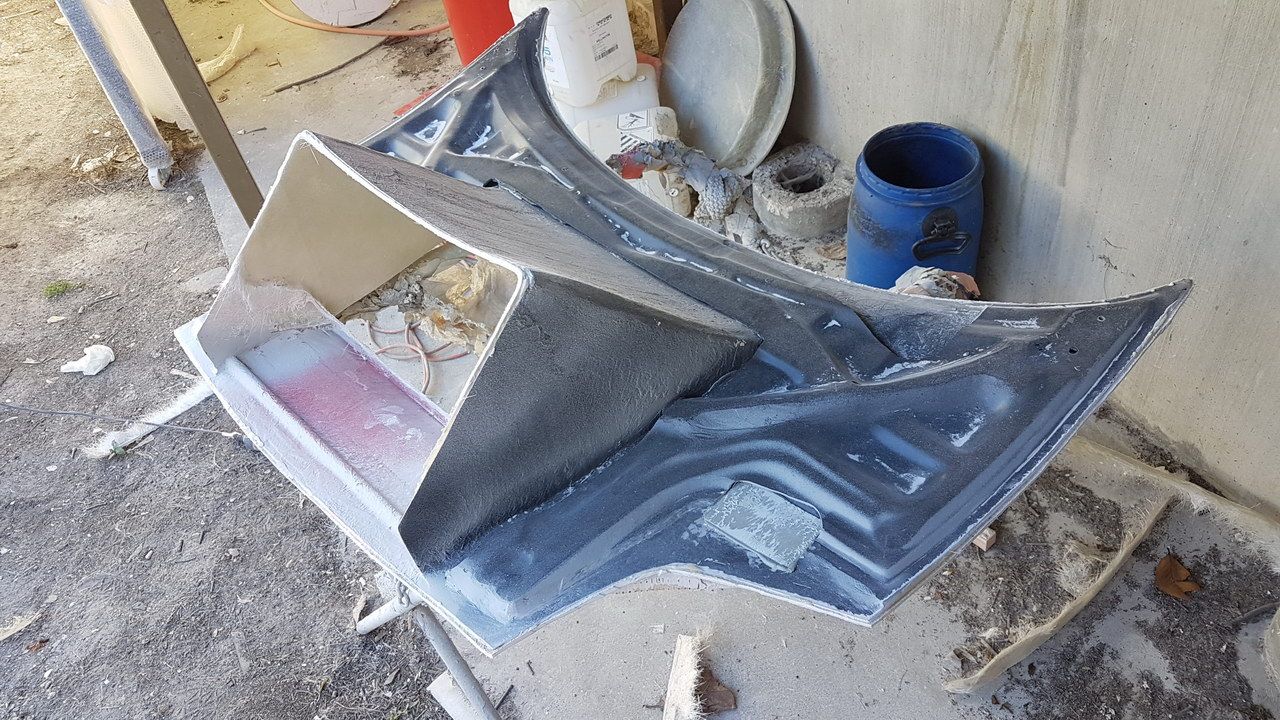
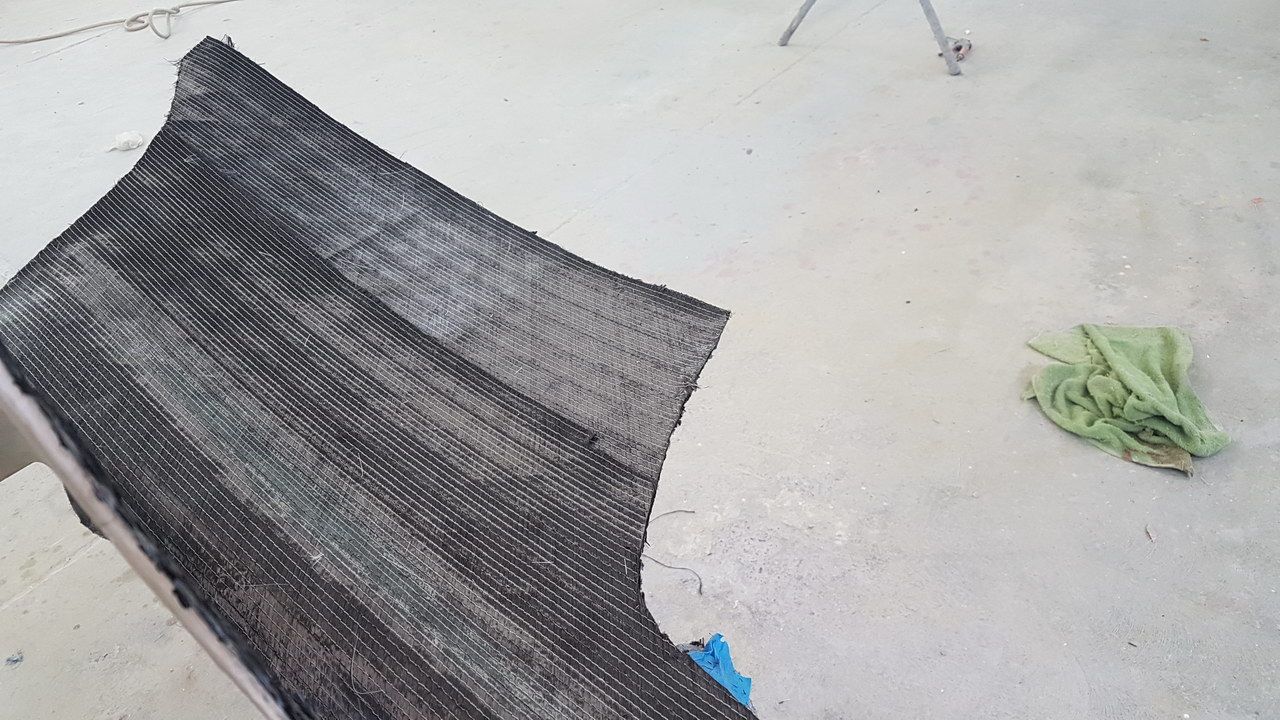
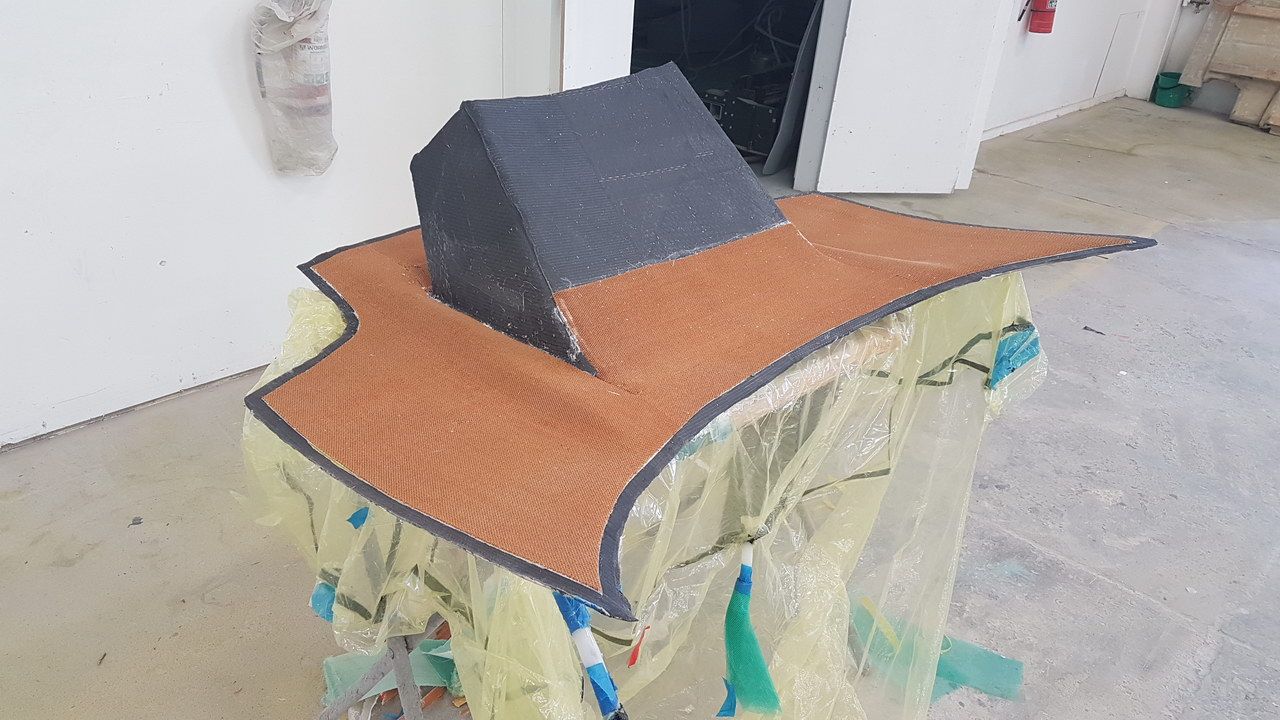
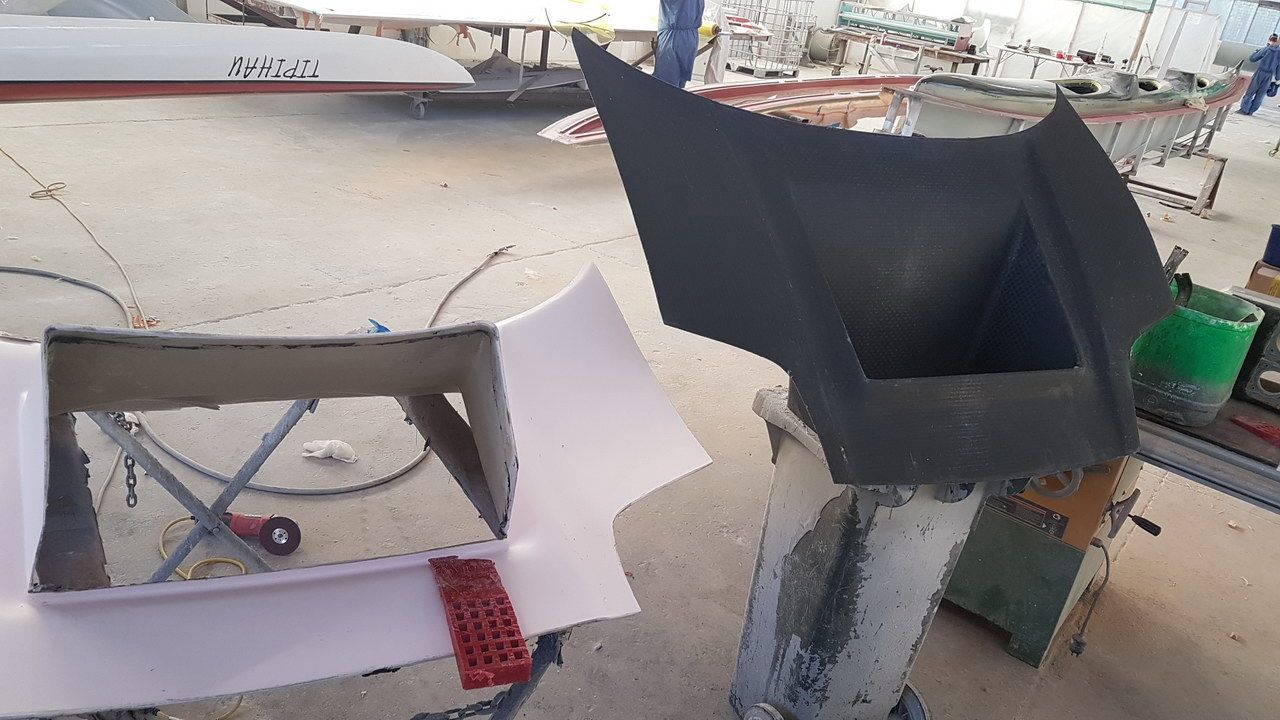
This is the original hood that was used to make a mold for our final carbon part. It's not done at a normal manufacturing level since we're only expecting to produce 2 or 3 of these.
This was the mold once the original part was removed.
Laying up the first layer of carbon once the mold had been prepped with release agent and wax etc.
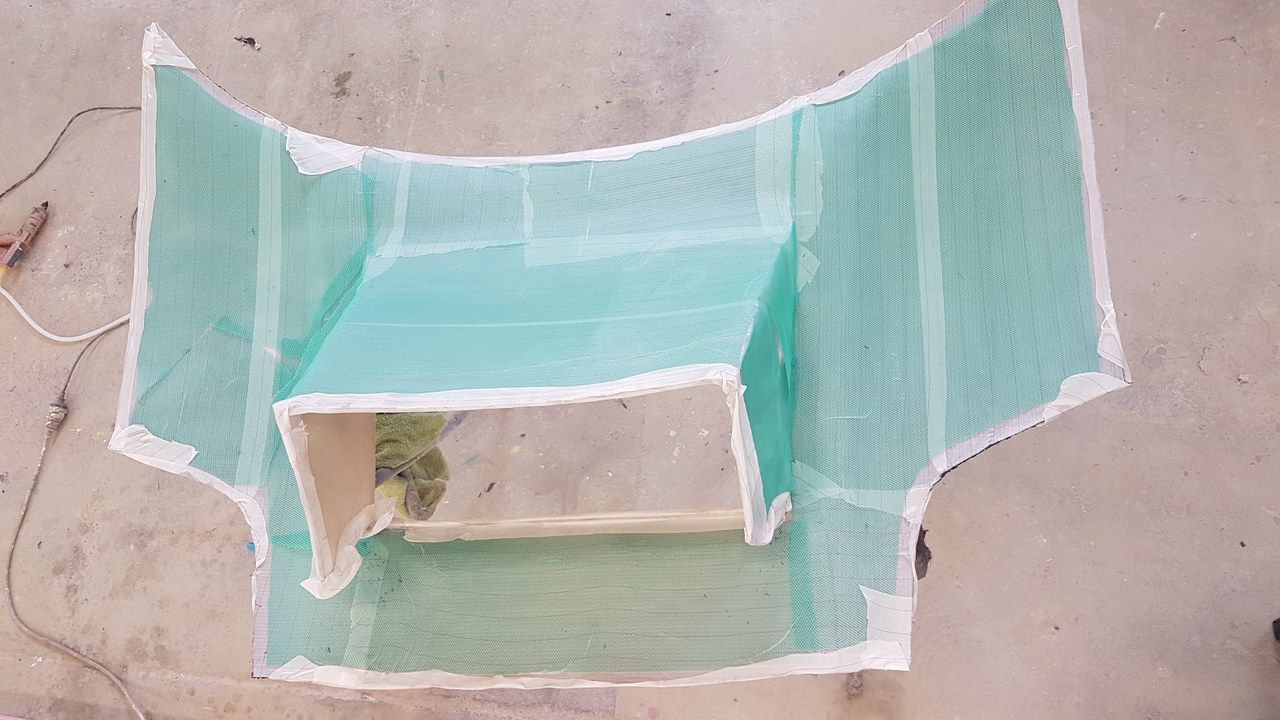
Next is some mesh and flow tubing to allow the resin to flow well through the part.
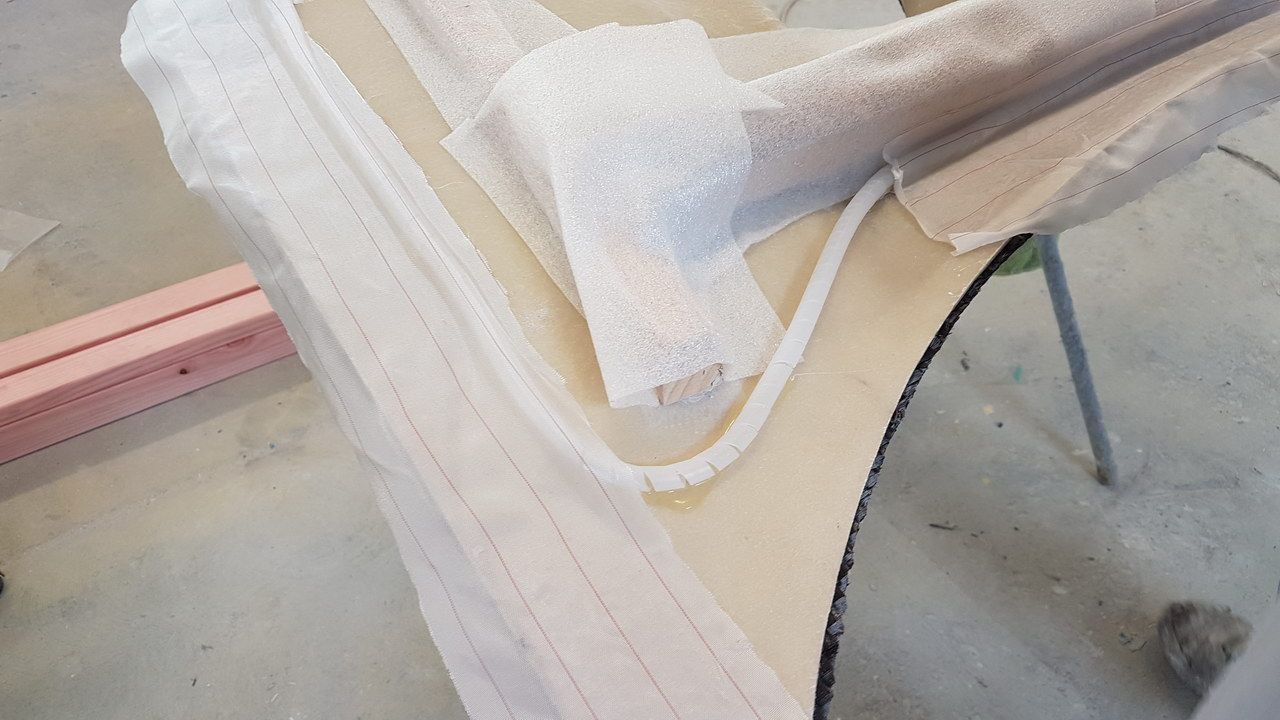
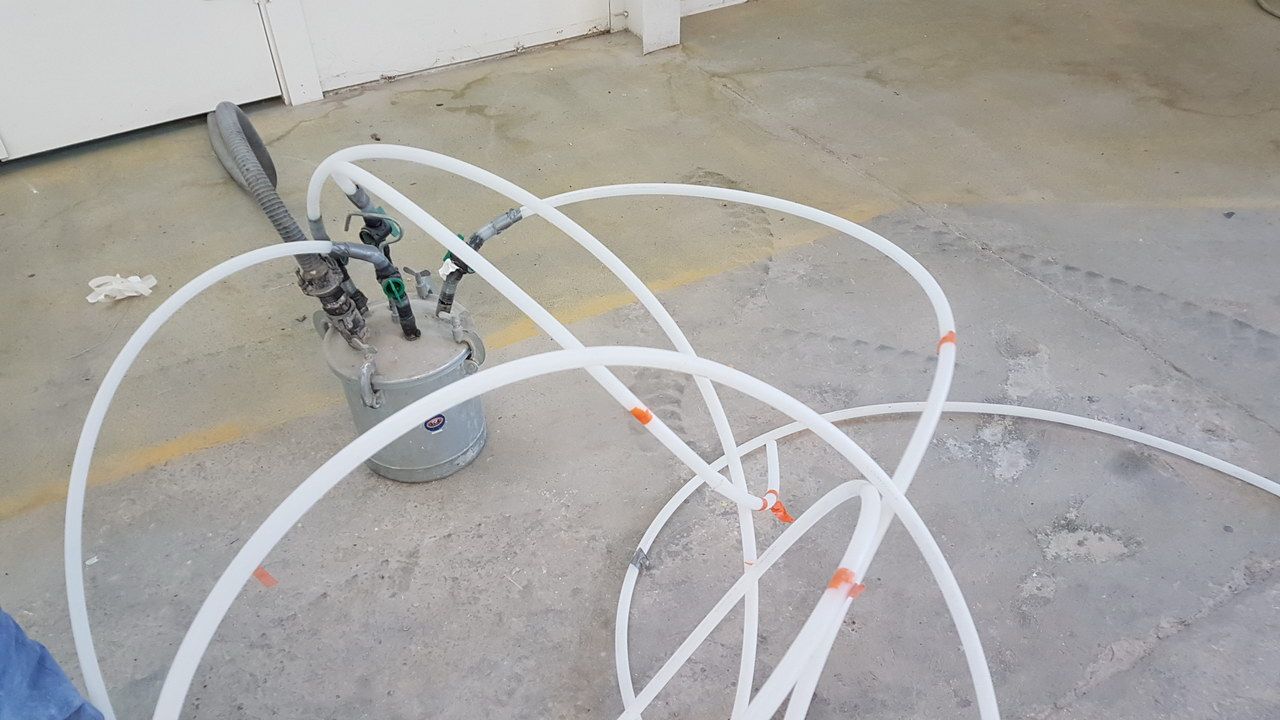
This pot is connected to the vacuum pump so it allows us to have multiple vacuum ports on the bag.
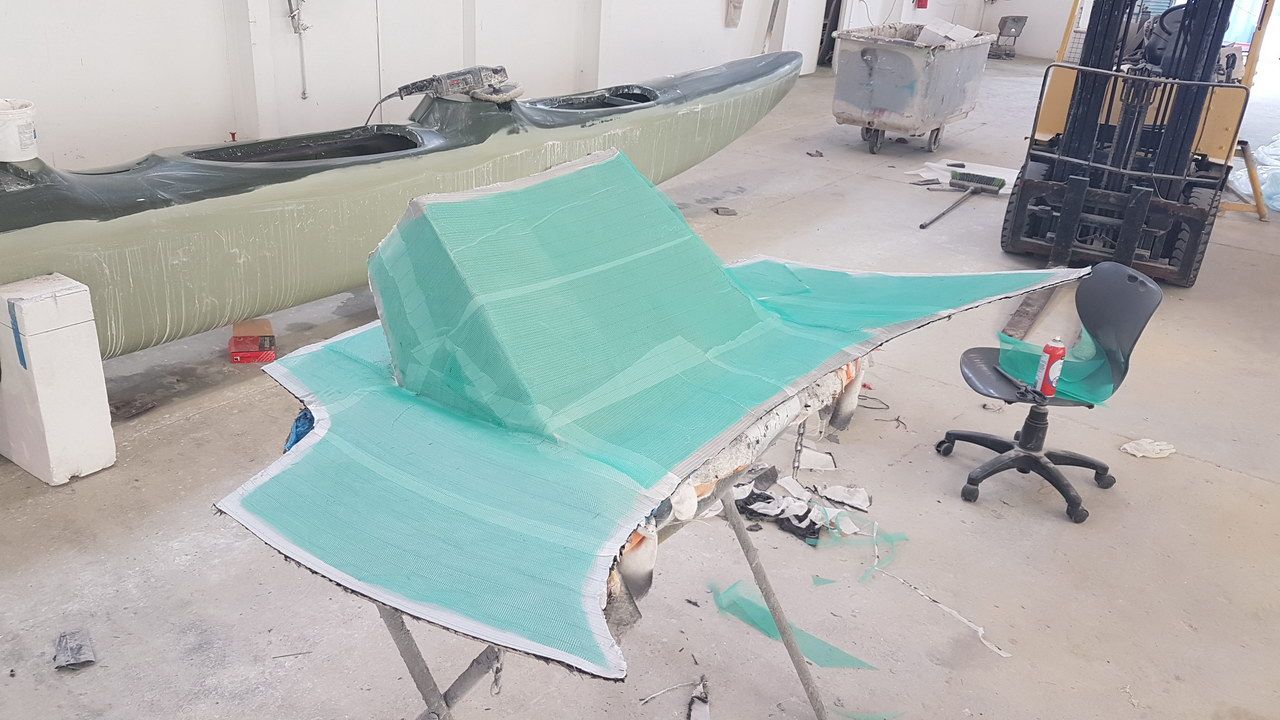
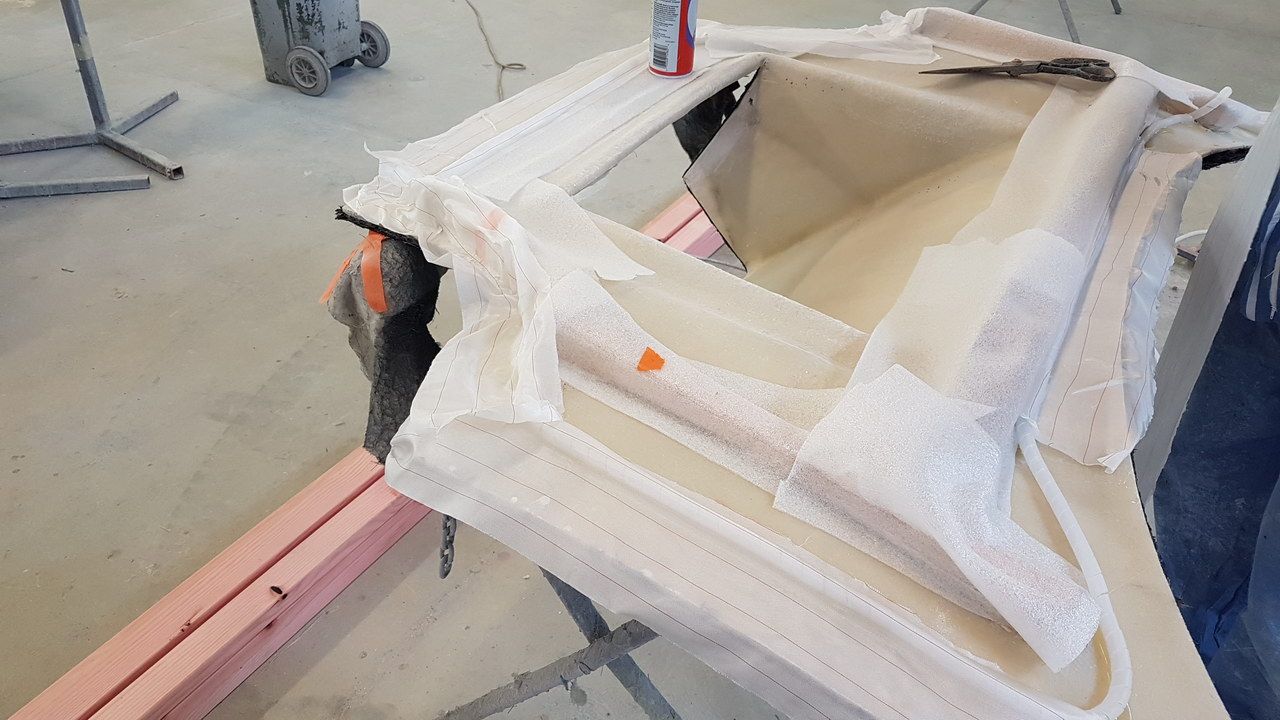
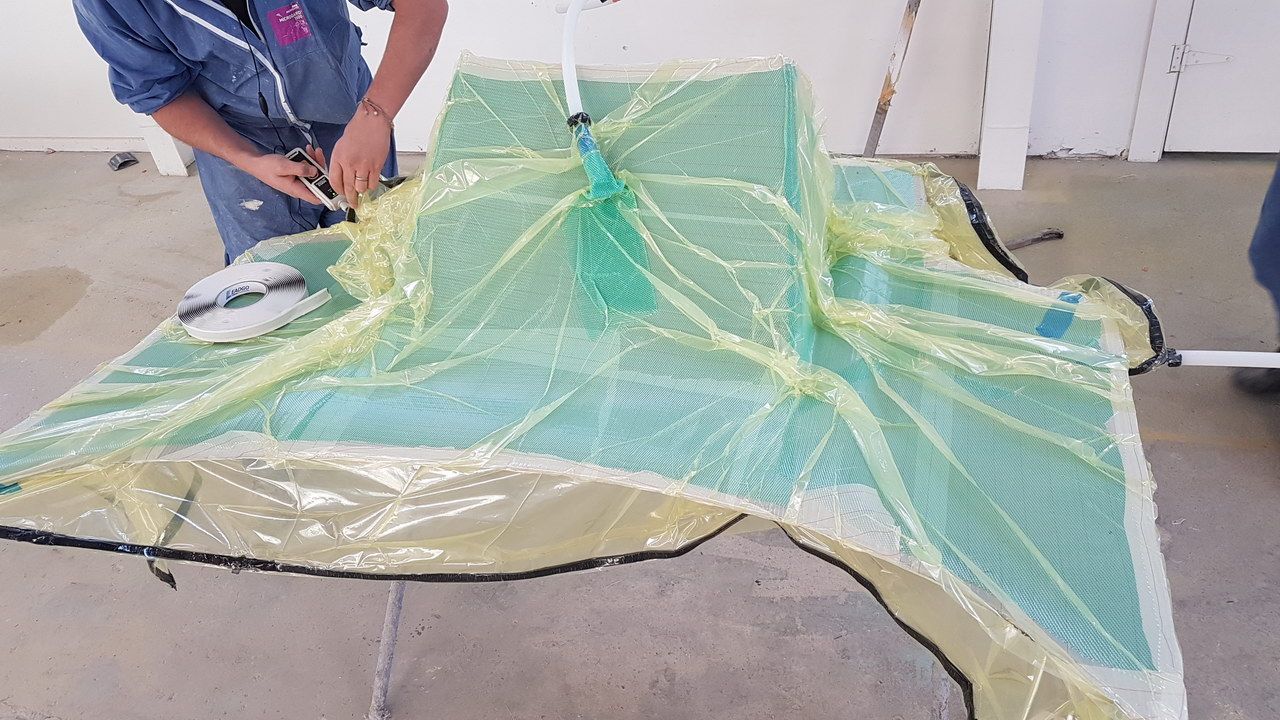
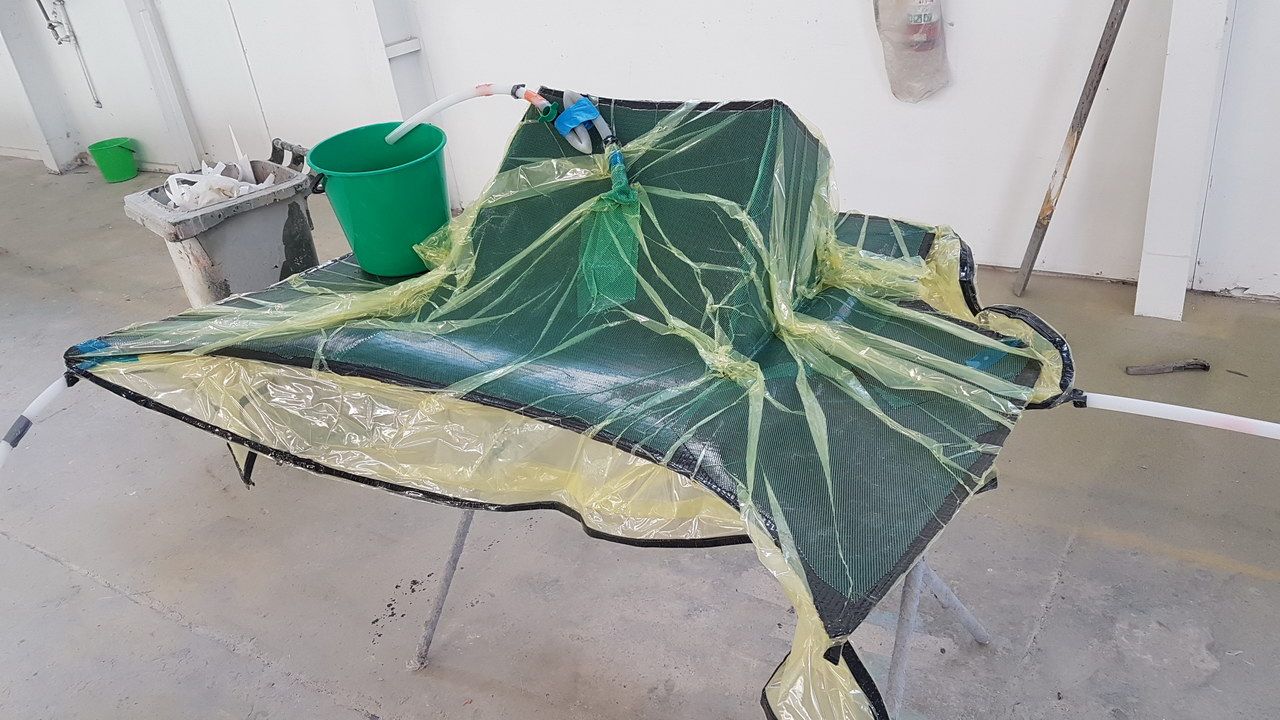
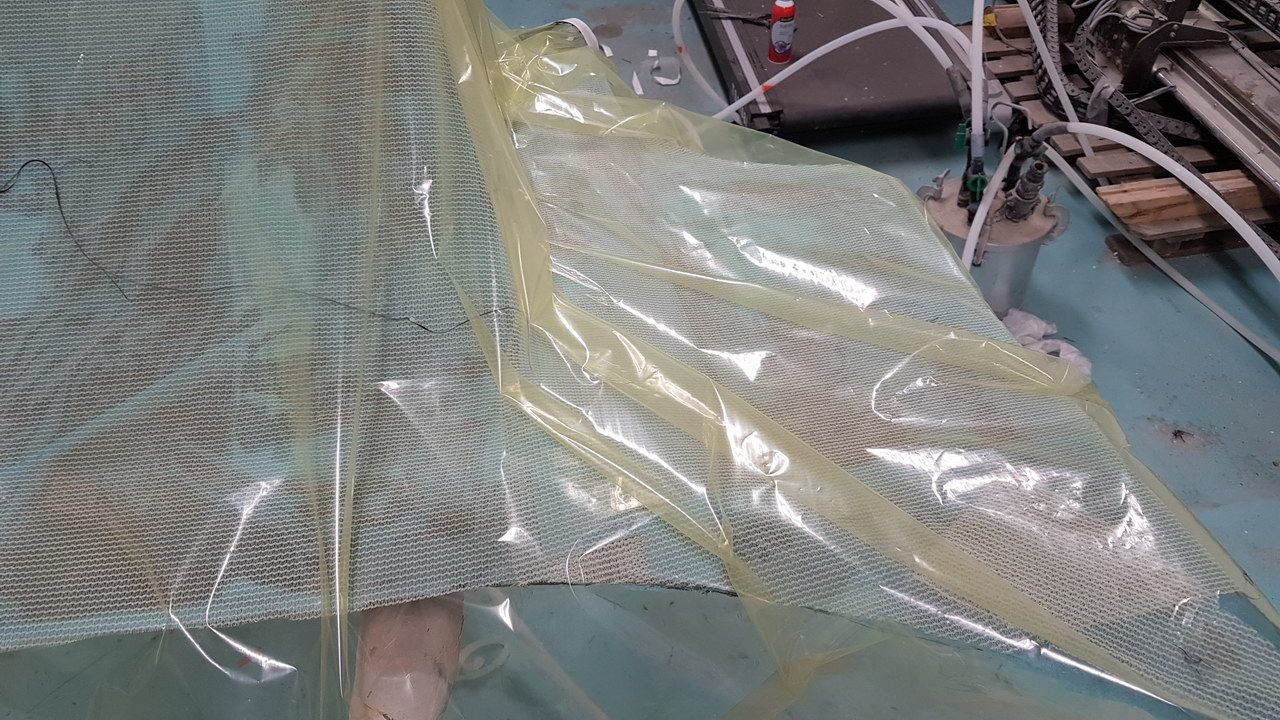
Next is to wrap the part in a bag to suck down onto the carbon and mold.
You can see the difference between this part and the previous picture now that the resin is being sucked into the part.........
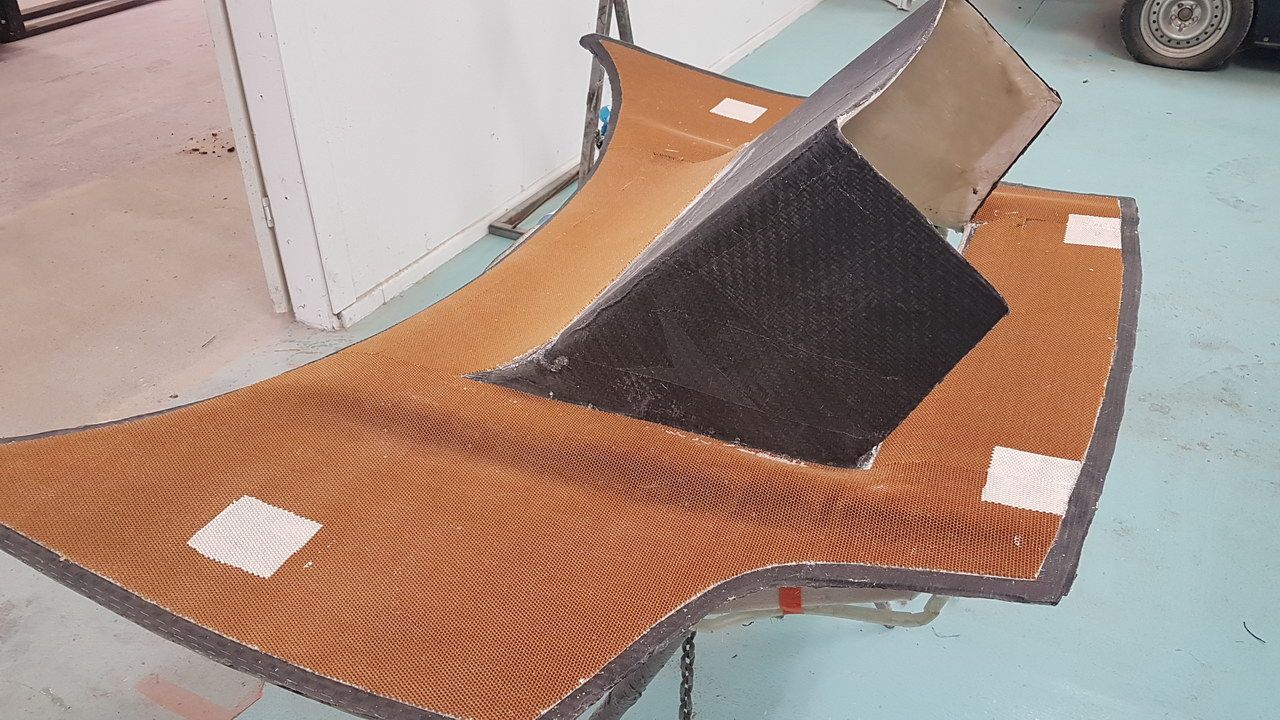
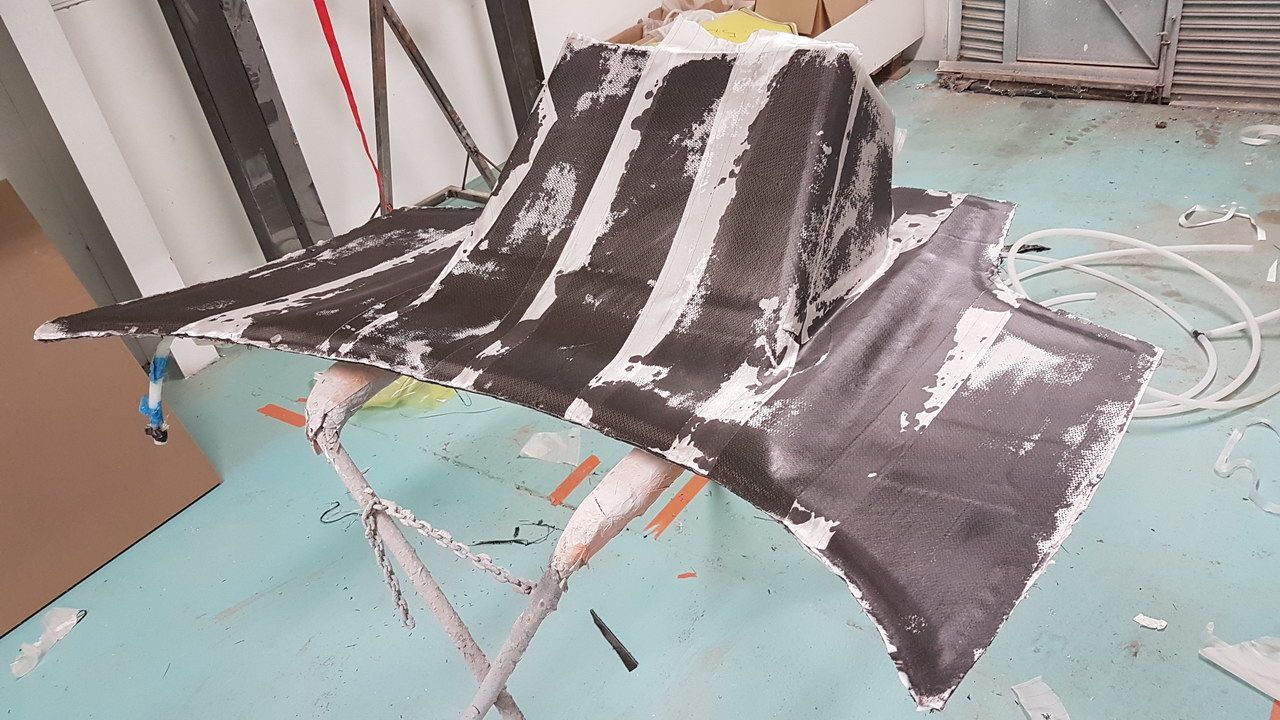
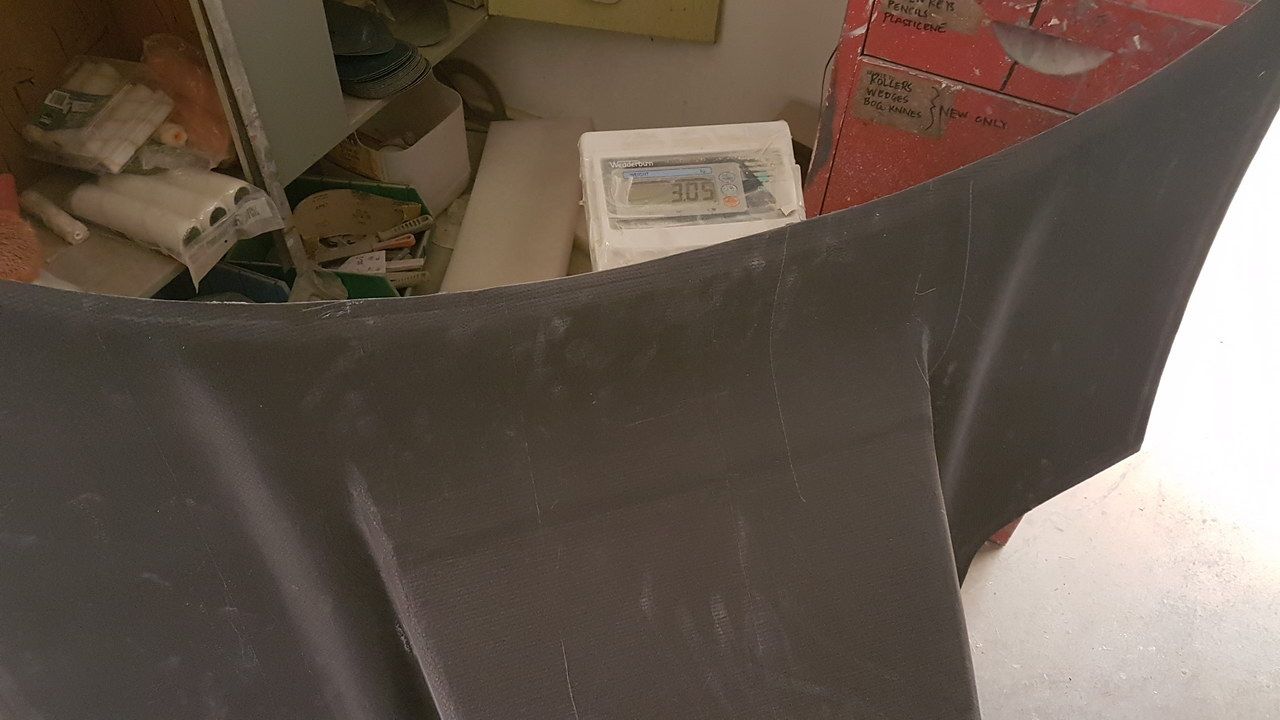
Once it had cooked overnight we could tear off all of the protective layers to reveal the part.
Next we tape up the outside before we put the next layer on so that it won't stick to the first carbon layer.
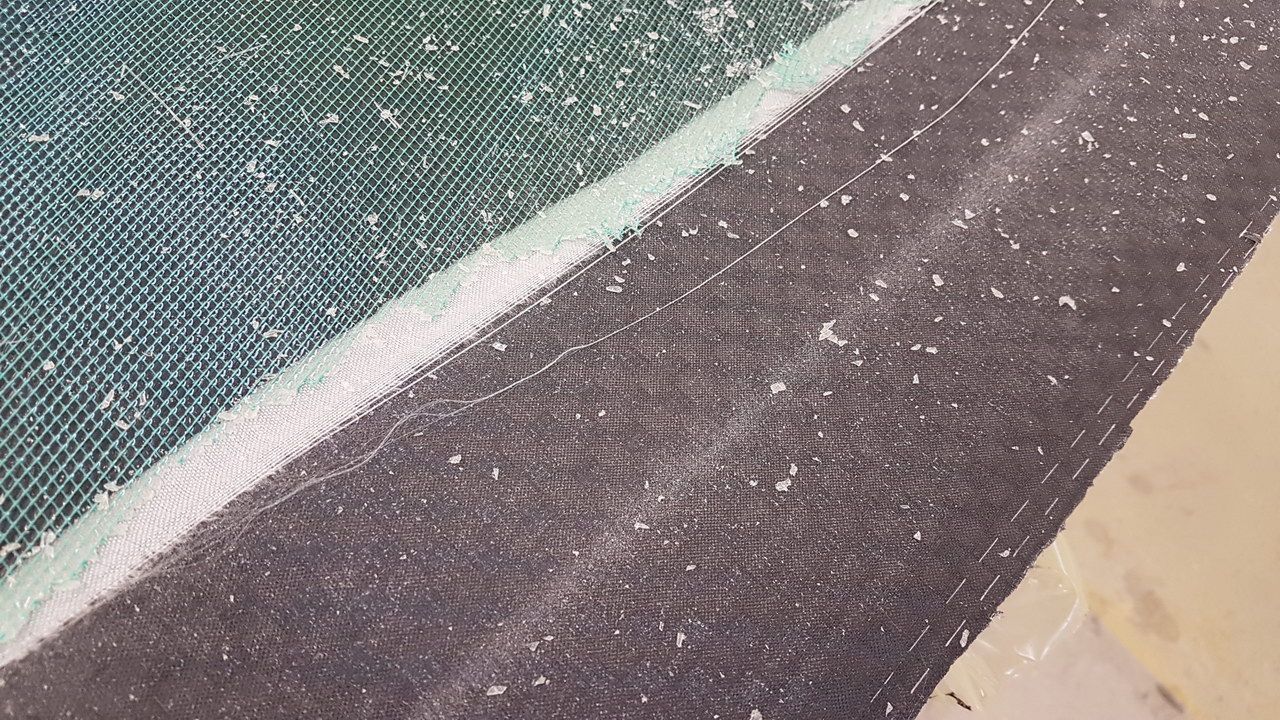
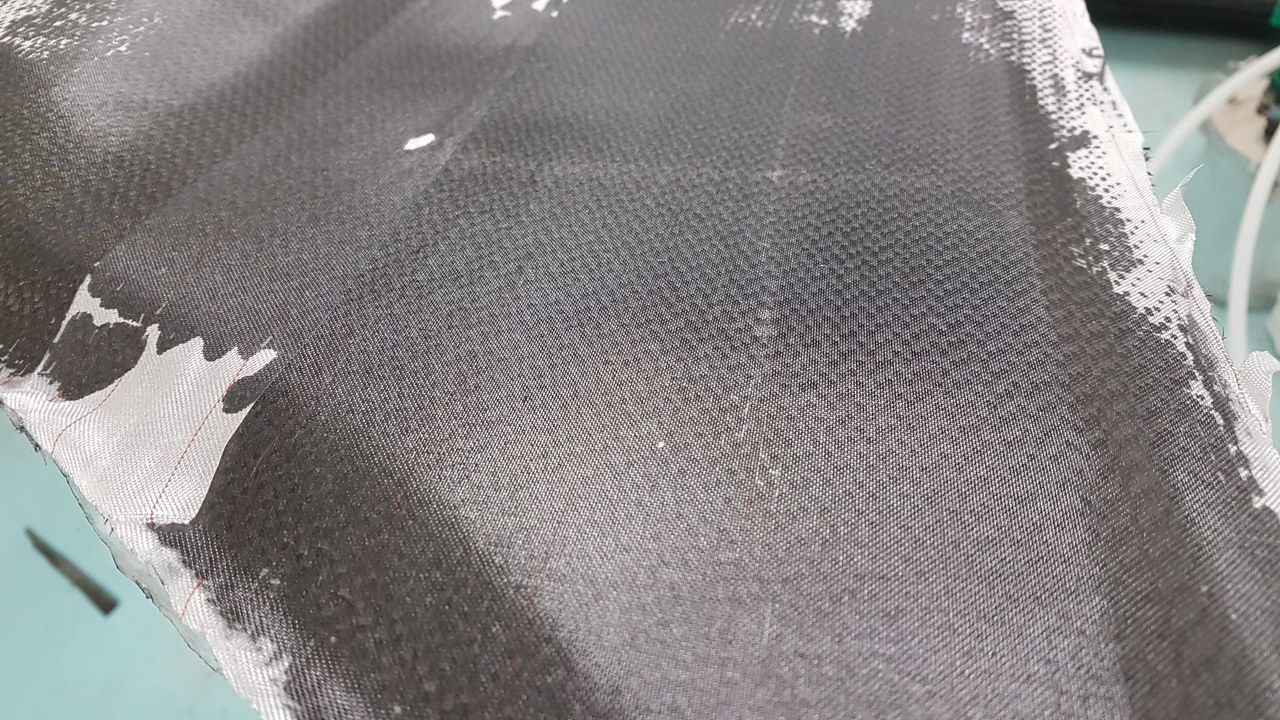
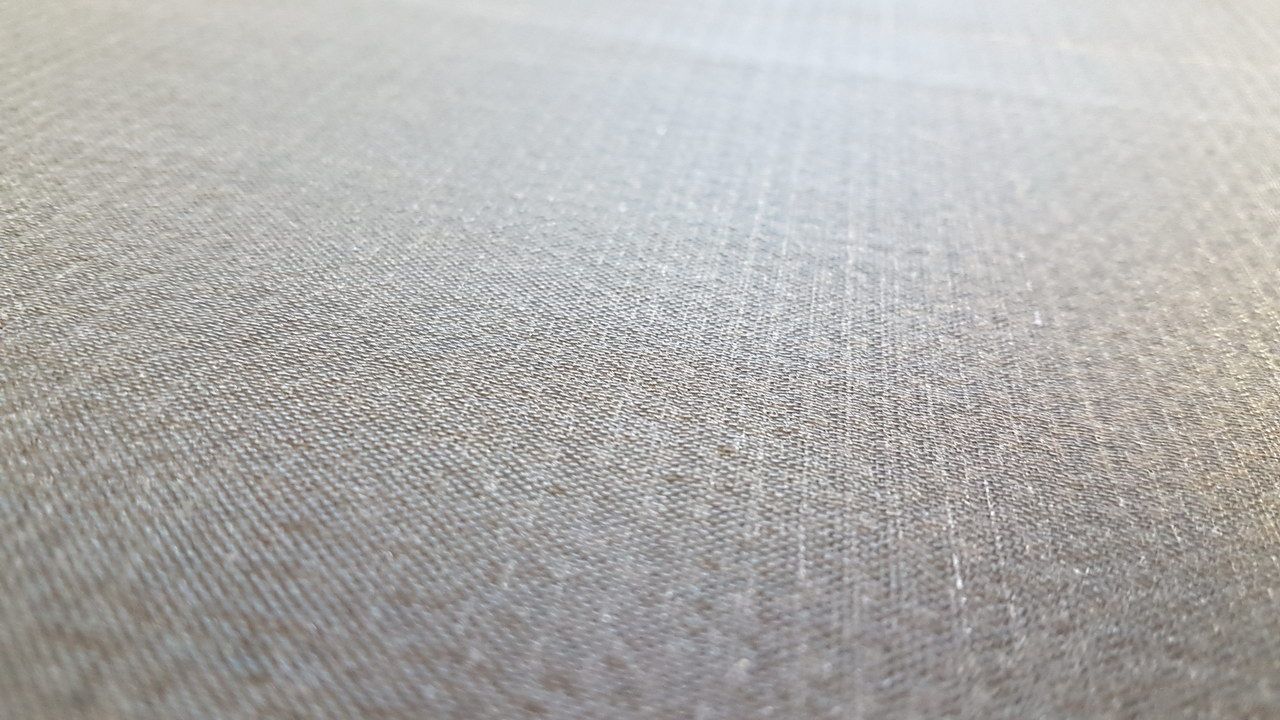
This layer is nomex material to help keep the part stiff, but light. It's basically paper folded in a pattern. This layer was vacuumed down and allowed to set overnight also.
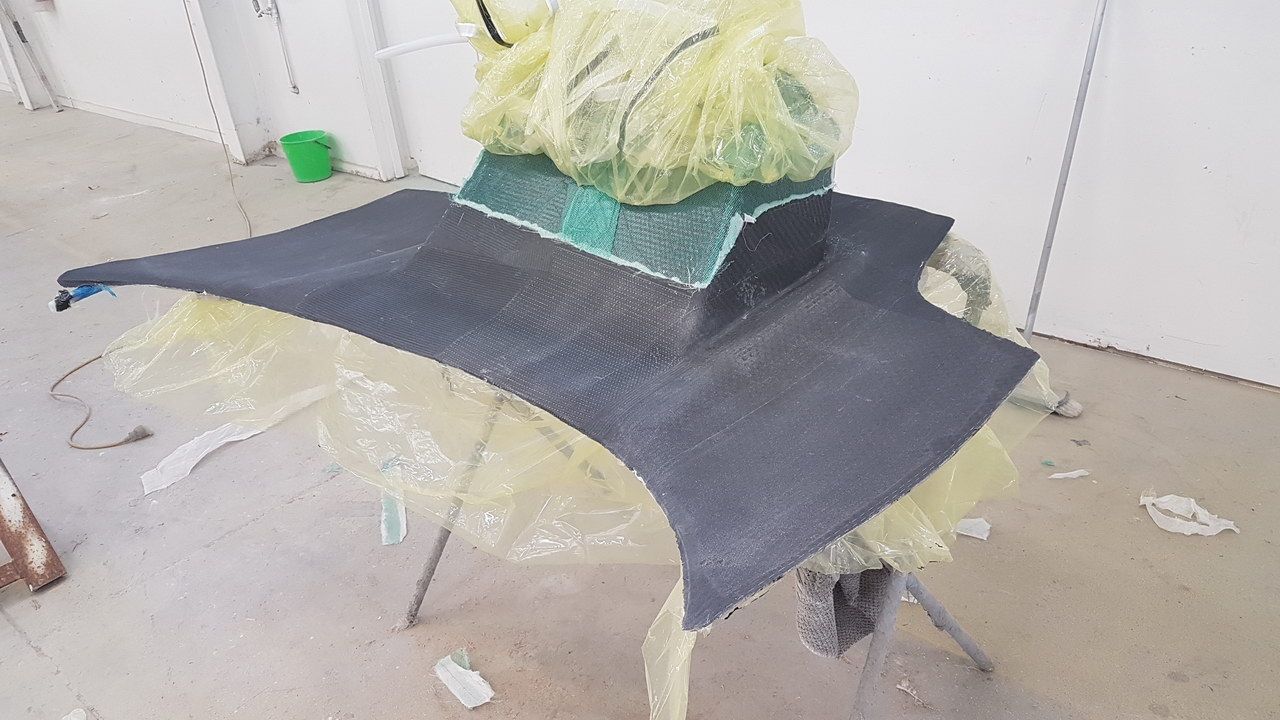
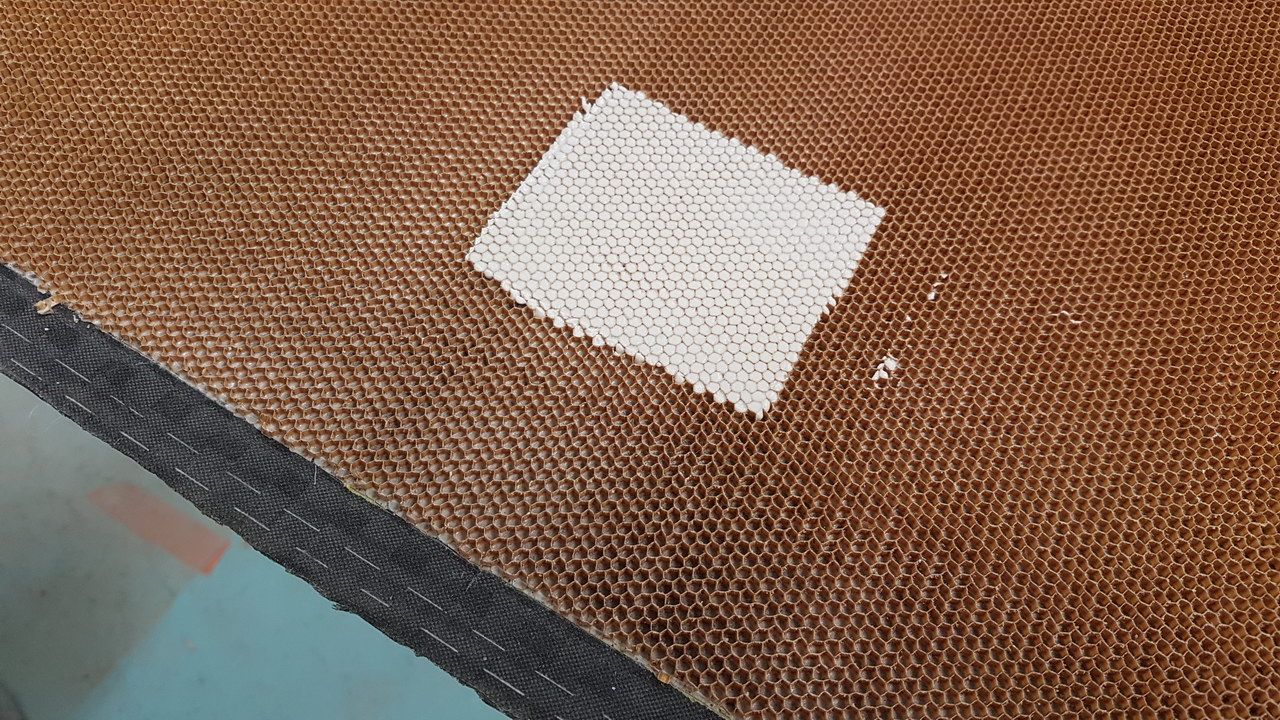
Next is to trim around the edge and remove the tape and add some solid fill area's were the body pins will be once mounted (white squares)

Next is more taping to mark an area around the outside that will be sanded so it tapers down ready for the final layer of carbon.
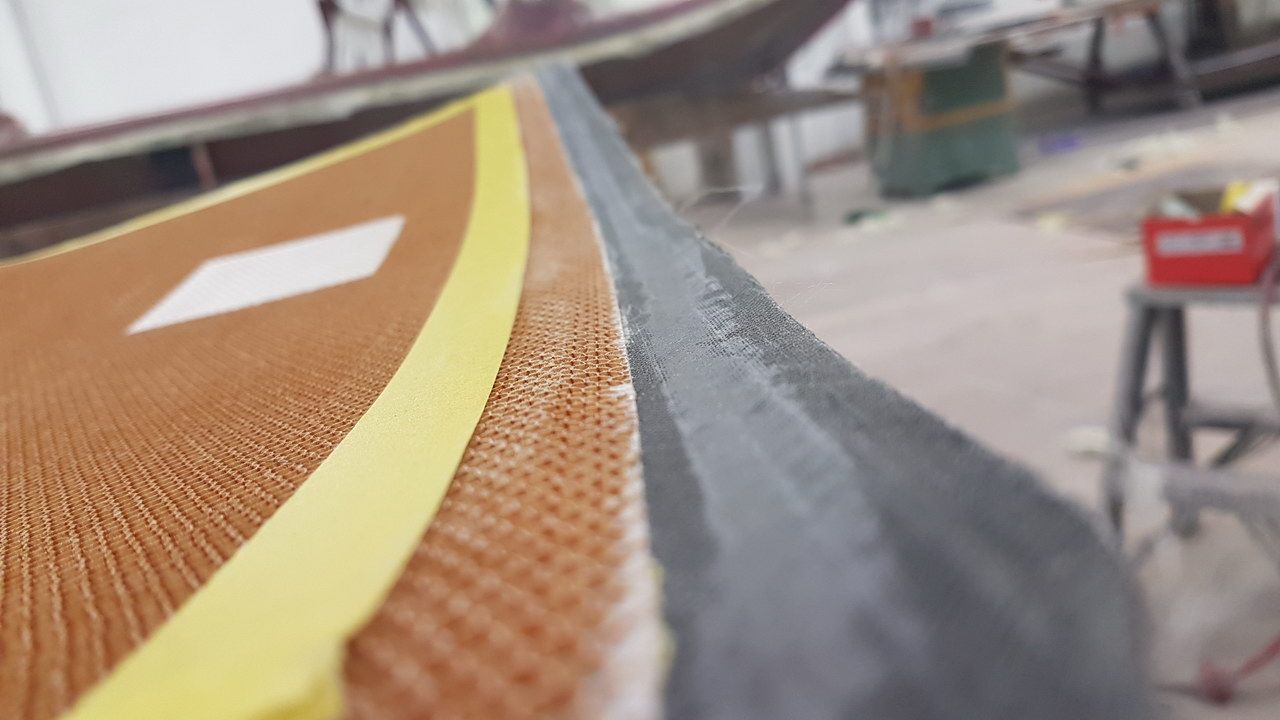
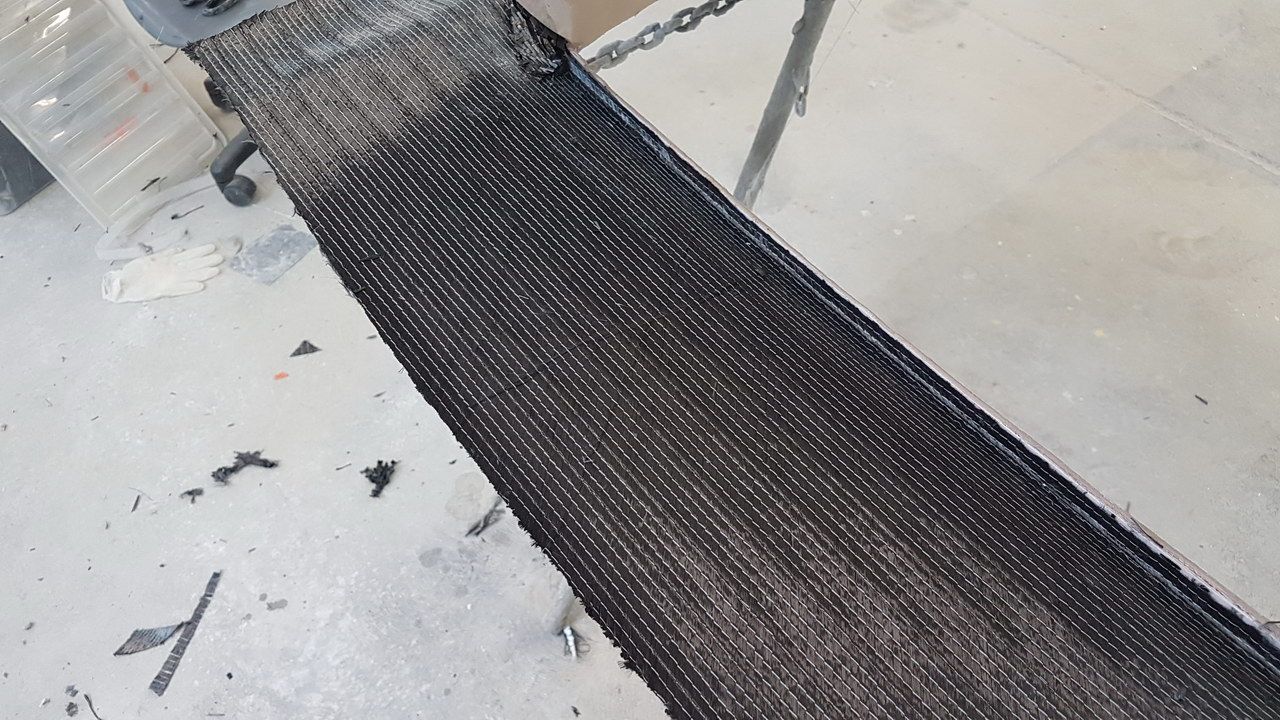
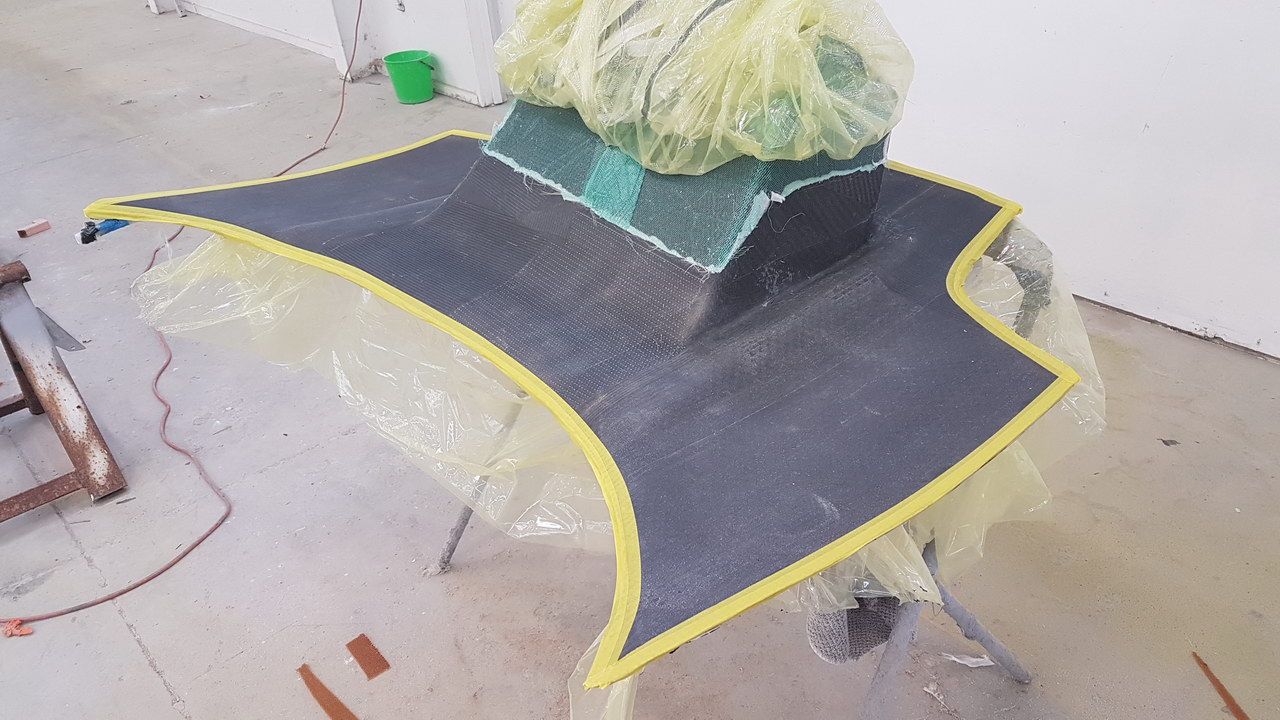
Next is to put the final layer of carbon on and vacuum it once again.
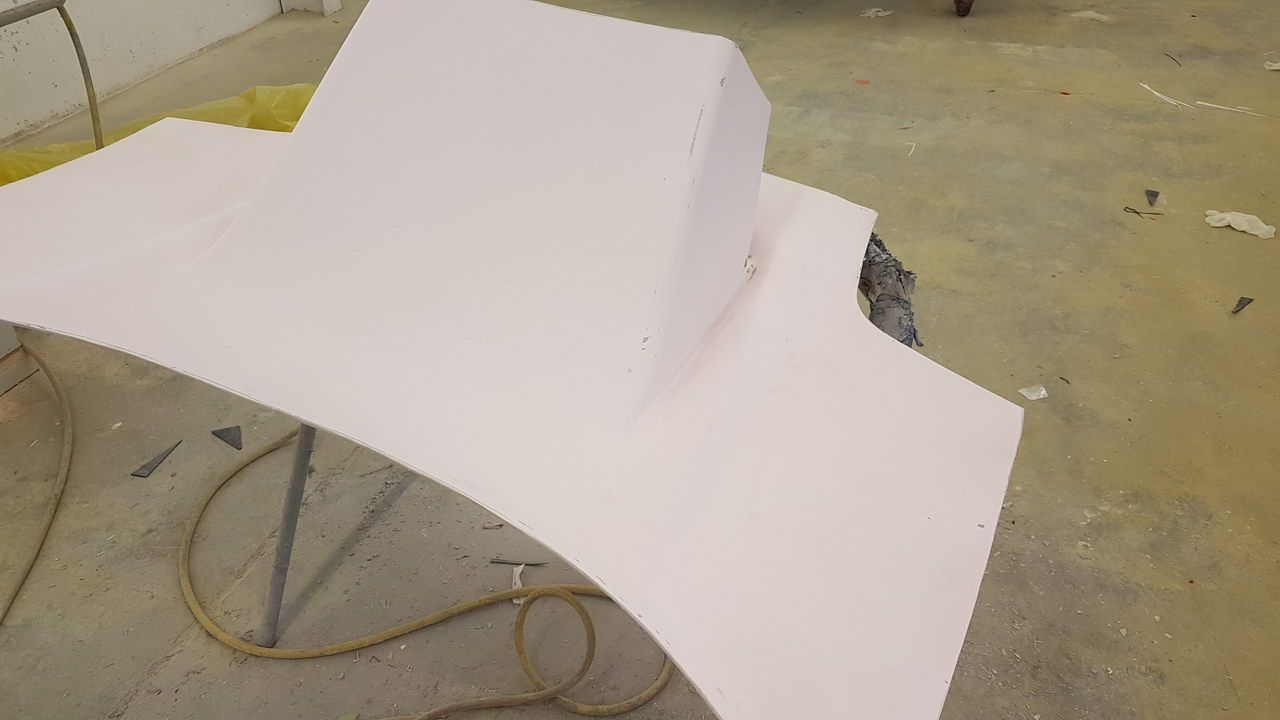
Now the final finished part straight out of the mold.
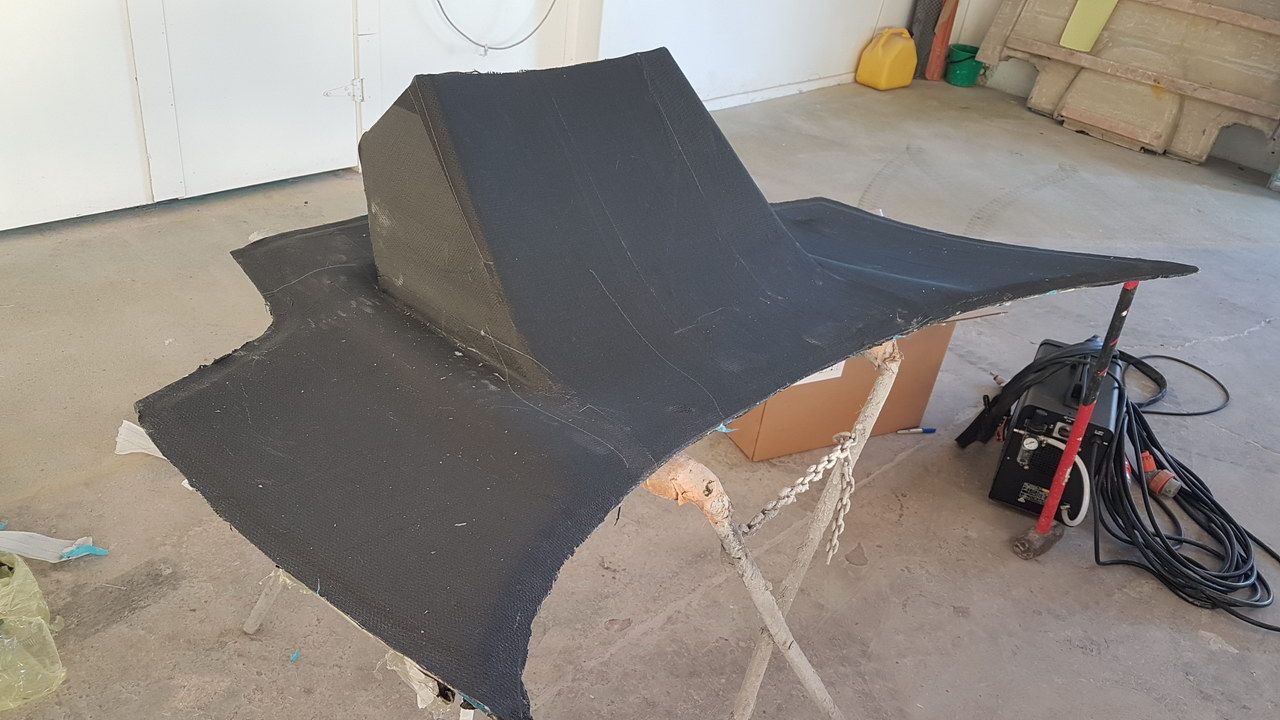
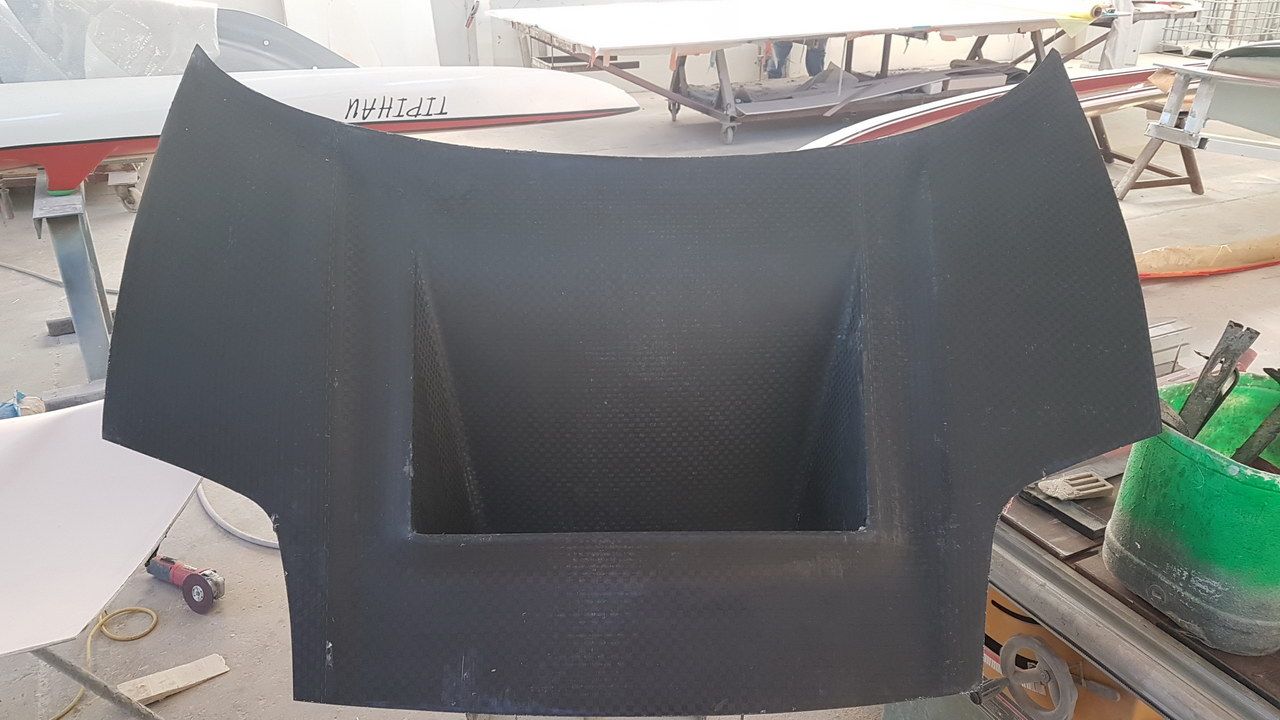
Final part is bang on 3KG ! and is super stiff......no wobbly hood for us !
Unfortunately I've had a couple of deaths in my family and so that really makes you reset what is important in life and up until fairly recently I haven't even been near my workshop.
When I did get down to the workshop I was focusing on our scratch built road car project (FZ12) https://www.drivelife.co.nz/2017/02/project-fz12-frasers-zacs-hand-built-supercar-part-1-the-plan/
But Zac and I have really started to miss getting out there and so decided to put some real effort into getting all of the carbon bodywork finished so the whole car is done and then re-painted so we can get out and do some more events.........
I've taken a fair few photos, cos everyone likes pics, of the whole process to give people an idea of what's involved to get the final product........ if you've got any questions, just ask ! New front guards are next, then doors.
This is the original hood that was used to make a mold for our final carbon part. It's not done at a normal manufacturing level since we're only expecting to produce 2 or 3 of these.
This was the mold once the original part was removed.
Laying up the first layer of carbon once the mold had been prepped with release agent and wax etc.
Next is some mesh and flow tubing to allow the resin to flow well through the part.
This pot is connected to the vacuum pump so it allows us to have multiple vacuum ports on the bag.
Next is to wrap the part in a bag to suck down onto the carbon and mold.
You can see the difference between this part and the previous picture now that the resin is being sucked into the part.........
Once it had cooked overnight we could tear off all of the protective layers to reveal the part.
Next we tape up the outside before we put the next layer on so that it won't stick to the first carbon layer.
This layer is nomex material to help keep the part stiff, but light. It's basically paper folded in a pattern. This layer was vacuumed down and allowed to set overnight also.
Next is to trim around the edge and remove the tape and add some solid fill area's were the body pins will be once mounted (white squares)
Next is more taping to mark an area around the outside that will be sanded so it tapers down ready for the final layer of carbon.
Next is to put the final layer of carbon on and vacuum it once again.
Now the final finished part straight out of the mold.
Final part is bang on 3KG ! and is super stiff......no wobbly hood for us !
Last edited:
First, I'm sorry for your losses.
You and your team down there are extremely talented! I thought your NSX was cool, but then I spent a long time completely reading through your FZ12 build. WOW! I'm speechless. The attention to detail is amazing. Thank you for documenting your ideas and progress.
One thing I'm truly amazed about is the professional wiring. I think 99.99% of people underestimate the work involved to do a quality wiring job.
I looked into the Berserk ASM's awhile ago and couldn't find anybody using them. That drove me to the (future) Tenneco offerings that seem to be a bit more compact. Did you try to contact Tenneco previously?
Also, with the hydraulic cup kit you have and the three planned ride heights, how are you planning to accommodate the alignment changes between normal driving and race driving modes? I wonder how the OEMs (Ford GT, McLaren's, etc) do it?
Man, after reading through all that, my projects in the implementation and execution phases are a disgrace compared to yours.... Looking forward to more articles documenting your progress!
Best wishes on your first start!
Dave
Holy moly I second Dave’s comment. That project car is amazing. It’s inspiring to me, as I’ve been working on my fabrication capabilities lately. Thank you for sharing so much about it and about your NSX project.
Thanks for the nice comments guys............I like to document our build so we have something to refer back to for ourselves, but also because a lot of people are all "secret squirrel" about what they do etc when they build something and it's so frustrating for someone like me who likes to understand stuff. I'm far from an expert, it's purely driven by trial and error and the fact I essentially wasted 6+ months of my life on the first version of rear suspension is testament to that ! But I think you have to blog all of your failures too (next couple of episodes have a couple more failures) so that it's clear to people that everything isn't always roses !
It's so frustrating to watch some video's (most) on YouTube etc where they start off saying "we're going to build this" and then a minute or so later of cut together videos they're like "taadaaa" and it's all done, like nothing went wrong and it took no time at all and so people get a really distorted view of just how long it takes to make things. That NSX hood is a good example.......... that was close to 2 weeks of maybe not full time, but close to full time work with it's multiple layers etc, but the photo's make it look easier than that.
The wiring is another great example.......... I had no idea just how much time was involved there, and luckily for me I have a friend Lance who loves doing it so we sat down and made a plan, but it was 6 months of 2 days a week for 2 of us to get this far and it's not even done yet ! I think we're probably 70% of the way there now though, but thanks so much for seeing / knowing how much work went into that....... I'm super proud of everything we've got to so far.......... there are parts that are rough around the edges now because we don't have approval yet from our local authority, but once that's given we will tidy a lot of stuff up........we want it to be "production" level finish so that it's not seen as something some bunch of mates put together in a shed which is exactly what it is
Thanks again, hope you keep following the FZ12 build, the next episode due out next Tuesday is an exciting stage and I hope to have the front guards done on the NSX soon and then some carbon doors so the whole car will be carbon (body wise) then we can go racing again, then concentrate on 3.2L twin turbo engine !!
Dave, sorry I forgot to answer your questions. I didn't look at the system you mentioned no. I talked to Viking about their system some years ago and was on the development road with them along the way so we just stuck with the plan. Their system seems to work really well so far, but we haven't been able to fully test it of course. If it doesn't pan out, it's not going to be a massive job to look at something else, but I think the system should work as we wanted. Space wise we of course could make everything suit so that wasn't an issue, but I could imagine that in a normal production car environment it could be an issue........ do you mean the external reservoirs / canisters being and main space issue ? or the sensors etc ?
Regarding the alignment when in race mode etc, we obviously don't have all the exact measurements yet as we're still to have the car fully assembled, but the main thing we're going to gain when in race mode is camber and gaining camber when on the track is usual not a bad thing as long as you're not running a lot on the road. I suspect McLaren etc don't have any particular way of altering their alignment either after seeing a P1 up close, I couldn't see anything that could adjust such settings and to be honest as mentioned you probably wouldn't want to as you would want to adjust camber and it would do that as it stands. You shouldn't alter caster or toe with lowering of the car if you've got it right anyhow............. but we're not experts here so we may still be proven wrong once it gets going !! I'll make sure I let you know in a blog of some sort..........
Regarding the alignment when in race mode etc, we obviously don't have all the exact measurements yet as we're still to have the car fully assembled, but the main thing we're going to gain when in race mode is camber and gaining camber when on the track is usual not a bad thing as long as you're not running a lot on the road. I suspect McLaren etc don't have any particular way of altering their alignment either after seeing a P1 up close, I couldn't see anything that could adjust such settings and to be honest as mentioned you probably wouldn't want to as you would want to adjust camber and it would do that as it stands. You shouldn't alter caster or toe with lowering of the car if you've got it right anyhow............. but we're not experts here so we may still be proven wrong once it gets going !! I'll make sure I let you know in a blog of some sort..........
That’s great way to make a good and use honeycomb without prepreg. Very clever!
Do you mind sharing the thickness you used? I ask because I’m making a hood soon as well. I figure 3-5mm aramid honeycomb would work great.
Do you mind sharing the thickness you used? I ask because I’m making a hood soon as well. I figure 3-5mm aramid honeycomb would work great.
Yep it was 5mm nomex. Made the part super stiff and at 6.6lb not heavy for it's size considering the section down to the radiator is quite big also.
Zac from Carboglass (who I share the car with) is the brains behind any of the composite stuff....... I'm just the untrained hands that's getting to learn as I go I'm sure he'll be happy that someone else in his trade thinks he's doing a good job
Zac from Carboglass (who I share the car with) is the brains behind any of the composite stuff....... I'm just the untrained hands that's getting to learn as I go
I'm sure he'll be happy that someone else in his trade thinks he's doing a good job
Last edited:
Yeah man looks like quite the project. Been following a while!
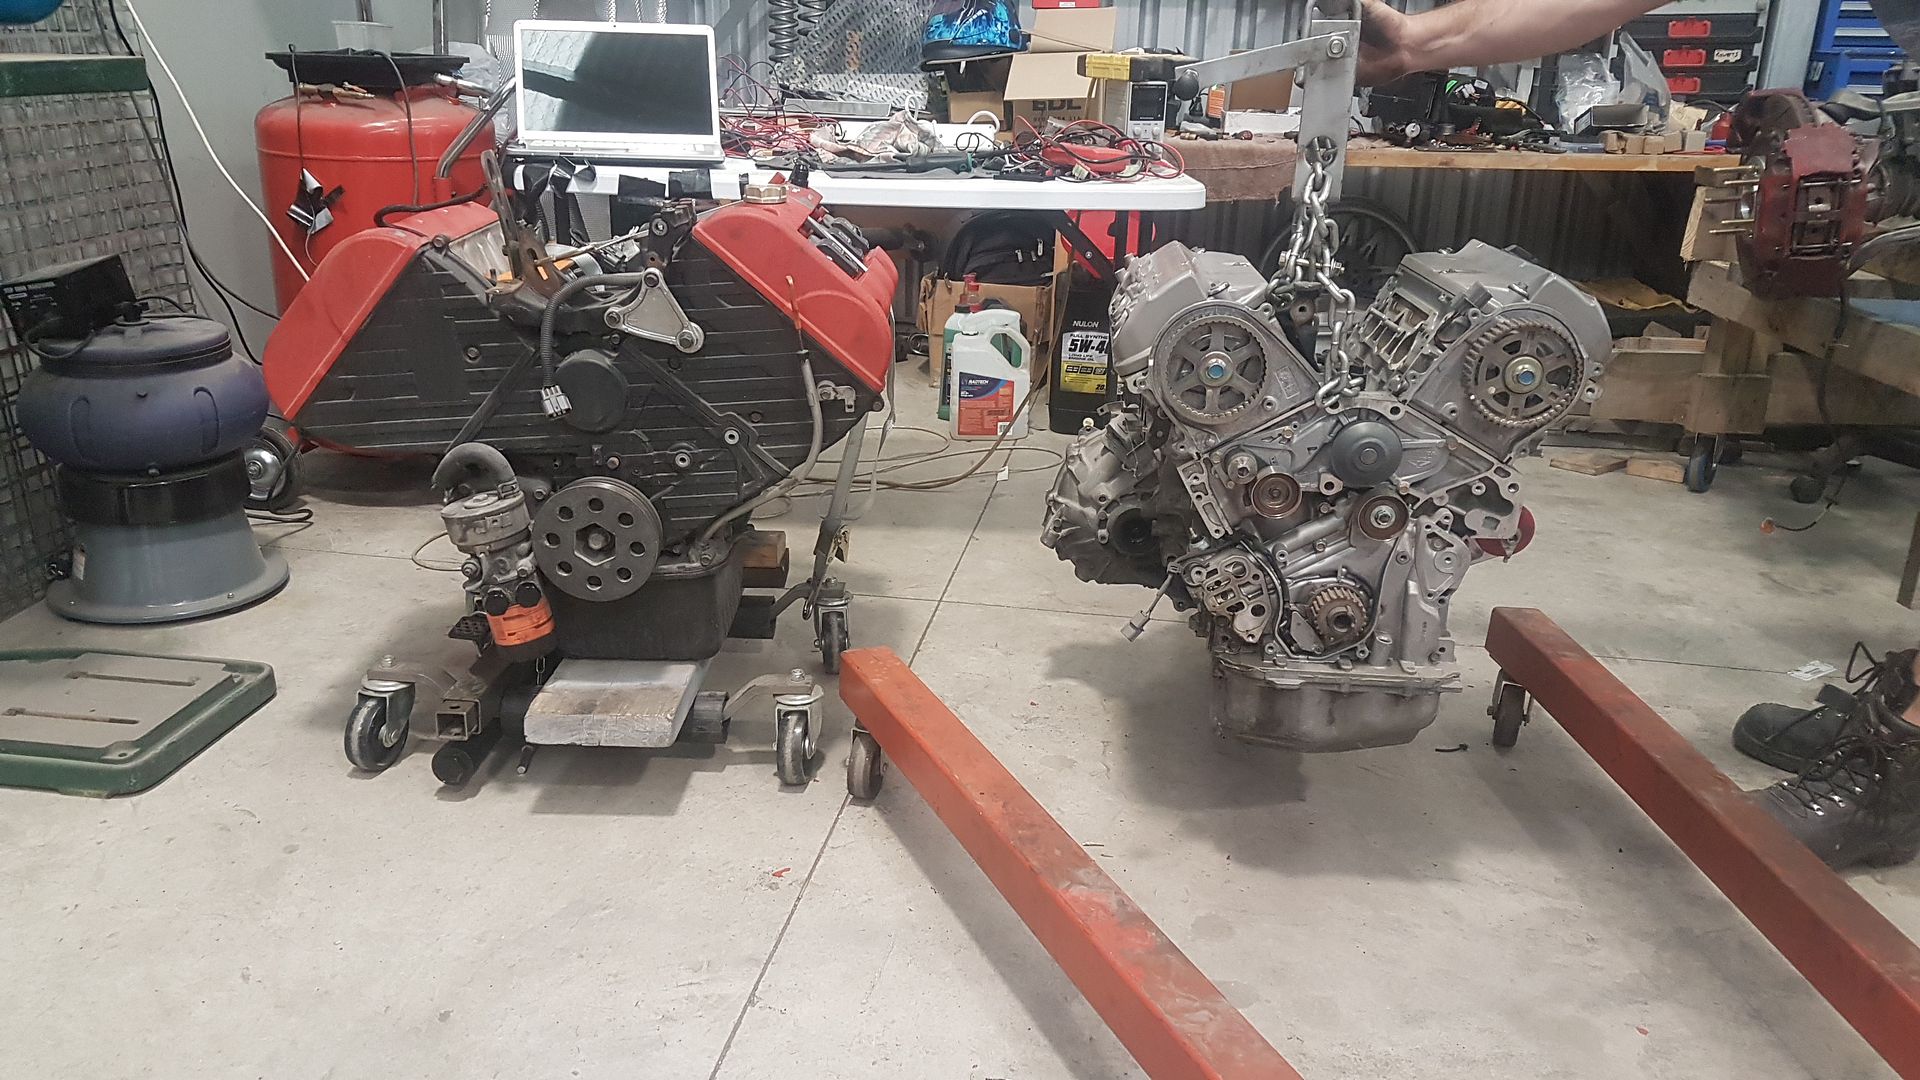
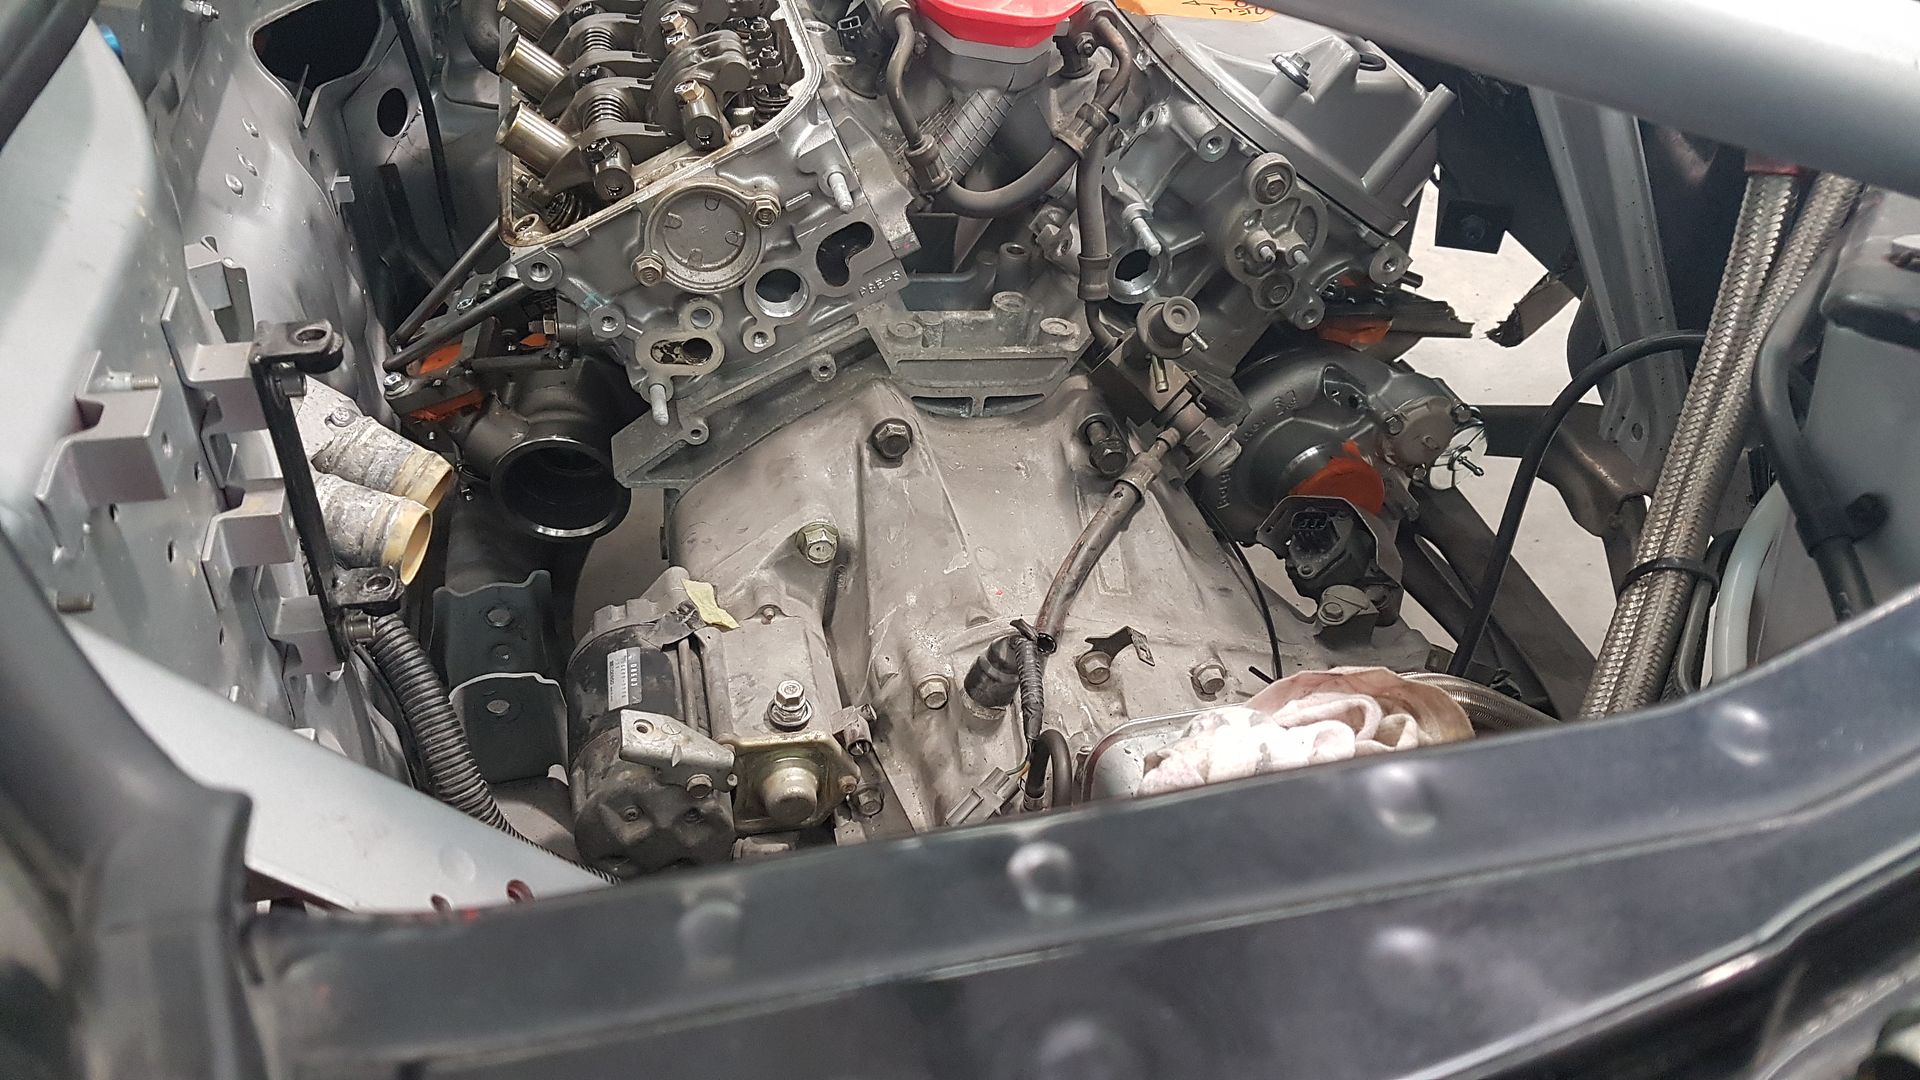
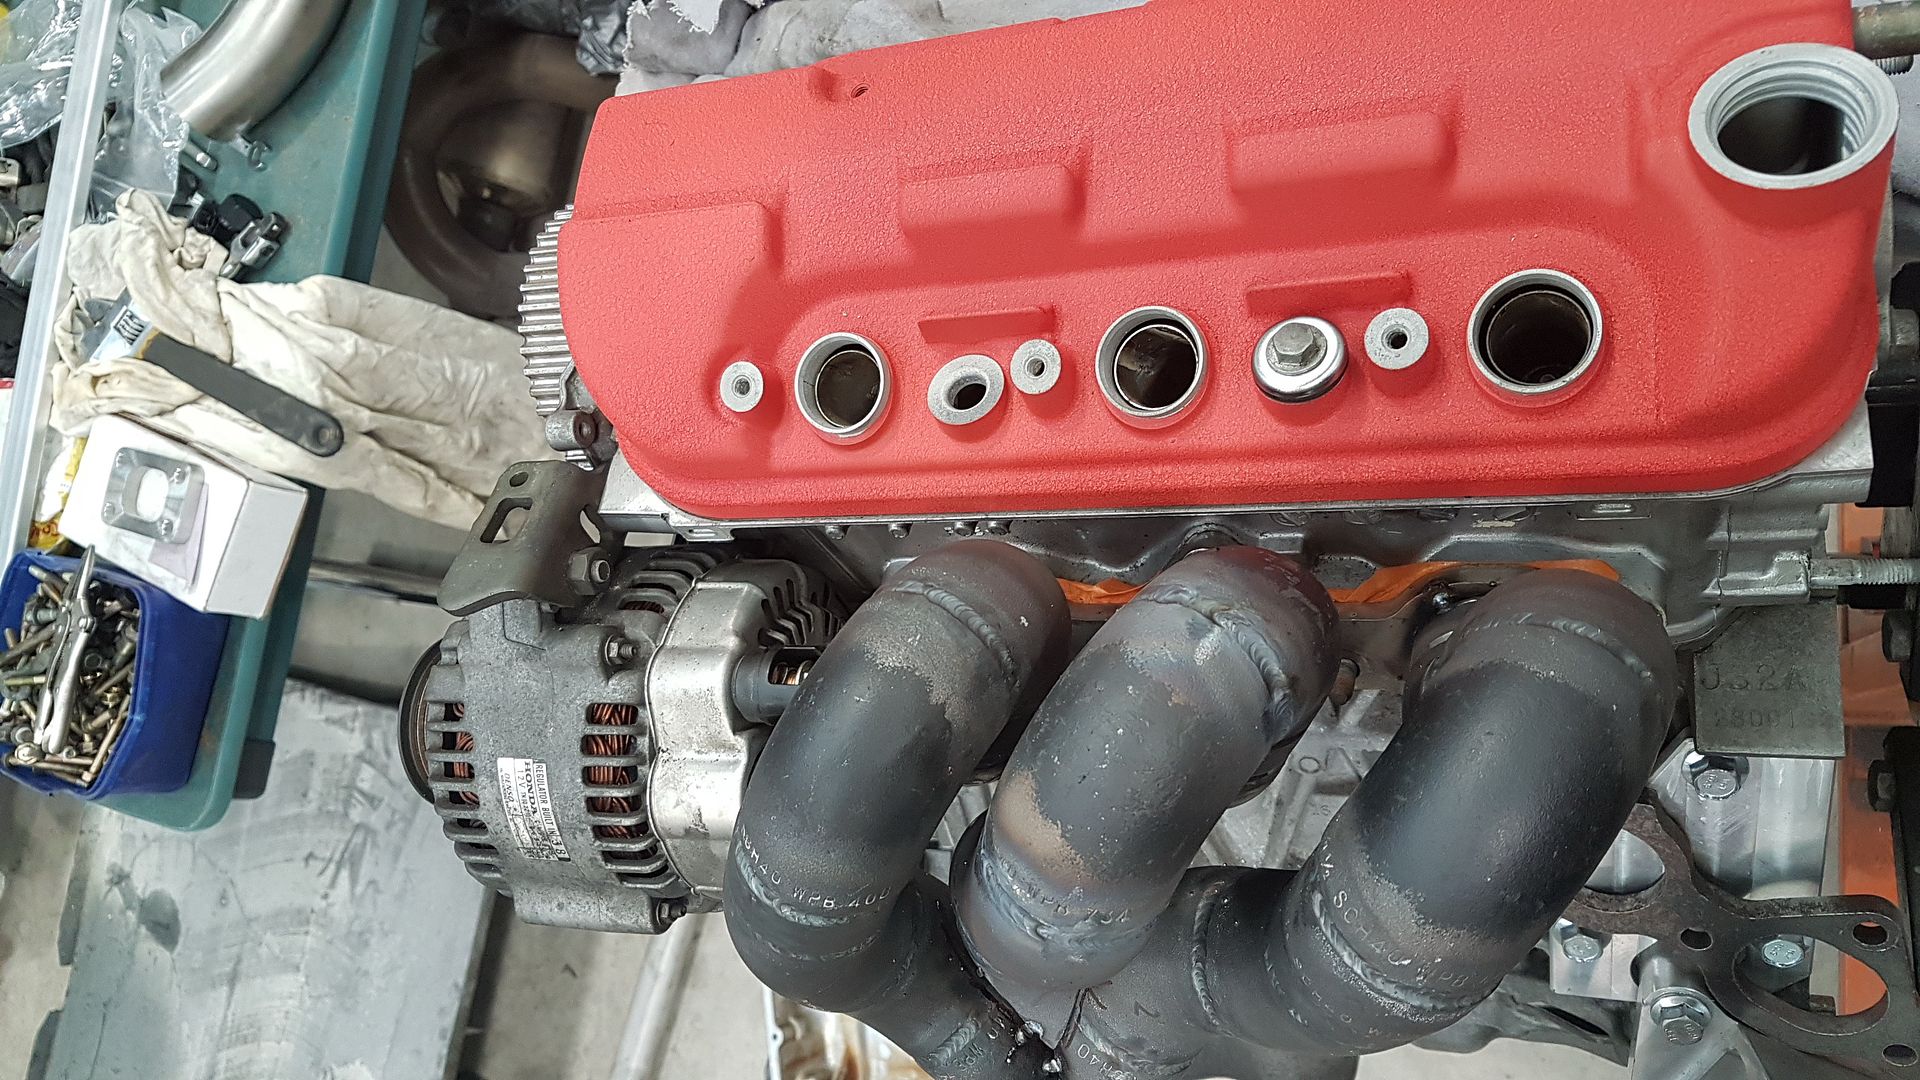
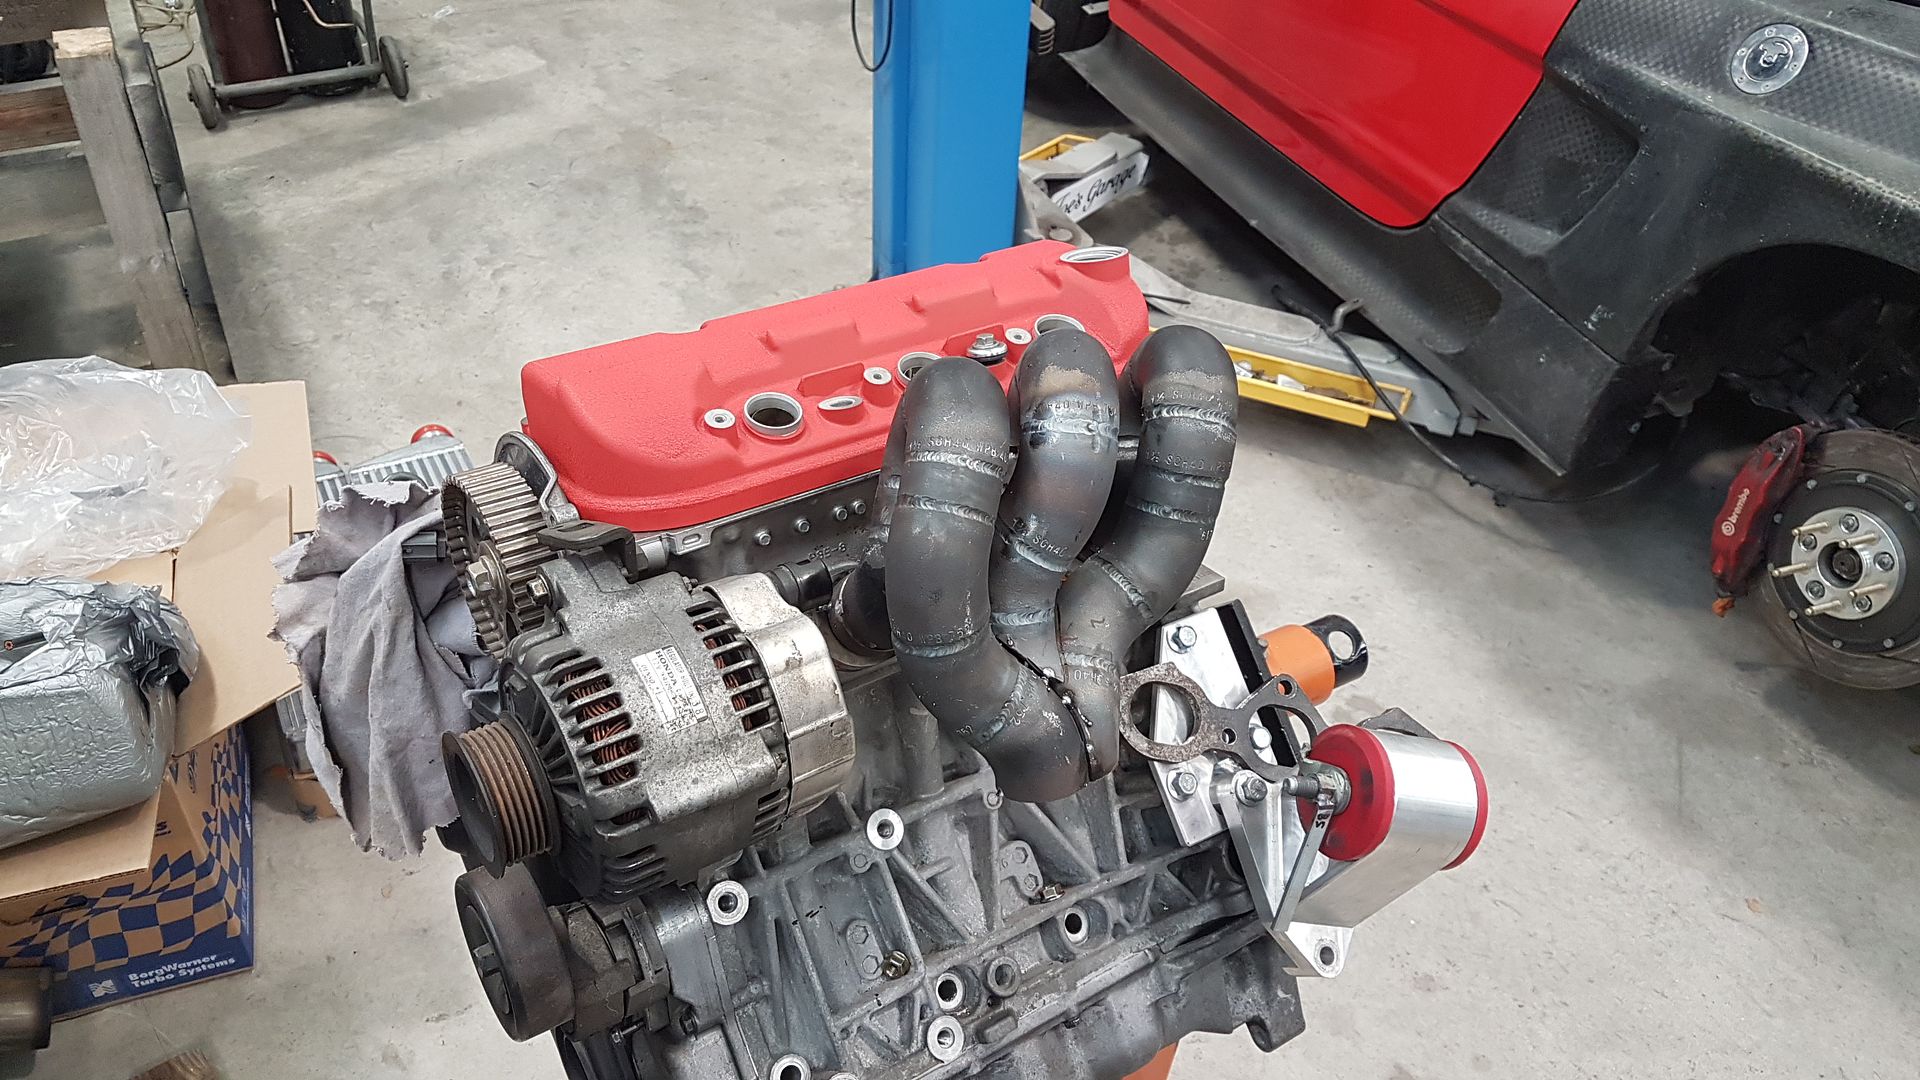
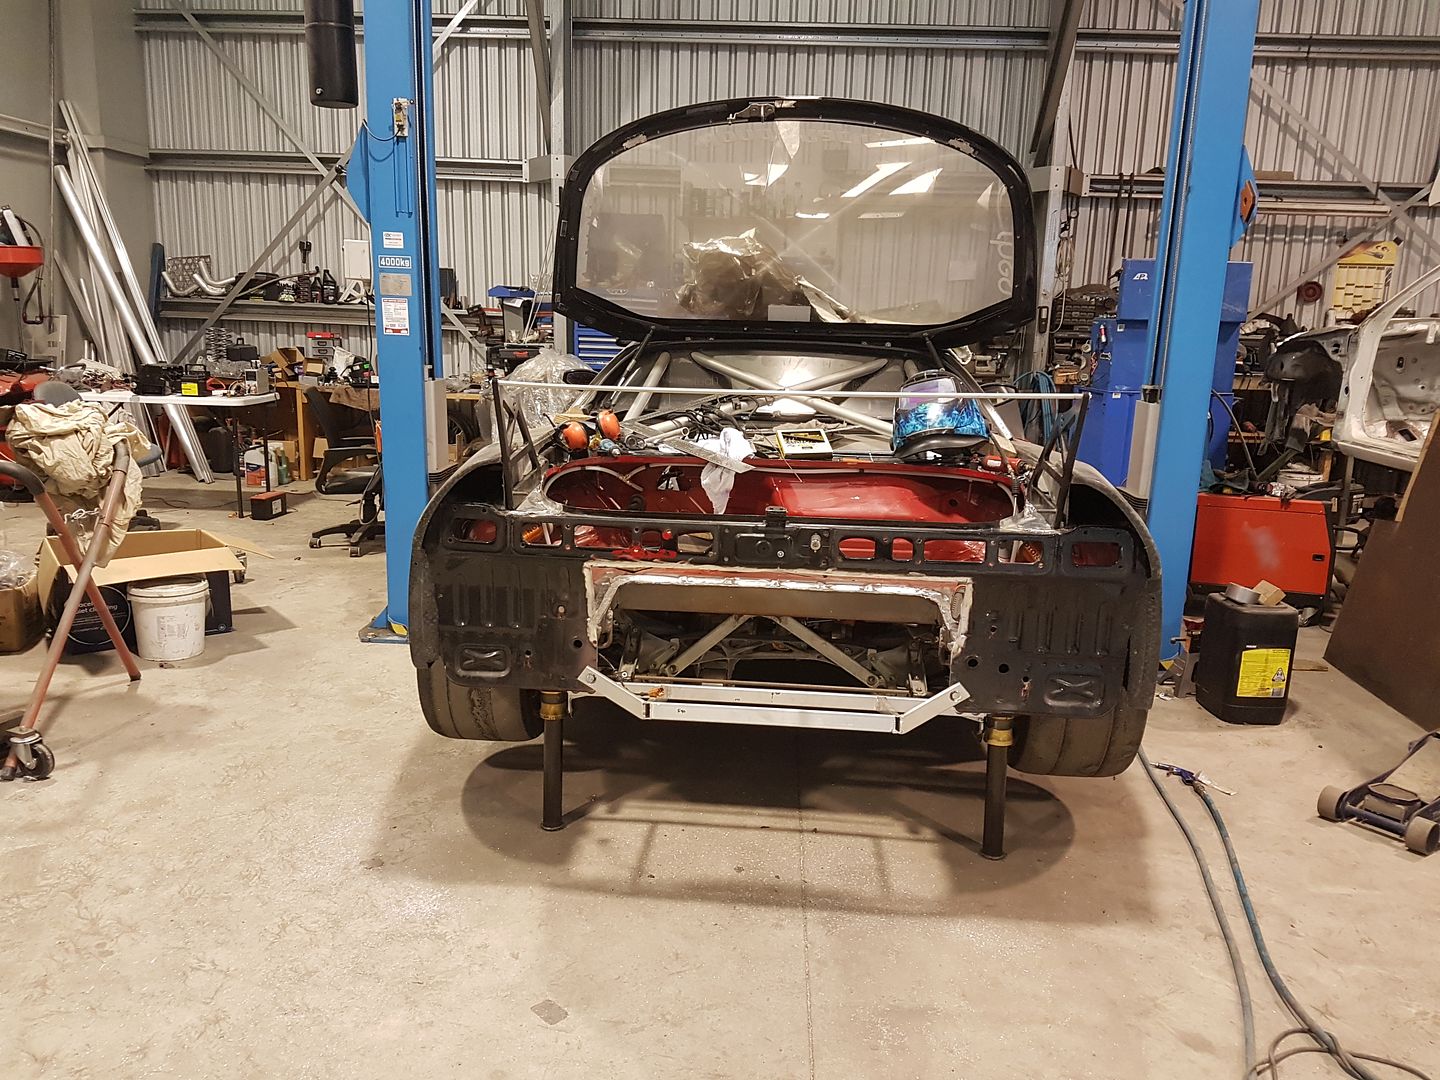
Well as seems to be the norm recently it's been way too bloody long, but we've finally got a big update for our NSX.We've finally started our engine and twin turbo upgrade. The original C30 engine was working well, but to get them to the stage where they can reliably run 700+ HP requires some serious cash and to be honest they're old technology so that didn't seem like a smart way to spend our money. What we decided to do was to swap the engine out for a J series engine from the Acura TL/RL cars. As some will know, this is getting more common, but for a race car it makes even more sense. It's smaller due to being a shallower V design which makes life fitting turbo's sooooo much easier and even better it's 30KG lighter due to being single not twin cam amongst other things.
That weight loss means we can pretty much add twin turbos and intercoolers and yet gain no extra weight ! Not only that but the J32A2 engine we've chosen to base our build on is already more powerful even without turbo's so it's a great starting point.
You can see here visually the difference in size.
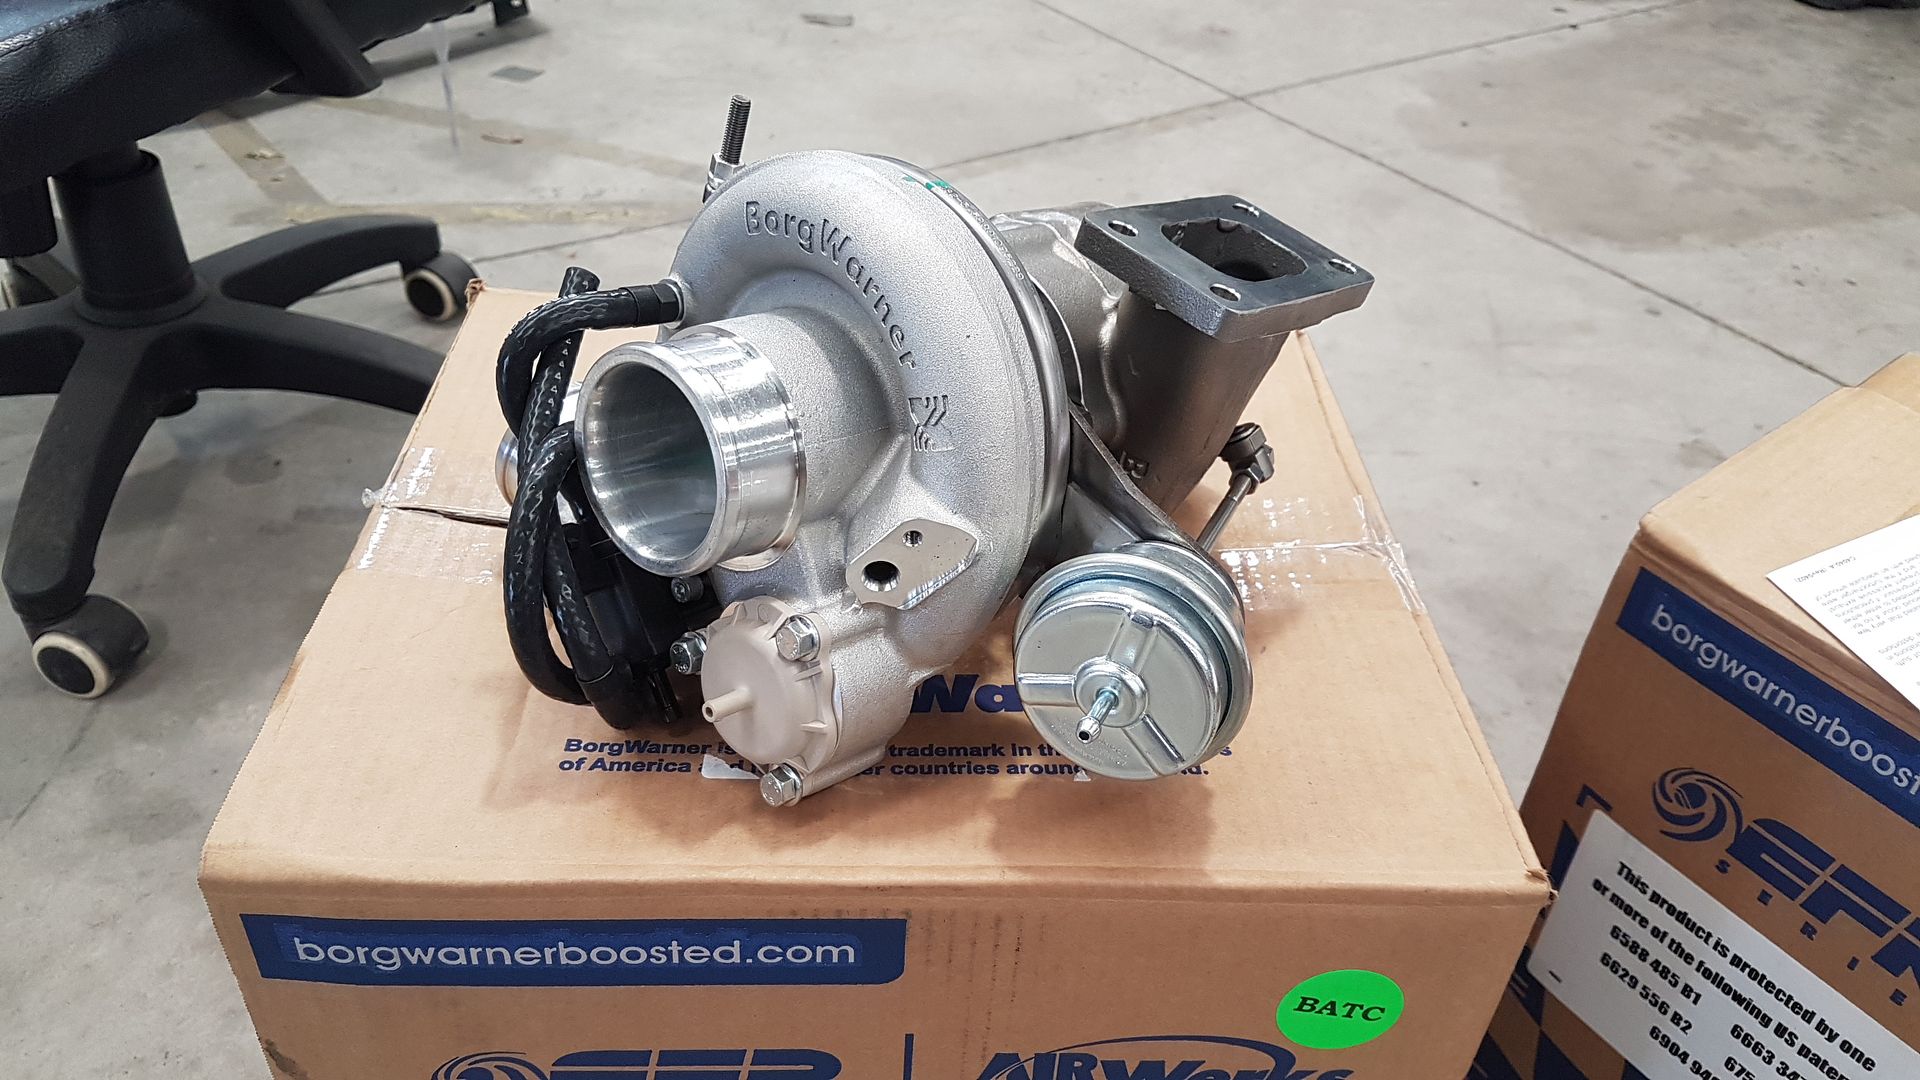
After a good chat with my mate Chris from Prestige Tuning and Motorsport we selected a twin Borg Warner EFR 6258 setup. We went through the whole single vs twin discussion and I did flip back and forth. To be honest I really don't think either are good or bad, just that Zac and I liked the idea of twin turbos on a V engine so that's what we went for. The EFR 6258 should come on nice and early with a 3.2L engine and each turbo is rated for 440HP so technically we should be able to see close to 800-850HP but I doubt we'll be going that far, but we intend to build the engine to be able to cope with that.
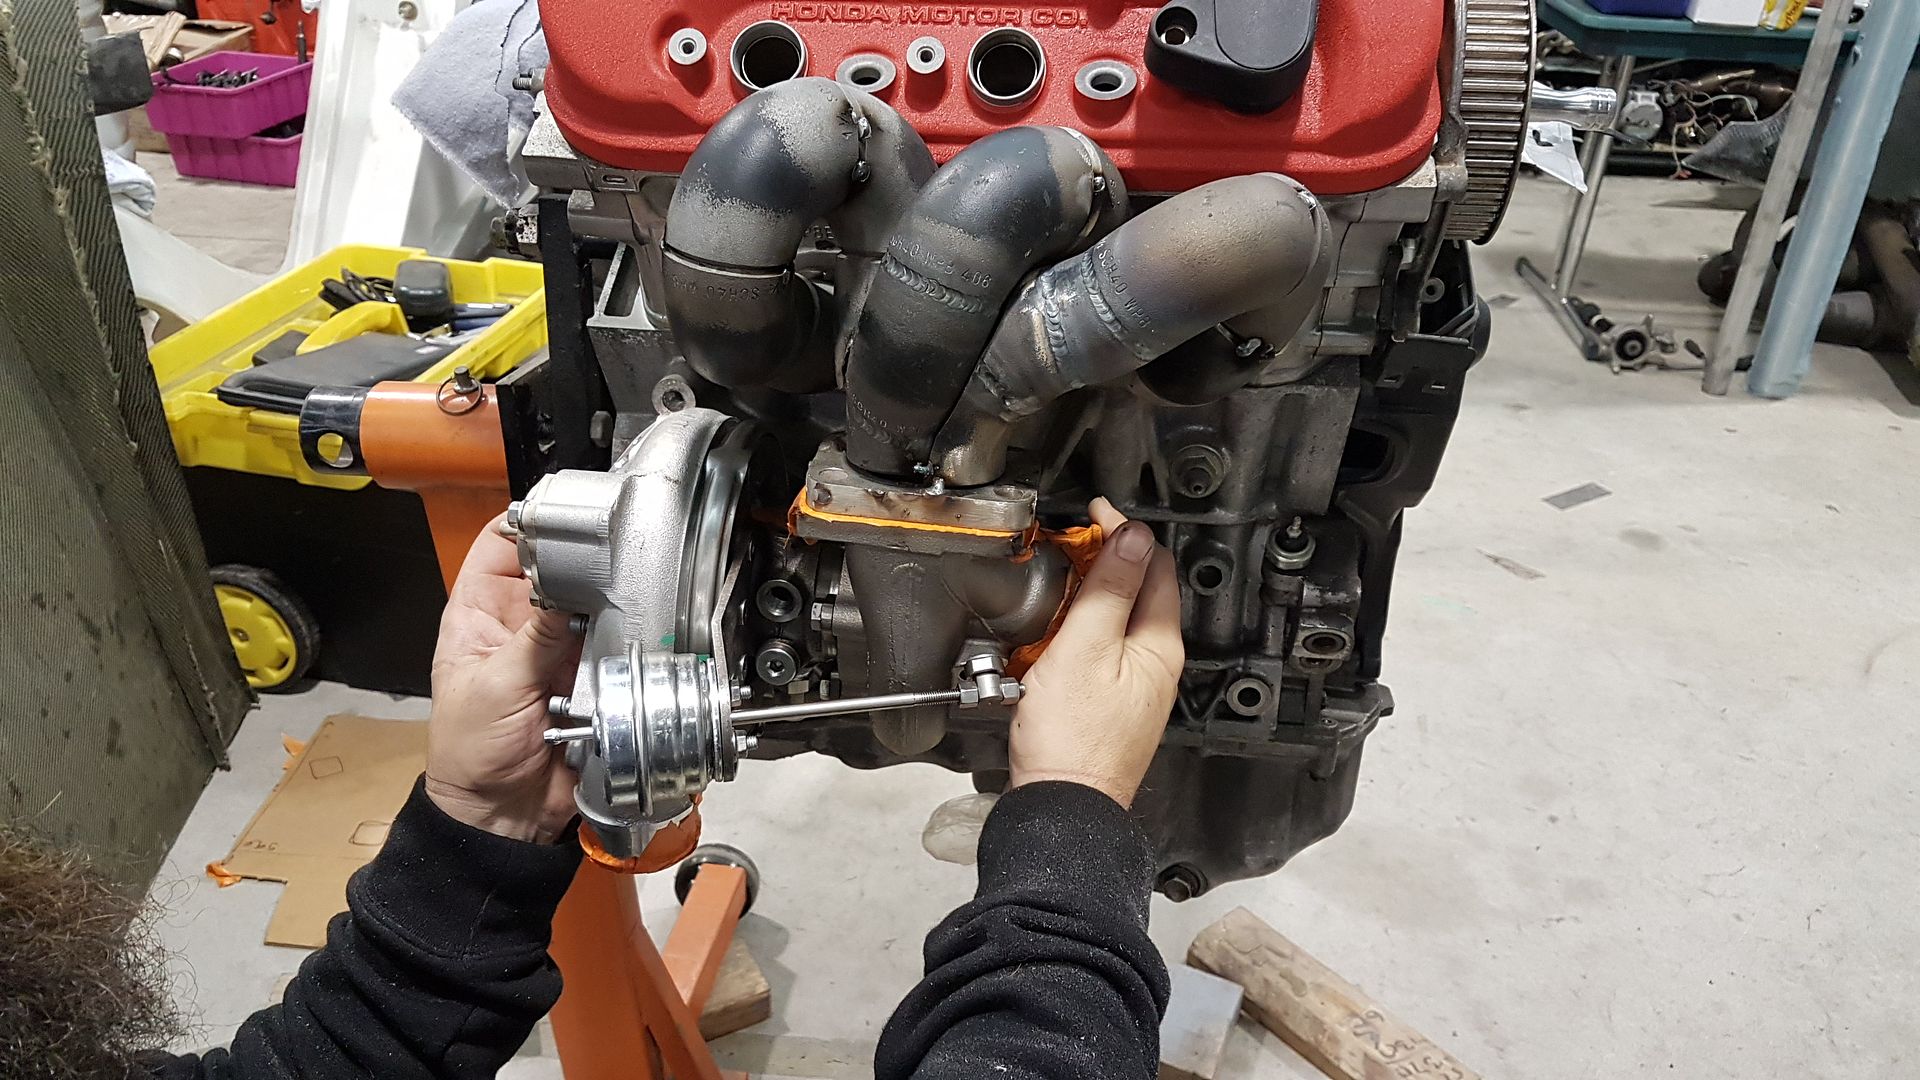
Bam (fab master) and I spent pretty much a whole day going through plans and looking at where we could fit the turbos to best run the intake and exhaust etc...…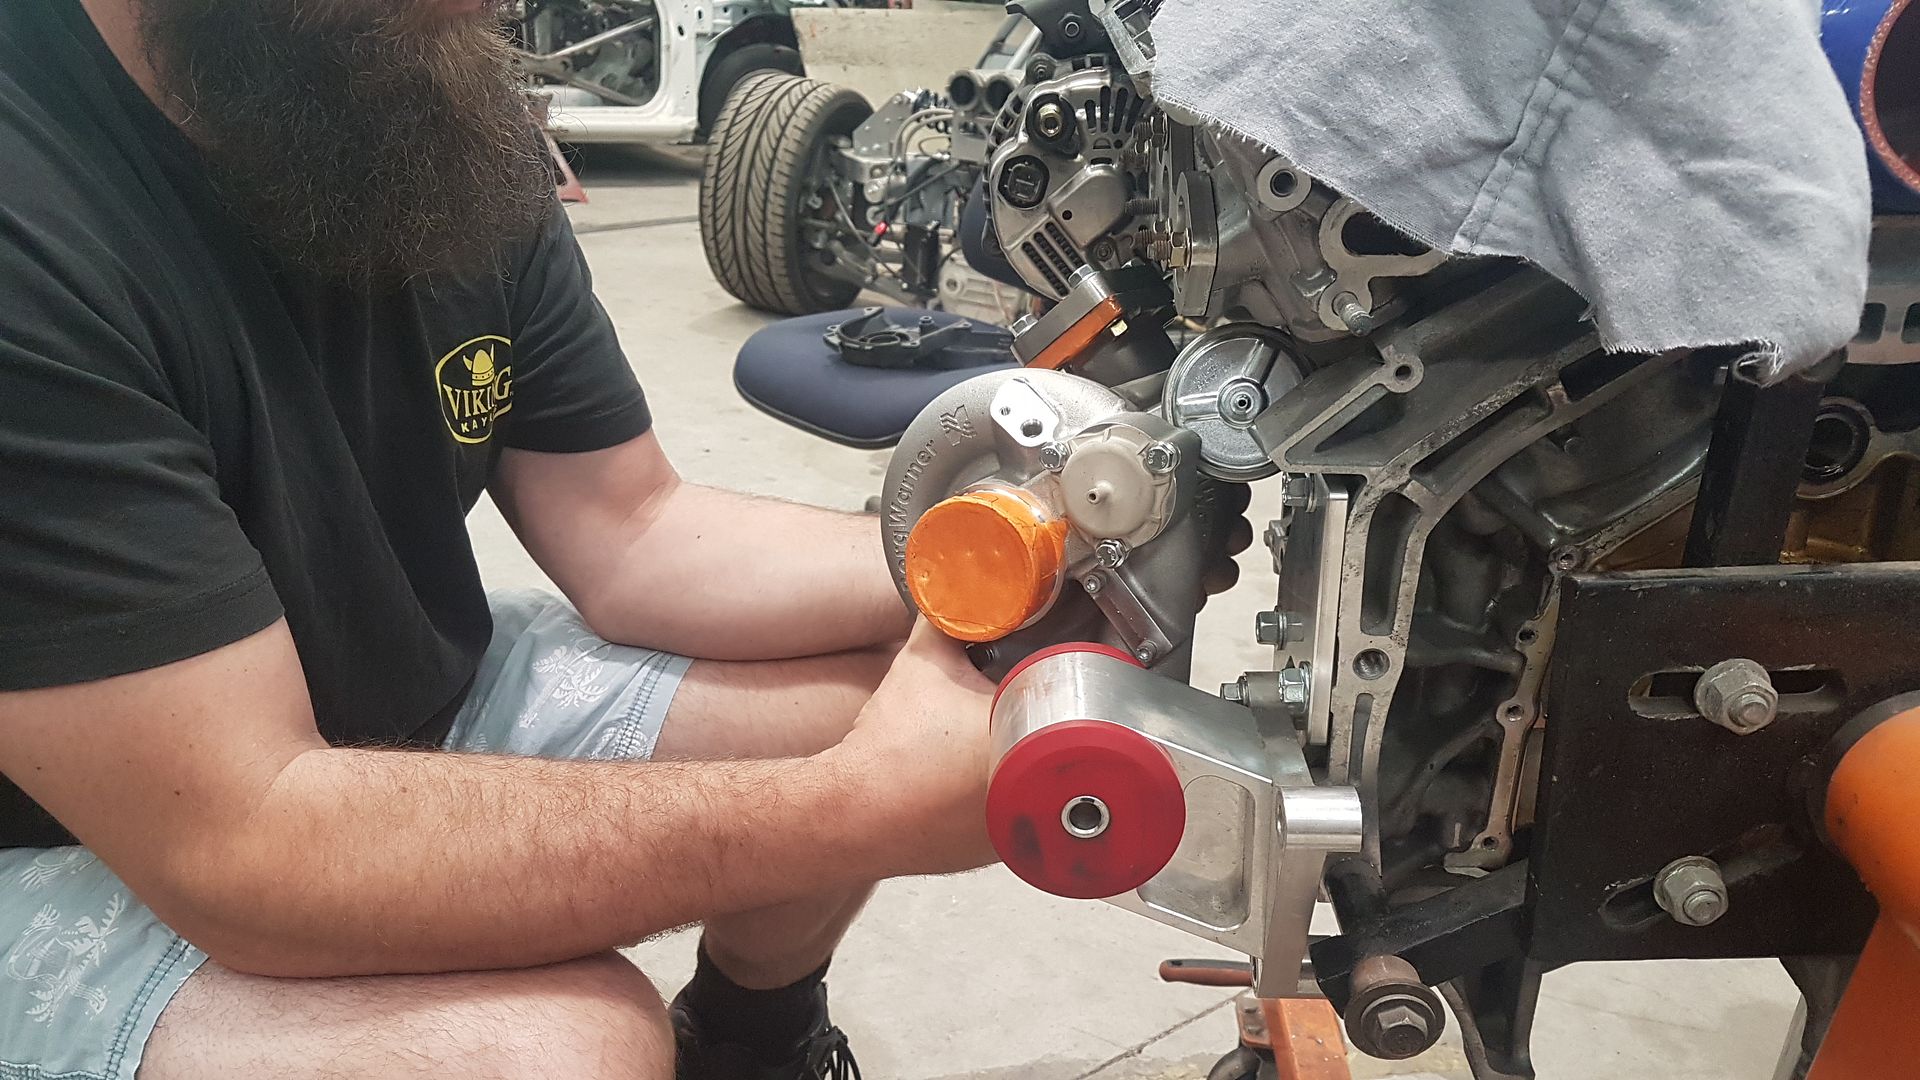
We took our pre-cut flanges at both ends and created a jig we can use to fab the manifolds easily off the car. Luckily we have spare engines to be able to test easily in and out of the car.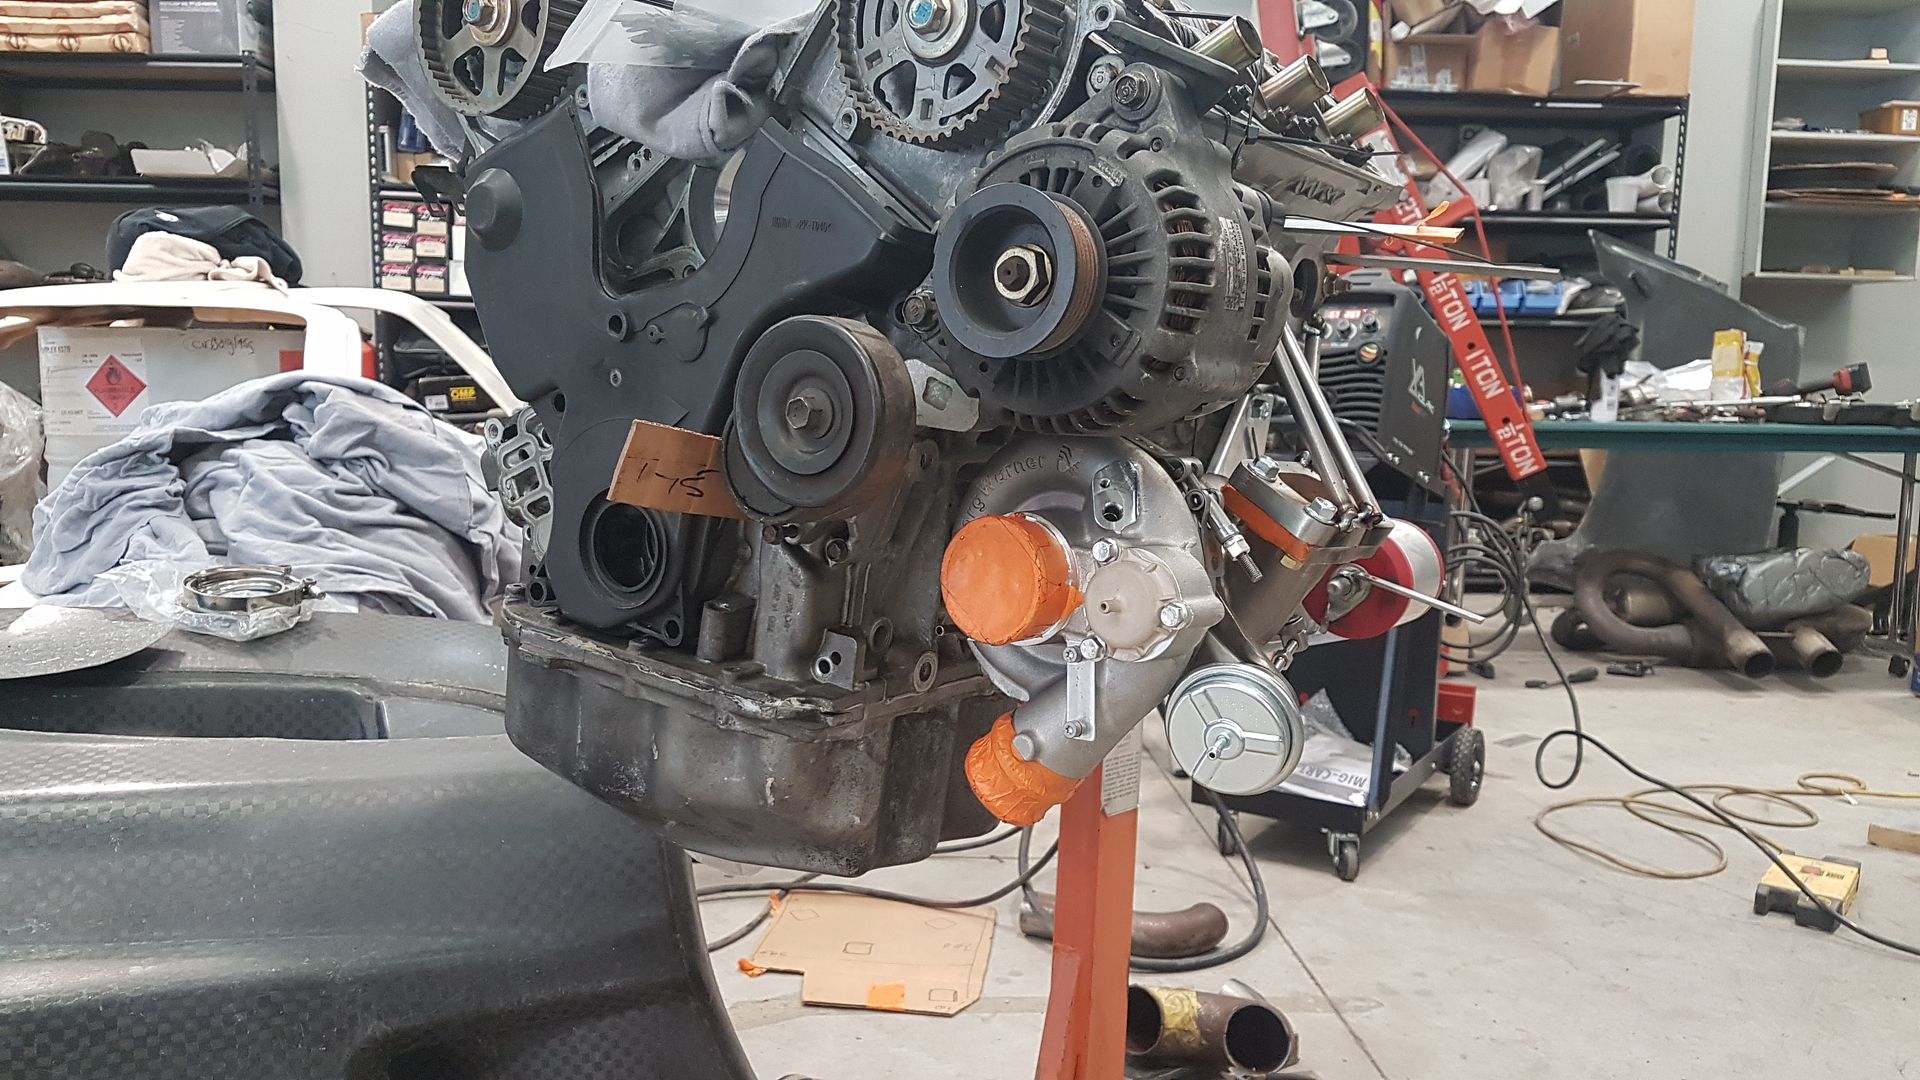
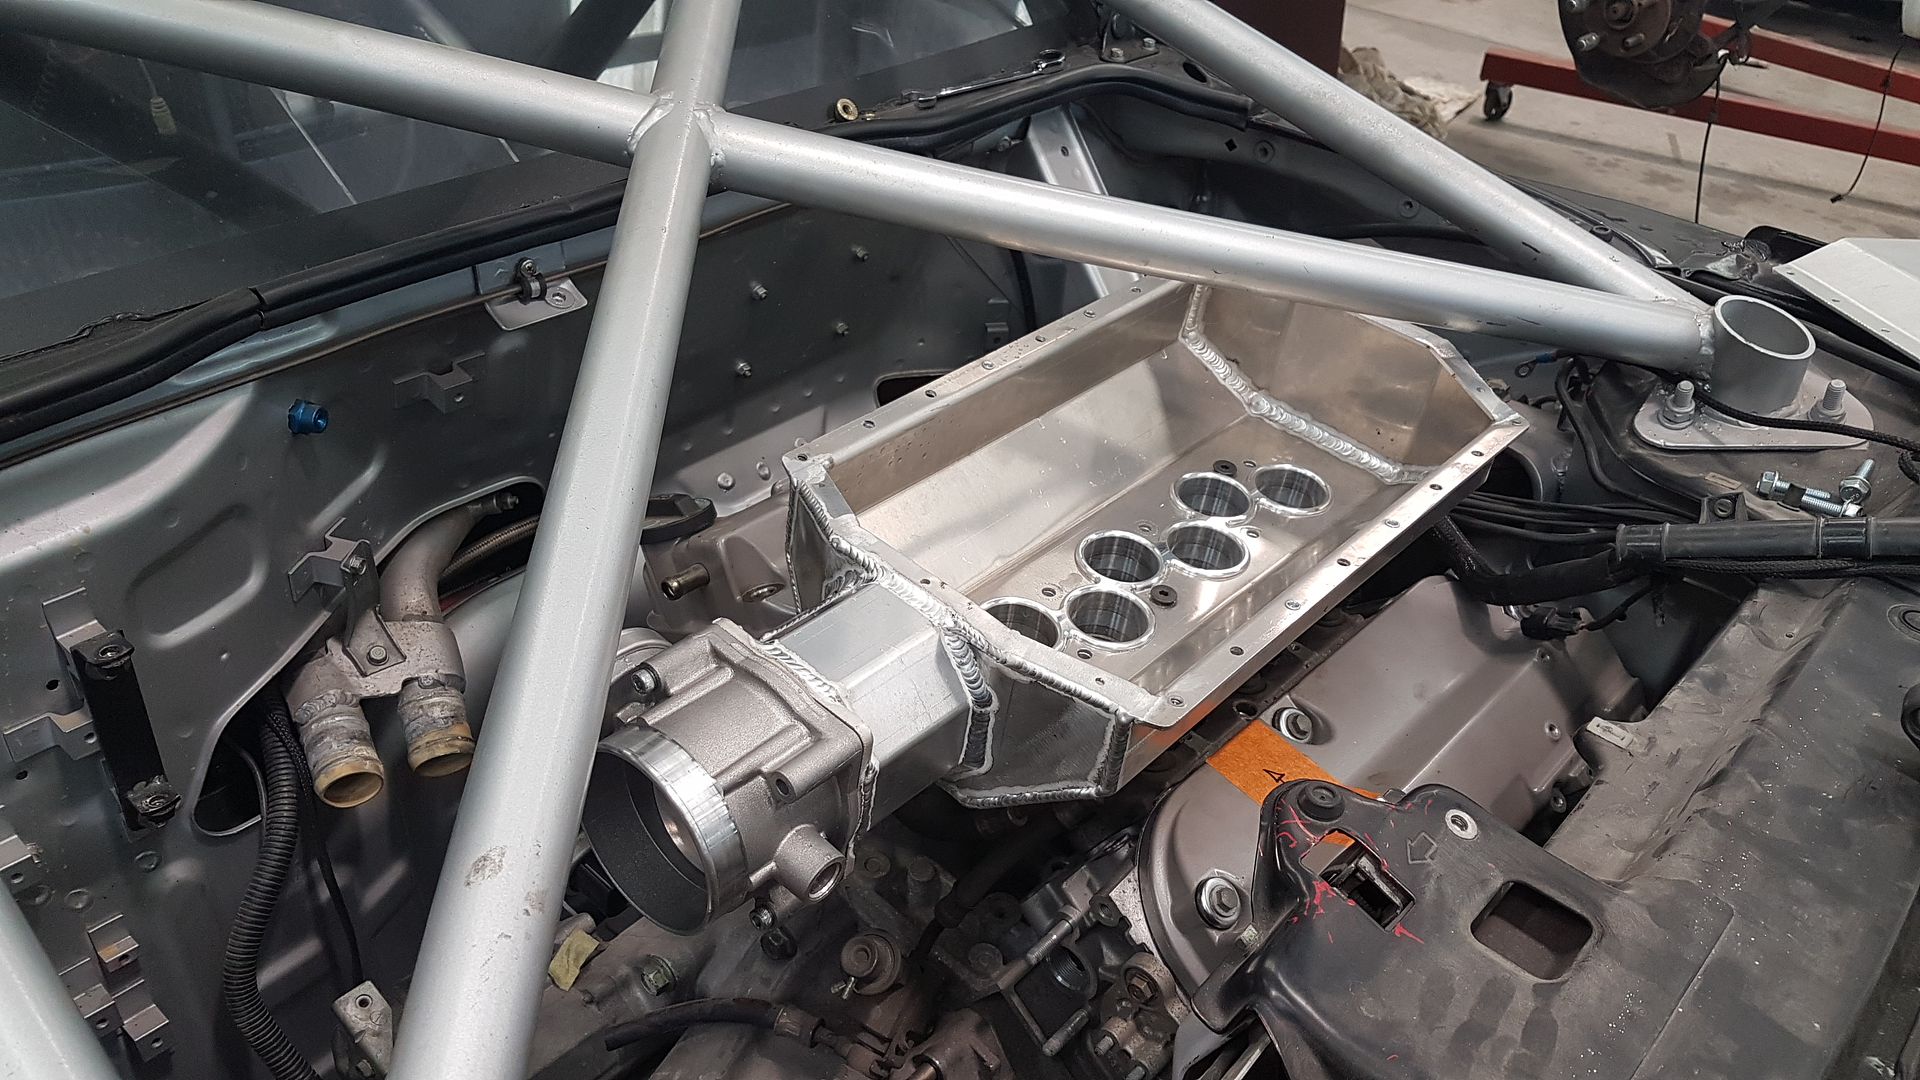
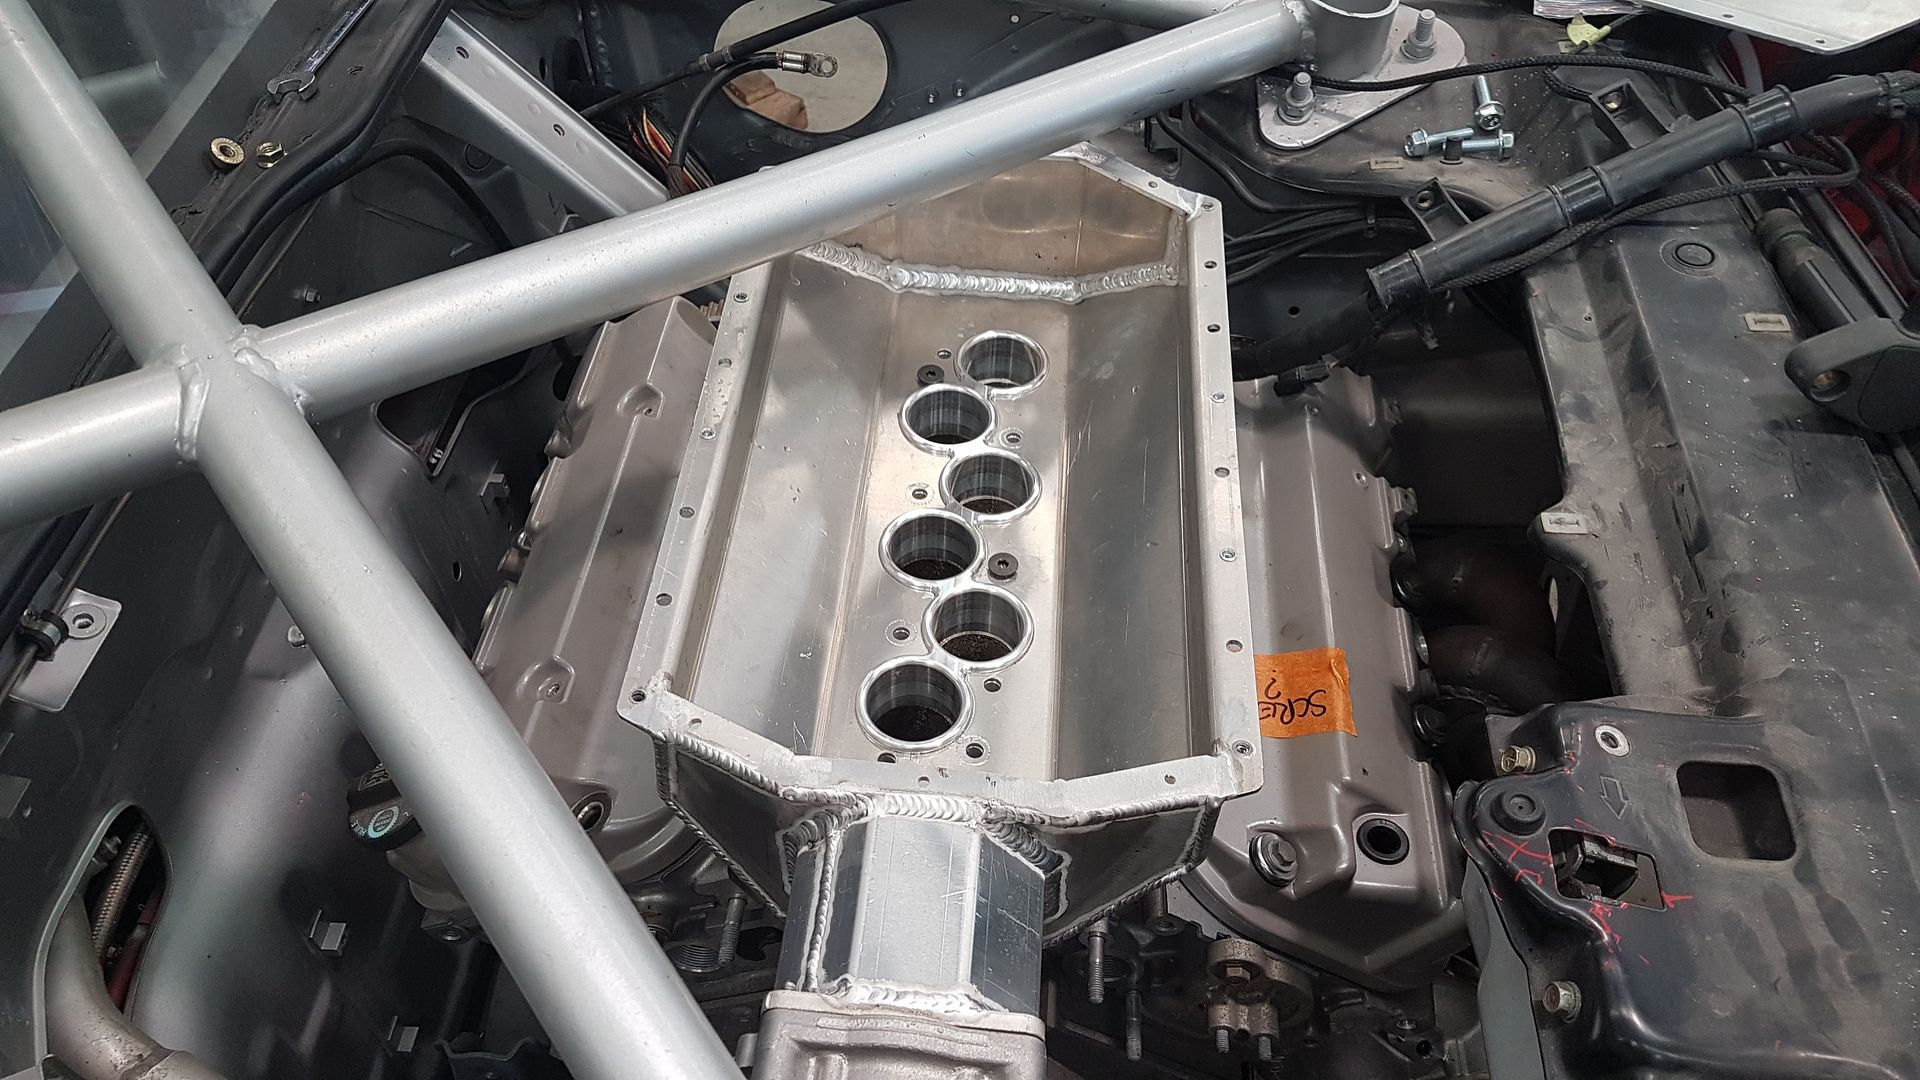
We're not quite finished with the manifolds yet but you get the idea. Next I wanted to create an intake plenum to suit our needs and I started as always with a 3D print to try a few designs out......

Now I had a good design we visited our friend the Haas CNC ……..
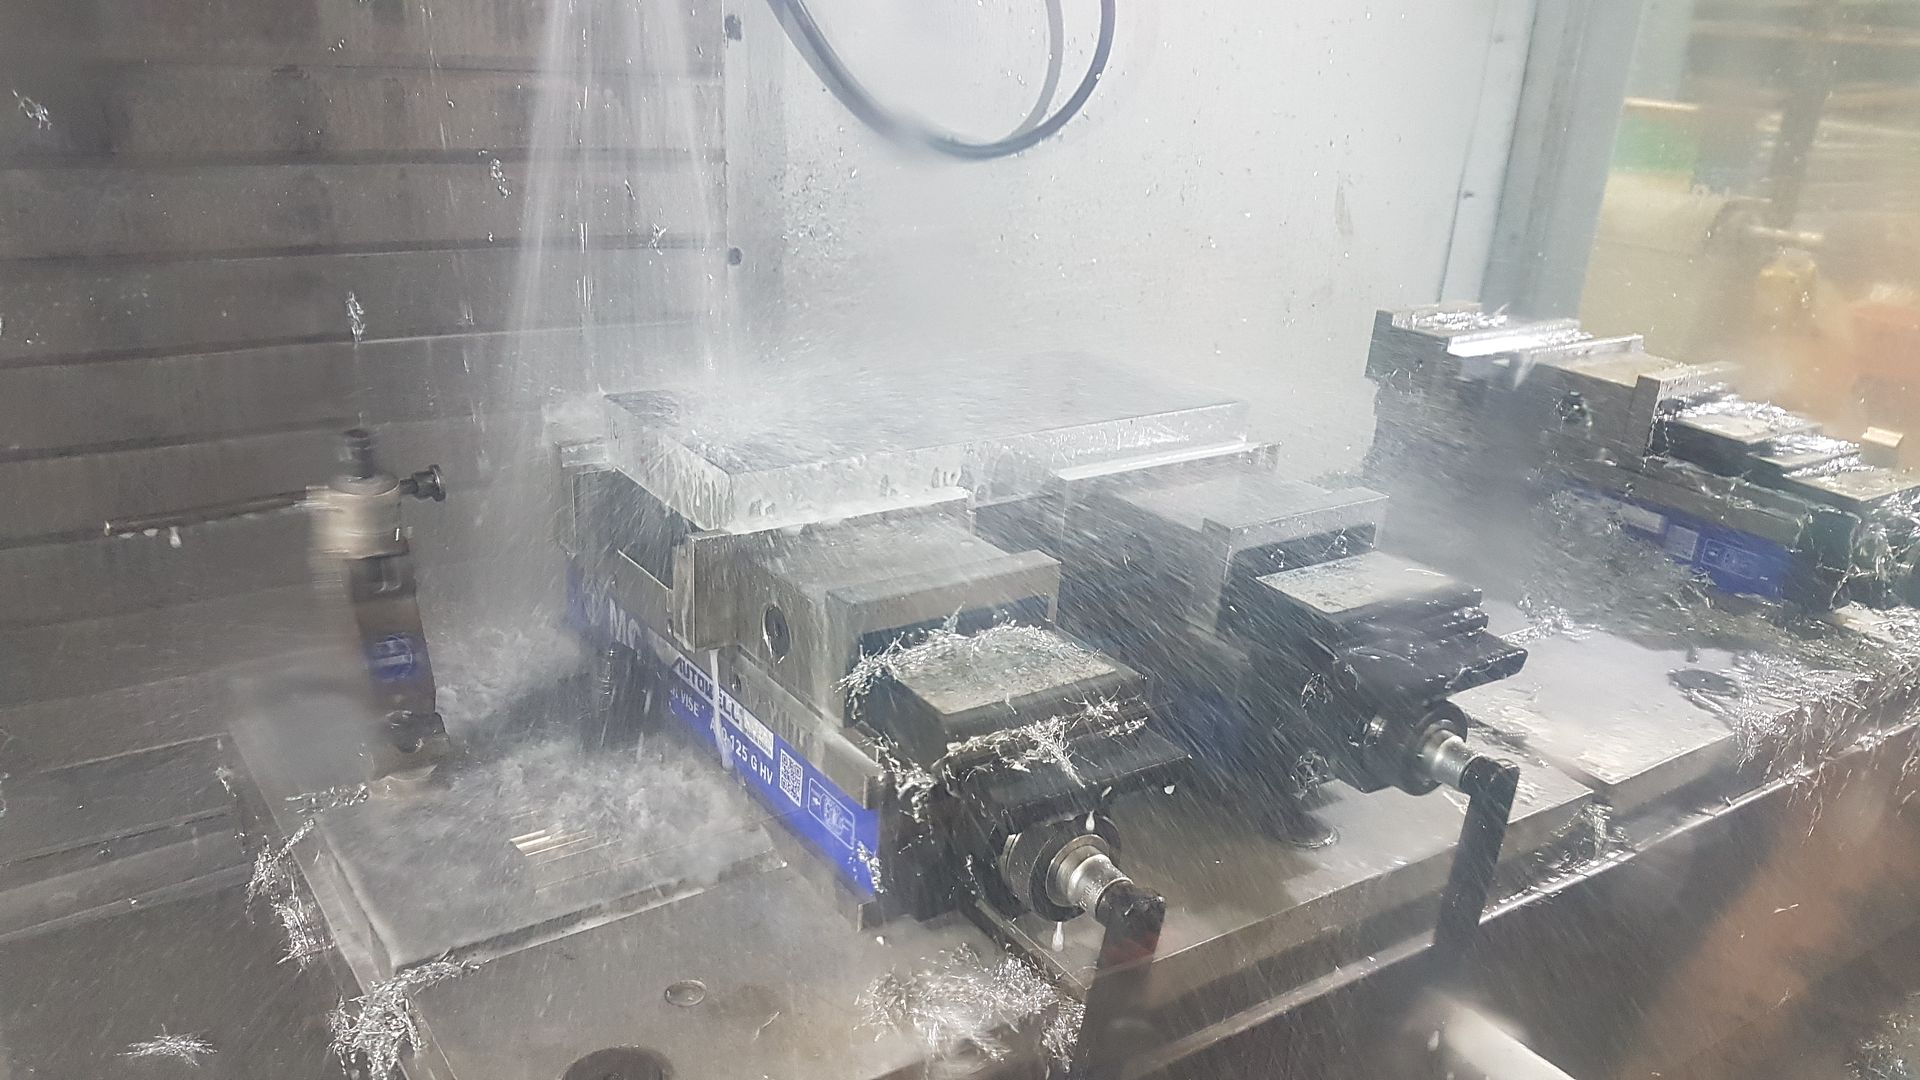
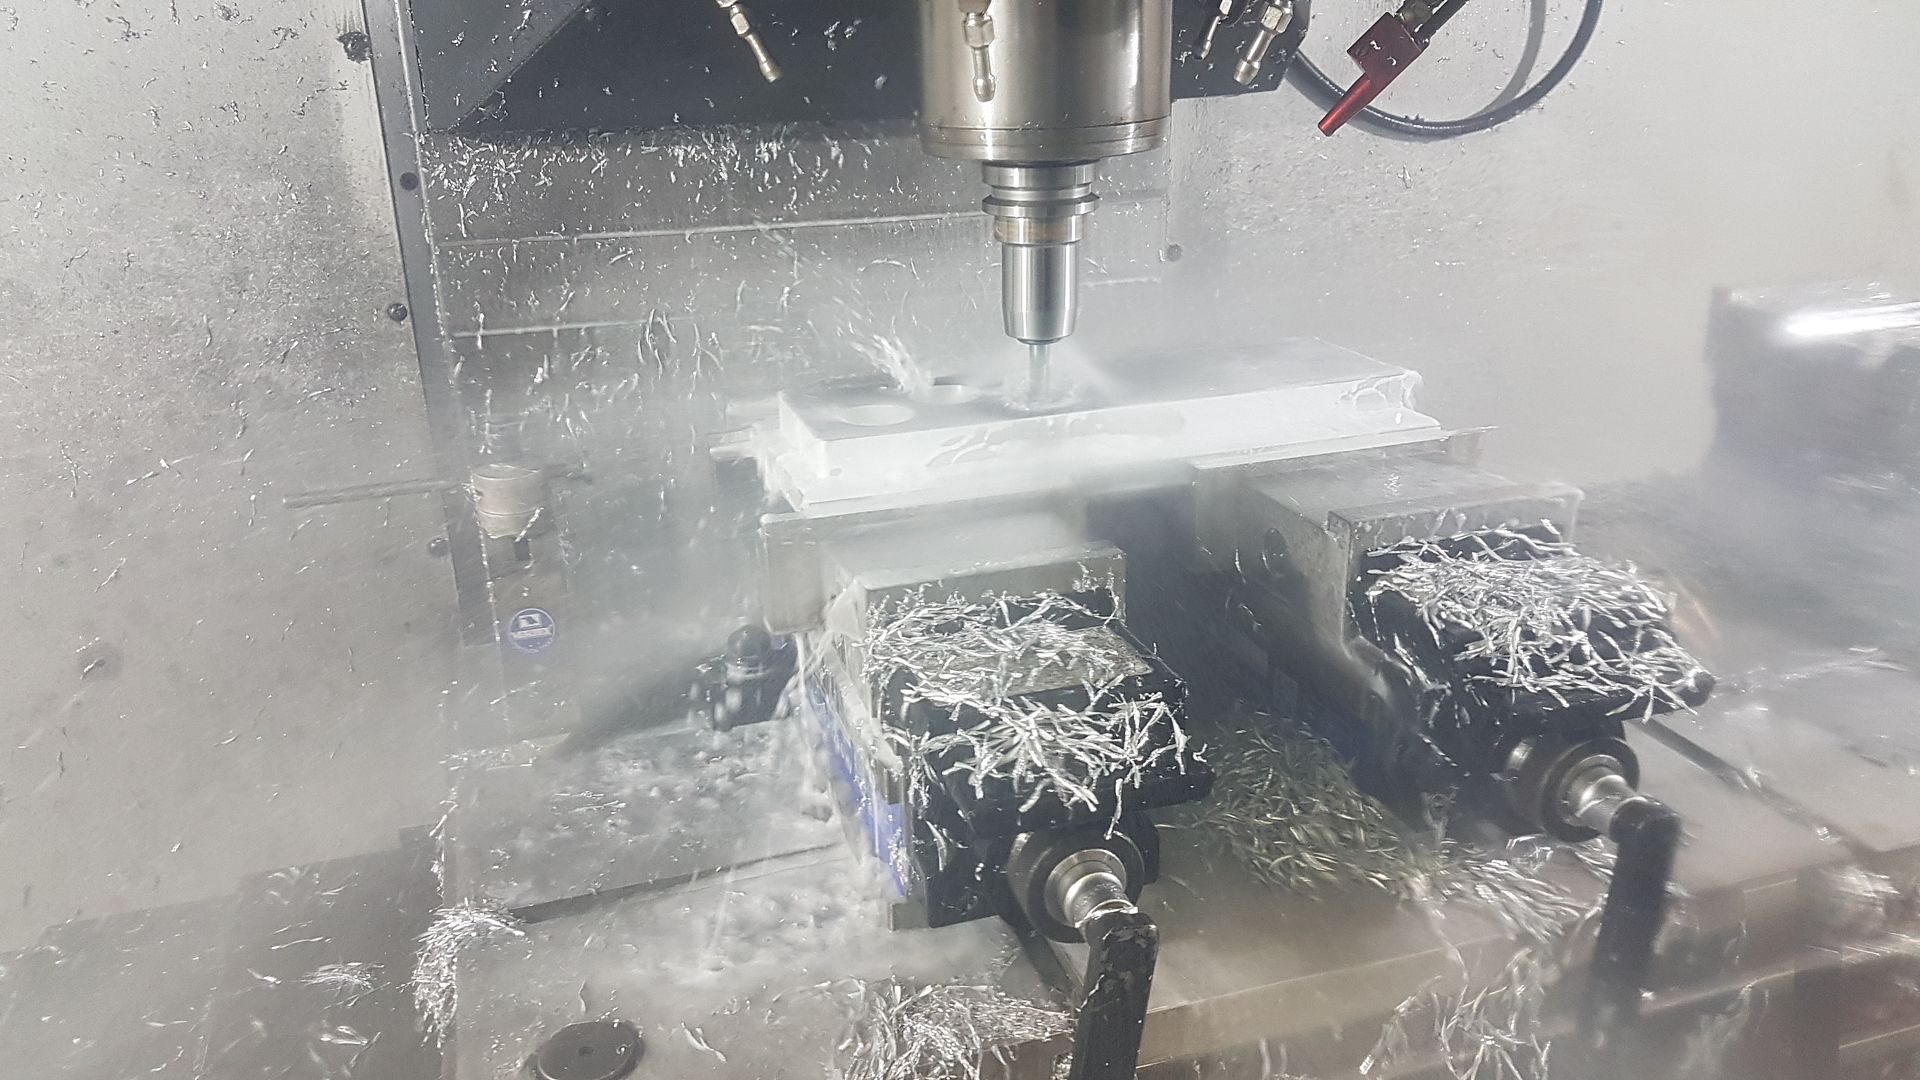
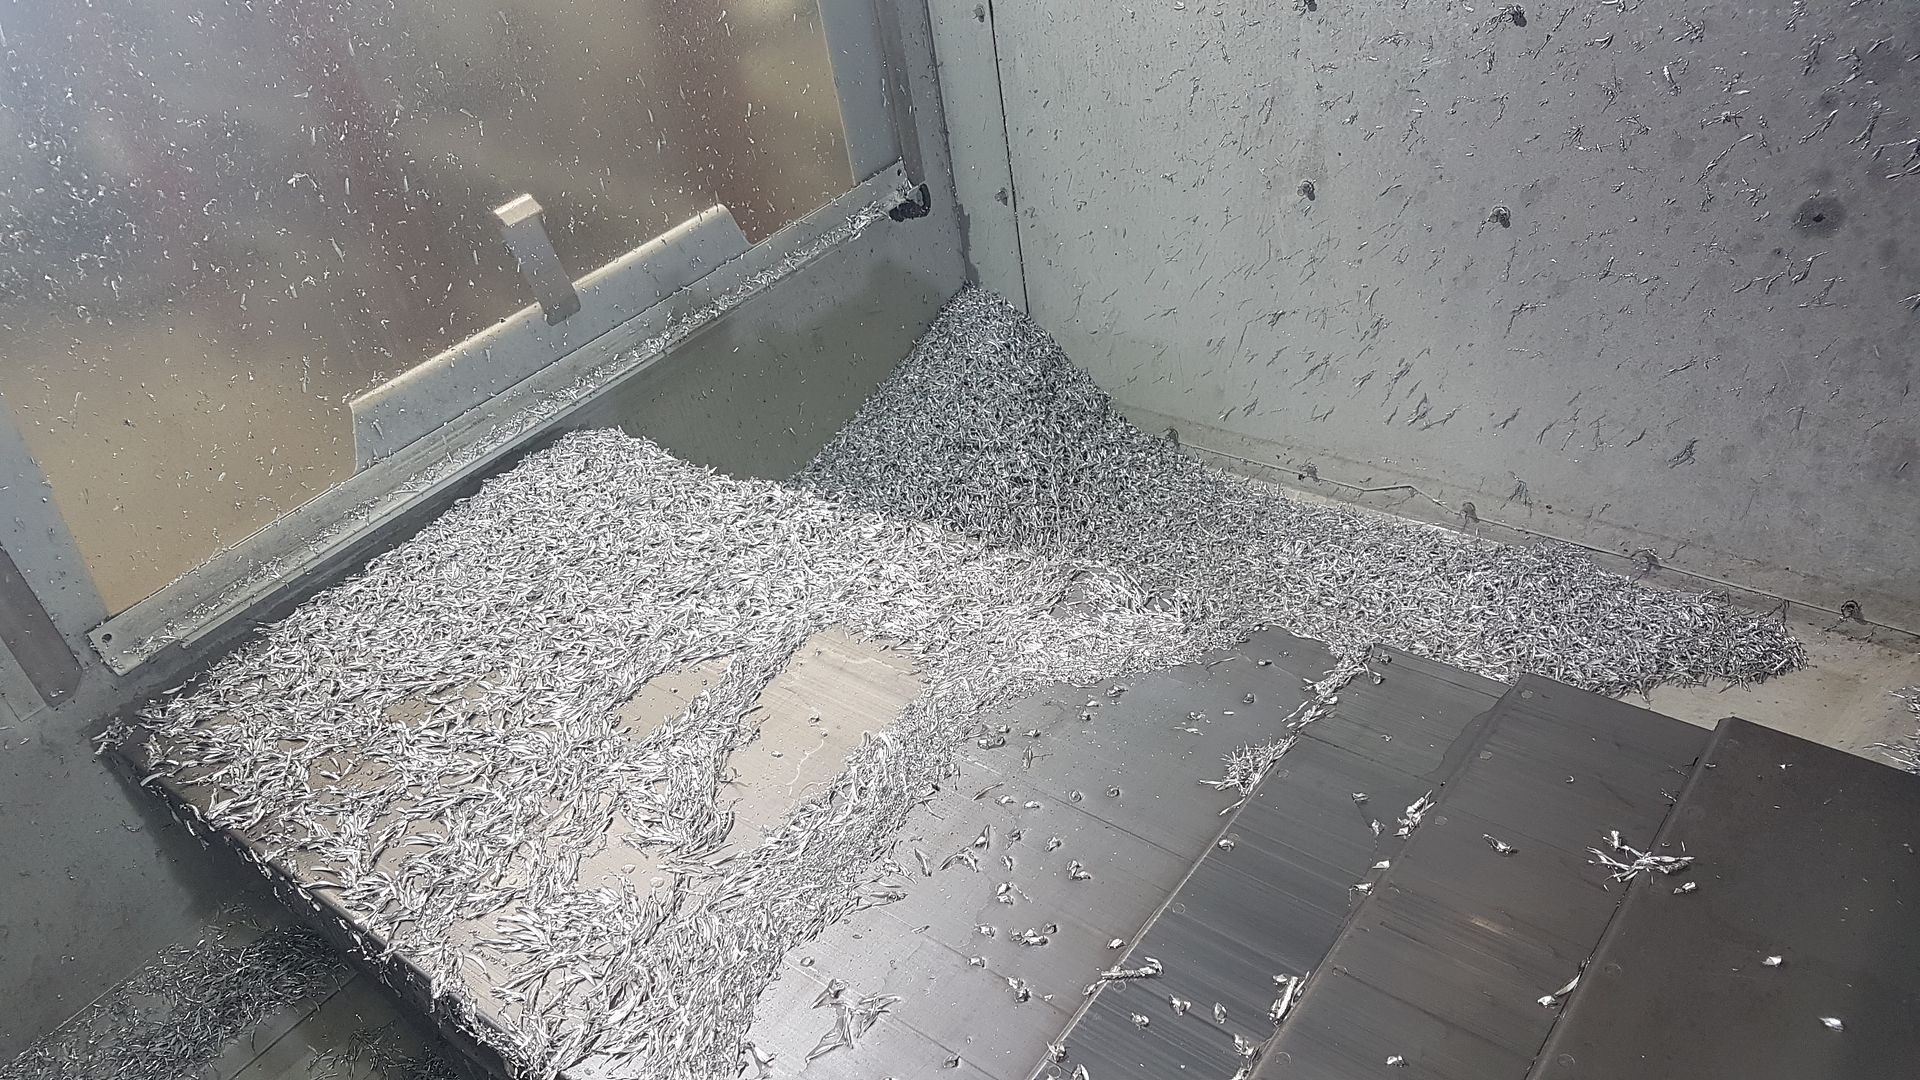
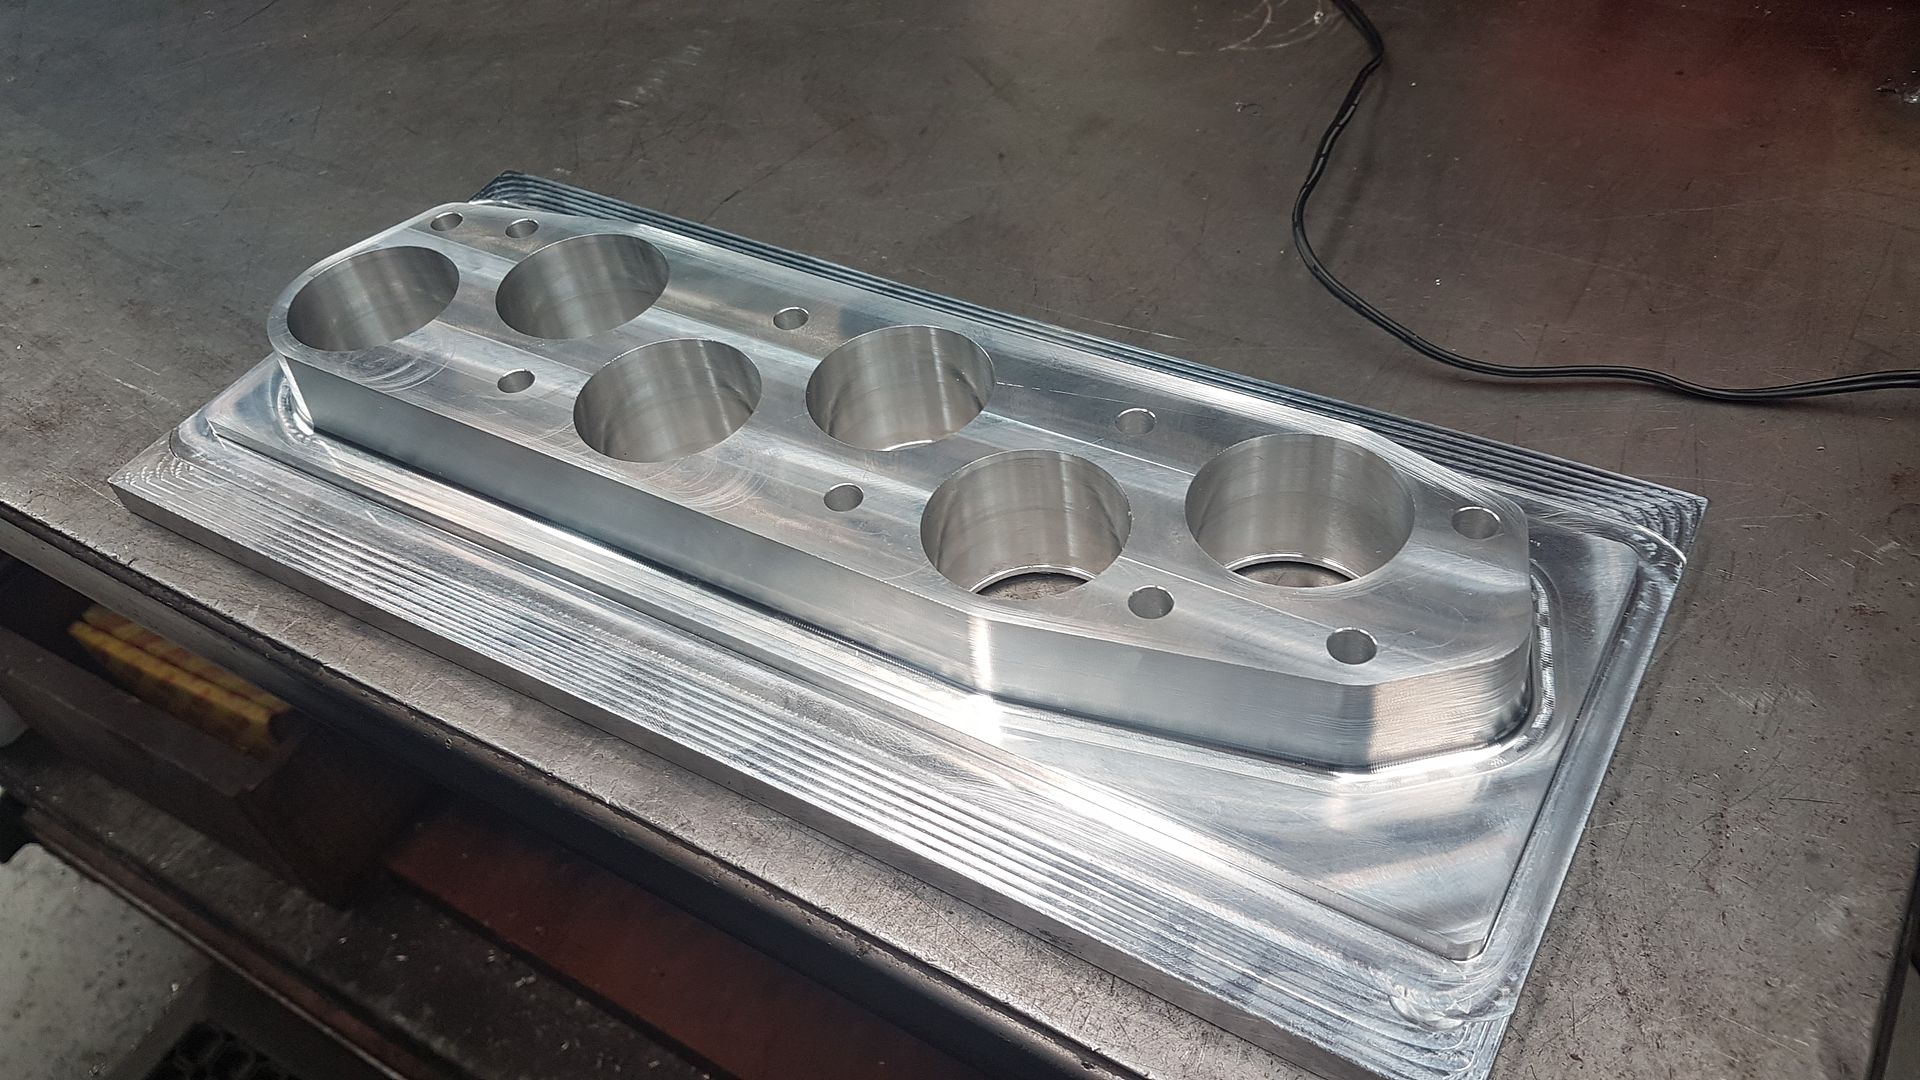
https://youtu.be/i1QHv_tSXag
Next I drew up the parts I needed for the airbox to sit on top of the new plate and Orrsumm Laser Services helped us laser cut it all out and then we used the CNC bender to bend up the design I wanted and it fit perfectly...…..success !
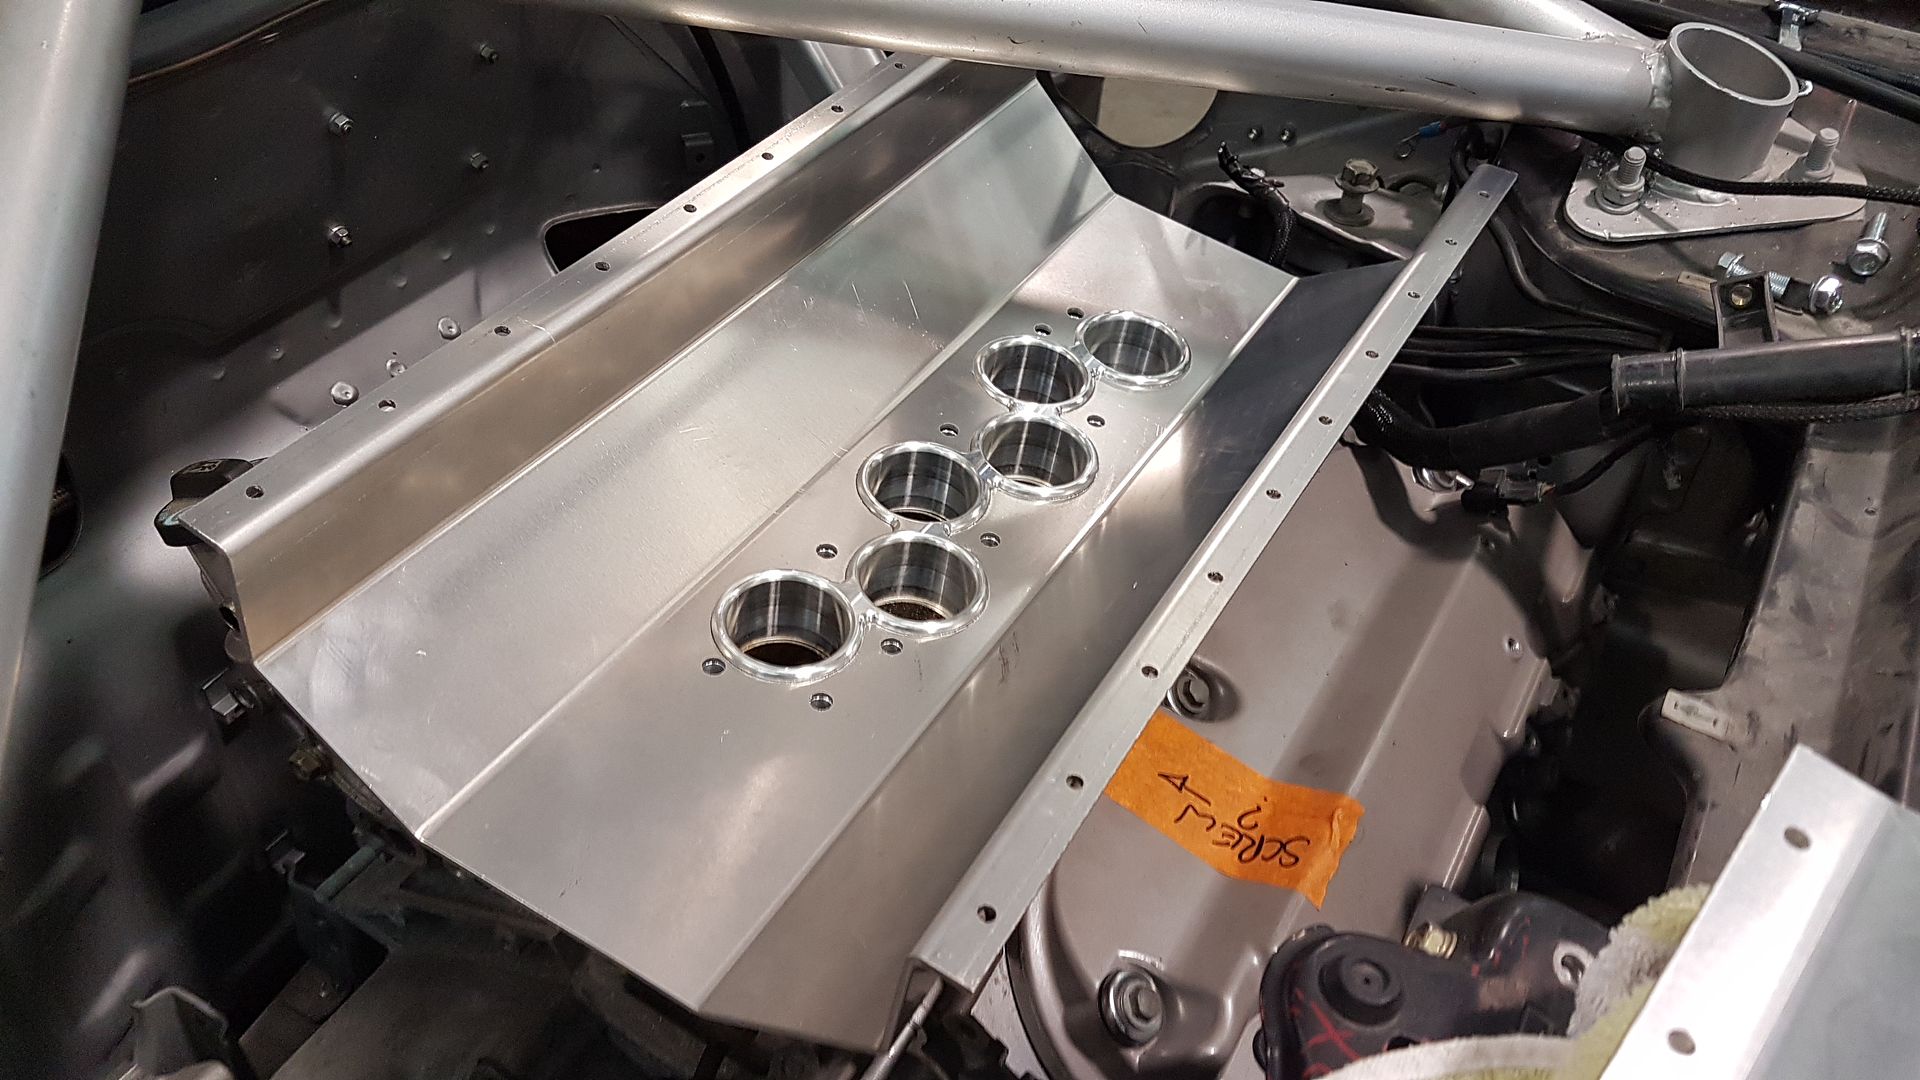
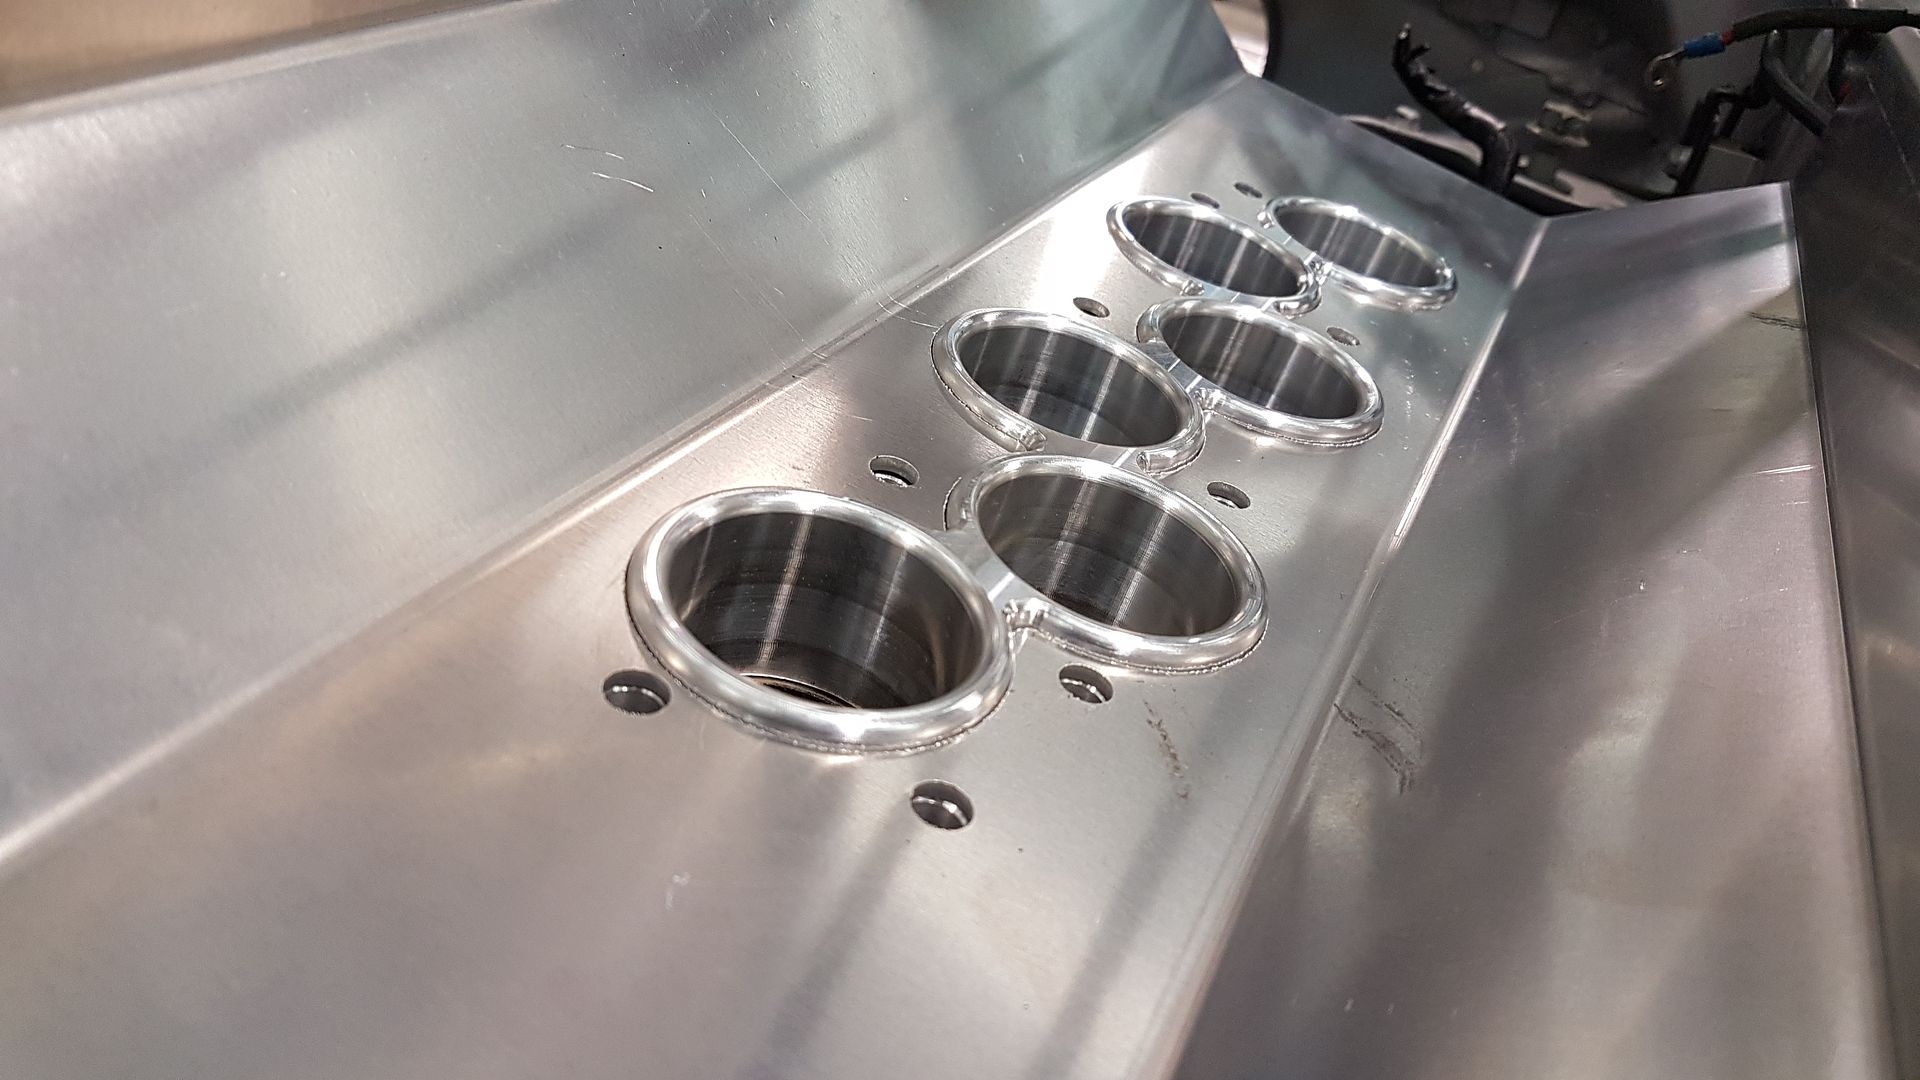


Zac and Bam tag teamed the welding on this puppy and I think it looks amazing. Obviously it's not finished yet as I have to cut a seal for the top etc, but you get the idea...…..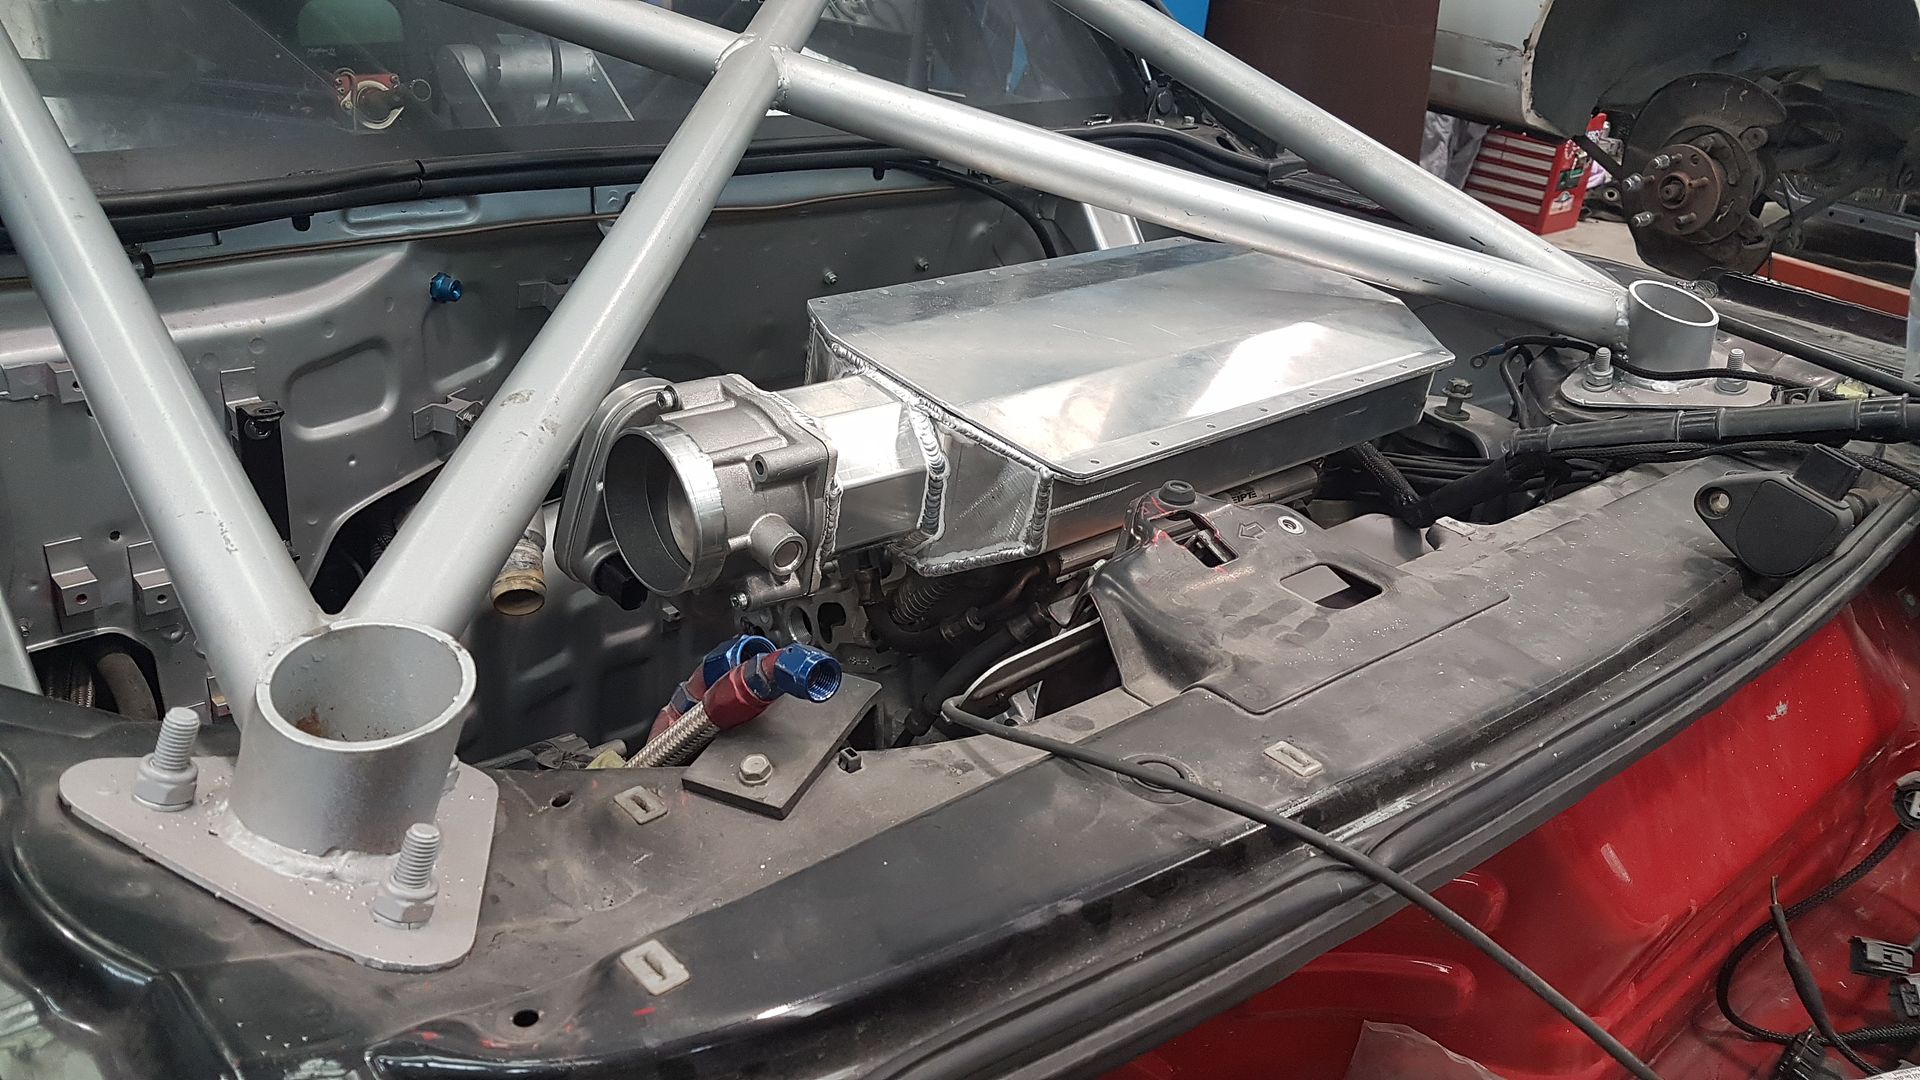
Next we'll start on the intercooler setup and we've got something a bit funky going on with that, but I'll post some more details once I've got pics to back it up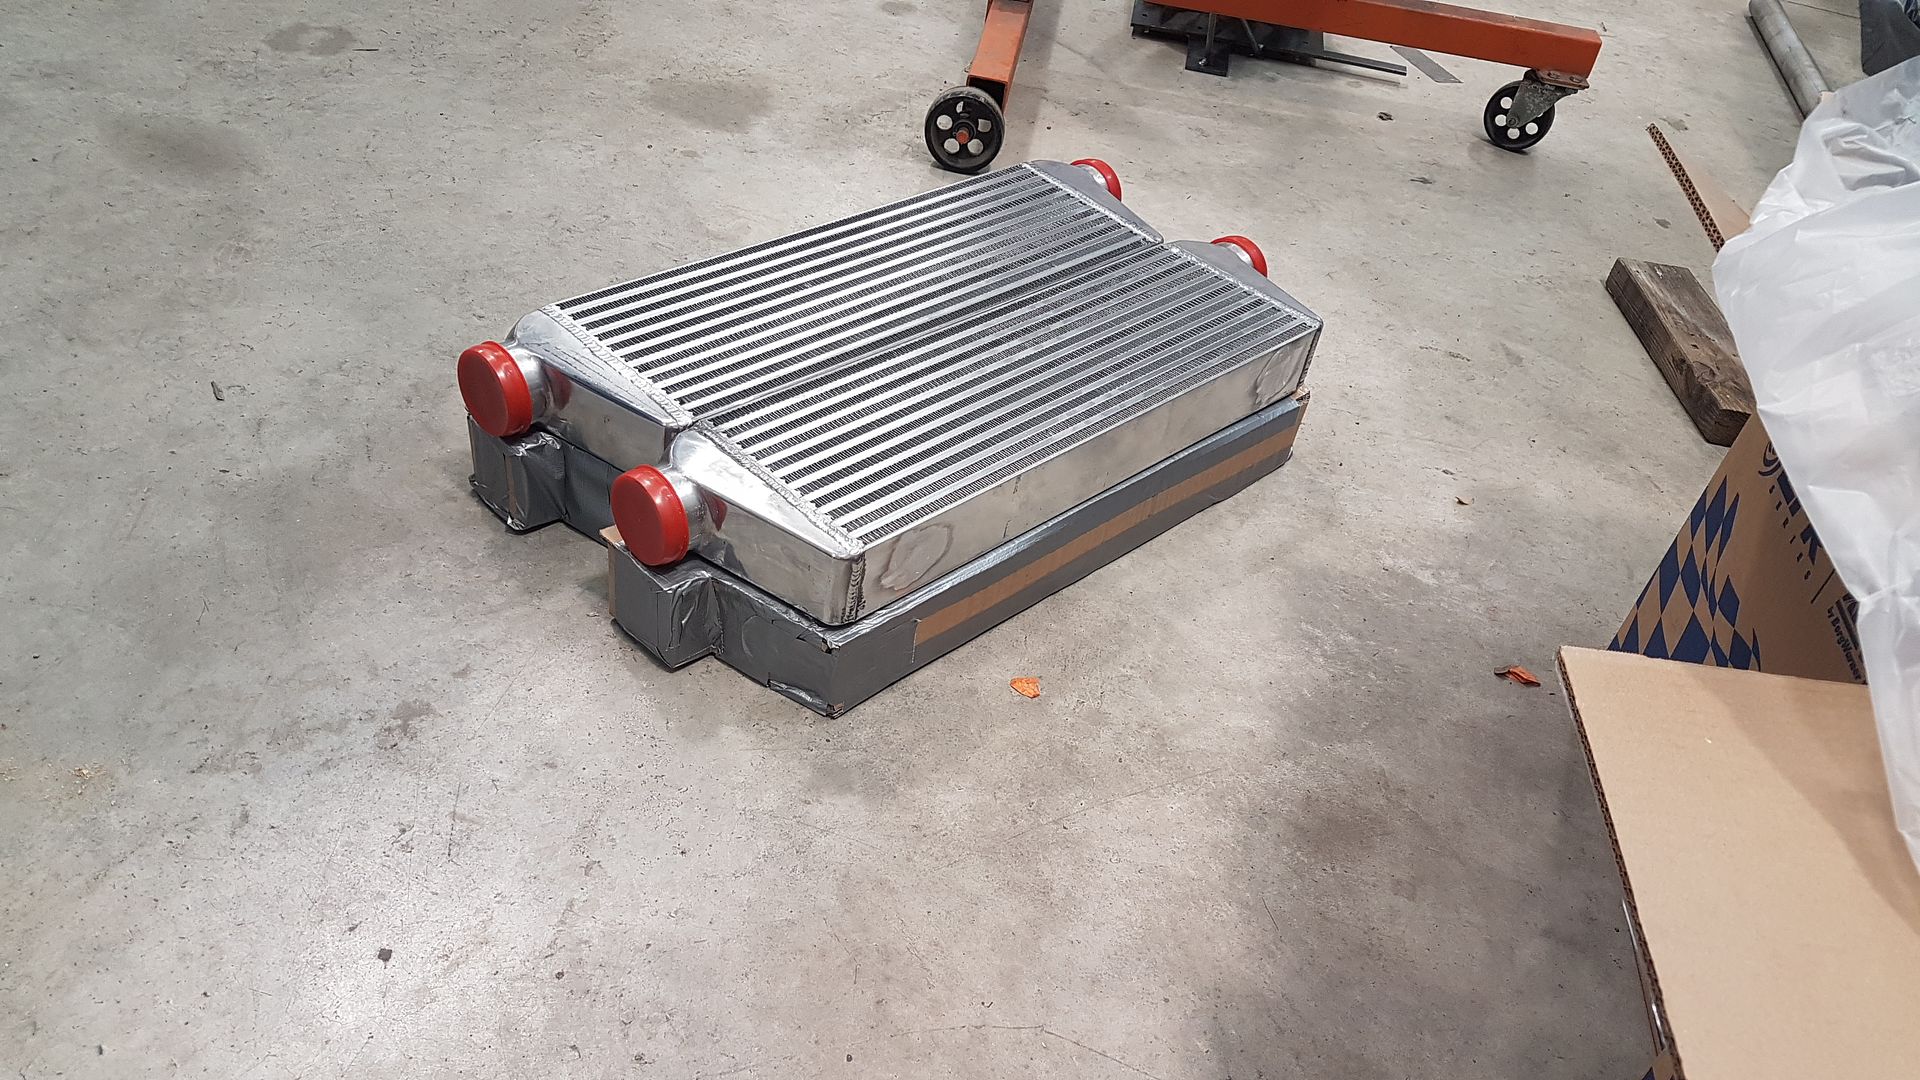
More updates in the new year I'm afraid as I'm about to jump a plane to the UK and Europe for Xmas and New Year...…
That weight loss means we can pretty much add twin turbos and intercoolers and yet gain no extra weight ! Not only that but the J32A2 engine we've chosen to base our build on is already more powerful even without turbo's so it's a great starting point.
You can see here visually the difference in size.

After a good chat with my mate Chris from Prestige Tuning and Motorsport we selected a twin Borg Warner EFR 6258 setup. We went through the whole single vs twin discussion and I did flip back and forth. To be honest I really don't think either are good or bad, just that Zac and I liked the idea of twin turbos on a V engine so that's what we went for. The EFR 6258 should come on nice and early with a 3.2L engine and each turbo is rated for 440HP so technically we should be able to see close to 800-850HP but I doubt we'll be going that far, but we intend to build the engine to be able to cope with that.

Bam (fab master) and I spent pretty much a whole day going through plans and looking at where we could fit the turbos to best run the intake and exhaust etc...…

We took our pre-cut flanges at both ends and created a jig we can use to fab the manifolds easily off the car. Luckily we have spare engines to be able to test easily in and out of the car.


We're not quite finished with the manifolds yet but you get the idea. Next I wanted to create an intake plenum to suit our needs and I started as always with a 3D print to try a few designs out......


Now I had a good design we visited our friend the Haas CNC ……..


https://youtu.be/i1QHv_tSXag
Next I drew up the parts I needed for the airbox to sit on top of the new plate and Orrsumm Laser Services helped us laser cut it all out and then we used the CNC bender to bend up the design I wanted and it fit perfectly...…..success !


Zac and Bam tag teamed the welding on this puppy and I think it looks amazing. Obviously it's not finished yet as I have to cut a seal for the top etc, but you get the idea...…..


Next we'll start on the intercooler setup and we've got something a bit funky going on with that, but I'll post some more details once I've got pics to back it up

More updates in the new year I'm afraid as I'm about to jump a plane to the UK and Europe for Xmas and New Year...…
far out fraser, that's some serious and impressive engineering !
What sort of kW are you targetting? (maybe it's just as much as you can get get
What sort of kW are you targetting? (maybe it's just as much as you can get get
Hey Sparky, to be honest the car is getting pretty close to 2300lb now with the new front guards and bonnet. Once we do the carbon doors we'll be closer to 2200lb so we think that 500-550HP at the wheels will be more than enough to put the shits up us with our driving skills, but as our skills grow or if we get someone more capable then we want to have it do as much as it can. Turbo's are good for 440HP each so shouldn't be impossible to see 800-850HP at the flywheel I hope if we ever want to go that far.
We're building the engine with a 900HP figure in mind to give us some headroom. More to follow in the new year when I'm back.
We're building the engine with a 900HP figure in mind to give us some headroom. More to follow in the new year when I'm back.
It seems like everytime I post here it's after a massive break in between posts...…..but I guess that's life. Just haven't really had the time to focus on the car for a sustained time in one hit, just bits here and there.
Luckily I've also got some really good mates with good skills who have been helping here and there too so we are moving forward.
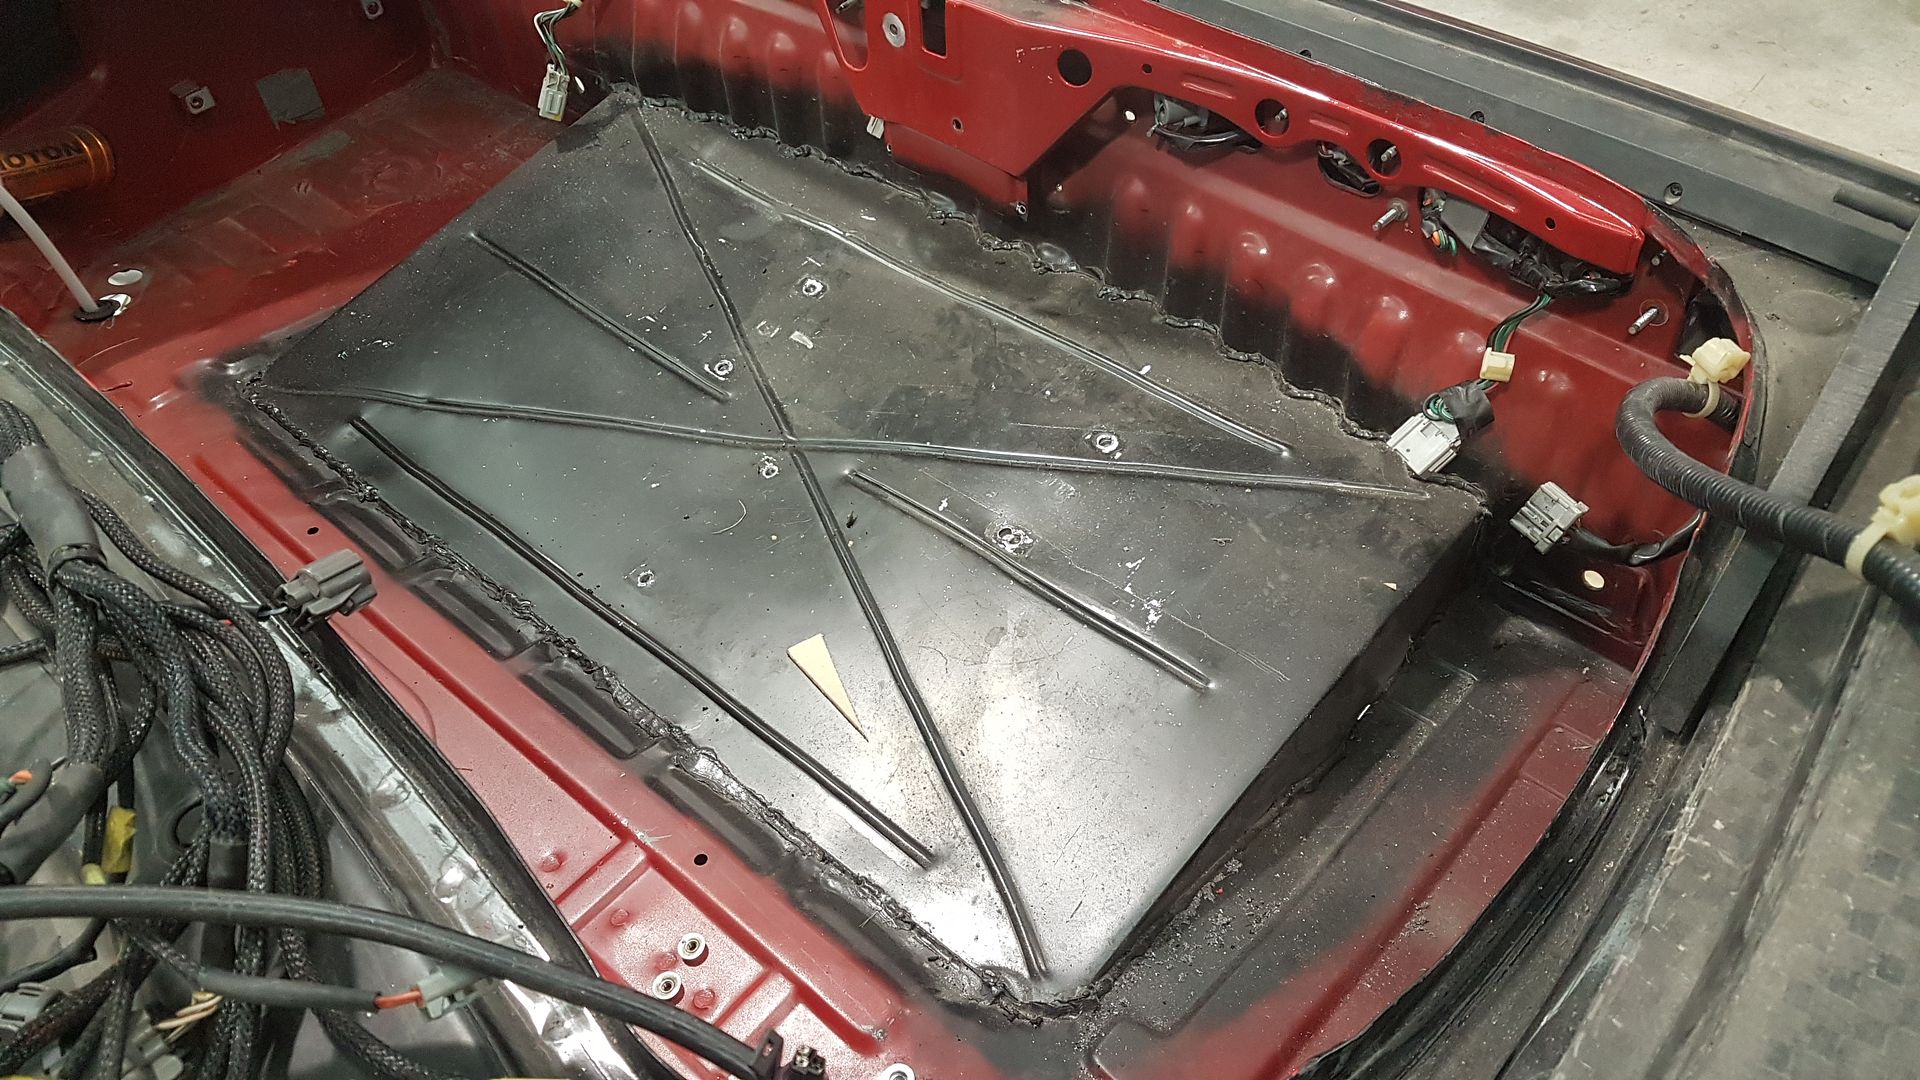
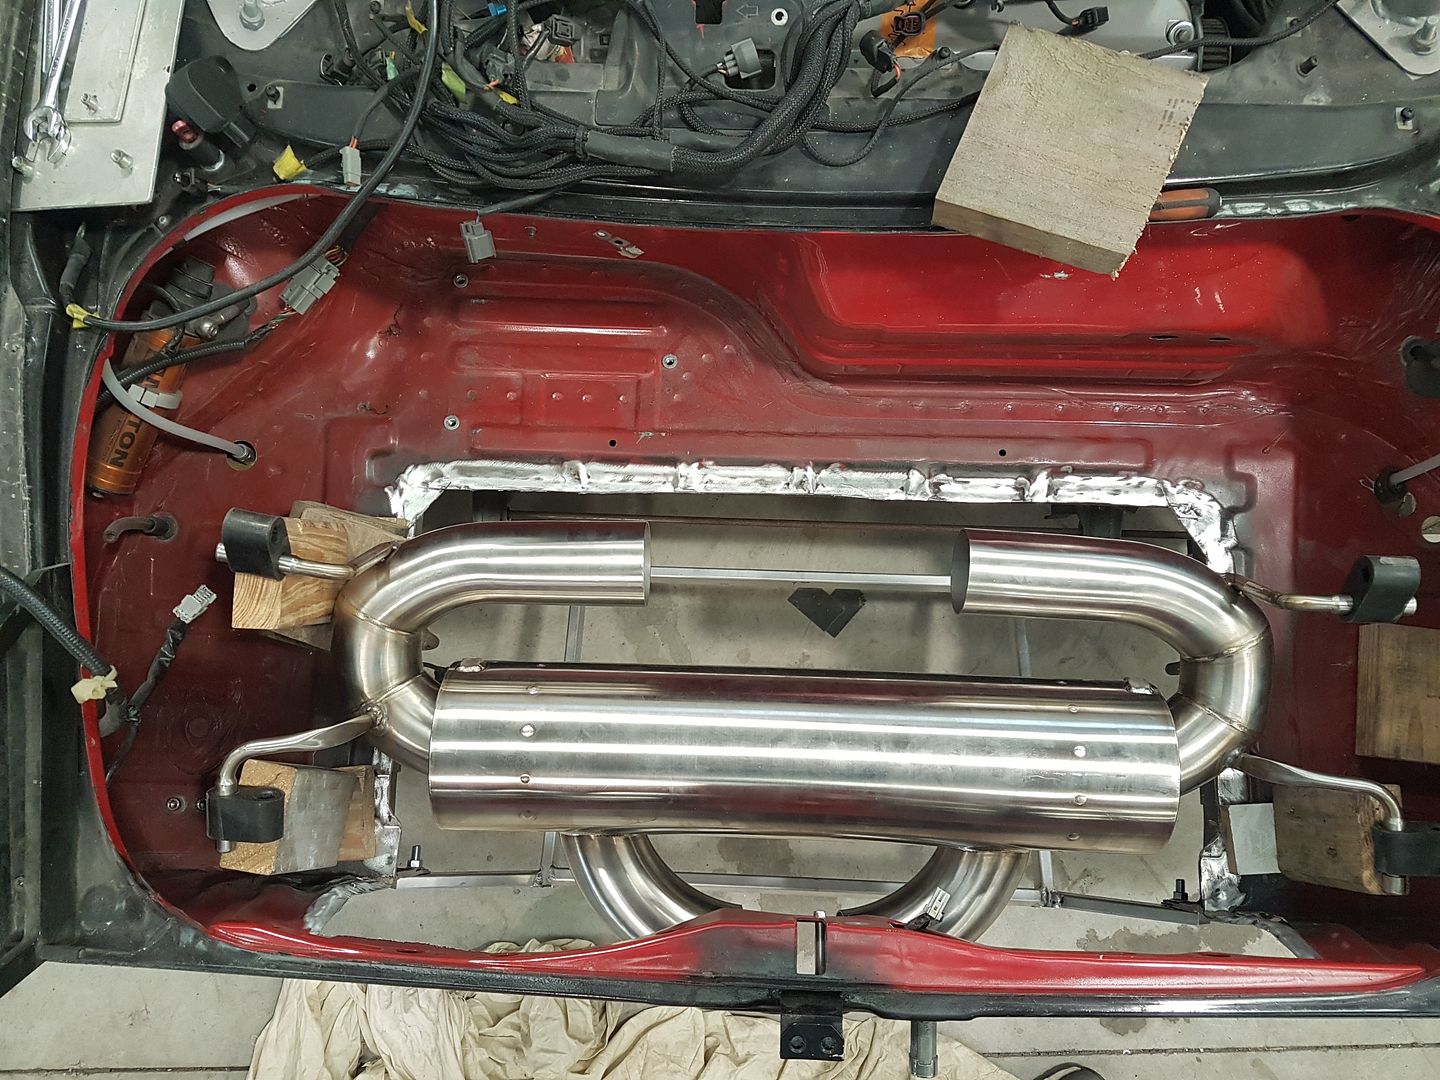
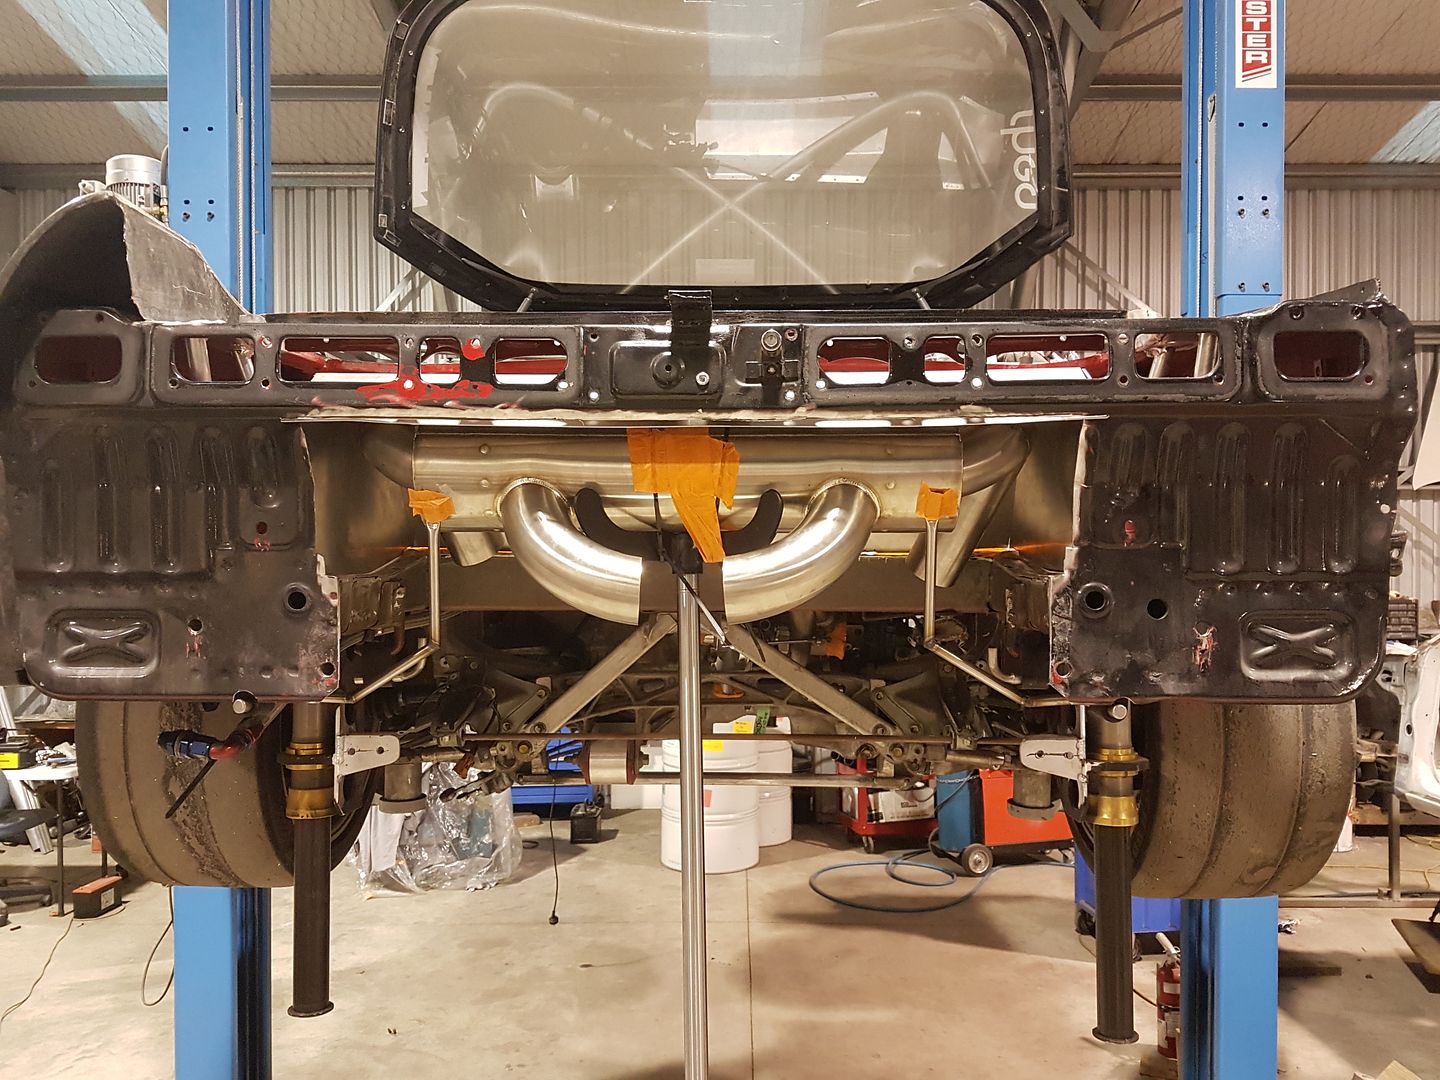
My friend Zac and I decided that even though a J swap into an NSX isn't that common, especially in a race car, but it has been done so we wanted to make ours different. We decided that instead of the usual water to air intercooler we'd use air to air. Nothing that special there, but since we had the freedom to move things around to suit we started with cutting out the floor of the boot. This had already been done before as we raised the floor a small amount to fit our old exhaust, but this time we needed to go higher so we had to cut out the old work and start again. The old one was basically tack welded in place and then sealed with urethane sealant so was easy to remove.
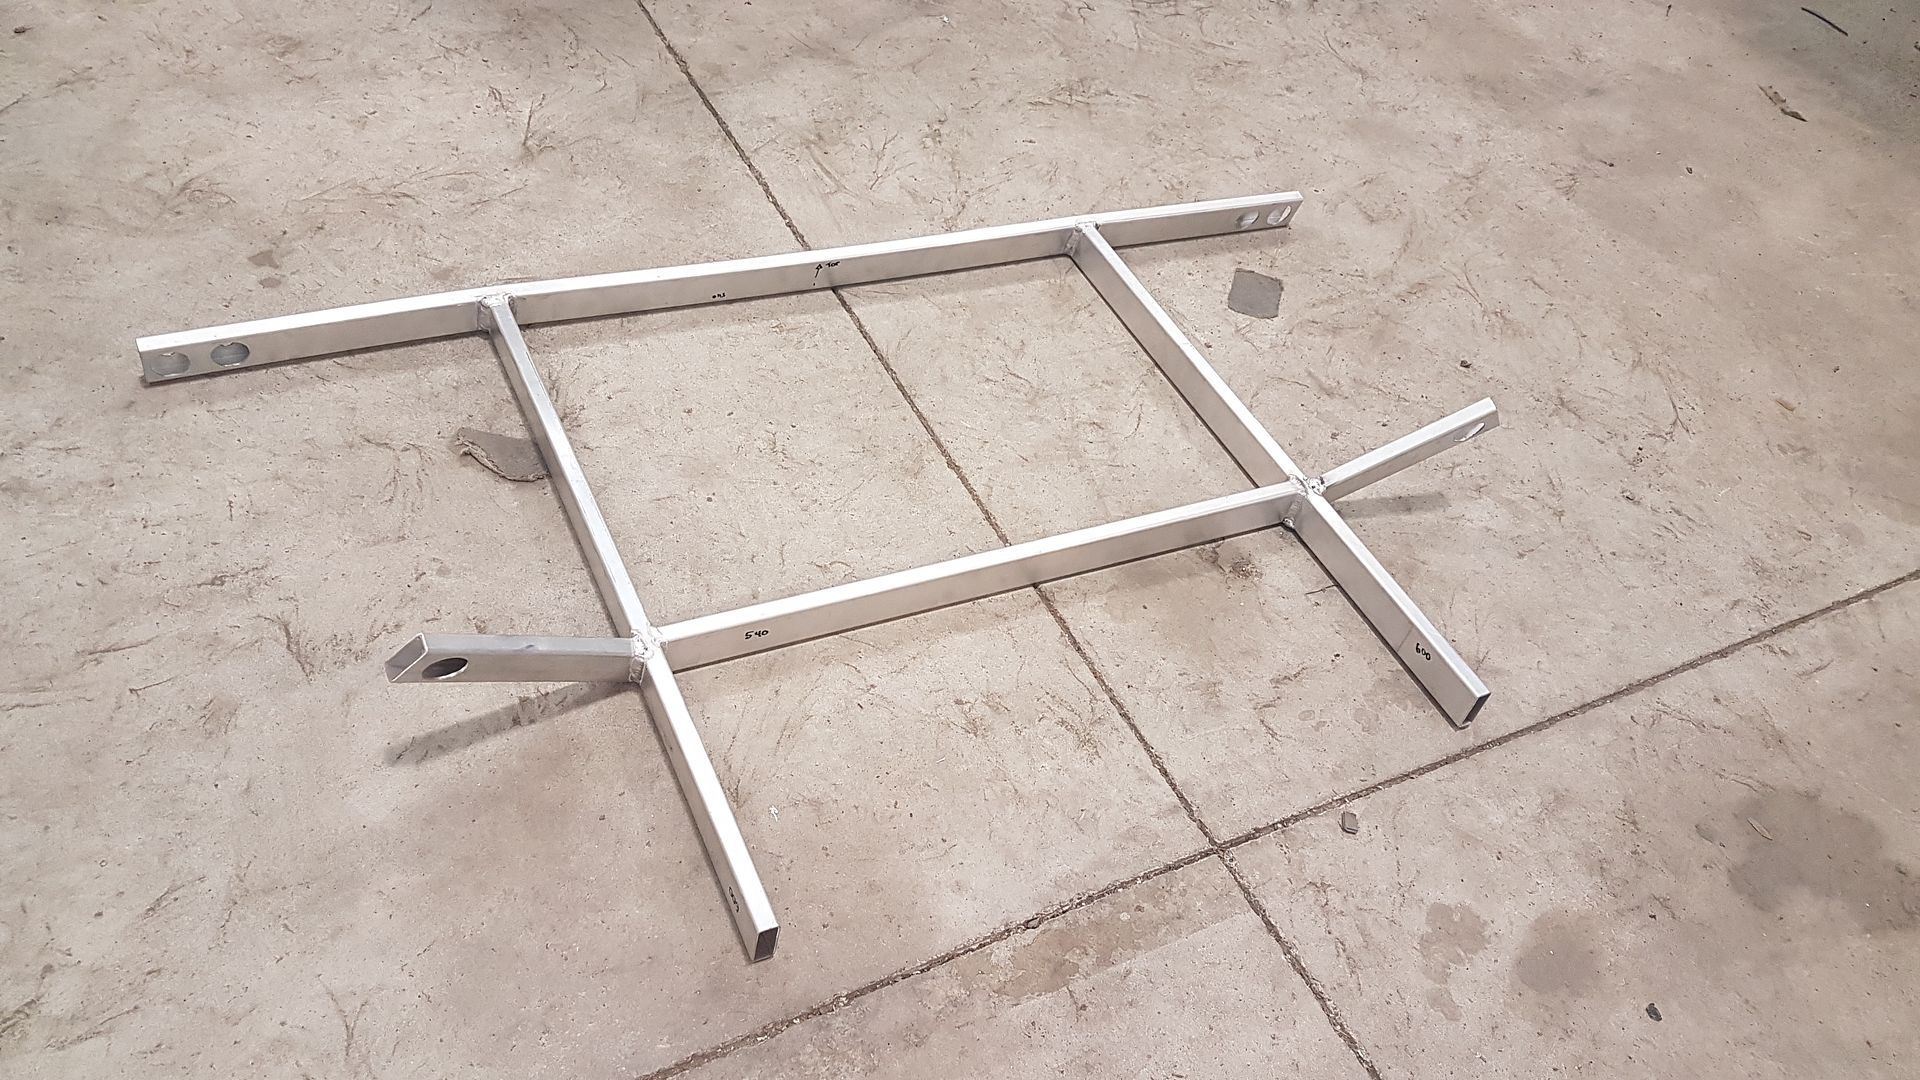
My friend Bam had welded up some aluminium rectangle extrusion similar to the OEM stuff used on one of the other support frames into a frame we'll need later on to mount the diffuser from.
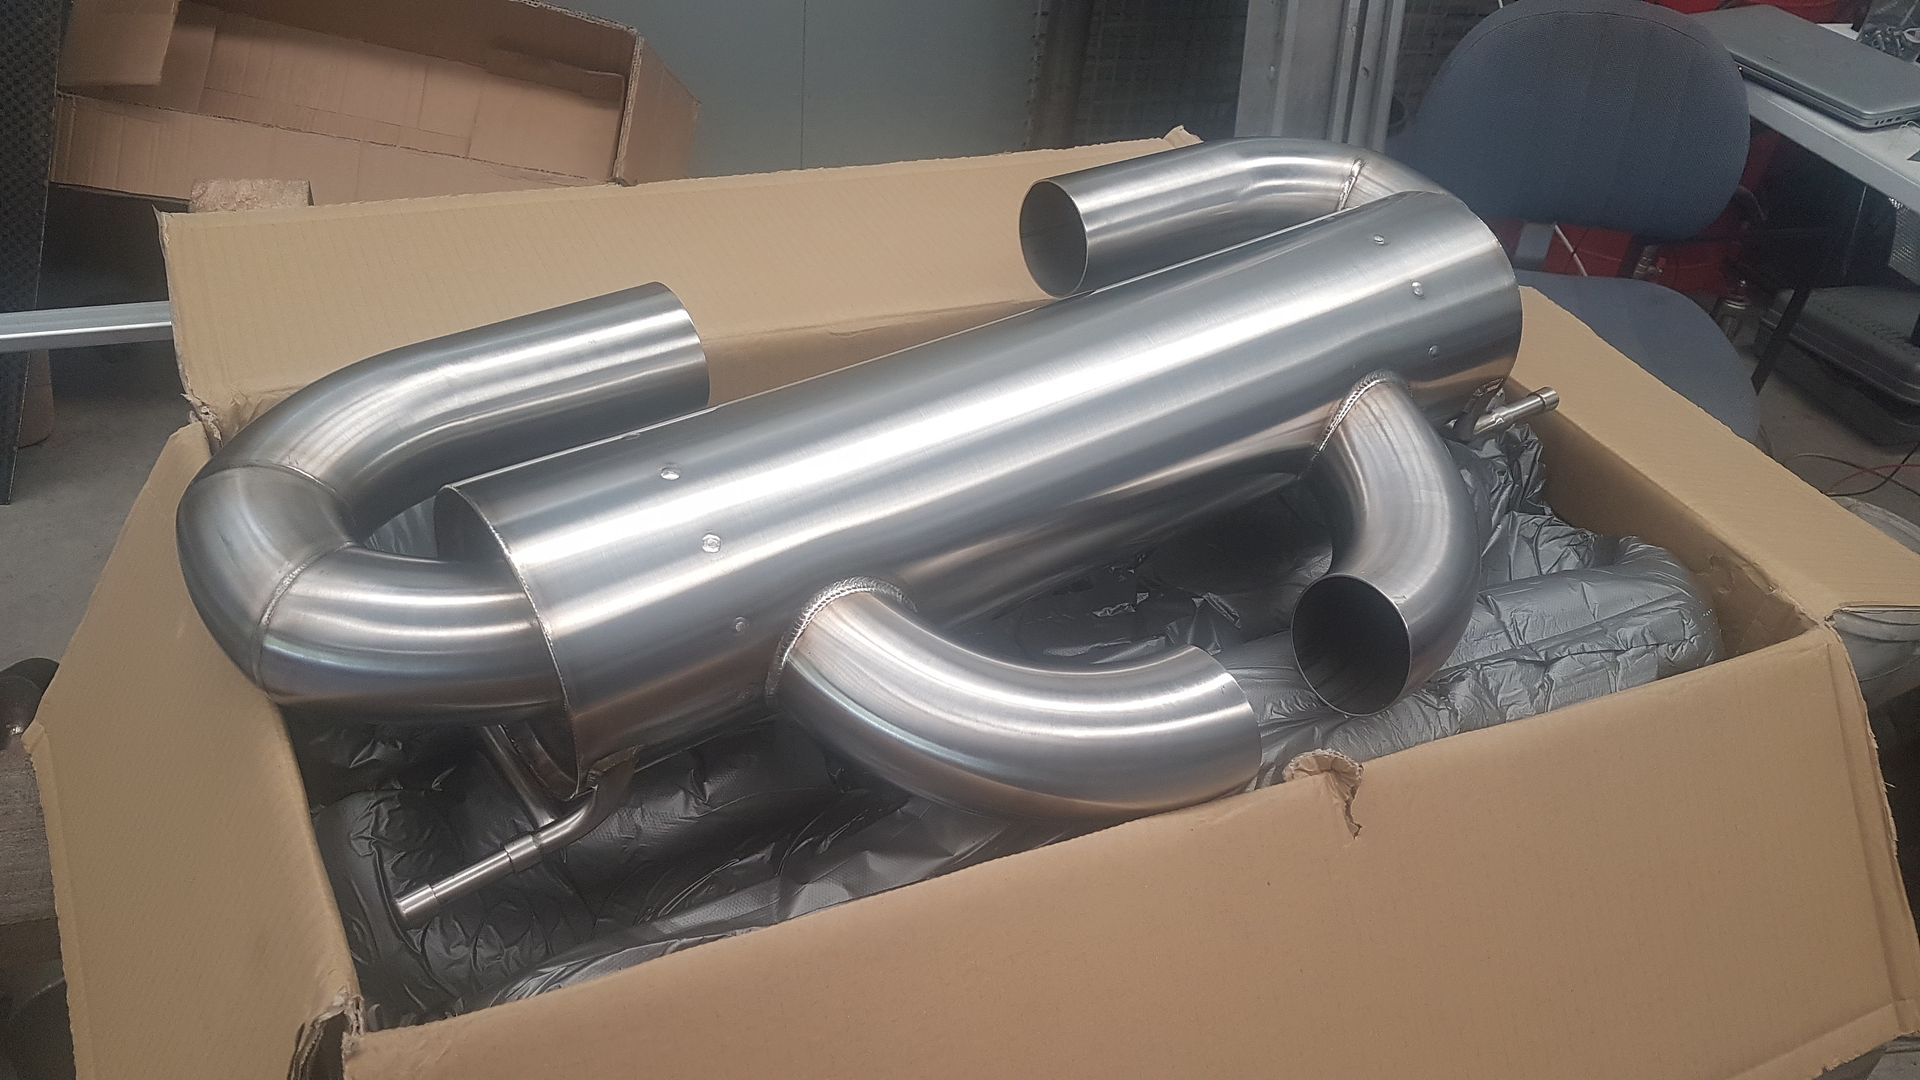
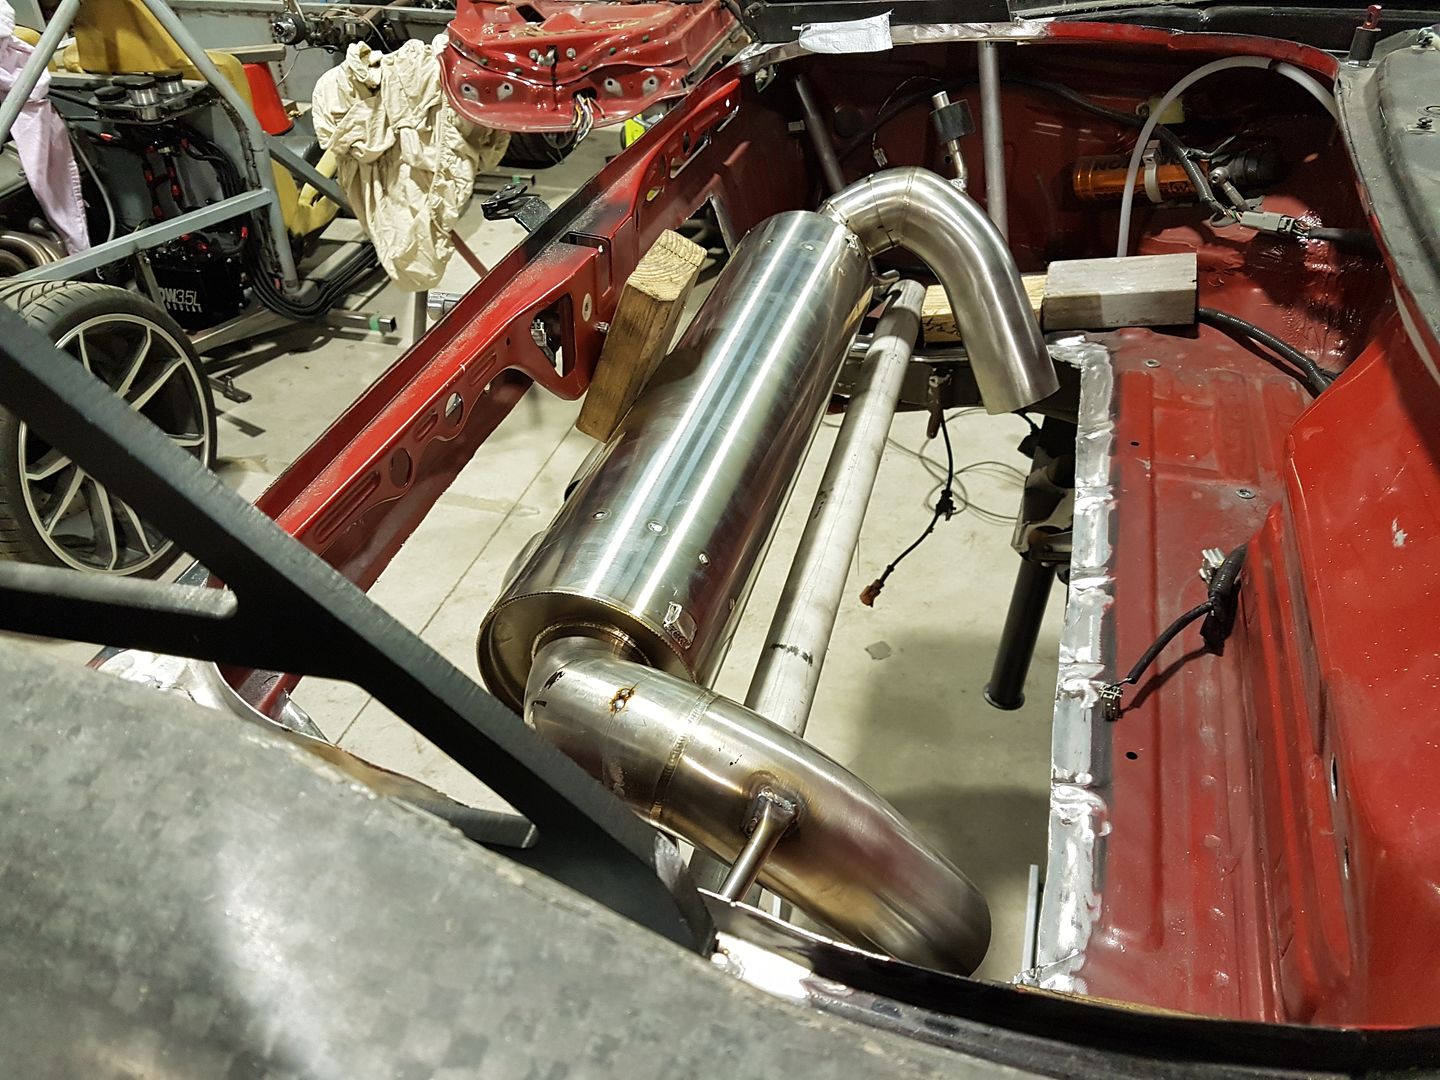
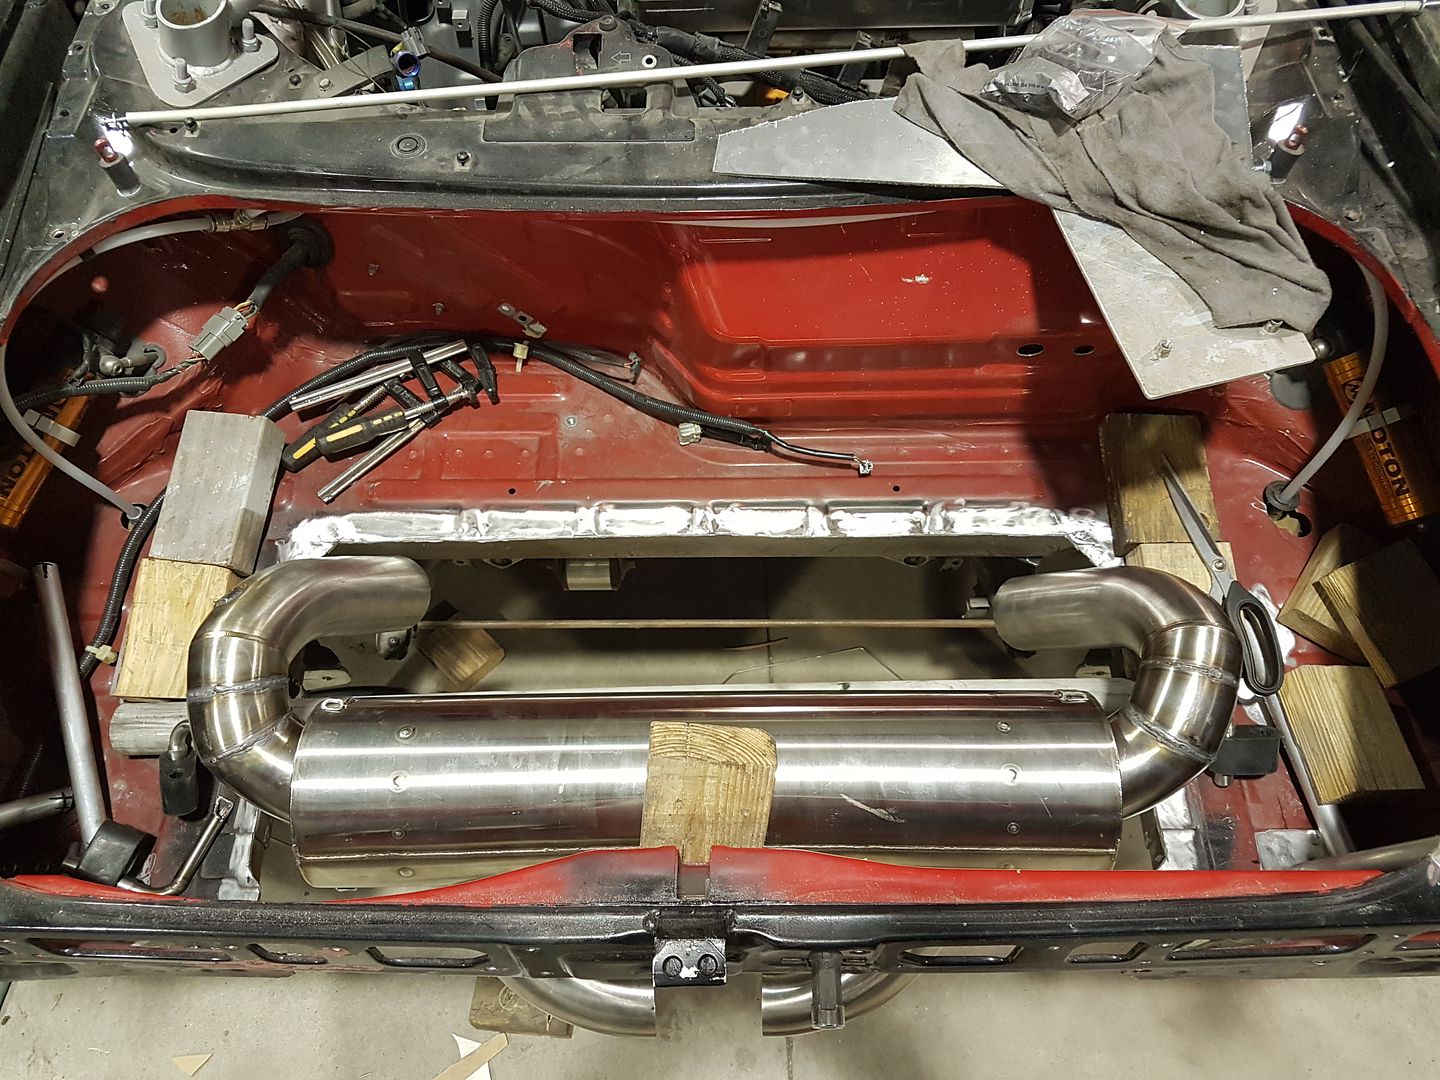
The next part of the new setup was a new rear muffler. I was really happy with what we had sound wise, but to make room for the new setup we needed something else. I did some searching and found a great company in Taiwan called Ace Header. They seem to primarily do Toyota GT86 stuff but their muffler was really close to what I needed which was a dual in and centre out type setup so I asked if they could make me one slightly altered and they were happy to help. Very reasonably priced too with freight, it just wasn't worth trying to make something ourselves.
Next step was to try and see if we could make it all work together in the space that I had. I had to clear out a little bit more than I originally cut, but not much and there was no difficulty cutting it out.
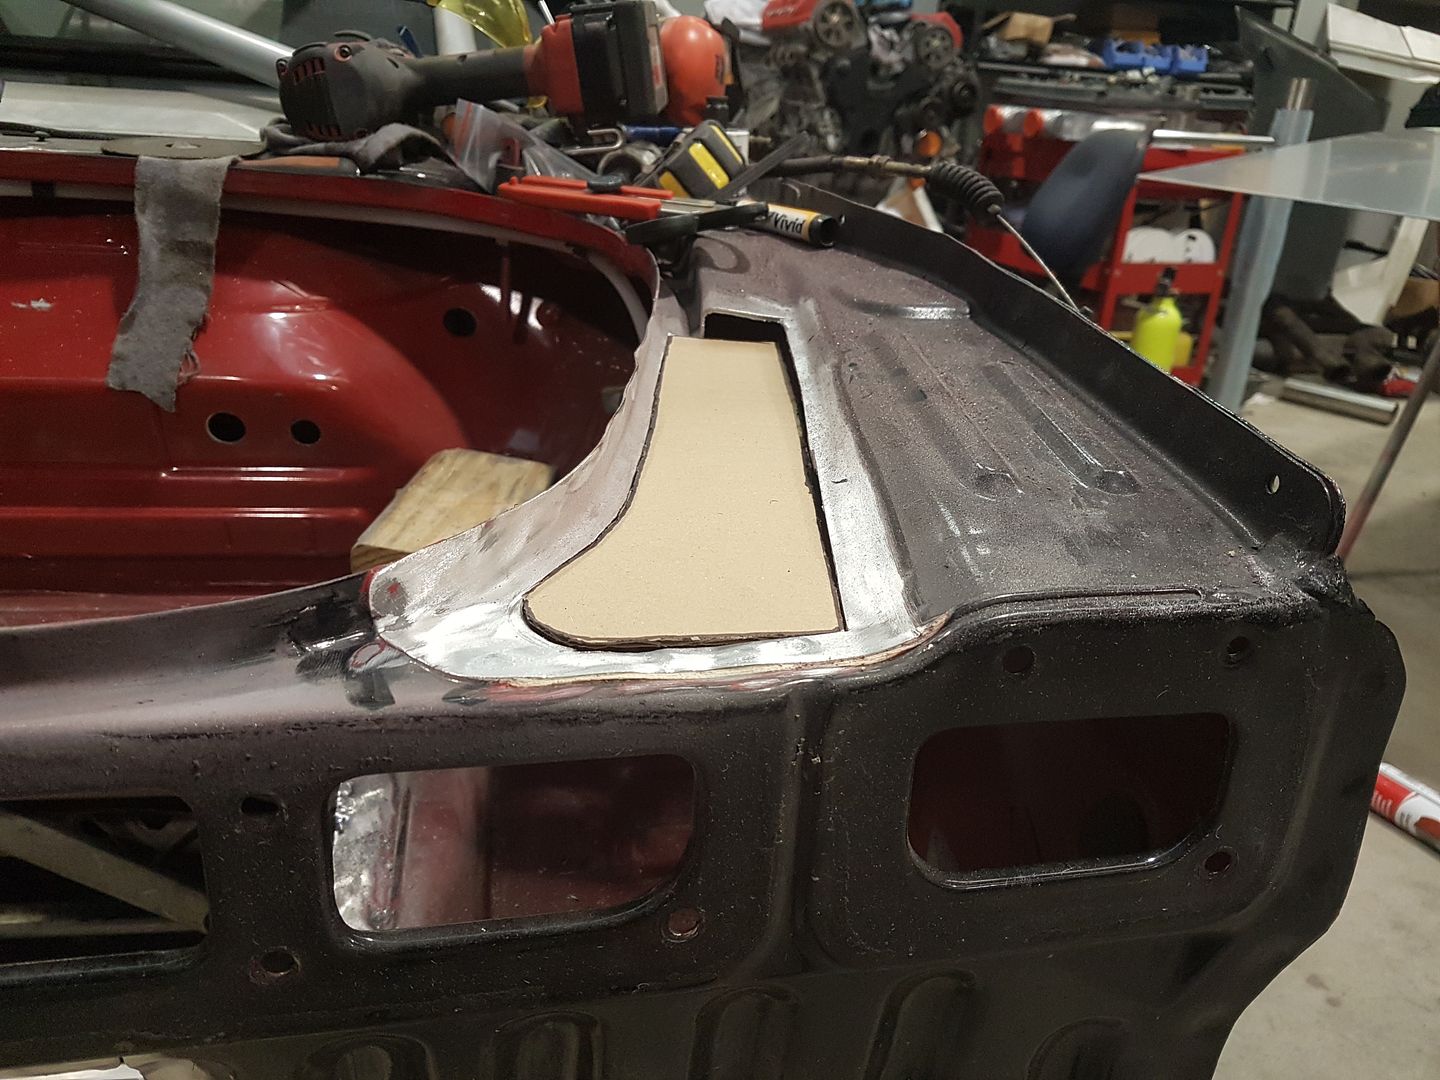
Here's the original cutout we had for the old setup
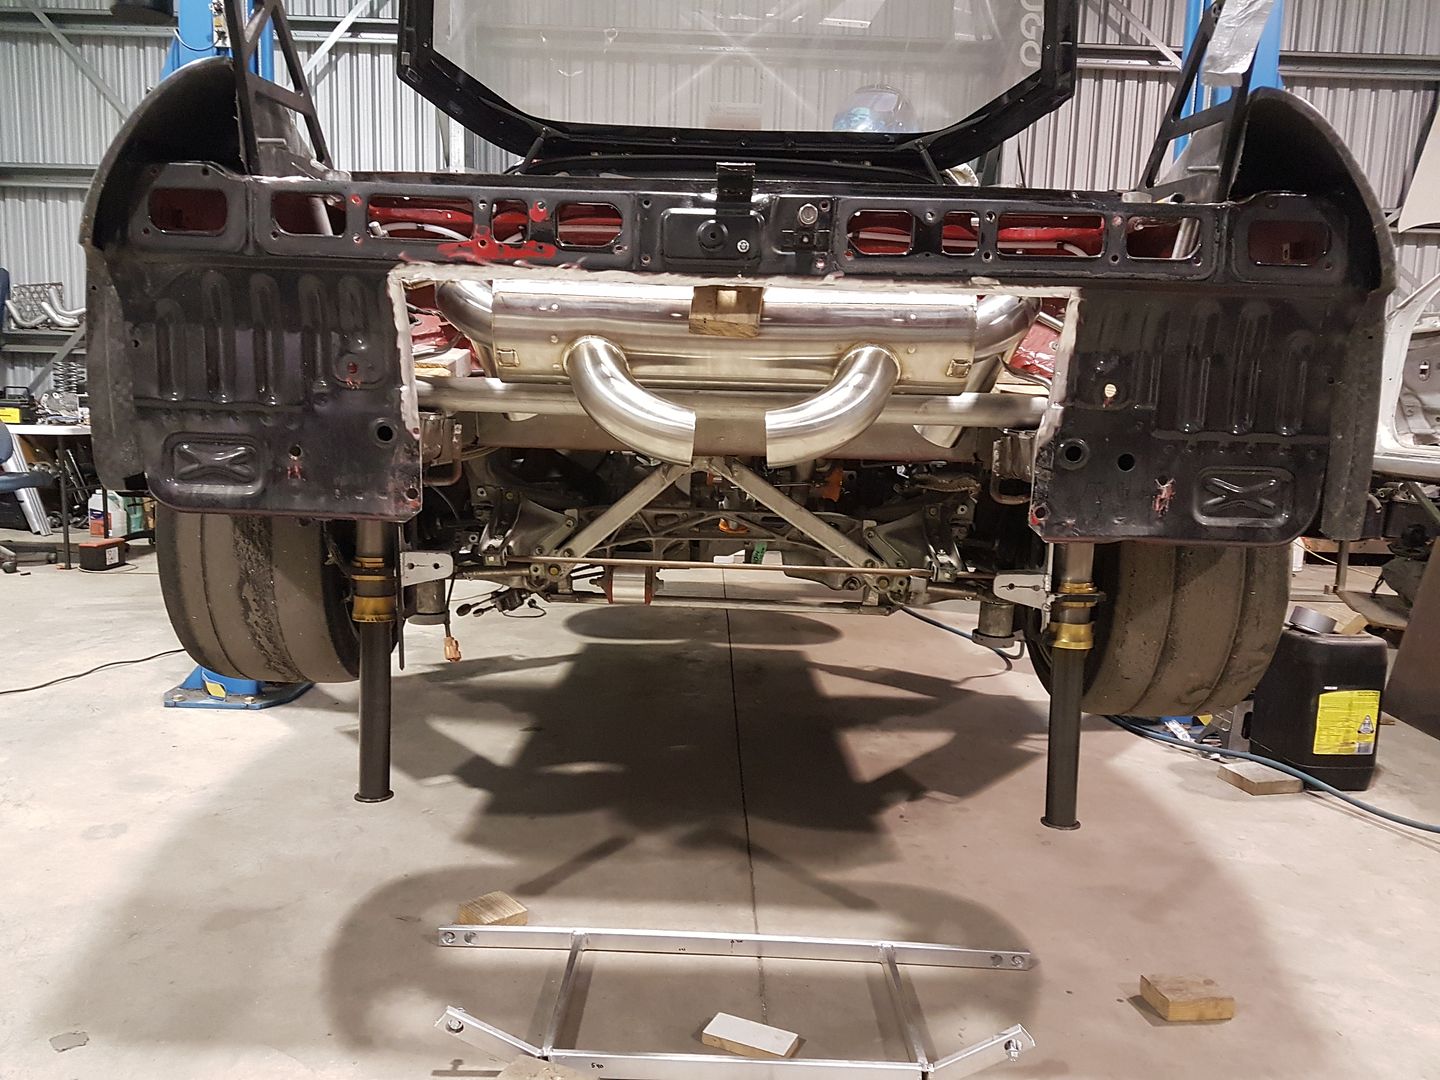
This is the new cutout……. a little wider but quite a bit higher. The exhaust outlets should end up in the same place so we won't need to modify the bumper though.
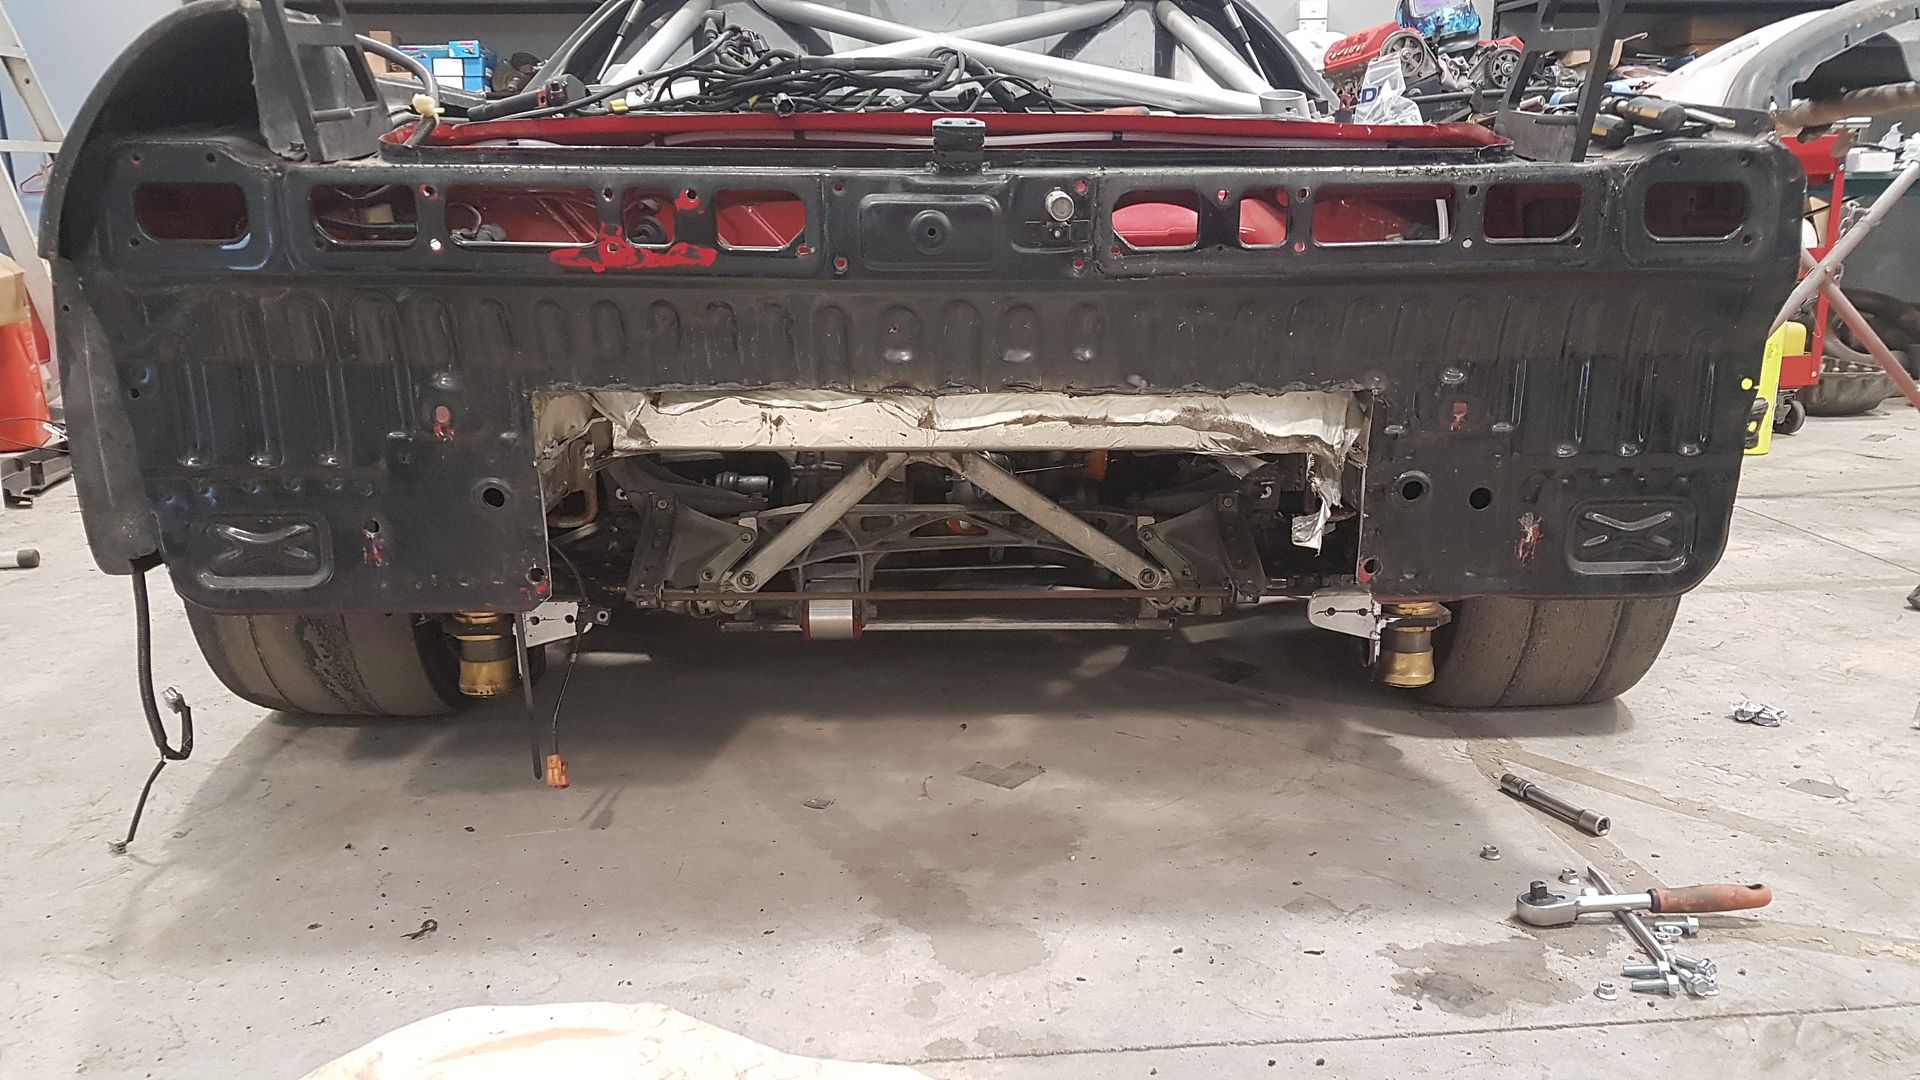
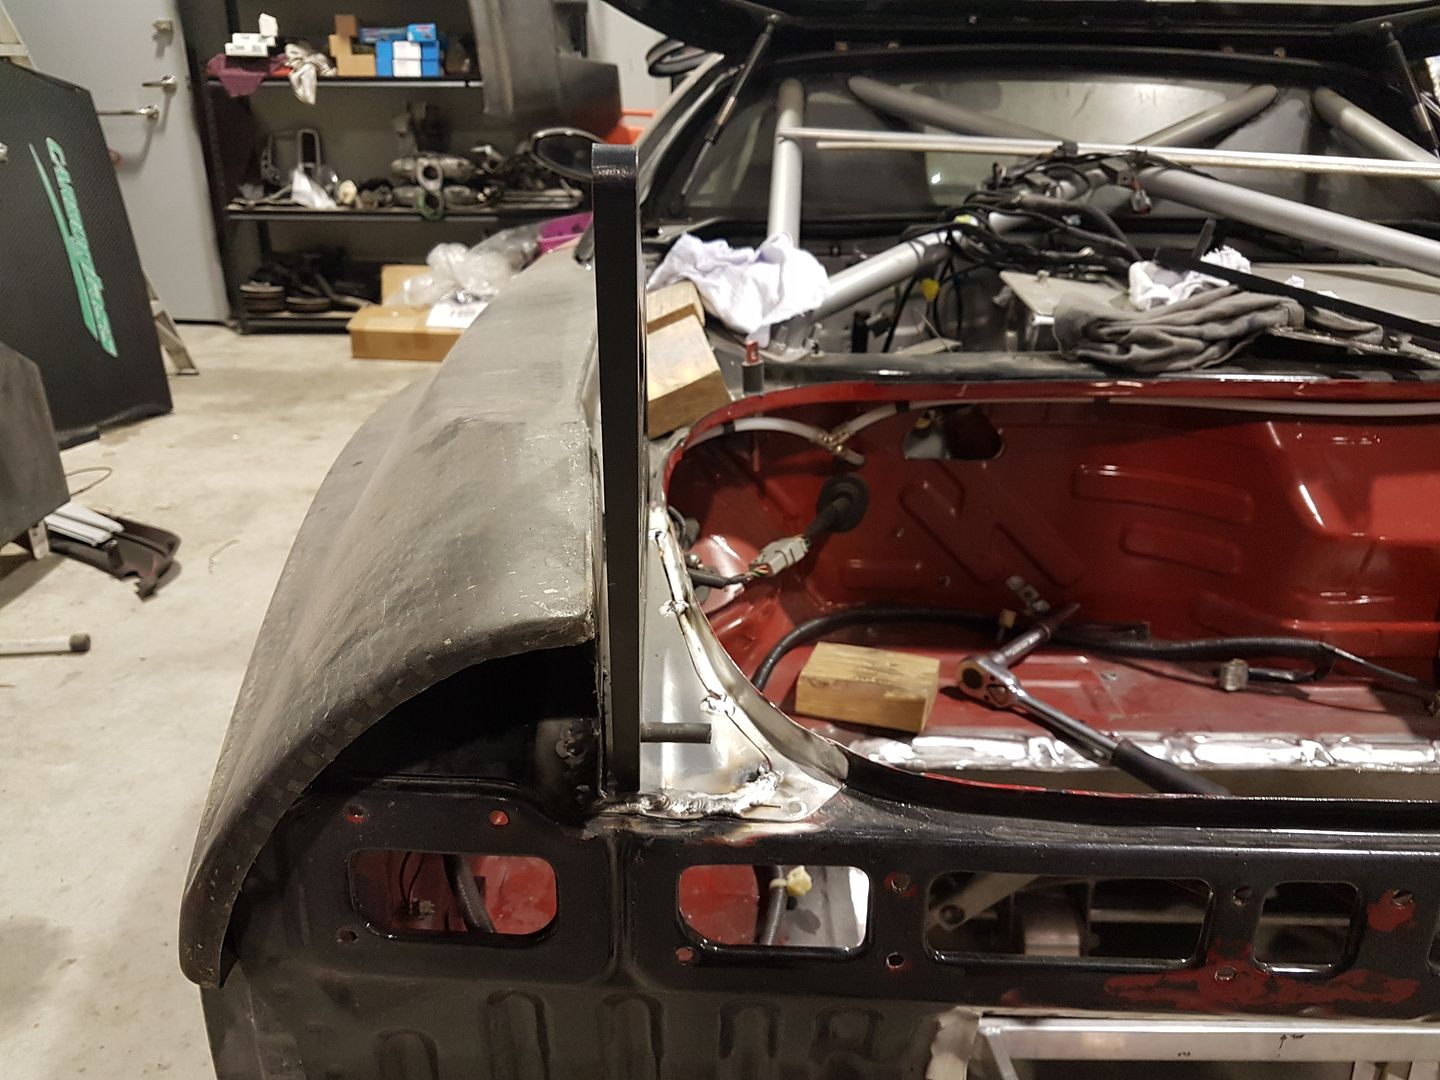
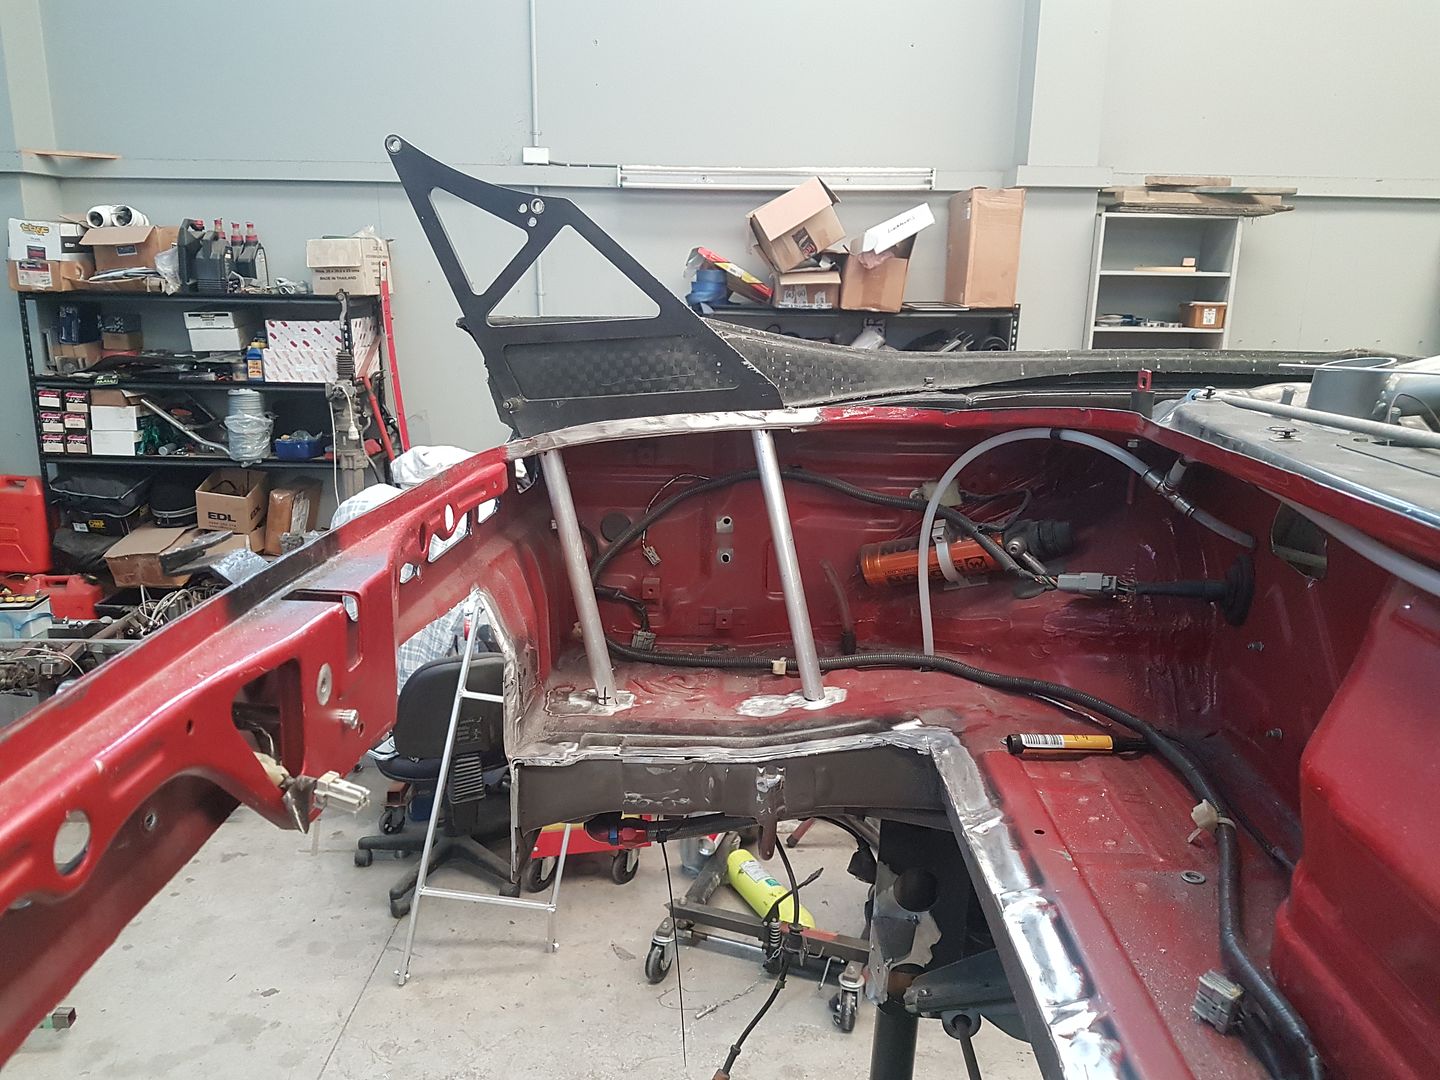
Next was an area that has been a "need to do" for a while now...….the rear wing stays. As most will know the original mounts are on the boot but with the extra load of the larger wing we had already re-made the stays to be a little higher than the stock APR supplied stays and mounted them on edge of area around the boot lid, not the boot lid itself. This was better than just the boot lid, but was really only temporary and so needed something better, especially with the new engine promising much higher speeds and in turn much more load on the rear wing.
The area we had used to mount was not very strong as it was never intended to take any real load, so we did 2 things. The first was to create a new stronger area of metal to mount the stays to, and also create some supports underneath to spread the load to the chassis rails below. Something else that's always bugged Zac was that the wing stays were not straight, but angled to match the lines of the rear guards. I can see why this was done, but from an aero perspective it's not good as in aero terms they're very wide and create disturbance under the wing which isn't good so we'll be straightening them whilst we do this since we will be making our own wing anyhow, we can create new mounts on the new wing to match.
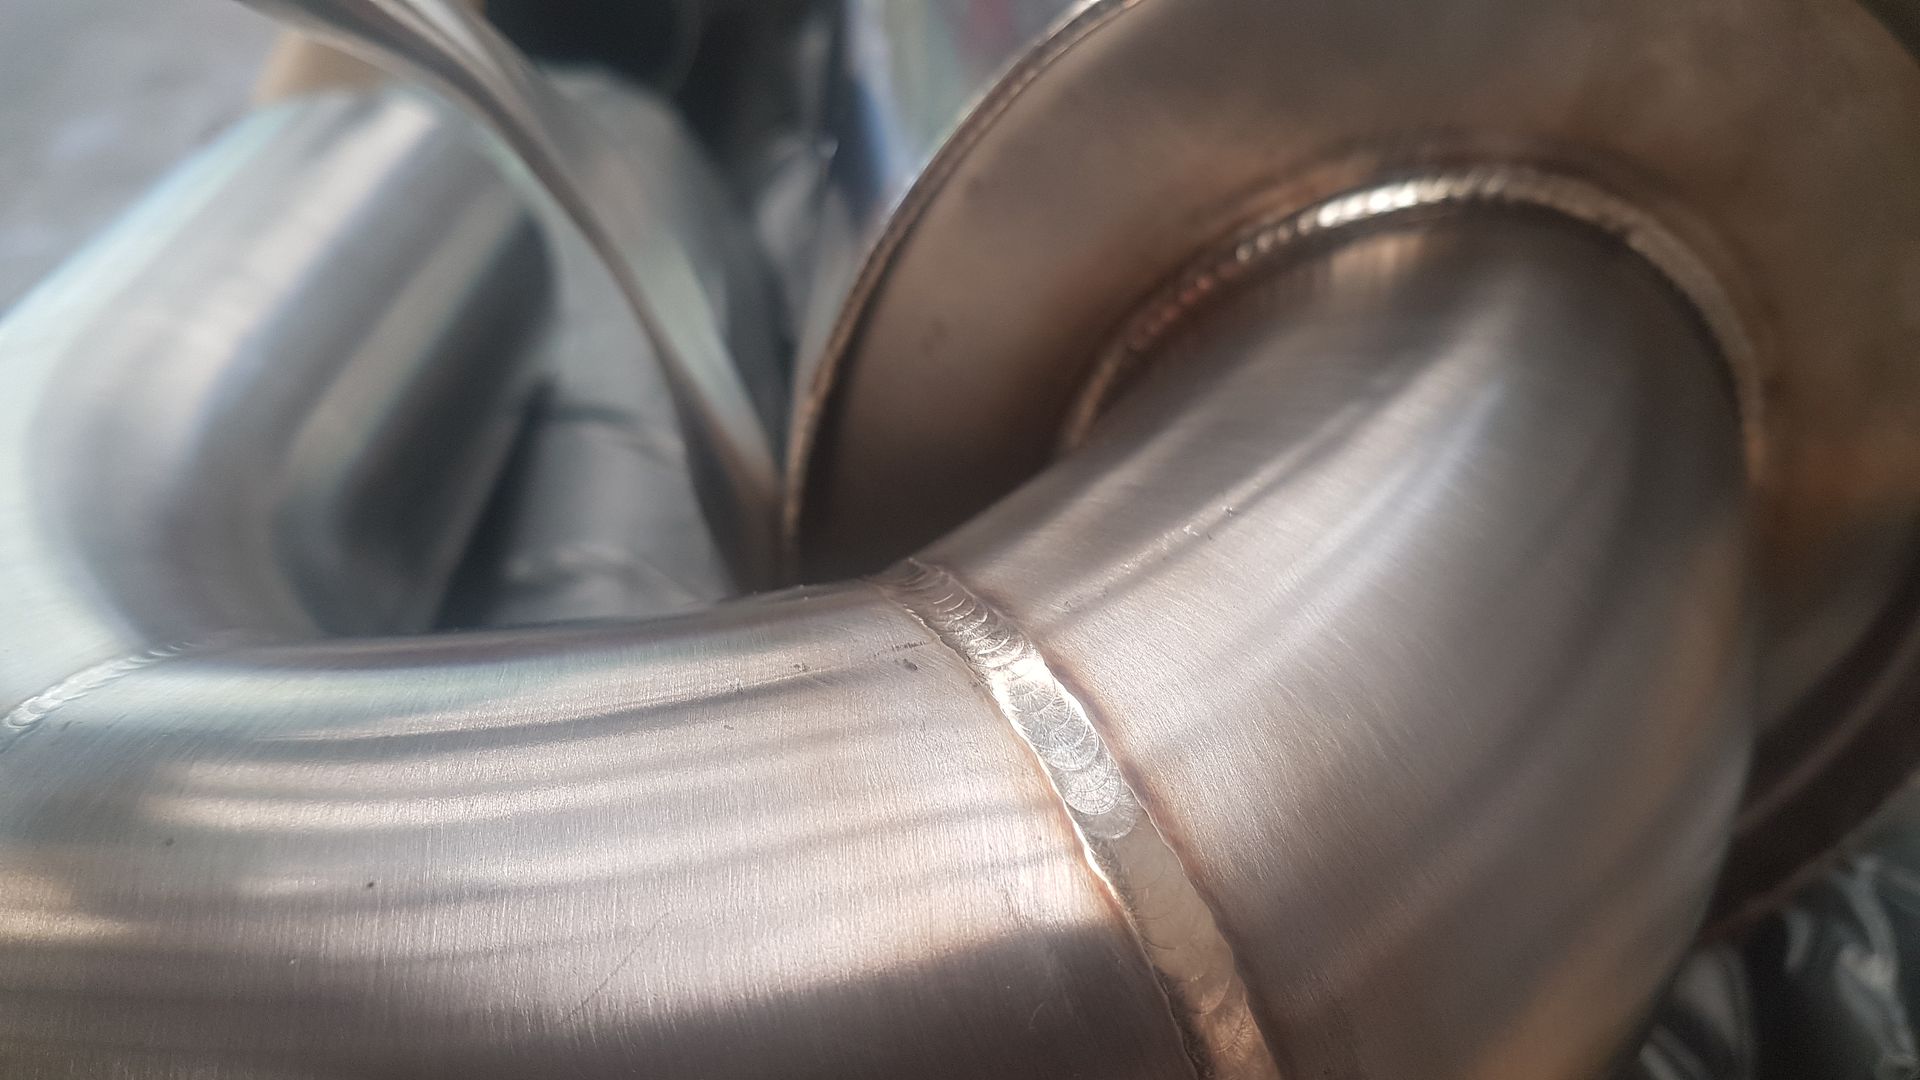
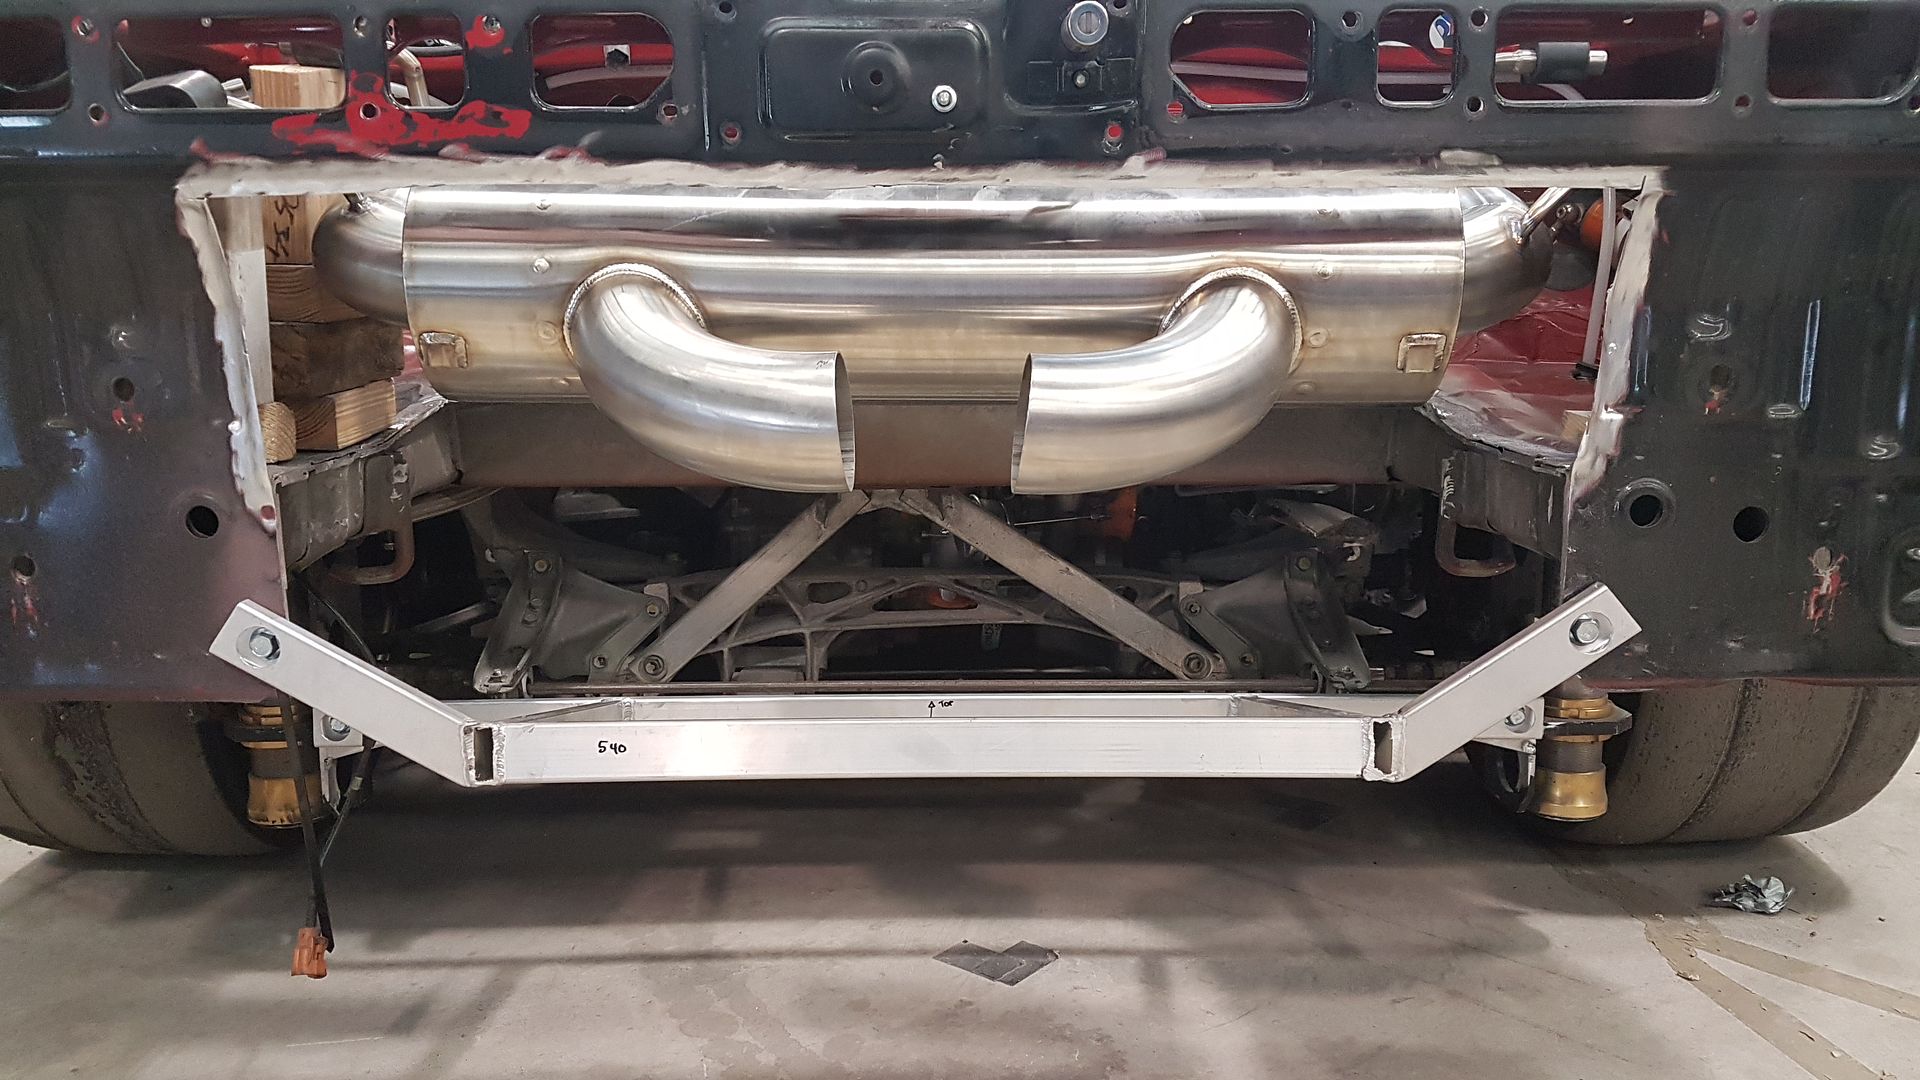
With that side of things sorted it was back sealing up the rear end / boot / trunk area. Before I could do that, the rear legs on the muffler I purchased were at the wrong angle once I angled the bumper side down to where I needed it to be, so it was just a matter of putting a couple of cuts into the pipes, rotating them to the right angles and then tacking them back up again. Now you can see that the rear legs angle down towards the underneath of the boot / trunk so that we can then route them to the turbo's.
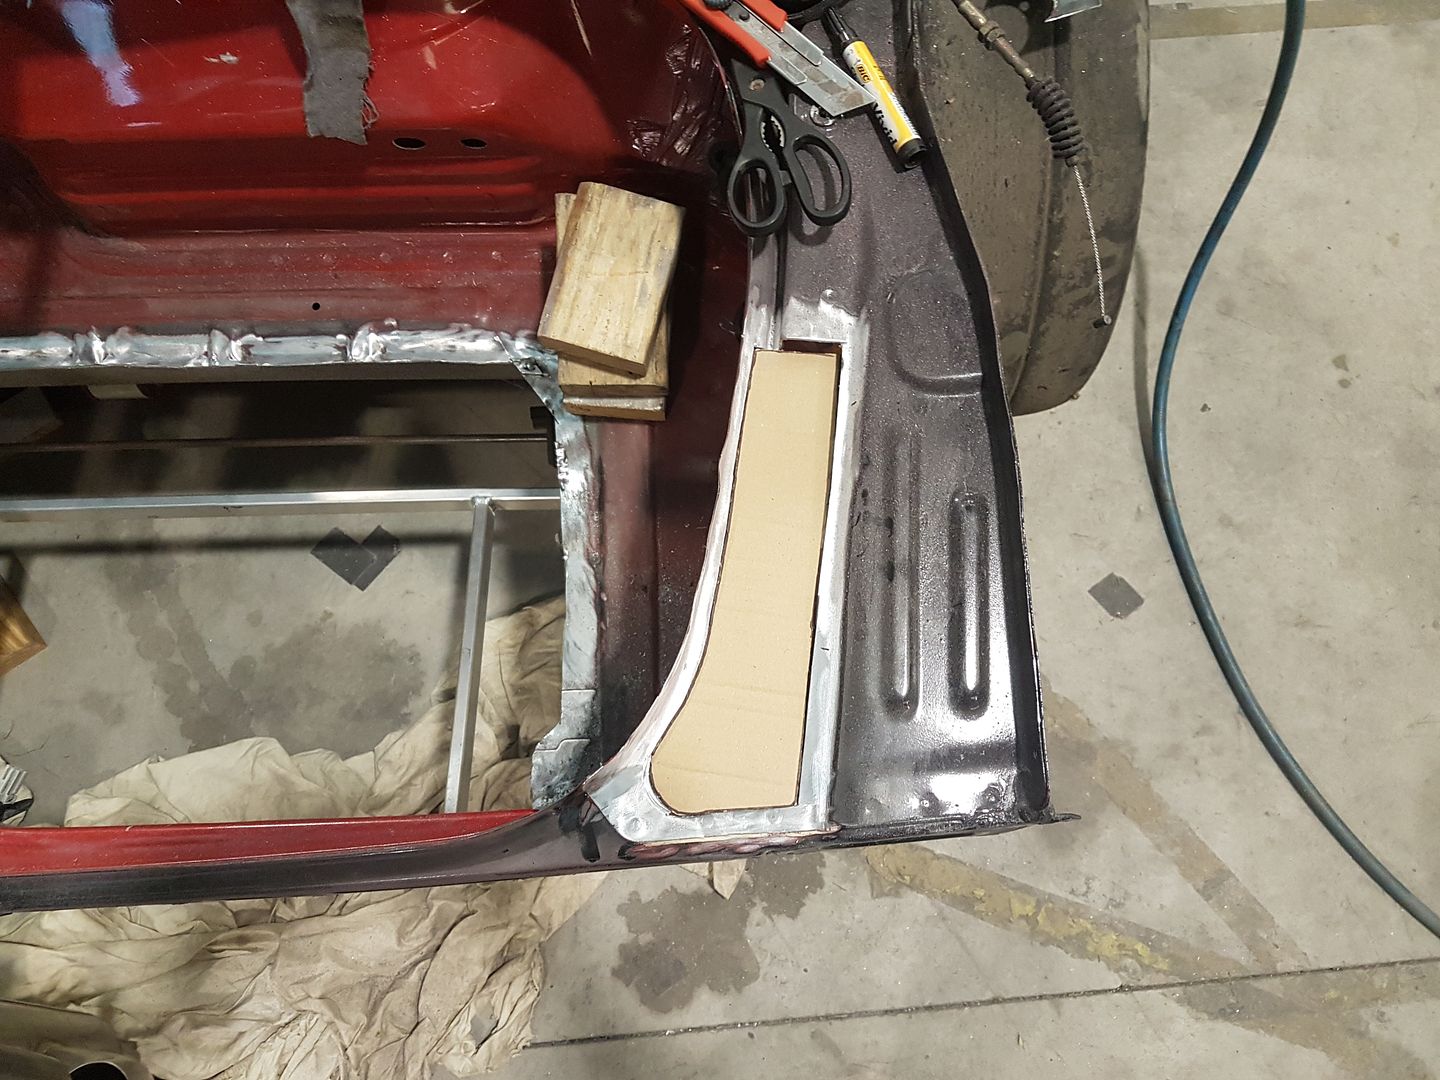
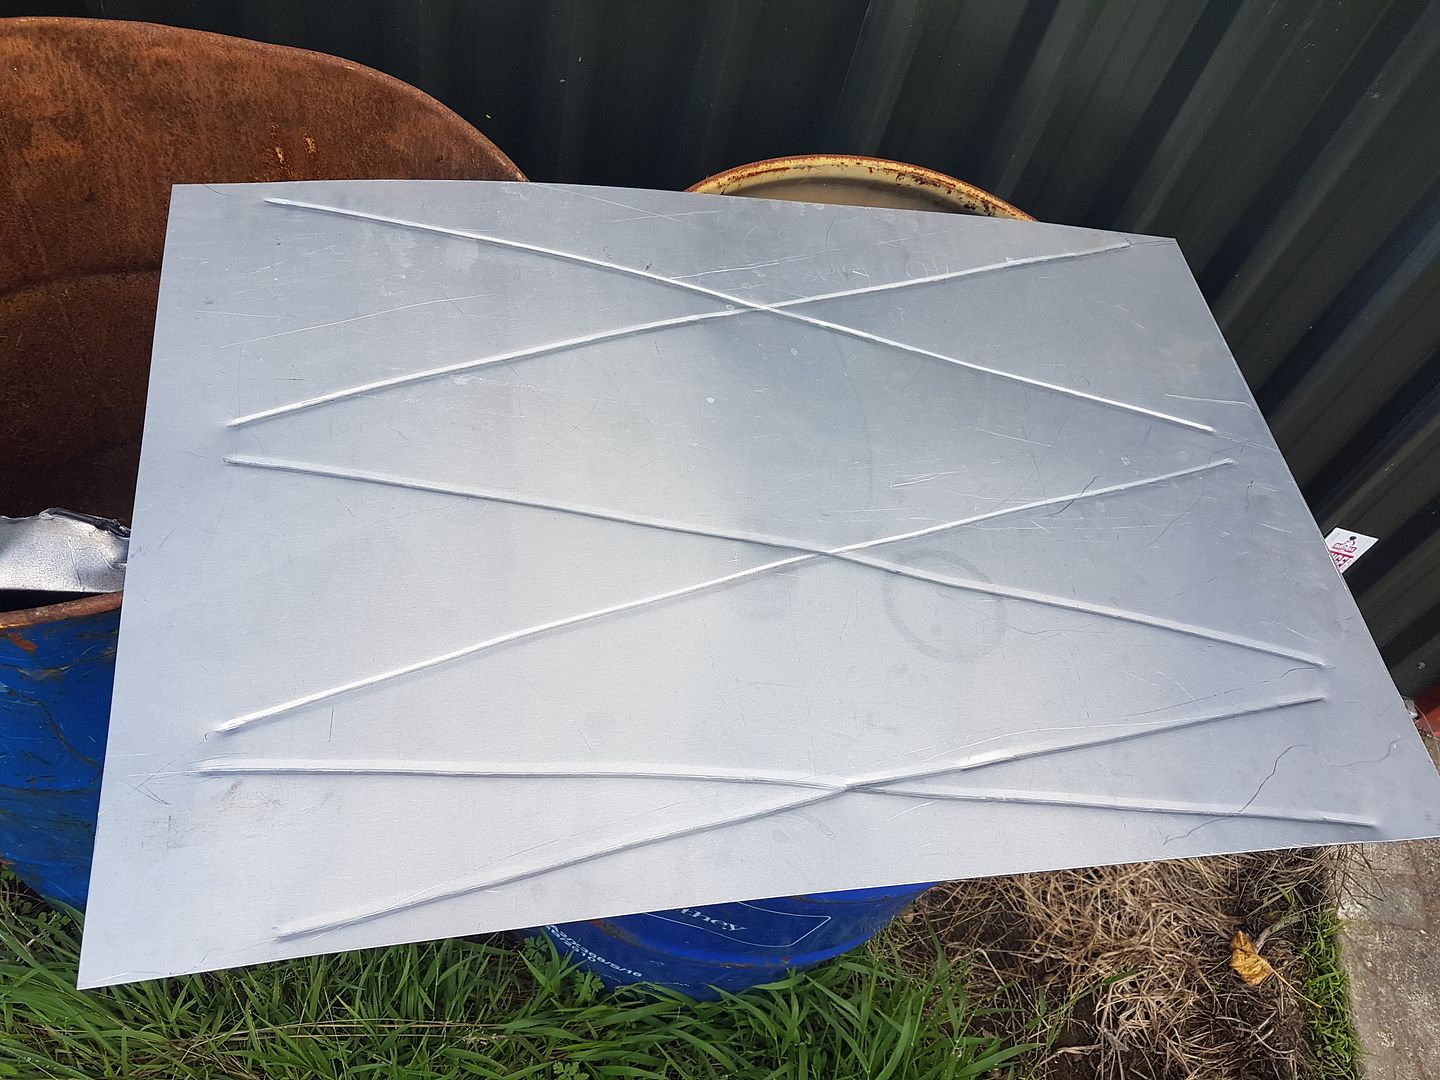
I created a basic template for each side and then a large sheet for the rest. Forgive the slightly wonky lines rolled into the sheet. It was quite a large sheet and I got impatient and did it on my own instead of having someone else wind the handle whilst I fed the metal through ……….. but still...…….
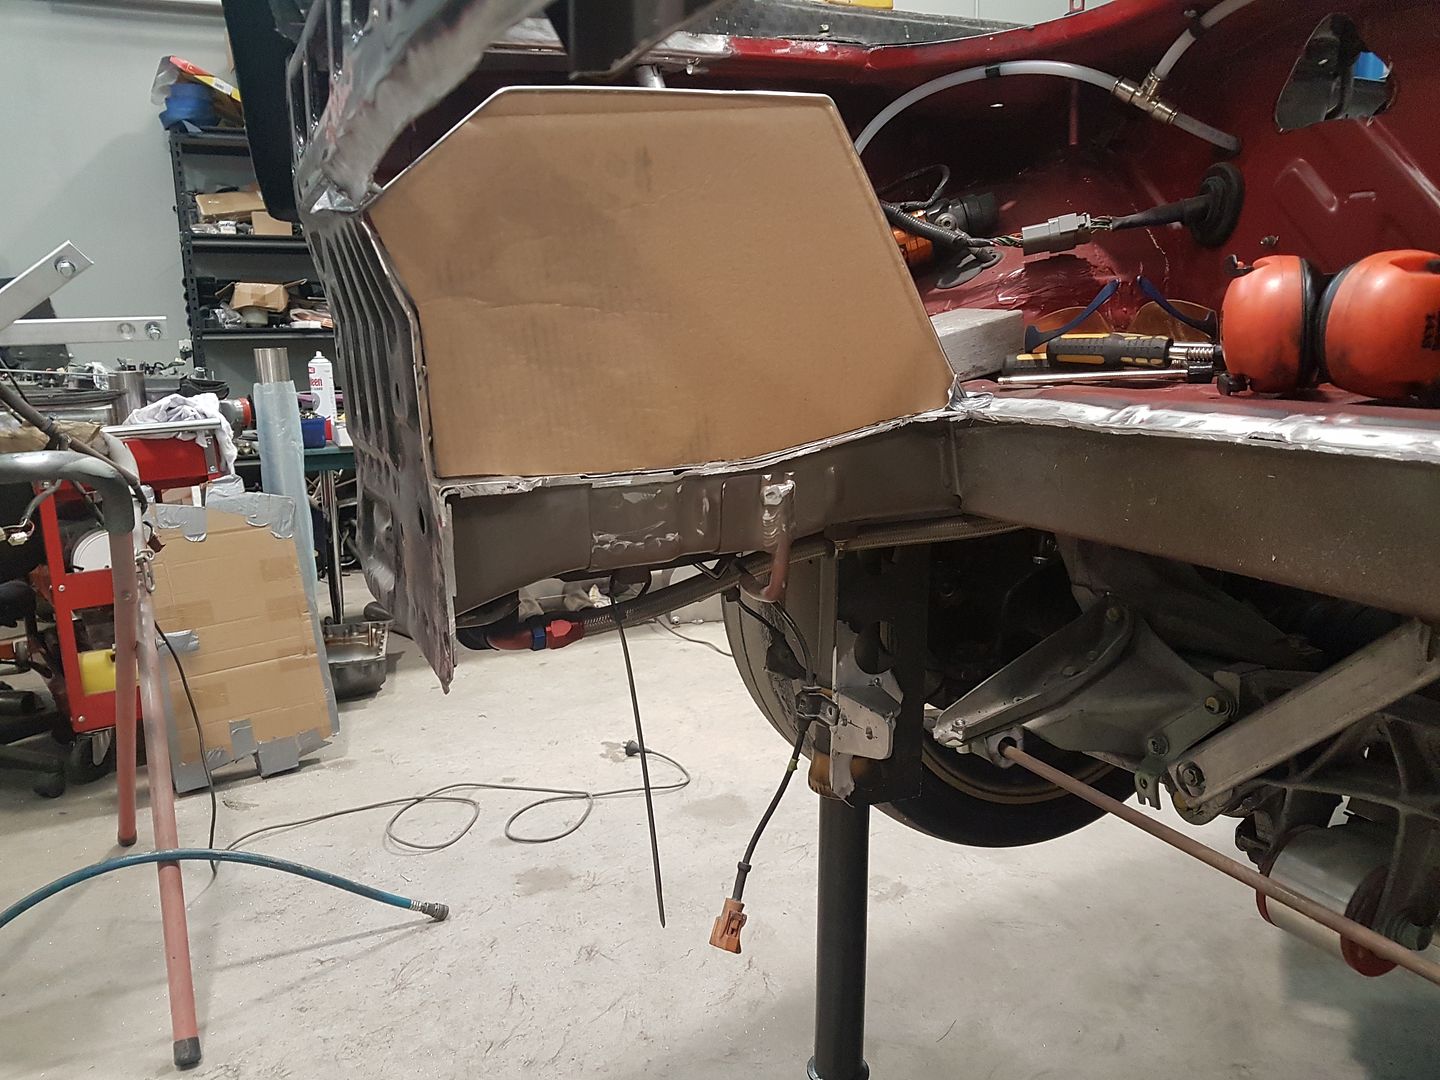
This little detail was a small slot so that the top of the new sheet would stick out the back of the car so we could easily tack it rather than trying to do it inside the boot as it's really close to the OEM bracing for the tail lights so wayyyyyy easier this way.
Next I had to knock up some basic mounts to hold the muffler...…. again not the most glamourous example of a muffler mount, but I just wanted to make sure it was stable so I could make sure everything was going to fit before we finalised the boot changes.
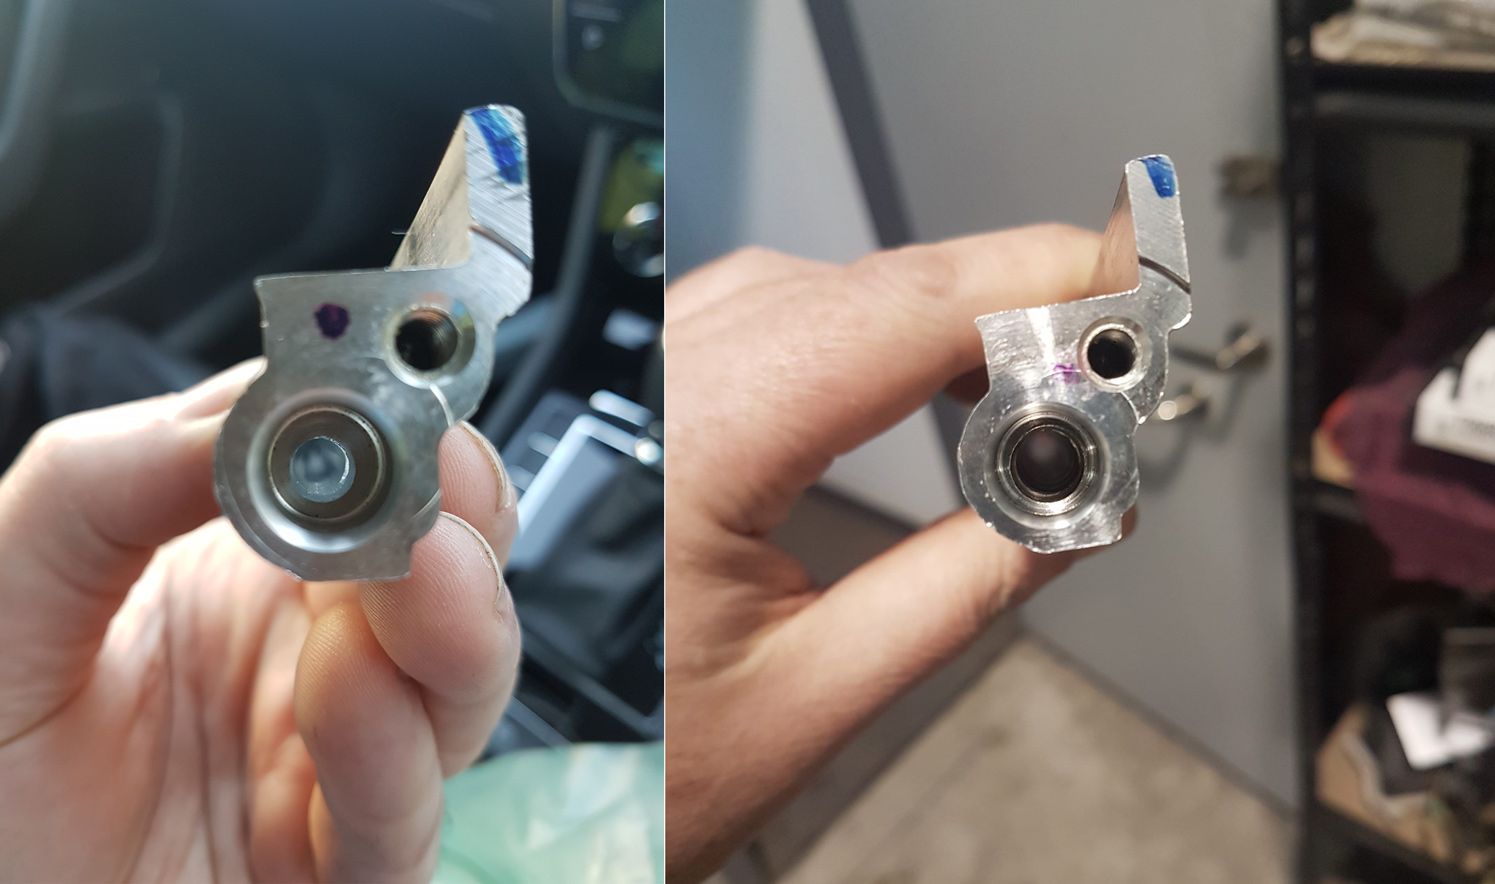
On a slightly different angle...…. the J32A2 engine we're using are a great OEM motor, but it's weak point are it's little chicken leg conrods...…… With new conrods and some new valve springs and retainers they're capable of awesome performance. We looked at getting some custom rods made and Pauter list some but they're close to $ 1500 USD for a set of 6. We thought that we could get some made locally for better money and just as good...…..here's the result.
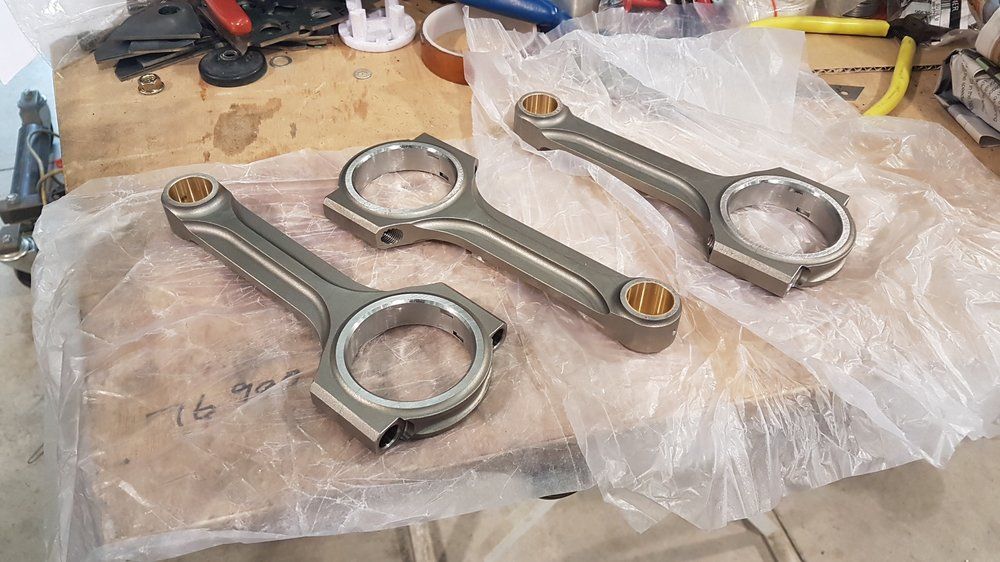
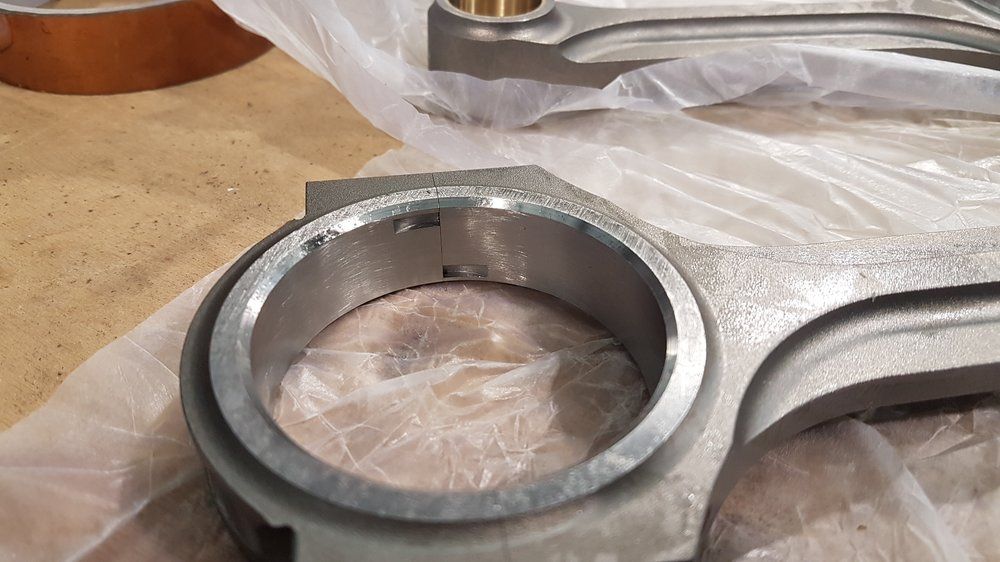
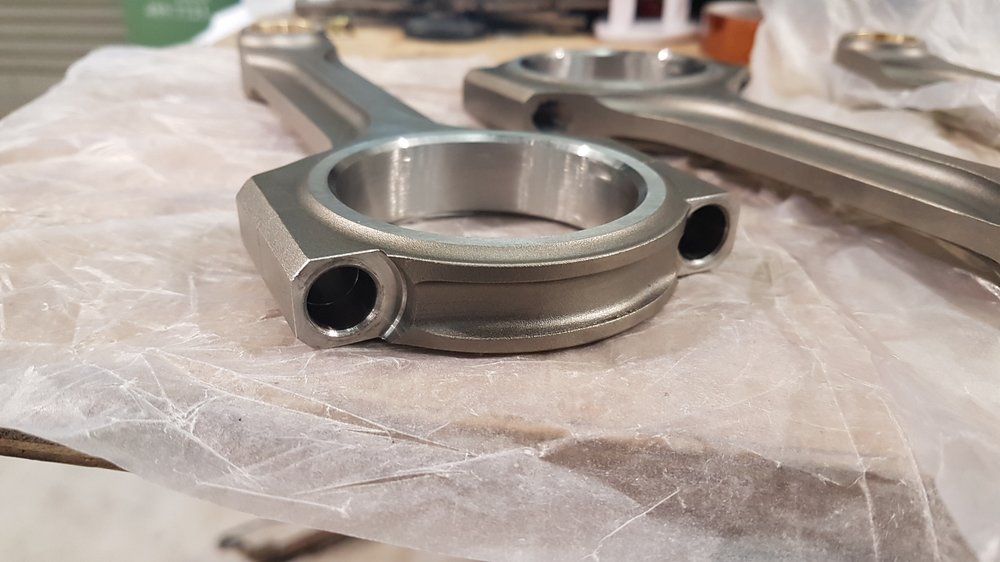
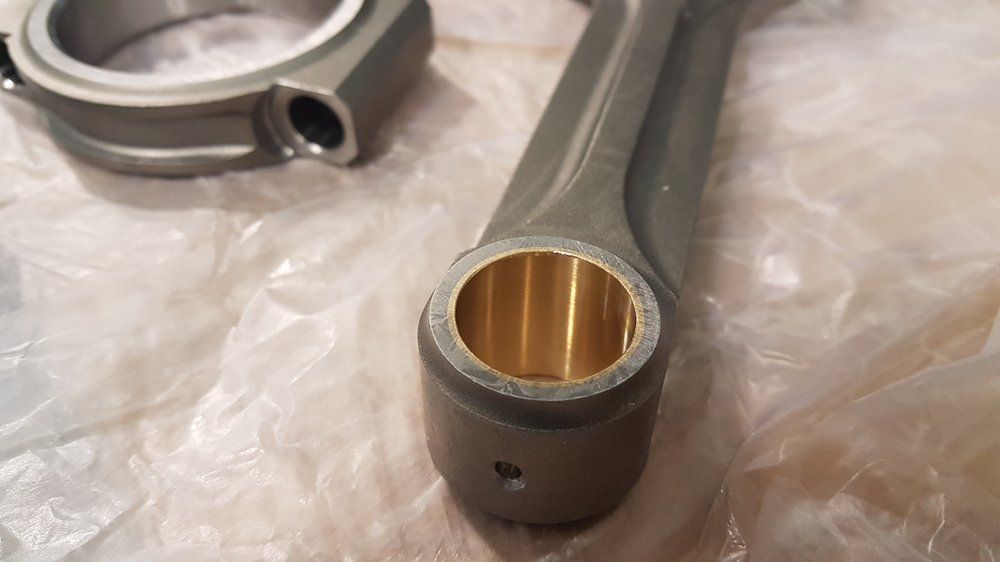
Hopefully people will be able to see from our build that we're not cheap and will spend money where it's needed, but the conrods are an example where we felt we could get something just as good but save money for other areas of the project. The pistons are also one of those areas. Wiseco make some K series oversized pistons that are pretty much perfect for the J32 apart from 1 thing. The pistons have an offset which means they'll work fine for the front of the engine, but when you put them in the back of the V6 they will be the wrong way around. That would seemingly be easy to resolve by turning the piston around, however the K series have small valves on one side and larger on the other so that's not possible as the valve clearances would not work.
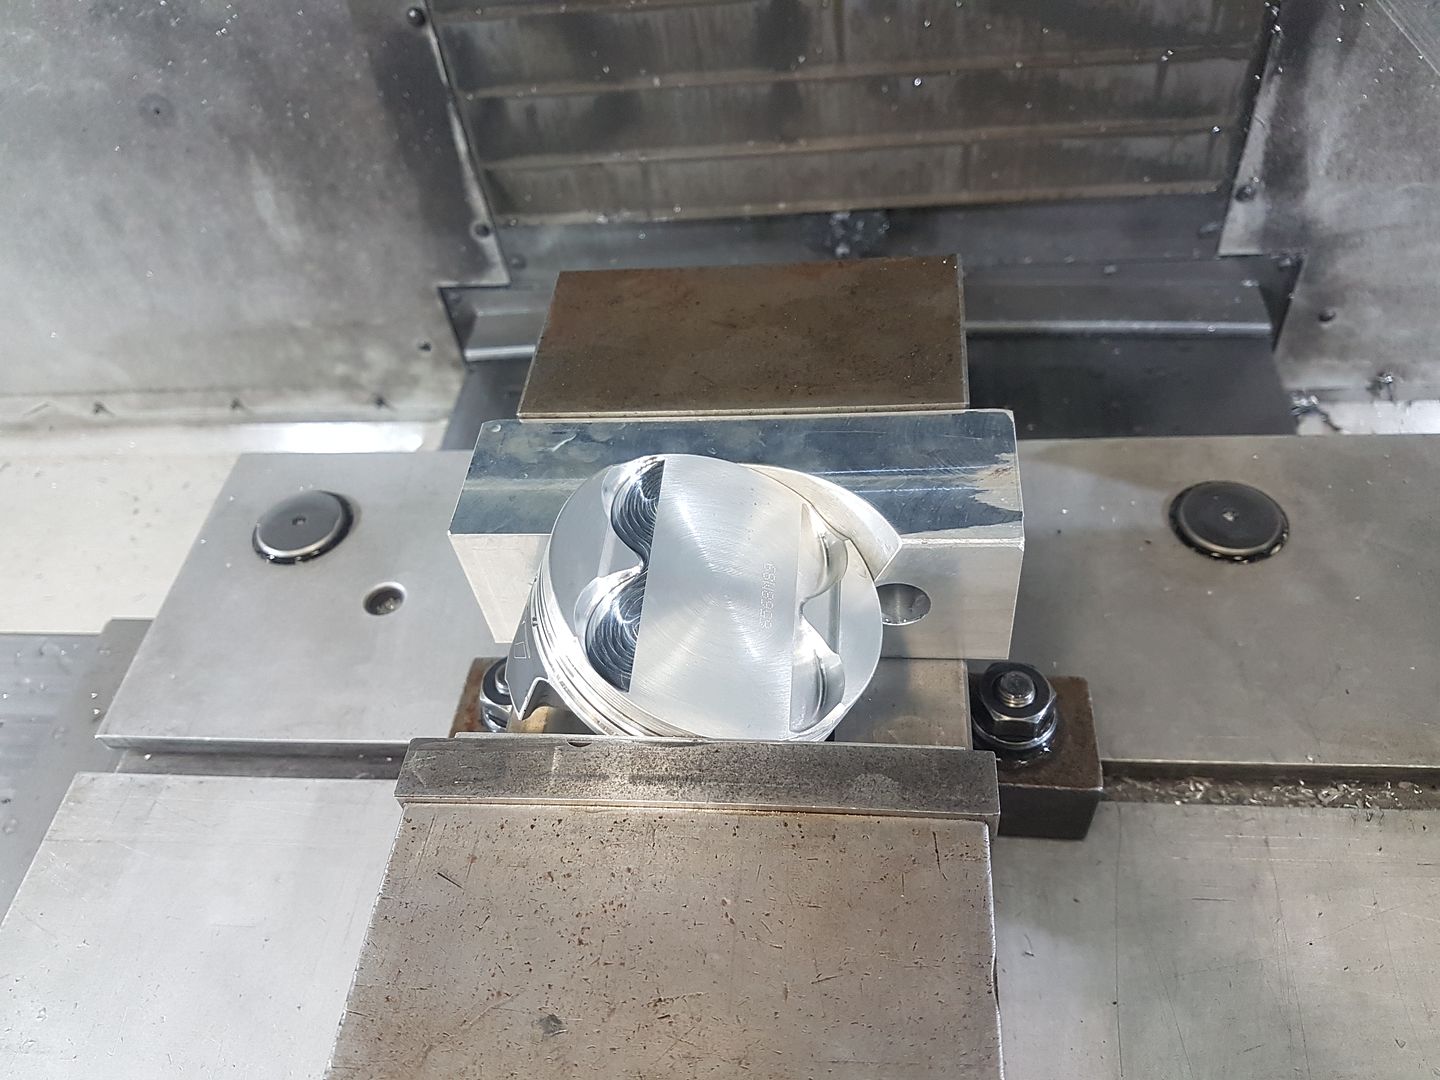
Others have had Wiseco make custom pistons previously and they are stamped with the same part number as the K series units but have the larger valve clearances machined. The custom pistons are close to twice the price of the stock K series units so we decided to buy some K series stock pistons and machine them ourselves to see how it all goes. Since Wiseco clearly use the K series piston when they make "custom" J series pistons for you, that suggests to me that they're simply the K series part with extra machining. We felt that we could so that ourselves and save some dollars...….. hopefully I'm right …...time will tell !
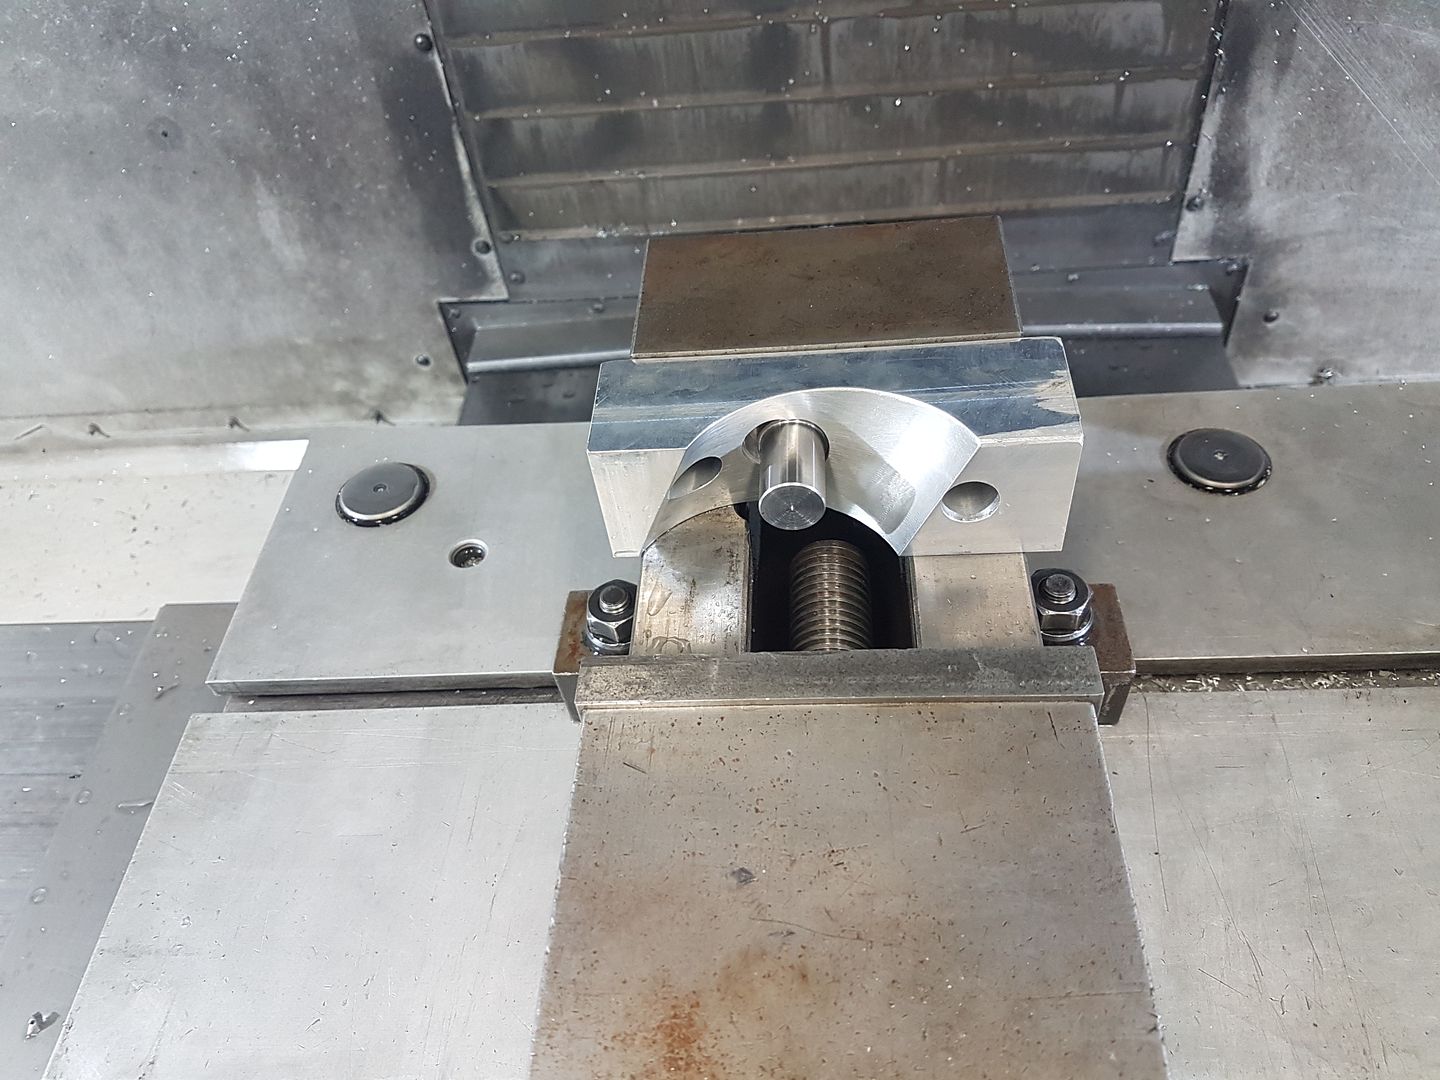
We did the first piston today after making up a jig to hold the piston and allow us to swap pistons out as we have 2 engines worth to do (this one and a spare).
That's it for now. We have more underway so I promise I'll post some more soon
Luckily I've also got some really good mates with good skills who have been helping here and there too so we are moving forward.
My friend Zac and I decided that even though a J swap into an NSX isn't that common, especially in a race car, but it has been done so we wanted to make ours different. We decided that instead of the usual water to air intercooler we'd use air to air. Nothing that special there, but since we had the freedom to move things around to suit we started with cutting out the floor of the boot. This had already been done before as we raised the floor a small amount to fit our old exhaust, but this time we needed to go higher so we had to cut out the old work and start again. The old one was basically tack welded in place and then sealed with urethane sealant so was easy to remove.

My friend Bam had welded up some aluminium rectangle extrusion similar to the OEM stuff used on one of the other support frames into a frame we'll need later on to mount the diffuser from.

The next part of the new setup was a new rear muffler. I was really happy with what we had sound wise, but to make room for the new setup we needed something else. I did some searching and found a great company in Taiwan called Ace Header. They seem to primarily do Toyota GT86 stuff but their muffler was really close to what I needed which was a dual in and centre out type setup so I asked if they could make me one slightly altered and they were happy to help. Very reasonably priced too with freight, it just wasn't worth trying to make something ourselves.


Next step was to try and see if we could make it all work together in the space that I had. I had to clear out a little bit more than I originally cut, but not much and there was no difficulty cutting it out.

Here's the original cutout we had for the old setup

This is the new cutout……. a little wider but quite a bit higher. The exhaust outlets should end up in the same place so we won't need to modify the bumper though.

Next was an area that has been a "need to do" for a while now...….the rear wing stays. As most will know the original mounts are on the boot but with the extra load of the larger wing we had already re-made the stays to be a little higher than the stock APR supplied stays and mounted them on edge of area around the boot lid, not the boot lid itself. This was better than just the boot lid, but was really only temporary and so needed something better, especially with the new engine promising much higher speeds and in turn much more load on the rear wing.
The area we had used to mount was not very strong as it was never intended to take any real load, so we did 2 things. The first was to create a new stronger area of metal to mount the stays to, and also create some supports underneath to spread the load to the chassis rails below. Something else that's always bugged Zac was that the wing stays were not straight, but angled to match the lines of the rear guards. I can see why this was done, but from an aero perspective it's not good as in aero terms they're very wide and create disturbance under the wing which isn't good so we'll be straightening them whilst we do this since we will be making our own wing anyhow, we can create new mounts on the new wing to match.


With that side of things sorted it was back sealing up the rear end / boot / trunk area. Before I could do that, the rear legs on the muffler I purchased were at the wrong angle once I angled the bumper side down to where I needed it to be, so it was just a matter of putting a couple of cuts into the pipes, rotating them to the right angles and then tacking them back up again. Now you can see that the rear legs angle down towards the underneath of the boot / trunk so that we can then route them to the turbo's.


I created a basic template for each side and then a large sheet for the rest. Forgive the slightly wonky lines rolled into the sheet. It was quite a large sheet and I got impatient and did it on my own instead of having someone else wind the handle whilst I fed the metal through ……….. but still...…….


This little detail was a small slot so that the top of the new sheet would stick out the back of the car so we could easily tack it rather than trying to do it inside the boot as it's really close to the OEM bracing for the tail lights so wayyyyyy easier this way.

Next I had to knock up some basic mounts to hold the muffler...…. again not the most glamourous example of a muffler mount, but I just wanted to make sure it was stable so I could make sure everything was going to fit before we finalised the boot changes.

On a slightly different angle...…. the J32A2 engine we're using are a great OEM motor, but it's weak point are it's little chicken leg conrods...…… With new conrods and some new valve springs and retainers they're capable of awesome performance. We looked at getting some custom rods made and Pauter list some but they're close to $ 1500 USD for a set of 6. We thought that we could get some made locally for better money and just as good...…..here's the result.


Hopefully people will be able to see from our build that we're not cheap and will spend money where it's needed, but the conrods are an example where we felt we could get something just as good but save money for other areas of the project. The pistons are also one of those areas. Wiseco make some K series oversized pistons that are pretty much perfect for the J32 apart from 1 thing. The pistons have an offset which means they'll work fine for the front of the engine, but when you put them in the back of the V6 they will be the wrong way around. That would seemingly be easy to resolve by turning the piston around, however the K series have small valves on one side and larger on the other so that's not possible as the valve clearances would not work.
Others have had Wiseco make custom pistons previously and they are stamped with the same part number as the K series units but have the larger valve clearances machined. The custom pistons are close to twice the price of the stock K series units so we decided to buy some K series stock pistons and machine them ourselves to see how it all goes. Since Wiseco clearly use the K series piston when they make "custom" J series pistons for you, that suggests to me that they're simply the K series part with extra machining. We felt that we could so that ourselves and save some dollars...….. hopefully I'm right
…...time will tell !We did the first piston today after making up a jig to hold the piston and allow us to swap pistons out as we have 2 engines worth to do (this one and a spare).


That's it for now. We have more underway so I promise I'll post some more soon
Last edited:
Great update, thanks!
OK got more progress shots...……. they're a little bit all over the place as I'm just trying to get through jobs regardless of what it is because it's all got to be done at some point. It's hard as I like to focus on one area at a time, but sometimes there's nothing to do or some hold up with one area that I can't do myself or need parts etc so I just move onto something else.
First thing was some new fuel rails I bought for the J32 engine. These are new OEM ones for another model but I also felt that to be safe for future power levels and fuels like E85 where we will need more flow for the same power, that it would make sense to drill them out a bit. I've done a before and after so you can see. I didn't really want to go much bigger as it would possibly have caused the wall of the rail in other areas to be a bit too thin. What we did was quite a bit more flow than before so this was a safe bet I think. It's quite hard to drill something close to 300mm long !!!
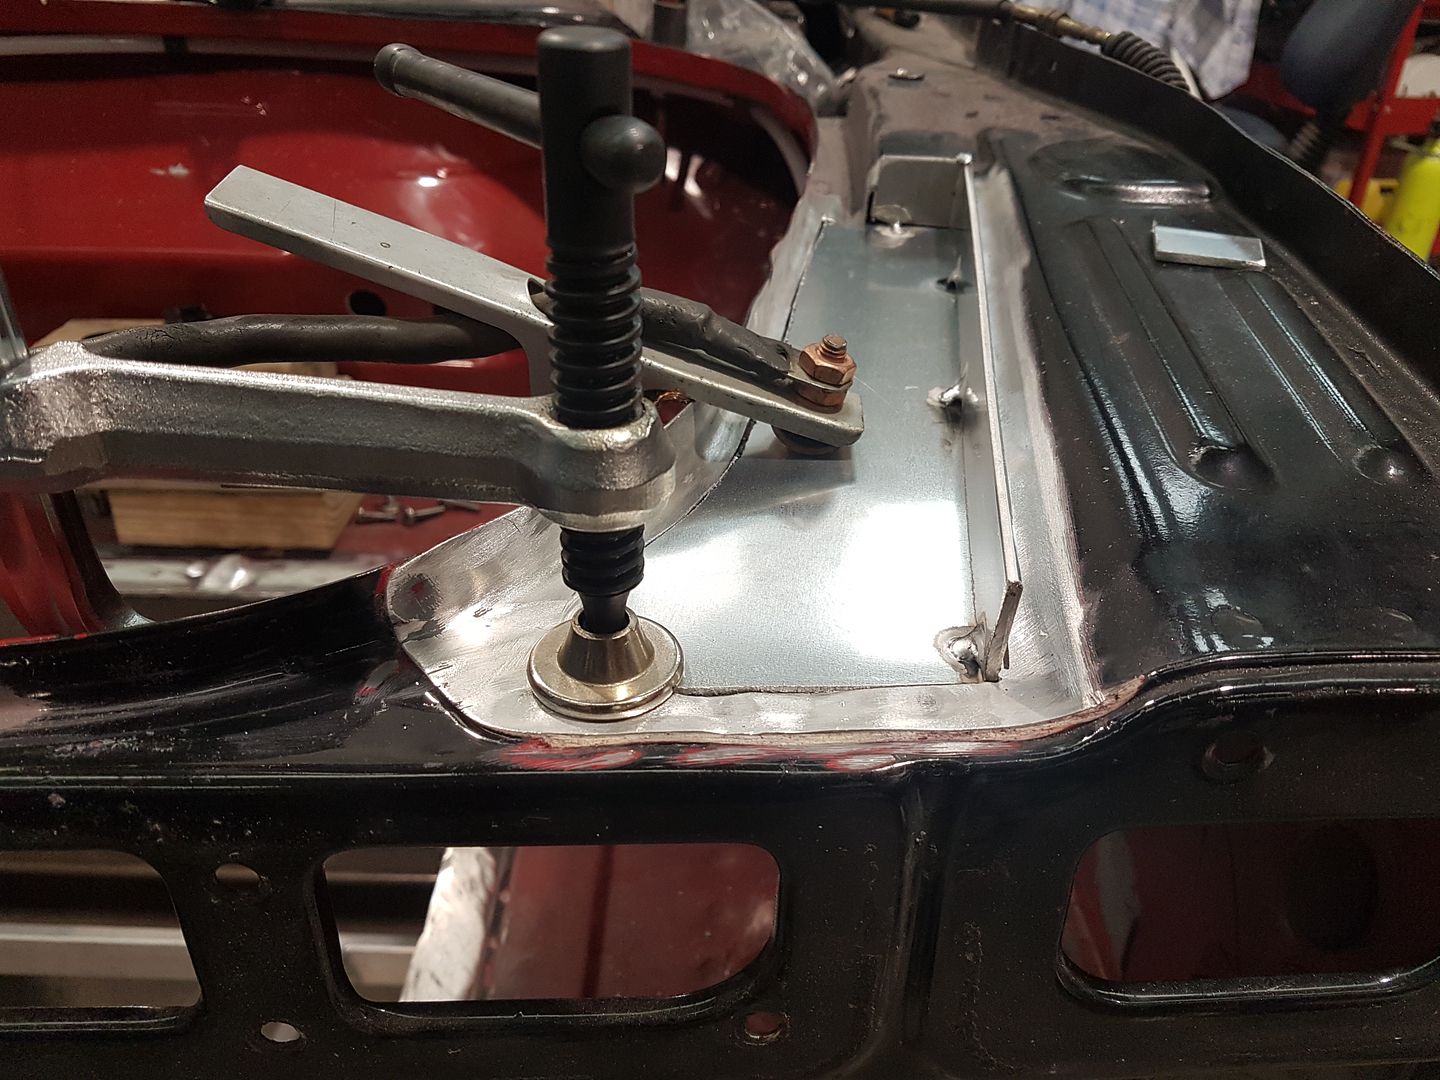
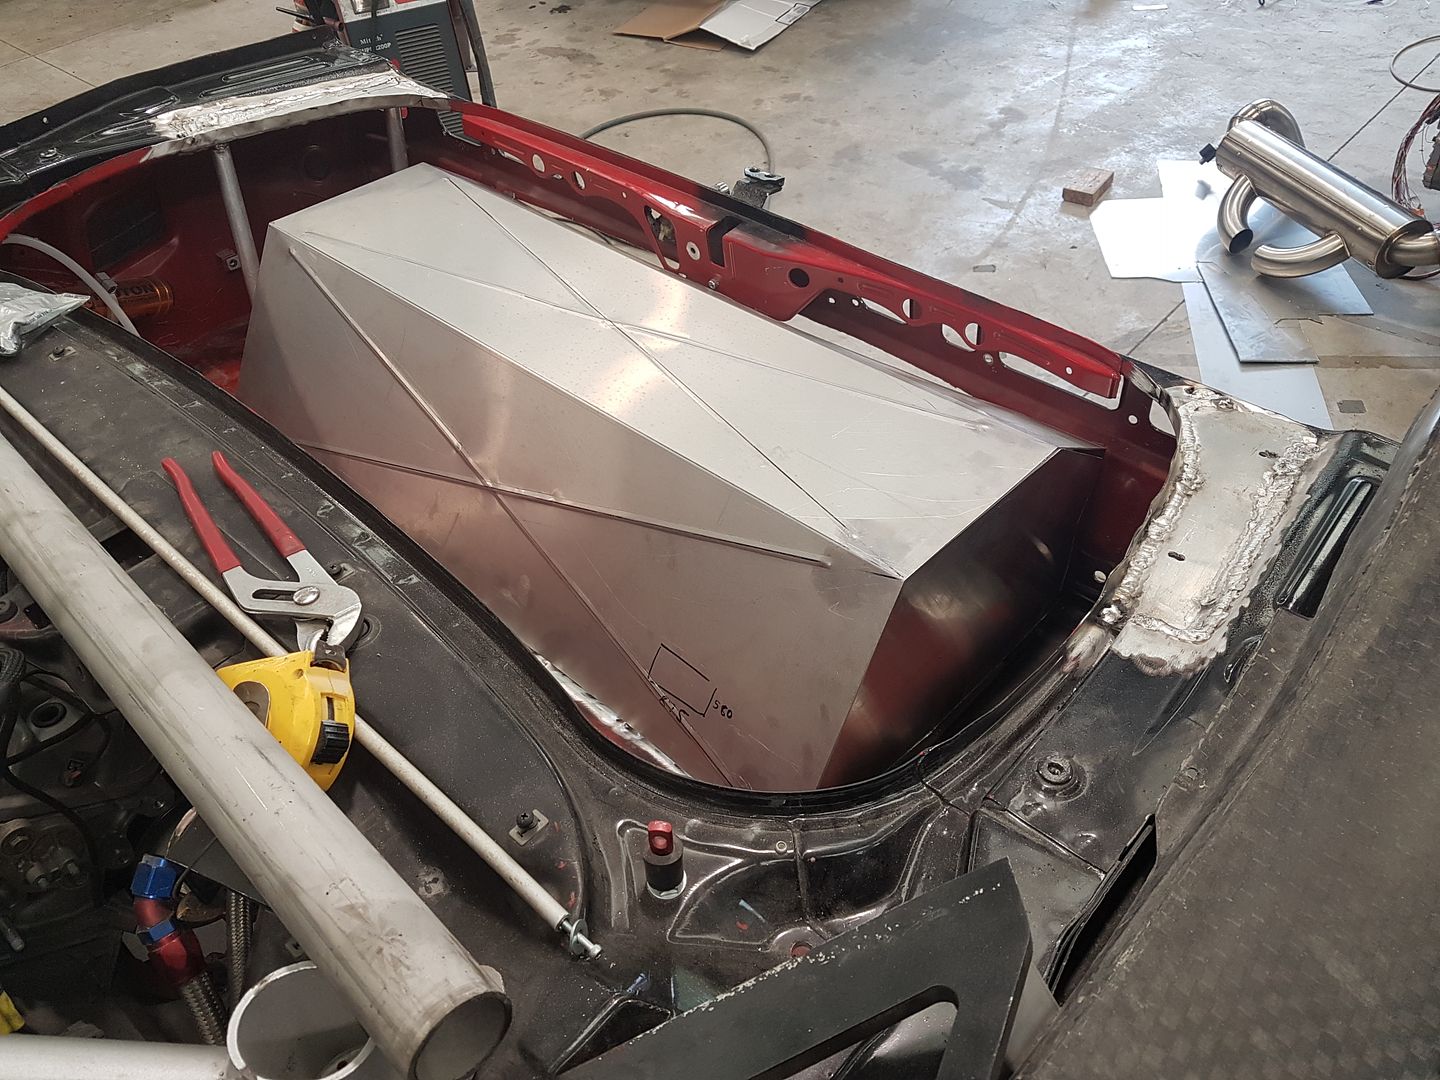
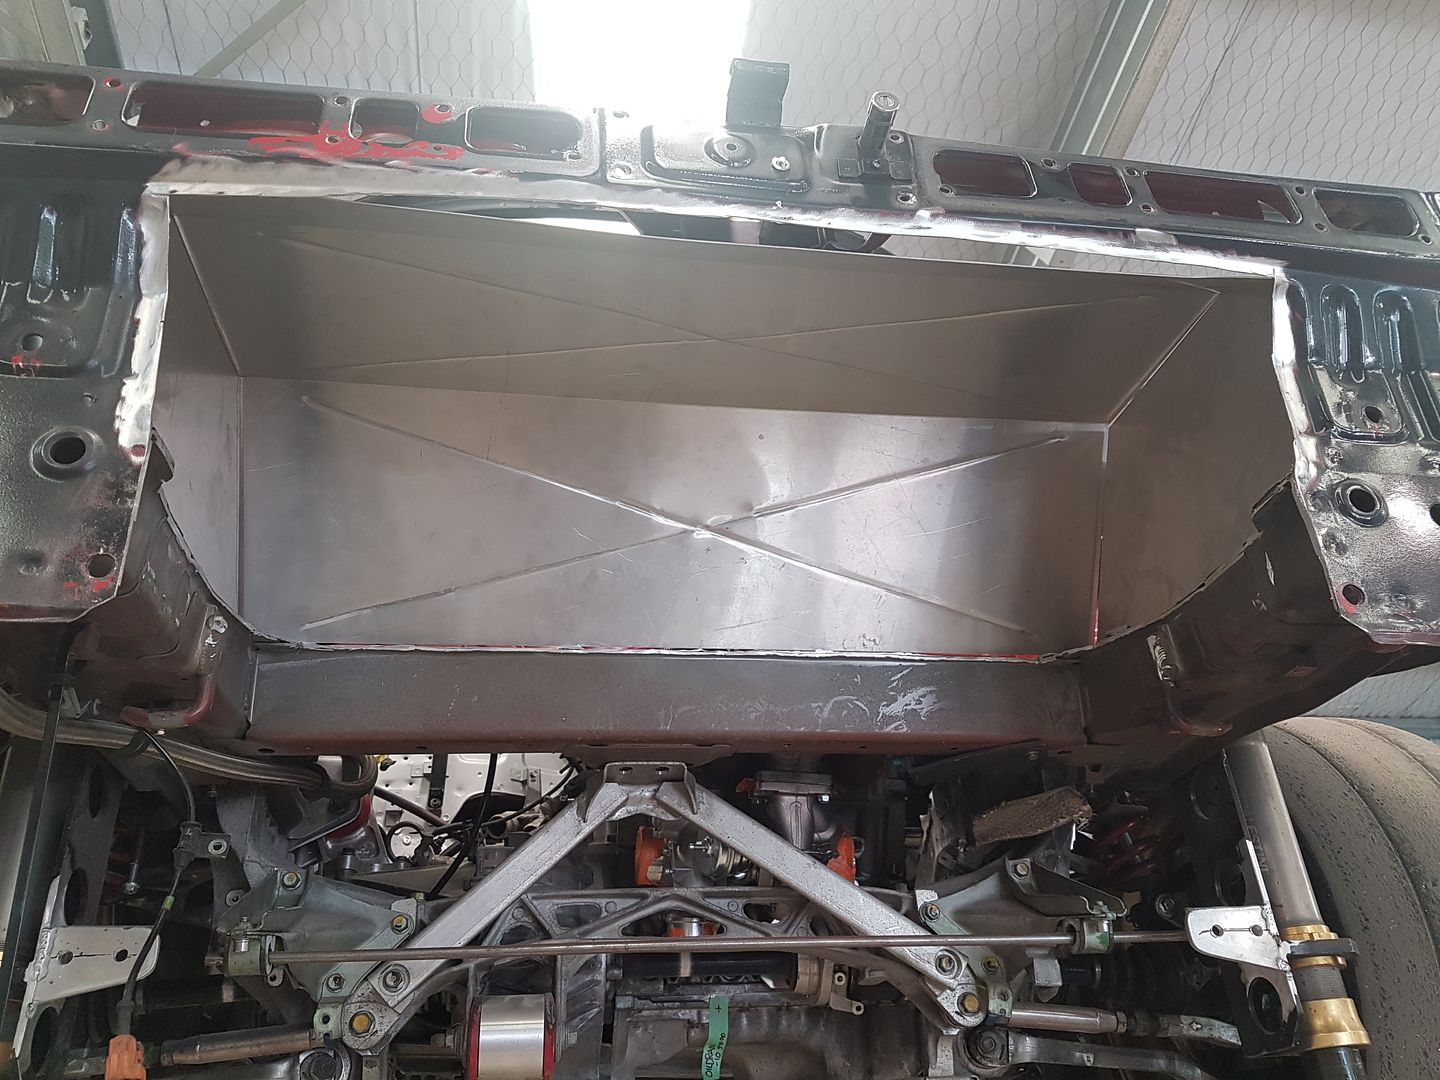
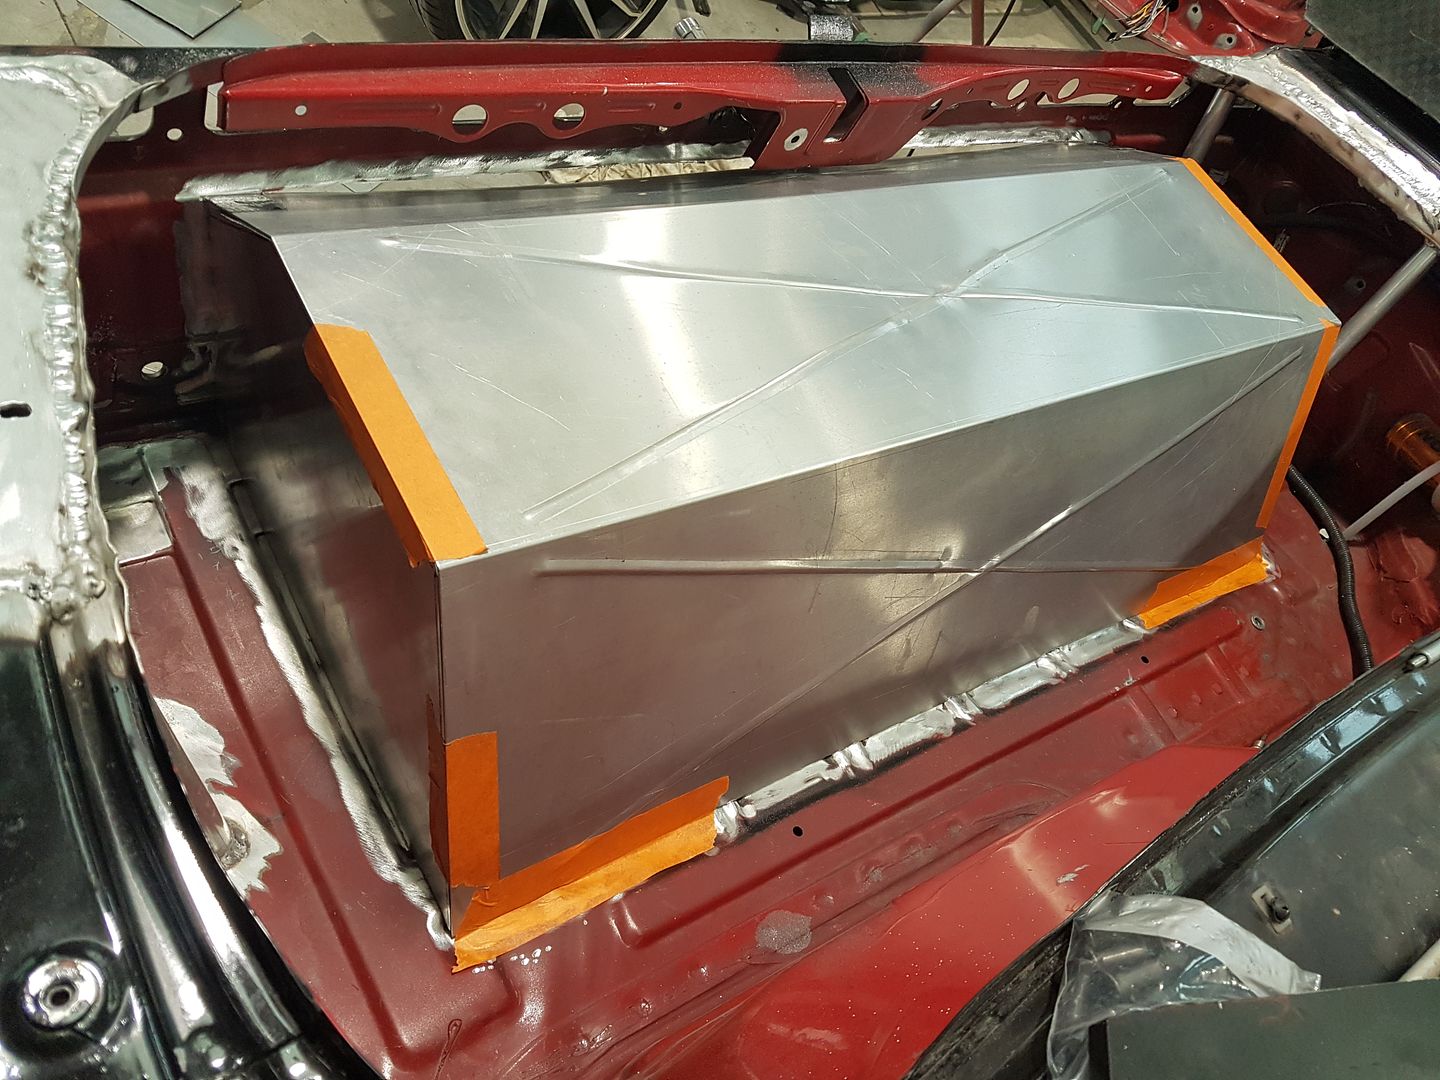
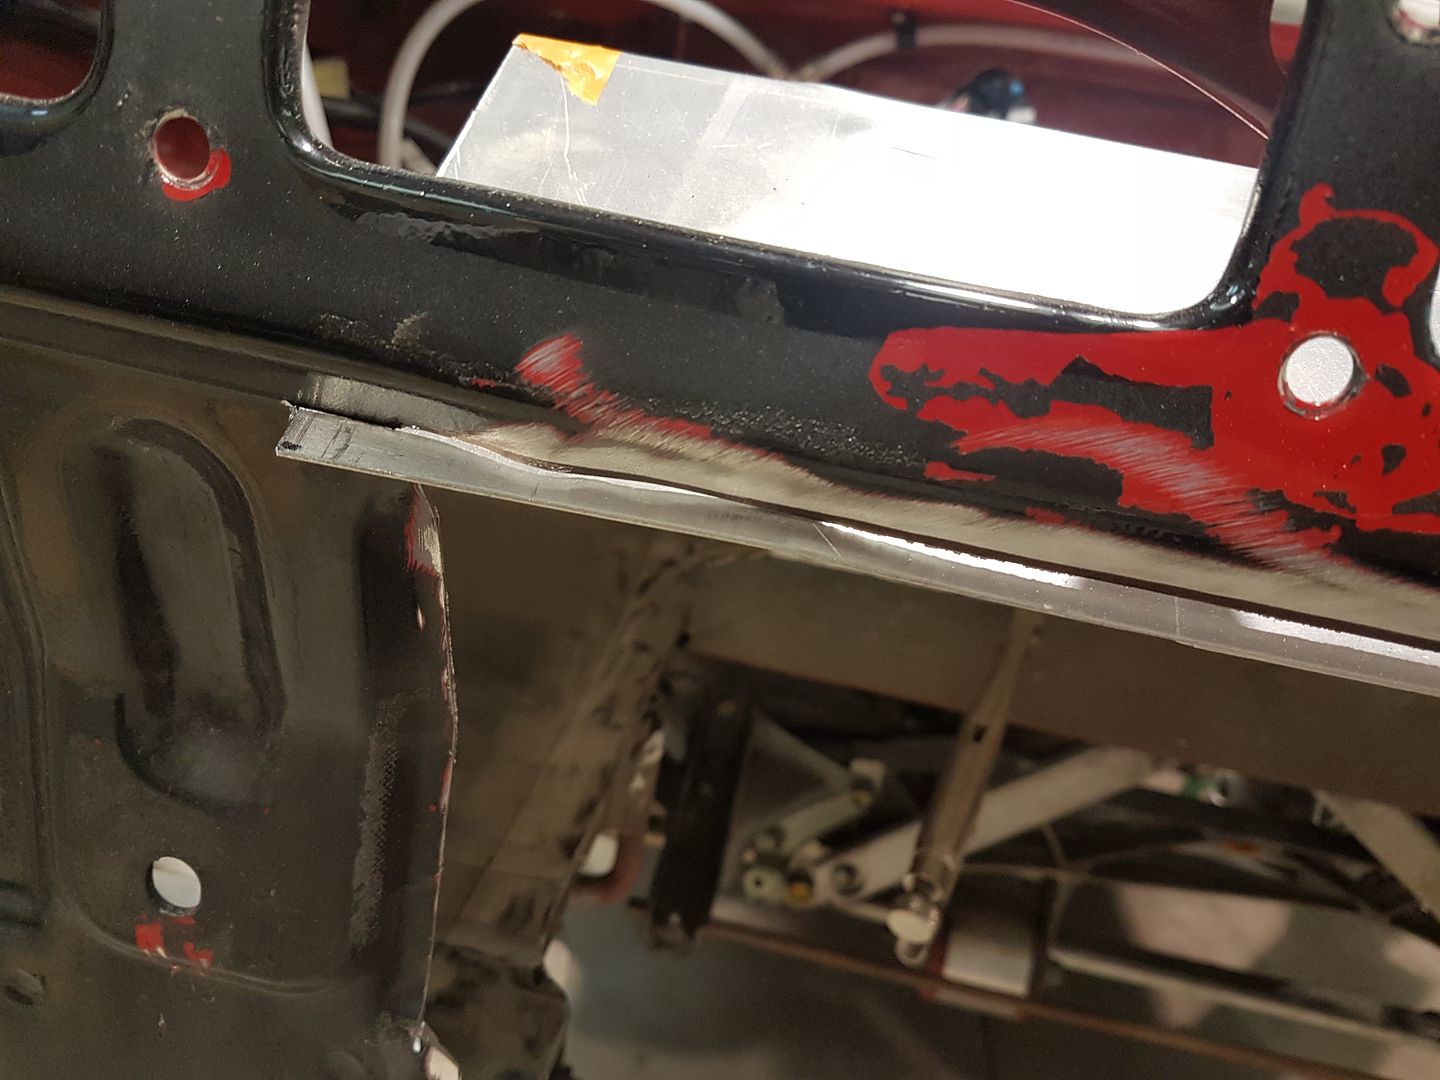
After getting the new boot all buttoned / welded / sealed up I gave it a lick of paint to tidy everything up.
Next I re-mounted the fuel pump and made up lines to suit.
Next to remount the Accusump and make new lines. Really happy with how the whole thing came out to be honest. Not that anyone ever really sees it etc, but I just like things to be nice and tidy.
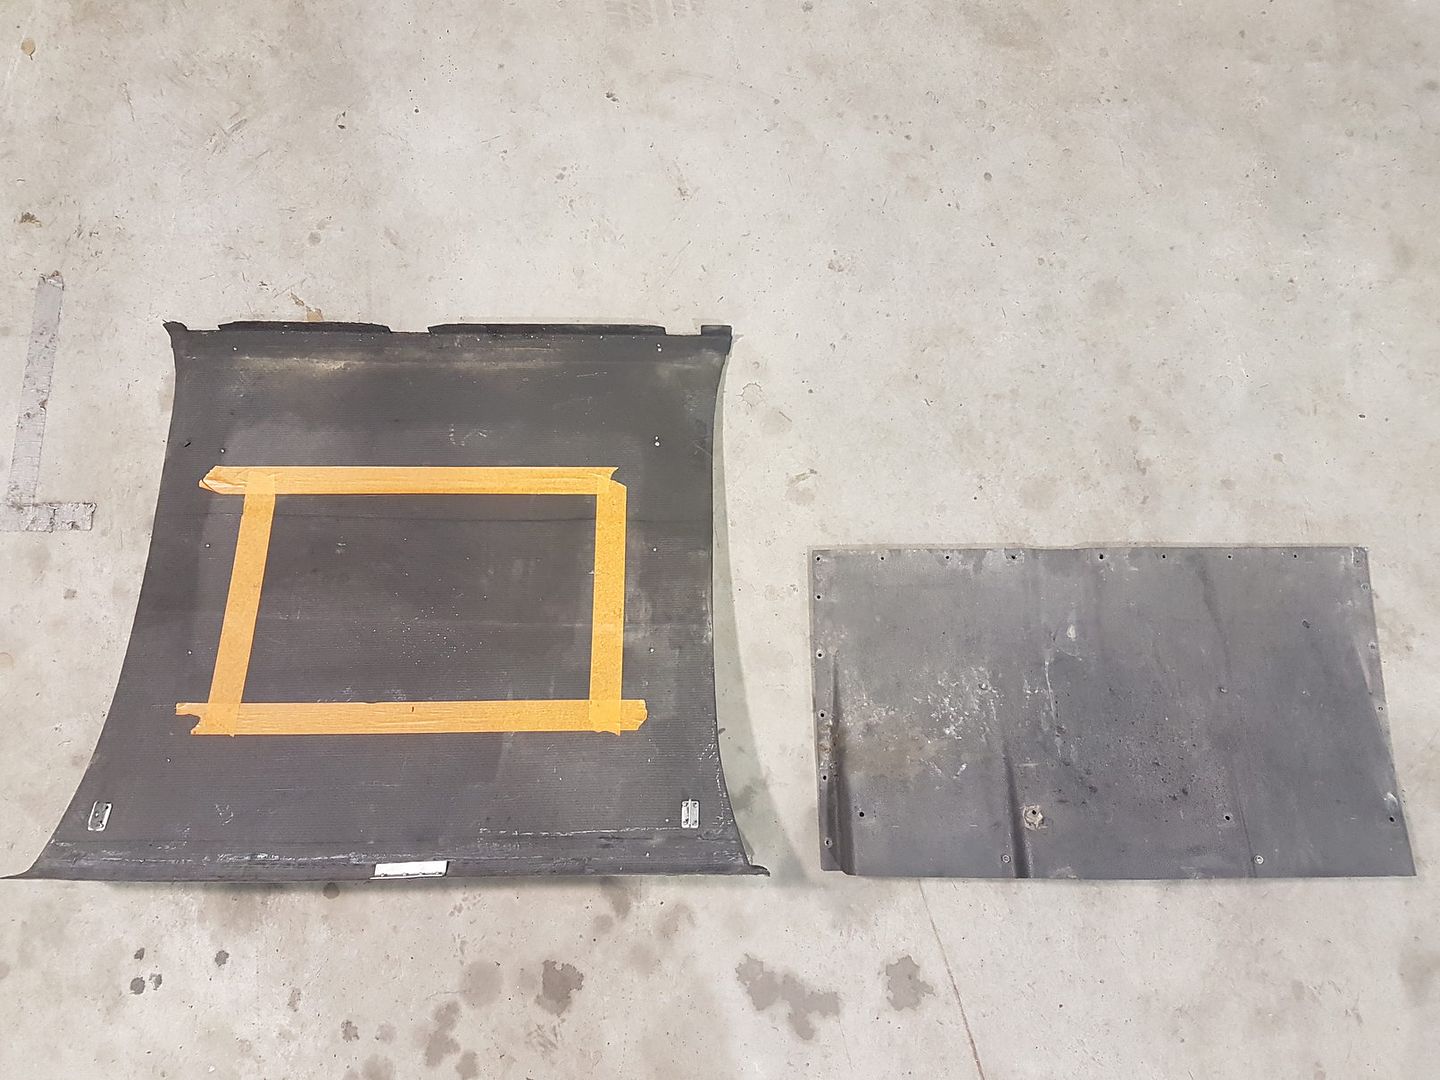
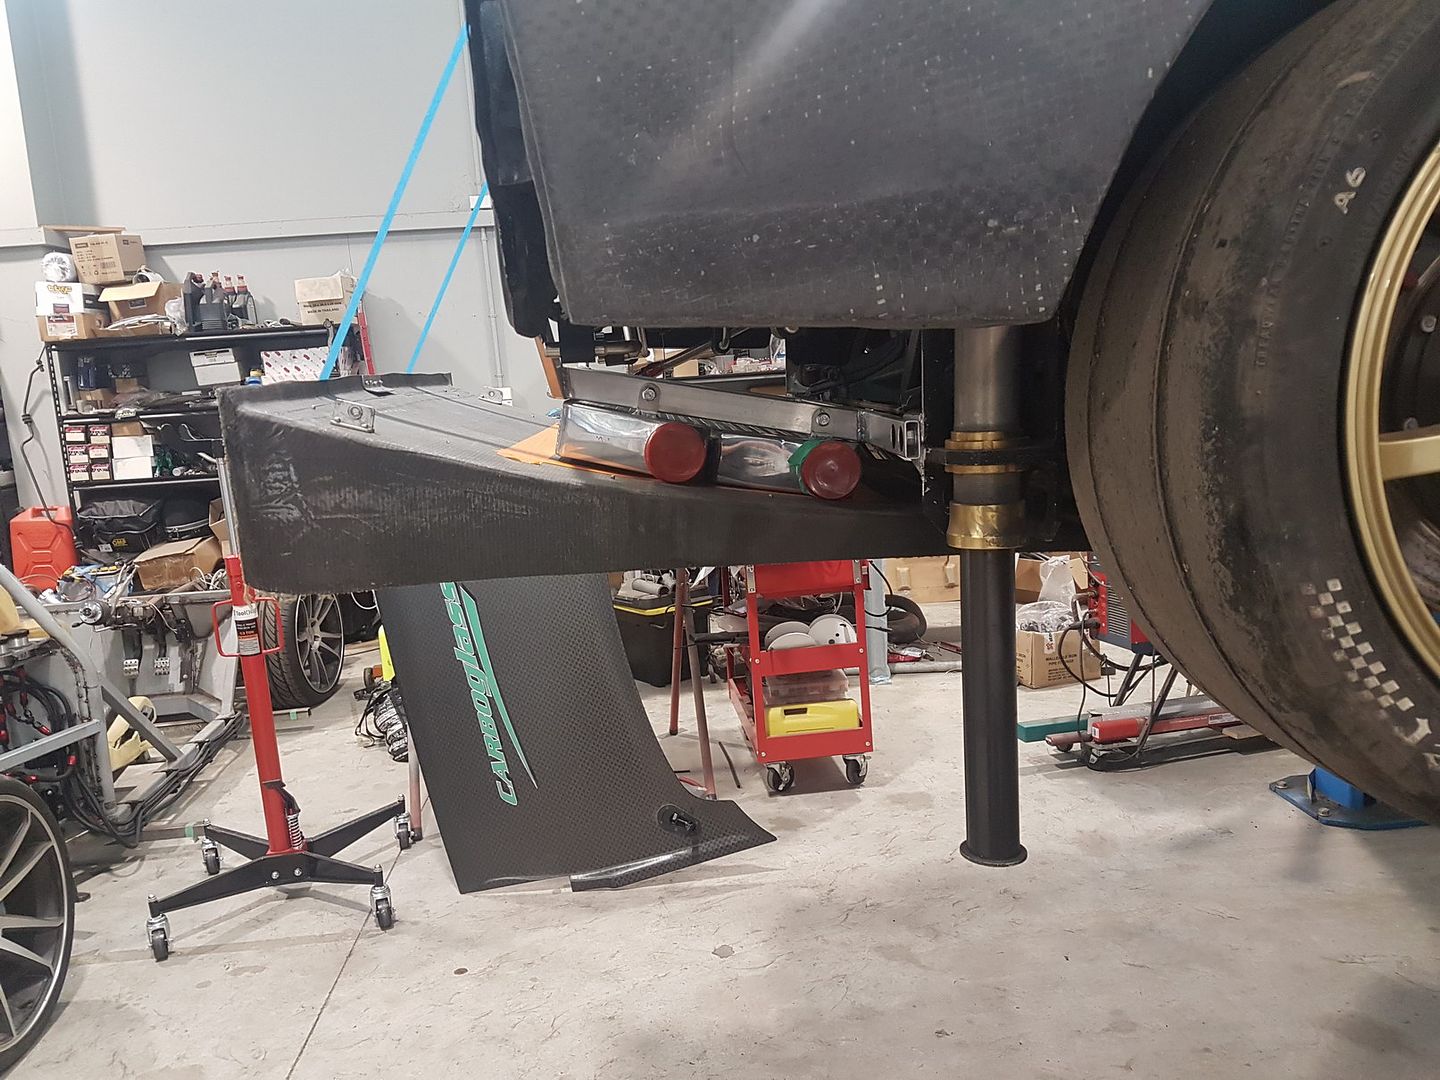
The next area we're upgrading is the diffuser. Zac has borrowed the one on the pictures from a friend of his. He made this for his hillclimb / circuit car called a Mallock and we were going to use it as a place to start, but fortunately when we tried to fit it to the NSX to see what we needed to adjust it was perfect so we will be making our own one with some slight differences, but the concept mostly the same.
Here is the old unit made by Taitec.
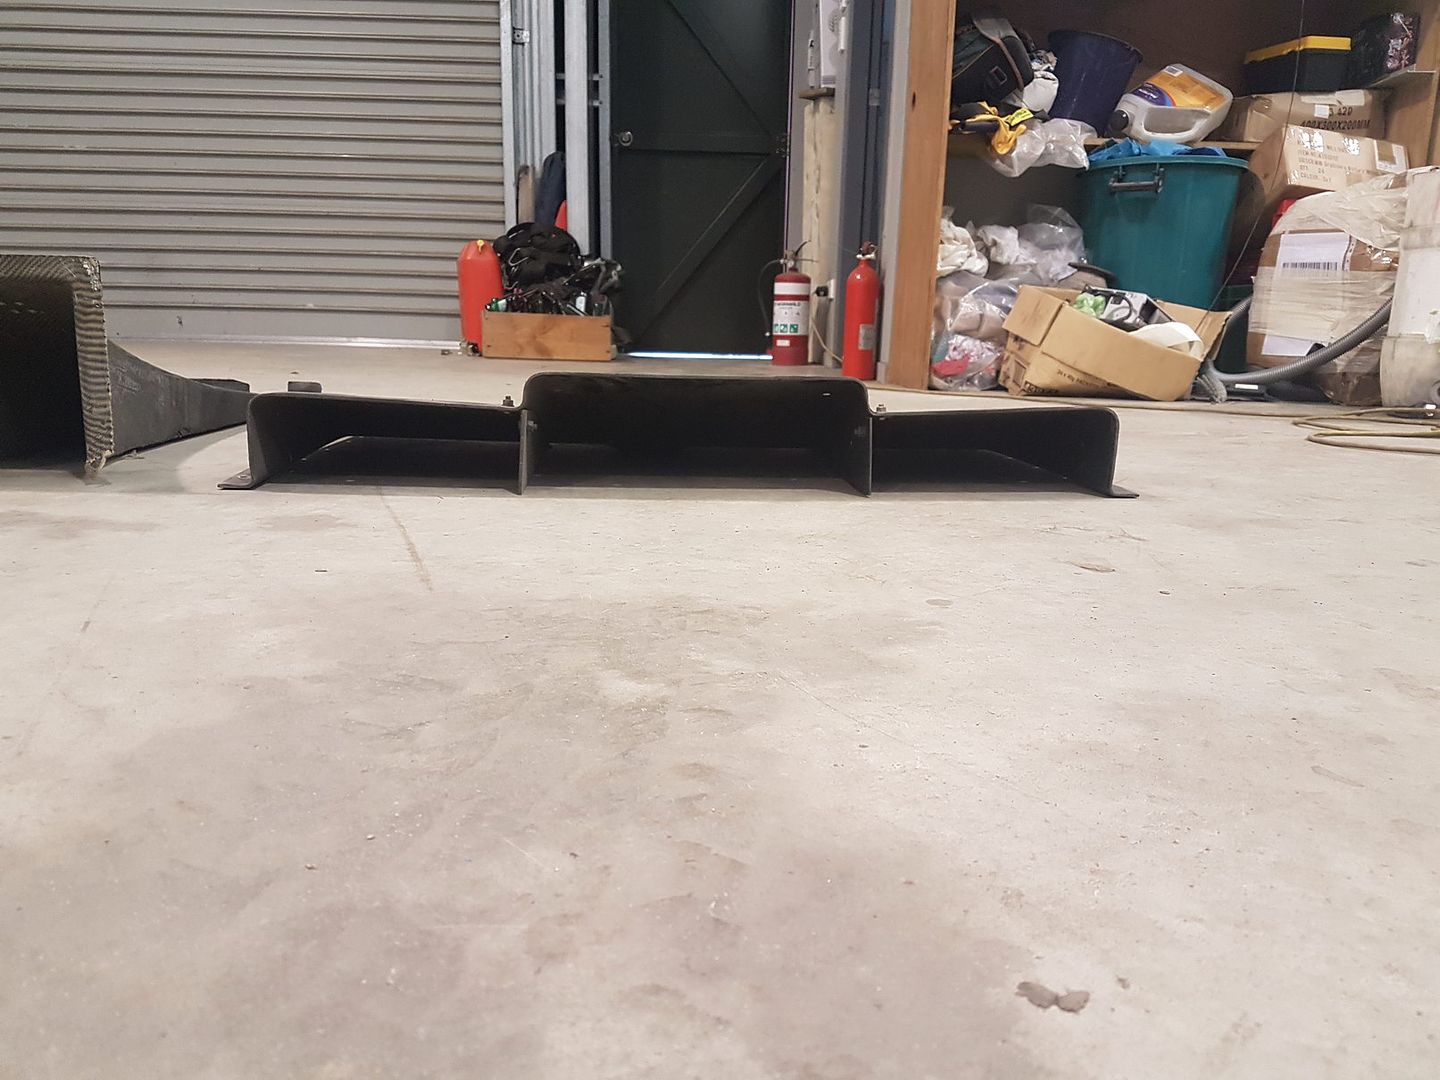

Here's the new diffuser side by side with the old to give you an idea of width, length and height differences...….
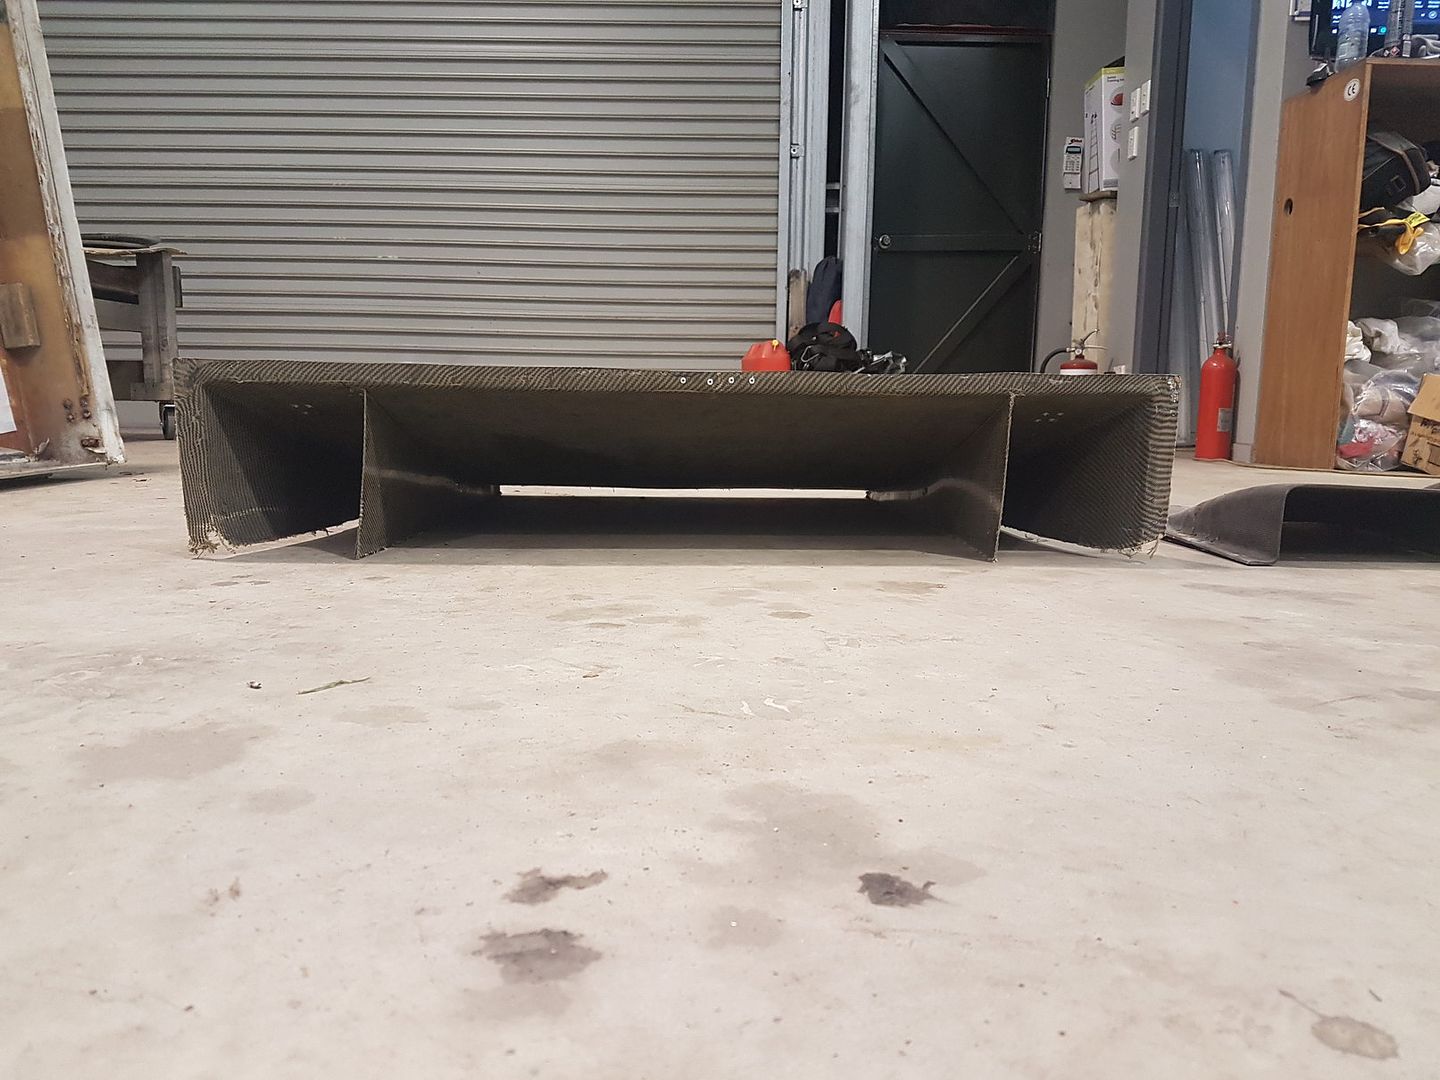
Here it is just temporarily setup on the car.
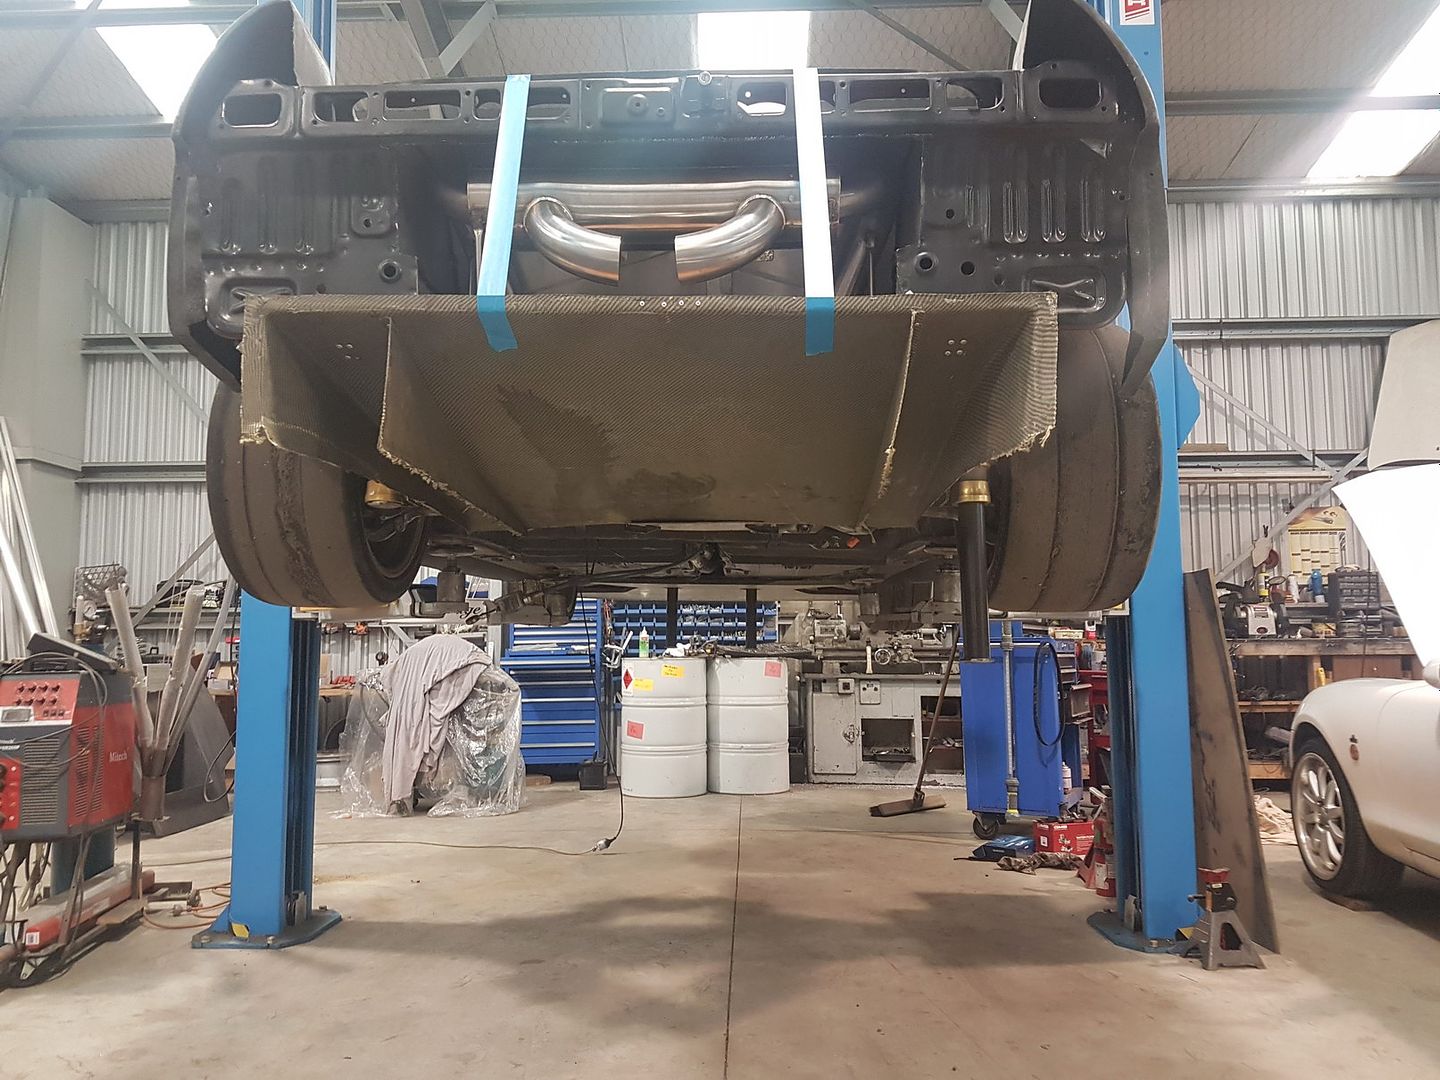
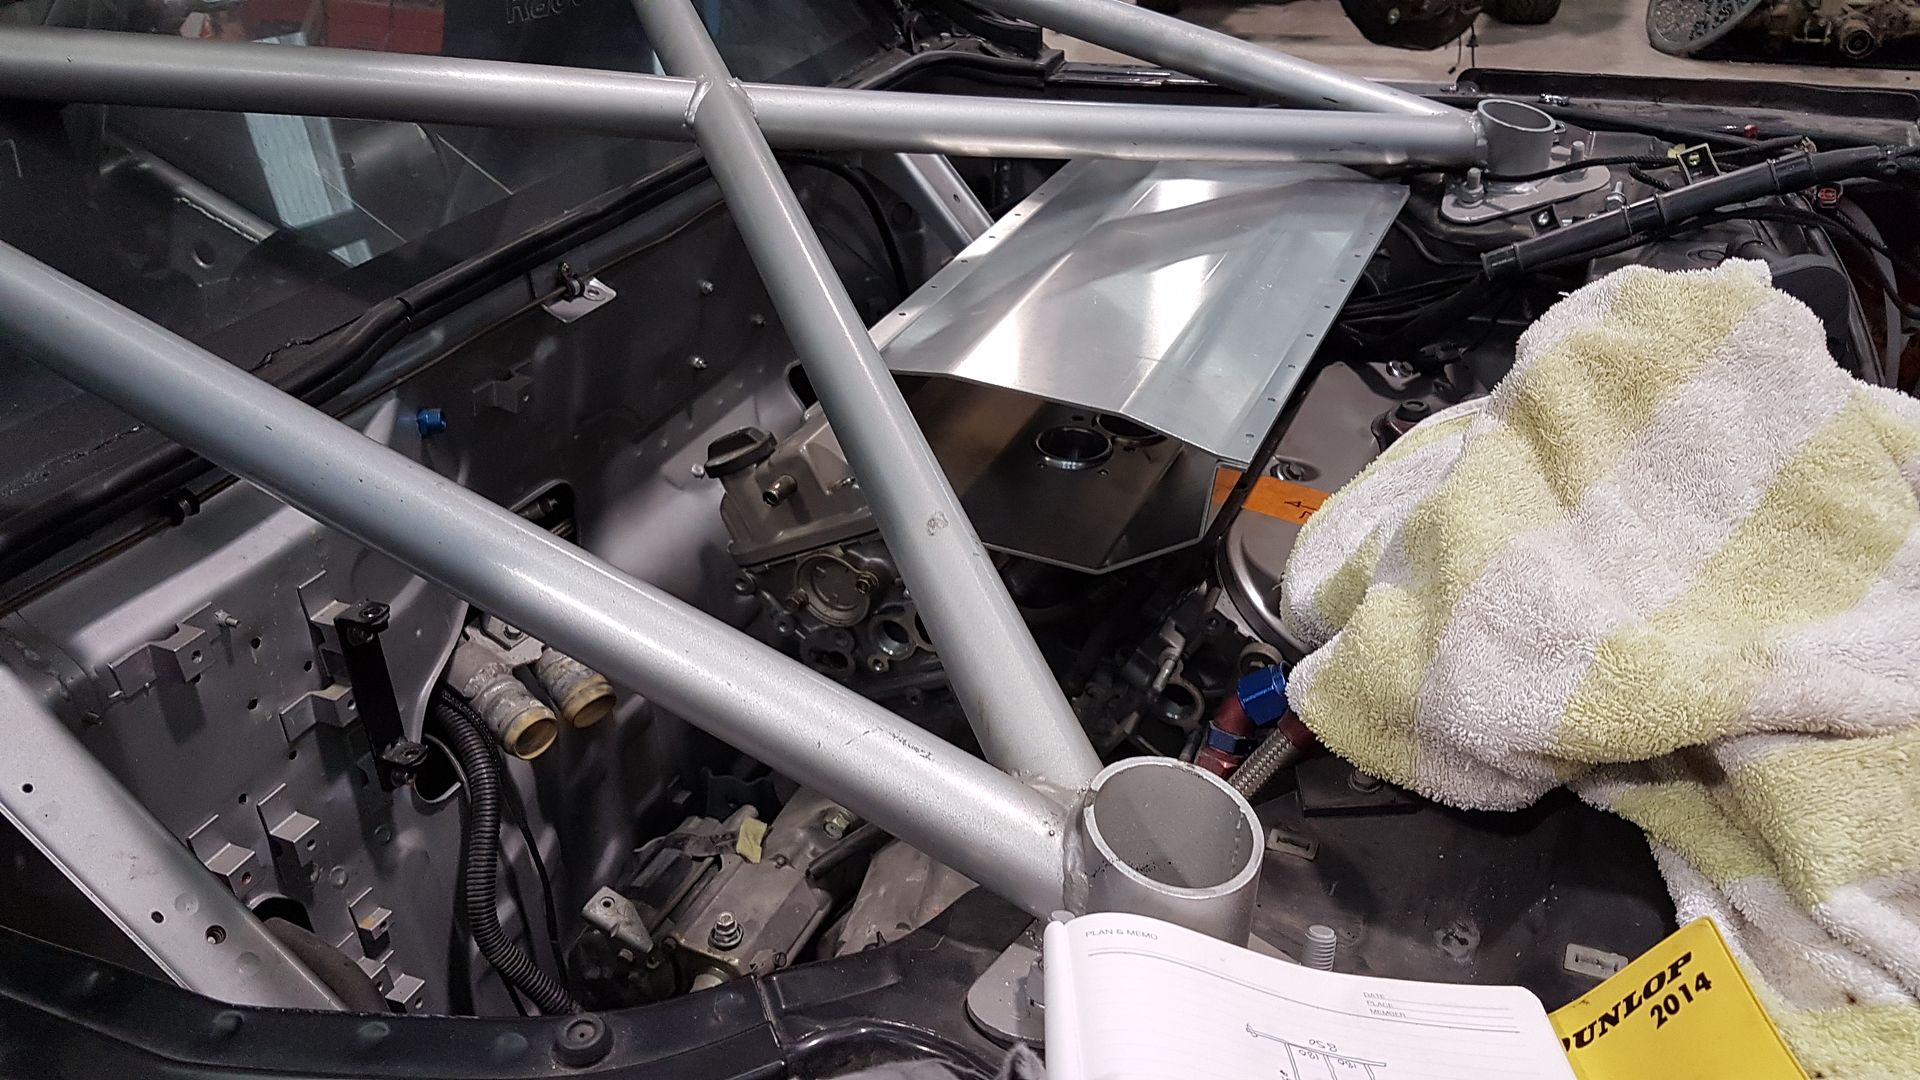
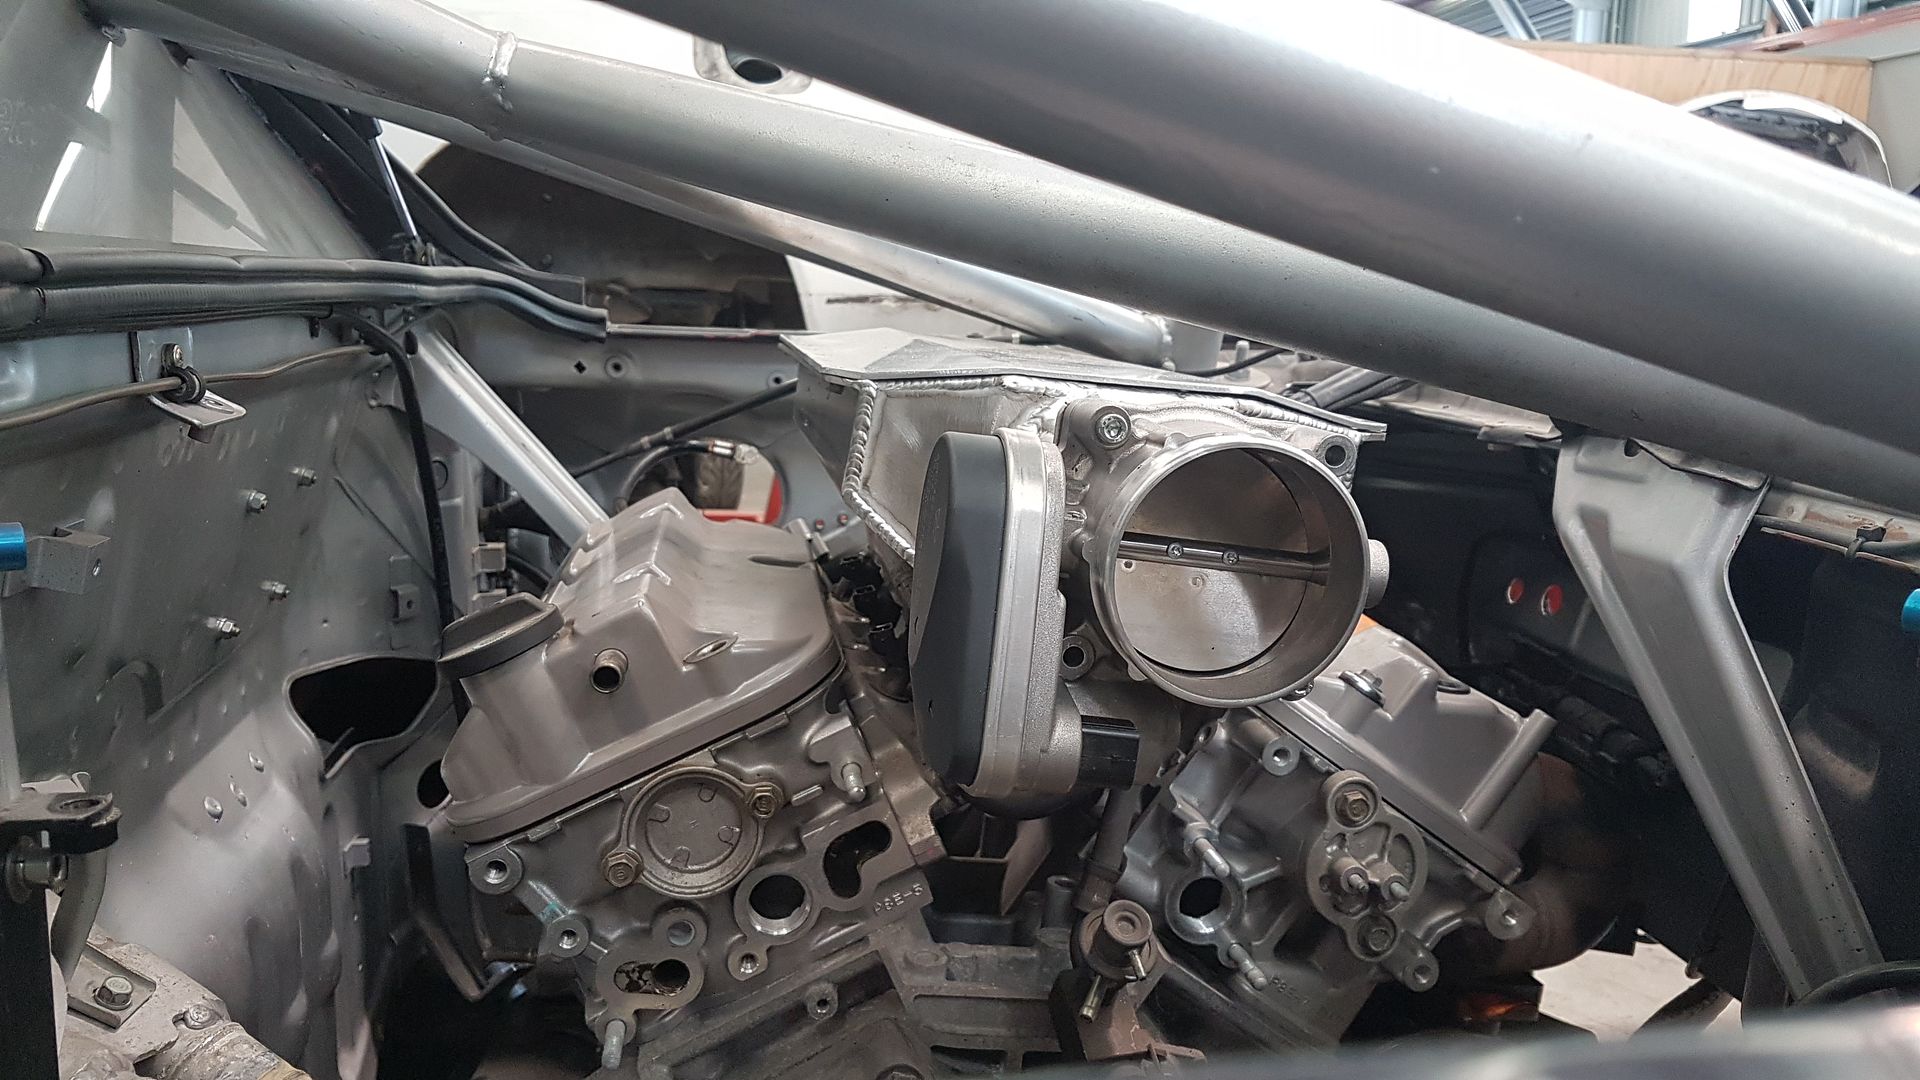
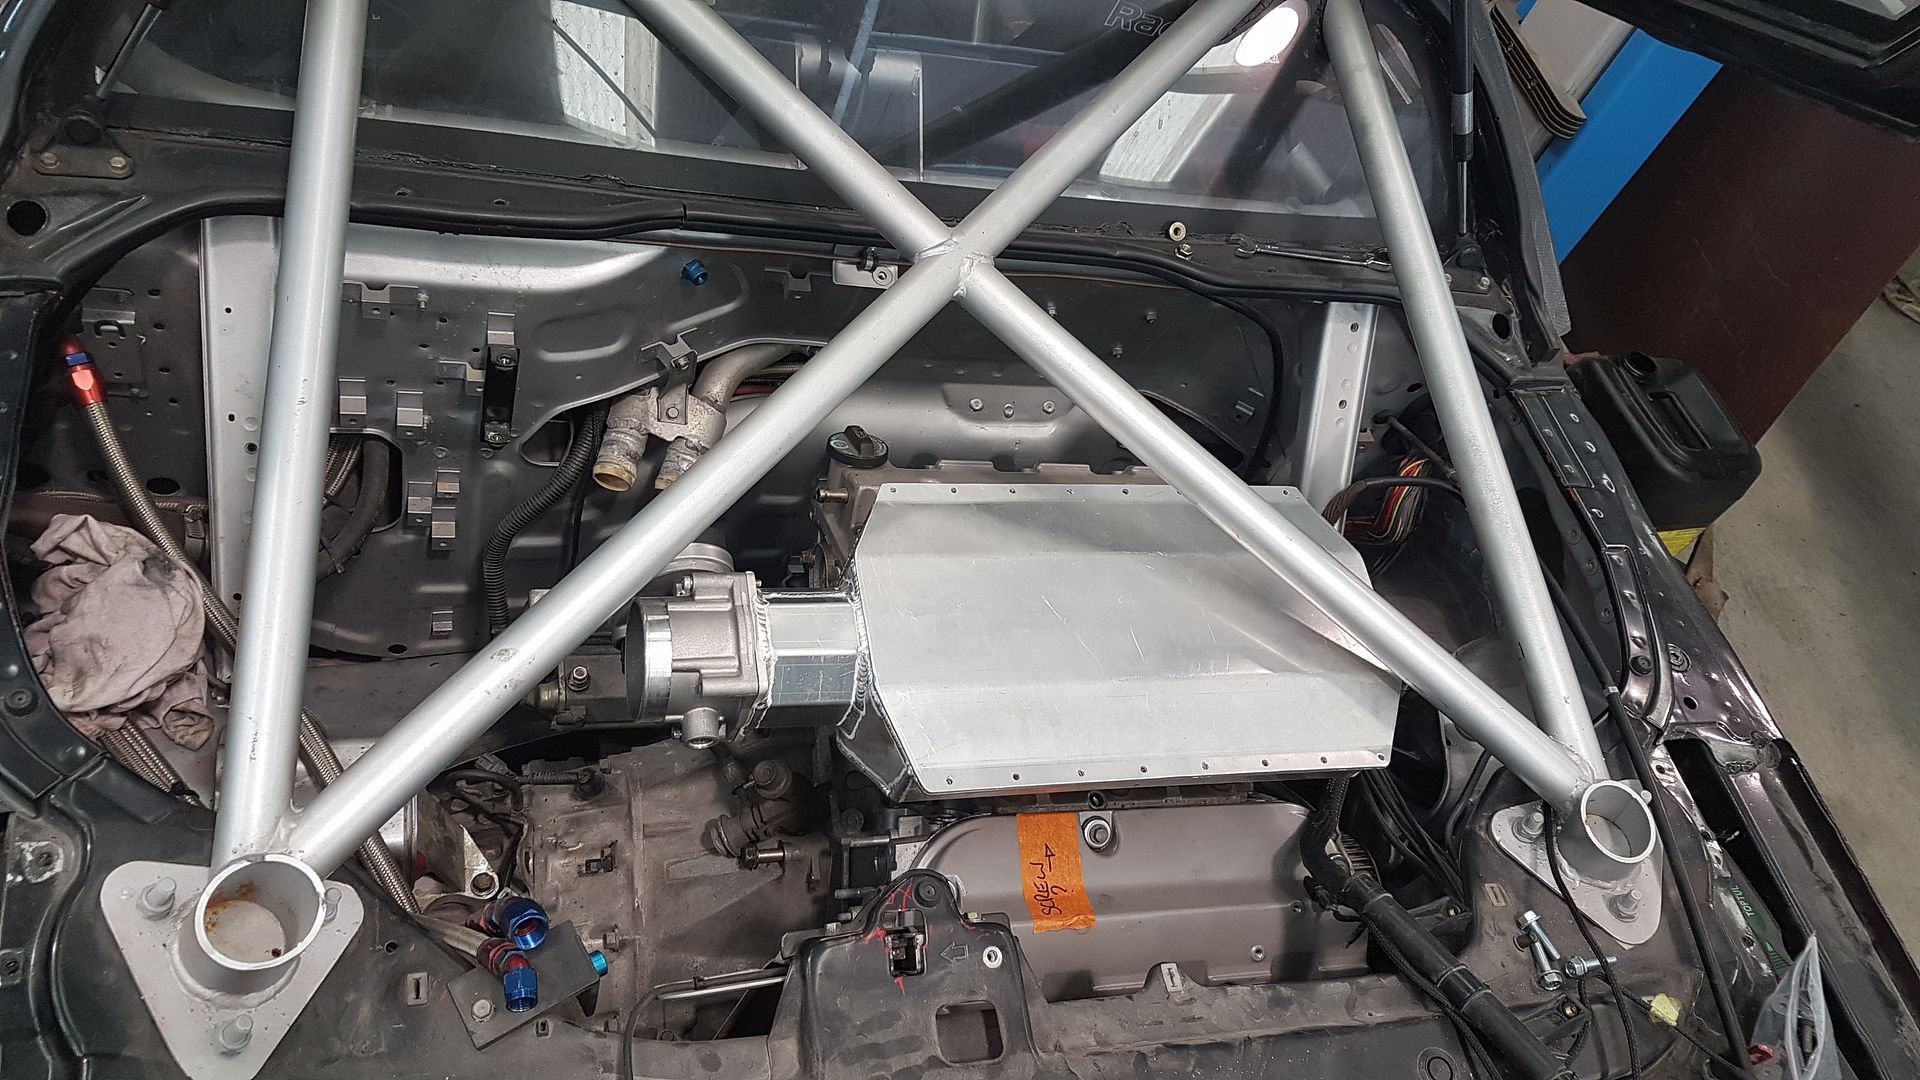
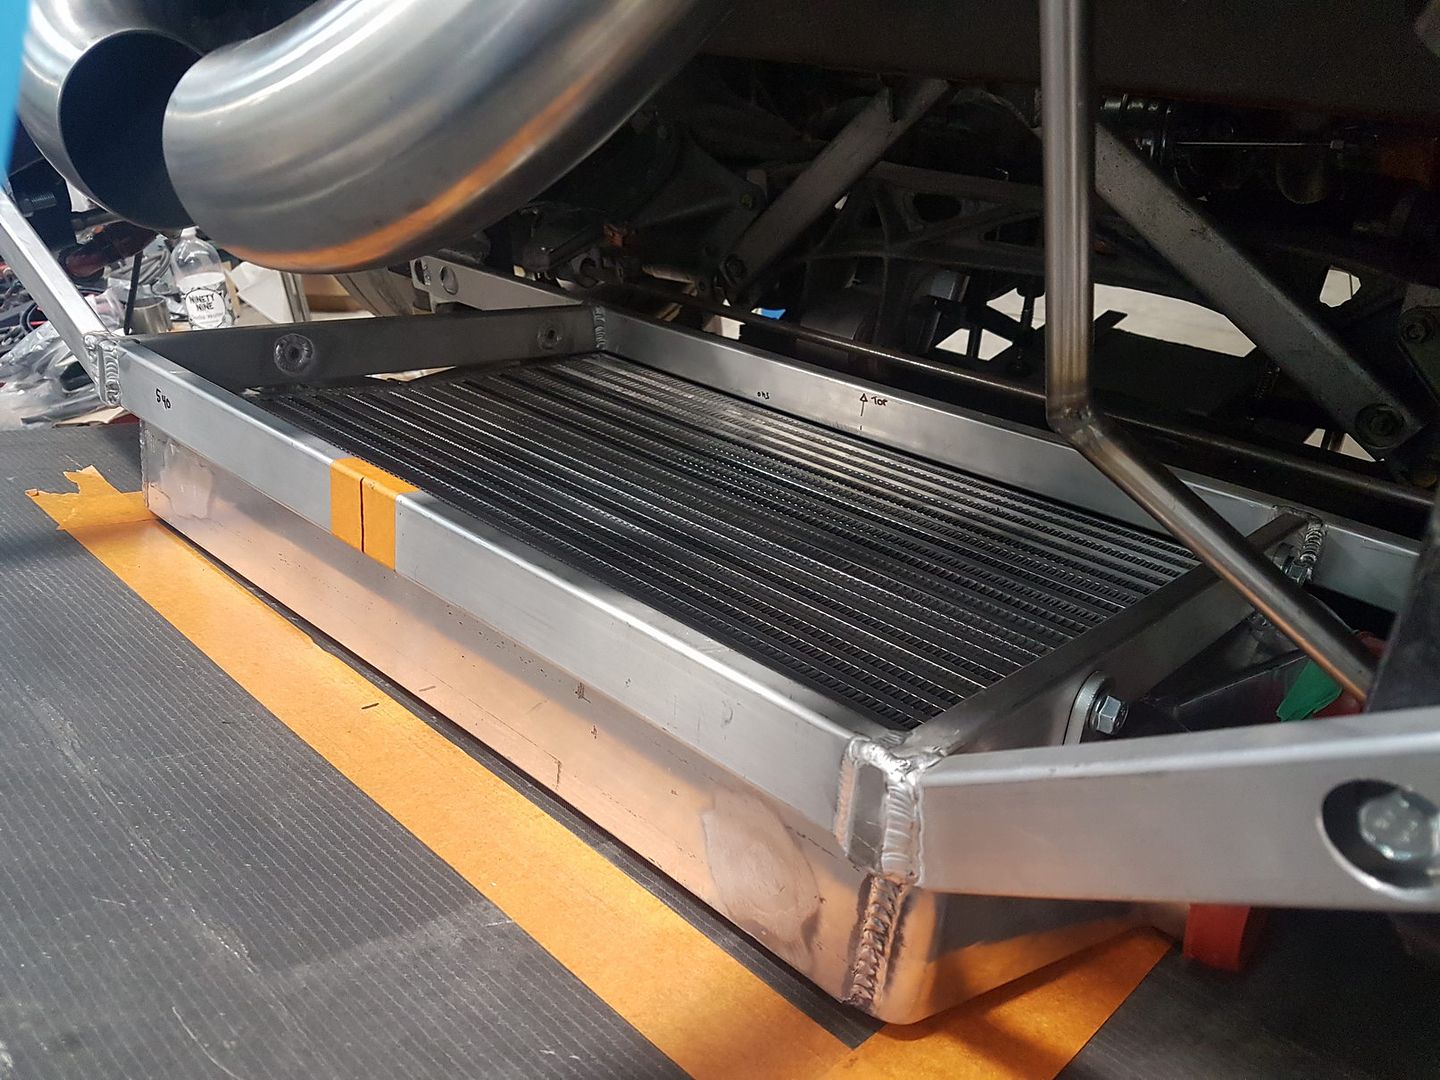
In my last post I alluded to us wanting to do something really different with our new setup and this is what I meant. There's an unwritten rule on race cars about trying to have as little on the car that only does one thing. So with that said, you may remember a photo of an aluminium frame that we'd made to support the diffuser. Well it's main job is to support the new intercoolers !
We're planning on actually running them as an integrated part of the rear diffuser to extract air through them. Here's what they look like mounted on the frame.
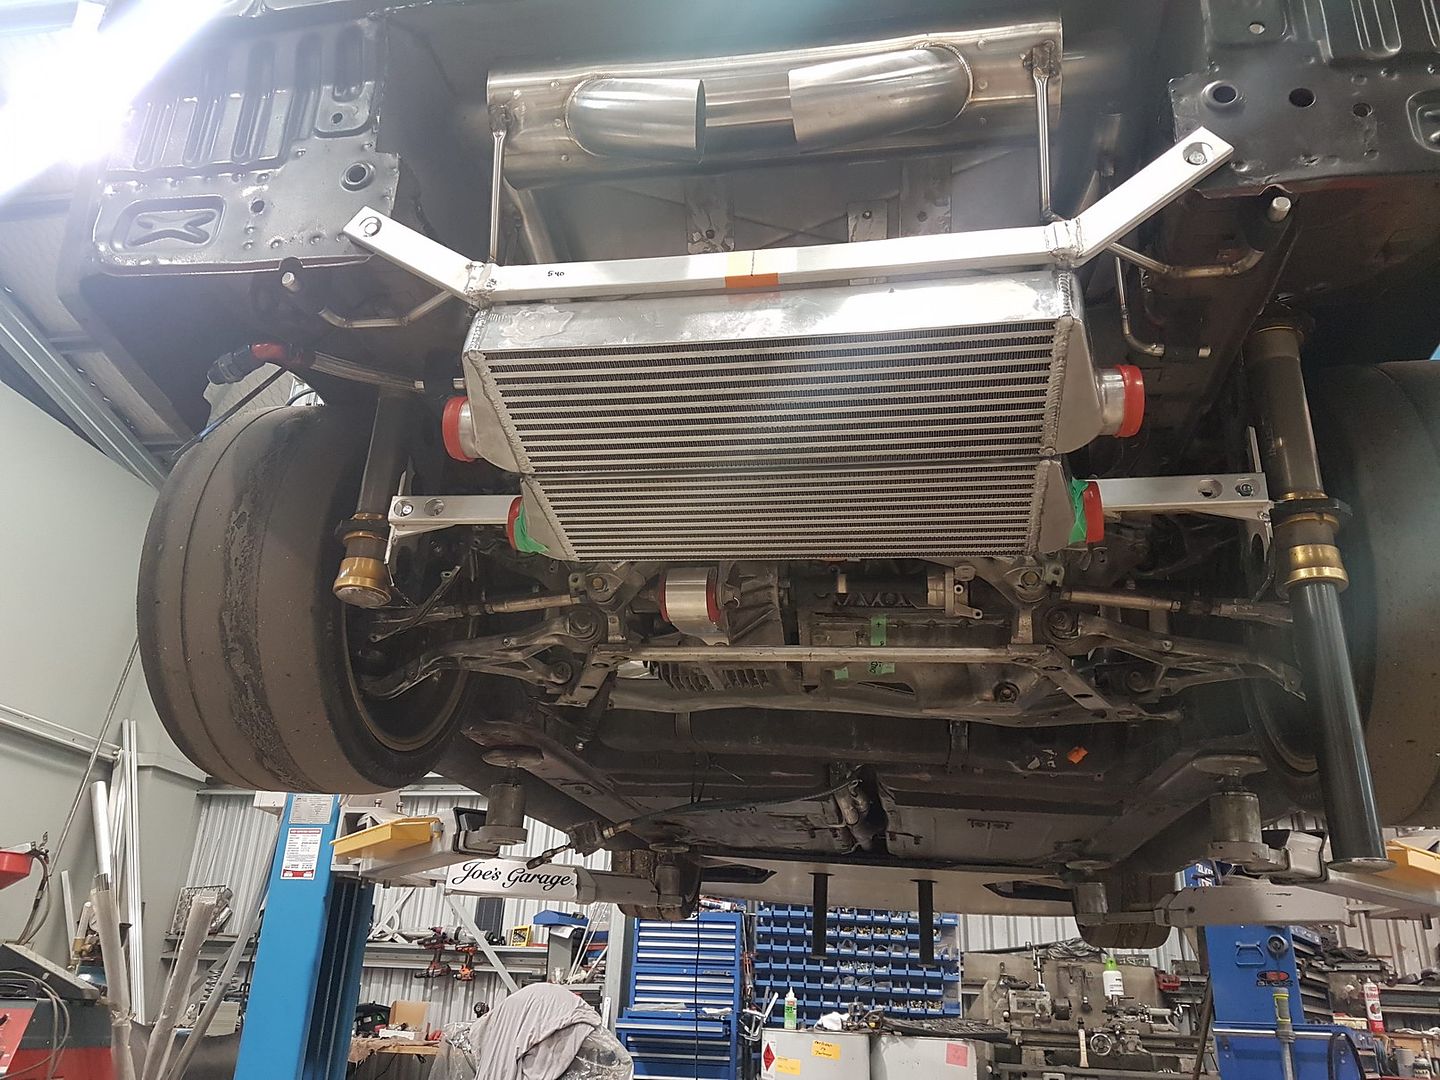
At the top of the coolers shown below, Zac is going to make a composite part that will seal off the top apart from a feed from the outside of the car so cold air from the side of the car will be funnelled down a flexi pipe to the intercoolers. In between the side of the car and the intake into the cooler we are fitting a large flow electric fan so there is constant airflow regardless of whether the car is moving or not. The fan is rated to just over 750 square metres per hour, so that is approx. 25 square centimetres per second which doesn't sound like much but it's a reasonable amount when you take into consideration that there will also be more flow once the car is actually moving with the pressure from the diffuser.
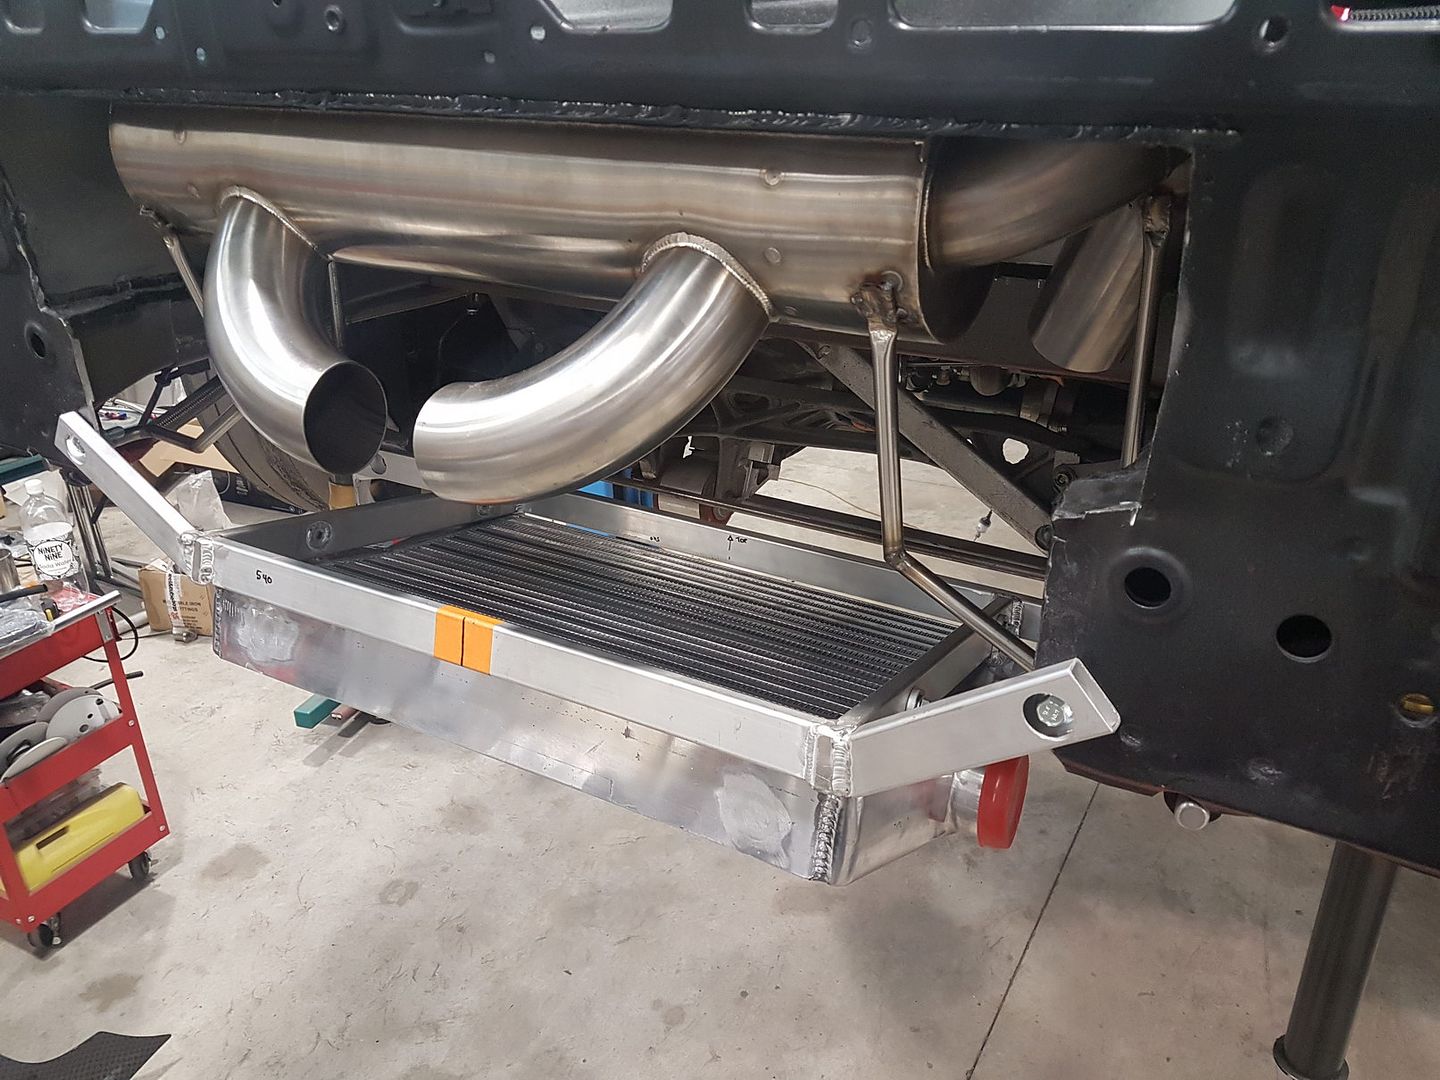
Some eagle eyed among you might have noticed a square shape outlined in orange tape on the new diffuser design. This will be where we plan on cutting away to allow the intercoolers to become part of the diffuser.
I have photo chopped something together to give you the idea of what it should be like when it's done.
Although we feel like we've got the best turbo's possible with the Borg Warner EFR series, there are issues with the factory supplied wastegate actuators not being able to control the boost properly so my good friend Reuben from R's Garage sorted me out some new direct replacements from Turbosmart.
Next is just parts build up really. As I mentioned before the J32A2 engine is a great platform right out of the box, but the weak points when getting up in HP and RPM is the valve springs which can cause valve float at high RPM. Luckily it's reasonably cheap to fix with new springs and retainers. These cost me about $ 550 USD per set. We have 2 engines we're building as well as one other engine we'll use for spares if needed so I bought 2 sets of everything I could. Also ARP head studs although I believe the stock ones are OK......they were cheap so it seemed like a no brainer.
And lastly some new Gates cam belts.
I've also got new oil and water pumps, gaskets, valves seals etc ……..just everything to make sure they're like brand new once we're done.
Well that's it again for now......
First thing was some new fuel rails I bought for the J32 engine. These are new OEM ones for another model but I also felt that to be safe for future power levels and fuels like E85 where we will need more flow for the same power, that it would make sense to drill them out a bit. I've done a before and after so you can see. I didn't really want to go much bigger as it would possibly have caused the wall of the rail in other areas to be a bit too thin. What we did was quite a bit more flow than before so this was a safe bet I think. It's quite hard to drill something close to 300mm long !!!

After getting the new boot all buttoned / welded / sealed up I gave it a lick of paint to tidy everything up.

Next I re-mounted the fuel pump and made up lines to suit.

Next to remount the Accusump and make new lines. Really happy with how the whole thing came out to be honest. Not that anyone ever really sees it etc, but I just like things to be nice and tidy.


The next area we're upgrading is the diffuser. Zac has borrowed the one on the pictures from a friend of his. He made this for his hillclimb / circuit car called a Mallock and we were going to use it as a place to start, but fortunately when we tried to fit it to the NSX to see what we needed to adjust it was perfect so we will be making our own one with some slight differences, but the concept mostly the same.
Here is the old unit made by Taitec.


Here's the new diffuser side by side with the old to give you an idea of width, length and height differences...….


Here it is just temporarily setup on the car.

In my last post I alluded to us wanting to do something really different with our new setup and this is what I meant. There's an unwritten rule on race cars about trying to have as little on the car that only does one thing. So with that said, you may remember a photo of an aluminium frame that we'd made to support the diffuser. Well it's main job is to support the new intercoolers !
We're planning on actually running them as an integrated part of the rear diffuser to extract air through them. Here's what they look like mounted on the frame.

At the top of the coolers shown below, Zac is going to make a composite part that will seal off the top apart from a feed from the outside of the car so cold air from the side of the car will be funnelled down a flexi pipe to the intercoolers. In between the side of the car and the intake into the cooler we are fitting a large flow electric fan so there is constant airflow regardless of whether the car is moving or not. The fan is rated to just over 750 square metres per hour, so that is approx. 25 square centimetres per second which doesn't sound like much but it's a reasonable amount when you take into consideration that there will also be more flow once the car is actually moving with the pressure from the diffuser.

Some eagle eyed among you might have noticed a square shape outlined in orange tape on the new diffuser design. This will be where we plan on cutting away to allow the intercoolers to become part of the diffuser.


I have photo chopped something together to give you the idea of what it should be like when it's done.

Although we feel like we've got the best turbo's possible with the Borg Warner EFR series, there are issues with the factory supplied wastegate actuators not being able to control the boost properly so my good friend Reuben from R's Garage sorted me out some new direct replacements from Turbosmart.


Next is just parts build up really. As I mentioned before the J32A2 engine is a great platform right out of the box, but the weak points when getting up in HP and RPM is the valve springs which can cause valve float at high RPM. Luckily it's reasonably cheap to fix with new springs and retainers. These cost me about $ 550 USD per set. We have 2 engines we're building as well as one other engine we'll use for spares if needed so I bought 2 sets of everything I could. Also ARP head studs although I believe the stock ones are OK......they were cheap so it seemed like a no brainer.

And lastly some new Gates cam belts.

I've also got new oil and water pumps, gaskets, valves seals etc ……..just everything to make sure they're like brand new once we're done.
Well that's it again for now......
Last edited:
My sincere congratulations for the job done!
Having just read Adrian Newey's book on the aerodynamics of Formula 1's, I suppose you decided to compromise the downforce produced by the undertray to extract enough air through the intercoolers?
On the engine side, given that the J35 engine doesn't rev as high as the the C30, it will have to produce more torque for the same horsepower.
Won't this put even more stress on the transmission?
Finally, how are you going to cool the engine?
At my 400 whp level it's already borderline with a D.A. racing radiator but admittedly the air path is reduced by the water radiator of the water to air intercooler mounted right in front of it...
Thanks. We've read that book too and we believe that it won't compromise the flow of the cooler in any way since the line of the diffuser won't be affected, we're simply replacing the part of the diffuser that's Kevlar with the face of the coolers. If anything it might help it because the air flowing out of the coolers will be hotter than the surrounding air and so as it leaves and cools it will attract other air around it...….. It's not a perfect science and we know that, but we also know that worst case scenario it won't be a large compromise and it gets the intercoolers out of the way and is also unique.
We're using a J32, not a J35 so revs aren't as much of an issue and based on the dyno sheet for our original C30 the power and torque start to drop off sharply after 7200rpm anyhow so I never used to rev our car out that hard anyhow so I don't see RPM as a restriction regardless of if we stayed with a C series or move to J. The big difference is that with a J I can make an engine capable of 900HP for less than $ 5000 USD ……..that's just not possible with a C series so it's a no brainer.
Transmission is one area obviously that is untested for us, but there are plenty of people out there running reasonable horsepower with stock gearboxes that don't seem to have too many issues. Long term plan is to get a Holinger sequential out of Aussie for it, but for now I believe if we're not too harsh with it that the stock one should be fine. Am dropping my Exedy twin plate carbon clutch off today to have it serviced so we'll see how that copes...…..
Engine cooling again is another "suck it and see" exercise. We have an awesome V mount radiator at the front supplied by Shad from Driving Ambition and it's never skipped a beat keeping the car at less than 195 degrees F so I suspect it will cope just fine with the hike in power. We're also running a large oil cooler in the side pod which is fed cold air from the lower side skirt vent and that also seems to work to keep temps down. We also plan to have the manifolds and turbo housings coated which will reduce temps in the engine bay. But as mentioned, that will have to be a "fingers crossed" and adjust accordingly if it doesn't work as hoped.
I will definitely follow through on this amazing project!Thanks. We've read that book too and we believe that it won't compromise the flow of the cooler in any way since the line of the diffuser won't be affected, we're simply replacing the part of the diffuser that's Kevlar with the face of the coolers. If anything it might help it because the air flowing out of the coolers will be hotter than the surrounding air and so as it leaves and cools it will attract other air around it...….. It's not a perfect science and we know that, but we also know that worst case scenario it won't be a large compromise and it gets the intercoolers out of the way and is also unique.
We're using a J32, not a J35 so revs aren't as much of an issue and based on the dyno sheet for our original C30 the power and torque start to drop off sharply after 7200rpm anyhow so I never used to rev our car out that hard anyhow so I don't see RPM as a restriction regardless of if we stayed with a C series or move to J. The big difference is that with a J I can make an engine capable of 900HP for less than $ 5000 USD ……..that's just not possible with a C series so it's a no brainer.
Transmission is one area obviously that is untested for us, but there are plenty of people out there running reasonable horsepower with stock gearboxes that don't seem to have too many issues. Long term plan is to get a Holinger sequential out of Aussie for it, but for now I believe if we're not too harsh with it that the stock one should be fine. Am dropping my Exedy twin plate carbon clutch off today to have it serviced so we'll see how that copes...…..
Engine cooling again is another "suck it and see" exercise. We have an awesome V mount radiator at the front supplied by Shad from Driving Ambition and it's never skipped a beat keeping the car at less than 195 degrees F so I suspect it will cope just fine with the hike in power. We're also running a large oil cooler in the side pod which is fed cold air from the lower side skirt vent and that also seems to work to keep temps down. We also plan to have the manifolds and turbo housings coated which will reduce temps in the engine bay. But as mentioned, that will have to be a "fingers crossed" and adjust accordingly if it doesn't work as hoped.


You're essentially putting a giant hole in the diffuser. It will probably render the diffuser useless as the low pressure area it is trying to create will be eliminated from the air being pulled through the intercooler. Diffusers are very finicky and rely on laminar flow to stay attached to the upper roof without separating/stalling, to create a low pressure area.
If I had to guess, the diffuser won't do much and I'd bet the intercooler won't get enough airflow either.
Sorry to be the bearer of bad news but this is a fundamental flaw.
0.02
If I had to guess, the diffuser won't do much and I'd bet the intercooler won't get enough airflow either.
Sorry to be the bearer of bad news but this is a fundamental flaw.
0.02
Similar threads
- Replies
- 0
- Views
- 208
- Replies
- 1
- Views
- 290